> For the complete documentation index, see [llms.txt](https://docs.aic-eec.com/llms.txt). Markdown versions of documentation pages are available by appending `.md` to page URLs; this page is available as [Markdown](https://docs.aic-eec.com/interfacing-with-infineon-psoc-tm-edge/basic-mcu-interfacing/workshops/hello-world.md).
# Hello World
## Lab 1: Hello World - ทำความเข้าใจโปรเจกต์ & LED Blink
#### วัตถุประสงค์
* เข้าใจโครงสร้างโปรเจกต์ ModusToolBox (MTB)
* เข้าใจ flow ของ `main()` ใน Embedded system
* ควบคุม LED Blink ด้วย macro
#### จะได้เรียนรู้อะไร?
* **Project Structure**: proj\_cm33\_s, proj\_cm33\_ns, proj\_cm55
* **GPIO API**: Cy\_GPIO\_Set(), Cy\_GPIO\_Clr(), Cy\_GPIO\_Inv()
* **Delay Function**: Cy\_SysLib\_Delay()
* **Macro Definition**: สร้าง LED control macros
### Lab 1.1 : Hello World & LED Blink
#### ทำความเข้าใจโค้ด main.c
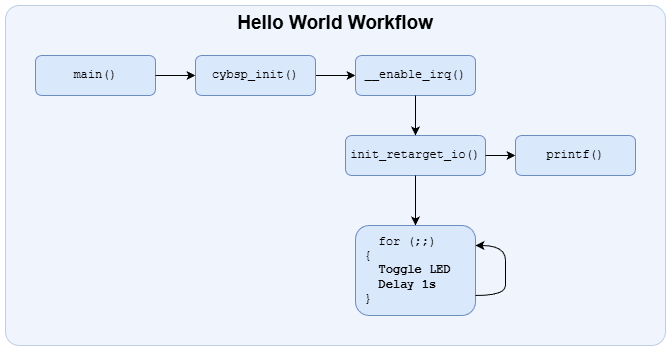
โค้ด `main()` ในตัวอย่าง Infineon จะมี pattern คงที่:
1. Initialize board และ peripherals
2. Enable global interrupt
3. Initialize UART สำหรับ debug (`printf`)
4. เข้า main loop ที่รันตลอดเวลา
```c
/* proj_cm33_ns/main.c - Hello World Example */
/*******************************************************************************
* File Name : main.c
*
* Description : This source file contains the main routine for non-secure
* application in the CM33 CPU
*
* Related Document : See README.md
*
********************************************************************************
/*******************************************************************************
* Header Files
*******************************************************************************/
#include "cybsp.h"
#include "retarget_io_init.h"
/*******************************************************************************
* Macros
*******************************************************************************/
#define BLINKY_LED_DELAY_MSEC (1000U)
/* The timeout value in microseconds used to wait for CM55 core to be booted */
#define CM55_BOOT_WAIT_TIME_USEC (10U)
/* App boot address for CM55 project */
#define CM55_APP_BOOT_ADDR (CYMEM_CM33_0_m55_nvm_START + \
CYBSP_MCUBOOT_HEADER_SIZE)
/*******************************************************************************
* Function Name: main
********************************************************************************
* Summary:
* This is the main function of the CM33 non-secure application.
*
* It initializes the device and board peripherals. It also initializes the
* retarget-io middleware to be used with the debug UART port using which
* "Hello World!" is printed on the debug UART. The LED pin is initialized with
* default configurations. The CM55 core is enabled and then the programs enters
* an infinite while loop which toggles the LED1 with a frequency of 1 Hz.
*
* Parameters:
* none
*
* Return:
* int
*
*******************************************************************************/
int main(void)
{
cy_rslt_t result = CY_RSLT_SUCCESS;
/* Initialize the device and board peripherals. */
result = cybsp_init();
/* Board initialization failed. Stop program execution. */
if (CY_RSLT_SUCCESS != result)
{
handle_app_error();
}
/* Enable global interrupts */
__enable_irq();
/* Initialize retarget-io middleware */
init_retarget_io();
/* \x1b[2J\x1b[;H - ANSI ESC sequence for clear screen. */
printf("\x1b[2J\x1b[;H");
printf("****************** "
"PSOC Edge MCU: Hello world "
"****************** \r\n\n");
printf("Hello World!\r\n\n");
printf("For more projects, "
"visit our code examples repositories:\r\n\n");
printf("https://github.com/Infineon/"
"Code-Examples-for-ModusToolbox-Software\r\n\n");
/* Enable CM55. */
/* CM55_APP_BOOT_ADDR must be updated if CM55 memory layout is changed.*/
Cy_SysEnableCM55(MXCM55, CM55_APP_BOOT_ADDR, CM55_BOOT_WAIT_TIME_USEC);
for(;;)
{
Cy_GPIO_Inv(CYBSP_USER_LED1_PORT, CYBSP_USER_LED1_PIN); // Toggle the LED1
Cy_SysLib_Delay(BLINKY_LED_DELAY_MSEC); // Delay for 1 second
}
}
/* [] END OF FILE */
```
#### แผนภาพการทำงาน
***
#### LED Blink ด้วย Macro
กำหนด delay ของ LED ด้วย macro
```c
#define BLINKY_LED_DELAY_MSEC (1000U)
```
และใน main loop:
```c
for(;;)
{
Cy_GPIO_Inv(CYBSP_USER_LED1_PORT, CYBSP_USER_LED1_PIN); // Toggle the LED1
Cy_SysLib_Delay(BLINKY_LED_DELAY_MSEC); // Delay for 1 second
}
```
***
### ทดลองสร้าง LED API (Best Practice)
โดยการเพิ่ม macro เพื่อให้โค้ดอ่านง่ายขึ้น:
```c
#define LED_ON() Cy_GPIO_Set(CYBSP_USER_LED1_PORT, CYBSP_USER_LED1_PIN)
#define LED_OFF() Cy_GPIO_Clr(CYBSP_USER_LED1_PORT, CYBSP_USER_LED1_PIN)
#define LED_TOGGLE() Cy_GPIO_Inv(CYBSP_USER_LED1_PORT, CYBSP_USER_LED1_PIN)
```
แล้วเปลี่ยนใน loop เป็น:
```c
for(;;)
{
LED_TOGGLE(); // Toggle the LED1
Cy_SysLib_Delay(BLINKY_LED_DELAY_MSEC); // Delay for 1 second
}
```
***
**Build และ Flash**
```bash
make build -j8
make program
```
***
### Lab 1.2 : ทดลอง LED Blinking Patterns
```c
/* Pattern 1: Simple blink */
for(;;)
{
LED_TOGGLE();
Cy_SysLib_Delay(250);
}
/* Pattern 2: SOS pattern */
for(;;)
{
/* S: ... */
for (int i = 0; i < 3; i++) {
LED_ON(); Cy_SysLib_Delay(100);
LED_OFF(); Cy_SysLib_Delay(100);
}
Cy_SysLib_Delay(200);
/* O: --- */
for (int i = 0; i < 3; i++) {
LED_ON(); Cy_SysLib_Delay(300);
LED_OFF(); Cy_SysLib_Delay(100);
}
Cy_SysLib_Delay(200);
/* S: ... */
for (int i = 0; i < 3; i++) {
LED_ON(); Cy_SysLib_Delay(100);
LED_OFF(); Cy_SysLib_Delay(100);
}
Cy_SysLib_Delay(1000); /* Pause between SOS */
}
```
**Build และ Flash**
```bash
make build -j8
make program
```
#### GPIO Functions (PDL) Summary