# AIC Knowledge @ EEC for All

Welcome to Open Knowledge from EE Department, Faculty of Engineering, Burapha University collaborating with Bangsaen Design House Spin-off (www\.kin-yoo-dee.com)

<div data-full-width="true"><img src="/files/-MHfZ1Kf95xb_HLblUnu" alt="Industrial Oriented Faculty of Engineering in the East"></div>

{% hint style="success" %}

## Authors:

* *Associate Professor Wiroon Sriborrirux*
* *Mr. Sriengchhun Chheang*
* *Mr. Sabol Socare*
* *Miss Soontree Jaikhong*&#x20;
* *Mr. Thanaluk Pranekunakol*&#x20;
* *Mr. Waratith Sawangboon*
  {% endhint %}

| ![](https://paper-attachments.dropbox.com/s_BE2A77D610452E81AC232468B6C84CA93722DD403B636B9CBB681655C47D8E40_1600604020703_Embedded+Android+Development.jpg)       | ![](https://paper-attachments.dropbox.com/s_BE2A77D610452E81AC232468B6C84CA93722DD403B636B9CBB681655C47D8E40_1600604534776_Screen+Shot+2563-09-20+at+19.22.04.png) |
| ------------------------------------------------------------------------------------------------------------------------------------------------------------------ | ------------------------------------------------------------------------------------------------------------------------------------------------------------------ |
| [*Request for this Open Book >>*](https://docs.google.com/forms/d/e/1FAIpQLSc6r4PJaHOfYLpBwEOsu4vDGJo9YydAjUfMqvlNOnh77hIbYA/viewform)                             | [*Request for this Open Book >>*](https://docs.google.com/forms/d/e/1FAIpQLScxMaLZgpHgbRgne_5_Gmnfa8rWrIfdW3yyTIwv4aUsTFrg8g/viewform)                             |
| ![](https://paper-attachments.dropbox.com/s_BE2A77D610452E81AC232468B6C84CA93722DD403B636B9CBB681655C47D8E40_1600604401251_Screen+Shot+2563-09-20+at+19.19.51.png) | ![](/files/-MJfS5HIr6b0BaS2enqX)                                                                                                                                   |
| [*Request for this Open Book >>*](https://docs.google.com/forms/d/e/1FAIpQLSfruEMgMWVqFcoOHMWekZlKHJbylXEZlWEyN6Ptj69ZMJK4Aw/viewform)                             | [*Request for this Open Book >>*](https://forms.gle/XDbCSKzqs5F2NKZL7)                                                                                             |
| ![](/files/-MJfS8WW-V3gHVUzBtSA)                                                                                                                                   | ![](/files/-MJfSBAK_q6b_EQi3r4l)                                                                                                                                   |
| [*Request for this Open Book >>*](https://forms.gle/e3uqepYamScXXTtw6)                                                                                             | [*Request for this Open Book >>*](https://forms.gle/jp7szTVhTzQmU31P8)                                                                                             |

| ![](/files/-MJfSM32w-2qmRAf6axm)                                       |   |
| ---------------------------------------------------------------------- | - |
| [*Request for this Open Book >>*](https://forms.gle/XjQim3Dc8ho6d9Vx8) |   |

สาขาวิศวกรรมระบบสมองกลฝังตัว และอิเล็กทรอนิกส์สื่อสาร (หลักสูตรปรับปรุง พ.ศ. 2564) >> [Link](https://sites.google.com/eng.buu.ac.th/embedded2564/home?authuser=4)

<div data-full-width="true"><figure><img src="/files/EwEny7QhCxB3l9TJJgE8" alt=""><figcaption><p>Flow map หลักสูตรวิศวกรรมศาสตรบัณฑิต สาขาวิชาวิศวกรรมระบบสมองกลฝังตัวและอิเล็กทรอนิกส์สื่อสาร 2564</p></figcaption></figure></div>

<figure><img src="/files/dR5EEQbuoiO3iwewleR8" alt=""><figcaption><p>Details: <a href="https://docs.aic-eec.com/recommended_by_aic/embedded-engineer-developer">https://docs.aic-eec.com/recommended_by_aic/embedded-engineer-developer</a></p></figcaption></figure>

<div data-full-width="true"><figure><img src="/files/B3znpC7LbVdYYOVPIdeG" alt=""><figcaption><p>BDH (Bangsaen Design House) Open Platform สำหรับ Developer และ Entrepreneur</p></figcaption></figure></div>

<div data-full-width="true"><figure><img src="/files/kOTuIETHGEkQZoNyyPRl" alt=""><figcaption><p>ศูนย์ BiiL สำหรับการถ่ายทอดเทคโนโลยีจาก Infineon ณ ชั้น 2 ตึก EAST Science Park, มหาวิทยาลัยบูรพา</p></figcaption></figure></div>


# Karel Robot

> Learning via the Karel Robot Programming -> [Link](https://karel.vamstack.com/python/th/intro.html)


# Code to Flowchart

<https://code2flow.com/>


# Play with Docker

<figure><img src="/files/G08kGpZmD14NoEHu9jfk" alt="" width="375"><figcaption></figcaption></figure>

{% embed url="<https://labs.play-with-docker.com/>" %}


# CNX Software

CNX SOFTWARE – ข่าวไอโอทีและสมองกลฝังตัว

{% embed url="<https://th.cnx-software.com>" %}

<figure><img src="/files/KesxbBOKtjXTgOJkFrFP" alt=""><figcaption></figcaption></figure>


# BENTO Game Playground

{% embed url="<https://bento-game.tesaiot.dev>" %}

{% embed url="<https://www.youtube.com/watch?v=qSpnmRB3qOQ>" %}

{% embed url="<https://github.com/Advance-Innovation-Centre-AIC/embedded-systems-for-developer>" %}


# Infineon PSOC™ Edge

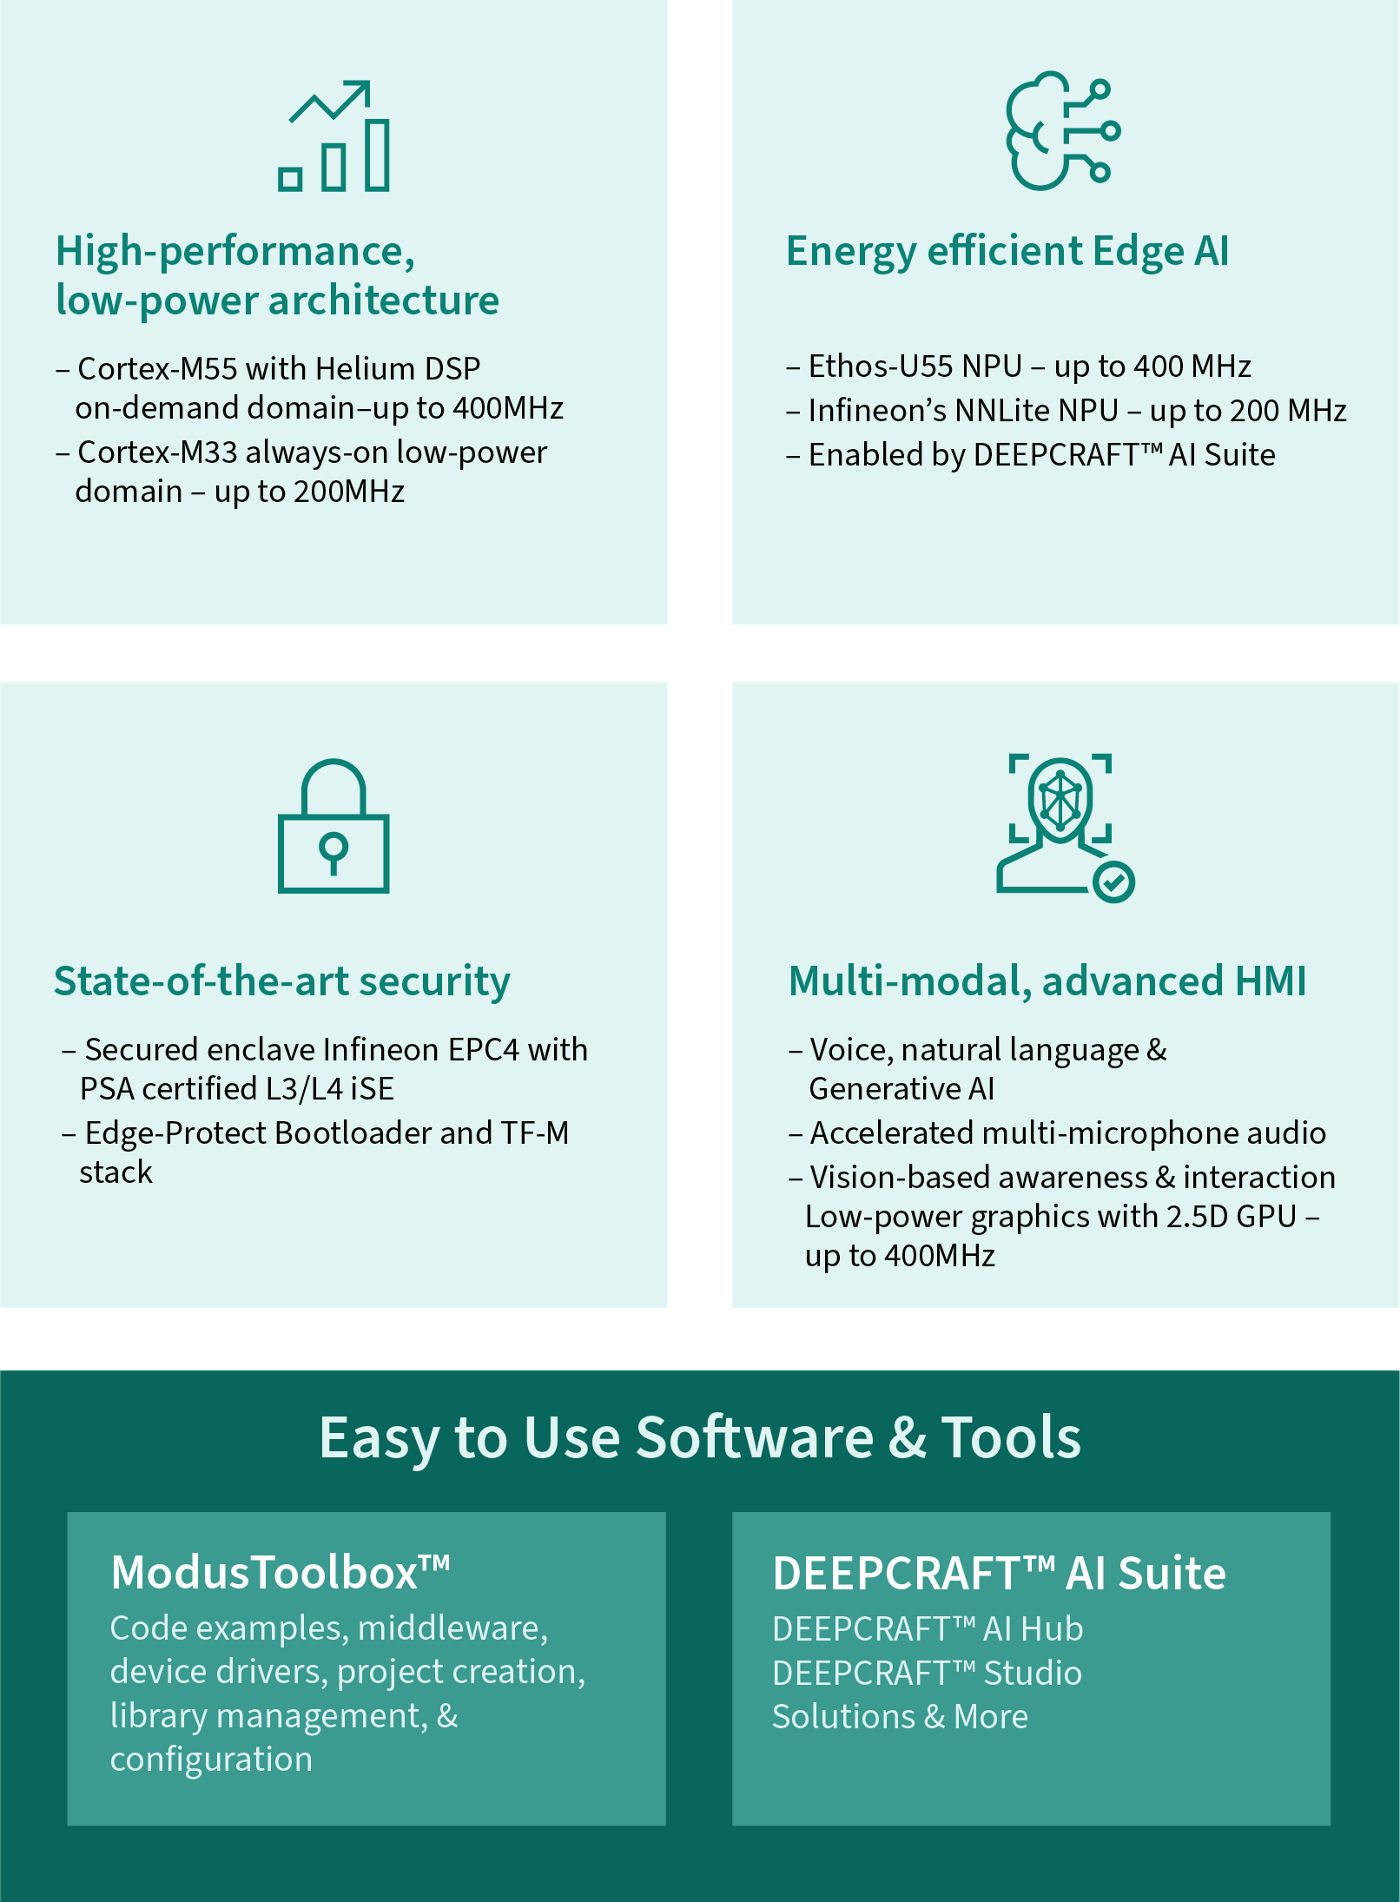
PSOC™ Edge E84 series of Arm® Cortex®-M MCUs feature high-performance, low-power, secured MCUs with advanced machine learning (ML) acceleration for next generation AI/ML applications. The PSOC™ Edge E84 MCUs are based on Arm Cortex-M55, with Helium DSP support paired with Ethos-U55 NPU as well as a low-power Cortex-M33 paired with Infineon’s ultra-low power NNLite hardware accelerator and advanced HMI interfaces including graphics.

{% embed url="<https://youtu.be/mFgNdMUjXyQ?si=UFm3zeSPrmMRZfqn>" fullWidth="true" %}

#### Key Features

* Cortex®-M55 CPU with Helium™ DSP
* Low-power Cortex®-M33 with DSP
* Advanced ML with Arm Ethos-U55 NPU
* NN Lite for Low-Power Always-On ML
* Up to 6MB SRAM for Next Gen Apps
* Ultra-low power RRAM Technology
* Rich Peripheral Set to Reduce BOM
* Low-Power 2.5D GPU and Interfaces
* ModusToolbox™ Software Support
* End-to-end ML Solution w/DEEPCRAFT™
* State-of-the-Art Secured Enclave
* Infineon Edge Protect Technology

#### Fully Integrated Microcontroller with Comprehensive Tools, Software & Utilities

<figure><img src="https://assets.infineon.com/is/image/infineon/psoc-edge-graphic.png?wid=1400" alt=""><figcaption></figcaption></figure>

### Compare families

| **Processor**                    |        Cortex-M55 + Helium DSP        |       Cortex-M55 +Helium DSP       |       Cortex-M55 + Helium DSP      |        Cortex-M55 + Helium DSP        |
| -------------------------------- | :-----------------------------------: | :--------------------------------: | :--------------------------------: | :-----------------------------------: |
| **Max CPU Speed**                |                 400MHz                |               400MHz               |               400MHz               |                 400MHz                |
| **Co-Processor**                 |               Cortex-M33              |             Cortex-M33             |             Cortex-M33             |               Cortex-M33              |
| **Max CPU Speed (Co-Processor)** |                 200MHz                |               200MHz               |               200MHz               |                 200MHz                |
| **Neural Processing Unit (NPU)** |        NNLite + Ethos™ U55-128        |               NNLite               |               NNLite               |        NNLite + Ethos™ U55-128        |
| **SRAM**                         |        Up to 6 MB (System RAM)        |       Up to 5 MB (System RAM)      |       Up to 5 MB (System RAM)      |        Up to 5 MB (System RAM)        |
| **RRAM / NVM**                   |                 512 kB                |               512 kB               |               512 kB               |                 512 kB                |
| **External Memory**              |     2x SMIF, 2x SD Host Controller    |   2x SMIF, 2x SD Host Controller   |   2x SMIF, 2x SD Host Controller   |     2x SMIF, 2x SD Host Controller    |
| **Graphics**                     |         2.5D GPU, MIPI-DSI/DBI        |                 --                 |       2.5D GPU, MIPI-DSI/DBI       |                   --                  |
| **High-Speed Peripherals**       |   USB FS/HS, 10/100 Ethernet, CAN-FD  | USB FS/HS, 10/100 Ethernet, CAN-FD | USB FS/HS, 10/100 Ethernet, CAN-FD |   USB FS/HS, 10/100 Ethernet, CAN-FD  |
| **Peripheral/Communications**    |        SPI, UART, I2C, I3C, I2S       |      SPI, UART, I2C, I3C, I2S      |      SPI, UART, I2C, I3C, I2S      |        SPI, UART, I2C, I3C, I2S       |
| **Security**                     |            EPC/PSA 2 and 4            |           EPC/PSA 2 and 4          |           EPC/PSA 2 and 4          |            EPC/PSA 2 and 4            |
| **Edge AI Audio/Voice**          | U55-based WWD, full voice inferencing |             NNLite WWD             |             NNLite WWD             | U55-based WWD, full voice inferencing |
| **Edge AI Vision**               |        Presence/Gesture/Motion        |                 --                 |                 --                 |        Presence/Gesture/Motion        |
| **Packages**                     |       BGA-220, WLB-154, eWLB-235      |          BGA-220, WLB-154          |          BGA-220, WLB-154          |            BGA-220, WLB-154           |


# Hardware Architecture

<div data-full-width="true"><figure><img src="/files/E1G8E0RZX0A8OisZQCME" alt=""><figcaption></figcaption></figure></div>

<div data-full-width="true"><figure><img src="/files/Db19U2axAq9tF90h8kgB" alt=""><figcaption></figcaption></figure></div>

<div data-full-width="true"><figure><img src="/files/Ib2JZ2ckgQy9gZYJAOMj" alt=""><figcaption></figcaption></figure></div>

1. Baseboard Power LED (D1)
2. KitProg3 Program/Debug USB Type-C connector (J8)
3. PSOC™ 5LP-based KitProg3 programmer and debugger (CY8C5868LTI-LP039, U2)
4. Reset button (SW1)
5. KitProg3 status LED (D2)
6. PSOC™ Edge E84 MCU ETM/JTAG debug and trace header (J15)
7. PSOC™ Edge E84 MCU 10-pin SWD/JTAG program and debug header (J16)
8. Alternative serial interface configuration headers (J20, J21)
9. PSOC™ Edge E84 MCU USB host Type-A connector (J27)
10. USB Type-C Power Delivery (PD) fault LED (D6)
11. Custom display capacitive touch panel connector (J37)
12. PSOC™ Edge E84 MCU USB device Type-C connector (J30)
13. External power supply VIN connector (J31)
14. PSOC™ Edge E84 MCU user buttons (SW2, SW4)
15. M.2 (B-key) memory interface connector (J29)
16. 128 Mbit Octal-SPI HYPERRAM™ (S70KS1283GABHI020, U12)
17. Processor system-on-module (SoM) 260-pin SODIMM connector (J28)
18. CYW55513 tri-band (Wi-Fi & Bluetooth® ) combo radio (U3) section
19. Processor System on Module (SoM) power LED (D3)
20. 1 Gbit Octal-SPI NOR flash (S28HS01GTGZBH1030, U10)
21. 128 Mbit Quad-SPI NOR flash (S25FS128SAGMFB100, U11)
22. MIPI-DSI custom display connector (J38)1)
23. PSOC™ Edge E84 MCU (PSE846GPS4DBZC4A, U1)
24. PSOC™ 4000T CAPSENSE™ co-processor (U9)
25. Raspberry Pi-compatible MIPI-DSI display connector (J39)
26. 3-axis magnetometer (BMM350, U4)
27. Raspberry Pi compatible display capacitive touch connector (J41)
28. Linear potentiometer (R34)
29. Analog microphones (IM73A135V01XTSA1, U36 and U37)
30. User LEDs (D3, D4, D5)
31. Thermistor (TH1)
32. CAPSENSE™ buttons and slider (CSB1, CSB2, CSS1)
33. Boot configuration switch (SW6)
34. Proximity sense connector (J19)
35. I/O headers compatible with Arduino UNO R3 (J2, J3, J4)
36. Alternative serial interface I/O header (J14)
37. Power header compatible with Arduino UNO R3 (J1)
38. PSOC™ Edge E84 MCU expansion I/O headers (J6, J7, J40)
39. MicroSD card holder (J35)
40. Infineon's Shield2Go interface headers (J10, J12)
41. PDM microphones (IM72D128V01XTMA1, U7 and U8)
42. mikroBUS-compatible headers by MikroElektronika (J9, J17)
43. Extended I2S header (J11)
44. 6-axis accelerometer and gyroscope IMU (BMI270, U5)
45. M.2 (E-key) radio interface connector (J13)
46. PSOC™ Edge E84 MCU power selection/monitoring headers (J18, J22, J23, J24, J25, J26)
47. Headphone connector (J34)
48. Speaker (ACC6)


# First Power-up

## Connect and power up the board

1. Ensure that the Boot configuration switch (SW6) is in OFF position
2. Ensure that jumpers are set to their default positions as below: • J22, J23: 2-3 • J18, J24, J25, J26: SHORT • J20, J21: OPEN
3. Connect the camera module cable to USB host Type-A connector on baseboard(J27)
4. Connect the KitProg3 USB connector (J8) to your PC using the Type-C to Type-C USB cable
5. Ensure that the power LED (D1, yellow) on the base board is ON
6. Ensure that the power LED (D3, yellow) on the System on Module (SOM) board is ON

<div data-full-width="true"><figure><img src="/files/lKlUmoxL2RvAFrAdiNXw" alt=""><figcaption></figcaption></figure></div>

#### Run the pre-programmed code examples

1. Observe the splash screen boot-up on the 4.3 inch display
2. A carousal menu appears listing the demo applications pre-programmed into the kit
3. Select the application to be demonstrated

<div data-full-width="true"><figure><img src="/files/0W3Y5JVM1GOIdN9AoCkt" alt=""><figcaption></figcaption></figure></div>

4. Follow the instructions (if any) presented by the demo app
5. Press the Home button to get back to main menu
6. Press the XRES button (SW1) to reboot the device to splash screen (if required)
7. Visit the PSOC™ Edge E84 Evaluation Kit webpage for latest software and other kit documentation


# Development Preparation

## 1. ModusToolbox Installation and Firmware Updates

### ModusToolbox Installation

**💻 System Requirement**

```
- Windows 7 64-bit / Windows 10 64-bit
- macOS10.x
- UbuntuLinux18LTS
```

#### **Download the Software**

Go to the Infineon ModusToolbox website ([https://www.infineon.com/design-resources/development-tools/sdk/modustoolbox-software](https://www.infineon.com/design-resources/development-tools/sdk/modustoolbox-software?utm_source=cypress\&utm_medium=referral\&utm_campaign=202110_globe_en_all_integration-product_families\&redirId=VL1296)) and download your appropriate software from your platform2. Eclipse IDE Development Tools and Project Creator

<div data-full-width="true"><figure><img src="/files/vFcyLL6I5CVpjxBgMv6s" alt=""><figcaption></figcaption></figure></div>

<figure><img src="/files/9oAsEGcDjS5sK67p9AYi" alt=""><figcaption></figcaption></figure>

<figure><img src="/files/STILEwwRX9OMS9zB0SUR" alt=""><figcaption></figcaption></figure>

{% hint style="info" %}
**Note:**&#x20;

* Fix environment errors in case you encounter build errors.
  {% endhint %}

<figure><img src="/files/tJcF1gRzi6RXiaQz6kbo" alt=""><figcaption><p>Open Edit the System environment variables</p></figcaption></figure>

<figure><img src="/files/bXwD1NX2HMTPTgARnTJm" alt="" width="563"><figcaption></figcaption></figure>

> Variable name: <mark style="color:red;">**CY\_TOOLS\_PATHS**</mark>
>
> Variable value: <mark style="color:red;">< Your ModusToolbox folder ></mark>&#x20;

<figure><img src="/files/1szwNFY7WERSd4oI63pI" alt=""><figcaption></figcaption></figure>

<figure><img src="/files/HCHvhcv3OvBbMZfNH9xo" alt=""><figcaption></figcaption></figure>

## 2. Microsoft Visual Studio Code or Cursor AI Installation

{% embed url="<https://youtu.be/a5K_mm7Lw1w?si=bMGNZ04ObNaEw4QN>" fullWidth="true" %}

{% embed url="<https://www.youtube.com/watch?v=Z2ivS_FFQ30>" %}

## 3. Create Project for VSCode IDE

{% embed url="<https://www.youtube.com/watch?v=Jc5RR7OUTGE>" fullWidth="true" %}

## 4. Putty (Serial Console)

{% embed url="<https://www.youtube.com/watch?v=2WpnQUjkuMw>" %}


# Basic MCU Interfacing

## พื้นฐาน GPIO และ C Programming สำหรับ PSoC Edge

***

### โครงสร้างการเรียนรู้

| หัวข้อ                       | รายละเอียด                      |
| ---------------------------- | ------------------------------- |
| ภาพรวม PSoC Edge E84         | PSoC Edge, Project codes        |
| Basic Embedded C Programming | Data Types, Macros              |
| Lab 1: Hello World           | ทำความเข้าใจโปรเจกต์, LED Blink |
| Lab 2: User Switch           | อ่านค่าปุ่มกด, Debounce         |
| Lab 3: Potentiometer (ADC)   | อ่านค่า Analog จาก POT          |
| Lab 4: รวมทุกอย่าง           | POT ควบคุม LED Blink Rate       |
| Quiz และสรุป                 | ทบทวนความรู้                    |

***

## ส่วนที่ 1: ภาพรวม PSoC Edge E84

### 1.1 สถาปัตยกรรม Dual-Core

<figure><img src="/files/blj265lJQ26otbzv58ra" alt=""><figcaption></figcaption></figure>

**เปรียบเทียบเพื่อความเข้าใจ:**

* **M33** = หัวหน้าทีม - จัดการงานทั่วไป, ควบคุม GPIO, สื่อสาร
* **M55** = ผู้เชี่ยวชาญ - งานหนักอย่างประมวลผลเสียง/ภาพ
* **Ethos-U55** = AI Specialist - รัน Neural Network เร็วมาก

***

### 1.2 โครงสร้างสามโปรเจกต์

```
mtb-example-psoc-edge-hello-world/
├── proj_cm33_s/      ← Secure Boot (อย่าแก้ไข!)
├── proj_cm33_ns/     ← Main Application (เขียนโค้ดที่นี่!)
└── proj_cm55/        ← ML Core (ถ้าต้องการ)
```

| โปรเจกต์           | วัตถุประสงค์                   | แก้ไข?       |
| ------------------ | ------------------------------ | ------------ |
| proj\_cm33\_s      | Secure boot, เริ่มต้น hardware | ❌ ไม่        |
| **proj\_cm33\_ns** | **โค้ดหลักของเรา**             | ✅ ใช่        |
| proj\_cm55         | ประมวลผล ML/DSP                | ⚪ ถ้าต้องการ |

#### **ลำดับการ Boot**

<figure><img src="/files/Vq9GLh41nMwdTBzgGjN7" alt=""><figcaption></figcaption></figure>

{% hint style="warning" %}
**ข้อควรระวัง!**

* **ห้ามลบหรือแก้ไข proj\_cm33\_s** โดยไม่จำเป็น - ถ้าพัง MCU จะไม่ boot
* **โค้ดหลักของเราอยู่ใน proj\_cm33\_ns** - นี่คือที่ที่เราจะเขียนโปรแกรม
* **proj\_cm55 เป็น optional** - ถ้าไม่ใช้ ML ก็ปล่อยว่างได้
  {% endhint %}

***

### 1.3 HAL vs PDL

| HAL (High-Level)         | PDL (Low-Level)          |
| ------------------------ | ------------------------ |
| `cyhal_gpio_toggle(pin)` | `Cy_GPIO_Inv(port, pin)` |
| ใช้ง่าย, portable        | ควบคุมละเอียด, เร็วกว่า  |
| Prefix: `cyhal_*`        | Prefix: `Cy_*`           |

**แนะนำ:** *เริ่มต้นด้วย HAL ก่อน* เมื่อต้องการ performance สูงค่อยใช้ PDL


# พื้นฐาน Embedded C - ตอนที่ 1

Embedded C Programming Part 1: พื้นฐานสำคัญ

***

### <mark style="color:$success;">ทำไม Embedded C ต่างจาก C ปกติ?</mark>

{% hint style="info" %}
**Desktop C vs Embedded C**

ดังนั้น: ต้องระวังเรื่อง size, timing, และ hardware access
{% endhint %}

{% tabs %}
{% tab title="Desktop C" %}

* มี OS จัดการให้
* int = 32/64-bit
* printf() ใช้ได้เลย
* ไม่ค่อยสนใจ timing
  {% endtab %}

{% tab title="Embedded C" %}

* Memory จำกัด (KB-MB)
* อาจไม่มี OS (Bare-metal)
* int อาจ = 16-bit!
* ต้อง retarget UART
* Timing สำคัญมาก
  {% endtab %}
  {% endtabs %}

### <mark style="color:$success;">ทำไมต้องเข้าใจ Embedded C สำหรับ IoT และ Edge AI?</mark>

การเขียนโปรแกรม Embedded C สำหรับ IoT และ Edge AI แตกต่างจากการเขียน C บนคอมพิวเตอร์ทั่วไป:

1. **ทรัพยากรจำกัด**: RAM และ Flash memory มีจำกัด ต้องเลือกใช้ data types ที่เหมาะสม
2. **Real-time Requirements**: ต้องควบคุม timing แม่นยำ เข้าใจ macro และ inline functions
3. **Hardware Interaction**: ต้องจัดการ GPIO, Sensors, Peripherals ผ่าน HAL/PDL
4. **Power Efficiency**: การเขียนโค้ดที่มีประสิทธิภาพช่วยประหยัดพลังงาน

**Applications ในชีวิตจริง:**

* Smart Home: ควบคุม LED, อ่านสถานะปุ่ม, sensors
* Wearables: อ่านข้อมูล heart rate, accelerometer
* Industrial IoT: ควบคุม motors, valves, monitoring
* Edge AI: pre-processing ข้อมูล sensor ก่อนส่ง ML model

***

## <mark style="color:blue;">ส่วนที่ 1: Data Types</mark>

#### ทำไมต้องใช้ Fixed-Width Types ให้ถูกต้อง?

**เหตุผล:**

1. **Memory Optimization**: ใน Embedded system RAM มีจำกัด (เช่น 512KB - 2MB)
2. **Performance**: การใช้ type ที่เล็กเกินไปอาจต้อง typecast บ่อย
3. **Overflow Prevention**: ใช้ type ที่เล็กเกินไปทำให้เกิด overflow
4. **Sensor Data**: ต้องเลือก type ที่รองรับ range ของ sensor

### 1.1 ปัญหาของ `int` ใน Embedded

```c
/* ❌ ปัญหา: int มีขนาดไม่แน่นอน */
int delay = 1000;  /* 16-bit หรือ 32-bit? */

/* บน PSoC Edge:    int = 4 bytes = 0 to 2,147,483,647 */
/* บน PC 32-bit:    int = 4 bytes = 0 to 2,147,483,647 */
/* บน Arduino Uno:  int = 2 bytes = 0 to 65,535 */

/* ถ้าเขียนโค้ดบน PC แล้วเอาไป compile บน MCU 16-bit อาจ overflow! */
```

### 1.2 Fixed-Width Integer Types (`stdint.h`)

```c
#include <stdint.h>  /* Standard Integer Types */

/* Unsigned (ไม่มีเครื่องหมาย, ค่าบวกเท่านั้น) */
uint8_t   pin_number = 5;       /* 0 to 255           (1 byte)  */
uint16_t  adc_value = 2048;     /* 0 to 65,535        (2 bytes) */
uint32_t  timestamp = 1000000;  /* 0 to 4,294,967,295 (4 bytes) */

/* Signed (มีเครื่องหมาย, ค่าบวกและลบ) */
int8_t    temperature = -20;    /* -128 to 127        (1 byte)  */
int16_t   sensor_raw = -1000;   /* -32,768 to 32,767  (2 bytes) */
int32_t   position = -50000;    /* -2.1B to 2.1B      (4 bytes) */
```

#### Standard Integer Types (`stdint.h`)

<table><thead><tr><th width="96.35296630859375">Type</th><th width="92.05609130859375">Size</th><th width="162.219482421875">Range</th><th width="138.8565673828125">ใช้งาน</th><th>Real Application</th></tr></thead><tbody><tr><td><code>int8_t</code></td><td>1 byte</td><td>-128 to 127</td><td>Signed 8-bit</td><td>Temperature offset (-50°C to +50°C)</td></tr><tr><td><code>uint8_t</code></td><td>1 byte</td><td>0 to 255</td><td>Unsigned 8-bit</td><td>I2C register, LED brightness (0-255)</td></tr><tr><td><code>int16_t</code></td><td>2 bytes</td><td>-32768 to 32767</td><td>Sensor raw data</td><td>IMU accelerometer raw values</td></tr><tr><td><code>uint16_t</code></td><td>2 bytes</td><td>0 to 65535</td><td>ADC values</td><td>12-bit ADC (0-4095), timer counts</td></tr><tr><td><code>int32_t</code></td><td>4 bytes</td><td>-2B to 2B</td><td>Large signed</td><td>Audio samples, GPS coordinates</td></tr><tr><td><code>uint32_t</code></td><td>4 bytes</td><td>0 to 4B</td><td>Timestamps</td><td>System tick count (ms), memory addresses</td></tr><tr><td><code>float</code></td><td>4 bytes</td><td>±3.4e38</td><td>Decimal</td><td>Sensor values in physical units (m/s², °C)</td></tr></tbody></table>

```c
/* Examples from Real IoT Applications */

/* Smart Wearable - Heart Rate Monitor */
uint8_t  heart_rate_bpm = 72;           /* 40-200 BPM */
uint16_t spo2_raw = 2048;               /* Pulse oximeter ADC */

/* IMU Sensor - Motion Detection */
int16_t  accel_x_raw = 16384;           /* ±2g range, BMI270 */
float    accel_x_g = accel_x_raw / 16384.0f;  /* Convert to g */

/* Environmental Sensor */
float    temperature_c = 25.5f;          /* Temperature in Celsius */
float    humidity_pct = 60.2f;           /* Humidity percentage */

/* System Timing */
uint32_t timestamp_ms = 123456789;       /* Milliseconds since boot */
uint32_t uptime_seconds = timestamp_ms / 1000;

/* GPIO and Peripherals */
uint8_t  led_brightness = 128;           /* PWM duty cycle 0-255 */
bool     button_state = true;            /* Button pressed */
```

**การเปรียบเทียบ: int vs uint**

<table><thead><tr><th width="162.67047119140625">Feature</th><th width="289.00714111328125">int16_t (Signed)</th><th>uint16_t (Unsigned)</th></tr></thead><tbody><tr><td>Range</td><td>-32768 to +32767</td><td>0 to 65535</td></tr><tr><td>Use Case</td><td>Temperature, accel</td><td>ADC values, counters</td></tr><tr><td>Overflow</td><td>Wraps to negative</td><td>Wraps to 0</td></tr><tr><td>When to use</td><td>ต้องการค่าลบ</td><td>ต้องการ range กว้างขึ้น 2 เท่า</td></tr></tbody></table>

**Best Practices:**

* ใช้ `stdint.h` types แทน `int`, `short`, `long` (portable)
* เลือก type ที่พอดีกับ data range (ไม่เล็กไป ไม่ใหญ่เกิน)
* ใช้ `uint` สำหรับ count, index, bit operations
* ใช้ `int` สำหรับค่าที่อาจเป็นลบ
* ใช้ `float` เฉพาะเมื่อจำเป็น (ช้ากว่า integer)

**Common Pitfalls:**

```c
/* WRONG: uint8 overflow */
uint8_t counter = 255;
counter++;  /* Now counter = 0! (wraps around) */

/* WRONG: int16 too small for large ADC */
int16_t adc_sum = 0;
for (int i = 0; i < 100; i++) {
    adc_sum += read_adc();  /* Might overflow! */
}

/* CORRECT: Use appropriate type */
int32_t adc_sum = 0;  /* Large enough for sum */

/* WRONG: Using int instead of stdint */
int sensor_value;  /* Size depends on platform! */

/* CORRECT: Use fixed-size type */
int16_t sensor_value;  /* Always 16-bit */
```

### 1.3 ตัวอย่างจากโค้ดจริง (Hello World)

```c
/* จากไฟล์ main.c ของ hello-world example */

#define BLINKY_LED_DELAY_MSEC       (1000U)  /* U = Unsigned */
#define CM55_BOOT_WAIT_TIME_USEC    (10U)

/* ทำไมใช้ U ต่อท้าย? */
/* 1000U หมายถึง unsigned integer literal */
/* ป้องกัน warning เวลาเปรียบเทียบกับ unsigned variable */
```

### 1.4 Boolean Type (stdbool.h)

```c
#include <stdbool.h>  /* true, false, bool */

/* จากโค้ด gpio-interrupt example */
volatile bool gpio_intr_flag = true;

/* volatile บอกว่าค่าอาจเปลี่ยนได้จากภายนอก (เช่น interrupt) */
/* Compiler จะไม่ optimize ตัวแปรนี้ออก */

bool button_pressed = false;

if (button_pressed)  /* เหมือน if (button_pressed == true) */
{
    /* do something */
}
```

### 1.5 Cypress Result Type (cy\_rslt\_t)

```c
/* cy_rslt_t เป็น typedef ที่ Infineon สร้างขึ้น */
/* ใช้เก็บ error code จาก API functions */

cy_rslt_t result;

result = cybsp_init();

/* ตรวจสอบ error */
if (CY_RSLT_SUCCESS != result)
{
    /* Board init failed! */
    handle_app_error();
}

/* CY_RSLT_SUCCESS = 0 หมายถึงสำเร็จ */
/* ค่าอื่นๆ หมายถึง error ต่างๆ */
```

#### Pattern: Error Checking

```c
/* ✓ Good Pattern: ตรวจสอบทุก API call */
cy_rslt_t result = CY_RSLT_SUCCESS;

result = cybsp_init();
if (CY_RSLT_SUCCESS != result)
{
    handle_app_error();
}

result = init_adc();
if (CY_RSLT_SUCCESS != result)
{
    printf("ADC init failed!\r\n");
    handle_app_error();
}

/* ทำไมเขียน CY_RSLT_SUCCESS != result แทน result != CY_RSLT_SUCCESS? */
/* เพื่อป้องกัน typo: ถ้าเขียน = แทน == compiler จะ error */
/* เรียกว่า "Yoda Conditions" */
```

***

## <mark style="color:blue;">ส่วนที่ 2: Macros</mark>

#### ทำไมต้องใช้ Define/Macro?

**ข้อดี&#x20;*****(**&#xE04;่าคงที่และการทำให้โค้ดอ่านง่าย)***:**

1. **Magic Number Elimination**: ไม่มีตัวเลขลึกลับกระจายอยู่ในโค้ด
2. **Easy Maintenance**: เปลี่ยนค่าที่เดียว แก้ทั้งโปรเจค
3. **Performance**: Macro expand ตอน compile-time (ไม่เสีย runtime)
4. **Hardware Configuration**: กำหนดค่า pins, addresses, timing parameters

**การประยุกต์ใช้จริง:**

* GPIO Pin Configuration (LED, Button, Sensor pins)
* I2C/SPI Addresses และ Registers
* Timing Constants (delays, sampling rates)
* Buffer Sizes และ Thresholds
* Bit Masks สำหรับ register manipulation

### 2.1 #define Basics

```c
/* Macro = text replacement ที่ทำก่อน compile */

/* Syntax: #define NAME value */
/* ไม่มี = และ ; ท้าย */

#define DELAY_MS        (1000U)     /* ✓ ถูก */
#define DELAY_MS =      1000U       /* ❌ ผิด - มี = */
#define DELAY_MS        1000U;      /* ❌ ผิด - มี ; */
```

### 2.2 ทำไมต้องใส่วงเล็บ?

```c
/* ❌ ปัญหาถ้าไม่ใส่วงเล็บ */
#define OFFSET  5 + 3

int result = OFFSET * 2;
/* Preprocessor แทนที่เป็น: int result = 5 + 3 * 2; */
/* ผลลัพธ์ = 5 + 6 = 11 (ไม่ใช่ 16!) */

/* ✓ ใส่วงเล็บ */
#define OFFSET  (5 + 3)

int result = OFFSET * 2;
/* Preprocessor แทนที่เป็น: int result = (5 + 3) * 2; */
/* ผลลัพธ์ = 8 * 2 = 16 (ถูกต้อง) */
```

### 2.3 ตัวอย่างจากโค้ดจริง

```c
/* จาก gpio-interrupt example */
#define DELAY_SHORT_MS           (250U)
#define DELAY_LONG_MS            (500U)
#define LED_BLINK_COUNT          (4U)
#define GPIO_INTERRUPT_PRIORITY  (7U)
#define DEBOUNCE_DELAY_MS        (300U)
#define INIT_COUNT               (0U)

/* GPIO Pin Configuration - From hello-world example */
#define LED_PIN             CYBSP_USER_LED
#define BUTTON_PIN          CYBSP_USER_BTN

/* จาก adc-basic example */
#define SAR_ADC_INDEX           (0U)
#define SAR_ADC_SEQUENCER       (0U)
#define SAR_ADC_CHANNEL         (0U)
#define SAR_ADC_VREF_MV         (1800U)

/* Communication Settings */
#define UART_BAUDRATE       115200
#define I2C_FREQUENCY       400000   /* 400 kHz */

/* Sensor Configuration - From BMI270 driver */
#define SAMPLE_RATE_HZ      100
#define IMU_I2C_ADDRESS     0x68
#define BUFFER_SIZE         256

/* Application Constants */
#define MAX_RETRIES         3
#define TIMEOUT_MS          5000
#define LED_BLINK_DELAY     500
```

### 2.4 Function-Like Macros

**ทำไมใช้ Macro แทน Function?**

* **Performance**: ไม่มี function call overhead
* **Type-generic**: ทำงานกับหลาย types
* **Compile-time**: Expand ตอน compile (ไม่เสีย RAM)

```c
/* Macro ที่รับ parameter เหมือน function */

#define LED_ON()    Cy_GPIO_Set(CYBSP_USER_LED1_PORT, CYBSP_USER_LED1_PIN)
#define LED_OFF()   Cy_GPIO_Clr(CYBSP_USER_LED1_PORT, CYBSP_USER_LED1_PIN)
#define LED_TOGGLE() Cy_GPIO_Inv(CYBSP_USER_LED1_PORT, CYBSP_USER_LED1_PIN)

/* ใช้งาน */
LED_ON();     /* แทนที่เป็น Cy_GPIO_Set(...) */
LED_TOGGLE(); /* แทนที่เป็น Cy_GPIO_Inv(...) */

/* Min/Max macros - Generic for any type */
#define MIN(a, b)   ((a) < (b) ? (a) : (b))
#define MAX(a, b)   ((a) > (b) ? (a) : (b))

/* Clamp value to range - Limit sensor values */
#define CLAMP(val, min, max)  (MIN(MAX(val, min), max))

/* Bit manipulation macros - Register control */
#define BIT_SET(reg, bit)     ((reg) |= (1U << (bit)))
#define BIT_CLEAR(reg, bit)   ((reg) &= ~(1U << (bit)))
#define BIT_TOGGLE(reg, bit)  ((reg) ^= (1U << (bit)))
#define BIT_CHECK(reg, bit)   (((reg) >> (bit)) & 1U)

/* Array size macro - Prevent buffer overrun */
#define ARRAY_SIZE(arr)       (sizeof(arr) / sizeof((arr)[0]))

/* Conversion macros - Unit conversion */
#define MS_TO_TICKS(ms)       ((ms) * configTICK_RATE_HZ / 1000)
#define DEG_TO_RAD(deg)       ((deg) * 3.14159f / 180.0f)
#define CELSIUS_TO_F(c)       ((c) * 9.0f / 5.0f + 32.0f)

/* Macro with parameter */
#define IS_BUTTON_PRESSED() (Cy_GPIO_Read(USER_BTN_PORT, USER_BTN_PIN) == 0)

if (IS_BUTTON_PRESSED())
{
    LED_TOGGLE();
}
```

#### ข้อควรระวัง: Macro ไม่ใช่ Function

```c
/* ❌ ปัญหา: Macro ไม่มี return type */
#define LED_ON()  Cy_GPIO_Set(PORT, PIN)

/* Cy_GPIO_Set() return void */
if (LED_ON())  /* ❌ Error! ไม่มีค่า return */
{
    /* ... */
}

/* ✓ ถูกต้อง */
LED_ON();  /* เรียกแล้วจบ ไม่ต้องเช็ค return */
```

### 2.5 Macro สำหรับ Array Size

```c
/* Pattern ที่ใช้บ่อยมาก */
#define ARRAY_SIZE(arr)  (sizeof(arr) / sizeof((arr)[0]))

int values[10];
size_t len = ARRAY_SIZE(values);  /* len = 10 */

/* คำอธิบาย: */
/* sizeof(values) = 40 bytes (int = 4 bytes × 10) */
/* sizeof(values[0]) = 4 bytes (หนึ่ง int) */
/* 40 / 4 = 10 elements */
```

***

## <mark style="color:blue;">ส่วนที่ 3: Functions ใน Embedded C</mark>

### 3.1 Function Declaration และ Definition

```c
/* Declaration (Prototype) - บอก compiler ว่ามี function นี้ */
static void gpio_interrupt_handler(void);
cy_rslt_t init_adc(void);
bool read_button_with_debounce(void);

/* Definition - โค้ดจริงของ function */
static void gpio_interrupt_handler(void)
{
    /* ... implementation ... */
}
```

### 3.2 static Keyword

```c
/* static function = ใช้ได้เฉพาะในไฟล์นี้เท่านั้น */

/* จาก sensor_hub_daq_task.c */
static float lsb_to_mps2(int16_t val, int8_t g_range, uint8_t bit_width)
{
    float half_scale = (float)(1u << (bit_width - 1u));
    return ((GRAVITY_EARTH) * val * g_range) / half_scale;
}

/* ทำไมใช้ static? */
/* 1. ป้องกัน function ถูกเรียกจากไฟล์อื่น */
/* 2. Compiler optimize ได้ดีกว่า (inline) */
/* 3. หลีกเลี่ยง naming conflict */

/* ถ้าไม่ใส่ static = global function (เรียกจากไฟล์อื่นได้) */
cy_rslt_t create_sensor_hub_daq_task(void)
{
    /* ... */
}
```

### 3.3 Function Parameters

```c
/* Pass by Value - ส่งค่า (copy) */
void set_delay(uint32_t delay_ms)
{
    /* delay_ms เป็น copy ของ argument */
    /* แก้ไขที่นี่ไม่มีผลกับตัวแปรเดิม */
}

/* Pass by Pointer - ส่ง address */
cy_rslt_t read_adc(int16_t *result)
{
    /* result เป็น pointer ไปยังตัวแปรจริง */
    *result = 1234;  /* เขียนค่าไปยังตัวแปรเดิมได้! */
    return CY_RSLT_SUCCESS;
}

/* การใช้งาน */
int16_t adc_value;
read_adc(&adc_value);  /* ส่ง address ด้วย & */
```

### 3.4 ตัวอย่างจากโค้ดจริง

```c
/* จาก gpio-interrupt example */
cy_en_sysint_status_t Cy_SysInt_Init(
    const cy_stc_sysint_t *config,  /* pointer to config struct */
    cy_israddress userIsr           /* function pointer */
);

/* การใช้งาน */
cy_stc_sysint_t intrCfg = {
    CYBSP_USER_BTN_IRQ,       /* Interrupt source */
    GPIO_INTERRUPT_PRIORITY   /* Interrupt priority */
};

cy_en_sysint_status_t status = Cy_SysInt_Init(&intrCfg,
                                               &gpio_interrupt_handler);

/* &intrCfg = address ของ struct */
/* &gpio_interrupt_handler = address ของ function */
```

### 3.5 Return Values

```c
/* void - ไม่ return อะไร */
void handle_app_error(void)
{
    /* Disable interrupts */
    __disable_irq();

    /* Infinite loop */
    while(1)
    {
        /* Halt here */
    }
}

/* Return status/error code */
cy_rslt_t init_adc(void)
{
    cy_rslt_t result = CY_RSLT_SUCCESS;

    /* ... do initialization ... */

    if (/* something failed */)
    {
        return CY_RSLT_TYPE_ERROR;  /* Early return on error */
    }

    return CY_RSLT_SUCCESS;  /* Success */
}

/* Return computed value */
int16_t read_potentiometer_mv(void)
{
    /* ... */
    return adc_mv;
}

/* Return boolean */
bool read_button_with_debounce(void)
{
    /* ... */
    if (button_pressed)
    {
        return true;
    }
    return false;
}
```

***

## <mark style="color:blue;">ส่วนที่ 4: Conditional Compilation</mark>

### 4.1 #if, #ifdef, #ifndef

```c
/* จาก gpio-interrupt example */

/* ตรวจสอบว่า macro ถูก define หรือไม่ */
#if defined(CYBSP_USER_BTN2_ENABLED)
    Cy_GPIO_ClearInterrupt(CYBSP_USER_BTN2_PORT, CYBSP_USER_BTN2_PIN);
    NVIC_ClearPendingIRQ(CYBSP_USER_BTN2_IRQ);
#endif

/* แบบย่อ */
#ifdef CYBSP_USER_BTN2_ENABLED
    /* BTN2 is enabled */
#else
    /* BTN2 is not enabled */
#endif

/* ตรวจสอบว่าไม่ได้ define */
#ifndef DEBUG_DISABLED
    printf("Debug message\r\n");
#endif
```

### 4.2 การใช้งานจริง

```c
/* เลือก code ตาม board */
#if defined(KIT_PSE84_EVAL_EPC2)
    #define USER_LED_PORT  CYBSP_USER_LED1_PORT
    #define USER_LED_PIN   CYBSP_USER_LED1_PIN
#elif defined(KIT_PSE84_AI)
    #define USER_LED_PORT  CYBSP_LED_RGB_RED_PORT
    #define USER_LED_PIN   CYBSP_LED_RGB_RED_PIN
#else
    #error "Unknown board configuration!"
#endif

/* Debug mode */
#ifdef DEBUG
    #define DBG_PRINTF(...) printf(__VA_ARGS__)
#else
    #define DBG_PRINTF(...) /* Nothing */
#endif

DBG_PRINTF("ADC value: %d\r\n", adc_value);  /* แสดงเฉพาะ Debug mode */
```

***

## <mark style="color:blue;">ส่วนที่ 5: Bit Operations</mark>

### 5.1 Bit Shifting

```c
/* << Left shift - เลื่อน bit ไปทางซ้าย */
/* >> Right shift - เลื่อน bit ไปทางขวา */

/* จาก sensor_hub_daq_task.c */
float half_scale = (float)(1u << (bit_width - 1u));

/* bit_width = 16 */
/* 1u << 15 = 1 เลื่อนไปทางซ้าย 15 ตำแหน่ง */
/* = 0b1000000000000000 = 32768 */

/* การใช้งานทั่วไป */
uint8_t flags = 0;

/* Set bit 3 */
flags |= (1 << 3);   /* flags = 0b00001000 */

/* Clear bit 3 */
flags &= ~(1 << 3);  /* flags = 0b00000000 */

/* Toggle bit 3 */
flags ^= (1 << 3);   /* สลับ bit 3 */

/* Check bit 3 */
if (flags & (1 << 3))
{
    /* bit 3 is set */
}
```

### 5.2 ใช้กับ Register Configuration

```c
/* ตัวอย่าง: GPIO configuration register */

/* Set multiple bits */
GPIO_CFG |= (1 << 4) | (1 << 5);  /* Set bits 4 and 5 */

/* Clear and set (modify field) */
GPIO_CFG &= ~(0x03 << 2);  /* Clear bits 2-3 */
GPIO_CFG |= (0x02 << 2);   /* Set bits 2-3 to value 2 */

/* Mask and extract */
uint8_t field = (GPIO_CFG >> 2) & 0x03;  /* Get bits 2-3 */
```

***

## <mark style="color:blue;">ส่วนที่ 6: Type Casting</mark>

### 6.1 Explicit Casting

```c
/* จาก sensor_hub_daq_task.c */

int16_t raw_value = -1000;
int8_t g_range = 2;
uint8_t bit_width = 16;

/* Cast to float for calculation */
float half_scale = (float)(1u << (bit_width - 1u));
float result = ((GRAVITY_EARTH) * raw_value * g_range) / half_scale;

/* ทำไมต้อง cast? */
/* 1u << 15 = 32768 (integer) */
/* ถ้าไม่ cast เป็น float, การหารจะเป็น integer division */
/* 100 / 32768 = 0 (integer) */
/* (float)100 / 32768 = 0.00305... (correct) */
```

### 6.2 Casting สำหรับ printf

```c
/* printf ใน embedded ต้องระวังเรื่อง format specifier */

float value = 9.81f;

/* ❌ อาจมีปัญหาบาง compiler */
printf("Value: %f\n", value);

/* ✓ ใช้ (double) เพื่อความปลอดภัย */
printf("Value: %9.6f\n", (double)value);

/* %lu สำหรับ uint32_t */
uint32_t count = 1000000;
printf("Count: %lu\n", count);

/* %d สำหรับ int16_t */
int16_t sensor = -500;
printf("Sensor: %d\n", sensor);
```

***

## <mark style="color:blue;">ส่วนที่ 7: การเก็บเวลาด้วย Tick Count</mark>

### 7.1 Tick-Based Timing

```c
/* จากโค้ด debounce */

static uint32_t last_press_time = 0;

bool read_button_with_debounce(void)
{
    uint32_t current_time = Cy_SysTick_GetValue();
    /* หรือใช้ xTaskGetTickCount() ถ้าใช้ FreeRTOS */

    if (current_time - last_press_time > DEBOUNCE_DELAY_MS)
    {
        last_press_time = current_time;
        return true;
    }
    return false;
}
```

### 7.2 Non-Blocking Delay Pattern

```c
/* ❌ Blocking delay - หยุดทุกอย่าง */
LED_ON();
Cy_SysLib_Delay(500);  /* หยุดที่นี่ 500ms */
LED_OFF();

/* ✓ Non-blocking - ทำอย่างอื่นได้ระหว่างรอ */
static uint32_t last_toggle = 0;
uint32_t current_time = Cy_SysTick_GetValue();

if (current_time - last_toggle >= 500)
{
    last_toggle = current_time;
    LED_TOGGLE();
}

/* อ่าน sensor ได้ตลอดเวลา ไม่ต้องรอ LED */
read_sensors();
```

***

## <mark style="color:blue;">ส่วนที่ 8: Volatile Keyword</mark>

### 8.1 ทำไมต้องใช้ volatile?

* **ปัญหา:** Compiler optimize ตัวแปรไว้ใน register ทำให้ main loop ไม่เห็นการเปลี่ยนแปลงจาก ISR
* **ประโยชน์:** บังคับให้อ่าน/เขียนจาก memory จริงทุกครั้ง
* **Hardware:** ISR และ main code ทำงานแยก context กัน

```c
/* จาก gpio-interrupt example */
volatile bool gpio_intr_flag = true;

/* volatile บอก compiler ว่า:
 * "ค่าตัวแปรนี้อาจเปลี่ยนได้ตลอดเวลา
 *  โดยไม่ได้มาจากโค้ดที่เห็น"
 *
 * เช่น: Interrupt handler เปลี่ยนค่า
 *       Hardware register เปลี่ยนค่า
 *       Another thread/core เปลี่ยนค่า
 */

/* ❌ ถ้าไม่ใส่ volatile */
bool flag = true;

while (flag)  /* Compiler อาจ optimize เป็น while(1) */
{
    /* wait */
}

/* ✓ ใส่ volatile */
volatile bool flag = true;

while (flag)  /* Compiler จะอ่านค่าจริงทุกรอบ */
{
    /* wait until ISR clears flag */
}
```

**HOW: ประยุกต์ใช้จริงในอุตสาหกรรม**

* **Smart Home:** Flag ตรวจจับการเปิดประตู/หน้าต่าง (Interrupt-driven)
* **Wearable:** Flag บอกว่าผู้ใช้กดปุ่มบน Smart Watch
* **Industrial:** Status flags จาก Emergency Stop button

**CAUTION: ข้อควรระวัง**

| ข้อผิดพลาด             | ผลกระทบ                         | วิธีป้องกัน                            |
| ---------------------- | ------------------------------- | -------------------------------------- |
| ลืมใช้ volatile        | Main loop ไม่เห็นการเปลี่ยนแปลง | ใช้กับทุก shared variable              |
| ใช้ volatile มากเกินไป | Performance ลดลง                | ใช้เฉพาะกับ ISR-shared variables       |
| Non-atomic access      | Race condition                  | ใช้ critical section สำหรับ multi-byte |

### 8.2 ใช้กับ Hardware Registers

```c
/* Memory-mapped I/O registers ต้องใช้ volatile */

volatile uint32_t *GPIO_DATA = (volatile uint32_t *)0x40000000;

*GPIO_DATA = 0x01;  /* Write to GPIO */
uint32_t value = *GPIO_DATA;  /* Read from GPIO */

/* ถ้าไม่ใส่ volatile, compiler อาจ:
 * - Cache ค่าไว้ใน register แทนที่จะอ่านจริง
 * - Remove "unnecessary" reads/writes
 */
```

***

## <mark style="color:blue;">ส่วนที่ 9: สรุปภาพรวม</mark>

### 9.1 Embedded C Mindset: ทำไม Embedded C ถึงไม่เหมือน C บน PC

แม้ภาษาเป็น C เหมือนกัน แต่ “บริบท” ต่างกันมาก

**Desktop / PC**

* ทรัพยากรเยอะ (RAM/CPU/Storage)
* OS ช่วยจัดการหลายอย่าง
* `printf()` ใช้ได้ง่าย
* timing ไม่ค่อย critical

**Embedded**

* ทรัพยากรจำกัด (RAM/Flash)
* บางระบบไม่มี OS (bare-metal) หรือใช้ RTOS
* timing สำคัญ (real-time behavior)
* ต้องคุม hardware, interrupt, power

> สิ่งสำคัญ: Embedded code ที่ดีต้อง “คาดเดาได้ (predictable)” และ “ควบคุมได้ (controllable)”

***

### 9.2 สิ่งที่ต้องจำให้ขึ้นใจจากตอน 1 (Key Takeaways)

**(1) Types: ใช้ให้ถูก ตั้งแต่บรรทัดแรก**

* ใช้ `stdint.h` เพื่อให้ type มีขนาดแน่นอน เช่น `uint32_t`, `int16_t`
* ใช้ `stdbool.h` สำหรับ `bool`
* ระวัง overflow โดยเฉพาะ `uint8_t`, `int16_t`
* `float` ใช้เมื่อจำเป็นจริง ๆ (เพราะ cost สูงกว่า integer)

**(2) Macros: ทรงพลัง แต่ต้อง “ระวัง”**

* `#define` เหมาะกับ constant และ configuration
* Function-like macro อันตรายเรื่อง **side effect** (เช่น `x++`)
* ใส่วงเล็บรอบ parameter และ expression เสมอ
* ถ้า logic เริ่มซับซ้อน → ควรขยับไปใช้ `static inline` หรือ function

**(3) Functions: แยกส่วนเพื่อ maintain ได้**

* Prototype กับ definition ต้องชัดเจน
* ใช้ `static` เพื่อจำกัด scope และลด naming conflict
* เข้าใจ pass-by-value vs pointer
* return type ที่เหมาะสมช่วยลด bug (เช่นใช้ `cy_rslt_t`)

**(4) Conditional compilation: แยก debug / feature ให้เป็นระบบ**

* `#ifdef DEBUG` ช่วยให้ debug code ไม่หลุดเข้า production
* ใช้ `#if defined(...)` เพื่อรองรับหลาย board / feature

**(5) Timing: เลี่ยงการ “หยุดโลก” ด้วย blocking delay**

* Blocking delay ทำให้ระบบไม่ responsive
* Tick-based timing และ non-blocking pattern คือพื้นฐานของระบบที่ดี
* ใน RTOS: ใช้ tick count ของ RTOS ตาม pattern ที่เหมาะสม

**(6) Volatile: ต้องใช้เมื่อ “ค่าถูกเปลี่ยนจากภายนอก”**

* ISR / hardware register / multi-thread → ต้องพิจารณา `volatile`
* `volatile` ไม่ได้แปลว่า thread-safe แต่ช่วยกัน compiler optimize ผิด

***

### 9.3 Checklist ก่อนขยับไปตอน 2

ก่อนเรียนตอน 2 ผู้อ่านควร “ทำได้จริง” อย่างน้อย:

* [ ] เลือก type ให้เหมาะกับ sensor data และ counter ได้
* [ ] อธิบายปัญหา overflow ของ `uint8_t` ได้
* [ ] อ่าน macro แล้วบอกได้ว่า expand เป็นอะไร
* [ ] เข้าใจ pointer และส่งค่าออกจาก function ด้วย pointer ได้
* [ ] แยก blocking vs non-blocking timing ได้
* [ ] อธิบายได้ว่าเมื่อไรต้องใช้ `volatile`

***

### 9.4 Next: ตอน 2 จะพาไปอะไร

ตอน 2 จะต่อยอดจากพื้นฐานนี้ไปสู่ “เครื่องมือที่ใช้จริงใน firmware” ได้แก่:

* `struct` / `typedef` เพื่อจัดระเบียบ data
* array + pointer แบบใช้งานจริง
* parsing / packing data (protocol, sensor frame)
* memory layout และ safety basics

> ถ้าตอน 1 คือ “อ่านภาษา C ให้คล่อง”\
> ตอน 2 คือ “เริ่มเขียน firmware แบบเป็นระบบ”

## สรุป: Quick Reference

### Data Types

```c
#include <stdint.h>
#include <stdbool.h>

uint8_t, uint16_t, uint32_t   /* Unsigned */
int8_t, int16_t, int32_t      /* Signed */
bool, true, false              /* Boolean */
cy_rslt_t                      /* Result/Error code */
```

### Macros

```c
#define CONSTANT       (100U)
#define FUNCTION()     some_func()
#define ARRAY_SIZE(a)  (sizeof(a)/sizeof((a)[0]))
```

### Functions

```c
static void internal_func(void);           /* File-local */
cy_rslt_t public_func(uint32_t *output);  /* Returns status */
```

### Error Checking

```c
cy_rslt_t result = some_api();
if (CY_RSLT_SUCCESS != result) { handle_error(); }
```

### Conditional Compilation

```c
#ifdef FEATURE_ENABLED
    /* Feature code */
#endif
```

### Timing

```c
volatile bool flag;
uint32_t tick = Cy_SysTick_GetValue();
if (current - last >= INTERVAL) { ... }
```

***

**กลับไปที่:** Session 01: GPIO Basics **ถัดไป:** C02: Structs, Pointers, Arrays


# C in ModusToolBox (MTB)

## 1. โครงสร้างโปรแกรม C ใน ModusToolbox

### <mark style="color:blue;">1.1 Header Files และ Include</mark>

การจัดการ `#include` ให้เป็นระบบเป็นพื้นฐานที่สำคัญมากในการเขียน Embedded C\
โดยเฉพาะบน **Infineon PSoC™ Edge E84** ที่ใช้ ModusToolbox ซึ่งมีทั้ง HAL, BSP และ Peripheral Driver Library (PDL)

การจัดกลุ่ม header ที่ดี จะช่วยให้:

* โค้ดอ่านง่ายและดูเป็นมืออาชีพ
* ลดการพึ่งพาไฟล์ที่ไม่จำเป็น
* ลดโอกาสเกิดปัญหา compile และ dependency ที่ซับซ้อนในอนาคต

***

{% hint style="info" %}

#### แนวคิด (Concept)

ใน ModusToolbox ควรแบ่ง `#include` ออกเป็น **2 กลุ่มหลัก** อย่างชัดเจน:

1. **System headers**\
   เป็น header จาก C standard library ใช้กับภาษา C ทั่วไป
2. **Infineon / PSoC platform headers**\
   เป็น header ที่เกี่ยวข้องกับ hardware, board และ middleware ของ Infineon

การเรียงลำดับที่แนะนำคือ\
👉 *System headers ก่อน* → *Platform headers ตามหลัง*
{% endhint %}

***

#### ตัวอย่างโครงสร้าง `#include` ที่แนะนำ

```c
/* ===================== System headers ===================== */
#include <stdio.h>      /* printf */
#include <stdint.h>     /* uint32_t, int16_t */
#include <stdbool.h>    /* bool, true, false */
#include <string.h>     /* memcpy, strlen */

/* ================= Infineon / PSoC headers ================= */
#include "cy_pdl.h"         /* Peripheral Driver Library */
#include "cyhal.h"          /* Hardware Abstraction Layer */
#include "cybsp.h"          /* Board Support Package */
#include "cy_retarget_io.h" /* UART printf redirection */
```

***

#### Best Practice

* Include เฉพาะ header ที่ใช้งานจริงเท่านั้น
* แยกกลุ่ม System กับ Platform ให้ชัดเจนเสมอ
* อย่า include header ซ้ำซ้อนโดยไม่จำเป็น
* หลีกเลี่ยงการ include header ใน `.h` ถ้าไม่จำเป็น (ควร include ใน `.c` แทน)

***

{% hint style="warning" %}

#### **ข้อควรระวัง (Pitfall)**

* การ include header จำนวนมากเกินไป อาจทำให้
  * compile time เพิ่มขึ้น
  * dependency ซับซ้อน
  * เกิด warning หรือ error ที่ debug ยาก
* การ include header ในลำดับที่ไม่เหมาะสม อาจทำให้ macro หรือ type ชนกันได้
  {% endhint %}

***

#### 📘 MISRA-C Note (สำหรับงานอุตสาหกรรม)

* MISRA-C แนะนำให้ include header เท่าที่จำเป็นเท่านั้น
* Header ควรมี include guard หรือ `#pragma once`
* หลีกเลี่ยงการ include header ที่มี side effect (เช่น มี code execution)

***

**สรุปสั้น ๆ**

> การจัด `#include` ที่ดี คือจุดเริ่มต้นของ firmware ที่ดูแลรักษาง่าย และขยายต่อได้ในระยะยาว

### <mark style="color:blue;">1.2 Simple Define (</mark><mark style="color:blue;">`#define`</mark> <mark style="color:blue;"></mark><mark style="color:blue;">สำหรับค่าคงที่)</mark>

การใช้ `#define` สำหรับกำหนดค่าคงที่ (constant) เป็นสิ่งที่พบได้บ่อยมากในงาน Embedded C\
โดยเฉพาะบน **PSoC™ Edge E84** ที่ต้องจัดการกับ GPIO, communication, sensor และ hardware configuration จำนวนมาก

หากใช้ `#define` อย่างเป็นระบบ จะช่วยให้โค้ด:

* อ่านง่าย
* แก้ไขง่าย
* ลด bug จากการใช้ magic number

***

{% hint style="info" %}

#### แนวคิด (Concept)

`#define` เหมาะสำหรับ:

* ค่าคงที่ที่ **ไม่เปลี่ยนระหว่าง runtime**
* ค่า configuration ที่เกี่ยวข้องกับ hardware
* ค่า parameter ที่ต้องใช้ซ้ำหลายจุดในโค้ด

ชื่อของ macro ควร:

* ใช้ **ตัวพิมพ์ใหญ่ทั้งหมด**
* ใช้ `_` คั่นคำ
* สื่อความหมายชัดเจน
  {% endhint %}

***

#### ตัวอย่าง Simple Define พื้นฐาน

**GPIO Pin Configuration**

(ตัวอย่างจาก hello-world project)

```c
#define LED_PIN        CYBSP_USER_LED
#define BUTTON_PIN     CYBSP_USER_BTN
```

***

**Communication Settings**

```c
#define UART_BAUDRATE  115200
#define I2C_FREQUENCY  400000U   /* 400 kHz */
```

***

**Sensor Configuration**

(ตัวอย่างจาก BMI270 driver)

```c
#define SAMPLE_RATE_HZ    100
#define IMU_I2C_ADDRESS  0x68
#define BUFFER_SIZE      256
```

***

**Application Constants**

```c
#define MAX_RETRIES       3
#define TIMEOUT_MS        5000
#define LED_BLINK_DELAY   500
```

***

#### ตัวอย่างจากโค้ดจริงของ Infineon

**จาก `ml-deepcraft-data-collection`**

```c
#define MAX_FRAMES_IN_CHUNK   (8U)      /* 400Hz / 8 = 50Hz */
#define AXIS_COUNT            (3U)      /* X, Y, Z */
#define SENSOR_COUNT          (2U)      /* Accel, Gyro */
#define GRAVITY_EARTH         (9.80665f)/* m/s^2 */
```

***

**Accelerometer Ranges (BMI270)**

```c
#define IMU_ACC_RANGE_2G      0x4000
#define IMU_ACC_RANGE_4G      0x2000
#define IMU_ACC_RANGE_8G      0x1000
#define IMU_ACC_RANGE_16G     0x0800
```

***

**Gyroscope Conversion Factors**

```c
#define IMU_GYRO_DIVIDE_125   262.0f   /* ±125 dps */
#define IMU_GYRO_DIVIDE_250   131.0f   /* ±250 dps */
#define IMU_GYRO_DIVIDE_500   65.5f    /* ±500 dps */
```

***

**ตัวอย่างจาก `wifi-udp-server`**

```c
#define UDP_LED_CMD_LEN          (1U)
#define LED_ON_CMD               ('1')
#define LED_OFF_CMD              ('0')
#define MAX_UDP_RECV_BUFFER_SIZE (20U)

#define SHIFT_BIT_8              (8U)
#define SHIFT_BIT_16             (16U)
#define SHIFT_BIT_24             (24U)

#define APP_SDIO_FREQUENCY_HZ    (25000000U) /* 25 MHz */
#define SDHC_SDIO_64BYTES_BLOCK  (64U)
```

***

#### Best Practice

* ใช้ `U`, `UL`, `f` ให้เหมาะกับชนิดข้อมูล (type)
* หลีกเลี่ยง magic number ในโค้ด
* ใช้ชื่อ macro ที่อธิบายความหมายได้ด้วยตัวมันเอง
* กลุ่ม macro ตามหน้าที่ (GPIO / Sensor / Network / App)

***

{% hint style="warning" %}

#### **ข้อควรระวัง (Pitfall)**

* การไม่ระบุ suffix (`U`, `f`) อาจทำให้เกิด type mismatch
* Macro ที่ชื่อไม่ชัดเจน จะทำให้โค้ดอ่านยากในระยะยาว
* การใช้ค่าคงที่ฝังในโค้ด (hard-coded) ทำให้แก้ไขยาก
  {% endhint %}

***

#### 📘 MISRA-C Note (สำหรับงานอุตสาหกรรม)

* MISRA-C อนุญาตให้ใช้ `#define` สำหรับ constant
* ควรหลีกเลี่ยง `#define` ที่ซับซ้อนหรือมี logic
* ค่าคงที่ที่เป็นกลุ่มเดียวกัน ควรถูกรวมไว้ใน header เดียว

***

**สรุปสั้น ๆ**

> ใช้ `#define` เพื่อแทนค่าคงที่เท่านั้น\
> ถ้าเริ่มมี logic → พิจารณาใช้ `static inline function` แทน

### <mark style="color:blue;">1.3 การใช้งานจริงของ Function-like Macros</mark>

Function-like macro เป็นเครื่องมือที่ถูกใช้บ่อยมากในงาน Embedded C\
โดยเฉพาะงานที่เกี่ยวข้องกับ **register control, sensor data processing และ performance-critical code**

อย่างไรก็ตาม macro ประเภทนี้ก็เป็นหนึ่งในแหล่งกำเนิด bug ที่พบบ่อยที่สุดเช่นกัน\
หากไม่เข้าใจข้อจำกัดและใช้งานอย่างระมัดระวัง

***

{% hint style="info" %}

#### **แนวคิด (Concept)**

Function-like macro คือ macro ที่มีลักษณะเหมือน function แต่ถูกแทนค่าตั้งแต่ขั้นตอน preprocessing\
จึง **ไม่มี type checking** และ **ไม่มีการป้องกัน side effect**

จุดเด่นคือ:

* เร็ว (ไม่มี function call overhead)
* ใช้กับ type ใดก็ได้ (type-generic)
* เหมาะกับ logic สั้น ๆ
  {% endhint %}

***

#### ตัวอย่าง Function-like Macros ที่ใช้บ่อย

```c
/* Min / Max macros - Generic for any type */
#define MIN(a, b)    ((a) < (b) ? (a) : (b))
#define MAX(a, b)    ((a) > (b) ? (a) : (b))

/* Clamp value to range - Limit sensor values */
#define CLAMP(val, min, max)  (MIN(MAX((val), (min)), (max)))

/* Bit manipulation macros - Register control */
#define BIT_SET(reg, bit)     ((reg) |=  (1U << (bit)))
#define BIT_CLEAR(reg, bit)   ((reg) &= ~(1U << (bit)))
#define BIT_TOGGLE(reg, bit)  ((reg) ^=  (1U << (bit)))
#define BIT_CHECK(reg, bit)   (((reg) >> (bit)) & 1U)

/* Array size macro - Prevent buffer overrun */
#define ARRAY_SIZE(arr)       (sizeof(arr) / sizeof((arr)[0]))

/* Unit conversion macros */
#define MS_TO_TICKS(ms)       ((ms) * configTICK_RATE_HZ / 1000U)
#define DEG_TO_RAD(deg)       ((deg) * 3.14159f / 180.0f)
#define CELSIUS_TO_F(c)       ((c) * 9.0f / 5.0f + 32.0f)
```

***

#### ตัวอย่างการใช้งานจริง (Real-world Usage)

**Sensor data validation**

```c
int16_t sensor_raw = read_sensor();
int16_t sensor_clamped = CLAMP(sensor_raw, -2000, 2000);
```

***

**Array iteration (ป้องกัน out-of-bounds)**

```c
int adc_readings[100];
size_t count = ARRAY_SIZE(adc_readings);

for (size_t i = 0; i < count; i++)
{
    process_reading(adc_readings[i]);
}
```

***

**GPIO register manipulation**

```c
uint32_t gpio_reg = 0;

BIT_SET(gpio_reg, 5);      /* Enable pin */
BIT_CLEAR(gpio_reg, 3);    /* Disable interrupt */

if (BIT_CHECK(gpio_reg, 5))
{
    printf("Pin 5 is HIGH\n");
}
```

***

**Temperature range limit**

```c
float temp = read_temperature();
float temp_limited = CLAMP(temp, -40.0f, 85.0f);
```

***

**FreeRTOS delay conversion**

```c
vTaskDelay(MS_TO_TICKS(100));   /* Delay 100 ms */
```

***

#### ตัวอย่างจากโค้ดจริงของ Infineon (IMU)

```c
#if IMU_SAMPLE_RANGE == BMI2_ACC_RANGE_2G
    #define IMU_ACC_DIVIDE  0x4000  /* 16384 */
#elif IMU_SAMPLE_RANGE == BMI2_ACC_RANGE_4G
    #define IMU_ACC_DIVIDE  0x2000  /* 8192 */
#elif IMU_SAMPLE_RANGE == BMI2_ACC_RANGE_8G
    #define IMU_ACC_DIVIDE  0x1000  /* 4096 */
#elif IMU_SAMPLE_RANGE == BMI2_ACC_RANGE_16G
    #define IMU_ACC_DIVIDE  0x0800  /* 2048 */
#endif
```

```c
#define IMU_INTR_MASK  (0x00000001UL << CYBSP_IMU_INT1_PORT_NUM)

#if defined(IMU_ACC) && defined(IMU_GYR)
    #define IMU_NUM_AXIS  (6U)   /* 3 accel + 3 gyro */
#else
    #define IMU_NUM_AXIS  (3U)   /* Only accel or gyro */
#endif
```

***

#### Best Practice

* ใส่วงเล็บรอบ **ทุก parameter และทุก expression**
* ใช้ macro กับ logic **สั้นและชัดเจนเท่านั้น**
* ใช้ชื่อ macro เป็น **ตัวพิมพ์ใหญ่ทั้งหมด**
* ใช้ macro สำหรับ register / bit manipulation จะเหมาะที่สุด

***

{% hint style="warning" %}

#### **ข้อควรระวัง (Pitfall)**

**❌ Side effect**

```c
#define MAX(a, b)  ((a) > (b) ? (a) : (b))

int x = 5;
int result = MAX(x++, 10);   /* x ถูกเพิ่มสองครั้ง */
```

**❌ Multi-statement macro ที่ไม่ใช้ `do { } while(0)`**

```c
#define LOG_ERROR(msg) printf("Error: %s\n", msg); error_count++
```

```c
if (failed)
    LOG_ERROR("Init failed");   /* error_count++ ทำงานเสมอ */
```

***

**✅ รูปแบบที่ถูกต้อง**

```c
#define LOG_ERROR(msg) do { \
    printf("Error: %s\n", msg); \
    error_count++; \
} while(0)
```

{% endhint %}

***

#### ⚖️ Macro vs Inline Function

| Aspect      | Macro       | Inline Function |
| ----------- | ----------- | --------------- |
| Type safety | ❌ No        | ✅ Yes           |
| Debugging   | ❌ Hard      | ✅ Easy          |
| Side effect | ❌ Dangerous | ✅ Safe          |
| Performance | ✅ Fast      | ✅ Fast          |

***

#### 📘 MISRA-C Note (สำหรับงานอุตสาหกรรม)

* MISRA-C แนะนำให้ **หลีกเลี่ยง function-like macro**
* อนุญาตเฉพาะ macro ที่:
  * ไม่มี side effect
  * ใช้กับ constant หรือ register
* Logic ที่ซับซ้อนควรใช้ `static inline function` แทน

```c
static inline int calculate_checksum(uint8_t *data, size_t len)
{
    int sum = 0;
    for (size_t i = 0; i < len; i++)
    {
        sum += data[i];
    }
    return (sum & 0xFF);
}
```

***

**สรุปสั้น ๆ**

> Function-like macro ทรงพลัง แต่ก็อันตราย\
> ถ้าเริ่มคิดนาน → อย่าใช้ macro

### <mark style="color:blue;">1.4 โครงสร้าง</mark> <mark style="color:blue;"></mark><mark style="color:blue;">`main()`</mark> <mark style="color:blue;"></mark><mark style="color:blue;">ที่แนะนำสำหรับ PSoC™ Edge E84</mark>

ฟังก์ชัน `main()` คือจุดเริ่มต้นของทุกโปรแกรม C\
ในงาน Embedded โดยเฉพาะบน **Infineon PSoC™ Edge E84**\
การจัดโครงสร้าง `main()` ให้ถูกต้องตั้งแต่ต้น จะช่วยให้ระบบ:

* ทำงานเสถียร
* ประหยัดพลังงาน
* Debug และขยายระบบได้ง่ายในอนาคต

***

{% hint style="info" %}

#### **แนวคิด (Concept)**

`main()` ในระบบ Embedded **ไม่ใช่โปรแกรมที่จบแล้ว exit**\
แต่เป็นจุดที่:

1. Initialize hardware และ system
2. Enable interrupt
3. เข้าสู่ main loop ที่ทำงานตลอดอายุของอุปกรณ์

ใน ModusToolbox โครงสร้าง `main()` ที่ดีควร:

* แยกขั้นตอน init อย่างชัดเจน
* ตรวจสอบ error ทุกครั้งที่ init
* รองรับ **Low power operation**
  {% endhint %}

***

#### โครงสร้าง `main()` พื้นฐานที่แนะนำ

```c
int main(void)
{
    cy_rslt_t result;

    /* 1. Initialize board and peripherals */
    result = cybsp_init();
    if (result != CY_RSLT_SUCCESS)
    {
        /* Critical error: stop execution */
        CY_ASSERT(0);
    }

    /* 2. Enable global interrupts */
    __enable_irq();

    /* 3. Initialize debug UART (optional) */
    cy_retarget_io_init(CYBSP_DEBUG_UART_TX,
                         CYBSP_DEBUG_UART_RX,
                         CY_RETARGET_IO_BAUDRATE);

    /* 4. Application-specific initialization */
    app_init();

    /* 5. Main loop */
    for (;;)
    {
        app_task();

        /* Enter deep sleep to save power */
        Cy_SysPm_CpuEnterDeepSleep(CY_SYSPM_WAIT_FOR_INTERRUPT);
    }
}
```

***

#### คำอธิบายแต่ละขั้นตอน

**1. `cybsp_init()`**

* Initialize clock, pins, peripherals ตาม BSP
* ต้อง **check return value เสมอ**
* ถ้าล้มเหลว → ระบบไม่ควรทำงานต่อ

**2. `__enable_irq()`**

* เปิด global interrupt
* ต้องเรียกหลังจาก init hardware เสร็จแล้ว
* ถ้าลืมเรียก → interrupt ทั้งระบบจะไม่ทำงาน

**3. `cy_retarget_io_init()` (optional)**

* ใช้ redirect `printf()` ไปที่ UART
* เหมาะสำหรับ debug / development
* ไม่จำเป็นใน production build เสมอไป

**4. Application Init / Task**

* ควรแยก logic ออกเป็น function
* หลีกเลี่ยงการเขียน code ยาว ๆ ใน `main()`

***

#### ตัวอย่างจริงจาก Infineon (hello-world project)

```c
/* From: mtb-example-psoc-edge-hello-world/proj_cm55/main.c */

int main(void)
{
    cy_rslt_t result;

    /* Initialize the device and board peripherals */
    result = cybsp_init();

    /* Board init failed. Stop program execution */
    if (CY_RSLT_SUCCESS != result)
    {
        __disable_irq();
        CY_ASSERT(0);
    }

    /* Enable global interrupts */
    __enable_irq();

    /* Put the CPU to Deep Sleep - saves power */
    for (;;)
    {
        Cy_SysPm_CpuEnterDeepSleep(CY_SYSPM_WAIT_FOR_INTERRUPT);
    }
}
```

***

#### Best Practice

* ตรวจสอบ return value ของ `cybsp_init()` ทุกครั้ง
* เรียก `__enable_irq()` หลัง init เสมอ
* แยก application logic ออกเป็น function (`app_init()`, `app_task()`)
* ใช้ **Deep Sleep** ใน main loop เมื่อไม่มีงาน

***

{% hint style="warning" %}

#### **ข้อควรระวัง (Pitfall)**

**❌ Loop เปล่า ๆ ที่ไม่ sleep**

```c
while (1)
{
    /* do nothing */
}
```

ผลลัพธ์:

* CPU ใช้งาน 100%
* เปลืองพลังงาน
* แบตเตอรี่หมดเร็วมาก

***

**❌ ลืม enable interrupt**

```c
cybsp_init();
/* forgot __enable_irq() */
```

ผลลัพธ์:

* Timer / UART / GPIO interrupt ไม่ทำงาน
* Debug ยากมาก
  {% endhint %}

***

#### 📘 MISRA-C Note (สำหรับงานอุตสาหกรรม)

* `main()` ต้องมี signature ชัดเจน (`int main(void)`)
* ไม่ควรมี code ที่ไม่ reachable
* Infinite loop เป็นสิ่งที่ **ยอมรับได้** ใน Embedded
* ควรหลีกเลี่ยง logic ซับซ้อนใน `main()`

***

#### สรุปสั้น ๆ

> `main()` ที่ดี\
> \= init ชัดเจน + check error + sleep เมื่อว่าง\
> คือหัวใจของ Embedded firmware ที่เสถียรและประหยัดพลังงาน

### <mark style="color:blue;">1.5 ANSI Escape Sequence สำหรับ Console Debug</mark>

ในระหว่างการพัฒนา Embedded firmware นักพัฒนามักใช้ `printf()` ผ่าน UART เพื่อ debug ค่า sensor, state machine หรือ system status

**ANSI Escape Sequence** คือชุดรหัสควบคุมพิเศษ\
ที่ทำให้ terminal สามารถ:

* ล้างหน้าจอ
* ย้ายตำแหน่ง cursor
* เปลี่ยนสีตัวอักษร
* จัด layout ข้อมูลแบบ real-time

ซึ่งมีประโยชน์มากในช่วง **development & debugging**

{% hint style="info" %}

#### **แนวคิด (Concept)**

ANSI Escape Sequence เป็น string ที่ขึ้นต้นด้วย **ESC character (ASCII 27)**\
ในภาษา C เขียนเป็น:

```c
\x1b
```

รูปแบบทั่วไป:

```
ESC [ <command>
```

ตัวอย่าง:

```c
\x1b[2J    // Clear screen
\x1b[H     // Move cursor to home
```

> Terminal ที่รองรับ: **Tera Term, PuTTY, Linux terminal**\
> Terminal ที่อาจไม่รองรับ: บาง Serial Monitor แบบง่าย
> {% endhint %}

```c
printf("\x1b[2J\x1b[;H");
//      ───┬─── ───┬───
//         │       │
//         │       └─ [;H = Move cursor to home (0,0)
//         └──────── [2J = Clear entire screen

// \x1b = ESC character (ASCII 27)
// ทำให้ terminal ล้างหน้าจอก่อนแสดงข้อความ
// ถ้าใช้ Tera Term หรือ PuTTY จะเห็นผล
// แต่ถ้าใช้ terminal ไม่รองรับ จะเห็นขยะ
```

***

#### ตัวอย่างพื้นฐานที่ใช้บ่อยที่สุด

**ล้างหน้าจอ + ย้าย cursor กลับจุดเริ่มต้น**

```c
printf("\x1b[2J\x1b[H");
```

อธิบาย:

```c
\x1b       // ESC character
[2J        // Clear entire screen
[H         // Move cursor to (0,0)
```

***

#### ตัวอย่างการใช้งานจริง (Real-world Usage)

**แสดงค่า sensor แบบ refresh หน้าจอ**

```c
while (1)
{
    printf("\x1b[2J\x1b[H");   /* Clear screen */

    printf("Temperature: %.2f C\n", temperature);
    printf("Humidity   : %.2f %%\n", humidity);
    printf("Pressure   : %.2f hPa\n", pressure);

    Cy_SysLib_Delay(1000);
}
```

ผลลัพธ์:

* หน้าจอไม่เลื่อนยาว
* ดูเหมือน dashboard แบบ real-time

***

**เปลี่ยนสีข้อความ (optional)**

```c
printf("\x1b[31mERROR\x1b[0m\n");   /* Red text */
printf("\x1b[32mOK\x1b[0m\n");      /* Green text */
```

สีที่ใช้บ่อย:

* `31` = Red
* `32` = Green
* `33` = Yellow
* `34` = Blue
* `0` = Reset

***

#### ทำไม ANSI Escape ถึงเหมาะกับ Embedded Debug

* ไม่ต้องใช้ GUI
* ใช้ resource น้อย
* เหมาะกับ board ที่ไม่มีจอ
* Debug ได้ผ่าน UART ธรรมดา

เหมาะมากกับ:

* Sensor bring-up
* Power consumption debug
* State machine monitoring

***

#### Best Practice

* ใช้ ANSI Escape **เฉพาะใน debug build**
* แยก debug output ด้วย macro

```c
#ifdef DEBUG_CONSOLE
#define CLEAR_SCREEN()  printf("\x1b[2J\x1b[H")
#else
#define CLEAR_SCREEN()
#endif
```

* ใช้ร่วมกับ `Cy_SysLib_Delay()` หรือ sleep เพื่อลด UART spam

***

{% hint style="warning" %}

#### **ข้อควรระวัง (Pitfall)**

**❌ Terminal ไม่รองรับ**

ถ้า terminal ไม่รองรับ ANSI:

* จะเห็นเป็นตัวอักษรแปลก ๆ เช่น `[2J[H`

**❌ ใช้ใน production firmware**

* เปลือง flash
* เปลือง UART bandwidth
* ไม่เหมาะกับระบบที่ต้อง deterministic timing
  {% endhint %}

***

#### ⚖️ ANSI Escape vs GUI Debug

| Aspect           | ANSI Escape | GUI Tool |
| ---------------- | ----------- | -------- |
| Resource         | ต่ำมาก      | สูง      |
| Setup            | ง่าย        | ซับซ้อน  |
| Flexibility      | ปานกลาง     | สูง      |
| Production ready | ❌           | ✅        |

***

{% hint style="success" %}

#### **MISRA-C Note (สำหรับงานอุตสาหกรรม)**

* ANSI Escape เป็น **string literal** → ไม่ผิด MISRA โดยตรง
* แต่:
  * ไม่ควรใช้ใน production code
  * ควรถูก guard ด้วย macro (`#ifdef DEBUG`)
* หลีกเลี่ยงการใช้ `printf()` ใน timing-critical path
  {% endhint %}

***

#### สรุปสั้น ๆ

> ANSI Escape = เครื่องมือ debug ที่ดีมาก\
> แต่ควรใช้ **เฉพาะตอนพัฒนา**\
> ไม่ใช่ solution ระยะยาวสำหรับ production system

### <mark style="color:blue;">1.6 Coding Style จากโค้ดตัวอย่างจริงของ Infineon (Hello-world & MQTT Multi-tasking)</mark>

หัวข้อนี้เป็นการ **สรุปแนวทางการเขียน C ที่ Infineon ใช้จริง**\
โดยอ้างอิงจากตัวอย่างทางการ เช่น:

* `mtb-example-psoc-edge-hello-world`
* ตัวอย่าง IoT / MQTT client ที่ใช้ **FreeRTOS multi-tasking**

เป้าหมายไม่ใช่แค่ “โค้ดรันได้”\
แต่คือ **เขียนให้ตรง mindset ของ Infineon และงานอุตสาหกรรม**

***

#### โครงสร้างโปรเจกต์ (Project Structure Mindset)

{% hint style="info" %}

#### **แนวคิด (Concept)**

จากตัวอย่างจริงของ Infineon จะเห็น pattern ชัดเจนว่า:

* `main.c` → ทำหน้าที่ **orchestration**
* logic งานจริง → แยกเป็น module
* hardware config → มาจาก BSP / Config Tool
* middleware → จัดการผ่าน Library Manager

โค้ด **ไม่กระจุกอยู่ไฟล์เดียว**
{% endhint %}

#### โครงสร้างที่พบได้บ่อย

```
proj_cm55/
 ├── main.c
 ├── app.c
 ├── app.h
 ├── FreeRTOSConfig.h
 ├── bsp/
 ├── middleware/
 └── generated/
```

***

#### Best Practice

* `main.c` ไม่ควรยาว
* Application logic ควรอยู่ใน `app_xxx.c`
* Hardware-specific code ไม่ควรปนกับ business logic
* ให้ Config Tool เป็นเจ้าของไฟล์ config (ไม่แก้มือ)

***

{% hint style="warning" %}

#### Pitfall

❌ เขียน logic ทั้งหมดใน `main.c`\
❌ แก้ไฟล์ที่ auto-generated → พังตอน regenerate\
❌ module หนึ่งทำหลายหน้าที่
{% endhint %}

***

#### Pattern ของ `main()` จาก Hello-world (Bare-metal Style)

{% hint style="info" %}

#### แนวคิด (Concept)

จาก hello-world ของ Infineon\
`main()` มีหน้าที่ชัดเจน 3 อย่าง:

1. Initialize system
2. Enable interrupt
3. เข้าสู่ loop ที่ประหยัดพลังงาน
   {% endhint %}

***

#### Pattern ที่พบจริง

```c
int main(void)
{
    cy_rslt_t result;

    result = cybsp_init();
    if (result != CY_RSLT_SUCCESS)
    {
        __disable_irq();
        CY_ASSERT(0);
    }

    __enable_irq();

    for (;;)
    {
        Cy_SysPm_CpuEnterDeepSleep(
            CY_SYSPM_WAIT_FOR_INTERRUPT);
    }
}
```

***

#### Best Practice

* check return value ทุกครั้ง
* error ร้ายแรง → หยุดระบบทันที
* idle loop ต้อง sleep เสมอ

***

#### MISRA-C Note

* Infinite loop ใน `main()` → ยอมรับได้
* หลีกเลี่ยง code ที่ unreachable
* `main()` ไม่ควรมี logic ซับซ้อน

***

#### สรุป 1.6

> ถ้าเขียนโค้ดให้ **โครงสร้างเหมือนตัวอย่างของ Infineon**\
> แปลว่าโค้ดคุณ “พร้อมต่อยอดเป็น production ได้จริง”

{% hint style="danger" %}

### Common Mistakes ที่ควรหลีกเลี่ยง

❌ เขียนทุกอย่างไว้ใน `main.c`\
❌ ไม่ check return value ของ init function\
❌ ใช้ macro แทน logic ที่ควรเป็น function\
❌ ใช้ printf เป็น logging หลักใน production\
❌ แก้ไฟล์ที่ Config Tool สร้างให้\
❌ ไม่คิดเรื่อง power consumption ตั้งแต่ต้น
{% endhint %}

***


# Workshops

{% embed url="<https://www.youtube.com/watch?v=ENHnzYqn0GY>" fullWidth="true" %}


# Hello World

## Lab 1: Hello World - ทำความเข้าใจโปรเจกต์ & LED Blink

#### วัตถุประสงค์

* เข้าใจโครงสร้างโปรเจกต์ ModusToolBox (MTB)
* เข้าใจ flow ของ `main()` ใน Embedded system
* ควบคุม LED Blink ด้วย macro

#### จะได้เรียนรู้อะไร?

* **Project Structure**: proj\_cm33\_s, proj\_cm33\_ns, proj\_cm55
* **GPIO API**: Cy\_GPIO\_Set(), Cy\_GPIO\_Clr(), Cy\_GPIO\_Inv()
* **Delay Function**: Cy\_SysLib\_Delay()
* **Macro Definition**: สร้าง LED control macros

### Lab 1.1 : Hello World & LED Blink

#### ทำความเข้าใจโค้ด main.c

โค้ด `main()` ในตัวอย่าง Infineon จะมี pattern คงที่:

1. Initialize board และ peripherals
2. Enable global interrupt
3. Initialize UART สำหรับ debug (`printf`)
4. เข้า main loop ที่รันตลอดเวลา

```c
/* proj_cm33_ns/main.c - Hello World Example */

/*******************************************************************************
* File Name        : main.c
*
* Description      : This source file contains the main routine for non-secure
*                    application in the CM33 CPU
*
* Related Document : See README.md
*
********************************************************************************

/*******************************************************************************
* Header Files
*******************************************************************************/

#include "cybsp.h"
#include "retarget_io_init.h"

/*******************************************************************************
* Macros
*******************************************************************************/
#define BLINKY_LED_DELAY_MSEC       (1000U)

/* The timeout value in microseconds used to wait for CM55 core to be booted */
#define CM55_BOOT_WAIT_TIME_USEC    (10U)

/* App boot address for CM55 project */
#define CM55_APP_BOOT_ADDR          (CYMEM_CM33_0_m55_nvm_START + \
                                        CYBSP_MCUBOOT_HEADER_SIZE)

/*******************************************************************************
* Function Name: main
********************************************************************************
* Summary:
* This is the main function of the CM33 non-secure application. 
* 
* It initializes the device and board peripherals. It also initializes the 
* retarget-io middleware to be used with the debug UART port using which 
* "Hello World!" is printed on the debug UART. The LED pin is initialized with
* default configurations. The CM55 core is enabled and then the programs enters
* an infinite while loop which toggles the LED1 with a frequency of 1 Hz.
*
* Parameters:
*  none
*
* Return:
*  int
*
*******************************************************************************/
int main(void)
{
    cy_rslt_t result = CY_RSLT_SUCCESS;

    /* Initialize the device and board peripherals. */
    result = cybsp_init();

    /* Board initialization failed. Stop program execution. */
    if (CY_RSLT_SUCCESS != result)
    {
        handle_app_error();
    }

    /* Enable global interrupts */
    __enable_irq();

    /* Initialize retarget-io middleware */
    init_retarget_io();

    /* \x1b[2J\x1b[;H - ANSI ESC sequence for clear screen. */
    printf("\x1b[2J\x1b[;H");

    printf("****************** "
           "PSOC Edge MCU: Hello world "
           "****************** \r\n\n");

    printf("Hello World!\r\n\n");
    printf("For more projects, "
           "visit our code examples repositories:\r\n\n");

    printf("https://github.com/Infineon/"
           "Code-Examples-for-ModusToolbox-Software\r\n\n");

    /* Enable CM55. */
    /* CM55_APP_BOOT_ADDR must be updated if CM55 memory layout is changed.*/
    Cy_SysEnableCM55(MXCM55, CM55_APP_BOOT_ADDR, CM55_BOOT_WAIT_TIME_USEC);

    for(;;)
    {
        Cy_GPIO_Inv(CYBSP_USER_LED1_PORT, CYBSP_USER_LED1_PIN); // Toggle the LED1
        Cy_SysLib_Delay(BLINKY_LED_DELAY_MSEC); // Delay for 1 second
    }
}

/* [] END OF FILE */

```

#### แผนภาพการทำงาน

<div data-full-width="true"><figure><img src="/files/AQZ5XyKFJAqkkhbXLHUd" alt=""><figcaption></figcaption></figure></div>

***

#### LED Blink ด้วย Macro

กำหนด delay ของ LED ด้วย macro

```c
#define BLINKY_LED_DELAY_MSEC (1000U)
```

และใน main loop:

```c
for(;;)
    {
        Cy_GPIO_Inv(CYBSP_USER_LED1_PORT, CYBSP_USER_LED1_PIN); // Toggle the LED1
        Cy_SysLib_Delay(BLINKY_LED_DELAY_MSEC); // Delay for 1 second
    }
```

***

### ทดลองสร้าง LED API (Best Practice)

โดยการเพิ่ม macro เพื่อให้โค้ดอ่านง่ายขึ้น:

```c
#define LED_ON()     Cy_GPIO_Set(CYBSP_USER_LED1_PORT, CYBSP_USER_LED1_PIN)
#define LED_OFF()    Cy_GPIO_Clr(CYBSP_USER_LED1_PORT, CYBSP_USER_LED1_PIN)
#define LED_TOGGLE() Cy_GPIO_Inv(CYBSP_USER_LED1_PORT, CYBSP_USER_LED1_PIN)
```

แล้วเปลี่ยนใน loop เป็น:

```c
for(;;)
    {
        LED_TOGGLE(); // Toggle the LED1
        Cy_SysLib_Delay(BLINKY_LED_DELAY_MSEC); // Delay for 1 second
    }
```

***

**Build และ Flash**

```bash
make build -j8
make program
```

***

### Lab 1.2 : ทดลอง LED Blinking Patterns

```c
/* Pattern 1: Simple blink */
for(;;)
{
    LED_TOGGLE();
    Cy_SysLib_Delay(250);
}

/* Pattern 2: SOS pattern */
for(;;)
{
    /* S: ... */
    for (int i = 0; i < 3; i++) {
        LED_ON();  Cy_SysLib_Delay(100);
        LED_OFF(); Cy_SysLib_Delay(100);
    }
    Cy_SysLib_Delay(200);

    /* O: --- */
    for (int i = 0; i < 3; i++) {
        LED_ON();  Cy_SysLib_Delay(300);
        LED_OFF(); Cy_SysLib_Delay(100);
    }
    Cy_SysLib_Delay(200);

    /* S: ... */
    for (int i = 0; i < 3; i++) {
        LED_ON();  Cy_SysLib_Delay(100);
        LED_OFF(); Cy_SysLib_Delay(100);
    }

    Cy_SysLib_Delay(1000);  /* Pause between SOS */
}
```

**Build และ Flash**

```bash
make build -j8
make program
```

#### GPIO Functions (PDL) Summary

<table><thead><tr><th width="326.24786376953125">Function</th><th>Description</th></tr></thead><tbody><tr><td><code>Cy_GPIO_Set(port, pin)</code></td><td>Set pin HIGH</td></tr><tr><td><code>Cy_GPIO_Clr(port, pin)</code></td><td>Set pin LOW</td></tr><tr><td><code>Cy_GPIO_Inv(port, pin)</code></td><td>Toggle pin</td></tr><tr><td><code>Cy_GPIO_Read(port, pin)</code></td><td>Read pin (0 or 1)</td></tr><tr><td><code>Cy_GPIO_Write(port, pin, val)</code></td><td>Write 0 or 1</td></tr></tbody></table>

#### Hardware Info

| Component | Macro             | หมายเหตุ    |
| --------- | ----------------- | ----------- |
| User LED1 | `CYBSP_USER_LED1` | Active HIGH |
| User LED2 | `CYBSP_USER_LED2` | Active HIGH |

### ✍️ Exercise:&#x20;

1. **Double Blink :** สร้าง pattern ที่ LED กระพริบ 2 ครั้งเร็วๆ แล้วหยุดนาน

```bash
ON(100ms) - OFF(100ms) - ON(100ms) - OFF(500ms) - repeat
```

2. **Heartbeat :** สร้าง pattern เหมือนหัวใจเต้น (สั้น-ยาว-หยุด)

```bash
ON(50ms) - OFF(50ms) - ON(150ms) - OFF(500ms) - repeat
```

{% hint style="info" %}
**Hint**

**ตัวอย่างใช้ `for (;;)`**

```c
LED_ON();  Cy_SysLib_Delay(100);
LED_OFF(); Cy_SysLib_Delay(100);
```

{% endhint %}

***


# User Switch

## Lab 2: User Switch — อ่านปุ่มกด & Debounce

#### วัตถุประสงค์

* **GPIO Input**: อ่านค่าจาก Digital Input
* **Debounce**: ป้องกันการอ่านค่าผิดพลาดจาก Contact Bounce
* **State Machine**: เปลี่ยน LED state เมื่อกดปุ่ม

#### จะได้เรียนรู้อะไร?

* **GPIO Read**: Cy\_GPIO\_Read()
* **Active LOW**: ปุ่มกดลง = 0
* **Debounce Pattern**: Software debounce
* **Static Variables**: เก็บ state ระหว่าง function calls

#### **Hardware Information**

| Component           | Port/Pin          | หมายเหตุ                |
| ------------------- | ----------------- | ----------------------- |
| User LED1           | CYBSP\_USER\_LED1 | Active HIGH (HIGH = ON) |
| User Button 1 (SW2) | CYBSP\_USER\_BTN1 | Active LOW (กดลง = 0)   |
| User Button 2 (SW4) | CYBSP\_USER\_BTN2 | Active LOW (กดลง = 0)   |

***

### Lab 2.1 : อ่านปุ่มกดแบบ Polling

#### **เพิ่ม Button Macros:**

```c
/* เพิ่มหลัง LED macros */

/* Button Configuration */
#define USER_BTN_PORT       CYBSP_USER_BTN1_PORT
#define USER_BTN_PIN        CYBSP_USER_BTN1_PIN

/* Button Read Macro - Active LOW */
#define IS_BUTTON_PRESSED() (Cy_GPIO_Read(USER_BTN_PORT, USER_BTN_PIN) == 0)
```

#### **แก้ไขฟังก์ชั่น Main :**

```c
int main(void)
{
    cy_rslt_t result = CY_RSLT_SUCCESS;
    
    /* Initialize */
    result = cybsp_init();
    if (CY_RSLT_SUCCESS != result) { handle_app_error(); }

    __enable_irq();
    init_retarget_io();

    printf("\x1b[2J\x1b[;H");
    printf("*** PSoC Edge: Button Demo ***\r\n");
    printf("Press SW2 to toggle LED\r\n\n");

    Cy_SysEnableCM55(MXCM55, CM55_APP_BOOT_ADDR, CM55_BOOT_WAIT_TIME_USEC);

    /* Main loop */
    for(;;)
    {
        /* ตรวจสอบปุ่ม */
        if (IS_BUTTON_PRESSED())
        {
            printf("Button pressed!\r\n");
        } else
        {
            printf("Button NOT pressed!\r\n");
        }

        /* หน่วงเวลาเล็กน้อยเพื่อลด CPU load */
        Cy_SysLib_Delay(10);
    }
}
```

***

### Lab 2.2 : Debounce แบบง่าย (Edge Detection)

**WHY: ทำไมต้องรู้?**

* **ปัญหา:** ปุ่มกดมีสัญญาณกระเด้ง (bouncing) ทำให้ detect หลายครั้ง (5-10 ครั้ง!)
* **ประโยชน์:** อ่านค่าปุ่มได้ถูกต้อง, ไม่มี false triggers
* **Hardware:** Mechanical switch มี contact bounce 10-50ms

```
ปุ่มกดจริงๆ:     ___████████████___
                 ↑ กด        ↑ ปล่อย

สัญญาณที่ MCU เห็น: ___█_█_██_█████___
                    ↑ Bouncing!
```

**CAUTION: ข้อควรระวัง**

| ข้อผิดพลาด       | ผลกระทบ               | วิธีป้องกัน              |
| ---------------- | --------------------- | ------------------------ |
| Delay สั้นเกินไป | ยัง bounce อยู่       | ใช้ 20-50ms              |
| Delay นานเกินไป  | ผู้ใช้รู้สึกว่า laggy | ไม่ควรเกิน 100ms         |
| Debounce ใน ISR  | Block interrupt นาน   | ใช้ timer-based debounce |

#### เพิ่ม debouncing และ Macro functions

```c
#define DEBOUNCE_DELAY_MS           (50U)

/* LED Control Macros */
#define LED_ON()                    Cy_GPIO_Clr(CYBSP_USER_LED1_PORT, CYBSP_USER_LED1_PIN)
#define LED_OFF()                   Cy_GPIO_Set(CYBSP_USER_LED1_PORT, CYBSP_USER_LED1_PIN)
#define LED_TOGGLE()                Cy_GPIO_Inv(CYBSP_USER_LED1_PORT, CYBSP_USER_LED1_PIN)

/*******************************************************************************
* Function Prototypes
*******************************************************************************/
static bool read_button_with_debounce(void);

/*******************************************************************************
* Global Variables
*******************************************************************************/
static uint32_t button_press_count = 0;
```

#### สร้างฟังก์ชัน Debounce

{% hint style="info" %}
**ด้วยเทคนิค Delay-based Debounce**:

1. ตรวจจับ rising edge (ปุ่มถูกกด)
2. รอ 50ms ด้วย `Cy_SysLib_Delay()`
3. อ่านค่าปุ่มอีกครั้งเพื่อยืนยัน
4. ถ้ายังกดอยู่ = valid press
   {% endhint %}

```c
/*******************************************************************************
* Function Name: read_button_with_debounce
********************************************************************************
* Summary:
*   อ่านค่าปุ่มพร้อม debounce เพื่อป้องกันการ bounce
*
* Parameters:
*   None
*
* Return:
*   true ถ้าปุ่มถูกกด (และ debounced แล้ว), false ถ้าไม่ได้กด
*
* Note:
*   ใช้ static variables เพื่อเก็บ state ระหว่าง calls
*******************************************************************************/
static bool read_button_with_debounce(void)
{
    static bool last_state = false;

    bool current_state = IS_BUTTON_PRESSED();

    /* Detect rising edge (button just pressed) */
    if (current_state && !last_state) {
        /* Wait for debounce period */
        Cy_SysLib_Delay(DEBOUNCE_DELAY_MS);

        /* Re-read to confirm button is still pressed */
        if (IS_BUTTON_PRESSED()) {
            last_state = true;
            return true;  /* Valid press detected */
        }
    }

    /* Update state when button is released */
    if (!current_state) {
        last_state = false;
    }

    return false;
}

```

#### แก้ไข Main Loop

```c
int main(void)
{
    cy_rslt_t result = CY_RSLT_SUCCESS;

    /* Initialize */
    result = cybsp_init();
    if (CY_RSLT_SUCCESS != result) { handle_app_error(); }

    __enable_irq();
    init_retarget_io();

    printf("\x1b[2J\x1b[;H");
    printf("*** PSoC Edge: Button Demo ***\r\n");
    printf("Press SW2 to toggle LED\r\n\n");

    Cy_SysEnableCM55(MXCM55, CM55_APP_BOOT_ADDR, CM55_BOOT_WAIT_TIME_USEC);

    /* Main loop */
    for(;;)
    {
       if (read_button_with_debounce()) {
          button_press_count++;  // เพิ่ม counter
          LED_TOGGLE();
          printf("Button pressed! Count: %lu, LED toggled.\r\n",
                  (unsigned long)button_press_count);
    }
    Cy_SysLib_Delay(10);
}
}
```

#### Debounce Flowchart

<figure><img src="/files/dNP5RvVkxxxVteVYrvP6" alt=""><figcaption></figcaption></figure>

***

### ทำความเข้าใจการเรียกใช้ Static Variables

```c
/* static ภายใน function = เก็บค่าระหว่าง calls */

void example(void)
{
    static int count = 0;  /* Initialize ครั้งเดียวตอนเริ่มโปรแกรม */
    count++;
    printf("Called %d times\n", count);
}

/* เรียก example() 3 ครั้ง:
 * Called 1 times
 * Called 2 times
 * Called 3 times
 */

/* ถ้าไม่ใช้ static: */
void bad_example(void)
{
    int count = 0;  /* Initialize ทุกครั้งที่เรียก! */
    count++;
    printf("Called %d times\n", count);
}

/* เรียก bad_example() 3 ครั้ง:
 * Called 1 times
 * Called 1 times
 * Called 1 times
 */
```

#### ✍️ Exercise

1. **Press Counter** : นับจำนวนครั้งที่กดปุ่มและแสดงผล

{% hint style="info" %}
**Hint**

ประกาศตัวแปร `uint32_t press_count = 0;` แล้วทำการเพิ่มค่า `press_count++;` ในลูป
{% endhint %}

2. **Long Press Detection** : ตรวจจับการกดค้าง (> 1 วินาที) และทำ action แตกต่าง

{% hint style="info" %}
**Hint**

เรียกใช้ฟังก์ชันนี้

```c
/* Long Press Detection using elapsed_time counter */
bool read_long_press(uint32_t hold_time_ms, uint32_t elapsed_time)
{
    static uint32_t press_start = 0;
    static bool counting = false;

    if (IS_BUTTON_PRESSED())
    {
        if (!counting)
        {
            counting = true;
            press_start = elapsed_time;
        }
        else if ((elapsed_time - press_start) >= hold_time_ms)
        {
            counting = false;  /* Reset for next detection */
            return true;       /* Long press detected! */
        }
    }
    else
    {
        counting = false;
    }

    return false;
}
```

{% endhint %}

***


# Potentiometer (ADC)

## Lab 3: Potentiometer (ADC) — อ่านค่า Analog

#### วัตถุประสงค์

* **Analog Input**: อ่านค่าแบบ Analog (ไม่ใช่แค่ 0/1)
* **ADC**: เข้าใจหลักการแปลง Analog → Digital
* **Scaling**: แปลงค่า ADC เป็นหน่วยที่เข้าใจได้

#### จะได้เรียนรู้อะไร

* **ADC Concept**: 12-bit resolution (0-4095)
* **Unit Conversion**: ADC counts → millivolts → percentage
* **Periodic Reading**: อ่านค่าเป็นช่วงเวลา

***

### หลักการ ADC

```
   Analog Input        ┌─────────┐        Digital Output         
   (0 - 1.8V)    ────► │   ADC   │ ────►  (0 - 4095)             
                       └─────────┘        12-bit      

Analog Input (0V - 1.8V)     ADC     Digital Output (0 - 4095)
         │                    │              │
    1.8V ├────────────────────┼─────────────→ 4095
    0.9V ├────────────────────┼─────────────→ 2048
    0.0V ├────────────────────┼─────────────→ 0
```

**Resolution 12-bit:** 2^12 = 4096 ระดับ

สูตรแปลงเป็น mV:

$$
mV = \frac{ADC\_count \times VREF\_mV}{4096}
$$

#### Hardware Info

| Component           | Pin      | หมายเหตุ       |
| ------------------- | -------- | -------------- |
| Potentiometer (POT) | P15\_1   | 0-1800mV range |
| ADC Reference       | Internal | 1.8V           |

***

### Lab 3.1 : แก้ไข Macros เดิมจาก

```c
/*******************************************************************************
 * Macros
 ******************************************************************************/
#define CM55_BOOT_WAIT_TIME_USEC    (10U) 
#define ADC_SCAN_DELAY_MSEC         (500U) <-- เดิม
#define SAR_ADC_INDEX               (0U)
#define SAR_ADC_SEQENCER            (0U)  <-- เดิม
#define SAR_ADC_CHANNEL             (0U)
#define SAR_ADC_VREF_MV             (1800U)
```

#### เป็น Macros ใหม่ , เพิ่ม Variables  และ ชื่อฟังก์ชันเพิ่มเติม ดังนี้

```c
/*******************************************************************************
 * Macros
 ******************************************************************************/
#define CM55_BOOT_WAIT_TIME_USEC    (10U)
#define ADC_READ_INTERVAL_MS        (100U)
#define SAR_ADC_INDEX               (0U)
#define SAR_ADC_SEQUENCER           (0U)
#define SAR_ADC_CHANNEL             (0U)
#define SAR_ADC_VREF_MV             (1800U)

/*******************************************************************************
* Global Variables
*******************************************************************************/
static bool adc_initialized = false;

/*******************************************************************************
* Function Prototypes
*******************************************************************************/
static cy_rslt_t init_adc(void);
static int16_t read_potentiometer_mv(void);
static uint8_t get_pot_percentage(int16_t voltage_mv);
```

#### สร้างฟังก์ชัน init\_adc()

```c
/*******************************************************************************
* Function Name: init_adc
********************************************************************************
* Summary:
*   Initializes the SAR ADC using autonomous analog control.
*   Sets up interrupt masks and enables autonomous operation.
*
* Parameters:
*   none
*
* Return:
*   cy_rslt_t - CY_RSLT_SUCCESS if initialization successful
*
*******************************************************************************/
static cy_rslt_t init_adc(void)
{
    cy_rslt_t result;

    /* Initialize SAR ADC with autonomous analog configuration */
    result = Cy_AutAnalog_Init(&autonomous_analog_init);

    if (CY_AUTANALOG_SUCCESS != result)
    {
        return result;
    }

    /* Set interrupt mask to enable SAR0 result interrupt */
    Cy_AutAnalog_SetInterruptMask(CY_AUTANALOG_INT_SAR0_RESULT);

    /* Start autonomous control of the ADC */
    Cy_AutAnalog_StartAutonomousControl();

    adc_initialized = true;

    return CY_RSLT_SUCCESS;
}
```

#### สร้างฟังก์ชัน read\_potentiometer\_mv()

```c
/*******************************************************************************
* Function Name: read_potentiometer_mv
********************************************************************************
* Summary:
*   Reads the potentiometer value from ADC and converts to millivolts.
*   Uses the autonomous analog SAR ADC API.
*
* Parameters:
*   none
*
* Return:
*   int16_t - Voltage in millivolts (0-1800 mV)
*
*******************************************************************************/
static int16_t read_potentiometer_mv(void)
{
    int32_t adc_count;
    int16_t voltage_mv;

    /* Read ADC result (raw counts) */
    adc_count = Cy_AutAnalog_SAR_ReadResult(SAR_ADC_INDEX,
                                            CY_AUTANALOG_SAR_INPUT_GPIO,
                                            SAR_ADC_CHANNEL);

    /* Convert ADC counts to millivolts */
    voltage_mv = Cy_AutAnalog_SAR_CountsTo_mVolts(SAR_ADC_INDEX,
                                                   false,
                                                   SAR_ADC_SEQUENCER,
                                                   CY_AUTANALOG_SAR_INPUT_GPIO,
                                                   SAR_ADC_CHANNEL,
                                                   SAR_ADC_VREF_MV,
                                                   adc_count);

    return voltage_mv;
}
```

#### สร้างฟังก์ชัน get\_pot\_percentage()

```c
/*******************************************************************************
* Function Name: get_pot_percentage
********************************************************************************
* Summary:
*   Converts potentiometer voltage to percentage (0-100%).
*   Maps the voltage range (0 to VREF_MV) to percentage scale.
*
* Parameters:
*   voltage_mv - Input voltage in millivolts
*
* Return:
*   uint8_t - Percentage value (0-100)
*
*******************************************************************************/
static uint8_t get_pot_percentage(int16_t voltage_mv)
{
    int32_t percentage;

    /* Ensure voltage is within valid range */
    if (voltage_mv < 0)
    {
        voltage_mv = 0;
    }
    else if (voltage_mv > SAR_ADC_VREF_MV)
    {
        voltage_mv = SAR_ADC_VREF_MV;
    }

    /* Calculate percentage: (voltage / VREF) * 100 */
    percentage = ((int32_t)voltage_mv * 100) / SAR_ADC_VREF_MV;

    return (uint8_t)percentage;
}
```

#### ปรับปรุง main() ใหม่

```c
int main(void)
{
    cy_rslt_t result = CY_RSLT_SUCCESS;
    int16_t voltage_mv;
    uint8_t percentage;

    /* Initialize the device and board peripherals. */
    result = cybsp_init();

    /* Board initialization failed. Stop program execution. */
    if (CY_RSLT_SUCCESS != result)
    {
        handle_app_error();
    }

    /* Enable global interrupts */
    __enable_irq();

    /* Initialize retarget-io middleware */
    init_retarget_io();

    /* \x1b[2J\x1b[;H - ANSI ESC sequence for clear screen. */
    printf("\x1b[2J\x1b[;H");
    printf("***********************************************************\r\n");
    printf("            PSOC Edge MCU: Potentiometer ADC               \r\n");
    printf("***********************************************************\r\n\n");

    /* Initialize SAR ADC using helper function */
    result = init_adc();

    if (CY_RSLT_SUCCESS != result)
    {
        printf("ADC initialization failed!\r\n");
        handle_app_error();
    }

    /* Inform user about potentiometer connection */
    printf("ADC initialized successfully!\r\n");
    printf("Reading potentiometer on pin P15_1\r\n");
    printf("VREF = %d mV (12-bit resolution)\r\n\n", SAR_ADC_VREF_MV);

    /* CY_CM55_APP_BOOT_ADDR must be updated if CM55 memory layout is changed.*/
    Cy_SysEnableCM55(MXCM55, CY_CM55_APP_BOOT_ADDR, CM55_BOOT_WAIT_TIME_USEC);

    for(;;)
    {
        /* Read potentiometer voltage using helper function */
        voltage_mv = read_potentiometer_mv();

        /* Convert to percentage using helper function */
        percentage = get_pot_percentage(voltage_mv);

        /* Print ADC output in millivolts and percentage */
        printf("POT: %4d mV  |  %3d%%\r\n", voltage_mv, percentage);

        /* Toggle user LED to indicate activity */
        Cy_GPIO_Inv(CYBSP_USER_LED_PORT, CYBSP_USER_LED_PIN);

        /* Delay between ADC readings */
        Cy_SysLib_Delay(ADC_READ_INTERVAL_MS);
    }

}
```

#### ตัวอย่าง Output บน Serial Terminal

```bash
***********************************************************
            PSOC Edge MCU: Potentiometer ADC               
***********************************************************

ADC initialized successfully!
Reading potentiometer on pin P15_1
VREF = 1800 mV (12-bit resolution)

POT:    0 mV  |    0%
POT:  450 mV  |   25%
POT:  900 mV  |   50%
POT: 1350 mV  |   75%
POT: 1800 mV  |  100%
```

### ADC Potentiometer Flowcharts

#### Overall Program Flow and init\_adc() Flowchart

<figure><img src="/files/5O0uXbEopzDcMZigeRIg" alt=""><figcaption></figcaption></figure>

***

#### read\_potentiometer\_mv() Flowchart

```bash
┌─────────────────────────────────────────────────────────────────┐
│                read_potentiometer_mv() Function                 │
├─────────────────────────────────────────────────────────────────┤
│                                                                 │
│   ┌──────────────────┐                                          │
│   │      START       │                                          │
│   └────────┬─────────┘                                          │
│            │                                                    │
│            ▼                                                    │
│   ┌──────────────────────────────────────┐                      │
│   │  adc_count = Cy_AutAnalog_SAR_       │                      │
│   │     ReadResult(                      │                      │
│   │       SAR_ADC_INDEX,                 │                      │
│   │       CY_AUTANALOG_SAR_INPUT_GPIO,   │                      │
│   │       SAR_ADC_CHANNEL                │                      │
│   │     )                                │                      │
│   └────────┬─────────────────────────────┘                      │
│            │                                                    │
│            │  adc_count = 0 ~ 4095 (12-bit)                     │
│            ▼                                                    │
│   ┌──────────────────────────────────────┐                      │
│   │  voltage_mv = Cy_AutAnalog_SAR_      │                      │
│   │     CountsTo_mVolts(                 │                      │
│   │       SAR_ADC_INDEX,                 │                      │
│   │       false,                         │                      │
│   │       SAR_ADC_SEQUENCER,             │                      │
│   │       CY_AUTANALOG_SAR_INPUT_GPIO,   │                      │
│   │       SAR_ADC_CHANNEL,               │                      │
│   │       SAR_ADC_VREF_MV,    ◄── 1800   │                      │
│   │       adc_count                      │                      │
│   │     )                                │                      │
│   └────────┬─────────────────────────────┘                      │
│            │                                                    │
│            │  voltage_mv = 0 ~ 1800 mV                          │
│            ▼                                                    │
│   ┌──────────────────┐                                          │
│   │ return voltage_mv│                                          │
│   └──────────────────┘                                          │
│                                                                 │
└─────────────────────────────────────────────────────────────────┘
```

***

#### get\_pot\_percentage() Flowchart

```bash
┌─────────────────────────────────────────────────────────────────┐
│                 get_pot_percentage() Function                   │
├─────────────────────────────────────────────────────────────────┤
│                                                                 │
│   ┌──────────────────┐                                          │
│   │  START           │                                          │
│   │  Input: voltage  │                                          │
│   └────────┬─────────┘                                          │
│            │                                                    │
│            ▼                                                    │
│   ┌──────────────────────────────────────┐                      │
│   │         voltage_mv < 0 ?             │                      │
│   └────────┬──────────────────┬──────────┘                      │
│            │ YES              │ NO                              │
│            ▼                  ▼                                 │
│   ┌──────────────────┐  ┌──────────────────────────────────┐    │
│   │ voltage_mv = 0   │  │      voltage_mv > 1800 ?         │    │
│   └────────┬─────────┘  └────────┬──────────────┬──────────┘    │
│            │                     │ YES          │ NO            │
│            │                     ▼              │               │
│            │            ┌──────────────────┐    │               │
│            │            │voltage_mv = 1800 │    │               │
│            │            └────────┬─────────┘    │               │
│            │                     │              │               │
│            └─────────────────────┴──────────────┘               │
│                                  │                              │
│                                  ▼                              │
│            ┌─────────────────────────────────────────┐          │
│            │                                         │          │
│            │  percentage = (voltage_mv × 100)        │          │
│            │                ─────────────────        │          │
│            │                  VREF (1800)            │          │
│            │                                         │          │
│            └────────────────────┬────────────────────┘          │
│                                 │                               │
│                                 ▼                               │
│            ┌──────────────────────────────────┐                 │
│            │  return (uint8_t) percentage     │                 │
│            │         (0 ~ 100%)               │                 │
│            └──────────────────────────────────┘                 │
│                                                                 │
└─────────────────────────────────────────────────────────────────┘
```

***

#### ADC Conversion Diagram

```bash
┌─────────────────────────────────────────────────────────────────┐
│                    ADC Conversion Process                       │
├─────────────────────────────────────────────────────────────────┤
│                                                                 │
│   Potentiometer (P15_1)                                         │
│        │                                                        │
│        │  Analog Voltage                                        │
│        │  (0V ~ 1.8V)                                           │
│        ▼                                                        │
│   ┌──────────────────┐                                          │
│   │    SAR ADC       │                                          │
│   │   12-bit         │                                          │
│   │   Resolution     │                                          │
│   └────────┬─────────┘                                          │
│            │                                                    │
│            │  Digital Count                                     │
│            │  (0 ~ 4095)                                        │
│            ▼                                                    │
│   ┌──────────────────────────────────────┐                      │
│   │  CountsTo_mVolts()                   │                      │
│   │                                      │                      │
│   │  mV = (count × VREF) / 4096          │                      │
│   │     = (count × 1800) / 4096          │                      │
│   │                                      │                      │
│   └────────┬─────────────────────────────┘                      │
│            │                                                    │
│            │  Voltage in mV                                     │
│            │  (0 ~ 1800 mV)                                     │
│            ▼                                                    │
│   ┌──────────────────────────────────────┐                      │
│   │  get_pot_percentage()                │                      │
│   │                                      │                      │
│   │  % = (mV × 100) / 1800               │                      │
│   │                                      │                      │
│   └────────┬─────────────────────────────┘                      │
│            │                                                    │
│            │  Percentage                                        │
│            │  (0% ~ 100%)                                       │
│            ▼                                                    │
│   ┌──────────────────┐                                          │
│   │  Display Output  │                                          │
│   │  "POT: 900 mV |  │                                          │
│   │        50%"      │                                          │
│   └──────────────────┘                                          │
│                                                                 │
│   ═══════════════════════════════════════════════════════════   │
│                                                                 │
│   Examples:                                                     │
│   ─────────                                                     │
│   Count = 0    → 0 mV    → 0%                                   │
│   Count = 1024 → 450 mV  → 25%                                  │
│   Count = 2048 → 900 mV  → 50%                                  │
│   Count = 3072 → 1350 mV → 75%                                  │
│   Count = 4095 → 1800 mV → 100%                                 │
│                                                                 │
└─────────────────────────────────────────────────────────────────┘
```

***

### <mark style="color:blue;">Program Code ทั้งหมด</mark>

```c
/*******************************************************************************
* File Name        : main.c
*
* Description      : This source file contains the main routine for non-secure
*                    application in the CM33 CPU
*
*******************************************************************************/

/*******************************************************************************
* Header Files
*******************************************************************************/

#include "cybsp.h"
#include "retarget_io_init.h"
#include <stdbool.h>

/*******************************************************************************
 * Macros
 ******************************************************************************/
#define CM55_BOOT_WAIT_TIME_USEC    (10U)
#define ADC_READ_INTERVAL_MS        (100U)
#define SAR_ADC_INDEX               (0U)
#define SAR_ADC_SEQUENCER           (0U)
#define SAR_ADC_CHANNEL             (0U)
#define SAR_ADC_VREF_MV             (1800U)

/*******************************************************************************
* Global Variables
*******************************************************************************/
static bool adc_initialized = false;

/*******************************************************************************
* Function Prototypes
*******************************************************************************/
static cy_rslt_t init_adc(void);
static int16_t read_potentiometer_mv(void);
static uint8_t get_pot_percentage(int16_t voltage_mv);

/*******************************************************************************
* Function Name: init_adc
********************************************************************************
* Summary:
*   Initializes the SAR ADC using autonomous analog control.
*   Sets up interrupt masks and enables autonomous operation.
*
* Parameters:
*   none
*
* Return:
*   cy_rslt_t - CY_RSLT_SUCCESS if initialization successful
*
*******************************************************************************/
static cy_rslt_t init_adc(void)
{
    cy_rslt_t result;

    /* Initialize SAR ADC with autonomous analog configuration */
    result = Cy_AutAnalog_Init(&autonomous_analog_init);

    if (CY_AUTANALOG_SUCCESS != result)
    {
        return result;
    }

    /* Set interrupt mask to enable SAR0 result interrupt */
    Cy_AutAnalog_SetInterruptMask(CY_AUTANALOG_INT_SAR0_RESULT);

    /* Start autonomous control of the ADC */
    Cy_AutAnalog_StartAutonomousControl();

    adc_initialized = true;

    return CY_RSLT_SUCCESS;
}

/*******************************************************************************
* Function Name: read_potentiometer_mv
********************************************************************************
* Summary:
*   Reads the potentiometer value from ADC and converts to millivolts.
*   Uses the autonomous analog SAR ADC API.
*
* Parameters:
*   none
*
* Return:
*   int16_t - Voltage in millivolts (0-1800 mV)
*
*******************************************************************************/
static int16_t read_potentiometer_mv(void)
{
    int32_t adc_count;
    int16_t voltage_mv;

    /* Read ADC result (raw counts) */
    adc_count = Cy_AutAnalog_SAR_ReadResult(SAR_ADC_INDEX,
                                            CY_AUTANALOG_SAR_INPUT_GPIO,
                                            SAR_ADC_CHANNEL);

    /* Convert ADC counts to millivolts */
    voltage_mv = Cy_AutAnalog_SAR_CountsTo_mVolts(SAR_ADC_INDEX,
                                                   false,
                                                   SAR_ADC_SEQUENCER,
                                                   CY_AUTANALOG_SAR_INPUT_GPIO,
                                                   SAR_ADC_CHANNEL,
                                                   SAR_ADC_VREF_MV,
                                                   adc_count);

    return voltage_mv;
}

/*******************************************************************************
* Function Name: get_pot_percentage
********************************************************************************
* Summary:
*   Converts potentiometer voltage to percentage (0-100%).
*   Maps the voltage range (0 to VREF_MV) to percentage scale.
*
* Parameters:
*   voltage_mv - Input voltage in millivolts
*
* Return:
*   uint8_t - Percentage value (0-100)
*
*******************************************************************************/
static uint8_t get_pot_percentage(int16_t voltage_mv)
{
    int32_t percentage;

    /* Ensure voltage is within valid range */
    if (voltage_mv < 0)
    {
        voltage_mv = 0;
    }
    else if (voltage_mv > SAR_ADC_VREF_MV)
    {
        voltage_mv = SAR_ADC_VREF_MV;
    }

    /* Calculate percentage: (voltage / VREF) * 100 */
    percentage = ((int32_t)voltage_mv * 100) / SAR_ADC_VREF_MV;

    return (uint8_t)percentage;
}

/*******************************************************************************
* Function Name: main
*******************************************************************************
* Summary:
*   Main function - entry point for the ADC potentiometer demo.
*
*   This demo reads the potentiometer connected to P15_1 and displays:
*   - Raw voltage in millivolts (0-1800 mV)
*   - Percentage value (0-100%)
*
*   The LED toggles with each ADC reading to indicate activity.
*
* Parameters:
*   none
*
* Return:
*   int
*
******************************************************************************/
int main(void)
{
    cy_rslt_t result = CY_RSLT_SUCCESS;
    int16_t voltage_mv;
    uint8_t percentage;

    /* Initialize the device and board peripherals. */
    result = cybsp_init();

    /* Board initialization failed. Stop program execution. */
    if (CY_RSLT_SUCCESS != result)
    {
        handle_app_error();
    }

    /* Enable global interrupts */
    __enable_irq();

    /* Initialize retarget-io middleware */
    init_retarget_io();

    /* \x1b[2J\x1b[;H - ANSI ESC sequence for clear screen. */
    printf("\x1b[2J\x1b[;H");
    printf("***********************************************************\r\n");
    printf("            PSOC Edge MCU: Potentiometer ADC               \r\n");
    printf("***********************************************************\r\n\n");

    /* Initialize SAR ADC using helper function */
    result = init_adc();

    if (CY_RSLT_SUCCESS != result)
    {
        printf("ADC initialization failed!\r\n");
        handle_app_error();
    }

    /* Inform user about potentiometer connection */
    printf("ADC initialized successfully!\r\n");
    printf("Reading potentiometer on pin P15_1\r\n");
    printf("VREF = %d mV (12-bit resolution)\r\n\n", SAR_ADC_VREF_MV);

    /* CY_CM55_APP_BOOT_ADDR must be updated if CM55 memory layout is changed.*/
    Cy_SysEnableCM55(MXCM55, CY_CM55_APP_BOOT_ADDR, CM55_BOOT_WAIT_TIME_USEC);

    for(;;)
    {
        /* Read potentiometer voltage using helper function */
        voltage_mv = read_potentiometer_mv();

        /* Convert to percentage using helper function */
        percentage = get_pot_percentage(voltage_mv);

        /* Print ADC output in millivolts and percentage */
        printf("POT: %4d mV  |  %3d%%\r\n", voltage_mv, percentage);

        /* Toggle user LED to indicate activity */
        Cy_GPIO_Inv(CYBSP_USER_LED_PORT, CYBSP_USER_LED_PIN);

        /* Delay between ADC readings */
        Cy_SysLib_Delay(ADC_READ_INTERVAL_MS);
    }

}

/* [] END OF FILE */
```

***

#### ✍️ Exercise

1. **LED Brightness Indicator** : ใช้ POT ควบคุมความเร็วการกระพริบ (Blink Rate) ของ LED

* 0-25%: Blink Rate --> 1000 ms&#x20;
* 25-50%: Blink Rate --> 500 ms
* 50-75%: Blink Rate --> 250 ms
* 75-100%: Blink Rate --> 100 ms

{% hint style="info" %}
**Hint**

ตัวอย่าง

```c
uint8_t pot_pct = get_pot_percentage(); 
uint32_t blink_delay;

if (pot_pct < 25) { 
    blink_delay = 1000; /* Slow blink */ } 
else if (pot_pct < 50) {
.
.
. 
} else {
...
}
```

{% endhint %}

2. **Threshold Alert** : แจ้งเตือนเมื่อ POT เกิน threshold ที่กำหนด

{% hint style="info" %}
**Hint**

ตัวอย่าง

```c
#define THRESHOLD_PCT   (75U)
static bool alert_triggered = false;

for(;;)
{
    uint8_t pot_pct = get_pot_percentage();

    if (pot_pct >= THRESHOLD_PCT && !alert_triggered)
    {
        .
        .
        alert_triggered = true;
    }
    else if (pot_pct < THRESHOLD_PCT && alert_triggered)
    {
        .
        .
        alert_triggered = false;
    }

    Cy_SysLib_Delay(100);
}
```

{% endhint %}

***


# GPIO Integration

## Lab 4: รวมทุกอย่าง — POT ควบคุม LED Blink Rate

#### วัตถุประสงค์

* **Integration**: รวมความรู้จาก Lab 1-3 (LED, Button, ADC)
* **Real Application**: สร้าง Interactive LED Controller
* **State Machine**: จัดการหลาย input/output พร้อมกัน

#### จะได้เรียนรู้อะไร

* **Multiple Inputs:** จัดการ POT + Button พร้อมกัน
* **Value Mapping:** แปลงค่า POT เป็น delay time
* **Mode Switching:** สลับโหมดด้วย button
* **Non-Blocking Design:** ทำหลายอย่างพร้อมกัน

***

### Application Design

```bash
┌─────────────────────────────────────────────────────────────────┐
│                  Interactive LED Controller                     │
├─────────────────────────────────────────────────────────────────┤
│                                                                 │
│   INPUTS:                                                       │
│   ════════                                                      │
│   POT (P15_1)     ────►  LED Blink Rate                         │
│   └─ 0%   = 1000ms (ช้าสุด)                                       │
│   └─ 50%  = 525ms                                               │
│   └─ 100% = 50ms  (เร็วสุด)                                       │
│                                                                 │
│   Button (USER_BTN1) ────►  Toggle Mode                         │
│   └─ Active LOW (กด = 0)                                        │
│   └─ Debounce 50ms                                              │
│                                                                 │
│   MODES:                                                        │
│   ═══════                                                       │
│   MODE_NORMAL:  LED blinks at POT-controlled speed              │
│   MODE_FAST:    LED blinks at 2x speed (delay / 2)              │
│                                                                 │
│   OUTPUT:                                                       │
│   ═══════                                                       │
│   LED (USER_LED1) ────►  Blinks based on calculated delay       │
│   Serial Terminal ────►  Real-time ASCII status bar             │
│                                                                 │
└─────────────────────────────────────────────────────────────────┘
```

***

### Lab 4.1 : Code Implementation

#### Step 1: Macros Configuration

```c
#include "cybsp.h"
#include "retarget_io_init.h"
#include <stdbool.h>

/*******************************************************************************
 * Macros
 ******************************************************************************/
/* System Configuration */
#define CM55_BOOT_WAIT_TIME_USEC    (10U)

/* ADC Configuration */
#define SAR_ADC_INDEX               (0U)
#define SAR_ADC_SEQUENCER           (0U)
#define SAR_ADC_CHANNEL             (0U)
#define SAR_ADC_VREF_MV             (1800U)
#define ADC_READ_INTERVAL_MS        (100U)

/* Button Configuration */
#define USER_BTN_PORT               CYBSP_USER_BTN1_PORT
#define USER_BTN_PIN                CYBSP_USER_BTN1_PIN
#define DEBOUNCE_DELAY_MS           (50U)

/* Button is Active LOW: pressed = 0 */
#define IS_BUTTON_PRESSED()         (Cy_GPIO_Read(USER_BTN_PORT, USER_BTN_PIN) == 0)

/* LED Control Macros (Active LOW on PSoC Edge E84) */
#define LED_ON()                    Cy_GPIO_Clr(CYBSP_USER_LED1_PORT, CYBSP_USER_LED1_PIN)
#define LED_OFF()                   Cy_GPIO_Set(CYBSP_USER_LED1_PORT, CYBSP_USER_LED1_PIN)
#define LED_TOGGLE()                Cy_GPIO_Inv(CYBSP_USER_LED1_PORT, CYBSP_USER_LED1_PIN)

/* LED Blink Speed Limits */
#define BLINK_DELAY_MIN_MS          (50U)
#define BLINK_DELAY_MAX_MS          (1000U)
```

#### Step 2: Mode Definition

```c
/* Mode Definitions */
typedef enum {
    MODE_NORMAL = 0,    // LED blinks at POT-controlled speed
    MODE_FAST   = 1     // LED blinks at 2x speed
} led_mode_t;

/* Global Variables */
static bool adc_initialized = false;
static led_mode_t current_mode = MODE_NORMAL;
static uint32_t mode_change_count = 0;
```

#### Step 3: Helper Functions

**read\_button\_with\_debounce() - Delay-Based Debounce**

> **หมายเหตุ:** PSoC Edge ไม่มี `Cy_SysLib_GetTimerTick()` จึงใช้ Delay-Based Debounce แทน

```c
/*******************************************************************************
* Function Name: read_button_with_debounce
********************************************************************************
* Summary:
*   Reads the user button with software debouncing.
*   Uses delay-based debounce suitable for PSoC Edge.
*
* Return:
*   bool - true if a valid button press was detected
*******************************************************************************/
static bool read_button_with_debounce(void)
{
    static bool last_state = false;

    bool current_state = IS_BUTTON_PRESSED();

    /* Detect rising edge (button just pressed) */
    if (current_state && !last_state)
    {
        /* Wait for debounce period */
        Cy_SysLib_Delay(DEBOUNCE_DELAY_MS);

        /* Re-read to confirm button is still pressed */
        if (IS_BUTTON_PRESSED())
        {
            last_state = true;
            return true;
        }
    }

    /* Update state when button is released */
    if (!current_state)
    {
        last_state = false;
    }

    return false;
}
```

**map\_pot\_to\_delay() - แปลงค่า POT เป็น Delay**

```c
/*******************************************************************************
* Function Name: map_pot_to_delay
********************************************************************************
* Summary:
*   Maps potentiometer percentage (0-100%) to LED blink delay.
*   Inverted mapping: higher pot value = faster blink
*
*   Formula: delay = MAX - (percentage * (MAX - MIN) / 100)
*
*   Examples:
*     0%   → 1000ms (slowest)
*     50%  → 525ms
*     100% → 50ms   (fastest)
*
* Parameters:
*   pot_percentage - Potentiometer reading as percentage (0-100)
*
* Return:
*   uint32_t - Delay in milliseconds (50-1000)
*******************************************************************************/
static uint32_t map_pot_to_delay(uint8_t pot_percentage)
{
    uint32_t delay;

    /* Map 0-100% to 1000-50ms (inverted) */
    delay = BLINK_DELAY_MAX_MS - ((uint32_t)pot_percentage *
            (BLINK_DELAY_MAX_MS - BLINK_DELAY_MIN_MS) / 100);

    /* Ensure minimum delay */
    if (delay < BLINK_DELAY_MIN_MS)
    {
        delay = BLINK_DELAY_MIN_MS;
    }

    return delay;
}
```

**print\_status\_bar() - ASCII Status Bar**

```c
/*******************************************************************************
* Function Name: print_status_bar
********************************************************************************
* Summary:
*   Prints an ASCII status bar showing potentiometer percentage,
*   current delay, and operating mode.
*******************************************************************************/
static void print_status_bar(uint8_t percentage, uint32_t delay_ms, led_mode_t mode)
{
    int i;
    int bar_length = percentage / 5;  /* 0-20 characters */

    printf("\r[");

    for (i = 0; i < 20; i++)
    {
        if (i < bar_length)
        {
            printf("#");
        }
        else
        {
            printf("-");
        }
    }

    printf("] %3d%% | %4lums | %s     ",
           percentage,
           (unsigned long)delay_ms,
           (mode == MODE_FAST) ? "FAST" : "NORMAL");

    fflush(stdout);
}
```

#### Step 4: Main Function (Non-Blocking Design)

```c
/*******************************************************************************
* Main Function
*******************************************************************************/
int main(void)
{
    cy_rslt_t result = CY_RSLT_SUCCESS;
    int16_t voltage_mv;
    uint8_t percentage;
    uint32_t base_delay;
    uint32_t actual_delay;
    uint32_t elapsed_time = 0;
    uint32_t last_toggle_time = 0;
    uint32_t last_adc_time = 0;

    /* Initialize the device and board peripherals */
    result = cybsp_init();
    if (CY_RSLT_SUCCESS != result) handle_app_error();

    __enable_irq();
    init_retarget_io();

    /* Clear screen */
    printf("\x1b[2J\x1b[;H");
    printf("***********************************************************\r\n");
    printf("        PSOC Edge MCU: Interactive LED Controller          \r\n");
    printf("***********************************************************\r\n\n");

    /* Initialize SAR ADC */
    result = init_adc();
    if (CY_RSLT_SUCCESS != result)
    {
        printf("ADC initialization failed!\r\n");
        handle_app_error();
    }

    /* Print instructions */
    printf("Controls:\r\n");
    printf("  - Potentiometer (P15_1): Adjust LED blink speed\r\n");
    printf("  - Button (USER_BTN1):    Toggle Normal/Fast mode\r\n\n");
    printf("Speed Range: 50ms (fast) to 1000ms (slow)\r\n");
    printf("Fast Mode:   2x speed (half delay)\r\n\n");

    /* Enable CM55 */
    Cy_SysEnableCM55(MXCM55, CY_CM55_APP_BOOT_ADDR, CM55_BOOT_WAIT_TIME_USEC);

    /* Initial ADC read */
    voltage_mv = read_potentiometer_mv();
    percentage = get_pot_percentage(voltage_mv);
    base_delay = map_pot_to_delay(percentage);
    actual_delay = base_delay;

    printf("Starting LED Controller...\r\n\n");

    for(;;)
    {
        /* 1. Check button for mode toggle */
        if (read_button_with_debounce())
        {
            /* Toggle mode */
            current_mode = (current_mode == MODE_NORMAL) ? MODE_FAST : MODE_NORMAL;
            mode_change_count++;

            printf("\n>>> Mode changed to: %s (count: %lu)\r\n\n",
                   (current_mode == MODE_FAST) ? "FAST" : "NORMAL",
                   (unsigned long)mode_change_count);
        }

        /* 2. Read ADC periodically (every 100ms) */
        if ((elapsed_time - last_adc_time) >= ADC_READ_INTERVAL_MS)
        {
            voltage_mv = read_potentiometer_mv();
            percentage = get_pot_percentage(voltage_mv);
            base_delay = map_pot_to_delay(percentage);

            /* 3. Apply mode multiplier */
            if (current_mode == MODE_FAST)
            {
                actual_delay = base_delay / 2;
                if (actual_delay < BLINK_DELAY_MIN_MS / 2)
                {
                    actual_delay = BLINK_DELAY_MIN_MS / 2;
                }
            }
            else
            {
                actual_delay = base_delay;
            }

            /* Print status bar */
            print_status_bar(percentage, actual_delay, current_mode);

            last_adc_time = elapsed_time;
        }

        /* 4. Toggle LED based on calculated delay */
        if ((elapsed_time - last_toggle_time) >= actual_delay)
        {
            LED_TOGGLE();
            last_toggle_time = elapsed_time;
        }

        /* 5. Small delay for loop timing */
        Cy_SysLib_Delay(10);
        elapsed_time += 10;
    }
}
```

***

### 4. Flowchart

```bash
┌─────────────────────────────────────────────────────────────────┐
│              Interactive LED Controller Flowchart               │
├─────────────────────────────────────────────────────────────────┤
│                                                                 │
│   ┌──────────────────┐                                          │
│   │      START       │                                          │
│   └────────┬─────────┘                                          │
│            │                                                    │
│            ▼                                                    │
│   ┌──────────────────┐                                          │
│   │  cybsp_init()    │                                          │
│   │  init_adc()      │                                          │
│   │  Enable CM55     │                                          │
│   └────────┬─────────┘                                          │
│            │                                                    │
│            ▼                                                    │
│   ╔══════════════════════════════════════════════════════╗      │
│   ║                    MAIN LOOP                         ║      │
│   ╠══════════════════════════════════════════════════════╣      │
│   ║                                                      ║      │
│   ║  ┌─────────────────────────────────────────────┐     ║      │
│   ║  │  1. Check Button (with debounce)            │     ║      │
│   ║  │     If pressed: Toggle MODE                 │     ║      │
│   ║  │     MODE_NORMAL ←→ MODE_FAST                │     ║      │
│   ║  └─────────────────────────────────────────────┘     ║      │
│   ║                        │                             ║      │
│   ║                        ▼                             ║      │
│   ║  ┌─────────────────────────────────────────────┐     ║      │
│   ║  │  2. Read ADC (every 100ms)                  │     ║      │
│   ║  │     percentage = get_pot_percentage()       │     ║      │
│   ║  │     base_delay = map_pot_to_delay()         │     ║      │
│   ║  └─────────────────────────────────────────────┘     ║      │
│   ║                        │                             ║      │
│   ║                        ▼                             ║      │
│   ║  ┌─────────────────────────────────────────────┐     ║      │
│   ║  │  3. Apply Mode Multiplier                   │     ║      │
│   ║  │     NORMAL: actual_delay = base_delay       │     ║      │
│   ║  │     FAST:   actual_delay = base_delay / 2   │     ║      │
│   ║  └─────────────────────────────────────────────┘     ║      │
│   ║                        │                             ║      │
│   ║                        ▼                             ║      │
│   ║  ┌─────────────────────────────────────────────┐     ║      │
│   ║  │  4. Toggle LED (if delay elapsed)           │     ║      │
│   ║  │     LED_TOGGLE()                            │     ║      │
│   ║  └─────────────────────────────────────────────┘     ║      │
│   ║                        │                             ║      │
│   ║                        ▼                             ║      │
│   ║  ┌─────────────────────────────────────────────┐     ║      │
│   ║  │  5. Print Status Bar                        │     ║      │
│   ║  │     [####----] 50% | 525ms | NORMAL         │     ║      │
│   ║  └─────────────────────────────────────────────┘     ║      │
│   ║                        │                             ║      │
│   ║                        ▼                             ║      │
│   ║  ┌─────────────────────────────────────────────┐     ║      │
│   ║  │  6. Delay 10ms + elapsed_time += 10         │     ║      │
│   ║  └────────────────────┬────────────────────────┘     ║      │
│   ║                       │                              ║      │
│   ╚═══════════════════════╪══════════════════════════════╝      │
│                           │                                     │
│                           └──────────► (repeat)                 │
│                                                                 │
└─────────────────────────────────────────────────────────────────┘
```

***

### 5. State Diagram

```bash
┌─────────────────────────────────────────────────────────────────┐
│                     Mode State Machine                          │
├─────────────────────────────────────────────────────────────────┤
│                                                                 │
│   ┌──────────────────┐       Button Press      ┌──────────────┐ │
│   │                  │ ◄─────────────────────► │              │ │
│   │   MODE_NORMAL    │                         │  MODE_FAST   │ │
│   │    (1x speed)    │                         │  (2x speed)  │ │
│   │                  │                         │              │ │
│   └──────────────────┘                         └──────────────┘ │
│          │                                            │         │
│          │                                            │         │
│          ▼                                            ▼         │
│   LED Delay = POT delay                 LED Delay = POT delay/2 │
│   (50ms - 1000ms)                       (25ms - 500ms)          │
│                                                                 │
└─────────────────────────────────────────────────────────────────┘
```

***

### 6. ตัวอย่าง Output

```bash
***********************************************************
        PSOC Edge MCU: Interactive LED Controller
***********************************************************

Controls:
  - Potentiometer (P15_1): Adjust LED blink speed
  - Button (USER_BTN1):    Toggle Normal/Fast mode

Speed Range: 50ms (fast) to 1000ms (slow)
Fast Mode:   2x speed (half delay)

Starting LED Controller...

[--------------------]   0% | 1000ms | NORMAL
[#####---------------]  25% |  762ms | NORMAL
[##########----------]  50% |  525ms | NORMAL

>>> Mode changed to: FAST (count: 1)

[##########----------]  50% |  262ms | FAST
[###############-----]  75% |  143ms | FAST
[####################] 100% |   25ms | FAST

>>> Mode changed to: NORMAL (count: 2)

[####################] 100% |   50ms | NORMAL
```

***

### <mark style="color:blue;">Program Code ทั้งหมด</mark>

```c
/*******************************************************************************
* File Name        : main.c
*
* Description      : GPIO Integration - Interactive LED Controller
*                    Combines Button + LED + ADC (Potentiometer)
*
* Features:
*   - Potentiometer controls LED blink speed (50ms - 1000ms)
*   - Button toggles between Normal and Fast mode (2x speed)
*   - Non-blocking design pattern
*   - Real-time ASCII status bar display
*
*******************************************************************************/

/*******************************************************************************
* Header Files
*******************************************************************************/
#include "cybsp.h"
#include "retarget_io_init.h"
#include <stdbool.h>

/*******************************************************************************
 * Macros
 ******************************************************************************/
/* System Configuration */
#define CM55_BOOT_WAIT_TIME_USEC    (10U)

/* ADC Configuration */
#define SAR_ADC_INDEX               (0U)
#define SAR_ADC_SEQUENCER           (0U)
#define SAR_ADC_CHANNEL             (0U)
#define SAR_ADC_VREF_MV             (1800U)
#define ADC_READ_INTERVAL_MS        (100U)

/* Button Configuration */
#define USER_BTN_PORT               CYBSP_USER_BTN1_PORT
#define USER_BTN_PIN                CYBSP_USER_BTN1_PIN
#define DEBOUNCE_DELAY_MS           (50U)

/* Button is Active LOW: pressed = 0 */
#define IS_BUTTON_PRESSED()         (Cy_GPIO_Read(USER_BTN_PORT, USER_BTN_PIN) == 0)

/* LED Control Macros */
#define LED_ON()                    Cy_GPIO_Clr(CYBSP_USER_LED1_PORT, CYBSP_USER_LED1_PIN)
#define LED_OFF()                   Cy_GPIO_Set(CYBSP_USER_LED1_PORT, CYBSP_USER_LED1_PIN)
#define LED_TOGGLE()                Cy_GPIO_Inv(CYBSP_USER_LED1_PORT, CYBSP_USER_LED1_PIN)

/* LED Blink Speed Limits */
#define BLINK_DELAY_MIN_MS          (50U)
#define BLINK_DELAY_MAX_MS          (1000U)

/* Mode Definitions */
typedef enum {
    MODE_NORMAL = 0,
    MODE_FAST   = 1
} led_mode_t;

/*******************************************************************************
* Global Variables
*******************************************************************************/
static bool adc_initialized = false;
static led_mode_t current_mode = MODE_NORMAL;
static uint32_t mode_change_count = 0;

/*******************************************************************************
* Function Prototypes
*******************************************************************************/
static cy_rslt_t init_adc(void);
static int16_t read_potentiometer_mv(void);
static uint8_t get_pot_percentage(int16_t voltage_mv);
static bool read_button_with_debounce(void);
static uint32_t map_pot_to_delay(uint8_t pot_percentage);
static void print_status_bar(uint8_t percentage, uint32_t delay_ms, led_mode_t mode);

/*******************************************************************************
* Function Name: init_adc
********************************************************************************
* Summary:
*   Initializes the SAR ADC using autonomous analog control.
*
* Return:
*   cy_rslt_t - CY_RSLT_SUCCESS if initialization successful
*******************************************************************************/
static cy_rslt_t init_adc(void)
{
    cy_rslt_t result;

    result = Cy_AutAnalog_Init(&autonomous_analog_init);

    if (CY_AUTANALOG_SUCCESS != result)
    {
        return result;
    }

    Cy_AutAnalog_SetInterruptMask(CY_AUTANALOG_INT_SAR0_RESULT);
    Cy_AutAnalog_StartAutonomousControl();

    adc_initialized = true;
    return CY_RSLT_SUCCESS;
}

/*******************************************************************************
* Function Name: read_potentiometer_mv
********************************************************************************
* Summary:
*   Reads the potentiometer value from ADC and converts to millivolts.
*
* Return:
*   int16_t - Voltage in millivolts (0-1800 mV)
*******************************************************************************/
static int16_t read_potentiometer_mv(void)
{
    int32_t adc_count;
    int16_t voltage_mv;

    adc_count = Cy_AutAnalog_SAR_ReadResult(SAR_ADC_INDEX,
                                            CY_AUTANALOG_SAR_INPUT_GPIO,
                                            SAR_ADC_CHANNEL);

    voltage_mv = Cy_AutAnalog_SAR_CountsTo_mVolts(SAR_ADC_INDEX,
                                                   false,
                                                   SAR_ADC_SEQUENCER,
                                                   CY_AUTANALOG_SAR_INPUT_GPIO,
                                                   SAR_ADC_CHANNEL,
                                                   SAR_ADC_VREF_MV,
                                                   adc_count);

    return voltage_mv;
}

/*******************************************************************************
* Function Name: get_pot_percentage
********************************************************************************
* Summary:
*   Converts potentiometer voltage to percentage (0-100%).
*
* Parameters:
*   voltage_mv - Input voltage in millivolts
*
* Return:
*   uint8_t - Percentage value (0-100)
*******************************************************************************/
static uint8_t get_pot_percentage(int16_t voltage_mv)
{
    int32_t percentage;

    if (voltage_mv < 0)
    {
        voltage_mv = 0;
    }
    else if (voltage_mv > SAR_ADC_VREF_MV)
    {
        voltage_mv = SAR_ADC_VREF_MV;
    }

    percentage = ((int32_t)voltage_mv * 100) / SAR_ADC_VREF_MV;

    return (uint8_t)percentage;
}

/*******************************************************************************
* Function Name: read_button_with_debounce
********************************************************************************
* Summary:
*   Reads the user button with software debouncing.
*   Uses delay-based debounce suitable for PSoC Edge.
*
* Return:
*   bool - true if a valid button press was detected
*******************************************************************************/
static bool read_button_with_debounce(void)
{
    static bool last_state = false;

    bool current_state = IS_BUTTON_PRESSED();

    /* Detect rising edge (button just pressed) */
    if (current_state && !last_state)
    {
        /* Wait for debounce period */
        Cy_SysLib_Delay(DEBOUNCE_DELAY_MS);

        /* Re-read to confirm button is still pressed */
        if (IS_BUTTON_PRESSED())
        {
            last_state = true;
            return true;
        }
    }

    /* Update state when button is released */
    if (!current_state)
    {
        last_state = false;
    }

    return false;
}

/*******************************************************************************
* Function Name: map_pot_to_delay
********************************************************************************
* Summary:
*   Maps potentiometer percentage (0-100%) to LED blink delay.
*   0% = slowest (1000ms), 100% = fastest (50ms)
*   Inverted mapping: higher pot value = faster blink
*
* Parameters:
*   pot_percentage - Potentiometer reading as percentage (0-100)
*
* Return:
*   uint32_t - Delay in milliseconds (50-1000)
*******************************************************************************/
static uint32_t map_pot_to_delay(uint8_t pot_percentage)
{
    uint32_t delay;

    /* Map 0-100% to 1000-50ms (inverted) */
    /* delay = MAX - (percentage * (MAX - MIN) / 100) */
    delay = BLINK_DELAY_MAX_MS - ((uint32_t)pot_percentage *
            (BLINK_DELAY_MAX_MS - BLINK_DELAY_MIN_MS) / 100);

    /* Ensure minimum delay */
    if (delay < BLINK_DELAY_MIN_MS)
    {
        delay = BLINK_DELAY_MIN_MS;
    }

    return delay;
}

/*******************************************************************************
* Function Name: print_status_bar
********************************************************************************
* Summary:
*   Prints an ASCII status bar showing potentiometer percentage,
*   current delay, and operating mode.
*
* Parameters:
*   percentage - Current pot percentage
*   delay_ms   - Current blink delay in ms
*   mode       - Current operating mode
*******************************************************************************/
static void print_status_bar(uint8_t percentage, uint32_t delay_ms, led_mode_t mode)
{
    int i;
    int bar_length = percentage / 5;  /* 0-20 characters */

    printf("\r[");

    for (i = 0; i < 20; i++)
    {
        if (i < bar_length)
        {
            printf("#");
        }
        else
        {
            printf("-");
        }
    }

    printf("] %3d%% | %4lums | %s     ",
           percentage,
           (unsigned long)delay_ms,
           (mode == MODE_FAST) ? "FAST" : "NORMAL");

    fflush(stdout);
}

/*******************************************************************************
* Function Name: main
********************************************************************************
* Summary:
*   Main function - GPIO Integration Demo
*
*   Features:
*   - Potentiometer controls LED blink speed (50-1000ms)
*   - Button toggles between Normal and Fast mode
*   - Fast mode doubles the blink speed (halves the delay)
*   - Real-time ASCII status bar display
*
* Return:
*   int
*******************************************************************************/
int main(void)
{
    cy_rslt_t result = CY_RSLT_SUCCESS;
    int16_t voltage_mv;
    uint8_t percentage;
    uint32_t base_delay;
    uint32_t actual_delay;
    uint32_t elapsed_time = 0;
    uint32_t last_toggle_time = 0;
    uint32_t last_adc_time = 0;

    /* Initialize the device and board peripherals */
    result = cybsp_init();

    if (CY_RSLT_SUCCESS != result)
    {
        handle_app_error();
    }

    /* Enable global interrupts */
    __enable_irq();

    /* Initialize retarget-io middleware */
    init_retarget_io();

    /* Clear screen */
    printf("\x1b[2J\x1b[;H");
    printf("***********************************************************\r\n");
    printf("        PSOC Edge MCU: Interactive LED Controller          \r\n");
    printf("***********************************************************\r\n\n");

    /* Initialize SAR ADC */
    result = init_adc();

    if (CY_RSLT_SUCCESS != result)
    {
        printf("ADC initialization failed!\r\n");
        handle_app_error();
    }

    /* Print instructions */
    printf("Controls:\r\n");
    printf("  - Potentiometer (P15_1): Adjust LED blink speed\r\n");
    printf("  - Button (USER_BTN1):    Toggle Normal/Fast mode\r\n\n");
    printf("Speed Range: 50ms (fast) to 1000ms (slow)\r\n");
    printf("Fast Mode:   2x speed (half delay)\r\n\n");

    /* Enable CM55 */
    Cy_SysEnableCM55(MXCM55, CY_CM55_APP_BOOT_ADDR, CM55_BOOT_WAIT_TIME_USEC);

    /* Initial ADC read */
    voltage_mv = read_potentiometer_mv();
    percentage = get_pot_percentage(voltage_mv);
    base_delay = map_pot_to_delay(percentage);
    actual_delay = base_delay;

    printf("Starting LED Controller...\r\n\n");

    for(;;)
    {
        /* Check button for mode toggle */
        if (read_button_with_debounce())
        {
            /* Toggle mode */
            if (current_mode == MODE_NORMAL)
            {
                current_mode = MODE_FAST;
            }
            else
            {
                current_mode = MODE_NORMAL;
            }

            mode_change_count++;

            printf("\n>>> Mode changed to: %s (count: %lu)\r\n\n",
                   (current_mode == MODE_FAST) ? "FAST" : "NORMAL",
                   (unsigned long)mode_change_count);
        }

        /* Read ADC periodically */
        if ((elapsed_time - last_adc_time) >= ADC_READ_INTERVAL_MS)
        {
            voltage_mv = read_potentiometer_mv();
            percentage = get_pot_percentage(voltage_mv);
            base_delay = map_pot_to_delay(percentage);

            /* Apply mode multiplier */
            if (current_mode == MODE_FAST)
            {
                actual_delay = base_delay / 2;
                if (actual_delay < BLINK_DELAY_MIN_MS / 2)
                {
                    actual_delay = BLINK_DELAY_MIN_MS / 2;
                }
            }
            else
            {
                actual_delay = base_delay;
            }

            /* Print status bar */
            print_status_bar(percentage, actual_delay, current_mode);

            last_adc_time = elapsed_time;
        }

        /* Toggle LED based on calculated delay */
        if ((elapsed_time - last_toggle_time) >= actual_delay)
        {
            LED_TOGGLE();
            last_toggle_time = elapsed_time;
        }

        /* Small delay for loop timing */
        Cy_SysLib_Delay(10);
        elapsed_time += 10;
    }
}
/* [] END OF FILE */
```

***

### 7. แบบฝึกหัด

#### Exercise 1: Three Modes (Triple Speed)

{% hint style="info" %}
**Hint**

```c
/* Mode Definitions */
typedef enum {
    MODE_NORMAL = 0,
    MODE_FAST   = 1,
    MODE_ULTRA  = 2
} led_mode_t;

/* In button handler */
if (read_button_with_debounce())
{
    current_mode = (current_mode + 1) % 3;  /* Cycle: 0→1→2→0 */

    const char* mode_names[] = {"NORMAL", "FAST (2x)", "ULTRA (4x)"};
    printf("\n>>> Mode: %s\r\n", mode_names[current_mode]);
}

/* Apply mode multiplier */
uint32_t divider[] = {1, 2, 4};
actual_delay = base_delay / divider[current_mode];
if (actual_delay < 25) {
   actual_delay = 25;
}
```

{% endhint %}

#### Exercise 2: LED Brightness Pattern

{% hint style="info" %}
**Hint**

สร้าง pattern เช่น heartbeat (สั้น-สั้น-ยาว)

```c
/* Heartbeat pattern: short-short-long pause */
static uint8_t beat_phase = 0;
static uint32_t beat_delays[] = {100, 100, 100, 100, 500};  /* 5 phases */

if ((elapsed_time - last_toggle_time) >= beat_delays[beat_phase])
{
    LED_TOGGLE();
    last_toggle_time = elapsed_time;
    beat_phase = (beat_phase + 1) % 5;
}
```

{% endhint %}

***

***


# Sensor Interfacing

## Session 02: IMU Sensors และ Motion Processing

***

### วัตถุประสงค์การเรียนรู้

หลังจบ Session นี้ นิสิตจะสามารถ:

1. เข้าใจการทำงานของ IMU Sensor (BMI270) และการอ่านค่าผ่าน I2C
2. แปลงค่า Raw Data เป็นหน่วยทางฟิสิกส์ (m/s², rad/s)
3. เพิ่มฟังก์ชันประมวลผลข้อมูล (Magnitude, Motion Detection, Filtering)
4. ใช้ C Programming - Arrays, Structs, Pointers กับข้อมูล Sensor

***

### โปรเจกต์หลัก (Base Project)

```
mtb-example-psoc-edge-sensor-hub-imu
├── proj_cm33_s/              # Secure Project
├── proj_cm33_ns/             # Non-Secure Project (เราทำงานที่นี่)
│   ├── main.c
│   ├── sensor_hub_daq_task.c # <-- ไฟล์หลักที่เราจะเรียนรู้และต่อยอด
│   └── sensor_hub_daq_task.h
└── proj_cm55/                # CM55 Project
```

> **สำคัญ:** Labs ทั้งหมดจะเป็นการเพิ่มฟังก์ชันเข้าไปใน `sensor_hub_daq_task.c` ไม่ใช่การสร้างโปรเจกต์ใหม่!

***

### โครงสร้างการเรียนรู้ (3 ชั่วโมง)

<table><thead><tr><th width="100" align="center">ลำดับ</th><th>หัวข้อ</th></tr></thead><tbody><tr><td align="center">1</td><td>ภาพรวม IMU Sensor และ I2C</td></tr><tr><td align="center">2</td><td>Lab 1: ทำความเข้าใจโค้ด Sensor Hub</td></tr><tr><td align="center">3</td><td>Lab 2: คำนวณ Acceleration Magnitude</td></tr><tr><td align="center">4</td><td>Lab 3: ตรวจจับการเคลื่อนไหว</td></tr><tr><td align="center">5</td><td>Lab 4: Moving Average Filter</td></tr><tr><td align="center">6</td><td>Lab 5: ระบบ Motion Detection สมบูรณ์</td></tr><tr><td align="center">7</td><td>สรุปและแบบทดสอบ</td></tr></tbody></table>

### ภาพรวม IMU Sensor (Accelerometer + Gyroscope)

<figure><img src="/files/D05C0Ph9K6xwUEiqxwVM" alt=""><figcaption></figcaption></figure>

<figure><img src="/files/vNclHYIFYH8WxOmtVEZR" alt=""><figcaption></figcaption></figure>

<figure><img src="/files/7y42V4A5UUT1xtX2Umri" alt=""><figcaption></figcaption></figure>

**จบ Session 2** | **ต่อไป:** Session 3: LVGL Display


# พื้นฐาน Embedded C - ตอนที่ 2

### ทำไมต้องเรียน Struct, Array, Pointer?

**Struct, Array, และ Pointer คือหัวใจของ Embedded IoT Programming:**

1. **Sensor Data Management**: จัดเก็บข้อมูล multi-axis sensors (IMU: 6-axis, 9-axis)
2. **Efficient Communication**: ส่งข้อมูลหลายค่าพร้อมกัน (I2C, SPI, UART)
3. **Memory Efficiency**: Pass by pointer ประหยัด RAM และ CPU time
4. **Buffering**: Circular buffers สำหรับ ADC, audio streaming
5. **Hardware Abstraction**: Struct-based driver architecture

**Real Applications:**

* **Wearable**: เก็บข้อมูล heart rate, steps, calories ใน array
* **Motion Detection**: IMU data (accel + gyro) organized ใน struct
* **Environmental Monitoring**: Temperature, humidity, pressure arrays
* **Edge AI**: Input features เป็น float arrays ส่งเข้า ML model

```
┌─────────────────────────────────────────────────────────────────┐
│                 Sensor Data Processing Flow                     │
├─────────────────────────────────────────────────────────────────┤
│                                                                 │
│   Sensor    →   Raw Data   →   Process    →   Result            │
│   (BMI270)      (bytes)        (compute)      (decision)        │
│                                                                 │
│   ต้องใช้:                                                        │
│   - Structs: จัดกลุ่มข้อมูล X, Y, Z                                  │
│   - Pointers: ส่งข้อมูลไปฟังก์ชันอย่างมีประสิทธิภาพ                       │
│   - Arrays: เก็บ buffer สำหรับ filtering                          │
│   - Algorithms: magnitude, moving average, thresholding         │
│                                                                 │
└─────────────────────────────────────────────────────────────────┘
```

### 1. Arrays (อาร์เรย์)

#### 1.1 การประกาศและใช้งาน Array

```c
/* Array declaration */
int numbers[5];                     /* Uninitialized array of 5 ints */
int values[5] = {1, 2, 3, 4, 5};   /* Initialized array */
int zeros[10] = {0};               /* All elements = 0 */
char name[] = "PSoC";              /* String (char array) */

/* Access elements (0-indexed) */
int first = values[0];   /* 1 */
int last = values[4];    /* 5 */
values[2] = 100;         /* Modify element */

/* Array size */
#define ARRAY_SIZE(arr)  (sizeof(arr) / sizeof((arr)[0]))
size_t len = ARRAY_SIZE(values);  /* len = 5 */
```

#### 1.2 Multi-dimensional Arrays

```c
/* 2D array (matrix) */
int matrix[3][4] = {
    {1, 2, 3, 4},
    {5, 6, 7, 8},
    {9, 10, 11, 12}
};

/* Access element at row 1, column 2 */
int val = matrix[1][2];  /* 7 */

/* Iterate through 2D array */
for (int row = 0; row < 3; row++)
{
    for (int col = 0; col < 4; col++)
    {
        printf("%d ", matrix[row][col]);
    }
    printf("\r\n");
}
```

#### 1.3 Array ใช้กับ Sensor Data

```c
/* Buffer for sensor readings */
#define SAMPLE_COUNT    100

int16_t sensor_buffer[SAMPLE_COUNT];
uint32_t buffer_index = 0;

/* Add sample to buffer */
void add_sample(int16_t sample)
{
    sensor_buffer[buffer_index] = sample;
    buffer_index++;

    if (buffer_index >= SAMPLE_COUNT)
    {
        buffer_index = 0;  /* Circular buffer */
    }
}

/* Calculate average */
float calculate_average(void)
{
    int32_t sum = 0;
    for (int i = 0; i < SAMPLE_COUNT; i++)
    {
        sum += sensor_buffer[i];
    }
    return (float)sum / SAMPLE_COUNT;
}
```

***

### 2. Structures (โครงสร้าง)

#### ทำไมต้องใช้ Struct?

**ข้อดี:**

1. **Logical Grouping**: จัดกลุ่มข้อมูลที่เกี่ยวข้องกัน (X,Y,Z axes)
2. **Easy to Pass**: ส่งหลายค่าพร้อมกันในฟังก์ชันเดียว
3. **Self-documenting**: ชื่อ member บอกความหมายชัดเจน
4. **Memory Layout Control**: สามารถ pack เพื่อส่งผ่าน communication
5. **Driver Architecture**: มาตรฐานใน embedded drivers

```c
/* ❌ ปัญหา: ตัวแปรแยกกัน - ยากจัดการ */
int16_t acc_x, acc_y, acc_z;
int16_t gyr_x, gyr_y, gyr_z;
uint32_t timestamp;

/* ถ้าจะส่งไป function ต้องส่งทีละตัว! */
void process(int16_t ax, int16_t ay, int16_t az,
             int16_t gx, int16_t gy, int16_t gz,
             uint32_t time);  /* 7 parameters! */

/* ✓ ใช้ Struct: จัดกลุ่มข้อมูลที่เกี่ยวข้อง */
typedef struct {
    int16_t acc_x, acc_y, acc_z;
    int16_t gyr_x, gyr_y, gyr_z;
    uint32_t timestamp;
} imu_data_t;

void process(imu_data_t *data);  /* 1 parameter! */
```

#### 2.1 การประกาศ Struct

```c
/* วิธีที่ 1: struct tag */
struct sensor_data {
    int16_t x;
    int16_t y;
    int16_t z;
};

struct sensor_data my_sensor;  /* ต้องเขียน struct ทุกครั้ง */
my_sensor.x = 100;

/* วิธีที่ 2: typedef (แนะนำ) */
typedef struct {
    int16_t x;
    int16_t y;
    int16_t z;
} sensor_data_t;

sensor_data_t my_sensor;  /* ไม่ต้องเขียน struct */
my_sensor.x = 100;

/* Convention: ใช้ _t ต่อท้ายชื่อ typedef */
/* เช่น: imu_data_t, motion_state_t, filter_config_t */
```

#### 2.2 Nested Structs (Struct ซ้อน Struct)

```c
/* สร้าง struct ที่ใช้ซ้ำได้ */
typedef struct {
    float x;
    float y;
    float z;
} vector3f_t;

/* ใช้เป็น member ของ struct อื่น */
typedef struct {
    vector3f_t acceleration;   /* m/s² */
    vector3f_t gyroscope;      /* rad/s */
    vector3f_t magnetometer;   /* uT */
    float temperature;         /* °C */
    uint32_t timestamp_ms;
} sensor_fusion_t;

/* การใช้งาน */
sensor_fusion_t fusion;
fusion.acceleration.x = 0.0f;
fusion.acceleration.z = 9.81f;
fusion.temperature = 25.5f;
fusion.timestamp_ms = 1000;

/* คำนวณ magnitude */
float ax = fusion.acceleration.x;
float ay = fusion.acceleration.y;
float az = fusion.acceleration.z;
float mag = sqrtf(ax*ax + ay*ay + az*az);
```

#### 2.3 Struct Initialization

```c
/* วิธีที่ 1: ทีละ member */
imu_data_t data;
data.acc_x = 100;
data.acc_y = 200;
data.acc_z = 300;

/* วิธีที่ 2: Initializer list */
imu_data_t data = {100, 200, 300, 0, 0, 0, 0};
/* อันตราย! ต้องจำลำดับ member */

/* วิธีที่ 3: Designated initializers (แนะนำ!) */
imu_data_t data = {
    .acc_x = 100,
    .acc_y = 200,
    .acc_z = 300,
    .gyr_x = 0,
    .gyr_y = 0,
    .gyr_z = 0,
    .timestamp = 0
};

/* วิธีที่ 4: Zero initialize ทุก member */
imu_data_t data = {0};

/* จากโค้ดจริง - Interrupt config */
cy_stc_sysint_t intrCfg = {
    .intrSrc = CYBSP_USER_BTN_IRQ,
    .intrPriority = GPIO_INTERRUPT_PRIORITY
};
```

#### 2.4 ขนาดของ Struct และ Padding

```c
typedef struct {
    uint8_t  a;    /* 1 byte */
    uint32_t b;    /* 4 bytes */
    uint8_t  c;    /* 1 byte */
} bad_layout_t;

/* คิดว่า size = 1 + 4 + 1 = 6 bytes? */
/* ผิด! size อาจเป็น 12 bytes เพราะ padding */

/*
Memory layout:
a:       [X] [ ] [ ] [ ]    (1 byte + 3 padding)
b:       [X] [X] [X] [X]    (4 bytes, aligned)
c:       [X] [ ] [ ] [ ]    (1 byte + 3 padding)
Total:   12 bytes
*/

/* ✓ จัดเรียงใหม่ให้ประหยัด */
typedef struct {
    uint32_t b;    /* 4 bytes */
    uint8_t  a;    /* 1 byte */
    uint8_t  c;    /* 1 byte */
    /* padding: 2 bytes */
} better_layout_t;  /* size = 8 bytes */

/* ตรวจสอบ size */
printf("Size: %zu bytes\n", sizeof(better_layout_t));
```

#### 2.5 Packed Structs (for communication)

```c
/* Packed struct - no padding between members */
typedef struct __attribute__((packed)) {
    uint8_t header;
    uint16_t length;
    uint8_t data[10];
    uint16_t checksum;
} packet_t;

/* Size is exactly sum of members */
/* sizeof(packet_t) = 1 + 2 + 10 + 2 = 15 bytes */
```

***

### 3. Pointers (พอยน์เตอร์)

#### 3.1 พื้นฐาน Pointer

```c
int value = 42;
int *ptr;           /* Declare pointer to int */

ptr = &value;       /* ptr now points to value (& = address of) */

printf("value = %d\r\n", value);       /* 42 */
printf("&value = %p\r\n", &value);     /* Address of value */
printf("ptr = %p\r\n", ptr);           /* Same address */
printf("*ptr = %d\r\n", *ptr);         /* 42 (* = dereference) */

*ptr = 100;         /* Modify value through pointer */
printf("value = %d\r\n", value);       /* 100 */
```

#### 3.2 Pointer และ Array

```c
int arr[5] = {10, 20, 30, 40, 50};
int *p = arr;       /* Array name is pointer to first element */

/* Access via pointer */
printf("%d\r\n", *p);       /* 10 (arr[0]) */
printf("%d\r\n", *(p+1));   /* 20 (arr[1]) */
printf("%d\r\n", *(p+2));   /* 30 (arr[2]) */

/* Pointer arithmetic */
p++;                /* Move to next element */
printf("%d\r\n", *p);       /* 20 */

/* Array notation vs pointer notation */
arr[3] == *(arr + 3)  /* Both access 4th element */
```

#### 3.3 ทำไม Embedded ใช้ Pointer เยอะ?

```c
/* เหตุผลหลัก 3 ข้อ: */

/* 1. Efficiency - ประหยัด memory และเร็วกว่า */
typedef struct {
    float data[1000];  /* 4000 bytes! */
} big_struct_t;

/* ❌ Pass by value: copy 4000 bytes ทุกครั้ง */
void process_slow(big_struct_t data);

/* ✓ Pass by pointer: copy 4 bytes (address) */
void process_fast(big_struct_t *data);

/* 2. Modify caller's variable */
void read_sensor(int16_t *result)
{
    *result = 1234;  /* เขียนค่ากลับไปยัง caller */
}

int16_t value;
read_sensor(&value);  /* value = 1234 */

/* 3. Hardware access - memory-mapped I/O */
volatile uint32_t *GPIO_REG = (volatile uint32_t *)0x40000000;
*GPIO_REG = 0x01;  /* Write to hardware register */
```

#### 3.4 Pointer to Struct

```c
imu_data_t data = {100, 200, 300, 10, 20, 30};
imu_data_t *data_ptr = &data;

/* Access members via pointer */
/* Method 1: Dereference then access */
(*data_ptr).acc_x = 500;

/* Method 2: Arrow operator (preferred) */
data_ptr->acc_y = 600;
data_ptr->timestamp = get_tick();

printf("X: %d, Y: %d\r\n", data_ptr->acc_x, data_ptr->acc_y);
```

#### 3.5 Passing Struct to Function

```c
/* Pass by value (copies entire struct - slow for large structs) */
void print_data_copy(imu_data_t data)
{
    printf("Acc: %d, %d, %d\r\n", data.acc_x, data.acc_y, data.acc_z);
}

/* Pass by pointer (efficient - only copies address) */
void print_data_ptr(imu_data_t *data)
{
    printf("Acc: %d, %d, %d\r\n", data->acc_x, data->acc_y, data->acc_z);
}

/* Pass by const pointer (cannot modify) */
void print_data_const(const imu_data_t *data)
{
    printf("Acc: %d, %d, %d\r\n", data->acc_x, data->acc_y, data->acc_z);
    /* data->acc_x = 0;  // ERROR: cannot modify const */
}

/* Usage */
imu_data_t sensor;
print_data_copy(sensor);    /* Copies 12 bytes */
print_data_ptr(&sensor);    /* Copies 4 bytes (pointer size) */
print_data_const(&sensor);  /* Safe read-only access */
```

#### 3.6 Function Pointer (Callback)

```c
/* Define function pointer type */
typedef void (*button_callback_t)(void);

/* Callback function */
void on_button_press(void)
{
    printf("Button pressed!\r\n");
    cyhal_gpio_toggle(CYBSP_USER_LED);
}

/* Register callback */
button_callback_t registered_callback = NULL;

void register_button_callback(button_callback_t callback)
{
    registered_callback = callback;
}

/* Call the callback */
void button_interrupt_handler(void)
{
    if (registered_callback != NULL)
    {
        registered_callback();
    }
}

/* Usage */
register_button_callback(on_button_press);
```

### 4. Arrays และ Buffers

#### 4.1 Array Basics

```c
/* Declaration */
int16_t samples[100];           /* 100 elements, uninitialized */
float buffer[10] = {0};         /* 10 elements, all zeros */
int values[5] = {1, 2, 3, 4, 5}; /* 5 elements with values */

/* Access (0-indexed) */
samples[0] = 100;   /* First element */
samples[99] = 200;  /* Last element */
/* samples[100] = ?; ❌ Out of bounds! Undefined behavior */

/* Array size */
#define ARRAY_SIZE(arr) (sizeof(arr) / sizeof((arr)[0]))
size_t len = ARRAY_SIZE(samples);  /* len = 100 */
```

#### 4.2 Array และ Pointer ความสัมพันธ์

```c
int arr[5] = {10, 20, 30, 40, 50};

/* Array name = pointer to first element */
int *ptr = arr;  /* เหมือน: int *ptr = &arr[0]; */

/* Access via index vs pointer arithmetic */
arr[0]    == *ptr        /* 10 */
arr[1]    == *(ptr + 1)  /* 20 */
arr[2]    == *(ptr + 2)  /* 30 */

/* ในทางกลับกัน */
ptr[0]    == arr[0]      /* 10 */
ptr[1]    == arr[1]      /* 20 */

/* Pointer arithmetic: +1 = เลื่อนไป sizeof(type) bytes */
/* ถ้า int = 4 bytes, ptr + 1 = address + 4 bytes */
```

#### 4.3 Circular Buffer

```c
/*
 * Circular Buffer: ใช้เก็บข้อมูลแบบวนรอบ
 * เหมาะสำหรับ: Sensor data, Moving average, FIFO
 */

#define BUFFER_SIZE 10

typedef struct {
    float data[BUFFER_SIZE];
    uint32_t head;      /* ตำแหน่งที่จะเขียนถัดไป */
    uint32_t count;     /* จำนวนข้อมูลปัจจุบัน */
} circular_buffer_t;

void buffer_init(circular_buffer_t *buf)
{
    memset(buf, 0, sizeof(circular_buffer_t));
}

void buffer_push(circular_buffer_t *buf, float value)
{
    buf->data[buf->head] = value;
    buf->head = (buf->head + 1) % BUFFER_SIZE;  /* Wrap around */

    if (buf->count < BUFFER_SIZE)
    {
        buf->count++;
    }
}

/*
 * Example: Push values 1, 2, 3, 4, 5
 *
 * After push(1): [1, _, _, _, _, _, _, _, _, _] head=1, count=1
 * After push(2): [1, 2, _, _, _, _, _, _, _, _] head=2, count=2
 * ...
 * After push(10):[1, 2, 3, 4, 5, 6, 7, 8, 9, 10] head=0, count=10
 * After push(11):[11,2, 3, 4, 5, 6, 7, 8, 9, 10] head=1, count=10
 *                 ↑ overwrites oldest (1)
 */
```


# C in ModusToolBox (MTB)

## 1. FreeRTOS: Real-Time Operating System

### 1.1 RTOS คืออะไร?

**WHY: ทำไมต้องรู้?**

* **ปัญหา:** โปรแกรมแบบ bare-metal (while loop เดียว) จัดการหลายงานพร้อมกันยาก
* **ประโยชน์:** แบ่งงานเป็น Tasks, จัดการ timing, ใช้ resources ร่วมกันได้
* **Hardware:** MCU ยุคใหม่มี RAM เพียงพอสำหรับ RTOS overhead

```shellscript
┌─────────────────────────────────────────────────────────────┐
│                      Bare-metal                             │
│  while(1) {                                                 │
│      read_sensor();    // ถ้านานเกินไป...                     │
│      process_data();   // ...งานอื่นต้องรอ                     │
│      send_to_cloud();  // blocking!                         │
│  }                                                          │
└─────────────────────────────────────────────────────────────┘

┌─────────────────────────────────────────────────────────────┐
│                       FreeRTOS                              │
│  Task 1: read_sensor()      ─┐                              │
│  Task 2: process_data()      ├─→ ทำงานพร้อมกัน!               │
│  Task 3: send_to_cloud()    ─┘   (time-slicing)             │
└─────────────────────────────────────────────────────────────┘
```

### 1.2 FreeRTOS Configuration

จาก `FreeRTOSConfig.h`:

```c
#define configUSE_PREEMPTION            1          // Preemptive scheduling
#define configTICK_RATE_HZ              1000       // 1ms per tick
#define configMAX_PRIORITIES            7          // 7 priority levels
#define configMINIMAL_STACK_SIZE        256        // 256 words minimum
#define configTOTAL_HEAP_SIZE           (50*1024)  // 50KB heap
#define configUSE_TICKLESS_IDLE         2          // Power saving
#define configENABLE_FPU                1          // Enable FPU
```

**HOW: ประยุกต์ใช้จริงในอุตสาหกรรม**

* **Smart Watch:** Task แยก: UI, Heart Rate, Step Counter, BLE
* **Industrial PLC:** Task แยก: I/O Scan, Communication, Control Loop
* **IoT Gateway:** Task แยก: Sensor Reading, Data Processing, Cloud Upload

**CAUTION: ข้อควรระวัง**

| ข้อผิดพลาด            | ผลกระทบ                      | วิธีป้องกัน                         |
| --------------------- | ---------------------------- | ----------------------------------- |
| Stack size น้อยเกินไป | Stack overflow, Hard fault   | ใช้ `uxTaskGetStackHighWaterMark()` |
| Heap เต็ม             | Task create fail             | Monitor heap usage                  |
| Priority inversion    | High priority task ถูก block | ใช้ mutex with priority inheritance |

### 1.3 การสร้าง Task

**WHY: ทำไมต้องรู้?**

* **ปัญหา:** งาน periodic (เช่น อ่าน sensor ทุก 100ms) ต้องจัดการ timing
* **ประโยชน์:** RTOS จัดการ scheduling ให้, โค้ดอ่านง่าย
* **Hardware:** Kernel ใช้ SysTick timer จัดการ context switching

**ตัวอย่างโค้ด**

**Header file (`sensor_hub_daq_task.h`):**

```c
#define TASK_SENSOR_HUB_DAQ_PRIORITY    (configMAX_PRIORITIES - 1)  // High priority
#define TASK_SENSOR_HUB_DAQ_STACK_SIZE  (2048u)  // Stack size in words
#define TASK_SENSOR_HUB_DAQ_DELAY_MS    (10u)    // Task period

cy_rslt_t create_sensor_hub_daq_task(void);
```

**Task function:**

```c
static void sensor_hub_daq_task(void *pvParameters)
{
    // ===== One-time Initialization =====
    // Initialize I2C, sensor, etc.

    TickType_t xLastWakeTime = xTaskGetTickCount();
    const TickType_t xDelay = 100 / portTICK_PERIOD_MS;  // 100ms

    // ===== Infinite Loop =====
    for (;;)
    {
        // 1. อ่านค่าจากเซนเซอร์
        mtb_bmi270_read(&bmi270, &bmi270_data);

        // 2. แปลงและแสดงผล
        float accel_x = lsb_to_mps2(bmi270_data.sensor_data.acc.x, ...);
        printf("Accel X: %f m/s²\r\n", accel_x);

        // 3. Toggle LED
        Cy_GPIO_Inv(CYBSP_USER_LED1_PORT, CYBSP_USER_LED1_PIN);

        // 4. Wait for next cycle (NON-BLOCKING!)
        vTaskDelayUntil(&xLastWakeTime, xDelay);
    }
}
```

**Task creation:**

```c
cy_rslt_t create_sensor_hub_daq_task(void)
{
    BaseType_t status;

    status = xTaskCreate(
        sensor_hub_daq_task,              // Task function
        "Sensor Hub DAQ",                 // Task name (for debug)
        TASK_SENSOR_HUB_DAQ_STACK_SIZE,   // Stack size
        NULL,                             // Parameter (optional)
        TASK_SENSOR_HUB_DAQ_PRIORITY,     // Priority
        NULL                              // Task handle (optional)
    );

    return (pdPASS == status) ? CY_RSLT_SUCCESS : CY_RSLT_ERROR;
}
```

**HOW: ประยุกต์ใช้จริงในอุตสาหกรรม**

* **Sensor Data Acquisition:** อ่านค่าทุก 10-100ms
* **Motor Control:** PID loop ทุก 1ms
* **Communication:** Check incoming data ทุก 50ms

**CAUTION: ข้อควรระวัง**

| ข้อผิดพลาด                             | ผลกระทบ                     | วิธีป้องกัน                           |
| -------------------------------------- | --------------------------- | ------------------------------------- |
| ใช้ `vTaskDelay` แทน `vTaskDelayUntil` | Timing drift                | ใช้ `vTaskDelayUntil` สำหรับ periodic |
| Task ไม่มี delay                       | CPU 100%, task อื่นไม่ทำงาน | ต้องมี delay หรือ yield               |
| Stack overflow                         | Crash, Data corruption      | ตรวจสอบ high watermark                |

### 1.4 vTaskDelay vs vTaskDelayUntil

```shellscript
vTaskDelay(100):
├─ Work (20ms) ─┤ Delay 100ms ├─ Work (20ms) ─┤ Delay 100ms ├─
│               ←── 120ms ──→ │               ←── 120ms ──→ │
                    ↑ Timing Drift!

vTaskDelayUntil(100):
├─ Work (20ms) ─┤ Delay 80ms ├─ Work (20ms) ─┤ Delay 80ms ├─
│               ←── 100ms ──→ │               ←── 100ms ──→ │
                    ↑ Precise Timing
```

***

## 2. I2C Communication

### 2.1 I2C คืออะไร?

**WHY: ทำไมต้องรู้?**

* **ปัญหา:** ต้องเชื่อมต่อกับ sensor/peripheral ภายนอกที่มี protocol ซับซ้อน
* **ประโยชน์:** ใช้สายแค่ 2 เส้น (SDA, SCL), เชื่อมต่อหลาย device ได้
* **Hardware:** Sensor ส่วนใหญ่รองรับ I2C (เช่น IMU, Temperature, Display)

```ini
     MCU (Master)                    Sensors (Slaves)
    ┌───────────┐                  ┌──────────────┐
    │           │───── SCL ────────│ BMI270 (0x68)│
    │   I2C     │                  └──────────────┘
    │ Controller│───── SDA ────────┬──────────────┐
    │           │                  │ SHT31 (0x44) │
    └───────────┘                  └──────────────┘
                                    (หลาย device บน bus เดียว)
```

### 2.2 I2C Initialization

**ตัวอย่างโค้ด**

```c
static mtb_hal_i2c_t CYBSP_I2C_CONTROLLER_hal_obj;
static cy_stc_scb_i2c_context_t CYBSP_I2C_CONTROLLER_context;

// Step 1: Initialize I2C peripheral
initStatus = Cy_SCB_I2C_Init(CYBSP_I2C_CONTROLLER_HW,
                             &CYBSP_I2C_CONTROLLER_config,
                             &CYBSP_I2C_CONTROLLER_context);
if (CY_SCB_I2C_SUCCESS != initStatus) {
    handle_app_error();
}

// Step 2: Enable I2C
Cy_SCB_I2C_Enable(CYBSP_I2C_CONTROLLER_HW);

// Step 3: Setup HAL wrapper
result = mtb_hal_i2c_setup(&CYBSP_I2C_CONTROLLER_hal_obj,
                           &CYBSP_I2C_CONTROLLER_hal_config,
                           &CYBSP_I2C_CONTROLLER_context,
                           NULL);
```

**HOW: ประยุกต์ใช้จริงในอุตสาหกรรม**

* **Smart Watch:** I2C bus เชื่อม IMU, Heart Rate, Touch Controller
* **Weather Station:** I2C เชื่อม Temperature, Humidity, Pressure sensors
* **OLED Display:** SSD1306 display ใช้ I2C

**CAUTION: ข้อควรระวัง**

| ข้อผิดพลาด             | ผลกระทบ            | วิธีป้องกัน                    |
| ---------------------- | ------------------ | ------------------------------ |
| ไม่มี Pull-up resistor | Communication fail | ใช้ external 4.7kΩ pull-up     |
| Address conflict       | Device ชนกัน       | ตรวจสอบ address แต่ละ device   |
| Clock speed ไม่ตรง     | Data corruption    | ใช้ speed ที่ทุก device รองรับ |
| Bus stuck (SDA low)    | I2C หยุดทำงาน      | Implement bus recovery         |

***

## 3. BMI270 IMU Sensor Integration

### 3.1 BMI270 คืออะไร?

**BMI270** = 6-axis Inertial Measurement Unit (IMU) จาก Bosch

* **Accelerometer:** วัดความเร่ง 3 แกน (X, Y, Z) หน่วย g หรือ m/s²
* **Gyroscope:** วัดความเร็วเชิงมุม 3 แกน หน่วย °/s หรือ rad/s

```ini
               +Y
                ↑
                │
                │  ┌──────────┐
                │  │  BMI270  │
        +X ←────┼──│          │
                │  │    ●     │ ← Sensor
                │  └──────────┘
                │
               +Z (out of page)
```

### 3.2 Sensor Initialization

**ตัวอย่างโค้ด**

```c
static mtb_bmi270_t bmi270;
static mtb_bmi270_data_t bmi270_data;

// Step 1: Initialize sensor via I2C
result = mtb_bmi270_init_i2c(&bmi270,
                             &CYBSP_I2C_CONTROLLER_hal_obj,
                             MTB_BMI270_ADDRESS_DEFAULT);  // 0x68
if (CY_RSLT_SUCCESS != result) {
    handle_app_error();
}

// Step 2: Configure with default settings
result = mtb_bmi270_config_default(&bmi270);
if (CY_RSLT_SUCCESS != result) {
    handle_app_error();
}
```

### 3.3 Reading Sensor Data

```c
// อ่านค่าจากเซนเซอร์
result = mtb_bmi270_read(&bmi270, &bmi270_data);

// ค่าดิบที่ได้ (int16_t):
// bmi270_data.sensor_data.acc.x  ← Accelerometer X
// bmi270_data.sensor_data.acc.y  ← Accelerometer Y
// bmi270_data.sensor_data.acc.z  ← Accelerometer Z
// bmi270_data.sensor_data.gyr.x  ← Gyroscope X
// bmi270_data.sensor_data.gyr.y  ← Gyroscope Y
// bmi270_data.sensor_data.gyr.z  ← Gyroscope Z
```

**HOW: ประยุกต์ใช้จริงในอุตสาหกรรม**

* **Fitness Tracker:** นับก้าว, ตรวจจับกิจกรรม (วิ่ง, ว่ายน้ำ)
* **Drone:** ควบคุม stability และ orientation
* **Gaming Controller:** ตรวจจับการเคลื่อนไหวมือ
* **Industrial:** ตรวจจับ vibration เพื่อ predictive maintenance

**CAUTION: ข้อควรระวัง**

| ข้อผิดพลาด           | ผลกระทบ                      | วิธีป้องกัน                 |
| -------------------- | ---------------------------- | --------------------------- |
| ไม่ calibrate sensor | ค่า offset ผิด               | Calibrate ก่อนใช้งาน        |
| อ่านค่าถี่เกินไป     | ได้ค่าซ้ำ                    | ใช้ Data Ready interrupt    |
| Range ไม่เหมาะสม     | Clipping หรือ Resolution ต่ำ | เลือก range ตาม application |

## 4. Math Operations สำหรับ Sensor Data

### 4.1 การแปลงหน่วย (Unit Conversion)

```c
/* จาก sensor_hub_daq_task.c */

#define GRAVITY_EARTH  (9.80665f)  /* m/s² */
#define DEG_TO_RAD     (0.01745f)  /* π/180 */

/* แปลง raw accelerometer → m/s² */
static float lsb_to_mps2(int16_t val, int8_t g_range, uint8_t bit_width)
{
    /*
     * สูตร: acc = (raw_value × g_range × 9.80665) / 2^(bit_width-1)
     *
     * Parameters:
     * - val: raw value จาก sensor (-32768 to 32767)
     * - g_range: ช่วงวัด (2 = ±2g)
     * - bit_width: 16 bits
     *
     * Example: val=16384, g_range=2, bit_width=16
     * half_scale = 2^15 = 32768
     * result = (9.80665 × 16384 × 2) / 32768 = 9.80665 m/s²
     */

    float half_scale = (float)(1u << (bit_width - 1u));
    return ((GRAVITY_EARTH) * val * g_range) / half_scale;
}

/* แปลง raw gyroscope → rad/s */
static float lsb_to_rps(int16_t val, float dps, uint8_t bit_width)
{
    /*
     * สูตร: gyro = (raw × dps × π/180) / 2^(bit_width-1)
     *
     * Parameters:
     * - val: raw value
     * - dps: degrees per second range (2000)
     * - bit_width: 16 bits
     */

    float half_scale = (float)(1u << (bit_width - 1u));
    return ((DEG_TO_RAD) * ((dps) / (half_scale)) * (val));
}
```

### 4.2 Vector Magnitude

```c
#include <math.h>  /* sqrtf, fabsf */

/* คำนวณขนาดของ vector */
static float calculate_magnitude(float x, float y, float z)
{
    return sqrtf(x * x + y * y + z * z);
}

/*
 * Magnitude ของ acceleration:
 * - วางราบ: sqrt(0² + 0² + 9.81²) ≈ 9.81 m/s² (1g)
 * - เขย่า: magnitude จะเพิ่มขึ้น
 * - ตกอิสระ: magnitude ≈ 0 (weightlessness)
 */

/* ตรวจจับการเคลื่อนไหว */
float mag = calculate_magnitude(acc_x, acc_y, acc_z);
float deviation = fabsf(mag - GRAVITY_EARTH);

if (deviation > MOTION_THRESHOLD)
{
    /* Motion detected! */
}
```

### 4.3 Absolute Value

```c
#include <stdlib.h>  /* abs() for int */
#include <math.h>    /* fabsf() for float */

/* Integer absolute */
int16_t raw = -1000;
int16_t abs_raw = abs(raw);  /* 1000 */

/* Float absolute */
float deviation = -0.5f;
float abs_dev = fabsf(deviation);  /* 0.5f */

/* จากโค้ด orientation detection */
abs_x = abs(bmi270_data.sensor_data.acc.x);
abs_y = abs(bmi270_data.sensor_data.acc.y);
abs_z = abs(bmi270_data.sensor_data.acc.z);

/* หาแกนที่มีค่ามากที่สุด */
if ((abs_z > abs_x) && (abs_z > abs_y))
{
    /* Z-axis is dominant */
}
```

***

## 5. Enum - State Machines

### 5.1 Enum Basics

```c
/* Enum = ชุดของค่าคงที่ที่ตั้งชื่อ */

typedef enum {
    MOTION_STATIONARY = 0,  /* ค่าเริ่มต้น 0 */
    MOTION_LIGHT,           /* = 1 (อัตโนมัติ) */
    MOTION_MODERATE,        /* = 2 */
    MOTION_INTENSE          /* = 3 */
} motion_state_t;

/* ใช้งาน */
motion_state_t current_state = MOTION_STATIONARY;

if (current_state == MOTION_INTENSE)
{
    /* Handle intense motion */
}

/* Switch-case กับ enum */
switch (current_state)
{
    case MOTION_STATIONARY:
        printf("Device is still\n");
        break;
    case MOTION_LIGHT:
        printf("Light movement\n");
        break;
    case MOTION_MODERATE:
    case MOTION_INTENSE:
        printf("Significant motion!\n");
        break;
}
```

### 5.2 Enum สำหรับ Orientation

```c
/* จาก sensor-hub-imu concept */

typedef enum {
    ORIENTATION_UNKNOWN = 0,
    ORIENTATION_UP,         /* Screen facing up */
    ORIENTATION_DOWN,       /* Screen facing down */
    ORIENTATION_LEFT,       /* Left edge down */
    ORIENTATION_RIGHT,      /* Right edge down */
    ORIENTATION_TOP,        /* Top edge down */
    ORIENTATION_BOTTOM      /* Bottom edge down */
} orientation_t;

orientation_t detect_orientation(float ax, float ay, float az)
{
    float abs_x = fabsf(ax);
    float abs_y = fabsf(ay);
    float abs_z = fabsf(az);

    if ((abs_z > abs_x) && (abs_z > abs_y))
    {
        return (az > 0) ? ORIENTATION_UP : ORIENTATION_DOWN;
    }
    else if ((abs_y > abs_x) && (abs_y > abs_z))
    {
        return (ay > 0) ? ORIENTATION_BOTTOM : ORIENTATION_TOP;
    }
    else
    {
        return (ax > 0) ? ORIENTATION_LEFT : ORIENTATION_RIGHT;
    }
}
```

***

## 6. Memory Management

### 6.1 memset - ล้างข้อมูล

```c
#include <string.h>  /* memset, memcpy */

/* ล้าง struct ให้เป็น 0 */
motion_stats_t stats;
memset(&stats, 0, sizeof(motion_stats_t));

/* ล้าง array */
float buffer[100];
memset(buffer, 0, sizeof(buffer));

/* Syntax: memset(destination, value, size_in_bytes) */
/* value ส่วนใหญ่ใช้ 0 */
```

### 6.2 memcpy - Copy ข้อมูล

```c
/* Copy struct */
imu_data_t source = {.acc_x = 100, .acc_y = 200, .acc_z = 300};
imu_data_t dest;

memcpy(&dest, &source, sizeof(imu_data_t));
/* dest ตอนนี้เหมือน source ทุกประการ */

/* Copy array */
float src_buffer[10] = {1.0f, 2.0f, 3.0f, /*...*/};
float dst_buffer[10];

memcpy(dst_buffer, src_buffer, sizeof(src_buffer));
```

### 6.3 sizeof - ขนาดของ Type/Variable

```c
/* sizeof type */
size_t int_size = sizeof(int);              /* 4 */
size_t float_size = sizeof(float);          /* 4 */
size_t ptr_size = sizeof(void *);           /* 4 (32-bit) or 8 (64-bit) */

/* sizeof variable */
imu_data_t data;
size_t struct_size = sizeof(data);          /* อาจมี padding */
size_t struct_size2 = sizeof(imu_data_t);   /* เหมือนกัน */

/* sizeof array */
int arr[10];
size_t arr_bytes = sizeof(arr);             /* 40 bytes (10 × 4) */
size_t arr_count = sizeof(arr) / sizeof(arr[0]);  /* 10 elements */
```

***

### สรุปองค์ความรู้สำคัญ

#### API Functions ที่ใช้บ่อย

<table><thead><tr><th width="100">ประเภท</th><th>Function</th><th>คำอธิบาย</th></tr></thead><tbody><tr><td><strong>RTOS</strong></td><td><code>xTaskCreate()</code></td><td>สร้าง Task</td></tr><tr><td></td><td><code>vTaskDelayUntil()</code></td><td>Delay แบบ precise</td></tr><tr><td></td><td><code>xTaskGetTickCount()</code></td><td>อ่านค่า tick ปัจจุบัน</td></tr><tr><td></td><td><code>vTaskStartScheduler()</code></td><td>เริ่ม RTOS</td></tr><tr><td><strong>I2C</strong></td><td><code>Cy_SCB_I2C_Init()</code></td><td>Initialize I2C</td></tr><tr><td></td><td><code>mtb_hal_i2c_setup()</code></td><td>Setup HAL</td></tr><tr><td><strong>BMI270</strong></td><td><code>mtb_bmi270_init_i2c()</code></td><td>Initialize sensor</td></tr><tr><td></td><td><code>mtb_bmi270_config_default()</code></td><td>Configure sensor</td></tr><tr><td></td><td><code>mtb_bmi270_read()</code></td><td>อ่านค่า</td></tr></tbody></table>

## Quick Reference

### Struct

```c
typedef struct {
    int16_t x, y, z;
} vector3i_t;

vector3i_t v = {.x = 1, .y = 2, .z = 3};
vector3i_t *ptr = &v;
ptr->x = 10;  /* Arrow operator */
```

### Pointer

```c
int value = 42;
int *ptr = &value;    /* ptr = address of value */
*ptr = 100;           /* Modify through pointer */

void func(data_t *out) { *out = result; }
func(&my_data);
```

### Array

```c
float buf[10] = {0};
size_t len = sizeof(buf) / sizeof(buf[0]);
index = (index + 1) % BUFFER_SIZE;  /* Circular */
```

### Math

```c
#include <math.h>
float mag = sqrtf(x*x + y*y + z*z);
float abs_val = fabsf(value);
```

### Memory

```c
memset(&struct_var, 0, sizeof(struct_var));
memcpy(&dest, &src, sizeof(src));
```

### Enum

```c
typedef enum { STATE_A, STATE_B, STATE_C } state_t;
state_t current = STATE_A;
switch (current) { case STATE_A: /*...*/ break; }
```

***


# Workshops

## 1. ภาพรวม IMU Sensor

### 1.1 BMI270 - 6-Axis IMU

<figure><img src="/files/0MrVlepnYGPARTbw2NkD" alt=""><figcaption></figcaption></figure>

### 1.2 หลักการทำงาน Accelerometer

<figure><img src="/files/7y42V4A5UUT1xtX2Umri" alt=""><figcaption></figcaption></figure>

เมื่อวางราบ (face up):

* acc\_x ≈ 0 m/s²
* acc\_y ≈ 0 m/s²
* acc\_z ≈ +9.81 m/s² (1g pointing up)

เมื่อเอียง:

* acc ถูกแบ่งไปตามแกนต่างๆ
* Magnitude (ขนาด) ยังคง ≈ 9.81 m/s²

### 1.3 I2C Communication

<figure><img src="/files/XT2Hdi0afGEi5IwJpsey" alt=""><figcaption></figcaption></figure>

### 1.4 การแปลงค่า Raw → Physical Units

<figure><img src="/files/0yvjZU7DDijiS6xRalnG" alt="" width="375"><figcaption></figcaption></figure>

```c
/* BMI270 Raw Data: int16_t (-32768 to +32767) */

/* สูตรแปลง Accelerometer (Range ±2g) */
               raw_value × g_range × 9.80665
acc (m/s²) = ─────────────────────────────────
                     2^(bit_width - 1)

/* สูตรแปลง Gyroscope (Range ±2000 dps) */
              raw_value × dps_range × 0.01745
gyro (rad/s) = ────────────────────────────────
                     2^(bit_width - 1)
```

```c
/* BMI270 Raw Data: int16_t (-32768 to +32767) */

/* สูตรแปลง Accelerometer (Range ±2g) */
acc (m/s²) = (raw_value × g_range × 9.80665) / 2^(bit_width - 1)

/* สูตรแปลง Gyroscope (Range ±2000 dps) */
gyro (rad/s) = (raw_value × dps_range × 0.01745) / 2^(bit_width - 1)

```

***

## 2. C Programming Review

### 2.1 Arrays สำหรับ Sensor Buffer

```c
/* Array declaration */
#define BUFFER_SIZE  100
float sensor_buffer[BUFFER_SIZE];    /* 100 samples */
int16_t imu_data[6];                 /* ax,ay,az,gx,gy,gz */

/* Array size macro - ใช้บ่อยมาก! */
#define ARRAY_SIZE(arr)  (sizeof(arr) / sizeof((arr)[0]))

/* ตัวอย่าง: circular buffer index */
uint32_t index = 0;
sensor_buffer[index] = new_value;
index = (index + 1) % BUFFER_SIZE;  /* Wrap around */
```

### 2.2 Structs สำหรับ Sensor Data

```c
/* Vector 3D - ใช้บ่อยกับ sensor data */
typedef struct {
    float x;
    float y;
    float z;
} vector3f_t;

/* IMU Complete Data */
typedef struct {
    vector3f_t acceleration;  /* m/s² */
    vector3f_t gyroscope;     /* rad/s */
    uint32_t timestamp_ms;
} imu_data_t;

/* Usage */
imu_data_t sensor;
sensor.acceleration.x = 0.0f;
sensor.acceleration.z = 9.81f;
```

### 2.3 Pointers และ Pass-by-Reference

```c
/* Pass by pointer - efficient for structs */
void process_data(const imu_data_t *data)  /* read-only */
{
    printf("X: %.2f\n", data->acceleration.x);
}

void update_data(imu_data_t *data)  /* can modify */
{
    data->timestamp_ms = get_time_ms();
}

/* Usage */
imu_data_t my_data;
process_data(&my_data);  /* Pass address */
update_data(&my_data);
```


# IMU Sensor Hub

## Lab 1: ทำความเข้าใจโค้ด Sensor Hub

### วัตถุประสงค์

* **IMU Sensor**: เข้าใจ Accelerometer + Gyroscope
* **I2C Communication**: สื่อสารกับ sensor ภายนอก
* **Unit Conversion**: แปลง raw data เป็นหน่วยทางฟิสิกส์

#### จะได้เรียนรู้อะไร

* **BMI270**: 6-axis IMU sensor
* **`lsb_to_mps2()`**: แปลง raw → m/s²
* **`lsb_to_rps()`**: แปลง raw → rad/s
* **Orientation Detection**: ตรวจจับทิศทางการวาง

### <mark style="color:green;">ตัวอย่างการโหลด Project Code จาก AIC Github Repo เพื่อเปิดบน VSCode IDE</mark>

{% embed url="<https://github.com/Advance-Innovation-Centre-AIC/aic-psoc-edge-epc2-imu-sensor-hub>" %}

{% embed url="<https://youtu.be/PjwsFiQoLAg>" fullWidth="true" %}

***

### 1.1 เปิดโปรเจกต์ aic-psoc-edge-epc2-imu-sensor-hub-master

เปิดไฟล์ `proj_cm33_ns/sensor_hub_daq_task.c` และศึกษาโครงสร้าง:

```shellscript
aic-psoc-edge-epc2-imu-sensor-hub-master/
├── proj_cm33_s/              # Secure Project
├── proj_cm33_ns/             
│   ├── main.c
│   ├── sensor_hub_daq_task.c 
│   └── sensor_hub_daq_task.h
└── proj_cm55/                # CM55 Project
```

#### **Important Macros and Variables**

```c
/*******************************************************************************
* Macros
*******************************************************************************/
#define GRAVITY_EARTH                       (9.80665f)
#define DEG_TO_RAD                          (0.01745f)
#define GYR_RANGE_DPS                       (2000.0f)
#define ACC_RANGE_2G                        (2.0f)
#define RESET_VAL_ZERO                      (0)

/* Custom app module ID to avoid collisions */
#define APP_RSLT_MODULE_ID                  (1U)

/* App error for task creation failure */
#define APP_RSLT_ACQ_TASK_CREATE_FAILED     CY_RSLT_CREATE(CY_RSLT_TYPE_ERROR,\
                                                        APP_RSLT_MODULE_ID,\
                                                        1U)

/*******************************************************************************
* Global Variables
*******************************************************************************/
static mtb_hal_i2c_t CYBSP_I2C_CONTROLLER_hal_obj;
static cy_stc_scb_i2c_context_t CYBSP_I2C_CONTROLLER_context;

static mtb_bmi270_data_t bmi270_data;
static mtb_bmi270_t bmi270;

static cy_en_scb_i2c_status_t initStatus;
static cy_rslt_t result;
```

#### Unit Conversion: Accelerometer

```c
/*******************************************************************************
 * Function Name: lsb_to_mps2
 *******************************************************************************
* Summary:
* This function converts the raw sensor value to meter/sec^2.
*
* Parameters:
*  val       raw value
*  g_range   The accelerometer range is expressed in multiples of g.
*  bit_width data width in bits
*
* Return:
*  float
*
*******************************************************************************/
static float lsb_to_mps2(int16_t val, int8_t g_range, uint8_t bit_width)
{
    float half_scale = (float) (1u << (bit_width - 1u));

    return ((GRAVITY_EARTH)*val * g_range) / half_scale;
}
```

#### Unit Conversion: Gyroscope

```c
/*******************************************************************************
 * Function Name: lsb_to_rps
 *******************************************************************************
* Summary:
* This function converts the raw gyroscope sensor value to rad/sec.
*
* Parameters:
*  val       raw value
*  dps       The gyroscope sensor range in degrees per second
*  bit_width data width in bits
*
* Return:
*  float
*
*******************************************************************************/
static float lsb_to_rps(int16_t val, float dps, uint8_t bit_width)
{
    float half_scale = (float) (1u << (bit_width - 1u));

    return ((DEG_TO_RAD) * ((dps) / (half_scale)) * (val));
}
```

#### Motion Sensor Update Orientation

```c
/*******************************************************************************
 * Function Name: motion_sensor_update_orientation
 *******************************************************************************
 * Summary:
 *  Function that updates the orientation status to one of the 6 types,
 *  'ORIENTATION_UP, ORIENTATION_DOWN, TOP_EDGE, BOTTOM_EDGE,
 *  LEFT_EDGE, and RIGHT_EDGE'. This functions detects the axis that is most 
 *  perpendicular to the ground based on the absolute value of acceleration in 
 *  that axis. The sign of the acceleration signifies whether the axis is 
 *  facing the ground or the opposite.
 *
 * Return:
 *  CY_RSLT_SUCCESS upon successful orientation update, else a non-zero value
 *  that indicates the error.
 *
 ******************************************************************************/
static cy_rslt_t motion_sensor_update_orientation(void)
{
    /* Status variable */
    cy_rslt_t result = CY_RSLT_SUCCESS;
    int16_t abs_x;
    int16_t abs_y;
    int16_t abs_z;

    /* Read x, y, z components of acceleration */
    result = mtb_bmi270_read(&bmi270, &bmi270_data);
    if (CY_RSLT_SUCCESS != result)
    {
        printf("read data failed\r\n");
    }
    abs_x = abs(bmi270_data.sensor_data.acc.x);
    abs_y = abs(bmi270_data.sensor_data.acc.y);
    abs_z = abs(bmi270_data.sensor_data.acc.z);

    if ((abs_z > abs_x) && (abs_z > abs_y))
    {
        if (bmi270_data.sensor_data.acc.z < RESET_VAL_ZERO)
        {
            /* Kit faces down (towards the ground) */
            printf("Orientation = ORIENTATION_DOWN       \r\n");
        }
        else
        {
            /* Kit faces up (towards the sky/ceiling) */
            printf("Orientation = ORIENTATION_UP         \r\n");
        }
    }
    /* Y axis (parallel with shorter edge of board) is most aligned with
     * gravity.
     */
    else if ((abs_y > abs_x) && (abs_y > abs_z))
    {
        if (bmi270_data.sensor_data.acc.y > RESET_VAL_ZERO)
        {
            /* Kit has an inverted landscape orientation */
            printf("Orientation = ORIENTATION_BOTTOM_EDGE\r\n");
        }
        else
        {
            /* Kit has landscape orientation */
            printf("Orientation = ORIENTATION_TOP_EDGE  \r\n");
        }
    }
    /* X axis (parallel with longer edge of board) is most aligned with
     * gravity.
     */
    else
    {
        if (bmi270_data.sensor_data.acc.x < RESET_VAL_ZERO)
        {
            /* Kit has an inverted portrait orientation */
            printf("Orientation = ORIENTATION_RIGHT_EDGE \r\n");
        }
        else
        {
            /* Kit has portrait orientation */
            printf("Orientation = ORIENTATION_LEFT_EDGE  \r\n");
        }
    }
    return result;
}

```

### 1.2 เขียน Main Task Loop

```c
/*******************************************************************************
 * Function Name: sensor_hub_daq_task
 *******************************************************************************
* Summary:
* This function initializes the I2C and BMI270 sensor, reads the sensor values,
* and prints them on the UART terminal.
*
* Parameters:
*  void *
*
* Return:
*  void
*
*******************************************************************************/
static void sensor_hub_daq_task(void *pvParameters)
{

    TickType_t xLastWakeTime = 0;
    const TickType_t xDelay = 100 / portTICK_PERIOD_MS;

    float x = 0.0f;
    float y = 0.0f;
    float z = 0.0f;

    (void)pvParameters;

    initStatus = Cy_SCB_I2C_Init(CYBSP_I2C_CONTROLLER_HW, 
                                &CYBSP_I2C_CONTROLLER_config, 
                                &CYBSP_I2C_CONTROLLER_context);

    /* I2C initialization failed. Stop program execution. */
    if (CY_SCB_I2C_SUCCESS != initStatus)
    {
        handle_app_error();
    }

    Cy_SCB_I2C_Enable(CYBSP_I2C_CONTROLLER_HW);

    result = mtb_hal_i2c_setup(&CYBSP_I2C_CONTROLLER_hal_obj,
                                &CYBSP_I2C_CONTROLLER_hal_config, 
                                &CYBSP_I2C_CONTROLLER_context,
                                NULL);

    /* HAL I2C setup failed. Stop program execution. */
    if (CY_RSLT_SUCCESS != result)
    {
        handle_app_error();
    }

    /* Initialize can configure platform-dependent function pointers. */
    result = mtb_bmi270_init_i2c(&bmi270, 
                                &CYBSP_I2C_CONTROLLER_hal_obj, 
                                MTB_BMI270_ADDRESS_DEFAULT);
    
    /* BMI270 sensor initialization failed. Stop program execution. */
    if (CY_RSLT_SUCCESS != result)
    {
        handle_app_error();
    }

    /* Configure accelerometer and gyroscope. */
    result = mtb_bmi270_config_default(&bmi270);

    /* BMI270 sensor configuration failed. Stop program execution. */
    if (CY_RSLT_SUCCESS != result)
    {
        handle_app_error();
    }

    /* \x1b[2J\x1b[;H - ANSI ESC sequence for clear screen */
    printf("\x1b[2J\x1b[;H");

    printf("************************************************************\n");
    printf("               PSOC Edge MCU: Sensor hub IMU                \n");
    printf("************************************************************\r\n");
    printf("Code example configured in data acquisition mode\r\n\n");

    /* Initialize the xLastWakeTime with the current tick count. */
    xLastWakeTime = xTaskGetTickCount();

    for (;;)
    {
        /* Get accelerometer and gyroscope sensor data. */
        result = mtb_bmi270_read(&bmi270, &bmi270_data);

        /* BMI270 sensor read failed. Stop program execution. */
        if (CY_RSLT_SUCCESS != result)
        {
            handle_app_error();
        }

        x = lsb_to_mps2(bmi270_data.sensor_data.acc.x, 
                        ACC_RANGE_2G,
                        bmi270.sensor.resolution);
        y = lsb_to_mps2(bmi270_data.sensor_data.acc.y, 
                        ACC_RANGE_2G,
                        bmi270.sensor.resolution);
        z = lsb_to_mps2(bmi270_data.sensor_data.acc.z, 
                        ACC_RANGE_2G,
                        bmi270.sensor.resolution);
        printf("Accelerometer: \n\rx:%9.6f, y:%9.6f, z:%9.6f \n\n",
                 (double)x, (double)y, (double)z);

        x = lsb_to_rps(bmi270_data.sensor_data.gyr.x, 
                        GYR_RANGE_DPS,
                        bmi270.sensor.resolution);
        y = lsb_to_rps(bmi270_data.sensor_data.gyr.y, 
                        GYR_RANGE_DPS,
                        bmi270.sensor.resolution);
        z = lsb_to_rps(bmi270_data.sensor_data.gyr.z, 
                        GYR_RANGE_DPS,
                        bmi270.sensor.resolution);
        printf("Gyroscope: \n\rx:%9.6f, y:%9.6f, z:%9.6f \n\n",
                 (double)x, (double)y, (double)z);

        motion_sensor_update_orientation();

        /* \x1b[7A\x1b[42D - ANSI ESC sequence to get the cursor back 
         * to the start. */
        printf("\x1b[7A\x1b[42D");

        /* Toggle user led */
        Cy_GPIO_Inv(CYBSP_USER_LED1_PORT, CYBSP_USER_LED1_PIN);

        /* Wait for UART traffic to stop */
        while(!(Cy_SCB_UART_IsTxComplete(CYBSP_DEBUG_UART_HW))) {};

        /* Wait for the next cycle.*/
        vTaskDelayUntil(&xLastWakeTime, xDelay);
    }
}
```

#### Create Sensor Hub DAQ Task Function

```c
/*******************************************************************************
* Function Name: create_sensor_hub_daq_task
********************************************************************************
* Summary:
*  Function that creates Sensor Hub data acquisition task
*
* Parameters:
*  None
*
* Return:
*  CY_RSLT_SUCCESS upon successful creation of the motion sensor task, else a
*  non-zero value that indicates the error.
*
*******************************************************************************/
cy_rslt_t create_sensor_hub_daq_task(void)
{
    BaseType_t status;

    /* Create the "sensor_hub_daq" Task */
    status = xTaskCreate(sensor_hub_daq_task, "Sensor Hub DAQ",
                            TASK_SENSOR_HUB_DAQ_STACK_SIZE, NULL,
                            TASK_SENSOR_HUB_DAQ_PRIORITY, NULL);

    return (pdPASS == status) ? \
        CY_RSLT_SUCCESS : APP_RSLT_ACQ_TASK_CREATE_FAILED;
}
```

### <mark style="color:blue;">Program Code ทั้งหมด</mark>

#### Build และ Flash

```bash
make build -j8
make program
```

#### ทดลองหมุนบอร์ด

ลองหมุนบอร์ดไปในทิศทางต่างๆ และสังเกต:

* ค่า accelerometer เปลี่ยนอย่างไร
* Orientation เปลี่ยนอย่างไร

```bash
# Build proj_cm33_s → proj_cm33_ns → proj_cm55
# Program และเปิด Terminal (115200 baud)

# จะเห็น output:
# Accelerometer:
# x: 0.012345, y: -0.023456, z: 9.806650
#
# Gyroscope:
# x: 0.001234, y: 0.002345, z: -0.003456
#
# Orientation = ORIENTATION_UP
```

### ✍️ Exercise

1. **Orientation Logic :** เขียนโค้ดตรวจสอบว่าบอร์ดวางอยู่ในทิศทาง:
   * FLAT\_UP
   * FLAT\_DOWN
   * TILTED

{% hint style="info" %}
**Hint**

```c
typedef enum {
    FLAT_UP,
    FLAT_DOWN,
    TILTED
} orientation_t;

orientation_t get_orientation(float acc_x, float acc_y, float acc_z)
{
    float abs_z = fabsf(acc_z);
    float threshold = 9.0f;  /* ~0.9g */

    if (abs_z > threshold)
    {
       ...
    }
    return TILTED;
}
```

{% endhint %}

***

**จบ Session 2** | **ต่อไป:** Session 3: LVGL Display


# Acceleration Magnitude

## Lab 2: คำนวณ Acceleration Magnitude

### วัตถุประสงค์

* **Motion Detection**: ขนาดของ acceleration บอกระดับการเคลื่อนไหว
* **Gravity Reference**: วางนิ่ง = 1g (9.81 m/s²)
* **Impact Detection**: ตกกระแทก = magnitude spike

#### จะได้เรียนรู้อะไร

1. **Vector Magnitude**: √(x² + y² + z²)
2. **Math Functions**: sqrtf()
3. **Physical Meaning**: ความหมายของ magnitude

### 2.1 Concept: Vector Magnitude

$$
\text{magnitude} = \sqrt{x^2 + y^2 + z^2}
$$

{% hint style="info" %}
**เมื่อวางราบ:**

* x ≈ 0, y ≈ 0, z ≈ 9.81
* Magnitude ≈ 9.81 m/s² (1g)

**เมื่อเคลื่อนไหว:**

* Magnitude > 9.81 หรือ < 9.81
* สามารถใช้ตรวจจับการเคลื่อนไหว!

**เมื่อตกอิสระ:**&#x20;

* Magnitude ≈ 0 (weightlessness)
  {% endhint %}

### <mark style="color:green;">โหลด Project Code จาก AIC Github Repo เพื่อเปิดบน VSCode IDE</mark>

{% embed url="<https://github.com/Advance-Innovation-Centre-AIC/aic-psoc-edge-epc2-imu-magnitude>" %}

{% embed url="<https://youtu.be/ad2l0MAGdII>" fullWidth="true" %}

### 2.2 เปิดโปรเจกต์ aic-psoc-edge-epc2-imu-magnitude-master

เปิดไฟล์ `proj_cm33_ns/sensor_hub_daq_task.c` และศึกษาโครงสร้าง:

```shellscript
aic-psoc-edge-epc2-imu-magnitude-master/
├── proj_cm33_s/              # Secure Project
├── proj_cm33_ns/             
│   ├── main.c
│   ├── sensor_hub_daq_task.c 
│   └── sensor_hub_daq_task.h
└── proj_cm55/                # CM55 Project
```

#### เพิ่ม Include

```c
#include <math.h>  /* sqrtf */
```

#### **Important Macros and Variables**

```c
/*******************************************************************************
* Macros
*******************************************************************************/
#define GRAVITY_EARTH                       (9.80665f)
#define DEG_TO_RAD                          (0.01745f)
#define GYR_RANGE_DPS                       (2000.0f)
#define ACC_RANGE_2G                        (2.0f)

/* Custom app module ID to avoid collisions */
#define APP_RSLT_MODULE_ID                  (1U)

/* App error for task creation failure */
#define APP_RSLT_ACQ_TASK_CREATE_FAILED     CY_RSLT_CREATE(CY_RSLT_TYPE_ERROR,\
                                                        APP_RSLT_MODULE_ID,\
                                                        1U)

/*******************************************************************************
* Global Variables
*******************************************************************************/
static mtb_hal_i2c_t CYBSP_I2C_CONTROLLER_hal_obj;
static cy_stc_scb_i2c_context_t CYBSP_I2C_CONTROLLER_context;

static mtb_bmi270_data_t bmi270_data;
static mtb_bmi270_t bmi270;

static cy_en_scb_i2c_status_t initStatus;
static cy_rslt_t result;
```

#### สร้างฟังก์ชัน Raw accelerometer Conversion ชื่อ `lsb_to_mp2()`

```c
/*******************************************************************************
 * Function Name: lsb_to_mps2
 *******************************************************************************
 * Summary:
 *   Converts raw accelerometer value to m/s²
 *
 * Parameters:
 *   val       - raw value from sensor (-32768 to +32767)
 *   g_range   - accelerometer range in g (2 = ±2g)
 *   bit_width - data width in bits (16)
 *
 * Return:
 *   float - acceleration in m/s²
 ******************************************************************************/
static float lsb_to_mps2(int16_t val, int8_t g_range, uint8_t bit_width)
{
    float half_scale = (float)(1u << (bit_width - 1u));
    return ((GRAVITY_EARTH) * val * g_range) / half_scale;
}
```

#### **สร้างฟังก์ชัน Magnitude Calcuation ชื่อ `calculate_magnitude()`**

```c
/*******************************************************************************
 * Function Name: calculate_magnitude
 *******************************************************************************
 * Summary:
 *   Calculates the magnitude of acceleration vector: |acc| = sqrt(x² + y² + z²)
 *   Used for motion detection and impact sensing.
 *
 * Parameters:
 *   acc_x, acc_y, acc_z - acceleration components in m/s²
 *
 * Return:
 *   float - magnitude in m/s² (stationary ≈ 9.81 m/s² = 1g)
 *
 * Note:
 *   - Stationary: magnitude ≈ 9.81 m/s² (1g from gravity)
 *   - Moving: magnitude deviates from 9.81
 *   - Free fall: magnitude ≈ 0 (weightlessness)
 ******************************************************************************/
static float calculate_magnitude(float acc_x, float acc_y, float acc_z)
{
    return sqrtf(acc_x * acc_x + acc_y * acc_y + acc_z * acc_z);
}
```

### 2.3 เขียน Main Task Loop

```c
/*******************************************************************************
 * Function Name: sensor_hub_daq_task
 *******************************************************************************
 * Summary:
 *   FreeRTOS task that reads BMI270 sensor and displays magnitude
 ******************************************************************************/
static void sensor_hub_daq_task(void *pvParameters)
{
    TickType_t xLastWakeTime = 0;
    const TickType_t xDelay = 100 / portTICK_PERIOD_MS;

    float acc_x = 0.0f;
    float acc_y = 0.0f;
    float acc_z = 0.0f;
    float magnitude = 0.0f;

    (void)pvParameters;

    /* Initialize I2C */
    initStatus = Cy_SCB_I2C_Init(CYBSP_I2C_CONTROLLER_HW,
                                &CYBSP_I2C_CONTROLLER_config,
                                &CYBSP_I2C_CONTROLLER_context);

    if (CY_SCB_I2C_SUCCESS != initStatus)
    {
        handle_app_error();
    }

    Cy_SCB_I2C_Enable(CYBSP_I2C_CONTROLLER_HW);

    result = mtb_hal_i2c_setup(&CYBSP_I2C_CONTROLLER_hal_obj,
                                &CYBSP_I2C_CONTROLLER_hal_config,
                                &CYBSP_I2C_CONTROLLER_context,
                                NULL);

    if (CY_RSLT_SUCCESS != result)
    {
        handle_app_error();
    }

    /* Initialize BMI270 */
    result = mtb_bmi270_init_i2c(&bmi270,
                                &CYBSP_I2C_CONTROLLER_hal_obj,
                                MTB_BMI270_ADDRESS_DEFAULT);

    if (CY_RSLT_SUCCESS != result)
    {
        handle_app_error();
    }

    result = mtb_bmi270_config_default(&bmi270);

    if (CY_RSLT_SUCCESS != result)
    {
        handle_app_error();
    }

    /* Clear screen */
    printf("\x1b[2J\x1b[;H");

    printf("************************************************************\r\n");
    printf("     Lab 2-2: Acceleration Magnitude                        \r\n");
    printf("************************************************************\r\n\r\n");
    printf("Magnitude = sqrt(x^2 + y^2 + z^2)\r\n");
    printf("Stationary: ~9.81 m/s^2 (1g)\r\n\r\n");

    xLastWakeTime = xTaskGetTickCount();

    for (;;)
    {
        /* Read sensor */
        result = mtb_bmi270_read(&bmi270, &bmi270_data);

        if (CY_RSLT_SUCCESS != result)
        {
            handle_app_error();
        }

        /* Convert to m/s² */
        acc_x = lsb_to_mps2(bmi270_data.sensor_data.acc.x,
                            ACC_RANGE_2G,
                            bmi270.sensor.resolution);
        acc_y = lsb_to_mps2(bmi270_data.sensor_data.acc.y,
                            ACC_RANGE_2G,
                            bmi270.sensor.resolution);
        acc_z = lsb_to_mps2(bmi270_data.sensor_data.acc.z,
                            ACC_RANGE_2G,
                            bmi270.sensor.resolution);

        /* Calculate magnitude */
        magnitude = calculate_magnitude(acc_x, acc_y, acc_z);

        /* Display results */
        printf("Accelerometer:\r\n");
        printf("  x: %9.6f m/s^2\r\n", (double)acc_x);
        printf("  y: %9.6f m/s^2\r\n", (double)acc_y);
        printf("  z: %9.6f m/s^2\r\n", (double)acc_z);
        printf("\r\n");
        printf("Magnitude: %9.6f m/s^2 (%.2f g)\r\n",
               (double)magnitude,
               (double)(magnitude / GRAVITY_EARTH));

        /* Move cursor back for clean display */
        printf("\x1b[6A");

        /* Toggle LED to show activity */
        Cy_GPIO_Inv(CYBSP_USER_LED1_PORT, CYBSP_USER_LED1_PIN);

        /* Wait for UART */
        while(!(Cy_SCB_UART_IsTxComplete(CYBSP_DEBUG_UART_HW))) {};

        vTaskDelayUntil(&xLastWakeTime, xDelay);
    }
}
```

#### Create Sensor Hub DAQ Task Function

```c
/*******************************************************************************
 * Function Name: create_sensor_hub_daq_task
 ******************************************************************************/
cy_rslt_t create_sensor_hub_daq_task(void)
{
    BaseType_t status;

    status = xTaskCreate(sensor_hub_daq_task, "IMU Magnitude",
                            TASK_SENSOR_HUB_DAQ_STACK_SIZE, NULL,
                            TASK_SENSOR_HUB_DAQ_PRIORITY, NULL);

    return (pdPASS == status) ?
        CY_RSLT_SUCCESS : APP_RSLT_ACQ_TASK_CREATE_FAILED;
}
```

### 2.4 Build และ Flash

```bash
make build -j8
make program
```

### 2.5 Output ที่คาดหวัง

```bash
Accelerometer:
x: 0.012345, y: -0.023456, z: 9.806650 m/s²
Magnitude: 9.806789 m/s² (1.00 g)

[เมื่อเขย่า]
Magnitude: 12.345678 m/s² (1.26 g)

[เมื่อตกกระแทก]
Magnitude: 24.516625 m/s² (2.50 g)

Gyroscope:
x: 0.001234, y: 0.002345, z: -0.003456

Orientation = ORIENTATION_UP
```

#### Physical Meaning

| สถานะ             | Magnitude     | ความหมาย          |
| ----------------- | ------------- | ----------------- |
| วางนิ่ง           | ≈ 9.81 m/s²   | 1g จากแรงโน้มถ่วง |
| เคลื่อนไหวเบา     | 9.5-10.5 m/s² | ±0.1g deviation   |
| เคลื่อนไหวปานกลาง | 8-12 m/s²     | ±0.3g deviation   |
| ตกกระแทก          | > 20 m/s²     | > 2g (impact)     |
| ตกอิสระ           | ≈ 0 m/s²      | Weightlessness    |

### Flowchart

<figure><img src="/files/tgLgb3nY3BrFUTWyvfju" alt=""><figcaption></figcaption></figure>

***

### ✍️ Exercise

1\. **G-Force Display** : แสดงค่า magnitude ในหน่วย g พร้อม visual indicator

```
|====------| 0.8g (Low)
|=========-| 1.2g (High)
```

{% hint style="info" %}
**Hint**
{% endhint %}

```c
void print_g_force_bar(float magnitude)
{
    float g_force = magnitude / GRAVITY_EARTH;
    int bars = (int)(g_force * 10);  /* 0.1g per bar */

   ...

    printf("|");
    for (int i = 0; i < 20; i++)
    {
        ...
    }
    ...
}
```

2. **Max/Min Tracking :** เก็บค่า max และ min magnitude ที่เคยวัดได้

{% hint style="info" %}
**Hint**

```c
static float max_magnitude = 0.0f;
static float min_magnitude = 100.0f;

void track_magnitude(float magnitude)
{
    if (magnitude > max_magnitude)
    {
        ...
    }
    if (magnitude < min_magnitude)
    {
        ...
    }

    printf("Current: %.3f | Min: %.3f | Max: %.3f m/s²\r\n",
           (double)magnitude,
           (double)min_magnitude,
           (double)max_magnitude);
}
```

{% endhint %}

***

**จบ Session 2** | **ต่อไป:** Session 3: LVGL Display


# Basic Motion Detection

## Lab 3: ตรวจจับการเคลื่อนไหว

### วัตถุประสงค์

* **Activity Detection**: ตรวจจับว่าอุปกรณ์เคลื่อนไหวหรือไม่
* **State Classification**: แบ่งประเภทการเคลื่อนไหว
* **Event Triggering**: ทำ action เมื่อตรวจพบ motion

#### จะได้เรียนรู้อะไร

* **Threshold Logic**: ใช้ค่า threshold ในการตัดสินใจ
* **Enum States**: สร้าง motion states
* **fabsf()**: คำนวณค่า absolute

### Concept: Motion Detection

หลักการ:

* เมื่อนิ่ง: Magnitude ≈ 1g (9.81 m/s²)
* เมื่อเคลื่อนไหว: Magnitude เบี่ยงเบนจาก 1g

ใช้ Threshold:

* threshold = 0.3g (ประมาณ 3 m/s²)
* ถ้าค่า absolute ของ `|magnitude - 1g| > threshold` แสดงว่า Motion Detected!

ระดับ:

* < 0.1g: STATIONARY
* < 0.3g: LIGHT&#x20;
* < 0.6g: MODERATE&#x20;
* \>= 0.6g: INTENSE

### <mark style="color:green;">โหลด Project Code จาก AIC Github Repo เพื่อเปิดบน VSCode IDE</mark>

{% embed url="<https://github.com/Advance-Innovation-Centre-AIC/aic-psoc-edge-epc2-imu-motion>" %}

### 3.1 เปิดโปรเจกต์ aic-psoc-edge-epc2-imu-motion

เปิดไฟล์ `proj_cm33_ns/sensor_hub_daq_task.c` และศึกษาโครงสร้าง:

```shellscript
aic-psoc-edge-epc2-imu-motion/
├── proj_cm33_s/              # Secure Project
├── proj_cm33_ns/             
│   ├── main.c
│   ├── sensor_hub_daq_task.c 
│   └── sensor_hub_daq_task.h
└── proj_cm55/                # CM55 Project
```

#### เพิ่ม Include

```c
#include <math.h>  /* sqrtf */
```

#### **Important Macros and Variables**

```c
/*******************************************************************************
* Macros
*******************************************************************************/
#define GRAVITY_EARTH                       (9.80665f)
#define DEG_TO_RAD                          (0.01745f)
#define GYR_RANGE_DPS                       (2000.0f)
#define ACC_RANGE_2G                        (2.0f)

/* LED Macros - Active HIGH (PSoC Edge E84 USER_LED1) */
#define LED_ON()     Cy_GPIO_Set(CYBSP_USER_LED1_PORT, CYBSP_USER_LED1_PIN)
#define LED_OFF()    Cy_GPIO_Clr(CYBSP_USER_LED1_PORT, CYBSP_USER_LED1_PIN)

/* Custom app module ID to avoid collisions */
#define APP_RSLT_MODULE_ID                  (1U)

/* App error for task creation failure */
#define APP_RSLT_ACQ_TASK_CREATE_FAILED     CY_RSLT_CREATE(CY_RSLT_TYPE_ERROR,\
                                                        APP_RSLT_MODULE_ID,\
                                                        1U)

/*******************************************************************************
* Motion State Enum
*******************************************************************************/
typedef enum {
    MOTION_STATIONARY = 0,
    MOTION_LIGHT,
    MOTION_MODERATE,
    MOTION_INTENSE
} motion_state_t;

/*******************************************************************************
* Global Variables
*******************************************************************************/
static mtb_hal_i2c_t CYBSP_I2C_CONTROLLER_hal_obj;
static cy_stc_scb_i2c_context_t CYBSP_I2C_CONTROLLER_context;

static mtb_bmi270_data_t bmi270_data;
static mtb_bmi270_t bmi270;

static cy_en_scb_i2c_status_t initStatus;
static cy_rslt_t result;
```

#### สร้างฟังก์ชัน Raw accelerometer Conversion ชื่อ `lsb_to_mp2()`

```c
/*******************************************************************************
 * Function Name: lsb_to_mps2
 *******************************************************************************
 * Summary:
 *   Converts raw accelerometer value to m/s²
 *
 * Parameters:
 *   val       - raw value from sensor (-32768 to +32767)
 *   g_range   - accelerometer range in g (2 = ±2g)
 *   bit_width - data width in bits (16)
 *
 * Return:
 *   float - acceleration in m/s²
 ******************************************************************************/
static float lsb_to_mps2(int16_t val, int8_t g_range, uint8_t bit_width)
{
    float half_scale = (float)(1u << (bit_width - 1u));
    return ((GRAVITY_EARTH) * val * g_range) / half_scale;
}
```

#### **สร้างฟังก์ชัน Magnitude Calcuation ชื่อ `calculate_magnitude()`**

```c
/*******************************************************************************
 * Function Name: calculate_magnitude
 *******************************************************************************
 * Summary:
 *   Calculates the magnitude of acceleration vector: |acc| = sqrt(x² + y² + z²)
 *   Used for motion detection and impact sensing.
 *
 * Parameters:
 *   acc_x, acc_y, acc_z - acceleration components in m/s²
 *
 * Return:
 *   float - magnitude in m/s² (stationary ≈ 9.81 m/s² = 1g)
 *
 * Note:
 *   - Stationary: magnitude ≈ 9.81 m/s² (1g from gravity)
 *   - Moving: magnitude deviates from 9.81
 *   - Free fall: magnitude ≈ 0 (weightlessness)
 ******************************************************************************/
static float calculate_magnitude(float acc_x, float acc_y, float acc_z)
{
    return sqrtf(acc_x * acc_x + acc_y * acc_y + acc_z * acc_z);
}
```

#### **สร้างฟังก์ชัน Motion Detection ชื่อ** `detect_motion`**`()`**

```c
/*******************************************************************************
 * Function Name: detect_motion
 *******************************************************************************
 * Summary:
 *   Detects motion level from acceleration magnitude using threshold-based
 *   classification.
 *
 * Parameters:
 *   magnitude - acceleration magnitude in m/s²
 *
 * Return:
 *   motion_state_t - detected motion level
 *
 * Thresholds:
 *   - STATIONARY: deviation < 0.1g
 *   - LIGHT:      deviation < 0.3g
 *   - MODERATE:   deviation < 0.6g
 *   - INTENSE:    deviation >= 0.6g
 ******************************************************************************/
static motion_state_t detect_motion(float magnitude)
{
    /* Calculate deviation from 1g (gravity) */
    float deviation = fabsf(magnitude - GRAVITY_EARTH);

    if (deviation < 0.1f * GRAVITY_EARTH)
    {
        return MOTION_STATIONARY;
    }
    else if (deviation < 0.3f * GRAVITY_EARTH)
    {
        return MOTION_LIGHT;
    }
    else if (deviation < 0.6f * GRAVITY_EARTH)
    {
        return MOTION_MODERATE;
    }
    else
    {
        return MOTION_INTENSE;
    }
}
```

#### **สร้างฟังก์ชัน Motion State Conversion ชื่อ** `get_motion_string`**`()`**

```c
/*******************************************************************************
 * Function Name: get_motion_string
 *******************************************************************************
 * Summary:
 *   Converts motion state enum to display string
 *
 * Parameters:
 *   state - motion state enum value
 *
 * Return:
 *   const char* - human-readable motion state string
 ******************************************************************************/
static const char* get_motion_string(motion_state_t state)
{
    switch (state)
    {
        case MOTION_STATIONARY: return "STATIONARY  ";
        case MOTION_LIGHT:      return "LIGHT MOTION";
        case MOTION_MODERATE:   return "MODERATE    ";
        case MOTION_INTENSE:    return "INTENSE!    ";
        default:                return "UNKNOWN     ";
    }
}
```

### 3.2 เขียน Main Task Loop

```c
/*******************************************************************************
 * Function Name: sensor_hub_daq_task
 *******************************************************************************
 * Summary:
 *   FreeRTOS task that reads BMI270 sensor and performs motion detection
 ******************************************************************************/
static void sensor_hub_daq_task(void *pvParameters)
{
    TickType_t xLastWakeTime = 0;
    const TickType_t xDelay = 100 / portTICK_PERIOD_MS;

    float acc_x = 0.0f;
    float acc_y = 0.0f;
    float acc_z = 0.0f;
    float magnitude = 0.0f;
    motion_state_t motion_state = MOTION_STATIONARY;

    (void)pvParameters;

    /* Initialize I2C */
    initStatus = Cy_SCB_I2C_Init(CYBSP_I2C_CONTROLLER_HW,
                                &CYBSP_I2C_CONTROLLER_config,
                                &CYBSP_I2C_CONTROLLER_context);

    if (CY_SCB_I2C_SUCCESS != initStatus)
    {
        handle_app_error();
    }

    Cy_SCB_I2C_Enable(CYBSP_I2C_CONTROLLER_HW);

    result = mtb_hal_i2c_setup(&CYBSP_I2C_CONTROLLER_hal_obj,
                                &CYBSP_I2C_CONTROLLER_hal_config,
                                &CYBSP_I2C_CONTROLLER_context,
                                NULL);

    if (CY_RSLT_SUCCESS != result)
    {
        handle_app_error();
    }

    /* Initialize BMI270 */
    result = mtb_bmi270_init_i2c(&bmi270,
                                &CYBSP_I2C_CONTROLLER_hal_obj,
                                MTB_BMI270_ADDRESS_DEFAULT);

    if (CY_RSLT_SUCCESS != result)
    {
        handle_app_error();
    }

    result = mtb_bmi270_config_default(&bmi270);

    if (CY_RSLT_SUCCESS != result)
    {
        handle_app_error();
    }

    /* Clear screen */
    printf("\x1b[2J\x1b[;H");

    printf("************************************************************\r\n");
    printf("     Lab 2-3: Motion Detection                              \r\n");
    printf("************************************************************\r\n\r\n");
    printf("Motion Thresholds:\r\n");
    printf("  STATIONARY: < 0.1g | LIGHT: < 0.3g\r\n");
    printf("  MODERATE:   < 0.6g | INTENSE: >= 0.6g\r\n\r\n");

    /* Initialize LED to OFF */
    LED_OFF();

    xLastWakeTime = xTaskGetTickCount();

    for (;;)
    {
        /* Read sensor */
        result = mtb_bmi270_read(&bmi270, &bmi270_data);

        if (CY_RSLT_SUCCESS != result)
        {
            handle_app_error();
        }

        /* Convert to m/s² */
        acc_x = lsb_to_mps2(bmi270_data.sensor_data.acc.x,
                            ACC_RANGE_2G,
                            bmi270.sensor.resolution);
        acc_y = lsb_to_mps2(bmi270_data.sensor_data.acc.y,
                            ACC_RANGE_2G,
                            bmi270.sensor.resolution);
        acc_z = lsb_to_mps2(bmi270_data.sensor_data.acc.z,
                            ACC_RANGE_2G,
                            bmi270.sensor.resolution);

        /* Calculate magnitude */
        magnitude = calculate_magnitude(acc_x, acc_y, acc_z);

        /* Detect motion state */
        motion_state = detect_motion(magnitude);

        /* Display results */
        printf("Accelerometer:\r\n");
        printf("  x: %9.6f m/s^2\r\n", (double)acc_x);
        printf("  y: %9.6f m/s^2\r\n", (double)acc_y);
        printf("  z: %9.6f m/s^2\r\n", (double)acc_z);
        printf("\r\n");
        printf("Magnitude: %9.6f m/s^2 (%.2f g)\r\n",
               (double)magnitude,
               (double)(magnitude / GRAVITY_EARTH));
        printf("Motion: %s (deviation: %.2f g)\r\n",
               get_motion_string(motion_state),
               (double)(fabsf(magnitude - GRAVITY_EARTH) / GRAVITY_EARTH));

        /* LED feedback - Active LOW (PSoC Edge E84) */
        /* Turn LED ON when motion is MODERATE or higher */
        if (motion_state >= MOTION_MODERATE)
        {
            LED_ON();   /* Clr = ON for Active LOW */
        }
        else
        {
            LED_OFF();  /* Set = OFF for Active LOW */
        }

        /* Move cursor back for clean display */
        printf("\x1b[7A");

        /* Wait for UART */
        while(!(Cy_SCB_UART_IsTxComplete(CYBSP_DEBUG_UART_HW))) {};

        vTaskDelayUntil(&xLastWakeTime, xDelay);
    }
}
```

#### Create Sensor Hub DAQ Task Function

```c
/*******************************************************************************
 * Function Name: create_sensor_hub_daq_task
 ******************************************************************************/
cy_rslt_t create_sensor_hub_daq_task(void)
{
    BaseType_t status;

    status = xTaskCreate(sensor_hub_daq_task, "Motion Detection",
                            TASK_SENSOR_HUB_DAQ_STACK_SIZE, NULL,
                            TASK_SENSOR_HUB_DAQ_PRIORITY, NULL);

    return (pdPASS == status) ?
        CY_RSLT_SUCCESS : APP_RSLT_ACQ_TASK_CREATE_FAILED;
}
```

### 3.3 Build และ Flash

```bash
make build -j8
make program
```

### 3.4 Output ที่คาดหวัง

```bash
Accelerometer:
x: 0.012345, y: -0.023456, z: 9.806650 m/s²
Magnitude: 9.806789 m/s² (1.00 g)
Motion: STATIONARY   (deviation: 0.00 g)

[เมื่อเขย่าเบา]
Magnitude: 10.784467 m/s² (1.10 g)
Motion: LIGHT MOTION (deviation: 0.10 g)

[เมื่อเขย่าแรง]
Magnitude: 14.709975 m/s² (1.50 g)
Motion: MODERATE     (deviation: 0.50 g)

[เมื่อตกกระแทก]
Magnitude: 24.516625 m/s² (2.50 g)
Motion: INTENSE!     (deviation: 1.50 g)
```

### State Diagram

<figure><img src="/files/qfUw1zLubMk2FizlRclL" alt=""><figcaption></figcaption></figure>

***

### ✍️ Exercise

1. **Free Fall Detection** - เพิ่มฟังก์ชันตรวจจับการตกอิสระ (magnitude < 0.3g)

{% hint style="info" %}
**Hint**

```c
/* LED Macros - Active HIGH (PSoC Edge E84) */
#define LED_ON()     Cy_GPIO_Set(CYBSP_USER_LED1_PORT, CYBSP_USER_LED1_PIN)
#define LED_OFF()    Cy_GPIO_Clr(CYBSP_USER_LED1_PORT, CYBSP_USER_LED1_PIN)
#define LED_TOGGLE() Cy_GPIO_Inv(CYBSP_USER_LED1_PORT, CYBSP_USER_LED1_PIN)

bool detect_free_fall(float magnitude)
{
    /* Free fall: magnitude < 0.3g */
    ...
}

/* Usage */
if (detect_free_fall(magnitude))
{
    printf("*** FREE FALL DETECTED! ***\r\n");
    /* Blink LED rapidly */
    for (int i = 0; i < 10; i++)
    {
        ...
    }
}
```

{% endhint %}

2. **Impact Detection** - เพิ่มฟังก์ชันตรวจจับการกระแทก (magnitude > 3g)

{% hint style="info" %}
**Hint**

```c
bool detect_impact(float magnitude, float threshold_g)
{
    ...
}

/* Usage */
if (detect_impact(magnitude, 3.0f))
{
    printf("*** IMPACT DETECTED (%.1f g) ***\r\n",
           (double)(magnitude / GRAVITY_EARTH));

    /* Log impact */
    static uint32_t impact_count = 0;
    ...
    printf("Total impacts: %lu\r\n", impact_count);
}

```

{% endhint %}

***

**จบ Session 2** | **ต่อไป:** Session 3: LVGL Display


# Moving Average Filter

## Lab 4: Moving Average Filter&#x20;

### วัตถุประสงค์

* **Noise Reduction**: ข้อมูล sensor มี noise ต้องกรอง
* **Smoother Data**: ข้อมูลราบเรียบขึ้นสำหรับ motion detection
* **Circular Buffer**: โครงสร้างข้อมูลสำคัญใน Embedded

#### จะได้เรียนรู้อะไร

* **Moving Average**: ค่าเฉลี่ยเคลื่อนที่
* **Circular Buffer**: เก็บข้อมูลแบบวนรอบ
* **Optimized Sum**: ไม่ต้องบวกใหม่ทุกครั้ง

### 1. หลักการ Moving Average Filter

Moving Average = ค่าเฉลี่ยของ N samples ล่าสุด

<figure><img src="/files/UmU3YMY2t42i80kZku8K" alt="" width="533"><figcaption></figcaption></figure>

#### 1.1 สูตรหลักของ Moving Average (ค่าเฉลี่ยของ `N` ตัวล่าสุด)

ให้ `x[k]` คือ sample ล่าสุด ณ เวลา `k` และใช้หน้าต่างยาว `N`

$$
y\[k]  =   \frac{1}{N}\sum\_{i=0}^{N-1} x\[k-i]
$$

ตัวอย่าง (N=5):&#x20;

samples = \[9.8, 9.9, 10.1, 9.7, 9.8]&#x20;

average = (9.8 + 9.9 + 10.1 + 9.7 + 9.8) / 5 = 9.86

ข้อดี:

* ลด noise แบบสุ่ม
* ข้อมูลราบเรียบขึ้น

ข้อเสีย:

* มี delay (latency)
* ตอบสนองช้าลง

#### 1.1.1 สูตรด้วยตัวแปร sum

* ถ้า buffer เต็มแล้ว: ลบค่าที่จะถูกเขียนทับออกจาก `sum`
* ใส่ค่าใหม่ แล้วบวกเข้า `sum`
* ค่าเฉลี่ย = `sum / count`

เขียนเป็น LaTeX ได้แบบนี้ (เมื่อ buffer เต็มแล้ว count=N):

$$
S\[k]  =  S\[k−1]  −  x\[k−N]  +  x\[k]
$$

$$
y\[k]  =  \frac{S\[k]}{N}
$$

กรณีช่วงเริ่มต้นที่ยังไม่ครบ `N` ตัว (เหมือน `count++` ในโค้ด):

$$
y\[k]  =  \frac{S\[k]}{\text{count}}, \quad \text{โดยที่ } \text{count}=\min(k+1,,N)
$$

#### 1.2 Circular Buffer Visualization

```
Push: 1, 2, 3, 4, 5, 6, 7, 8, 9, 10, 11

Buffer size = 10:
After push(10): [1, 2, 3, 4, 5, 6, 7, 8, 9, 10] head=0
After push(11): [11,2, 3, 4, 5, 6, 7, 8, 9, 10] head=1
                 ↑ overwrites oldest (1)
```

#### 1.2.1 สูตร “Circular Buffer index” (head ที่วนด้วย modulo)

ในโค้ดมีประมาณ:

$$
head←(head+1) mod N
$$

(ใช้สื่อว่า `index` วนกลับไป `0` เมื่อครบหน้าต่าง)

***

### <mark style="color:green;">โหลด Project Code จาก AIC Github Repo เพื่อเปิดบน VSCode IDE</mark>

{% embed url="<https://github.com/Advance-Innovation-Centre-AIC/aic-psoc-edge-epc2-imu-filter>" %}

### 2. เปิดโปรเจกต์ aic-psoc-edge-epc2-imu-filter

เปิดไฟล์ `proj_cm33_ns/sensor_hub_daq_task.c` และศึกษาโครงสร้าง:

```shellscript
aic-psoc-edge-epc2-imu-filter/
├── proj_cm33_s/              # Secure Project
├── proj_cm33_ns/             
│   ├── main.c
│   ├── sensor_hub_daq_task.c 
│   └── sensor_hub_daq_task.h
└── proj_cm55/                # CM55 Project
```

#### เพิ่ม Include

```c
#include <math.h>  /* sqrtf */
#include <string.h>
```

#### **Important Macros and Variables**

```c
/*******************************************************************************
* Macros
*******************************************************************************/
#define GRAVITY_EARTH                       (9.80665f)
#define DEG_TO_RAD                          (0.01745f)
#define GYR_RANGE_DPS                       (2000.0f)
#define ACC_RANGE_2G                        (2.0f)

/* Filter Configuration */
#define FILTER_WINDOW_SIZE                  (10)    /* 10 samples = 1 sec at 10Hz */

/* LED Macros - Active HIGH (PSoC Edge E84 USER_LED1) */
#define LED_ON()     Cy_GPIO_Set(CYBSP_USER_LED1_PORT, CYBSP_USER_LED1_PIN)
#define LED_OFF()    Cy_GPIO_Clr(CYBSP_USER_LED1_PORT, CYBSP_USER_LED1_PIN)

/* Custom app module ID to avoid collisions */
#define APP_RSLT_MODULE_ID                  (1U)

/* App error for task creation failure */
#define APP_RSLT_ACQ_TASK_CREATE_FAILED     CY_RSLT_CREATE(CY_RSLT_TYPE_ERROR,\
                                                        APP_RSLT_MODULE_ID,\
                                                        1U)

/*******************************************************************************
* Motion State Enum
*******************************************************************************/
typedef enum {
    MOTION_STATIONARY = 0,
    MOTION_LIGHT,
    MOTION_MODERATE,
    MOTION_INTENSE
} motion_state_t;

/*******************************************************************************
* Moving Average Filter Structure
*******************************************************************************/
typedef struct {
    float buffer[FILTER_WINDOW_SIZE];
    uint32_t head;      /* Position to write next */
    uint32_t count;     /* Current number of samples */
    float sum;          /* Running sum (optimized) */
} moving_avg_filter_t;

/*******************************************************************************
* Global Variables
*******************************************************************************/
static mtb_hal_i2c_t CYBSP_I2C_CONTROLLER_hal_obj;
static cy_stc_scb_i2c_context_t CYBSP_I2C_CONTROLLER_context;

static mtb_bmi270_data_t bmi270_data;
static mtb_bmi270_t bmi270;

static cy_en_scb_i2c_status_t initStatus;
static cy_rslt_t result;

/* Filter object for magnitude */
static moving_avg_filter_t mag_filter = {0};
```

#### สร้างฟังก์ชัน Raw accelerometer Conversion ชื่อ `lsb_to_mp2()`

```c
/*******************************************************************************
 * Function Name: lsb_to_mps2
 *******************************************************************************
 * Summary:
 *   Converts raw accelerometer value to m/s²
 *
 * Parameters:
 *   val       - raw value from sensor (-32768 to +32767)
 *   g_range   - accelerometer range in g (2 = ±2g)
 *   bit_width - data width in bits (16)
 *
 * Return:
 *   float - acceleration in m/s²
 ******************************************************************************/
static float lsb_to_mps2(int16_t val, int8_t g_range, uint8_t bit_width)
{
    float half_scale = (float)(1u << (bit_width - 1u));
    return ((GRAVITY_EARTH) * val * g_range) / half_scale;
}
```

#### **สร้างฟังก์ชัน Magnitude Calcuation ชื่อ `calculate_magnitude()`**

```c
/*******************************************************************************
 * Function Name: calculate_magnitude
 *******************************************************************************
 * Summary:
 *   Calculates the magnitude of acceleration vector: |acc| = sqrt(x² + y² + z²)
 *   Used for motion detection and impact sensing.
 *
 * Parameters:
 *   acc_x, acc_y, acc_z - acceleration components in m/s²
 *
 * Return:
 *   float - magnitude in m/s² (stationary ≈ 9.81 m/s² = 1g)
 *
 * Note:
 *   - Stationary: magnitude ≈ 9.81 m/s² (1g from gravity)
 *   - Moving: magnitude deviates from 9.81
 *   - Free fall: magnitude ≈ 0 (weightlessness)
 ******************************************************************************/
static float calculate_magnitude(float acc_x, float acc_y, float acc_z)
{
    return sqrtf(acc_x * acc_x + acc_y * acc_y + acc_z * acc_z);
}
```

#### สร้างฟังก์ชัน Filter&#x20;

```c
/*******************************************************************************
 * Function Name: filter_init
 *******************************************************************************
 * Summary:
 *   Initialize the moving average filter (reset to zero)
 *
 * Parameters:
 *   filter - pointer to filter structure
 ******************************************************************************/
static void filter_init(moving_avg_filter_t *filter)
{
    memset(filter, 0, sizeof(moving_avg_filter_t));
}

/*******************************************************************************
 * Function Name: filter_update
 *******************************************************************************
 * Summary:
 *   Add new value to filter and return the current moving average.
 *   Uses optimized O(1) algorithm: subtract oldest, add newest.
 *
 * Parameters:
 *   filter    - pointer to filter structure
 *   new_value - new sample to add
 *
 * Return:
 *   float - current moving average
 *
 * Algorithm:
 *   1. Subtract oldest value from sum (if buffer full)
 *   2. Add new value to buffer and sum
 *   3. Update head pointer (circular wrap)
 *   4. Return sum / count
 ******************************************************************************/
static float filter_update(moving_avg_filter_t *filter, float new_value)
{
    /* Subtract oldest value from sum (if buffer is full) */
    if (filter->count >= FILTER_WINDOW_SIZE)
    {
        filter->sum -= filter->buffer[filter->head];
    }
    else
    {
        filter->count++;
    }

    /* Add new value to buffer and sum */
    filter->buffer[filter->head] = new_value;
    filter->sum += new_value;

    /* Move head pointer (wrap around) */
    filter->head = (filter->head + 1) % FILTER_WINDOW_SIZE;

    /* Return average */
    return filter->sum / (float)filter->count;
}
```

#### **สร้างฟังก์ชัน Motion Detection ชื่อ** `detect_motion`**`()`**

```c
/*******************************************************************************
 * Function Name: detect_motion
 *******************************************************************************
 * Summary:
 *   Detects motion level from acceleration magnitude
 ******************************************************************************/
static motion_state_t detect_motion(float magnitude)
{
    float deviation = fabsf(magnitude - GRAVITY_EARTH);

    if (deviation < 0.1f * GRAVITY_EARTH)
    {
        return MOTION_STATIONARY;
    }
    else if (deviation < 0.3f * GRAVITY_EARTH)
    {
        return MOTION_LIGHT;
    }
    else if (deviation < 0.6f * GRAVITY_EARTH)
    {
        return MOTION_MODERATE;
    }
    else
    {
        return MOTION_INTENSE;
    }
}
```

#### **สร้างฟังก์ชัน Motion State Conversion ชื่อ** `get_motion_string`**`()`**

```c
/*******************************************************************************
 * Function Name: get_motion_string
 *******************************************************************************
 * Summary:
 *   Converts motion state enum to display string
 *
 * Parameters:
 *   state - motion state enum value
 *
 * Return:
 *   const char* - human-readable motion state string
 ******************************************************************************/
static const char* get_motion_string(motion_state_t state)
{
    switch (state)
    {
        case MOTION_STATIONARY: return "STATIONARY  ";
        case MOTION_LIGHT:      return "LIGHT MOTION";
        case MOTION_MODERATE:   return "MODERATE    ";
        case MOTION_INTENSE:    return "INTENSE!    ";
        default:                return "UNKNOWN     ";
    }
}
```

### 3. เขียน Main Task Loop

```c
/*******************************************************************************
 * Function Name: sensor_hub_daq_task
 *******************************************************************************
 * Summary:
 *   FreeRTOS task that reads BMI270 sensor with moving average filter
 ******************************************************************************/
static void sensor_hub_daq_task(void *pvParameters)
{
    TickType_t xLastWakeTime = 0;
    const TickType_t xDelay = 100 / portTICK_PERIOD_MS;

    float acc_x = 0.0f;
    float acc_y = 0.0f;
    float acc_z = 0.0f;
    float magnitude = 0.0f;
    float filtered_magnitude = 0.0f;
    motion_state_t motion_state = MOTION_STATIONARY;

    (void)pvParameters;

    /* Initialize I2C */
    initStatus = Cy_SCB_I2C_Init(CYBSP_I2C_CONTROLLER_HW,
                                &CYBSP_I2C_CONTROLLER_config,
                                &CYBSP_I2C_CONTROLLER_context);

    if (CY_SCB_I2C_SUCCESS != initStatus)
    {
        handle_app_error();
    }

    Cy_SCB_I2C_Enable(CYBSP_I2C_CONTROLLER_HW);

    result = mtb_hal_i2c_setup(&CYBSP_I2C_CONTROLLER_hal_obj,
                                &CYBSP_I2C_CONTROLLER_hal_config,
                                &CYBSP_I2C_CONTROLLER_context,
                                NULL);

    if (CY_RSLT_SUCCESS != result)
    {
        handle_app_error();
    }

    /* Initialize BMI270 */
    result = mtb_bmi270_init_i2c(&bmi270,
                                &CYBSP_I2C_CONTROLLER_hal_obj,
                                MTB_BMI270_ADDRESS_DEFAULT);

    if (CY_RSLT_SUCCESS != result)
    {
        handle_app_error();
    }

    result = mtb_bmi270_config_default(&bmi270);

    if (CY_RSLT_SUCCESS != result)
    {
        handle_app_error();
    }

    /* Initialize filter */
    filter_init(&mag_filter);

    /* Clear screen */
    printf("\x1b[2J\x1b[;H");

    printf("************************************************************\r\n");
    printf("     Lab 2-4: Moving Average Filter                         \r\n");
    printf("************************************************************\r\n\r\n");
    printf("Filter Window Size: %d samples (%.1f sec at 10Hz)\r\n\r\n",
           FILTER_WINDOW_SIZE,
           (float)FILTER_WINDOW_SIZE / 10.0f);

    /* Initialize LED to OFF */
    LED_OFF();

    xLastWakeTime = xTaskGetTickCount();

    for (;;)
    {
        /* Read sensor */
        result = mtb_bmi270_read(&bmi270, &bmi270_data);

        if (CY_RSLT_SUCCESS != result)
        {
            handle_app_error();
        }

        /* Convert to m/s² */
        acc_x = lsb_to_mps2(bmi270_data.sensor_data.acc.x,
                            ACC_RANGE_2G,
                            bmi270.sensor.resolution);
        acc_y = lsb_to_mps2(bmi270_data.sensor_data.acc.y,
                            ACC_RANGE_2G,
                            bmi270.sensor.resolution);
        acc_z = lsb_to_mps2(bmi270_data.sensor_data.acc.z,
                            ACC_RANGE_2G,
                            bmi270.sensor.resolution);

        /* Calculate raw magnitude */
        magnitude = calculate_magnitude(acc_x, acc_y, acc_z);

        /* Apply moving average filter */
        filtered_magnitude = filter_update(&mag_filter, magnitude);

        /* Detect motion using filtered value */
        motion_state = detect_motion(filtered_magnitude);

        /* Display results */
        printf("Accelerometer:\r\n");
        printf("  x: %9.6f m/s^2\r\n", (double)acc_x);
        printf("  y: %9.6f m/s^2\r\n", (double)acc_y);
        printf("  z: %9.6f m/s^2\r\n", (double)acc_z);
        printf("\r\n");
        printf("Magnitude: Raw=%6.3f, Filtered=%6.3f m/s^2\r\n",
               (double)magnitude,
               (double)filtered_magnitude);
        printf("Motion: %s (deviation: %.2f g)\r\n",
               get_motion_string(motion_state),
               (double)(fabsf(filtered_magnitude - GRAVITY_EARTH) / GRAVITY_EARTH));

        /* LED feedback - Active LOW (PSoC Edge E84) */
        if (motion_state >= MOTION_MODERATE)
        {
            LED_ON();
        }
        else
        {
            LED_OFF();
        }

        /* Move cursor back for clean display */
        printf("\x1b[7A");

        /* Wait for UART */
        while(!(Cy_SCB_UART_IsTxComplete(CYBSP_DEBUG_UART_HW))) {};

        vTaskDelayUntil(&xLastWakeTime, xDelay);
    }
}
```

#### Create Sensor Hub DAQ Task Function

```c
/*******************************************************************************
 * Function Name: create_sensor_hub_daq_task
 ******************************************************************************/
cy_rslt_t create_sensor_hub_daq_task(void)
{
    BaseType_t status;

    status = xTaskCreate(sensor_hub_daq_task, "IMU Filter",
                            TASK_SENSOR_HUB_DAQ_STACK_SIZE, NULL,
                            TASK_SENSOR_HUB_DAQ_PRIORITY, NULL);

    return (pdPASS == status) ?
        CY_RSLT_SUCCESS : APP_RSLT_ACQ_TASK_CREATE_FAILED;
}
```

### 4. Build และ Flash

```bash
make build -j8
make program
```

### Output ที่คาดหวัง

```bash
Magnitude: Raw= 9.856, Filtered= 9.812 m/s²
Motion: STATIONARY   (deviation: 0.00 g)

[เมื่อเขย่า - สังเกตว่า Filtered เปลี่ยนช้ากว่า Raw]
Magnitude: Raw=12.345, Filtered=10.456 m/s²
Motion: LIGHT MOTION (deviation: 0.07 g)

[หลังหยุดเขย่า - Filtered ค่อยๆ กลับสู่ปกติ]
Magnitude: Raw= 9.810, Filtered=10.123 m/s²
Motion: LIGHT MOTION (deviation: 0.03 g)
```

***

**จบ Session 2** | **ต่อไป:** Session 3: LVGL Display


# Full Motion Detection

## Lab 5: ระบบ Motion Detection สมบูรณ์

### วัตถุประสงค์

* **Integration**: รวมทุกฟังก์ชันจาก Lab 1-4
* **Statistics**: เก็บสถิติการเคลื่อนไหว
* **Real Application**: ระบบ Motion Detection ที่ใช้งานได้จริง

#### จะได้เรียนรู้อะไร

* **System Design**: ออกแบบระบบที่ซับซ้อน
* **Statistics Collection**: เก็บ min/max/count
* **LED Feedback**: แสดงสถานะผ่าน LED

### System Architecture

<figure><img src="/files/po5OGG5l7UIDT7zdUHbC" alt=""><figcaption></figcaption></figure>

### <mark style="color:green;">โหลด Project Code จาก AIC Github Repo เพื่อเปิดบน VSCode IDE</mark>

{% embed url="<https://github.com/Advance-Innovation-Centre-AIC/aic-psoc-edge-epc2-imu-full-system>" %}

### 1. เปิดโปรเจกต์ aic-psoc-edge-epc2-imu-full-system

เปิดไฟล์ `proj_cm33_ns/sensor_hub_daq_task.c` และศึกษาโครงสร้าง:

```shellscript
aic-psoc-edge-epc2-imu-full-system/
├── proj_cm33_s/              # Secure Project
├── proj_cm33_ns/             
│   ├── main.c
│   ├── sensor_hub_daq_task.c 
│   └── sensor_hub_daq_task.h
└── proj_cm55/                # CM55 Project
```

#### เพิ่ม Include

```c
#include <math.h>  /* sqrtf */
#include <string.h>
```

#### **Important Macros and Variables**

```c
/*******************************************************************************
* Macros
*******************************************************************************/
#define GRAVITY_EARTH                       (9.80665f)
#define DEG_TO_RAD                          (0.01745f)
#define GYR_RANGE_DPS                       (2000.0f)
#define ACC_RANGE_2G                        (2.0f)

/* Filter Configuration */
#define FILTER_WINDOW_SIZE                  (10)    /* 10 samples = 1 sec at 10Hz */

/* Statistics Report Interval */
#define STATS_REPORT_INTERVAL               (100)   /* 100 samples = 10 sec at 10Hz */

/* LED Macros - Active HIGH (PSoC Edge E84 USER_LED1) */
#define LED_ON()     Cy_GPIO_Set(CYBSP_USER_LED1_PORT, CYBSP_USER_LED1_PIN)
#define LED_OFF()    Cy_GPIO_Clr(CYBSP_USER_LED1_PORT, CYBSP_USER_LED1_PIN)

/* Custom app module ID to avoid collisions */
#define APP_RSLT_MODULE_ID                  (1U)

/* App error for task creation failure */
#define APP_RSLT_ACQ_TASK_CREATE_FAILED     CY_RSLT_CREATE(CY_RSLT_TYPE_ERROR,\
                                                        APP_RSLT_MODULE_ID,\
                                                        1U)

/*******************************************************************************
* Motion State Enum
*******************************************************************************/
typedef enum {
    MOTION_STATIONARY = 0,
    MOTION_LIGHT,
    MOTION_MODERATE,
    MOTION_INTENSE
} motion_state_t;

/*******************************************************************************
* Moving Average Filter Structure
*******************************************************************************/
typedef struct {
    float buffer[FILTER_WINDOW_SIZE];
    uint32_t head;
    uint32_t count;
    float sum;
} moving_avg_filter_t;

/*******************************************************************************
* Motion Statistics Structure
*******************************************************************************/
typedef struct {
    uint32_t stationary_count;
    uint32_t light_count;
    uint32_t moderate_count;
    uint32_t intense_count;
    float max_magnitude;
    float min_magnitude;
    uint32_t total_samples;
} motion_stats_t;

/*******************************************************************************
* Global Variables
*******************************************************************************/
static mtb_hal_i2c_t CYBSP_I2C_CONTROLLER_hal_obj;
static cy_stc_scb_i2c_context_t CYBSP_I2C_CONTROLLER_context;

static mtb_bmi270_data_t bmi270_data;
static mtb_bmi270_t bmi270;

static cy_en_scb_i2c_status_t initStatus;
static cy_rslt_t result;

/* Filter and Statistics objects */
static moving_avg_filter_t mag_filter = {0};
static motion_stats_t g_stats = {0};
```

#### สร้างฟังก์ชัน Raw accelerometer Conversion ชื่อ `lsb_to_mp2()`

```c
/*******************************************************************************
 * Function Name: lsb_to_mps2
 *******************************************************************************
 * Summary:
 *   Converts raw accelerometer value to m/s²
 *
 * Parameters:
 *   val       - raw value from sensor (-32768 to +32767)
 *   g_range   - accelerometer range in g (2 = ±2g)
 *   bit_width - data width in bits (16)
 *
 * Return:
 *   float - acceleration in m/s²
 ******************************************************************************/
static float lsb_to_mps2(int16_t val, int8_t g_range, uint8_t bit_width)
{
    float half_scale = (float)(1u << (bit_width - 1u));
    return ((GRAVITY_EARTH) * val * g_range) / half_scale;
}
```

#### **สร้างฟังก์ชัน Magnitude Calcuation ชื่อ `calculate_magnitude()`**

```c
/*******************************************************************************
 * Function Name: calculate_magnitude
 *******************************************************************************
 * Summary:
 *   Calculates the magnitude of acceleration vector: |acc| = sqrt(x² + y² + z²)
 *   Used for motion detection and impact sensing.
 *
 * Parameters:
 *   acc_x, acc_y, acc_z - acceleration components in m/s²
 *
 * Return:
 *   float - magnitude in m/s² (stationary ≈ 9.81 m/s² = 1g)
 *
 * Note:
 *   - Stationary: magnitude ≈ 9.81 m/s² (1g from gravity)
 *   - Moving: magnitude deviates from 9.81
 *   - Free fall: magnitude ≈ 0 (weightlessness)
 ******************************************************************************/
static float calculate_magnitude(float acc_x, float acc_y, float acc_z)
{
    return sqrtf(acc_x * acc_x + acc_y * acc_y + acc_z * acc_z);
}
```

#### สร้างฟังก์ชัน Filter&#x20;

```c
/*******************************************************************************
 * Function Name: filter_init
 *******************************************************************************
 * Summary:
 *   Initialize the moving average filter
 ******************************************************************************/
static void filter_init(moving_avg_filter_t *filter)
{
    memset(filter, 0, sizeof(moving_avg_filter_t));
}

/*******************************************************************************
 * Function Name: filter_update
 *******************************************************************************
 * Summary:
 *   Add new value to filter and return the current moving average.
 *   Uses optimized O(1) algorithm.
 ******************************************************************************/
static float filter_update(moving_avg_filter_t *filter, float new_value)
{
    if (filter->count >= FILTER_WINDOW_SIZE)
    {
        filter->sum -= filter->buffer[filter->head];
    }
    else
    {
        filter->count++;
    }

    filter->buffer[filter->head] = new_value;
    filter->sum += new_value;
    filter->head = (filter->head + 1) % FILTER_WINDOW_SIZE;

    return filter->sum / (float)filter->count;
}
```

#### **สร้างฟังก์ชัน Motion Detection ชื่อ** `detect_motion`**`()`**

```c
/*******************************************************************************
 * Function Name: detect_motion
 *******************************************************************************
 * Summary:
 *   Detects motion level from acceleration magnitude
 ******************************************************************************/
static motion_state_t detect_motion(float magnitude)
{
    float deviation = fabsf(magnitude - GRAVITY_EARTH);

    if (deviation < 0.1f * GRAVITY_EARTH)
    {
        return MOTION_STATIONARY;
    }
    else if (deviation < 0.3f * GRAVITY_EARTH)
    {
        return MOTION_LIGHT;
    }
    else if (deviation < 0.6f * GRAVITY_EARTH)
    {
        return MOTION_MODERATE;
    }
    else
    {
        return MOTION_INTENSE;
    }
}
```

#### **สร้างฟังก์ชันที่เหลือ**

```c
/*******************************************************************************
 * Function Name: get_motion_string
 *******************************************************************************
 * Summary:
 *   Converts motion state enum to display string
 ******************************************************************************/
static const char* get_motion_string(motion_state_t state)
{
    switch (state)
    {
        case MOTION_STATIONARY: return "STATIONARY  ";
        case MOTION_LIGHT:      return "LIGHT MOTION";
        case MOTION_MODERATE:   return "MODERATE    ";
        case MOTION_INTENSE:    return "INTENSE!    ";
        default:                return "UNKNOWN     ";
    }
}

/*******************************************************************************
 * Function Name: stats_init
 *******************************************************************************
 * Summary:
 *   Initialize motion statistics
 ******************************************************************************/
static void stats_init(motion_stats_t *stats)
{
    memset(stats, 0, sizeof(motion_stats_t));
    stats->min_magnitude = 100.0f;  /* Start high */
    stats->max_magnitude = 0.0f;
}

/*******************************************************************************
 * Function Name: stats_update
 *******************************************************************************
 * Summary:
 *   Update statistics from sensor reading
 ******************************************************************************/
static void stats_update(motion_stats_t *stats,
                         motion_state_t state,
                         float magnitude)
{
    stats->total_samples++;

    /* Count by state */
    switch (state)
    {
        case MOTION_STATIONARY: stats->stationary_count++; break;
        case MOTION_LIGHT:      stats->light_count++;      break;
        case MOTION_MODERATE:   stats->moderate_count++;   break;
        case MOTION_INTENSE:    stats->intense_count++;    break;
    }

    /* Track min/max */
    if (magnitude > stats->max_magnitude)
    {
        stats->max_magnitude = magnitude;
    }
    if (magnitude < stats->min_magnitude)
    {
        stats->min_magnitude = magnitude;
    }
}

/*******************************************************************************
 * Function Name: stats_print
 *******************************************************************************
 * Summary:
 *   Print statistics summary
 ******************************************************************************/
static void stats_print(const motion_stats_t *stats)
{
    if (stats->total_samples == 0) return;

    printf("\r\n========== Motion Statistics ==========\r\n");
    printf("Total Samples: %u\r\n", (unsigned int)stats->total_samples);
    printf("Stationary: %u (%.1f%%)\r\n",
           (unsigned int)stats->stationary_count,
           (double)(100.0f * stats->stationary_count / stats->total_samples));
    printf("Light:      %u (%.1f%%)\r\n",
           (unsigned int)stats->light_count,
           (double)(100.0f * stats->light_count / stats->total_samples));
    printf("Moderate:   %u (%.1f%%)\r\n",
           (unsigned int)stats->moderate_count,
           (double)(100.0f * stats->moderate_count / stats->total_samples));
    printf("Intense:    %u (%.1f%%)\r\n",
           (unsigned int)stats->intense_count,
           (double)(100.0f * stats->intense_count / stats->total_samples));
    printf("Min Magnitude: %.3f m/s^2 (%.2f g)\r\n",
           (double)stats->min_magnitude,
           (double)(stats->min_magnitude / GRAVITY_EARTH));
    printf("Max Magnitude: %.3f m/s^2 (%.2f g)\r\n",
           (double)stats->max_magnitude,
           (double)(stats->max_magnitude / GRAVITY_EARTH));
    printf("========================================\r\n\r\n");
}
```

### 3. เขียน Main Task Loop

```c
/*******************************************************************************
 * Function Name: sensor_hub_daq_task
 *******************************************************************************
 * Summary:
 *   Complete motion detection system with filter and statistics
 ******************************************************************************/
static void sensor_hub_daq_task(void *pvParameters)
{
    TickType_t xLastWakeTime = 0;
    const TickType_t xDelay = 100 / portTICK_PERIOD_MS;  /* 10Hz */

    float acc_x = 0.0f;
    float acc_y = 0.0f;
    float acc_z = 0.0f;
    float magnitude = 0.0f;
    float filtered_magnitude = 0.0f;
    motion_state_t motion_state = MOTION_STATIONARY;
    uint32_t print_counter = 0;

    (void)pvParameters;

    /* Initialize I2C */
    initStatus = Cy_SCB_I2C_Init(CYBSP_I2C_CONTROLLER_HW,
                                &CYBSP_I2C_CONTROLLER_config,
                                &CYBSP_I2C_CONTROLLER_context);

    if (CY_SCB_I2C_SUCCESS != initStatus)
    {
        handle_app_error();
    }

    Cy_SCB_I2C_Enable(CYBSP_I2C_CONTROLLER_HW);

    result = mtb_hal_i2c_setup(&CYBSP_I2C_CONTROLLER_hal_obj,
                                &CYBSP_I2C_CONTROLLER_hal_config,
                                &CYBSP_I2C_CONTROLLER_context,
                                NULL);

    if (CY_RSLT_SUCCESS != result)
    {
        handle_app_error();
    }

    /* Initialize BMI270 */
    result = mtb_bmi270_init_i2c(&bmi270,
                                &CYBSP_I2C_CONTROLLER_hal_obj,
                                MTB_BMI270_ADDRESS_DEFAULT);

    if (CY_RSLT_SUCCESS != result)
    {
        handle_app_error();
    }

    result = mtb_bmi270_config_default(&bmi270);

    if (CY_RSLT_SUCCESS != result)
    {
        handle_app_error();
    }

    /* Initialize filter and statistics */
    filter_init(&mag_filter);
    stats_init(&g_stats);

    /* Clear screen */
    printf("\x1b[2J\x1b[;H");

    printf("************************************************************\r\n");
    printf("     PSOC Edge MCU: Complete Motion Detection System        \r\n");
    printf("************************************************************\r\n\r\n");

    /* Initialize LED to OFF */
    LED_OFF();

    xLastWakeTime = xTaskGetTickCount();

    for (;;)
    {
        /* Read sensor */
        result = mtb_bmi270_read(&bmi270, &bmi270_data);

        if (CY_RSLT_SUCCESS != result)
        {
            handle_app_error();
        }

        /* Convert to m/s² */
        acc_x = lsb_to_mps2(bmi270_data.sensor_data.acc.x,
                            ACC_RANGE_2G,
                            bmi270.sensor.resolution);
        acc_y = lsb_to_mps2(bmi270_data.sensor_data.acc.y,
                            ACC_RANGE_2G,
                            bmi270.sensor.resolution);
        acc_z = lsb_to_mps2(bmi270_data.sensor_data.acc.z,
                            ACC_RANGE_2G,
                            bmi270.sensor.resolution);

        /* Calculate magnitude */
        magnitude = calculate_magnitude(acc_x, acc_y, acc_z);

        /* Apply filter */
        filtered_magnitude = filter_update(&mag_filter, magnitude);

        /* Detect motion (use filtered value) */
        motion_state = detect_motion(filtered_magnitude);

        /* Update statistics */
        stats_update(&g_stats, motion_state, magnitude);

        /* Display current values */
        printf("Acc: [%7.3f, %7.3f, %7.3f] m/s^2\r\n",
               (double)acc_x, (double)acc_y, (double)acc_z);
        printf("Mag: Raw=%6.3f, Flt=%6.3f m/s^2 | %s\r\n",
               (double)magnitude,
               (double)filtered_magnitude,
               get_motion_string(motion_state));

        /* LED feedback - Active LOW (PSoC Edge E84) */
        switch (motion_state)
        {
            case MOTION_STATIONARY:
                LED_OFF();  /* Set = OFF for Active LOW */
                break;
            case MOTION_LIGHT:
                Cy_GPIO_Inv(CYBSP_USER_LED1_PORT, CYBSP_USER_LED1_PIN);  /* Blink */
                break;
            case MOTION_MODERATE:
            case MOTION_INTENSE:
                LED_ON();   /* Clr = ON for Active LOW */
                break;
        }

        /* Print statistics every STATS_REPORT_INTERVAL samples */
        print_counter++;
        if (print_counter >= STATS_REPORT_INTERVAL)
        {
            stats_print(&g_stats);
            print_counter = 0;
        }

        /* Move cursor back for clean display */
        printf("\x1b[2A");

        /* Wait for UART */
        while(!(Cy_SCB_UART_IsTxComplete(CYBSP_DEBUG_UART_HW))) {};

        vTaskDelayUntil(&xLastWakeTime, xDelay);
    }
}
```

#### Create Sensor Hub DAQ Task Function

```c
/*******************************************************************************
 * Function Name: create_sensor_hub_daq_task
 ******************************************************************************/
cy_rslt_t create_sensor_hub_daq_task(void)
{
    BaseType_t status;

    status = xTaskCreate(sensor_hub_daq_task, "Motion System",
                            TASK_SENSOR_HUB_DAQ_STACK_SIZE, NULL,
                            TASK_SENSOR_HUB_DAQ_PRIORITY, NULL);

    return (pdPASS == status) ?
        CY_RSLT_SUCCESS : APP_RSLT_ACQ_TASK_CREATE_FAILED;
}
```

### 4. Build และ Flash

```bash
make build -j8
make program
```

### 5.3 Output ที่คาดหวัง

```bash
************************************************************
     PSOC Edge MCU: Motion Detection System
************************************************************

Acc: [  0.123,  -0.045,   9.801] m/s²
Mag: Raw= 9.802, Flt= 9.805 m/s² | STATIONARY

[หลัง 10 วินาที]
========== Motion Statistics ==========
Total Samples: 100
Stationary: 85 (85.0%)
Light:      10 (10.0%)
Moderate:   4 (4.0%)
Intense:    1 (1.0%)
Min Magnitude: 9.456 m/s² (0.96 g)
Max Magnitude: 15.234 m/s² (1.55 g)
========================================
```

## Next Steps

<figure><img src="/files/HQKo1kJXkFolQscWOpBA" alt=""><figcaption></figcaption></figure>

***

**จบ Session 2** | **ต่อไป:** Session 3: LVGL Display


# HMI Development

เตรียมพร้อม UX/UI Development สำหรับเครื่อง PC

## เตรียมพร้อม UX/UI Development สำหรับเครื่อง PC

## 1. ติดตั้ง LVGL PC Simulator

PC Simulator ใช้ **SDL2** เพื่อจำลองหน้าจอ LCD และ touch input บน PC ทำให้สามารถ:

* พัฒนาและทดสอบ UI ได้รวดเร็ว
* Debug code บน PC ได้สะดวก
* ไม่ต้องมีบอร์ดจริงก็พัฒนาได้
* รองรับ Widows, macOS และ Linux&#x20;

#### Windows

**ติดตั้ง MSYS2 (**&#x53;oftware Distribution and Building Platform for Window&#x73;**)**

1. ดาวน์โหลดและติดตั้ง [MSYS2](https://www.msys2.org/)
2. เปิด MSYS2 UCRT64 terminal
3. รันคำสั่ง:

```bash
pacman -Syu
pacman -S mingw-w64-ucrt-x86_64-cmake mingw-w64-ucrt-x86_64-gcc mingw-w64-ucrt-x86_64-SDL2 git make
```

#### macOS

```bash
# ติดตั้ง Homebrew (ถ้ายังไม่มี)
/bin/bash -c "$(curl -fsSL https://raw.githubusercontent.com/Homebrew/install/HEAD/install.sh)"

# ติดตั้ง dependencies
brew install cmake sdl2 git
```

#### Linux (Ubuntu/Debian)

```bash
sudo apt update
sudo apt install -y build-essential cmake git libsdl2-dev
```

#### Linux (Fedora/RHEL)

```bash
sudo dnf install -y cmake gcc gcc-c++ git SDL2-devel
```

## 2. ดาวโหลดโปรเจค LVGL PC Simulator (AIC-EEC version)

{% embed url="<https://www.youtube.com/watch?v=hXF-6t2KABs>" fullWidth="true" %}

กดลิงค์ GitHub ด้านล่าง

{% embed url="<https://github.com/Advance-Innovation-Centre-AIC/lv_port_pc_vscode_aic-eec>" %}

แล้วแตกไฟล์ลงในเครื่องของตัวเอง **`C:\lv_port_pc_vscode_aic-eec-main`**

### เปิดโปรแกรม MSYS2 UCRT64 Terminal แล้วรันคำสั่ง

```bash
cd C:\lv_port_pc_vscode_aic-eec-main
mkdir build && cd build
cmake -G "MSYS Makefiles" ..
make -j
```

Executable จะอยู่ที่ `bin/main` (macOS/Linux) หรือ `bin/main.exe` (Windows)

***

## 3. การรันโปรแกรม

เปิดโปรแกรม MSYS2 UCRT64 Terminal

<figure><img src="/files/6Rxh9f05MGqafH6kQePH" alt=""><figcaption></figcaption></figure>

ตัวอย่างการรันโปรแกรม

<figure><img src="/files/fCNNQswwu12EvwVqRqqw" alt=""><figcaption></figcaption></figure>

ผลลัพธ์การรันโปรแกรม

<figure><img src="/files/hI5j7o4B85SCqN4jwOxo" alt=""><figcaption></figcaption></figure>

### แบบที่ 1: เลือกตัวอย่าง + Build ด้วย build.sh

วิธีที่ง่ายที่สุด ใช้ `build.sh`:

```shellscript
cd C:\lv_port_pc_vscode_aic-eec-main
./build.sh 1 1     # Part 1, Example 1 (Hello World) → build + รัน
./build.sh 2 3     # Part 2, Example 3 (Chart Time Series)
./build.sh 5 5     # Part 5, Example 5 (WiFi Manager)
./build.sh 3 2 -b  # Part 3, Example 2 → build อย่างเดียว (ไม่รัน)
./build.sh         # build ค่าปัจจุบัน + รัน
./build.sh -l      # แสดงรายการตัวอย่างทั้งหมด
./build.sh -c      # ลบ build directory (clean)
./build.sh -h      # แสดงวิธีใช้
```

{% embed url="<https://www.youtube.com/watch?v=8cUpaT30wqI>" fullWidth="true" %}

Script จะ:

1. ตั้งค่า `SELECTED_PART` และ `SELECTED_EXAMPLE` ใน `src/example_selector.h` ให้อัตโนมัติ
2. สร้าง build directory + cmake (ถ้ายังไม่มี)
3. Build โปรเจค
4. Copy `SDL2.dll` ให้อัตโนมัติ (Windows)
5. รันโปรแกรมทันที (ยกเว้นใช้ `-b`)

{% embed url="<https://youtu.be/I0dRazU0NMA>" fullWidth="true" %}

***

### แบบที่ 1:  เลือกตัวอย่าง (แบบ Manual)

แก้ไขไฟล์ `src/example_selector.h`:

```c
#define SELECTED_PART       1    // เลือก Part (1-5)
#define SELECTED_EXAMPLE    1    // เลือก Example
```

แล้ว build ใหม่:

```bash
cd build
make -j
```

***

### รายการตัวอย่างทั้งหมด <a href="#e0-b8-a3-e0-b8-b2-e0-b8-a2-e0-b8-81-e0-b8-b2-e0-b8-a3-e0-b8-95-e0-b8-b1-e0-b8-a7-e0-b8-a-d-e0-b8-a2" id="e0-b8-a3-e0-b8-b2-e0-b8-a2-e0-b8-81-e0-b8-b2-e0-b8-a3-e0-b8-95-e0-b8-b1-e0-b8-a7-e0-b8-a-d-e0-b8-a2"></a>

#### Part 1: LVGL พื้นฐาน + GPIO (11 Examples) <a href="#part-1-lvgl-e0-b8-9e-e0-b8-b7-e0-b9-89-e0-b8-99-e0-b8-90-e0-b8-b2-e0-b8-99-gpio-11-examples" id="part-1-lvgl-e0-b8-9e-e0-b8-b7-e0-b9-89-e0-b8-99-e0-b8-90-e0-b8-b2-e0-b8-99-gpio-11-examples"></a>

**Section I — UI Only (จำลองบน PC ได้)**

<table><thead><tr><th width="106.2620849609375">Example</th><th width="230.8309326171875">ชื่อ</th><th>เรียนรู้</th></tr></thead><tbody><tr><td>1</td><td>Hello World</td><td>Label, Align, Style</td></tr><tr><td>2</td><td>Button Counter</td><td>Button, Event Callback</td></tr><tr><td>3</td><td>LED Control</td><td>LED Widget, Slider, Brightness</td></tr><tr><td>4</td><td>Switch Toggle</td><td>Switch, State Check</td></tr><tr><td>5</td><td>GPIO Dashboard</td><td>Layout, Multiple Widgets</td></tr></tbody></table>

**Section II — Hardware Integration (ใช้บอร์ดจริง / mock บน PC)**

<table><thead><tr><th width="109.24151611328125">Example</th><th width="259.03546142578125">ชื่อ</th><th>เรียนรู้</th></tr></thead><tbody><tr><td>6</td><td>HW LED Control</td><td>Real GPIO LED On/Off/Toggle</td></tr><tr><td>7</td><td>HW Button Status</td><td>Real Button State Display</td></tr><tr><td>8</td><td>HW ADC Display</td><td>Real ADC Potentiometer Reading</td></tr><tr><td>9</td><td>HW GPIO Dashboard</td><td>Combined LEDs + Button + ADC</td></tr><tr><td>10</td><td>CapSense Mockup</td><td>CapSense UI (no hardware)</td></tr><tr><td>11</td><td>CapSense Hardware</td><td>Real CapSense via I2C</td></tr></tbody></table>

#### Part 2: แสดงผลข้อมูลเซ็นเซอร์ (11 Examples) <a href="#part-2-e0-b9-81-e0-b8-aa-e0-b8-94-e0-b8-87-e0-b8-9c-e0-b8-a5-e0-b8-82-e0-b9-89-e0-b8-a-d-e0-b8-a1-e0" id="part-2-e0-b9-81-e0-b8-aa-e0-b8-94-e0-b8-87-e0-b8-9c-e0-b8-a5-e0-b8-82-e0-b9-89-e0-b8-a-d-e0-b8-a1-e0"></a>

**Section I — Simulated Data (จำลองบน PC ได้)**

<table><thead><tr><th width="131.9296875">Example</th><th width="236.06109619140625">ชื่อ</th><th>เรียนรู้</th></tr></thead><tbody><tr><td>1</td><td>Slider Bar</td><td>Slider, Bar, ADC Visualization</td></tr><tr><td>2</td><td>Arc Gauge</td><td>Arc Widget, Circular Gauge</td></tr><tr><td>3</td><td>Chart Time Series</td><td>Chart, Line Series, Timer</td></tr><tr><td>4</td><td>Scale Temperature</td><td>Scale Widget, Color Zones</td></tr><tr><td>5</td><td>Sensor Dashboard</td><td>TabView, IMU + ADC</td></tr><tr><td>6</td><td>Chart Dashboard</td><td>Bar/Area/Scatter/Line Charts</td></tr></tbody></table>

**Section II — Hardware Integration (ใช้บอร์ดจริง / mock บน PC)**

<table><thead><tr><th width="117.93109130859375">Example</th><th width="261.328125">ชื่อ</th><th>เรียนรู้</th></tr></thead><tbody><tr><td>7</td><td>Real IMU Display</td><td>BMI270 3-Axis Accelerometer Chart</td></tr><tr><td>8</td><td>Real Sensor Dashboard</td><td>Real ADC + IMU Dashboard</td></tr><tr><td>9</td><td>Real Arc Gauge</td><td>Real Potentiometer → Arc Display</td></tr><tr><td>10</td><td>Real Scale Gauge</td><td>Real Potentiometer → Scale Needle</td></tr><tr><td>11</td><td>Real Chart Dashboard</td><td>Real IMU on Multiple Chart Types</td></tr></tbody></table>

#### Part 3: Oscilloscope & Signal Processing (8 Examples) <a href="#part-3-oscilloscope--signal-processing-8-examples" id="part-3-oscilloscope--signal-processing-8-examples"></a>

**Section I — Simulated Data (จำลองบน PC ได้)**

<table><thead><tr><th width="129.49359130859375">Example</th><th width="216.311767578125">ชื่อ</th><th>เรียนรู้</th></tr></thead><tbody><tr><td>1</td><td>Waveform Generator</td><td>Square/Sine/Triangle/Sawtooth</td></tr><tr><td>2</td><td>Noise Generator</td><td>White Noise Display</td></tr><tr><td>3</td><td>Audio Waveform</td><td>I2S Audio Visualization</td></tr><tr><td>4</td><td>Mic Visualizer</td><td>PDM Microphone Display</td></tr><tr><td>5</td><td>Oscilloscope UI</td><td>Full Scope Interface</td></tr><tr><td>6</td><td>Spectrum Analyzer</td><td>FFT Frequency Display</td></tr></tbody></table>

**Section II — Integration (จำลอง + ฮาร์ดแวร์)**

<table><thead><tr><th width="111.94036865234375">Example</th><th width="222.6484375">ชื่อ</th><th>เรียนรู้</th></tr></thead><tbody><tr><td>7</td><td>Custom Panel Scope</td><td>Custom Panel Navigation</td></tr><tr><td>8</td><td>HW Scope</td><td>Real Potentiometer + LED3 Scope</td></tr></tbody></table>

#### Part 4: IPC, Logging, Event Bus (9 Examples) <a href="#part-4-ipc-logging-event-bus-9-examples" id="part-4-ipc-logging-event-bus-9-examples"></a>

**Section I — Simulated (จำลองบน PC ได้)**

<table><thead><tr><th width="105.100830078125">Example</th><th width="226.735107421875">ชื่อ</th><th>เรียนรู้</th></tr></thead><tbody><tr><td>1</td><td>IPC Ping Test</td><td>IPC Ping/Pong</td></tr><tr><td>2</td><td>Logging System</td><td>Remote Logging</td></tr><tr><td>3</td><td>IPC Sensor Data</td><td>Sensor Data via IPC</td></tr><tr><td>4</td><td>Event Bus</td><td>Event-driven Architecture</td></tr></tbody></table>

**Section II — Hardware IPC (ใช้บอร์ดจริง / mock บน PC)**

<table><thead><tr><th width="118.8082275390625">Example</th><th width="241.116455078125">ชื่อ</th><th>เรียนรู้</th></tr></thead><tbody><tr><td>5</td><td>HW IPC LED</td><td>LED Control via IPC</td></tr><tr><td>6</td><td>HW IPC Button</td><td>Button Events via IPC</td></tr><tr><td>7</td><td>HW IPC Dashboard</td><td>Full IPC Dashboard</td></tr><tr><td>8</td><td>Advanced Features</td><td>IPC + Event Bus + Logging</td></tr><tr><td>9</td><td>CapSense IPC</td><td>CapSense Touch via IPC</td></tr></tbody></table>

#### Part 5: WiFi Manager & IoT (8 Examples) <a href="#part-5-wifi-manager--iot-8-examples" id="part-5-wifi-manager--iot-8-examples"></a>

**Section I — WiFi Basics (จำลองบน PC ได้)**

<table><thead><tr><th width="106.24432373046875">Example</th><th width="224.08380126953125">ชื่อ</th><th>เรียนรู้</th></tr></thead><tbody><tr><td>1</td><td>WiFi Network List</td><td>List Widget, Network Data</td></tr><tr><td>2</td><td>WiFi Connect</td><td>Connect/Disconnect Flow</td></tr><tr><td>3</td><td>TCP/IP Info</td><td>Network Information Display</td></tr><tr><td>4</td><td>Hardware Info</td><td>System Information</td></tr></tbody></table>

**Section II — Full WiFi Integration (จำลอง + ฮาร์ดแวร์)**

<table><thead><tr><th width="116.571044921875">Example</th><th width="224.4815673828125">ชื่อ</th><th>เรียนรู้</th></tr></thead><tbody><tr><td>5</td><td>WiFi Manager</td><td>Full WiFi Manager UI</td></tr><tr><td>6</td><td>WiFi Status</td><td>Real-time Status Dashboard</td></tr><tr><td>7</td><td>IoT Dashboard</td><td>WiFi + Sensors Combined</td></tr><tr><td>8</td><td>MQTT Preview</td><td>MQTT Broker/Topics UI</td></tr></tbody></table>

***

### โครงสร้างโปรเจค <a href="#e0-b9-82-e0-b8-84-e0-b8-a3-e0-b8-87-e0-b8-aa-e0-b8-a3-e0-b9-89-e0-b8-b2-e0-b8-87-e0-b9-82-e0-b8-9b-e" id="e0-b9-82-e0-b8-84-e0-b8-a3-e0-b8-87-e0-b8-aa-e0-b8-a3-e0-b9-89-e0-b8-b2-e0-b8-87-e0-b9-82-e0-b8-9b-e"></a>

```bash
lv_port_pc_vscode_aic-eec/
├── build.sh                   Build Script (แนะนำ)
├── src/
│   ├── example_selector.h     <-- ตั้งค่า Part + Example ที่นี่
│   ├── main.c
│   ├── part1/                 Part 1: LVGL พื้นฐาน
│   ├── part2/                 Part 2: เซ็นเซอร์
│   ├── part3/                 Part 3: Oscilloscope
│   ├── part4/                 Part 4: IPC/Event Bus
│   ├── part5/                 Part 5: WiFi/IoT
│   ├── aic-eec/               ไลบรารี AIC-EEC (mock)
│   └── hal/                   Hardware Abstraction (SDL)
├── lvgl/                      LVGL Library v9.2
├── lv_conf.h                  LVGL Configuration
├── CMakeLists.txt             Build Configuration
├── patches/                   Patch files สำหรับ repo ต้นฉบับ LVGL
├── bin/                       Output Executables
└── build/                     Build Directory (auto-generated)
```

***

#### Rebuild หลังแก้โค้ด

ไม่ต้อง cmake ใหม่ แค่ make:

```bash
cd build
make -j
```

ถ้าแก้ CMakeLists.txt หรือเพิ่ม/ลบไฟล์ ให้ cmake ใหม่:

```bash
cd build
cmake ..
make -j
```

***

#### Clean Build

```bash
rm -rf build
mkdir build && cd build
cmake ..
make -j
```

หรือใช้ `build.sh`:

```bash
./build.sh -c        # clean
./build.sh 1 1       # build ใหม่
```

{% hint style="danger" %}

### แก้ปัญหา (Troubleshooting)&#x20;

#### Windows: cmake "Permission denied" หรือหา compiler ไม่เจอ

ถ้าติดตั้ง cmake จาก Windows (winget/installer) ไว้ด้วย จะชนกับ cmake ของ MSYS2

**ตรวจสอบ:**

```shellscript
which cmake
```

ถ้าได้ `/c/Program Files/CMake/bin/cmake` แสดงว่าใช้ตัวผิด

**แก้ไข:** เพิ่ม PATH ก่อนรัน cmake

```
export PATH=/ucrt64/bin:$PATH
```

หรือ**ถอนการติดตั้ง cmake ตัว Windows** ออก (ผ่าน Settings > Apps)

#### Windows: SDL2.dll was not found

```bash
cp /ucrt64/bin/SDL2.dll bin/
```

หรือใช้ `build.sh` ซึ่งจะ copy ให้อัตโนมัติ

#### Windows: ThorVG "config.h: No such file or directory"

> **หมายเหตุ:** ปัญหานี้เกิดเฉพาะกรณีที่ไปโหลด repo ต้นฉบับจาก LVGL (`git clone https://github.com/lvgl/lv_port_pc_vscode.git`) มาใช้เอง **repo นี้ (lv\_port\_pc\_vscode\_aic-eec) แก้ไขไว้ให้แล้ว ไม่ต้องทำอะไรเพิ่ม**

ถ้าใช้ repo ต้นฉบับของ LVGL จะเจอ error นี้ตอน build บน Windows/MSYS2:

```
tvgCommon.h:29:10: fatal error: config.h: No such file or directory
```

สาเหตุ: ThorVG (ไลบรารี vector graphics ใน LVGL) ต้องการ `config.h` ที่ cmake ควรจะ generate ให้ แต่บน MSYS2 มันไม่ทำงานถูกต้อง

**วิธีแก้:** ดูรายละเอียดทั้งหมดที่ `patches/fix-thorvg-windows.patch` โดยสรุปคือปิด ThorVG ใน `lv_conf.h` และ `CMakeLists.txt` (ไม่กระทบการใช้งานปกติ)

#### ทุก OS: Build ไม่ผ่านหลังย้ายโฟลเดอร์

ถ้าย้าย directory ของโปรเจค ต้อง clean build ใหม่เพราะ cmake cache จำ path เดิม:

```bash
rm -rf build bin
./build.sh 1 1
```

{% endhint %}


# AIC-EEC API

AIC-EEC Module Library

ไลบรารี Hardware Abstraction Layer และ UI helpers สำหรับ **Embedded Systems and IoT Development**, ภาควิชาวิศวกรรมไฟฟ้า คณะวิศวกรรมศาสตร์ มหาวิทยาลัยบูรพา นี่คือเวอร์ชัน **PC Simulator** — API ตรงกับเวอร์ชัน PSoC Edge E84 ทุกประการ โดยใช้ mock implementation แทนการเข้าถึงฮาร์ดแวร์จริง

> รศ.วิรุฬห์ ศรีบริรักษ์ ภาควิชาวิศวกรรมไฟฟ้า คณะวิศวกรรมศาสตร์ มหาวิทยาลัยบูรพา

***

### โมดูลทั้งหมด <a href="#e0-b9-82-e0-b8-a1-e0-b8-94-e0-b8-b9-e0-b8-a5-e0-b8-97-e0-b8-b1-e0-b9-89-e0-b8-87-e0-b8-ab-e0-b8-a1-e" id="e0-b9-82-e0-b8-a1-e0-b8-94-e0-b8-b9-e0-b8-a5-e0-b8-97-e0-b8-b1-e0-b9-89-e0-b8-87-e0-b8-ab-e0-b8-a1-e"></a>

#### Framework (โครงสร้างพื้นฐาน) <a href="#framework-e0-b9-82-e0-b8-84-e0-b8-a3-e0-b8-87-e0-b8-aa-e0-b8-a3-e0-b9-89-e0-b8-b2-e0-b8-87-e0-b8-9e" id="framework-e0-b9-82-e0-b8-84-e0-b8-a3-e0-b8-87-e0-b8-aa-e0-b8-a3-e0-b9-89-e0-b8-b2-e0-b8-87-e0-b8-9e"></a>

<table><thead><tr><th width="151.1591796875">ไฟล์</th><th>คำอธิบาย</th></tr></thead><tbody><tr><td><code>aic-eec.h/c</code></td><td>UI components กลาง — footer, header, logo, theme, container</td></tr><tr><td><code>aic_layout.h/c</code></td><td>ตัวช่วยจัด layout แบบ Flexbox — row, column, card, gauge, progress bar</td></tr><tr><td><code>aic_event.h/c</code></td><td>ระบบ Event Bus แบบ publish-subscribe — sensor/button/system events</td></tr><tr><td><code>aic_log.h/c</code></td><td>ระบบ Logging — แบ่ง level (Error/Warn/Info/Debug/Verbose), output ทาง printf + LVGL</td></tr></tbody></table>

#### Hardware Abstraction (Mock — จำลองฮาร์ดแวร์) <a href="#hardware-abstraction-mock-e0-b8-88-e0-b8-b3-e0-b8-a5-e0-b8-a-d-e0-b8-87-e0-b8-ae-e0-b8-b2-e0-b8-a3-e" id="hardware-abstraction-mock-e0-b8-88-e0-b8-b3-e0-b8-a5-e0-b8-a-d-e0-b8-87-e0-b8-ae-e0-b8-b2-e0-b8-a3-e"></a>

<table><thead><tr><th width="133.7620849609375">ไฟล์</th><th>คำอธิบาย</th></tr></thead><tbody><tr><td><code>gpio.h/c</code></td><td>ควบคุม LED (RGB), อ่านปุ่มกด, ปรับความสว่าง PWM — เก็บค่าในหน่วยความจำ</td></tr><tr><td><code>sensors.h/c</code></td><td>ADC (5 channels), IMU (BMI270), อุณหภูมิ, CAPSENSE — ข้อมูลจำลอง</td></tr></tbody></table>

#### Signal Processing (ประมวลผลสัญญาณ) <a href="#signal-processing-e0-b8-9b-e0-b8-a3-e0-b8-b0-e0-b8-a1-e0-b8-a7-e0-b8-a5-e0-b8-9c-e0-b8-a5-e0-b8-aa-e" id="signal-processing-e0-b8-9b-e0-b8-a3-e0-b8-b0-e0-b8-a1-e0-b8-a7-e0-b8-a5-e0-b8-9c-e0-b8-a5-e0-b8-aa-e"></a>

<table><thead><tr><th width="143.485107421875">ไฟล์</th><th>คำอธิบาย</th></tr></thead><tbody><tr><td><code>ma_filter.h</code></td><td>Moving average filter (header-only, ค่าเริ่มต้น window = 3 samples)</td></tr><tr><td><code>tilt.h/c</code></td><td>Complementary filter — คำนวณ roll/pitch จาก accelerometer + gyroscope</td></tr><tr><td><code>scope.h/c</code></td><td>สร้างสัญญาณ (sine, square, triangle, sawtooth), FFT</td></tr></tbody></table>

***

### ตัวอย่างการใช้งาน <a href="#e0-b8-95-e0-b8-b1-e0-b8-a7-e0-b8-a-d-e0-b8-a2-e0-b9-88-e0-b8-b2-e0-b8-87-e0-b8-81-e0-b8-b2-e0-b8-a3" id="e0-b8-95-e0-b8-b1-e0-b8-a7-e0-b8-a-d-e0-b8-a2-e0-b9-88-e0-b8-b2-e0-b8-87-e0-b8-81-e0-b8-b2-e0-b8-a3"></a>

#### GPIO — ควบคุม LED และปุ่มกด <a href="#gpio-e0-b8-84-e0-b8-a7-e0-b8-9a-e0-b8-84-e0-b8-b8-e0-b8-a1-led-e0-b9-81-e0-b8-a5-e0-b8-b0-e0-b8-9b-e" id="gpio-e0-b8-84-e0-b8-a7-e0-b8-9a-e0-b8-84-e0-b8-b8-e0-b8-a1-led-e0-b9-81-e0-b8-a5-e0-b8-b0-e0-b8-9b-e"></a>

```c
#include "gpio.h"

aic_gpio_init();                              // เริ่มต้นระบบ GPIO (คืนค่า bool)
aic_gpio_led_set(AIC_LED_RED, true);          // เปิด/ปิด LED
aic_gpio_led_toggle(AIC_LED_GREEN);           // สลับสถานะ LED
aic_gpio_pwm_set_brightness(AIC_LED_BLUE, 50);  // ปรับ PWM 0-100%

bool pressed = aic_gpio_button_read(AIC_BTN_USER);     // อ่านปุ่ม (มี debounce)
bool edge    = aic_gpio_button_was_pressed(AIC_BTN_USER); // ตรวจจับขอบ (กดแล้วเคลียร์)
aic_gpio_button_set_callback(AIC_BTN_USER, my_func);   // ลงทะเบียน callback
```

**LED ที่มี:** `AIC_LED_RED`, `AIC_LED_GREEN`, `AIC_LED_BLUE` **ปุ่มที่มี:** `AIC_BTN_USER` (SW2), `AIC_BTN_USER2` (SW4)

#### Sensors — เซ็นเซอร์ <a href="#sensors-e0-b9-80-e0-b8-8b-e0-b9-87-e0-b8-99-e0-b9-80-e0-b8-8b-e0-b8-a-d-e0-b8-a3-e0-b9-8c" id="sensors-e0-b9-80-e0-b8-8b-e0-b9-87-e0-b8-99-e0-b9-80-e0-b8-8b-e0-b8-a-d-e0-b8-a3-e0-b9-8c"></a>

```c
#include "sensors.h"

aic_sensors_init();                           // เริ่มต้นเซ็นเซอร์ทั้งหมด

// ADC — อ่านค่าแอนะล็อก
uint16_t raw = aic_adc_read(AIC_ADC_CH0);    // ค่าดิบ (0-4095 ที่ 12-bit)
float volts  = aic_adc_read_voltage(AIC_ADC_CH0);  // แรงดัน (0-3.3V)
float temp   = aic_adc_read_temperature();    // อุณหภูมิภายใน (องศา C)

// IMU — ตัวตรวจจับการเคลื่อนไหว (BMI270)
float ax, ay, az;
aic_imu_read_accel(&ax, &ay, &az);           // ความเร่ง (หน่วย g)
float gx, gy, gz;
aic_imu_read_gyro(&gx, &gy, &gz);           // ความเร็วเชิงมุม (deg/s)

aic_imu_data_t data;
aic_imu_read_all(&data);                     // อ่านข้อมูล IMU ทั้งหมดพร้อมกัน
```

**ADC channels:** `AIC_ADC_CH0` (Pot), `CH1`, `CH2`, `CH3`, `AIC_ADC_TEMP`

#### Layout — จัด UI ด้วย LVGL <a href="#layout-e0-b8-88-e0-b8-b1-e0-b8-94-ui-e0-b8-94-e0-b9-89-e0-b8-a7-e0-b8-a2-lvgl" id="layout-e0-b8-88-e0-b8-b1-e0-b8-94-ui-e0-b8-94-e0-b9-89-e0-b8-a7-e0-b8-a2-lvgl"></a>

```c
#include "aic_layout.h"

aic_apply_dark_theme(NULL);                   // ธีมมืดบนหน้าจอปัจจุบัน
lv_obj_t *row  = aic_row_create(parent);      // แถวแนวนอน (flex)
lv_obj_t *col  = aic_col_create(parent);      // คอลัมน์แนวตั้ง (flex)
lv_obj_t *card = aic_card_create(parent, "Title");  // การ์ดพร้อมหัวข้อ
lv_obj_t *val  = aic_value_display_create(parent, "Temp:");  // แสดง label + ค่า
lv_obj_t *bar  = aic_progress_bar_create(parent, "CPU");     // แถบความคืบหน้า
aic_create_footer(parent);                    // footer ลิขสิทธิ์
aic_create_header(parent, "My App");          // header พร้อมชื่อ
```

#### Event Bus — ระบบ Event <a href="#event-bus-e0-b8-a3-e0-b8-b0-e0-b8-9a-e0-b8-9a-event" id="event-bus-e0-b8-a3-e0-b8-b0-e0-b8-9a-e0-b8-9a-event"></a>

```c
#include "aic_event.h"

aic_event_init();

// subscribe รับ event เมื่อกดปุ่ม
aic_event_subscribe(AIC_EVENT_BUTTON_PRESS, my_callback, NULL);

// publish ส่ง event
aic_event_publish_button(AIC_BTN_USER, true);    // event ปุ่มกด
aic_event_publish_adc(0, raw_value, voltage_mv); // event ADC

// ประมวลผล event queue (ต้องเรียกเป็นระยะบน PC)
aic_event_process();
```

**กลุ่ม Event ที่สำคัญ:**

* Sensor: `AIC_EVENT_IMU_UPDATE`, `AIC_EVENT_ADC_UPDATE`, `AIC_EVENT_TEMP_UPDATE`
* Input: `AIC_EVENT_BUTTON_PRESS`, `AIC_EVENT_BUTTON_RELEASE`
* System: `AIC_EVENT_IPC_CONNECTED`, `AIC_EVENT_ERROR`
* Custom: `AIC_EVENT_CUSTOM_1` ถึง `AIC_EVENT_CUSTOM_5`

#### Logging — ระบบบันทึกข้อความ <a href="#logging-e0-b8-a3-e0-b8-b0-e0-b8-9a-e0-b8-9a-e0-b8-9a-e0-b8-b1-e0-b8-99-e0-b8-97-e0-b8-b6-e0-b8-81-e0" id="logging-e0-b8-a3-e0-b8-b0-e0-b8-9a-e0-b8-9a-e0-b8-9a-e0-b8-b1-e0-b8-99-e0-b8-97-e0-b8-b6-e0-b8-81-e0"></a>

```c
#include "aic_log.h"

aic_log_init();
aic_log_set_level(AIC_LOG_DEBUG);   // กำหนด level ต่ำสุดที่จะแสดง

AIC_LOGE("Error: %s", msg);        // ข้อผิดพลาด (สีแดง)
AIC_LOGW("Warning: %d", val);      // คำเตือน (สีเหลือง)
AIC_LOGI("Info: started");         // ข้อมูลทั่วไป
AIC_LOGD("Debug: x=%f", x);       // ดีบัก (สำหรับพัฒนา)
AIC_LOGV("Verbose: detail");      // รายละเอียดทั้งหมด
```

***

### เปรียบเทียบ PC Simulator กับ PSoC Edge E84 <a href="#e0-b9-80-e0-b8-9b-e0-b8-a3-e0-b8-b5-e0-b8-a2-e0-b8-9a-e0-b9-80-e0-b8-97-e0-b8-b5-e0-b8-a2-e0-b8-9a-p" id="e0-b9-80-e0-b8-9b-e0-b8-a3-e0-b8-b5-e0-b8-a2-e0-b8-9a-e0-b9-80-e0-b8-97-e0-b8-b5-e0-b8-a2-e0-b8-9a-p"></a>

<table><thead><tr><th width="133.0198974609375">ด้าน</th><th width="271.16900634765625">PC Simulator</th><th>PSoC Edge E84</th></tr></thead><tbody><tr><td><strong>API</strong></td><td>เหมือนกันทุกประการ</td><td>เหมือนกันทุกประการ</td></tr><tr><td><strong>GPIO</strong></td><td>เก็บค่าในหน่วยความจำ</td><td>ควบคุม GPIO pin จริง</td></tr><tr><td><strong>ADC</strong></td><td>ค่าจำลอง</td><td>SAR ADC จริง</td></tr><tr><td><strong>IMU</strong></td><td>สร้างข้อมูล sine wave</td><td>อ่านจาก BMI270 ผ่าน shared memory</td></tr><tr><td><strong>CAPSENSE</strong></td><td>stub (คืนค่า false เสมอ)</td><td>อ่านจาก PSoC 4000T ผ่าน I2C</td></tr><tr><td><strong>Event Bus</strong></td><td>circular buffer (single-thread)</td><td>FreeRTOS queue (multi-thread)</td></tr><tr><td><strong>Logging</strong></td><td>printf ไปที่ terminal</td><td>printf + ส่ง IPC ไปยัง CM33</td></tr></tbody></table>

#### ฟังก์ชันเฉพาะ PC Simulator <a href="#e0-b8-9f-e0-b8-b1-e0-b8-87-e0-b8-81-e0-b9-8c-e0-b8-8a-e0-b8-b1-e0-b8-99-e0-b9-80-e0-b8-89-e0-b8-9e-e" id="e0-b8-9f-e0-b8-b1-e0-b8-87-e0-b8-81-e0-b9-8c-e0-b8-8a-e0-b8-b1-e0-b8-99-e0-b9-80-e0-b8-89-e0-b8-9e-e"></a>

ฟังก์ชันเหล่านี้ใช้ได้เฉพาะบน PC สำหรับจำลองการทดสอบ:

```c
// จำลองการกดปุ่มจาก UI/keyboard
aic_gpio_sim_set_button(AIC_BTN_USER, true);

// ตั้งค่าเซ็นเซอร์จำลอง
aic_sensors_sim_set_adc(AIC_ADC_CH0, 75);      // ตั้ง ADC เป็น 75%
aic_sensors_sim_tick();                          // เคลื่อนไหว IMU อัตโนมัติ
aic_imu_set_simulated_accel(0.0f, 0.0f, 1.0f); // ตั้งค่าเฉพาะเจาะจง
```

***

### วิธี Build (PC Simulator) <a href="#e0-b8-a7-e0-b8-b4-e0-b8-98-e0-b8-b5-build-pc-simulator" id="e0-b8-a7-e0-b8-b4-e0-b8-98-e0-b8-b5-build-pc-simulator"></a>

[HMI Development](/interfacing-with-infineon-psoc-tm-edge/hmi-development#id-3)

***

### ชุดสี (กำหนดใน aic\_layout.h) <a href="#e0-b8-8a-e0-b8-b8-e0-b8-94-e0-b8-aa-e0-b8-b5-e0-b8-81-e0-b8-b3-e0-b8-ab-e0-b8-99-e0-b8-94-e0-b9-83-e" id="e0-b8-8a-e0-b8-b8-e0-b8-94-e0-b8-aa-e0-b8-b5-e0-b8-81-e0-b8-b3-e0-b8-ab-e0-b8-99-e0-b8-94-e0-b9-83-e"></a>

<table><thead><tr><th width="220.92828369140625">Macro</th><th width="202.55963134765625">สี</th><th>การใช้งาน</th></tr></thead><tbody><tr><td><code>AIC_COLOR_BG_DARK</code></td><td><code>#16213e</code></td><td>พื้นหลังหน้าจอ</td></tr><tr><td><code>AIC_COLOR_BG_CARD</code></td><td><code>#1f4068</code></td><td>พื้นหลังการ์ด</td></tr><tr><td><code>AIC_COLOR_PRIMARY</code></td><td><code>#00d4ff</code></td><td>สีหลัก</td></tr><tr><td><code>AIC_COLOR_SECONDARY</code></td><td><code>#ff6b6b</code></td><td>สีรอง</td></tr><tr><td><code>AIC_COLOR_SUCCESS</code></td><td><code>#4ade80</code></td><td>สถานะสำเร็จ</td></tr><tr><td><code>AIC_COLOR_WARNING</code></td><td><code>#fbbf24</code></td><td>สถานะเตือน</td></tr><tr><td><code>AIC_COLOR_ERROR</code></td><td><code>#ef4444</code></td><td>สถานะข้อผิดพลาด</td></tr><tr><td><code>AIC_COLOR_TEXT</code></td><td><code>#ffffff</code></td><td>ข้อความปกติ</td></tr><tr><td><code>AIC_COLOR_TEXT_DIM</code></td><td><code>#94a3b8</code></td><td>ข้อความจางๆ</td></tr></tbody></table>

***

### การย้ายโค้ดจาก PC ไปบอร์ดจริง <a href="#e0-b8-81-e0-b8-b2-e0-b8-a3-e0-b8-a2-e0-b9-89-e0-b8-b2-e0-b8-a2-e0-b9-82-e0-b8-84-e0-b9-89-e0-b8-94-e" id="e0-b8-81-e0-b8-b2-e0-b8-a3-e0-b8-a2-e0-b9-89-e0-b8-b2-e0-b8-a2-e0-b9-82-e0-b8-84-e0-b9-89-e0-b8-94-e"></a>

เนื่องจาก API เหมือนกัน 100% การย้ายโค้ดทำได้ง่าย:

1. **คัดลอกโค้ด** จาก PC Simulator ไปใส่ในโปรเจค PSoC Edge
2. **เปลี่ยน include path** — `"lvgl/lvgl.h"` เป็น `"lvgl.h"` (ถ้าจำเป็น)
3. **ลบฟังก์ชัน sim** — ลบ `aic_gpio_sim_set_button()`, `aic_sensors_sim_tick()` ฯลฯ
4. **Build และทดสอบ** บนบอร์ดจริง

ไม่ต้องเปลี่ยนชื่อฟังก์ชัน, ชนิดข้อมูล, หรือ parameter ใดๆ ทั้งสิ้น

***


# LVGL on PSoC Edge E84

## ขั้นตอนการดาวโหลดตัวอย่าง LVGL Demo พร้อมโปรแกรมลงบอร์ด PSoC Edge E84 Eva Kit

{% embed url="<https://www.youtube.com/watch?v=VuU_DS2-JVk>" fullWidth="true" %}


# GPIO-to-HMI Display

## ส่วนที่ 1: ภาพรวม LVGL

### 1.1 LVGL คืออะไร?

**LVGL (Light and Versatile Graphics Library)** เป็น Open Source Graphics Library สำหรับ Embedded Systems

<figure><img src="/files/b0W3ni9wwUJrGT2FZkdp" alt=""><figcaption></figcaption></figure>

***

### 1.2 Display Options

| Display        | Resolution | Interface | Touch        |
| -------------- | ---------- | --------- | ------------ |
| 4.3" Waveshare | 800 x 480  | MIPI-DSI  | FT5406 (I2C) |
| 7" Waveshare   | 1024 x 600 | MIPI-DSI  | GT911 (I2C)  |

***

### 1.3 LVGL Core Concepts

| Concept             | คำอธิบาย                          |
| ------------------- | --------------------------------- |
| **Display**         | พื้นที่แสดงผลทั้งหมด              |
| **Screen**          | หน้าจอที่สลับได้ (container หลัก) |
| **Widget (Object)** | UI element เช่น Button, Label     |
| **Style**           | การตกแต่ง (สี, ขนาด, font)        |
| **Event**           | การตอบสนองต่อ user interaction    |

```c
/* Key LVGL Functions */
lv_init();                          /* Initialize LVGL */
lv_obj_t *scr = lv_scr_act();       /* Get active screen */
lv_obj_t *btn = lv_btn_create(scr); /* Create button on screen */
lv_timer_handler();                  /* Must call periodically! */
```

<figure><img src="/files/1kfPzNADcVrozszClmb0" alt="" width="563"><figcaption><p><a href="https://responsive-crow.static.domains/lvgl-basic">https://responsive-crow.static.domains/lvgl-basic</a></p></figcaption></figure>

{% embed url="<https://responsive-crow.static.domains/lvgl-basic>" %}

### 1.4 LVGL Layout และ Positioning พื้นฐาน

> **หมายเหตุ**: ส่วนนี้เป็นพื้นฐานสำคัญที่ต้องเข้าใจก่อนเริ่มสร้าง UI จริง เพราะการวางตำแหน่งที่ผิดพลาดจะทำให้ Widget แสดงผลไม่ถูกต้องหรือหายไปจากจอ

#### หน้าจอและระบบพิกัด (Screen & Coordinate System)

**ข้อมูลจอภาพ PSoC Edge E84 Eval Kit**:

<figure><img src="/files/MYj2pbXqNgddOwbCx3qA" alt=""><figcaption></figcaption></figure>

**ระบบพิกัดของ LVGL**:

<figure><img src="/files/0kklOaa6nTg70TpYtRjE" alt=""><figcaption></figcaption></figure>

#### ประเภทการจัดตำแหน่ง (Alignment Types)

LVGL v9.2 มี 2 กลุ่มหลักของ alignment:

**กลุ่ม 1: Align ภายใน Parent (ใช้กับ `lv_obj_align`)**

| Constant                | ตำแหน่ง     | การใช้งานที่เหมาะสม  |
| ----------------------- | ----------- | -------------------- |
| `LV_ALIGN_TOP_LEFT`     | มุมซ้ายบน   | Default position     |
| `LV_ALIGN_TOP_MID`      | กลางบน      | Title, Header        |
| `LV_ALIGN_TOP_RIGHT`    | มุมขวาบน    | Close button, Status |
| `LV_ALIGN_LEFT_MID`     | กลางซ้าย    | Side panel items     |
| `LV_ALIGN_CENTER`       | กลางจอ      | Main content         |
| `LV_ALIGN_RIGHT_MID`    | กลางขวา     | Side panel items     |
| `LV_ALIGN_BOTTOM_LEFT`  | มุมซ้ายล่าง | Footer buttons       |
| `LV_ALIGN_BOTTOM_MID`   | กลางล่าง    | Description, Footer  |
| `LV_ALIGN_BOTTOM_RIGHT` | มุมขวาล่าง  | Action buttons       |

#### **แผนภาพ Alignment ภายใน Parent**:

<figure><img src="/files/Rxa4gh4q6r9SBOQn8Uve" alt=""><figcaption></figcaption></figure>

**กลุ่ม 2: Align ภายนอก Object อ้างอิง (ใช้กับ `lv_obj_align_to`)**

| Constant                    | ตำแหน่งจาก Object อ้างอิง |
| --------------------------- | ------------------------- |
| `LV_ALIGN_OUT_TOP_LEFT`     | ด้านบน ชิดซ้าย            |
| `LV_ALIGN_OUT_TOP_MID`      | ด้านบน กลาง               |
| `LV_ALIGN_OUT_TOP_RIGHT`    | ด้านบน ชิดขวา             |
| `LV_ALIGN_OUT_BOTTOM_LEFT`  | ด้านล่าง ชิดซ้าย          |
| `LV_ALIGN_OUT_BOTTOM_MID`   | ด้านล่าง กลาง             |
| `LV_ALIGN_OUT_BOTTOM_RIGHT` | ด้านล่าง ชิดขวา           |
| `LV_ALIGN_OUT_LEFT_TOP`     | ด้านซ้าย ชิดบน            |
| `LV_ALIGN_OUT_LEFT_MID`     | ด้านซ้าย กลาง             |
| `LV_ALIGN_OUT_LEFT_BOTTOM`  | ด้านซ้าย ชิดล่าง          |
| `LV_ALIGN_OUT_RIGHT_TOP`    | ด้านขวา ชิดบน             |
| `LV_ALIGN_OUT_RIGHT_MID`    | ด้านขวา กลาง              |
| `LV_ALIGN_OUT_RIGHT_BOTTOM` | ด้านขวา ชิดล่าง           |

#### ตัวอย่างการใช้ `OUT_*` Alignment:

```c
/* สร้าง Label ใต้ LED widget */
lv_obj_t * label = lv_label_create(lv_screen_active());
lv_label_set_text(label, "LED Status");
lv_obj_align_to(label, led_widget, LV_ALIGN_OUT_BOTTOM_MID, 0, 5);
/*                       ↑               ↑                  ↑  ↑
                    object          วางใต้ led           x=0, y=+5 (ห่างลงมา 5px) */
```


# พื้นฐาน Embedded C - ตอนที่ 3

## C Programming - Control Flow

### 1. Conditional Statements (if-else)

**ทำไมต้องใช้?** ตัดสินใจตาม sensor input, user action, states

```c
int16_t temperature = 28;

/* Simple if */
if (temperature > 30)
{
    printf("Hot!\r\n");
}

/* if-else */
if (temperature > 30)
{
    set_led_color(RED);
}
else
{
    set_led_color(GREEN);
}

/* if-else if-else */
if (temperature > 35)
{
    printf("Very Hot!\r\n");
    set_led_color(RED);
}
else if (temperature > 30)
{
    printf("Hot\r\n");
    set_led_color(YELLOW);
}
else if (temperature < 15)
{
    printf("Cold\r\n");
    set_led_color(BLUE);
}
else
{
    printf("Normal\r\n");
    set_led_color(GREEN);
}
```

**Common Patterns:**

```c
/* Error checking */
cy_rslt_t result = cyhal_gpio_init(/* ... */);
if (result != CY_RSLT_SUCCESS)
{
    printf("Init failed!\r\n");
    return result;  /* Early return */
}

/* Null check */
void process_data(imu_data_t *data)
{
    if (data == NULL)
    {
        printf("Error: NULL pointer\r\n");
        return;
    }
    /* Safe to use */
    printf("X: %d\r\n", data->acc_x);
}

/* Range validation */
void set_brightness(int level)
{
    if (level < 0 || level > 100)
    {
        printf("Invalid level\r\n");
        return;
    }
    /* Apply brightness */
}
```

**Ternary Operator:**

```c
int a = 10, b = 20;
int max = (a > b) ? a : b;  /* max = 20 */

/* In printf */
bool led_on = true;
printf("LED is %s\r\n", led_on ? "ON" : "OFF");
```

***

### 2. Switch Statement

**ทำไมต้องใช้?** Multi-way branching, State Machines

```c
typedef enum {
    STATE_IDLE,
    STATE_RUNNING,
    STATE_PAUSED,
    STATE_ERROR
} system_state_t;

system_state_t state = STATE_IDLE;

switch (state)
{
    case STATE_IDLE:
        printf("System idle\r\n");
        break;

    case STATE_RUNNING:
        printf("System running\r\n");
        break;

    case STATE_PAUSED:
        printf("System paused\r\n");
        break;

    case STATE_ERROR:
        printf("Error!\r\n");
        break;

    default:
        printf("Unknown state\r\n");
        break;
}
```

**Fall-through Pattern:**

```c
char command = 'a';

switch (command)
{
    case 'A':
    case 'a':  /* Fall-through: both do same thing */
        printf("Command A\r\n");
        break;

    case 'Q':
    case 'q':
        printf("Quit\r\n");
        break;

    default:
        printf("Unknown: %c\r\n", command);
        break;
}
```

***

### 3. Loops

**for Loop:**

```c
/* Basic */
for (int i = 0; i < 10; i++)
{
    printf("i = %d\r\n", i);
}

/* Array iteration */
int values[5] = {10, 20, 30, 40, 50};
for (int i = 0; i < 5; i++)
{
    printf("values[%d] = %d\r\n", i, values[i]);
}

/* Nested */
for (int row = 0; row < 3; row++)
{
    for (int col = 0; col < 4; col++)
    {
        printf("[%d,%d] ", row, col);
    }
    printf("\r\n");
}
```

**while Loop:**

```c
/* Wait for button */
while (cyhal_gpio_read(BUTTON_PIN) == true)
{
    Cy_SysLib_Delay(10);
}
printf("Button pressed!\r\n");

/* Retry pattern */
int retry = 0;
while (connect_wifi() != SUCCESS && retry < 5)
{
    retry++;
    printf("Retry %d...\r\n", retry);
    Cy_SysLib_Delay(1000);
}
```

**do-while Loop:**

```c
/* Execute at least once */
int attempts = 0;
bool success = false;

do {
    attempts++;
    printf("Attempt %d\r\n", attempts);

    if (sensor_init() == SUCCESS)
    {
        success = true;
    }
    else
    {
        Cy_SysLib_Delay(500);
    }
} while (!success && attempts < 3);
```

**break และ continue:**

```c
/* break - exit loop */
for (int i = 0; i < 100; i++)
{
    if (values[i] == target)
    {
        printf("Found at %d\r\n", i);
        break;  /* Exit loop */
    }
}

/* continue - skip iteration */
for (int i = 0; i < 10; i++)
{
    if (i == 5)
    {
        continue;  /* Skip when i == 5 */
    }
    printf("i = %d\r\n", i);  /* Prints 0-4, 6-9 */
}
```

**Infinite Loop (Main Loop):**

```c
/* Standard embedded pattern */
for (;;)
{
    process_sensors();
    update_display();
    check_buttons();
    Cy_SysLib_Delay(10);
}
```

***

### 4. State Machine Pattern

```c
typedef enum {
    SCREEN_HOME,
    SCREEN_SENSORS,
    SCREEN_SETTINGS,
    SCREEN_COUNT
} ui_screen_t;

typedef struct {
    ui_screen_t current;
    ui_screen_t previous;
    bool needs_update;
} ui_state_t;

ui_state_t g_ui = {
    .current = SCREEN_HOME,
    .previous = SCREEN_HOME,
    .needs_update = true
};

void ui_change_screen(ui_screen_t new_screen)
{
    if (new_screen >= SCREEN_COUNT) return;

    if (new_screen != g_ui.current)
    {
        g_ui.previous = g_ui.current;
        g_ui.current = new_screen;
        g_ui.needs_update = true;
    }
}

void ui_update(void)
{
    if (!g_ui.needs_update) return;

    switch (g_ui.current)
    {
        case SCREEN_HOME:
            show_home_screen();
            break;

        case SCREEN_SENSORS:
            show_sensor_screen();
            break;

        case SCREEN_SETTINGS:
            show_settings_screen();
            break;

        default:
            break;
    }

    g_ui.needs_update = false;
}
```


# LVGL Principles

## 1. ภาพรวมของ LVGL

#### LVGL คืออะไร?

**LVGL (Light and Versatile Graphics Library)** เป็น Open-source Graphics Library สำหรับระบบ Embedded ที่ต้องการสร้าง UI บนหน้าจอ

<figure><img src="/files/bLpd0avCOUKyL7VW24KK" alt=""><figcaption></figcaption></figure>

***

## 2. สถาปัตยกรรมของ LVGL

#### 2.1 Object Model

| องค์ประกอบ | คำอธิบาย                      | ตัวอย่าง                  |
| ---------- | ----------------------------- | ------------------------- |
| **Screen** | หน้าจอหลัก (Container สูงสุด) | `lv_screen_active()`      |
| **Object** | วัตถุพื้นฐาน (Base class)     | `lv_obj_t *`              |
| **Widget** | วัตถุที่มี function เฉพาะทาง  | Button, Label, Slider     |
| **Part**   | ส่วนประกอบย่อยของ Widget      | MAIN, INDICATOR, KNOB     |
| **State**  | สถานะของ Object               | DEFAULT, PRESSED, CHECKED |

#### WHY: ทำไมต้องเข้าใจ Object Model?

* UI ทุกตัวใน LVGL เป็น Object ที่มี Parent-Child relationship
* การจัดการ Memory และ Layout ขึ้นอยู่กับโครงสร้างนี้
* Event จะ propagate ตาม hierarchy

#### HOW: การประยุกต์ใช้จริง

<figure><img src="/files/pjNTCTwFQhCodGxjCyt9" alt=""><figcaption></figcaption></figure>

#### CAUTION: ข้อควรระวัง

* ห้าม delete parent ก่อน children (จะ crash)
* Object ที่สร้างแล้วจะถูก LVGL จัดการ Memory (ห้าม free เอง)
* Screen เดียวกันไม่ควรมี Object เกิน \~100 ตัว (performance)

#### Flowchart การวาง Widget

<figure><img src="/files/icSBcpKezxIP5Ccs3Wgl" alt=""><figcaption></figcaption></figure>

***

## 3. Basic Widgets

#### 3.1 Label - แสดงข้อความ

**ตัวอย่างจาก: `examples/get_started/lv_example_get_started_1.c`**

```c
void lv_example_get_started_1(void)
{
    /* เปลี่ยนสีพื้นหลังของ Screen */
    lv_obj_set_style_bg_color(lv_screen_active(),
                              lv_color_hex(0x003a57),
                              LV_PART_MAIN);

    /* สร้าง Label */
    lv_obj_t * label = lv_label_create(lv_screen_active());
    lv_label_set_text(label, "Hello world");

    /* ตั้งค่าสีข้อความ */
    lv_obj_set_style_text_color(lv_screen_active(),
                                lv_color_hex(0xffffff),
                                LV_PART_MAIN);

    /* จัดตำแหน่งไว้กลางจอ */
    lv_obj_align(label, LV_ALIGN_CENTER, 0, 0);
}
```

| Function                  | หน้าที่                  | Parameter                               |
| ------------------------- | ------------------------ | --------------------------------------- |
| `lv_label_create()`       | สร้าง Label widget       | parent object                           |
| `lv_label_set_text()`     | ตั้งค่าข้อความ           | object, string                          |
| `lv_label_set_text_fmt()` | ตั้งค่าข้อความแบบ format | object, format, ...                     |
| `lv_obj_align()`          | จัดตำแหน่ง               | object, alignment, x\_offset, y\_offset |

#### WHY: ทำไม Label สำคัญ?

* ใช้แสดงค่าจาก Sensor (ADC, IMU, Temperature)
* Debug output บนหน้าจอแทน UART
* Status message ให้ผู้ใช้

#### CAUTION: ข้อควรระวัง Label

* ข้อความยาวเกินไปจะ overflow (ใช้ `lv_label_set_long_mode()`)
* `lv_label_set_text()` จะ copy string ทุกครั้ง (memory allocation)
* ใช้ `lv_label_set_text_static()` ถ้า string เป็น constant

***

#### 3.2 Button - ปุ่มกด

**ตัวอย่างจาก: `examples/get_started/lv_example_get_started_2.c`**

```c
static void btn_event_cb(lv_event_t * e)
{
    lv_event_code_t code = lv_event_get_code(e);
    lv_obj_t * btn = lv_event_get_target(e);

    if(code == LV_EVENT_CLICKED) {
        static uint8_t cnt = 0;
        cnt++;

        /* ดึง Label ที่เป็น child ของ Button */
        lv_obj_t * label = lv_obj_get_child(btn, 0);
        lv_label_set_text_fmt(label, "Button: %d", cnt);
    }
}

void lv_example_get_started_2(void)
{
    /* สร้าง Button */
    lv_obj_t * btn = lv_button_create(lv_screen_active());
    lv_obj_set_pos(btn, 10, 10);           /* กำหนดตำแหน่ง */
    lv_obj_set_size(btn, 120, 50);         /* กำหนดขนาด */

    /* ลงทะเบียน Event callback */
    lv_obj_add_event_cb(btn, btn_event_cb, LV_EVENT_ALL, NULL);

    /* สร้าง Label ใน Button */
    lv_obj_t * label = lv_label_create(btn);
    lv_label_set_text(label, "Button");
    lv_obj_center(label);
}
```

#### WHY: ทำไม Button สำคัญ?

* เป็น input หลักสำหรับ user interaction
* ใช้ควบคุม GPIO (ON/OFF LED, Motor)
* Trigger การทำงานต่างๆ (Start measurement, Reset)

#### HOW: เชื่อมโยงกับ GPIO จากสัปดาห์ที่ 1

```c
/* Button บน UI → ควบคุม LED จริง */
static void btn_led_event_cb(lv_event_t * e)
{
    lv_event_code_t code = lv_event_get_code(e);

    if(code == LV_EVENT_CLICKED) {
        /* Toggle LED - เชื่อมโยงกับ Week 1 GPIO */
        Cy_GPIO_Inv(CYBSP_USER_LED1_PORT, CYBSP_USER_LED1_PIN);
    }
}
```

***

#### 3.3 Switch - สวิตช์เปิด/ปิด

**ตัวอย่างจาก: `examples/widgets/switch/lv_example_switch_1.c`**

```c
static void switch_event_handler(lv_event_t * e)
{
    lv_event_code_t code = lv_event_get_code(e);
    lv_obj_t * obj = lv_event_get_target(e);

    if(code == LV_EVENT_VALUE_CHANGED) {
        /* ตรวจสอบสถานะ Switch */
        bool is_on = lv_obj_has_state(obj, LV_STATE_CHECKED);

        if(is_on) {
            printf("Switch: ON\n");
        } else {
            printf("Switch: OFF\n");
        }
    }
}

void create_switch_example(void)
{
    lv_obj_t * sw = lv_switch_create(lv_screen_active());
    lv_obj_center(sw);
    lv_obj_add_event_cb(sw, switch_event_handler, LV_EVENT_VALUE_CHANGED, NULL);
}
```

#### WHY: ทำไม Switch เหมาะกับ GPIO?

* แสดงสถานะ ON/OFF ชัดเจน
* เหมาะกับการควบคุม Binary Output (LED, Relay, Motor)
* User-friendly กว่า Button สำหรับ toggle state

***

#### 3.4 LED Widget - แสดงสถานะ

**ตัวอย่างจาก: `examples/widgets/led/lv_example_led_1.c`**

```c
void lv_example_led_1(void)
{
    /* LED ปิด */
    lv_obj_t * led1 = lv_led_create(lv_screen_active());
    lv_obj_align(led1, LV_ALIGN_CENTER, -80, 0);
    lv_led_off(led1);

    /* LED สีแดง ความสว่าง 150 */
    lv_obj_t * led2 = lv_led_create(lv_screen_active());
    lv_obj_align(led2, LV_ALIGN_CENTER, 0, 0);
    lv_led_set_brightness(led2, 150);
    lv_led_set_color(led2, lv_palette_main(LV_PALETTE_RED));

    /* LED เปิด */
    lv_obj_t * led3 = lv_led_create(lv_screen_active());
    lv_obj_align(led3, LV_ALIGN_CENTER, 80, 0);
    lv_led_on(led3);
}
```

| Function                  | หน้าที่             |
| ------------------------- | ------------------- |
| `lv_led_create()`         | สร้าง LED widget    |
| `lv_led_on()`             | เปิด LED (สว่างสุด) |
| `lv_led_off()`            | ปิด LED (มืด)       |
| `lv_led_set_brightness()` | ตั้งความสว่าง 0-255 |
| `lv_led_set_color()`      | ตั้งสี              |

#### WHY: ทำไมต้องมี Virtual LED?

* แสดงสถานะ Hardware LED บนหน้าจอ
* ใช้เมื่อ Physical LED ไม่พอ
* สื่อสาร Status ให้ผู้ใช้ (Error, Warning, OK)

***

## 4. Event Handling

#### 4.1 Event Callback Pattern

```c
/* รูปแบบมาตรฐานของ Event Callback */
static void my_event_cb(lv_event_t * e)
{
    /* 1. ดึงประเภท Event */
    lv_event_code_t code = lv_event_get_code(e);

    /* 2. ดึง Object ที่เกิด Event */
    lv_obj_t * target = lv_event_get_target(e);

    /* 3. ดึง User Data (ถ้ามี) */
    void * user_data = lv_event_get_user_data(e);

    /* 4. Handle แต่ละ Event Type */
    switch(code) {
        case LV_EVENT_CLICKED:
            /* ผู้ใช้คลิก */
            break;
        case LV_EVENT_VALUE_CHANGED:
            /* ค่าเปลี่ยน (Slider, Switch) */
            break;
        case LV_EVENT_PRESSED:
            /* กดค้าง */
            break;
        case LV_EVENT_RELEASED:
            /* ปล่อย */
            break;
    }
}
```

#### 4.2 Event Types ที่สำคัญ

| Event Code               | เมื่อไหร่ถูกเรียก       | ใช้กับ Widget       |
| ------------------------ | ----------------------- | ------------------- |
| `LV_EVENT_CLICKED`       | Click (Press + Release) | Button, Image       |
| `LV_EVENT_VALUE_CHANGED` | ค่าเปลี่ยน              | Slider, Switch, Arc |
| `LV_EVENT_PRESSED`       | กดค้าง                  | ทุก Object          |
| `LV_EVENT_LONG_PRESSED`  | กดค้างนาน (>400ms)      | ทุก Object          |
| `LV_EVENT_RELEASED`      | ปล่อย                   | ทุก Object          |

#### WHY: ทำไม Event-Driven สำคัญ?

* ไม่ต้อง Polling สถานะ (ประหยัด CPU)
* แยก Logic ออกจาก UI (Maintainable)
* รองรับ Multiple Events บน Object เดียว

#### HOW: ส่ง User Data ผ่าน Event

```c
/* ส่ง GPIO Port/Pin ผ่าน User Data */
typedef struct {
    GPIO_PRT_Type *port;
    uint32_t pin;
} gpio_info_t;

static gpio_info_t led1_info = {
    .port = CYBSP_USER_LED1_PORT,
    .pin = CYBSP_USER_LED1_PIN
};

static void led_toggle_cb(lv_event_t * e)
{
    gpio_info_t *gpio = (gpio_info_t *)lv_event_get_user_data(e);

    if(lv_event_get_code(e) == LV_EVENT_CLICKED) {
        Cy_GPIO_Inv(gpio->port, gpio->pin);
    }
}

void setup_led_button(void)
{
    lv_obj_t * btn = lv_button_create(lv_screen_active());
    lv_obj_add_event_cb(btn, led_toggle_cb, LV_EVENT_CLICKED, &led1_info);
}
```

#### CAUTION: ข้อควรระวัง Event

* User Data ต้อง valid ตลอด lifetime ของ Object
* ห้ามใช้ local variable เป็น User Data (จะหาย)
* หลาย Event อาจเกิดพร้อมกัน (ต้องกรองด้วย code)

#### Functions สำหรับการวางตำแหน่ง (LVGL v9.2 API)

```c
/*==========================================================================
 * 1. lv_obj_set_pos() - กำหนดตำแหน่งแบบ Absolute (จาก parent's content area)
 *    ใช้เมื่อ: ต้องการวางตำแหน่งที่แน่นอน เช่น grid layout
 *==========================================================================*/
lv_obj_set_pos(obj, x, y);        /* x, y เป็น pixels จาก top-left ของ parent */

/*==========================================================================
 * 2. lv_obj_set_x() / lv_obj_set_y() - กำหนดทีละแกน
 *    ใช้เมื่อ: ต้องการปรับแกนเดียว
 *==========================================================================*/
lv_obj_set_x(obj, 100);           /* ตั้ง x เป็น 100px */
lv_obj_set_y(obj, 50);            /* ตั้ง y เป็น 50px */

/*==========================================================================
 * 3. lv_obj_align() - จัดตำแหน่งตาม alignment พร้อม offset
 *    ใช้เมื่อ: วาง widget โดยอ้างอิงจาก parent (แนะนำ)
 *==========================================================================*/
lv_obj_align(obj, LV_ALIGN_CENTER, x_offset, y_offset);
/*                    ↑                ↑          ↑
            ประเภท alignment        เลื่อน X     เลื่อน Y

    ตัวอย่าง:
    - LV_ALIGN_CENTER, 0, 0     → กลางจอพอดี
    - LV_ALIGN_CENTER, 0, -50   → กลางจอ แต่ขยับขึ้น 50px
    - LV_ALIGN_TOP_MID, 0, 20   → กลางบน แต่ขยับลง 20px (สำหรับ title)
*/

/*==========================================================================
 * 4. lv_obj_align_to() - จัดตำแหน่งโดยอ้างอิงจาก object อื่น
 *    ใช้เมื่อ: วาง widget สัมพันธ์กับ widget อื่น
 *==========================================================================*/
lv_obj_align_to(obj, base_obj, LV_ALIGN_OUT_BOTTOM_MID, x_offset, y_offset);
/*               ↑      ↑              ↑                   ↑          ↑
              widget   อ้างอิง    วางใต้ base_obj           เลื่อน X     เลื่อน Y */

/*==========================================================================
 * 5. lv_obj_center() - วางกลาง parent อย่างง่าย
 *    ใช้เมื่อ: ต้องการวางกลางโดยไม่มี offset
 *==========================================================================*/
lv_obj_center(obj);               /* เทียบเท่า lv_obj_align(obj, LV_ALIGN_CENTER, 0, 0) */
```

## Functions สำหรับการกำหนดขนาด (Size Functions)

```c
/*==========================================================================
 * 1. lv_obj_set_size() - กำหนดทั้ง width และ height พร้อมกัน
 *==========================================================================*/
lv_obj_set_size(obj, width, height);

/* ค่าพิเศษที่ใช้ได้:
   - pixels (เช่น 200, 100)           → ขนาดคงที่
   - lv_pct(50)                       → 50% ของ parent
   - LV_SIZE_CONTENT                  → ขยายตาม content ข้างใน */

/*==========================================================================
 * 2. lv_obj_set_width() / lv_obj_set_height() - กำหนดทีละด้าน
 *==========================================================================*/
lv_obj_set_width(obj, 200);       /* กว้าง 200px */
lv_obj_set_height(obj, 100);      /* สูง 100px */
lv_obj_set_width(obj, lv_pct(80)); /* กว้าง 80% ของ parent */

/*==========================================================================
 * 3. lv_obj_set_style_pad_*() - กำหนด padding (ช่องว่างภายใน)
 *    ใช้เมื่อ: ต้องการขยายขนาด widget โดยอัตโนมัติ
 *==========================================================================*/
lv_obj_set_style_pad_hor(btn, 30, 0);  /* padding ซ้าย-ขวา 30px */
lv_obj_set_style_pad_ver(btn, 15, 0);  /* padding บน-ล่าง 15px */
/* หมายเหตุ: ดีกว่า lv_obj_set_size() สำหรับ Button เพราะขยายตาม text อัตโนมัติ */
```

#### Layout Pattern สำหรับ 480x320 Screen

**Pattern 1: Vertical Stacking (ใช้บ่อยที่สุด)**

```c
/* Title → Main Content → Description → Footer */
void create_vertical_layout(void)
{
    /* 1. Title - ชิดบน */
    lv_obj_t * title = lv_label_create(lv_screen_active());
    lv_label_set_text(title, "Example Title");
    lv_obj_align(title, LV_ALIGN_TOP_MID, 0, 20);        /* y=20 จากขอบบน */

    /* 2. Main content - กลางจอ */
    lv_obj_t * widget = lv_led_create(lv_screen_active());
    lv_obj_align(widget, LV_ALIGN_CENTER, 0, -30);       /* y=-30 ขยับขึ้นเล็กน้อย */

    /* 3. Description - ล่างสุด */
    lv_obj_t * desc = lv_label_create(lv_screen_active());
    lv_label_set_text(desc, "Description text");
    lv_obj_align(desc, LV_ALIGN_BOTTOM_MID, 0, -50);     /* y=-50 จากขอบล่าง */
}
```

**Pattern 2: Multiple Widgets at CENTER with Y-offset**

```c
/* วาง widgets หลายตัวจากกลางจอ โดยใช้ y_offset */
void create_center_stacked_layout(void)
{
    /* LED - อยู่เหนือกลางจอ */
    lv_obj_t * led = lv_led_create(lv_screen_active());
    lv_obj_align(led, LV_ALIGN_CENTER, 0, -70);          /* ขึ้นไป 70px จากกลาง */

    /* Label - กลางจอพอดี */
    lv_obj_t * label = lv_label_create(lv_screen_active());
    lv_obj_align(label, LV_ALIGN_CENTER, 0, 0);          /* กลางจอพอดี */

    /* Buttons - ล่างกลางจอ */
    lv_obj_t * btn1 = lv_button_create(lv_screen_active());
    lv_obj_align(btn1, LV_ALIGN_CENTER, -60, 50);        /* ซ้าย, ลง 50px */

    lv_obj_t * btn2 = lv_button_create(lv_screen_active());
    lv_obj_align(btn2, LV_ALIGN_CENTER, 60, 50);         /* ขวา, ลง 50px */

    /* Slider - ล่างสุดของกลุ่ม */
    lv_obj_t * slider = lv_slider_create(lv_screen_active());
    lv_obj_align(slider, LV_ALIGN_CENTER, 0, 110);       /* ลง 110px จากกลาง */
}
```

**Pattern 3: Container with Grid Layout**

```c
/* ใช้ container เมื่อมี widgets หลายตัวที่ต้องจัดเป็นกลุ่ม */
void create_container_grid_layout(void)
{
    /* Container - ขนาด 420x200 pixels */
    lv_obj_t * cont = lv_obj_create(lv_screen_active());
    lv_obj_set_size(cont, 420, 200);
    lv_obj_align(cont, LV_ALIGN_CENTER, 0, 10);
    lv_obj_clear_flag(cont, LV_OBJ_FLAG_SCROLLABLE);  /* ปิด scroll */

    /* วาง items ใน container ด้วย absolute position */
    for(int i = 0; i < 4; i++) {
        int x_pos = (i % 2) * 200 + 20;   /* 2 columns: x = 20 หรือ 220 */
        int y_pos = (i / 2) * 80 + 20;     /* 2 rows: y = 20 หรือ 100 */

        lv_obj_t * led = lv_led_create(cont);
        lv_obj_set_pos(led, x_pos, y_pos);
    }
}
```

## Widget Sizing Guidelines (แนะนำสำหรับ 800x480)

<table data-header-hidden><thead><tr><th width="100"></th><th></th><th></th></tr></thead><tbody><tr><td>Widget Type</td><td>Recommended Size (800x480)</td><td>Notes / Recommendations</td></tr><tr><td><strong>Title Label</strong></td><td>Auto (text length)</td><td>แนะนำ Font: <code>montserrat_32</code> หรือ <code>36</code> (เพื่อให้เด่นชัดบนความสูง 480px)</td></tr><tr><td><strong>Button</strong></td><td>Padding 50x25</td><td>ใช้ Padding แทนการ fix size เพื่อให้ปุ่มขยายตามขนาดตัวอักษร</td></tr><tr><td><strong>LED</strong></td><td>60x60 ถึง 120x120</td><td>ขนาด 60px เหมาะสำหรับสถานะทั่วไป, 120px สำหรับสถานะหลัก</td></tr><tr><td><strong>Switch</strong></td><td>100x50 ถึง 120x60</td><td>ปรับให้ใหญ่ขึ้นเพื่อให้กดง่าย (Touch Target ที่เหมาะสม)</td></tr><tr><td><strong>Slider</strong></td><td>Width 400-600</td><td>ความยาวควรอยู่ที่ประมาณ 50-75% ของความกว้างจอ</td></tr><tr><td><strong>Bar</strong></td><td>500x40</td><td>ปรับความหนา (Height) เป็น 40px เพื่อให้มองเห็นความก้าวหน้าชัดเจน</td></tr><tr><td><strong>Arc</strong></td><td>200x200 ถึง 350x350</td><td>ควรคงรูปทรงจัตุรัส (Square) เพื่อไม่ให้วงกลมเบี้ยว</td></tr><tr><td><strong>Chart</strong></td><td>700x400 max</td><td>ขยายให้เกือบเต็มพื้นที่หากเป็นหน้า Dashboard หลัก</td></tr><tr><td><strong>Container</strong></td><td>760x420 typical</td><td>เว้นขอบ (Margin) ด้านละ 20px เพื่อความสวยงาม</td></tr></tbody></table>

#### Common Background Colors (จาก Course Examples)

```c
/* Primary backgrounds */
#define BG_DARK_NAVY    0x003a57    /* Week3 Ex1: Hello World */
#define BG_DARK_BLUE    0x1a1a2e    /* Week3 Ex2,5: Button, Dashboard */
#define BG_DARKER       0x0f0f23    /* Week3 Ex3: LED Control */
#define BG_MIDNIGHT     0x16213e    /* Week3 Ex4, Week4: Switch, Chart */

/* Panel/Container backgrounds */
#define BG_PANEL        0x0f0f23    /* Container background */
#define BG_BORDER       0x444444    /* Container border */

/* Text colors */
#define TEXT_WHITE      0xFFFFFF    /* Main text */
#define TEXT_GRAY       0xAAAAAA    /* Description text */
#define TEXT_GREEN      0x00FF00    /* Status text */
```

#### CAUTION: ข้อควรระวังในการวาง Layout

1. **ห้ามวาง Widget นอกขอบจอ**: ค่า y ที่เกิน 319 หรือ x ที่เกิน 479 จะทำให้ widget หายไป
2. **ลำดับการสร้างสำคัญ**: Widget ที่สร้างทีหลังจะอยู่ด้านบน (z-order)
3. **align\_to ต้องทำหลัง base object ถูก position แล้ว**:

   ```c
   /* ✅ ถูก */
   lv_obj_align(slider, LV_ALIGN_CENTER, 0, 50);   /* position slider ก่อน */
   lv_obj_align_to(label, slider, LV_ALIGN_OUT_BOTTOM_MID, 0, 5);  /* แล้วค่อย align label */

   /* ❌ ผิด */
   lv_obj_align_to(label, slider, ...);   /* slider ยังไม่มี position! */
   lv_obj_align(slider, ...);
   ```
4. **ใช้ padding แทน set\_size สำหรับ Button**:

   ```c
   /* ✅ ดี - text ไม่ถูก clip */
   lv_obj_set_style_pad_hor(btn, 30, 0);
   lv_obj_set_style_pad_ver(btn, 15, 0);

   /* ⚠️ ระวัง - อาจ clip text ถ้าขนาดเล็กเกินไป */
   lv_obj_set_size(btn, 80, 30);  /* ต้องแน่ใจว่า text พอดี */
   ```
5. **Container ควรปิด scroll flag**:

   ```c
   lv_obj_clear_flag(cont, LV_OBJ_FLAG_SCROLLABLE);  /* ป้องกัน content เลื่อนได้ */
   ```


# UX/UI Workshops

## โค้ดโปรเจคสำหรับ GPIO-to-HMI Display

{% embed url="<https://github.com/Advance-Innovation-Centre-AIC/lv_port_pc_vscode_aic-eec>" %}

### ขั้นตอนการดาวโหลดจาก Github Repo และรันโปรแกรมตัวแรก - Label Demo

{% embed url="<https://www.youtube.com/watch?v=HvTe_VcUuXE>" fullWidth="true" %}

### ตัวอย่างการใช้ Eclipse ModusToolBox IDE

{% embed url="<https://www.youtube.com/watch?v=G4xLkdk53Ag>" fullWidth="true" %}


# Label & Button


# Label

## Lab 1: Hello World - Basic Label

***

### 1. ภาพรวมของ Lab (Why? What? How?)

#### Why?: วัตถุประสงค์การเรียนรู้

**Label** เป็น Widget พื้นฐานที่สุดและสำคัญที่สุดใน LVGL:

* แสดงค่าจาก **Sensor** (อุณหภูมิ, ความชื้น, ADC)
* แสดง **Status Messages** (Connected, Error, Ready)
* ใช้เป็น **Debug Output** บนหน้าจอแทน UART
* ทุกแอปพลิเคชัน **ต้องมี Label** เพื่อสื่อสารกับผู้ใช้

#### What?: เราจะเรียนรู้อะไร?

<table><thead><tr><th width="338.9503173828125">ฟังก์ชัน</th><th>หน้าที่</th></tr></thead><tbody><tr><td><code>lv_label_create()</code></td><td>สร้าง Label widget</td></tr><tr><td><code>lv_label_set_text()</code></td><td>กำหนดข้อความ (static text)</td></tr><tr><td><code>lv_label_set_text_fmt()</code></td><td>กำหนดข้อความแบบ format (เหมือน printf)</td></tr><tr><td><code>lv_obj_set_style_text_color()</code></td><td>เปลี่ยนสีข้อความ</td></tr><tr><td><code>lv_obj_set_style_text_font()</code></td><td>เปลี่ยนขนาดและชนิด font</td></tr><tr><td><code>lv_obj_set_style_bg_color()</code></td><td>เปลี่ยนสีพื้นหลัง</td></tr><tr><td><code>lv_color_hex()</code></td><td>สร้างสีจาก hex code</td></tr><tr><td><code>lv_palette_main()</code></td><td>ใช้สีจาก Material Design palette</td></tr></tbody></table>

#### How: นำไปใช้อย่างไร?

```
[สร้าง Label] --> [ตั้งค่าข้อความ] --> [ตั้งค่าสี] --> [จัดตำแหน่ง] --> [แสดงผล]
```

<figure><img src="/files/MeYWGEIROaIISoyKUIFt" alt=""><figcaption></figcaption></figure>

***

### 2. หลักการทำงาน

#### 2.1 โครงสร้าง Label Widget

<figure><img src="/files/zQkNHqV0FzTp8dVFq63K" alt=""><figcaption></figcaption></figure>

#### 2.2 Flowchart การสร้าง Label

<figure><img src="/files/nf00gyiJQtIVkwLJsYJJ" alt=""><figcaption></figcaption></figure>

***

### 3. โค้ดตัวอย่าง

#### 3.1 โค้ดอ้างอิง: `part1_ex1_hello_world()`

จากไฟล์ `part1_examples.c`:

```c
/*******************************************************************************
 * Example 1: Hello World - Basic Label
 *
 * Official Reference: https://docs.lvgl.io/9.2/widgets/label.html
 ******************************************************************************/
void part1_ex1_hello_world(void)
{
    /* Set background color */
    lv_obj_set_style_bg_color(lv_screen_active(),
                              lv_color_hex(0x003a57),
                              LV_PART_MAIN);

    /* Create title label */
    lv_obj_t * title = lv_label_create(lv_screen_active());
    lv_label_set_text(title, "Part 1 - Example 1");
    lv_obj_set_style_text_color(title, lv_color_hex(0xFFFFFF), 0);
    lv_obj_align(title, LV_ALIGN_TOP_MID, 0, 20);

    /* Create main label */
    lv_obj_t * label = lv_label_create(lv_screen_active());
    lv_label_set_text(label, "Hello BUU!");
    lv_obj_set_style_text_color(label, lv_color_hex(0xFFFFFF), 0);
    lv_obj_set_style_text_font(label, &lv_font_montserrat_24, 0);
    lv_obj_align(label, LV_ALIGN_CENTER, 0, 0);

    /* Create description label */
    lv_obj_t * desc = lv_label_create(lv_screen_active());
    lv_label_set_text(desc, "Basic Label Example\n"
                           "Learning: lv_label_create, lv_obj_align");
    lv_obj_set_style_text_color(desc, lv_color_hex(0xAAAAAA), 0);
    lv_obj_set_style_text_align(desc, LV_TEXT_ALIGN_CENTER, 0);
    lv_obj_align(desc, LV_ALIGN_BOTTOM_MID, 0, -50);
}
```

***

**วิเคราะห์ทีละขั้น**:

<table><thead><tr><th width="90.10791015625">ขั้นตอน</th><th width="415.07818603515625">โค้ด</th><th>อธิบาย</th></tr></thead><tbody><tr><td>1</td><td><code>lv_screen_active()</code></td><td>ดึง Screen ปัจจุบัน</td></tr><tr><td>2</td><td><code>lv_obj_set_style_bg_color(..., 0x003a57, ...)</code></td><td>Background น้ำเงินเข้ม</td></tr><tr><td>3</td><td><code>lv_label_create(lv_screen_active())</code></td><td>สร้าง Label บน Screen</td></tr><tr><td>4</td><td><code>lv_label_set_text(title, "...")</code></td><td>กำหนดข้อความ</td></tr><tr><td>5</td><td><code>lv_obj_set_style_text_color(title, ..., 0)</code></td><td>สีขาว, part=0 (MAIN)</td></tr><tr><td>6</td><td><code>lv_obj_align(title, LV_ALIGN_TOP_MID, 0, 20)</code></td><td>กลางบน, เลื่อนลง 20px</td></tr></tbody></table>

***

### 4. ฟังก์ชันสำคัญ (API Reference)

#### 4.1 Label Creation & Text

<table><thead><tr><th width="355.57318115234375">ฟังก์ชัน</th><th width="216.1527099609375">พารามิเตอร์</th><th>คำอธิบาย</th></tr></thead><tbody><tr><td><code>lv_label_create(parent)</code></td><td>parent object</td><td>สร้าง Label ใหม่</td></tr><tr><td><code>lv_label_set_text(label, text)</code></td><td>label, "string"</td><td>กำหนดข้อความ (copy)</td></tr><tr><td><code>lv_label_set_text_fmt(label, fmt, ...)</code></td><td>label, format, args</td><td>กำหนดข้อความแบบ printf</td></tr><tr><td><code>lv_label_set_text_static(label, text)</code></td><td>label, "string"</td><td>กำหนดข้อความ (ไม่ copy, ประหยัด RAM)</td></tr><tr><td><code>lv_label_set_long_mode(label, mode)</code></td><td>label, LV_LABEL_LONG_*</td><td>กำหนดวิธีจัดการข้อความยาว</td></tr></tbody></table>

#### 4.2 Style: Text Color & Font

<table><thead><tr><th width="420.4488525390625">ฟังก์ชัน</th><th width="211.72509765625">พารามิเตอร์</th><th>คำอธิบาย</th></tr></thead><tbody><tr><td><code>lv_obj_set_style_text_color(obj, color, part)</code></td><td>obj, lv_color_t, 0</td><td>สีข้อความ</td></tr><tr><td><code>lv_obj_set_style_text_font(obj, font, part)</code></td><td>obj, &#x26;lv_font_*, 0</td><td>ขนาด/ชนิด font</td></tr><tr><td><code>lv_obj_set_style_text_align(obj, align, part)</code></td><td>obj, LV_TEXT_ALIGN_*, 0</td><td>จัด text ซ้าย/กลาง/ขวา</td></tr><tr><td><code>lv_obj_set_style_text_opa(obj, opa, part)</code></td><td>obj, LV_OPA_*, 0</td><td>ความโปร่งใส</td></tr></tbody></table>

#### 4.3 Style: Background

<table><thead><tr><th width="384.69598388671875">ฟังก์ชัน</th><th>พารามิเตอร์</th><th>คำอธิบาย</th></tr></thead><tbody><tr><td><code>lv_obj_set_style_bg_color(obj, color, part)</code></td><td>obj, lv_color_t, part</td><td>สีพื้นหลัง</td></tr><tr><td><code>lv_obj_set_style_bg_opa(obj, opa, part)</code></td><td>obj, LV_OPA_*, part</td><td>ความโปร่งใสพื้นหลัง</td></tr></tbody></table>

#### 4.4 Color Functions

<table><thead><tr><th width="298.94317626953125">ฟังก์ชัน</th><th>พารามิเตอร์</th><th>คำอธิบาย</th></tr></thead><tbody><tr><td><code>lv_color_hex(hex)</code></td><td>0xRRGGBB</td><td>สร้างสีจาก hex code</td></tr><tr><td><code>lv_color_make(r, g, b)</code></td><td>0-255, 0-255, 0-255</td><td>สร้างสีจาก RGB</td></tr><tr><td><code>lv_palette_main(palette)</code></td><td>LV_PALETTE_*</td><td>สีหลักจาก Material palette</td></tr><tr><td><code>lv_palette_lighten(palette, lvl)</code></td><td>LV_PALETTE_*, 1-5</td><td>สีอ่อน</td></tr><tr><td><code>lv_palette_darken(palette, lvl)</code></td><td>LV_PALETTE_*, 1-4</td><td>สีเข้ม</td></tr></tbody></table>

### 5. องค์ความรู้และเทคนิค

#### 5.1 Vertical Stacking Pattern (ใช้ใน part1\_ex1)

```
    +-------------------------------------------+
    | Title (TOP_MID, y=+20)     font_24        |
    |                                           |
    |                                           |
    |        Main Content (CENTER, y=0)         |
    |                                           |
    |                                           |
    | Description (BOTTOM_MID, y=-50) font_14   |
    +-------------------------------------------+
```

ในตัวอย่างนี้ใช้รูปแบบการวาง Widget แนวตั้ง:

```c
/* Title - ชิดบน */
lv_obj_align(title, LV_ALIGN_TOP_MID, 0, 20);

/* Main Content - กลางจอ */
lv_obj_align(main, LV_ALIGN_CENTER, 0, 0);

/* Description - ชิดล่าง */
lv_obj_align(desc, LV_ALIGN_BOTTOM_MID, 0, -50);
```

#### 5.2 การจัดการข้อความหลายบรรทัด

```c
/* ใช้ \n เพื่อขึ้นบรรทัดใหม่ */
lv_label_set_text(label, "Line 1\nLine 2\nLine 3");

/* ตั้งค่าให้จัดกลาง */
lv_obj_set_style_text_align(label, LV_TEXT_ALIGN_CENTER, 0);
```

#### 5.3 ข้อควรระวังเรื่อง Long Text

```c
/* ถ้าข้อความยาวเกินไป ให้ใช้ long mode */
lv_label_set_long_mode(label, LV_LABEL_LONG_SCROLL);  /* เลื่อนอัตโนมัติ */
/* หรือ */
lv_label_set_long_mode(label, LV_LABEL_LONG_WRAP);    /* ตัดบรรทัดอัตโนมัติ */
```

#### 5.4 Format Specifiers สำหรับ Embedded

```c
/* int32_t ใช้ %d + cast */
int32_t adc_val = 2048;
lv_label_set_text_fmt(label, "ADC: %d", (int)adc_val);

/* uint32_t ใช้ %u + cast */
uint32_t count = 12345;
lv_label_set_text_fmt(label, "Count: %u", (unsigned int)count);

/* float ใช้ %.Xf */
float temp = 25.67f;
lv_label_set_text_fmt(label, "Temp: %.1f C", temp);

/* หลายค่า */
lv_label_set_text_fmt(label, "X:%d Y:%d Z:%d",
                      (int)ax, (int)ay, (int)az);
```

> **ข้อควรระวัง**: ห้ามใช้ `%ld` หรือ `%lu` ตรงๆ เพราะขนาด long อาจต่างกันในแต่ละ platform ให้ cast เป็น `(int)` หรือ `(unsigned int)` แทน

***

### 6. แบบฝึกหัด

#### Exercise 1: Device Info Display

**โจทย์**: สร้างหน้าจอแสดงข้อมูลอุปกรณ์ (Device Information Screen) ที่แสดง Label 3 ตัวด้วยขนาดและสีต่างกัน

**ข้อกำหนด**:

1. Background สี `0x0f0f23` (เข้มมาก)
2. Label ที่ 1 (Title): "PSoC Edge E84 Info"
   * Font: `montserrat_24`
   * สี: ขาว (`0xFFFFFF`)
   * ตำแหน่ง: TOP\_MID, y=+20
3. Label ที่ 2 (Detail): แสดงข้อมูล 4 บรรทัด (ใช้ `\n`)
   * "Board: APP\_KIT\_PSE84\_EVAL\_EPC2"
   * "CPU: Cortex-M33 + Cortex-M55"
   * "Display: 480 x 320 (TFT)"
   * "LVGL: v9.2.0"
   * Font: `montserrat_16` (default)
   * สี: สีเขียว (`LV_PALETTE_GREEN`)
   * ตำแหน่ง: CENTER, y=0
   * Text align: LEFT
4. Label ที่ 3 (Footer): "Embedded C for IoT Course - BUU"
   * Font: `montserrat_14`
   * สี: เทา (`0x888888`)
   * ตำแหน่ง: BOTTOM\_MID, y=-20

**ผลลัพธ์ที่คาดหวัง**:

```
    +-------------------------------------------+
    |       PSoC Edge E84 Info (ใหญ่,ขาว)        |
    |                                           |
    |  Board: APP_KIT_PSE84_EVAL_EPC2           |
    |  CPU: Cortex-M33 + Cortex-M55             |
    |  Display: 480 x 320 (TFT)                 |
    |  LVGL: v9.2.0                             |
    |                (เขียว)                     |
    |                                           |
    |  Embedded C for IoT Course - BUU (เทา)    |
    +-------------------------------------------+
```

***

#### Exercise 2: Scrolling Marquee Label

**โจทย์**: สร้างป้ายแสดงข้อความวิ่ง (Marquee) เหมือนป้ายโฆษณา LED ที่เห็นตามห้างสรรพสินค้า พร้อมข้อความสถานะด้านบน

**ข้อกำหนด**:

1. Background สี `0x1a1a2e`
2. Label ชื่อ "Factory Monitor" ด้านบน (font\_24, สีขาว)
3. สร้าง Container กว้าง 400px สูง 50px ตรงกลางจอ มี background สี `0x2a2a3e` พร้อมขอบสีเหลือง
4. ภายใน Container สร้าง Label ข้อความยาว:
   * "ALERT: Temperature sensor T-04 reading 85C -- Motor M-02 vibration above threshold -- Conveyor Belt B-01 maintenance due in 48 hours"
   * ใช้ `LV_LABEL_LONG_SCROLL_CIRCULAR`
   * กำหนดความกว้างของ label ให้เท่า Container (380px)
   * สีเหลือง, font\_20
5. Label แสดงเวลา "Last Update: 14:32:05" ด้านล่าง Container
   * สีเทา, font\_14

**ผลลัพธ์ที่คาดหวัง**:

```
    +-------------------------------------------+
    |          Factory Monitor (ขาว)            |
    |                                           |
    |  +-------------------------------------+  |
    |  | ALERT: Temperature sensor T-04 r... |  |  <-- ข้อความวิ่ง
    |  +-------------------------------------+  |
    |       Last Update: 14:32:05 (เทา)         |
    |                                           |
    +-------------------------------------------+
```

***

**LVGL v9.2 Reference**: <https://docs.lvgl.io/9.2/widgets/label.html>


# Button

## Lab 2: Button with Click Counter

### 1. โครงสร้างภาพรวมของ Lab

#### Why?: วัตถุประสงค์การเรียนรู้

Button เป็น Widget พื้นฐานที่สำคัญที่สุดสำหรับการรับ Input จากผู้ใช้:

* **User Interaction**: Button เป็นวิธีหลักที่ผู้ใช้โต้ตอบกับ GUI
* **GPIO Control**: ใช้ควบคุม GPIO เช่น เปิด/ปิด LED, Motor
* **Action Trigger**: ใช้สั่งเริ่ม/หยุดการทำงานต่างๆ
* **Event-Driven**: เรียนรู้แนวคิด Event-driven Programming

#### What?: จะได้เรียนรู้อะไร

1. **Button Widget**: สร้างปุ่มกดด้วย `lv_button_create()`
2. **Event Callback**: ผูก callback function กับ event
3. **Event Filtering**: กรอง event ที่ต้องการด้วย `LV_EVENT_CLICKED`
4. **Static Variable**: เก็บค่า counter ข้าม function calls
5. **Child Widget**: เพิ่ม Label ลงใน Button

<table><thead><tr><th width="257.9808349609375">ฟังก์ชัน</th><th>หน้าที่</th></tr></thead><tbody><tr><td><code>lv_button_create()</code></td><td>สร้าง Button widget</td></tr><tr><td><code>lv_obj_add_event_cb()</code></td><td>ผูก Event callback function</td></tr><tr><td><code>lv_event_get_code()</code></td><td>ดึง event code ภายใน callback</td></tr><tr><td><code>lv_event_get_target()</code></td><td>ดึง object ที่ถูกกด</td></tr><tr><td><code>lv_event_get_user_data()</code></td><td>ดึง user data ที่ส่งมากับ event</td></tr><tr><td><code>LV_EVENT_CLICKED</code></td><td>Event เมื่อกดและปล่อยปุ่ม</td></tr></tbody></table>

#### How? - ทำอย่างไร

* สร้างปุ่มที่นับจำนวนครั้งที่กด และแสดงผลบน Label ภายในปุ่ม

<figure><img src="/files/7PM3raekzhJTsHLwg85c" alt=""><figcaption></figcaption></figure>

***

### 2. หลักการทำงานและ Flowchart

#### 2.1 Event-Driven Model

<figure><img src="/files/fPq6WCwlDRWYdT8IwJBa" alt=""><figcaption></figcaption></figure>

#### 2.2 Button Creation Pattern (LVGL Official)

<figure><img src="/files/Q4rzIG403DoikBm3OmXE" alt=""><figcaption></figcaption></figure>

{% hint style="warning" %}
**WARNING:**&#x20;

ห้ามใช้คำสั่ง `lv_obj_set_size()` ก่อนที่จะสร้าง label เพราะอาจจะทำให้ text ถูกตัด (clip) ออกไป
{% endhint %}

#### 2.3 Program Flowchart

<figure><img src="/files/rxRQwIYIxjSMvyNoQHMQ" alt=""><figcaption></figcaption></figure>

***

### 3. ฟังก์ชันสำคัญ (API Reference)

#### 3.1 Button Creation & Style

<table><thead><tr><th width="387.7784423828125">ฟังก์ชัน</th><th>พารามิเตอร์</th><th>คำอธิบาย</th></tr></thead><tbody><tr><td><code>lv_button_create(parent)</code></td><td>parent object</td><td>สร้าง Button ใหม่</td></tr><tr><td><code>lv_obj_set_style_pad_hor(btn, px, part)</code></td><td>btn, pixels, 0</td><td>padding ซ้าย-ขวา (ทำให้ปุ่มกว้าง)</td></tr><tr><td><code>lv_obj_set_style_pad_ver(btn, px, part)</code></td><td>btn, pixels, 0</td><td>padding บน-ล่าง (ทำให้ปุ่มสูง)</td></tr><tr><td><code>lv_obj_set_style_bg_color(btn, color, part)</code></td><td>btn, lv_color_t, 0</td><td>สีพื้นหลังปุ่ม</td></tr><tr><td><code>lv_obj_set_style_radius(btn, r, part)</code></td><td>btn, pixels, 0</td><td>มุมมนของปุ่ม</td></tr></tbody></table>

#### 3.2 Event Functions

<table><thead><tr><th width="381.844482421875">ฟังก์ชัน</th><th width="197.4033203125">พารามิเตอร์</th><th>คำอธิบาย</th></tr></thead><tbody><tr><td><code>lv_obj_add_event_cb(obj, cb, filter, data)</code></td><td>obj, callback_fn, LV_EVENT_*, user_data</td><td>ลงทะเบียน event callback</td></tr><tr><td><code>lv_event_get_code(e)</code></td><td>lv_event_t *</td><td>ดึง event code</td></tr><tr><td><code>lv_event_get_target(e)</code></td><td>lv_event_t *</td><td>ดึง object ที่เกิด event</td></tr><tr><td><code>lv_event_get_user_data(e)</code></td><td>lv_event_t *</td><td>ดึง user data ที่ส่งมา</td></tr></tbody></table>

#### 3.3 Common Event Codes

<table><thead><tr><th width="214.788330078125">Event Code</th><th width="237.0440673828125">เมื่อไหร่</th><th>ใช้เมื่อ</th></tr></thead><tbody><tr><td><code>LV_EVENT_CLICKED</code></td><td>กดแล้วปล่อย (tap สมบูรณ์)</td><td>ใช้บ่อยที่สุด - สำหรับ action ทั่วไป</td></tr><tr><td><code>LV_EVENT_PRESSED</code></td><td>นิ้วแตะลง</td><td>ตอบสนองทันที ไม่รอปล่อย</td></tr><tr><td><code>LV_EVENT_RELEASED</code></td><td>ยกนิ้วขึ้น</td><td>ใช้คู่กับ PRESSED</td></tr><tr><td><code>LV_EVENT_LONG_PRESSED</code></td><td>กดค้างนาน (400ms)</td><td>สำหรับ action พิเศษ</td></tr><tr><td><code>LV_EVENT_VALUE_CHANGED</code></td><td>ค่าเปลี่ยน</td><td>สำหรับ Slider, Switch, Dropdown</td></tr></tbody></table>

#### 3.4 Label Functions ใน Button

<table><thead><tr><th width="352.71807861328125">ฟังก์ชัน</th><th>คำอธิบาย</th></tr></thead><tbody><tr><td><code>lv_label_create(btn)</code></td><td>สร้าง Label เป็น child ของ Button</td></tr><tr><td><code>lv_obj_center(label)</code></td><td>วาง Label ตรงกลาง Button</td></tr><tr><td><code>lv_obj_get_child(btn, 0)</code></td><td>ดึง child แรก (Label) จาก Button</td></tr><tr><td><code>lv_label_set_text_fmt(label, fmt, ...)</code></td><td>อัปเดตข้อความของ Label</td></tr></tbody></table>

***

### 4. โค้ดตัวอย่าง (Code Examples)

#### 4.1 โค้ดอ้างอิง: `part1_ex2_button_counter()`

จากไฟล์ `part1_examples.c`:

```c
/* Callback function - ประกาศ static นอก main function */
static void ex2_btn_event_cb(lv_event_t * e)
{
    lv_event_code_t code = lv_event_get_code(e);
    lv_obj_t * btn = lv_event_get_target(e);

    if(code == LV_EVENT_CLICKED) {
        static uint32_t cnt = 0;
        cnt++;

        /* Get the label child and update text */
        lv_obj_t * label = lv_obj_get_child(btn, 0);
        lv_label_set_text_fmt(label, "Clicked: %u", (unsigned int)cnt);

        printf("Button clicked %u times\r\n", (unsigned int)cnt);
    }
}

void part1_ex2_button_counter(void)
{
    /* Set background */
    lv_obj_set_style_bg_color(lv_screen_active(),
                              lv_color_hex(0x1a1a2e), LV_PART_MAIN);

    /* Title */
    lv_obj_t * title = lv_label_create(lv_screen_active());
    lv_label_set_text(title, "Part 1 - Example 2: Button Counter");
    lv_obj_set_style_text_color(title, lv_color_hex(0xFFFFFF), 0);
    lv_obj_align(title, LV_ALIGN_TOP_MID, 0, 20);

    /* Create button - following official LVGL pattern */
    lv_obj_t * btn = lv_button_create(lv_screen_active());
    lv_obj_add_event_cb(btn, ex2_btn_event_cb, LV_EVENT_CLICKED, NULL);
    lv_obj_align(btn, LV_ALIGN_CENTER, 0, 0);
    lv_obj_set_style_pad_hor(btn, 30, 0);
    lv_obj_set_style_pad_ver(btn, 15, 0);

    /* Add label to button */
    lv_obj_t * btn_label = lv_label_create(btn);
    lv_label_set_text(btn_label, "Click Me!");
    lv_obj_center(btn_label);

    /* Description */
    lv_obj_t * desc = lv_label_create(lv_screen_active());
    lv_label_set_text(desc, "Learning: lv_button_create, lv_obj_add_event_cb\n"
                           "Pattern: Event callback with LV_EVENT_CLICKED");
    lv_obj_set_style_text_color(desc, lv_color_hex(0xAAAAAA), 0);
    lv_obj_set_style_text_align(desc, LV_TEXT_ALIGN_CENTER, 0);
    lv_obj_align(desc, LV_ALIGN_BOTTOM_MID, 0, -50);
}
```

**วิเคราะห์จุดสำคัญ**:

| จุด             | โค้ด                                 | ทำไม                         |
| --------------- | ------------------------------------ | ---------------------------- |
| Event filter    | `LV_EVENT_CLICKED` ใน `add_event_cb` | ลงทะเบียนเฉพาะ CLICKED       |
| Static counter  | `static uint32_t cnt = 0`            | เก็บค่าข้าม function call    |
| Get child label | `lv_obj_get_child(btn, 0)`           | ดึง Label จาก Button         |
| Update text     | `lv_label_set_text_fmt()`            | อัปเดตข้อความแบบ dynamic     |
| Padding         | `pad_hor(30), pad_ver(15)`           | ใช้แทน `set_size()`          |
| user\_data      | `NULL`                               | ไม่ส่ง data เพราะมีปุ่มเดียว |

#### 4.2 Button กับ User Data

```c
/* Callback ที่ใช้ user_data แยกการทำงาน */
static lv_obj_t * count_label;
static int32_t counter = 0;

static void inc_dec_cb(lv_event_t * e)
{
    int32_t * step = (int32_t *)lv_event_get_user_data(e);
    counter += *step;
    lv_label_set_text_fmt(count_label, "Count: %d", (int)counter);
}

void example_two_buttons(void)
{
    static int32_t step_up = 1;     /* ต้อง static เพราะ user_data เก็บ pointer */
    static int32_t step_down = -1;

    /* Display label */
    count_label = lv_label_create(lv_screen_active());
    lv_label_set_text(count_label, "Count: 0");
    lv_obj_set_style_text_color(count_label, lv_color_hex(0xFFFFFF), 0);
    lv_obj_set_style_text_font(count_label, &lv_font_montserrat_24, 0);
    lv_obj_align(count_label, LV_ALIGN_CENTER, 0, -40);

    /* UP Button */
    lv_obj_t * btn_up = lv_button_create(lv_screen_active());
    lv_obj_add_event_cb(btn_up, inc_dec_cb, LV_EVENT_CLICKED, &step_up);
    lv_obj_align(btn_up, LV_ALIGN_CENTER, -70, 30);
    lv_obj_set_style_pad_hor(btn_up, 25, 0);
    lv_obj_set_style_pad_ver(btn_up, 12, 0);
    lv_obj_set_style_bg_color(btn_up, lv_palette_main(LV_PALETTE_GREEN), 0);

    lv_obj_t * lbl_up = lv_label_create(btn_up);
    lv_label_set_text(lbl_up, "+1");
    lv_obj_center(lbl_up);

    /* DOWN Button */
    lv_obj_t * btn_down = lv_button_create(lv_screen_active());
    lv_obj_add_event_cb(btn_down, inc_dec_cb, LV_EVENT_CLICKED, &step_down);
    lv_obj_align(btn_down, LV_ALIGN_CENTER, 70, 30);
    lv_obj_set_style_pad_hor(btn_down, 25, 0);
    lv_obj_set_style_pad_ver(btn_down, 12, 0);
    lv_obj_set_style_bg_color(btn_down, lv_palette_main(LV_PALETTE_RED), 0);

    lv_obj_t * lbl_down = lv_label_create(btn_down);
    lv_label_set_text(lbl_down, "-1");
    lv_obj_center(lbl_down);
}
```

#### 4.3 Multiple Callbacks กับ Multiple Buttons

```c
/* แต่ละปุ่มมี callback แยก */
static void start_cb(lv_event_t * e) {
    (void)e;
    printf("Process STARTED\r\n");
    /* สั่งเริ่ม data collection, motor, etc. */
}

static void stop_cb(lv_event_t * e) {
    (void)e;
    printf("Process STOPPED\r\n");
    /* สั่งหยุดทำงาน */
}

/* ลงทะเบียนแยก callback */
lv_obj_add_event_cb(btn_start, start_cb, LV_EVENT_CLICKED, NULL);
lv_obj_add_event_cb(btn_stop, stop_cb, LV_EVENT_CLICKED, NULL);
```

#### 4.4 Button Style Customization

```c
/* ปุ่มแบบ Danger (สีแดง, มุมมน) */
lv_obj_t * btn_danger = lv_button_create(lv_screen_active());
lv_obj_set_style_bg_color(btn_danger, lv_palette_main(LV_PALETTE_RED), 0);
lv_obj_set_style_bg_color(btn_danger,
lv_palette_darken(LV_PALETTE_RED, 2), LV_STATE_PRESSED);  /* สีเข้มเมื่อกด */
lv_obj_set_style_radius(btn_danger, 10, 0);  /* มุมมน */
lv_obj_set_style_pad_hor(btn_danger, 40, 0);
lv_obj_set_style_pad_ver(btn_danger, 20, 0);
lv_obj_set_style_shadow_width(btn_danger, 10, 0);  /* เงา */
lv_obj_set_style_shadow_color(btn_danger,
lv_palette_main(LV_PALETTE_RED), 0);
```

***

### 5. องค์ความรู้และเทคนิค

#### 5.1 Event Filter: ทำไมต้อง Filter?

```c
/* วิธีผิด: ลงทะเบียน LV_EVENT_ALL แล้ว filter ภายใน */
lv_obj_add_event_cb(btn, cb, LV_EVENT_ALL, NULL);  /* ไม่แนะนำ! */

/* วิธีถูก: ลงทะเบียนเฉพาะ event ที่ต้องการ */
lv_obj_add_event_cb(btn, cb, LV_EVENT_CLICKED, NULL);  /* ดีกว่า */
```

> **เหตุผล**: LV\_EVENT\_ALL จะเรียก callback ทุกครั้งที่มี event ใดๆ เกิดขึ้น (หลายสิบครั้งต่อ touch เดียว) ทำให้สิ้นเปลือง CPU และอาจเกิดปัญหาที่ไม่คาดคิด

#### 5.2 ข้อผิดพลาดที่พบบ่อย

<table><thead><tr><th width="259.5504150390625">ข้อผิดพลาด</th><th width="246.5958251953125">สาเหตุ</th><th>วิธีแก้</th></tr></thead><tbody><tr><td>ปุ่มเล็กเกินไป</td><td>ใช้ <code>lv_obj_set_size()</code> กับ Button</td><td>ใช้ <code>lv_obj_set_style_pad_hor/ver()</code> แทน</td></tr><tr><td>Label หายจากปุ่ม</td><td>สร้าง Label ก่อน set_size</td><td>สร้าง Label หลังสุด แล้ว <code>lv_obj_center()</code></td></tr><tr><td>Callback ไม่ทำงาน</td><td>ลืม add_event_cb หรือ event code ผิด</td><td>ตรวจสอบ filter event</td></tr><tr><td>Counter กลับเป็น 0</td><td>ตัวแปร local ไม่ใช่ static</td><td>ประกาศ <code>static</code></td></tr><tr><td>user_data เป็น garbage</td><td>ส่ง address ของ local variable</td><td>ใช้ <code>static</code> variable หรือ global</td></tr><tr><td>กด 1 ครั้ง callback เรียกหลายครั้ง</td><td>ใช้ LV_EVENT_ALL</td><td>ใช้ LV_EVENT_CLICKED</td></tr></tbody></table>

#### 5.3 ขนาดปุ่มที่แนะนำสำหรับ Touch Screen

```
    Minimum touch target: 40x40 pixels
    Recommended padding:  hor=25-40, ver=12-20

    +-----------------------+
    |  pad_ver = 15         |
    |  +---------------+    |
    |  |  "Click Me!"  |    |   <-- Label ถูก center อัตโนมัติ
    |  +---------------+    |
    |  pad_hor = 30         |
    +-----------------------+

    ขนาดปุ่มโดยประมาณ:
    - เล็ก:   pad_hor=20, pad_ver=10  (~80x34 px)
    - กลาง:  pad_hor=30, pad_ver=15  (~120x44 px)
    - ใหญ่:   pad_hor=40, pad_ver=20  (~160x54 px)
```

#### 5.4 Static Variables vs. Global Variables

```c
/* วิธี 1: Static ภายใน Callback (เรียบง่าย, ใช้กับ counter) */
static void cb(lv_event_t * e) {
    static int count = 0;   /* เห็นได้เฉพาะใน function นี้ */
    count++;
}

/* วิธี 2: Static Global (ใช้เมื่อ callback ต้องอัปเดต widget อื่น) */
static lv_obj_t * my_label;     /* เข้าถึงได้ทั้งไฟล์ */
static void cb(lv_event_t * e) {
    lv_label_set_text(my_label, "Updated!");
}

/* วิธี 3: User Data (ใช้เมื่อ callback ถูก reuse) */
static void cb(lv_event_t * e) {
    lv_obj_t * label = (lv_obj_t *)lv_event_get_user_data(e);
    lv_label_set_text(label, "Updated!");
}
lv_obj_add_event_cb(btn, cb, LV_EVENT_CLICKED, my_label);
```

***

### 6. แบบฝึกหัด (Exercises)

#### Exercise 1: Increment/Decrement Counter - 10-15 นาที

**โจทย์**: สร้าง Counter ที่มีปุ่ม 2 ตัว สำหรับเพิ่ม (+1) และลด (-1) ค่า

**ข้อกำหนด**:

1. Background สี `0x1a1a2e`
2. Title "Production Counter" (font\_24, สีขาว, TOP\_MID)
3. Label แสดงค่า counter เริ่มที่ 0 (font\_24, สีขาว, CENTER, y=-30)
4. ปุ่ม "+" สีเขียว อยู่ทางซ้าย (CENTER, x=-80, y=+40)
5. ปุ่ม "-" สีแดง อยู่ทางขวา (CENTER, x=+80, y=+40)
6. ค่า counter ไม่ต่ำกว่า 0 (ถ้า counter == 0 แล้วกด "-" ไม่ลด)
7. แสดง format "Count: XX"

**Expected Output:**

<figure><img src="/files/LwcGJwc60Old61oMHEfg" alt=""><figcaption></figcaption></figure>

**Hints:**

* ใช้ `static int` สำหรับ counter
* สร้าง global label pointer สำหรับแสดงค่า
* ใช้ user\_data ส่ง direction (+1 หรือ -1)

***

#### Exercise 2: Toggle Button (Medium)

สร้างปุ่มที่สลับระหว่าง "ON" และ "OFF" เมื่อกด พร้อมเปลี่ยนสีปุ่ม

**Expected Output:**

<figure><img src="/files/u3xWvwoV5hFehxiNFK6w" alt=""><figcaption></figcaption></figure>

**Hints:**

* ใช้ `static bool state = false;`
* `lv_obj_set_style_bg_color()` เปลี่ยนสีปุ่ม

***

#### Exercise 3: Long Press Detection (Advanced)

สร้างปุ่มที่แยกการกดสั้นและกดค้าง:

* กดสั้น: แสดง "Short Press"
* กดค้าง 1 วินาที: แสดง "Long Press"

**Hints:**

* ใช้ `LV_EVENT_CLICKED` และ `LV_EVENT_LONG_PRESSED`
* สามารถ register หลาย callback ได้

***

### 7. References

* [LVGL Button Documentation](https://docs.lvgl.io/9.2/widgets/button.html)
* [LVGL Button Example](https://github.com/lvgl/lvgl/blob/release/v9.2/examples/widgets/button/lv_example_button_1.c)
* [LVGL Events Guide](https://docs.lvgl.io/9.2/overview/event.html)

***

**Next Lab:** Lab 3: LED Widget Control


# LED & Switch


# LED

## Lab 3: LED Widget Control

### 1. โครงสร้างภาพรวมของ Lab

#### Why? - ทำไมต้องเรียนรู้เรื่องนี้

LED Widget เป็นเครื่องมือสำคัญสำหรับแสดงสถานะ:

* **Visual Feedback**: แสดงสถานะ ON/OFF อย่างชัดเจน
* **Status Indicator**: ใช้แสดงสถานะ GPIO, Connection, Error
* **Brightness Control**: สามารถควบคุมความสว่างได้ (0-255)
* **Multiple Colors**: รองรับสีต่างๆ ตาม Palette

#### What? - จะได้เรียนรู้อะไร

1. **LED Widget**: สร้างและควบคุม LED ด้วย LVGL
2. **ON/OFF Control**: ใช้ `lv_led_on()` และ `lv_led_off()`
3. **Brightness**: ปรับความสว่างด้วย `lv_led_set_brightness()`
4. **Slider Widget**: ควบคุมค่าต่อเนื่องด้วย Slider
5. **Multiple Callbacks**: ผูกหลาย callback กับหลาย widget

<table><thead><tr><th width="306.1129150390625">ฟังก์ชัน</th><th>หน้าที่</th></tr></thead><tbody><tr><td><code>lv_led_create()</code></td><td>สร้าง Virtual LED widget</td></tr><tr><td><code>lv_led_on()</code> / <code>lv_led_off()</code></td><td>เปิด/ปิด LED</td></tr><tr><td><code>lv_led_set_brightness()</code></td><td>ปรับความสว่าง (0-255)</td></tr><tr><td><code>lv_led_set_color()</code></td><td>เปลี่ยนสี LED</td></tr><tr><td><code>lv_slider_create()</code></td><td>สร้าง Slider widget</td></tr><tr><td><code>lv_slider_set_range()</code></td><td>กำหนดค่า min-max</td></tr><tr><td><code>lv_slider_get_value()</code></td><td>อ่านค่าปัจจุบัน</td></tr><tr><td><code>LV_EVENT_VALUE_CHANGED</code></td><td>Event เมื่อค่า Slider เปลี่ยน</td></tr></tbody></table>

#### How? - ทำอย่างไร

* สร้าง Virtual LED ที่ควบคุมได้ด้วยปุ่ม ON/OFF และ Slider ปรับความสว่าง

<figure><img src="/files/dyMUWXyq8KSIBFZbZBp6" alt=""><figcaption></figcaption></figure>

***

### 2. หลักการทำงานและ Flowchart

#### 2.1 LED Widget Architecture

```
┌─────────────────────────────────────────────────────────┐
│                   LED WIDGET                            │
├─────────────────────────────────────────────────────────┤
│                                                         │
│   ┌─────────────────────────────────────┐               │
│   │           LED Widget                │               │
│   │  ┌───────────────────────────────┐  │               │
│   │  │         Visual LED            │  │               │
│   │  │                               │  │               │
│   │  │   Color:  lv_led_set_color()  │  │               │
│   │  │   State:  ON / OFF            │  │               │
│   │  │   Bright: 0-255               │  │               │
│   │  │                               │  │               │
│   │  └───────────────────────────────┘  │               │
│   └─────────────────────────────────────┘               │
│                                                         │
│   Brightness Levels:                                    │
│   ├── 0:   OFF (completely dark)                        │
│   ├── 128: Mid brightness (50%)                         │
│   └── 255: Full brightness (100%)                       │
│                                                         │
│   ⚠️ NOTE: This is a VIRTUAL LED (UI only)              │
│            Not the physical LED on the board!           │
│                                                         │
└─────────────────────────────────────────────────────────┘
```

#### 2.2 Slider Widget Architecture

```
┌─────────────────────────────────────────────────────────┐
│                  SLIDER WIDGET                          │
├─────────────────────────────────────────────────────────┤
│                                                         │
│   ┌─────────────────────────────────────────────┐       │
│   │    ●════════════════════○                   │       │
│   │    │                    │                   │       │
│   │  min                   max                  │       │
│   └─────────────────────────────────────────────┘       │
│                                                         │
│   Properties:                                           │
│   ├── Range: min to max (default 0-100)                 │
│   ├── Value: current position                           │
│   └── Mode: Normal or Range                             │
│                                                         │
│   Events:                                               │
│   ├── LV_EVENT_VALUE_CHANGED: Value is changing         │
│   └── LV_EVENT_RELEASED: User released slider           │
│                                                         │
│   Parts:                                                │
│   ├── LV_PART_MAIN:      Background track               │
│   ├── LV_PART_INDICATOR: Filled part                    │
│   └── LV_PART_KNOB:      The draggable knob             │
│                                                         │
└─────────────────────────────────────────────────────────┘
```

#### 2.3 Program Flowchart

```
┌─────────────────────────────────────────────────────────┐
│                  PROGRAM FLOW                           │
├─────────────────────────────────────────────────────────┤
│                                                         │
│                    ┌─────────┐                          │
│                    │  Start  │                          │
│                    └────┬────┘                          │
│                         │                               │
│     ┌───────────────────┼───────────────────┐           │
│     │                   │                   │           │
│     ▼                   ▼                   ▼           │
│ ┌─────────┐      ┌───────────┐       ┌──────────┐       │
│ │ Create  │      │ Create ON │       │ Create   │       │
│ │   LED   │      │ OFF Btns  │       │ Slider   │       │
│ └────┬────┘      └─────┬─────┘       └────┬─────┘       │
│      │                 │                  │             │
│      │                 │                  │             │
│      └─────────────────┼──────────────────┘             │
│                        │                                │
│                        ▼                                │
│              ┌─────────────────────┐                    │
│              │   LVGL Main Loop    │◄──────────┐        │
│              └─────────┬───────────┘           │        │
│                        │                       │        │
│         ┌──────────────┼──────────────┐        │        │
│         │              │              │        │        │
│    ON Button      OFF Button     Slider        │        │
│    Clicked        Clicked        Changed       │        │
│         │              │              │        │        │
│         ▼              ▼              ▼        │        │
│    ┌─────────┐   ┌──────────┐  ┌────────────┐  │        │
│    │lv_led_  │   │lv_led_   │  │lv_led_set_ │  │        │
│    │  on()   │   │  off()   │  │brightness()│  │        │
│    └────┬────┘   └────┬─────┘  └─────┬──────┘  │        │
│         │             │              │         │        │
│         └─────────────┴──────────────┘         │        │
│                        │                       │        │
│                        ▼                       │        │
│              ┌─────────────────────┐           │        │
│              │  Update UI Labels   │───────────┘        │
│              └─────────────────────┘                    │
│                                                         │
└─────────────────────────────────────────────────────────┘
```

***

### 3. ฟังก์ชันสำคัญ (API Reference)

#### 3.1 LED Widget Functions

<table><thead><tr><th width="319.99072265625">ฟังก์ชัน</th><th width="161.464599609375">พารามิเตอร์</th><th>คำอธิบาย</th></tr></thead><tbody><tr><td><code>lv_led_create(parent)</code></td><td>parent object</td><td>สร้าง LED widget</td></tr><tr><td><code>lv_led_on(led)</code></td><td>led object</td><td>เปิด LED (brightness = 255)</td></tr><tr><td><code>lv_led_off(led)</code></td><td>led object</td><td>ปิด LED (brightness = 0)</td></tr><tr><td><code>lv_led_toggle(led)</code></td><td>led object</td><td>สลับ ON/OFF</td></tr><tr><td><code>lv_led_set_brightness(led, bright)</code></td><td>led, 0-255</td><td>กำหนดความสว่าง</td></tr><tr><td><code>lv_led_get_brightness(led)</code></td><td>led object</td><td>อ่านค่าความสว่าง</td></tr><tr><td><code>lv_led_set_color(led, color)</code></td><td>led, lv_color_t</td><td>เปลี่ยนสี LED</td></tr></tbody></table>

#### 3.2 Slider Widget Functions

<table><thead><tr><th width="363.85443115234375">ฟังก์ชัน</th><th width="190.2528076171875">พารามิเตอร์</th><th>คำอธิบาย</th></tr></thead><tbody><tr><td><code>lv_slider_create(parent)</code></td><td>parent object</td><td>สร้าง Slider widget</td></tr><tr><td><code>lv_slider_set_range(slider, min, max)</code></td><td>slider, min, max</td><td>กำหนดช่วงค่า</td></tr><tr><td><code>lv_slider_set_value(slider, value, anim)</code></td><td>slider, value, LV_ANIM_ON/OFF</td><td>กำหนดค่าปัจจุบัน</td></tr><tr><td><code>lv_slider_get_value(slider)</code></td><td>slider object</td><td>อ่านค่าปัจจุบัน</td></tr><tr><td><code>lv_obj_set_width(slider, w)</code></td><td>slider, width_px</td><td>กำหนดความกว้าง</td></tr></tbody></table>

#### 3.3 Style Functions ที่เกี่ยวข้อง

| ฟังก์ชัน                                   | คำอธิบาย                                         |
| ------------------------------------------ | ------------------------------------------------ |
| `lv_obj_set_size(led, w, h)`               | กำหนดขนาด LED (ปกติสี่เหลี่ยมจัตุรัส เช่น 80x80) |
| `lv_obj_set_style_bg_color(btn, color, 0)` | เปลี่ยนสีปุ่ม ON/OFF                             |
| `lv_obj_set_style_pad_hor(btn, px, 0)`     | padding ซ้าย-ขวาของปุ่ม                          |
| `lv_obj_set_style_pad_ver(btn, px, 0)`     | padding บน-ล่างของปุ่ม                           |

#### 3.4 Slider Parts (สำหรับ Style ขั้นสูง)

| Part                | คำอธิบาย                                  |
| ------------------- | ----------------------------------------- |
| `LV_PART_MAIN`      | พื้นหลัง track ของ Slider                 |
| `LV_PART_INDICATOR` | ส่วนที่เติมสี (จาก min ถึง current value) |
| `LV_PART_KNOB`      | ปุ่มกลมที่ผู้ใช้ลาก                       |

***

### 4. โค้ดตัวอย่าง (Code Examples)

#### 4.1 โค้ดอ้างอิง: `part1_ex3_led_control()`

จากไฟล์ `part1_examples.c`:

```c
static lv_obj_t * ex3_led;
static lv_obj_t * ex3_brightness_label;
static lv_obj_t * slider_label;

static void ex3_on_btn_cb(lv_event_t * e)
{
    (void)e;
    lv_led_on(ex3_led);
    lv_label_set_text(ex3_brightness_label, "Brightness: 255 (ON)");
}

static void ex3_off_btn_cb(lv_event_t * e)
{
    (void)e;
    lv_led_off(ex3_led);
    lv_label_set_text(ex3_brightness_label, "Brightness: 0 (OFF)");
}

static void ex3_slider_cb(lv_event_t * e)
{
    lv_obj_t * slider = lv_event_get_target(e);
    int32_t value = lv_slider_get_value(slider);

    /* Update percentage label (0-255 -> 0-100%) */
    int percent = (value * 100) / 255;
    lv_label_set_text_fmt(slider_label, "%d%%", percent);

    lv_led_set_brightness(ex3_led, (uint8_t)value);
    lv_label_set_text_fmt(ex3_brightness_label, "Brightness: %d",
                          (int)value);
}

void part1_ex3_led_control(void)
{
    /* Background */
    lv_obj_set_style_bg_color(lv_screen_active(),
                              lv_color_hex(0x0f0f23), LV_PART_MAIN);

    /* Title */
    lv_obj_t * title = lv_label_create(lv_screen_active());
    lv_label_set_text(title, "Part 1 - Example 3: LED Widget");
    lv_obj_set_style_text_color(title, lv_color_hex(0xFFFFFF), 0);
    lv_obj_align(title, LV_ALIGN_TOP_MID, 0, 20);

    /* Create LED widget */
    ex3_led = lv_led_create(lv_screen_active());
    lv_obj_set_size(ex3_led, 80, 80);
    lv_obj_align(ex3_led, LV_ALIGN_CENTER, 0, -70);
    lv_led_set_color(ex3_led, lv_palette_main(LV_PALETTE_GREEN));
    lv_led_set_brightness(ex3_led, 150);

    /* Brightness label */
    ex3_brightness_label = lv_label_create(lv_screen_active());
    lv_label_set_text(ex3_brightness_label, "Brightness: 150");
    lv_obj_set_style_text_color(ex3_brightness_label,
                                lv_color_hex(0xFFFFFF), 0);
    lv_obj_align(ex3_brightness_label, LV_ALIGN_CENTER, 0, 0);

    /* ON Button */
    lv_obj_t * btn_on = lv_button_create(lv_screen_active());
    lv_obj_add_event_cb(btn_on, ex3_on_btn_cb, LV_EVENT_CLICKED, NULL);
    lv_obj_align(btn_on, LV_ALIGN_CENTER, -60, 50);
    lv_obj_set_style_bg_color(btn_on,
                              lv_palette_main(LV_PALETTE_GREEN), 0);
    lv_obj_set_style_pad_hor(btn_on, 30, 0);
    lv_obj_set_style_pad_ver(btn_on, 15, 0);

    lv_obj_t * label_on = lv_label_create(btn_on);
    lv_label_set_text(label_on, "ON");
    lv_obj_center(label_on);

    /* OFF Button */
    lv_obj_t * btn_off = lv_button_create(lv_screen_active());
    lv_obj_add_event_cb(btn_off, ex3_off_btn_cb, LV_EVENT_CLICKED, NULL);
    lv_obj_align(btn_off, LV_ALIGN_CENTER, 60, 50);
    lv_obj_set_style_bg_color(btn_off,
                              lv_palette_main(LV_PALETTE_RED), 0);
    lv_obj_set_style_pad_hor(btn_off, 30, 0);
    lv_obj_set_style_pad_ver(btn_off, 15, 0);

    lv_obj_t * label_off = lv_label_create(btn_off);
    lv_label_set_text(label_off, "OFF");
    lv_obj_center(label_off);

    /* Brightness Slider */
    lv_obj_t * slider = lv_slider_create(lv_screen_active());
    lv_obj_set_width(slider, 200);
    lv_obj_align(slider, LV_ALIGN_CENTER, 0, 110);
    lv_slider_set_range(slider, 0, 255);
    lv_slider_set_value(slider, 150, LV_ANIM_OFF);
    lv_obj_add_event_cb(slider, ex3_slider_cb,
                        LV_EVENT_VALUE_CHANGED, NULL);

    /* Slider percentage label */
    slider_label = lv_label_create(lv_screen_active());
    lv_label_set_text(slider_label, "59%");
    lv_obj_set_style_text_color(slider_label, lv_color_hex(0xFFFFFF), 0);
    lv_obj_align_to(slider_label, slider,
                    LV_ALIGN_OUT_BOTTOM_MID, 0, 5);
}
```

**วิเคราะห์โครงสร้าง**:

| องค์ประกอบ       | ตำแหน่ง                 | หน้าที่                   |
| ---------------- | ----------------------- | ------------------------- |
| Title            | TOP\_MID, y=20          | ชื่อ Example              |
| LED (80x80)      | CENTER, y=-70           | แสดงสถานะ Virtual LED     |
| Brightness Label | CENTER, y=0             | แสดงค่า Brightness 0-255  |
| ON/OFF Buttons   | CENTER, y=50, x=-60/+60 | เปิด/ปิด LED              |
| Slider (w=200)   | CENTER, y=110           | ปรับ brightness ต่อเนื่อง |
| Slider Label     | ด้านล่าง Slider         | แสดง % (0-100%)           |

#### 4.2 LED สีต่างๆ

```c
/* LED สีแดง */
lv_obj_t * led_r = lv_led_create(lv_screen_active());
lv_led_set_color(led_r, lv_palette_main(LV_PALETTE_RED));
lv_led_on(led_r);

/* LED สีจาก Hex */
lv_obj_t * led_custom = lv_led_create(lv_screen_active());
lv_led_set_color(led_custom, lv_color_hex(0xFF6600));   /* สีส้ม */
lv_led_set_brightness(led_custom, 200);
```

#### 4.3 Slider กับ Custom Range

```c
/* Slider สำหรับอุณหภูมิ 15-35 องศา */
lv_obj_t * temp_slider = lv_slider_create(lv_screen_active());
lv_slider_set_range(temp_slider, 15, 35);
lv_slider_set_value(temp_slider, 25, LV_ANIM_OFF);

/* Slider สำหรับ PWM duty cycle 0-100% */
lv_obj_t * pwm_slider = lv_slider_create(lv_screen_active());
lv_slider_set_range(pwm_slider, 0, 100);
lv_slider_set_value(pwm_slider, 50, LV_ANIM_OFF);
```

#### 4.4 Slider Style Customization

```c
/* เปลี่ยนสี Slider */
lv_obj_t * slider = lv_slider_create(lv_screen_active());
lv_obj_set_width(slider, 250);

/* สี track (พื้นหลัง) */
lv_obj_set_style_bg_color(slider, lv_color_hex(0x333333), LV_PART_MAIN);

/* สี indicator (ส่วนที่เติม) */
lv_obj_set_style_bg_color(slider,
    lv_palette_main(LV_PALETTE_BLUE), LV_PART_INDICATOR);

/* สี knob (ปุ่มกลม) */
lv_obj_set_style_bg_color(slider,
    lv_palette_main(LV_PALETTE_CYAN), LV_PART_KNOB);
lv_obj_set_style_pad_all(slider, 6, LV_PART_KNOB);  /* ขนาด knob */
```

***

### 5. องค์ความรู้และเทคนิค (Patterns & Tips)

#### 5.1 Multiple Callbacks ควบคุม Widget เดียวกัน

```c
/*
 * Pattern: หลาย Callback อัปเดต Widget ร่วม
 *
 * LED (global)  <--- on_btn_cb()   (set 255)
 *               <--- off_btn_cb()  (set 0)
 *               <--- slider_cb()   (set 0-255)
 *
 * สิ่งที่ต้องระวัง:
 * - LED object ต้องเป็น static/global เพื่อให้ทุก callback เข้าถึงได้
 * - Brightness label ก็ต้อง global เพื่ออัปเดตจากทุก callback
 */
```

#### 5.2 ข้อผิดพลาดที่พบบ่อย

| ข้อผิดพลาด                        | สาเหตุ                               | วิธีแก้                                          |
| --------------------------------- | ------------------------------------ | ------------------------------------------------ |
| LED ไม่เปลี่ยนสี                  | ตั้งสีหลัง `lv_led_on()`             | ตั้งสีก่อน set\_brightness                       |
| Slider ไม่ตอบสนอง                 | ลืม add\_event\_cb                   | ตรวจสอบ LV\_EVENT\_VALUE\_CHANGED                |
| Label ไม่อัปเดต                   | ใช้ local variable แทน static/global | ใช้ static lv\_obj\_t \*                         |
| Virtual LED สับสนกับ Hardware LED | ไม่ได้อธิบายในโค้ด                   | comment ชัดเจนว่าเป็น virtual                    |
| Slider range ไม่ตรง               | ลืม `lv_slider_set_range()`          | default คือ 0-100, LED ต้อง 0-255                |
| Percentage คำนวณผิด               | ใช้ integer division                 | `(value * 100) / 255` ไม่ใช่ `value / 255 * 100` |

#### 5.3 Virtual LED vs. Hardware LED

```
    Virtual LED (LVGL)                  Hardware LED (GPIO)
    +-------------------+              +-------------------+
    | lv_led_create()   |              | aic_gpio_init()   |
    | lv_led_on()       |              | aic_gpio_led_set()|
    | lv_led_off()      |              |                   |
    | lv_led_set_       |              | ใช้ใน Part II     |
    |   brightness()    |              | (Ex 6-11)         |
    +-------------------+              +-------------------+
    |  แสดงบนจอเท่านั้น   |              |  ควบคุม LED จริง    |
    |  ใช้ใน Simulator   |              |  บนบอร์ด           |
    +-------------------+              +-------------------+

    เมื่อเรียนต่อ Part II:
    Slider --> callback --> lv_led_set_brightness()    (UI update)
                       --> aic_gpio_led_set(pwm_val)   (Hardware)
```

#### 5.4 Brightness to Percentage Conversion

```c
/* Brightness 0-255 to Percentage 0-100% */
int percent = (brightness * 100) / 255;

/* Percentage 0-100% to Brightness 0-255 */
int brightness = (percent * 255) / 100;

/* ตัวอย่างค่า: */
/*   0 -> 0%,  64 -> 25%,  128 -> 50%,  192 -> 75%,  255 -> 100% */
```

#### 5.5 Timer Pattern (สำหรับ animation)

```c
/* ใช้ lv_timer เพื่อทำ animation (เช่น LED กระพริบ) */
static void blink_timer_cb(lv_timer_t * timer)
{
    lv_obj_t * led = (lv_obj_t *)lv_timer_get_user_data(timer);
    lv_led_toggle(led);   /* สลับ ON/OFF */
}

/* สร้าง Timer ให้ LED กระพริบทุก 500ms */
lv_timer_create(blink_timer_cb, 500, my_led);
/*                              ^     ^
 *                              |     |
 *                         ทุก 500ms  user_data = LED object
 */
```

***

### 6. แบบฝึกหัด (Exercises)

#### Exercise 1: RGB LED Mixer - 15-20 นาที

**โจทย์**: สร้าง RGB Color Mixer ที่มี Slider 3 ตัว (R, G, B) ควบคุมสีของ LED Widget 1 ตัว

**ข้อกำหนด**:

1. Background สี `0x0f0f23`
2. Title "RGB LED Mixer" (font\_24, สีขาว, TOP\_MID)
3. LED Widget ขนาด 100x100 ตรงกลางด้านบน (CENTER, y=-60)
4. สร้าง Slider 3 ตัว:
   * Red Slider: range 0-255, ค่าเริ่มต้น 255
   * Green Slider: range 0-255, ค่าเริ่มต้น 0
   * Blue Slider: range 0-255, ค่าเริ่มต้น 0
5. แต่ละ Slider มี Label ชื่อสี (R/G/B) ทางซ้าย และ Label ค่า (0-255) ทางขวา
6. เมื่อ Slider เปลี่ยน ให้อัปเดตสี LED ด้วย `lv_led_set_color(led, lv_color_make(r, g, b))`
7. ความกว้าง Slider = 200px

**ผลลัพธ์ที่คาดหวัง**:

```
    +-------------------------------------------+
    |           RGB LED Mixer (ขาว)             |
    |                                           |
    |              +--------+                   |
    |              |  LED   |  (สีเปลี่ยนตาม)      |
    |              +--------+                   |
    |                                           |
    |  R: [==========O=======] 255              |
    |  G: [O=====================] 0            |
    |  B: [O=====================] 0            |
    |                                           |
    +-------------------------------------------+
```

***

#### Exercise 2: LED Traffic Light Simulation - 20-25 นาที

**โจทย์**: สร้างไฟจราจรจำลอง (Traffic Light) ที่มี LED 3 สี (แดง, เหลือง, เขียว) เปลี่ยนสลับอัตโนมัติด้วย Timer พร้อมปุ่ม Start/Stop

**ข้อกำหนด**:

1. Background สี `0x1a1a2e`
2. Title "Traffic Light Simulator" (font\_20, สีขาว)
3. LED Widget 3 ตัว จัดเรียงแนวตั้ง (ขนาด 60x60 แต่ละตัว):
   * แดง (ด้านบน)
   * เหลือง (กลาง)
   * เขียว (ด้านล่าง)
4. ใช้ Container สีเทาเข้ม (`0x2a2a2a`) ขนาด 100x220 เป็นกรอบไฟจราจร
5. ปุ่ม "Start" (สีเขียว) เริ่มจับเวลา / "Stop" (สีแดง) หยุดจับเวลา
6. ใช้ `lv_timer_create()` สำหรับเปลี่ยนสถานะ:
   * แดง: 3000ms (3 วินาที)
   * เหลือง: 1000ms (1 วินาที)
   * เขียว: 3000ms (3 วินาที)
7. เมื่อไฟเปลี่ยน: LED ที่ active = brightness 255, LED อื่น = brightness 0
8. Label แสดงสถานะ "State: RED (3s)" ด้านล่าง

**ผลลัพธ์ที่คาดหวัง**:

```
    +-------------------------------------------+
    |       Traffic Light Simulator (ขาว)       |
    |                                           |
    |          +----------+                     |
    |          |  (R) ON  |                     |
    |          |  (Y) off |                     |
    |          |  (G) off |                     |
    |          +----------+                     |
    |                                           |
    |     [Start (เขียว)]  [Stop (แดง)]          |
    |         State: RED (3s)                   |
    +-------------------------------------------+
```

***

### 7. References

* [LVGL LED Documentation](https://docs.lvgl.io/9.2/widgets/led.html)
* [LVGL LED Example](https://github.com/lvgl/lvgl/blob/release/v9.2/examples/widgets/led/lv_example_led_1.c)
* [LVGL Slider Documentation](https://docs.lvgl.io/9.2/widgets/slider.html)
* [LVGL Timer Documentation](https://docs.lvgl.io/9.2/overview/timer.html)

***

**Previous Lab:** Lab 2: Button with Counter **Next Lab:** Lab 4: Switch Toggle


# Toggle Switch

## Lab 4: Switch Toggle Control

### Week 3 Part I - LVGL Basics

***

### 1. โครงสร้างภาพรวมของ Lab

#### Why? - ทำไมต้องเรียนรู้เรื่องนี้

Switch Widget เป็นตัวควบคุมสถานะ Binary (ON/OFF) ที่ใช้กันมากที่สุดในระบบ Embedded:

* **Industrial Control**: ควบคุมเครื่องจักรในโรงงาน เปิด/ปิด Motor, Valve, Heater
* **Smart Home**: สวิตช์ไฟ พัดลม เครื่องปรับอากาศผ่าน Touch Panel
* **IoT Gateway**: เปิด/ปิด Module ต่าง ๆ เช่น WiFi, Bluetooth, Sensor
* **GPIO Mapping**: Switch Widget บน UI สะท้องสถานะ GPIO pin จริง (HIGH/LOW)

ในงาน HMI (Human-Machine Interface) จริง ๆ switch เป็น widget ที่ operator ใช้บ่อยที่สุด เพราะมองเห็นสถานะชัดเจนทั้งจากรูปร่างและสี ไม่ต้องเดาว่าเปิดหรือปิดอยู่

#### What? - จะได้เรียนรู้อะไร

1. **Switch Widget**: สร้าง toggle switch ด้วย `lv_switch_create()`
2. **State Management**: ตรวจสอบ/เปลี่ยนสถานะด้วย `lv_obj_has_state()`, `lv_obj_add_state()`, `lv_obj_clear_state()`
3. **LV\_EVENT\_VALUE\_CHANGED**: ตอบสนองเมื่อ switch ถูก toggle
4. **LED Synchronization**: ซิงค์สถานะ Switch กับ LED Widget
5. **Switch Styling**: กำหนดสี ON/OFF และรูปแบบ knob
6. **Programmatic Control**: ควบคุม switch จาก code (ไม่ใช่จาก touch)

#### How? - ทำอย่างไร

สร้าง Switch ที่ควบคุม Virtual LED พร้อมแสดงสถานะ GPIO (HIGH/LOW) จากนั้นฝึกสร้าง Device Power Panel สำหรับควบคุมอุปกรณ์หลายตัวพร้อมกัน

<figure><img src="/files/ZAq1v6anp7CxYBII2jni" alt=""><figcaption></figcaption></figure>

***

### 2. หลักการทำงานและ Flowchart

#### 2.1 Switch Widget Architecture

```
┌─────────────────────────────────────────────────────────┐
│                  SWITCH WIDGET                          │
├─────────────────────────────────────────────────────────┤
│                                                         │
│   OFF State:              ON State:                     │
│   ┌─────────────────┐    ┌─────────────────┐            │
│   │  ●          ░░░░│    │░░░░          ●  │            │
│   └─────────────────┘    └─────────────────┘            │
│   LV_STATE_DEFAULT       LV_STATE_CHECKED               │
│                                                         │
│   Properties:                                           │
│   ├── State: CHECKED or DEFAULT (unchecked)             │
│   ├── Disabled: Can be grayed out                       │
│   └── Color: Customizable for both states               │
│                                                         │
│   Event:                                                │
│   └── LV_EVENT_VALUE_CHANGED: When toggled              │
│                                                         │
└─────────────────────────────────────────────────────────┘
```

#### 2.2 State Checking Pattern

```
┌─────────────────────────────────────────────────────────┐
│              STATE CHECKING METHODS                     │
├─────────────────────────────────────────────────────────┤
│                                                         │
│   Method 1: lv_obj_has_state() ← Recommended            │
│   ─────────────────────────────                         │
│   bool is_on = lv_obj_has_state(sw, LV_STATE_CHECKED);  │
│                                                         │
│   Method 2: lv_obj_get_state()                          │
│   ─────────────────────────────                         │
│   lv_state_t state = lv_obj_get_state(sw);              │
│   bool is_on = (state & LV_STATE_CHECKED);              │
│                                                         │
│   Common States:                                        │
│   ├── LV_STATE_DEFAULT:  ไม่มี state พิเศษ                 │
│   ├── LV_STATE_CHECKED:  ถูกเลือก (ON)                    │
│   ├── LV_STATE_FOCUSED:  มี focus                        │
│   ├── LV_STATE_PRESSED:  กำลังกด                         │
│   └── LV_STATE_DISABLED: ถูก disable                     │
│                                                         │
└─────────────────────────────────────────────────────────┘
```

#### 2.3 GPIO Simulation Concept

```
┌─────────────────────────────────────────────────────────┐
│               GPIO ↔ SWITCH MAPPING                     │
├─────────────────────────────────────────────────────────┤
│                                                         │
│   UI (Switch)         →    Hardware (GPIO)              │
│   ────────────────────────────────────────────          │
│                                                         │
│   ┌──────────────┐         ┌──────────────┐             │
│   │ Switch OFF   │    ══>  │ GPIO = LOW   │ = 0V        │
│   │ (unchecked)  │         │ LED OFF      │             │
│   └──────────────┘         └──────────────┘             │
│                                                         │
│   ┌──────────────┐         ┌──────────────┐             │
│   │ Switch ON    │    ══>  │ GPIO = HIGH  │ = 3.3V      │
│   │ (checked)    │         │ LED ON       │             │
│   └──────────────┘         └──────────────┘             │
│                                                         │
│   In Real Hardware (Week 3 Part II):                    │
│   cyhal_gpio_write(LED_PIN, is_checked);                │
│                                                         │
└─────────────────────────────────────────────────────────┘
```

#### 2.4 Program Flowchart

```
┌─────────────────────────────────────────────────────────┐
│                  PROGRAM FLOW                           │
├─────────────────────────────────────────────────────────┤
│                                                         │
│                    ┌─────────┐                          │
│                    │  Start  │                          │
│                    └────┬────┘                          │
│                         │                               │
│                         ▼                               │
│              ┌─────────────────────┐                    │
│              │ Create LED          │                    │
│              │ (Initial: OFF)      │                    │
│              └──────────┬──────────┘                    │
│                         │                               │
│                         ▼                               │
│              ┌─────────────────────┐                    │
│              │ Create Switch       │                    │
│              │ (Initial: unchecked)│                    │
│              └──────────┬──────────┘                    │
│                         │                               │
│                         ▼                               │
│              ┌─────────────────────┐                    │
│              │ Create Status Label │                    │
│              │ "GPIO State: LOW"   │                    │
│              └──────────┬──────────┘                    │
│                         │                               │
│                         ▼                               │
│              ┌─────────────────────┐                    │
│              │ LVGL Main Loop      │◄──────────┐        │
│              └──────────┬──────────┘           │        │
│                         │                      │        │
│                    User toggles                │        │
│                    switch                      │        │
│                         │                      │        │
│                         ▼                      │        │
│              ┌─────────────────────┐           │        │
│              │ VALUE_CHANGED Event │           │        │
│              └──────────┬──────────┘           │        │
│                         │                      │        │
│                         ▼                      │        │
│              ┌─────────────────────┐           │        │
│              │ Check state:        │           │        │
│              │ lv_obj_has_state()  │           │        │
│              └──────────┬──────────┘           │        │
│                         │                      │        │
│           ┌─────────────┴─────────────┐        │        │
│           │                           │        │        │
│           ▼                           ▼        │        │
│    ┌────────────┐              ┌────────────┐  │        │
│    │ CHECKED:   │              │ UNCHECKED: │  │        │
│    │ LED ON     │              │ LED OFF    │  │        │
│    │ "HIGH"     │              │ "LOW"      │  │        │
│    └─────┬──────┘              └─────┬──────┘  │        │
│          │                           │         │        │
│          └───────────────────────────┘         │        │
│                         │                      │        │
│                         └──────────────────────┘        │
│                                                         │
└─────────────────────────────────────────────────────────┘
```

***

### 3. ฟังก์ชันสำคัญ (API Reference)

#### 3.1 Switch Creation & Control

<table><thead><tr><th width="364.88067626953125">Function</th><th width="224.469482421875">Description</th><th>Return</th></tr></thead><tbody><tr><td><code>lv_switch_create(parent)</code></td><td>สร้าง Switch widget</td><td><code>lv_obj_t *</code></td></tr><tr><td><code>lv_obj_add_state(sw, LV_STATE_CHECKED)</code></td><td>ตั้งค่าสถานะ ON</td><td>void</td></tr><tr><td><code>lv_obj_clear_state(sw, LV_STATE_CHECKED)</code></td><td>ตั้งค่าสถานะ OFF</td><td>void</td></tr><tr><td><code>lv_obj_has_state(sw, LV_STATE_CHECKED)</code></td><td>ตรวจว่า ON หรือ OFF</td><td><code>bool</code></td></tr><tr><td><code>lv_obj_add_state(sw, LV_STATE_DISABLED)</code></td><td>Disable switch (กดไม่ได้)</td><td>void</td></tr></tbody></table>

#### 3.2 LED Widget Functions

<table><thead><tr><th width="320.5909423828125">Function</th><th>Description</th><th>Parameters</th></tr></thead><tbody><tr><td><code>lv_led_create(parent)</code></td><td>สร้าง LED widget</td><td>parent object</td></tr><tr><td><code>lv_led_on(led)</code></td><td>เปิด LED (สว่างเต็ม)</td><td>led object</td></tr><tr><td><code>lv_led_off(led)</code></td><td>ปิด LED (หรี่สุด)</td><td>led object</td></tr><tr><td><code>lv_led_set_color(led, color)</code></td><td>ตั้งสี LED</td><td>led, <code>lv_color_t</code></td></tr><tr><td><code>lv_led_set_brightness(led, bright)</code></td><td>ตั้งความสว่าง 0-255</td><td>led, uint8_t</td></tr></tbody></table>

#### 3.3 Event Handling

<table><thead><tr><th width="418.90057373046875">Function</th><th width="212.4482421875">Description</th><th>Return</th></tr></thead><tbody><tr><td><code>lv_obj_add_event_cb(obj, cb, event, user_data)</code></td><td>ลงทะเบียน callback</td><td>void</td></tr><tr><td><code>lv_event_get_target(e)</code></td><td>ได้ object ที่ trigger event</td><td><code>lv_obj_t *</code></td></tr><tr><td><code>lv_event_get_user_data(e)</code></td><td>ได้ user_data ที่ส่งมา</td><td><code>void *</code></td></tr></tbody></table>

#### 3.4 Switch vs Button Comparison

<table><thead><tr><th width="147.45526123046875">Feature</th><th width="238.96661376953125">Button</th><th>Switch</th></tr></thead><tbody><tr><td>Action</td><td>Click (momentary)</td><td>Toggle (latching)</td></tr><tr><td>State</td><td>Pressed/Released</td><td>ON/OFF</td></tr><tr><td>Event</td><td><code>LV_EVENT_CLICKED</code></td><td><code>LV_EVENT_VALUE_CHANGED</code></td></tr><tr><td>Use Case</td><td>Action trigger</td><td>Setting toggle</td></tr><tr><td>Visual</td><td>Text label</td><td>Sliding knob</td></tr></tbody></table>

***

### 4. โค้ดตัวอย่าง (Code Examples)

#### 4.1 Complete Code - part1\_ex4\_switch\_toggle()

จากไฟล์ `part1_examples.c`:

```c
/*******************************************************************************
 * Example 4: Switch Widget (ON/OFF Toggle)
 *
 * Learning: lv_switch_create, LV_STATE_CHECKED, LV_EVENT_VALUE_CHANGED
 * Platform: PSoC Edge E84 + LVGL v9.2.0
 ******************************************************************************/

/* Global variables สำหรับ update จาก callback */
static lv_obj_t * ex4_status_label;
static lv_obj_t * ex4_led;

/* Switch callback - เรียกทุกครั้งที่ user toggle switch */
static void ex4_switch_cb(lv_event_t * e)
{
    lv_obj_t * sw = lv_event_get_target(e);
    bool is_checked = lv_obj_has_state(sw, LV_STATE_CHECKED);

    if(is_checked) {
        lv_label_set_text(ex4_status_label, "GPIO State: HIGH (ON)");
        lv_led_on(ex4_led);
        printf("Switch ON - GPIO would be HIGH\r\n");
    } else {
        lv_label_set_text(ex4_status_label, "GPIO State: LOW (OFF)");
        lv_led_off(ex4_led);
        printf("Switch OFF - GPIO would be LOW\r\n");
    }
}

void part1_ex4_switch_toggle(void)
{
    /* [1] Background - สีเข้มสำหรับ dark theme */
    lv_obj_set_style_bg_color(lv_screen_active(),
                              lv_color_hex(0x16213e),
                              LV_PART_MAIN);

    /* [2] Title */
    lv_obj_t * title = lv_label_create(lv_screen_active());
    lv_label_set_text(title, "Part 1 - Example 4: Switch Control");
    lv_obj_set_style_text_color(title, lv_color_hex(0xFFFFFF), 0);
    lv_obj_align(title, LV_ALIGN_TOP_MID, 0, 20);

    /* [3] LED indicator - เริ่มที่ OFF */
    ex4_led = lv_led_create(lv_screen_active());
    lv_obj_set_size(ex4_led, 60, 60);
    lv_obj_align(ex4_led, LV_ALIGN_CENTER, 0, -60);
    lv_led_set_color(ex4_led, lv_palette_main(LV_PALETTE_YELLOW));
    lv_led_off(ex4_led);

    /* [4] Label ใต้ LED */
    lv_obj_t * led_label = lv_label_create(lv_screen_active());
    lv_label_set_text(led_label, "Virtual LED");
    lv_obj_set_style_text_color(led_label, lv_color_hex(0xFFFFFF), 0);
    lv_obj_align_to(led_label, ex4_led, LV_ALIGN_OUT_BOTTOM_MID, 0, 10);

    /* [5] Switch - สร้าง + ลงทะเบียน callback */
    lv_obj_t * sw = lv_switch_create(lv_screen_active());
    lv_obj_set_size(sw, 80, 40);
    lv_obj_align(sw, LV_ALIGN_CENTER, 0, 40);
    lv_obj_add_event_cb(sw, ex4_switch_cb, LV_EVENT_VALUE_CHANGED, NULL);

    /* [6] Status label - แสดง GPIO state */
    ex4_status_label = lv_label_create(lv_screen_active());
    lv_label_set_text(ex4_status_label, "GPIO State: LOW (OFF)");
    lv_obj_set_style_text_color(ex4_status_label, lv_color_hex(0x00FF00), 0);
    lv_obj_align(ex4_status_label, LV_ALIGN_CENTER, 0, 100);

    /* [7] Description */
    lv_obj_t * desc = lv_label_create(lv_screen_active());
    lv_label_set_text(desc, "Learning: lv_switch_create, LV_STATE_CHECKED\n"
                           "This switch would control a real GPIO in actual hardware");
    lv_obj_set_style_text_color(desc, lv_color_hex(0xAAAAAA), 0);
    lv_obj_set_style_text_align(desc, LV_TEXT_ALIGN_CENTER, 0);
    lv_obj_align(desc, LV_ALIGN_BOTTOM_MID, 0, -45);
}
```

#### 4.2 Code Breakdown

**Part A: Switch Event Callback**

```c
static void ex4_switch_cb(lv_event_t * e)
{
    /* [1] ดึง object ที่ trigger event */
    lv_obj_t * sw = lv_event_get_target(e);

    /* [2] ตรวจสอบว่า switch ON หรือ OFF */
    bool is_checked = lv_obj_has_state(sw, LV_STATE_CHECKED);

    /* [3] อัพเดท UI ตาม state */
    if(is_checked) {
        lv_label_set_text(ex4_status_label, "GPIO State: HIGH (ON)");
        lv_led_on(ex4_led);                // LED สว่าง
    } else {
        lv_label_set_text(ex4_status_label, "GPIO State: LOW (OFF)");
        lv_led_off(ex4_led);               // LED ดับ
    }
}
```

**Part B: Switch Creation**

```c
/* สร้าง switch พร้อมกำหนดขนาดและตำแหน่ง */
lv_obj_t * sw = lv_switch_create(lv_screen_active());
lv_obj_set_size(sw, 80, 40);                    /* กว้าง 80, สูง 40 */
lv_obj_align(sw, LV_ALIGN_CENTER, 0, 40);       /* กลางจอ เลื่อนลง 40px */

/* ลงทะเบียน callback - เฉพาะ VALUE_CHANGED เท่านั้น */
lv_obj_add_event_cb(sw, ex4_switch_cb, LV_EVENT_VALUE_CHANGED, NULL);
```

***

### 5. องค์ความรู้และเทคนิค

#### 5.1 Switch Styling - กำหนดสี ON/OFF

```c
/* สี ON state (checked) - indicator track */
lv_obj_set_style_bg_color(sw, lv_palette_main(LV_PALETTE_GREEN),
                          LV_PART_INDICATOR | LV_STATE_CHECKED);

/* สี OFF state - indicator track */
lv_obj_set_style_bg_color(sw, lv_color_hex(0x666666),
                          LV_PART_INDICATOR);

/* สี knob (ปุ่มกลม) */
lv_obj_set_style_bg_color(sw, lv_color_hex(0xFFFFFF), LV_PART_KNOB);

/* เพิ่ม padding ให้ knob ใหญ่ขึ้น */
lv_obj_set_style_pad_all(sw, 5, LV_PART_KNOB);
```

#### 5.2 Programmatic State Control

```c
/* เปิด switch จาก code */
lv_obj_add_state(sw, LV_STATE_CHECKED);

/* ปิด switch จาก code */
lv_obj_clear_state(sw, LV_STATE_CHECKED);

/* สลับ (toggle) state */
if(lv_obj_has_state(sw, LV_STATE_CHECKED)) {
    lv_obj_clear_state(sw, LV_STATE_CHECKED);
} else {
    lv_obj_add_state(sw, LV_STATE_CHECKED);
}

/* สำคัญ: การเปลี่ยน state จาก code ไม่ trigger callback!
 * ถ้าต้องการให้ callback ทำงาน ใช้:
 * lv_event_send(sw, LV_EVENT_VALUE_CHANGED, NULL);
 */
```

#### 5.3 Disable/Enable Switch

```c
/* Disable - switch จะเป็นสีจาง กดไม่ได้ */
lv_obj_add_state(sw, LV_STATE_DISABLED);

/* Enable กลับมา */
lv_obj_clear_state(sw, LV_STATE_DISABLED);

/* ใช้ได้กับสถานการณ์:
 * - ต้อง login ก่อน ถึงจะควบคุมอุปกรณ์ได้
 * - อุปกรณ์เสีย ไม่ให้ user เปิด
 * - Interlock safety (ห้ามเปิดพร้อมกัน)
 */
```

#### 5.4 User Data Pattern (สำหรับหลาย Switch)

```c
/* เมื่อมี switch หลายตัว ใช้ user_data แยก */
typedef struct {
    lv_obj_t *led;
    const char *name;
} device_t;

static device_t devices[4];

/* ตอนสร้าง - ส่ง pointer ไปกับ callback */
lv_obj_add_event_cb(sw, device_cb,
                   LV_EVENT_VALUE_CHANGED, &devices[i]);

/* ตอนรับ - ดึง pointer กลับ */
static void device_cb(lv_event_t * e)
{
    device_t * dev = (device_t *)lv_event_get_user_data(e);
    printf("Device: %s toggled\n", dev->name);
}
```

***

### 6. แบบฝึกหัด (Exercises)

#### Exercise 1: Device Power Panel (Intermediate)

สร้าง Smart Home Power Panel ที่มี 4 switches ควบคุมอุปกรณ์ พร้อม LED indicator แต่ละตัว

**Requirements:**

* 4 อุปกรณ์: Fan, Light, AC, Heater
* แต่ละตัวมี Switch + LED + Label แสดงชื่อและสถานะ
* LED เปลี่ยนสีตามอุปกรณ์ (Fan=Blue, Light=Yellow, AC=Cyan, Heater=Red)
* แสดงจำนวนอุปกรณ์ที่เปิดอยู่ "Active: 2/4"

**Expected Output:**

```
+------------------------------------------+
|         Device Power Panel               |
|           Active: 2/4                    |
+------------------------------------------+
|                                          |
|   [O] Fan        [ ==== O ]  OFF         |
|   [*] Light      [ O ==== ]  ON          |
|   [*] AC         [ O ==== ]  ON          |
|   [O] Heater     [ ==== O ]  OFF         |
|                                          |
+------------------------------------------+
```

**Hints:**

* ใช้ struct array เก็บข้อมูลแต่ละอุปกรณ์
* ส่ง pointer ไป callback ด้วย user\_data
* สร้าง function `update_active_count()` แยก

***

#### Exercise 2: Master Switch with Child Switches (Advanced)

สร้าง Master Switch ที่ควบคุม switches ลูกทั้งหมด:

* Master ON --> ลูกทุกตัว ON
* Master OFF --> ลูกทุกตัว OFF
* ลูกแต่ละตัวยังสามารถ toggle เองได้
* แสดงสถานะ "All ON", "All OFF", หรือ "Partial (2/4)"

**Expected Output:**

```
+------------------------------------------+
|       Master Switch Control              |
+------------------------------------------+
|                                          |
|  MASTER:  [ O ==== ]  Status: Partial    |
|  --------------------------------------- |
|  CH1  [O]  [ ==== O ]  OFF               |
|  CH2  [*]  [ O ==== ]  ON                |
|  CH3  [*]  [ O ==== ]  ON                |
|  CH4  [O]  [ ==== O ]  OFF               |
|                                          |
+------------------------------------------+
```

**Hints:**

* Master switch callback ใช้ loop set state ให้ switches ลูกทั้งหมด
* เรียก `lv_obj_invalidate()` หลังเปลี่ยน state จาก code
* อัพเดท master label เมื่อ child switch เปลี่ยน

***

### 7. References

* [LVGL Switch Documentation](https://docs.lvgl.io/9.2/widgets/switch.html)
* [LVGL Switch Example](https://github.com/lvgl/lvgl/blob/release/v9.2/examples/widgets/switch/lv_example_switch_1.c)
* [LVGL State System](https://docs.lvgl.io/9.2/overview/obj.html#states)

***

**Previous Lab:** Lab 3: LED Widget Control **Next Lab:** Lab 5: GPIO Dashboard


# GPIO Dashboard

## Lab 5: GPIO Dashboard

### 1. โครงสร้างภาพรวมของ Lab

#### Why? - ทำไมต้องเรียนรู้เรื่องนี้

GPIO Dashboard เป็น Lab สุดท้ายของ Part 1 Section I ที่รวมทุก widget เข้าด้วยกัน:

* **Industrial HMI**: ในโรงงานจริง operator ต้องเห็นและควบคุม I/O หลายตัวจากหน้าจอเดียว
* **Factory Floor Monitoring**: แสดงสถานะ Motor, Valve, Sensor, Alarm พร้อมกัน
* **Multi-Widget Integration**: รวม Label + Button + Switch + LED ที่เรียนมาทั้งหมด
* **Layout Management**: จัดวาง widget หลายตัวให้เป็นระเบียบด้วย Container, Flex, Grid
* **Data Structure Design**: ใช้ struct array จัดการข้อมูลหลาย channel อย่างมีระบบ
* **Scalable Architecture**: ออกแบบ code ที่เพิ่ม/ลด channel ได้ง่าย

ใน Embedded System จริง dashboard คือหน้าจอที่ใช้งานบ่อยที่สุด เพราะ operator ต้องเห็นภาพรวมทั้งหมดจากที่เดียว

#### What? - จะได้เรียนรู้อะไร

1. **Container Widget**: สร้าง container สำหรับจัดกลุ่ม widgets
2. **Flex Layout**: จัดวาง widget ด้วย `lv_obj_set_flex_flow()`, `lv_obj_set_flex_align()`
3. **Grid Positioning**: คำนวณตำแหน่ง widgets แบบ 2D grid
4. **Struct Array Pattern**: ใช้ `typedef struct` + array จัดการหลาย items
5. **User Data Pattern**: ส่ง context ไปยัง callback ด้วย user\_data
6. **Batch Operations**: ควบคุมทุก GPIO พร้อมกันด้วยปุ่ม All ON / All OFF
7. **Color Theming**: ใช้ color constants จัดธีม dark/light

#### How? - ทำอย่างไร

สร้าง Dashboard ที่มี 4 GPIO channels (LED + Switch) ใน Container แบบ grid พร้อมปุ่ม All ON / All OFF สำหรับ batch control

<figure><img src="/files/18164t2JTdPAMlePC9hb" alt=""><figcaption></figcaption></figure>

***

### 2. หลักการทำงานและ Flowchart

#### 2.1 Dashboard Architecture

```
┌─────────────────────────────────────────────────────────────────┐
│                      GPIO DASHBOARD                             │
├─────────────────────────────────────────────────────────────────┤
│                                                                 │
│   ┌──────────────────────────────────────────────────────────┐  │
│   │                    Title: GPIO Dashboard                    │
│   └──────────────────────────────────────────────────────────┘  │
│                                                                 │
│   ┌──────────────────────────────────────────────────────────┐  │
│   │                    CONTAINER                             │  │
│   │  ┌────────────────┐    ┌────────────────┐                │  │
│   │  │ LED1    ●      │    │ LED2    ●      │                │  │
│   │  │ [Name] [Switch]│    │ [Name] [Switch]│                │  │
│   │  └────────────────┘    └────────────────┘                │  │
│   │  ┌────────────────┐    ┌────────────────┐                │  │
│   │  │ LED3    ●      │    │ LED4    ●      │                │  │
│   │  │ [Name] [Switch]│    │ [Name] [Switch]│                │  │
│   │  └────────────────┘    └────────────────┘                │  │
│   └──────────────────────────────────────────────────────────┘  │
│                                                                 │
│   ┌────────────────┐              ┌────────────────┐            │
│   │   [ All ON ]   │              │   [ All OFF ]  │            │
│   │     (Green)    │              │      (Red)     │            │
│   └────────────────┘              └────────────────┘            │
│                                                                 │
└─────────────────────────────────────────────────────────────────┘
```

#### 2.2 Data Structure Design

```
┌────────────────────────────────────────────────────────────────┐
│                    DATA STRUCTURE                              │
├────────────────────────────────────────────────────────────────┤
│                                                                │
│   typedef struct {                                             │
│       lv_obj_t *led;       // LED widget reference             │
│       lv_obj_t *sw;        // Switch widget reference          │
│       lv_obj_t *label;     // Name label reference             │
│       const char *name;    // GPIO name ("LED1", etc.)         │
│       bool state;          // Current ON/OFF state             │
│   } gpio_item_t;                                               │
│                                                                │
│   Array Layout:                                                │
│   ┌─────────────────────────────────────────────────────────┐  │
│   │  gpio_items[0]  │  gpio_items[1]  │  gpio_items[2]  │...│  │
│   │  LED1, Red      │  LED2, Green    │  LED3, Blue     │...│  │
│   └─────────────────────────────────────────────────────────┘  │
│                                                                │
│   Benefits:                                                    │
│   ├── Easy iteration with for loop                             │
│   ├── Pass item pointer as user_data to callback               │
│   └── Scalable - just change NUM_GPIOS                         │
│                                                                │
└────────────────────────────────────────────────────────────────┘
```

#### 2.3 Grid Positioning Calculation

```
┌─────────────────────────────────────────────────────────────────┐
│                 GRID POSITIONING                                │
├─────────────────────────────────────────────────────────────────┤
│                                                                 │
│   Container Size: 420 x 200 pixels                              │
│   Grid: 2 columns × 2 rows                                      │
│                                                                 │
│   Calculation:                                                  │
│   x_pos = (i % 2) * x_spacing + x_offset                        │
│   y_pos = (i / 2) * y_spacing + y_offset                        │
│                                                                 │
│   Example with x_spacing=200, y_spacing=80, offset=20:          │
│                                                                 │
│     i=0: x=(0%2)*200+20= 20    i=1: x=(1%2)*200+20=220          │
│          y=(0/2)*80+20 = 20         y=(1/2)*80+20 = 20          │
│                                                                 │
│     i=2: x=(2%2)*200+20= 20    i=3: x=(3%2)*200+20=220          │
│          y=(2/2)*80+20 =100         y=(3/2)*80+20 =100          │
│                                                                 │
│   Visual:                                                       │
│     ┌─────────────────────────────────────────┐                 │
│     │  (20,20)               (220,20)         │                 │
│     │    ● LED1                ● LED2         │                 │
│     │                                         │                 │
│     │  (20,100)              (220,100)        │                 │
│     │    ● LED3                ● LED4         │                 │
│     └─────────────────────────────────────────┘                 │
│                                                                 │
└─────────────────────────────────────────────────────────────────┘
```

#### 2.4 Program Flowchart

```
┌─────────────────────────────────────────────────────────────────┐
│                     PROGRAM FLOW                                │
├─────────────────────────────────────────────────────────────────┤
│                                                                 │
│                      ┌─────────┐                                │
│                      │  Start  │                                │
│                      └────┬────┘                                │
│                           │                                     │
│                           ▼                                     │
│                ┌─────────────────────┐                          │
│                │ Define gpio_names[] │                          │
│                │ Define gpio_colors[]│                          │
│                └──────────┬──────────┘                          │
│                           │                                     │
│                           ▼                                     │
│                ┌─────────────────────┐                          │
│                │ Create Container    │                          │
│                │ (420x200, no scroll)│                          │
│                └──────────┬──────────┘                          │
│                           │                                     │
│                           ▼                                     │
│                ┌─────────────────────┐                          │
│                │ for i = 0 to 3:     │                          │
│                │   Create LED        │                          │
│                │   Create Label      │                          │
│                │   Create Switch     │◄──────┐                  │
│                │   Set user_data     │       │                  │
│                └──────────┬──────────┘       │                  │
│                           │          Loop    │                  │
│                           └──────────────────┘                  │
│                           │                                     │
│                           ▼                                     │
│           ┌───────────────────────────────┐                     │
│           │                               │                     │
│           ▼                               ▼                     │
│   ┌──────────────┐               ┌──────────────┐               │
│   │ Create       │               │ Create       │               │
│   │ "All ON" Btn │               │ "All OFF" Btn│               │
│   └──────┬───────┘               └───────┬──────┘               │
│          │                               │                      │
│          └───────────────┬───────────────┘                      │
│                          │                                      │
│                          ▼                                      │
│               ┌─────────────────────┐                           │
│               │ LVGL Main Loop      │◄─────────────────┐        │
│               └─────────┬───────────┘                  │        │
│                         │                              │        │
│       ┌─────────────────┼─────────────────┐            │        │
│       │                 │                 │            │        │
│  Switch[i]         All ON Btn       All OFF Btn        │        │
│  Changed           Clicked          Clicked            │        │
│       │                 │                 │            │        │
│       ▼                 ▼                 ▼            │        │
│  ┌──────────┐    ┌────────────┐   ┌─────────────┐      │        │
│  │ Get item │    │ Loop all:  │   │ Loop all:   │      │        │
│  │ from     │    │ LED ON     │   │ LED OFF     │      │        │
│  │ user_data│    │ SW checked │   │ SW unchecked│      │        │
│  │ Update   │    │ Invalidate │   │ Invalidate  │      │        │
│  └─────┬────┘    └─────┬──────┘   └─────┬───────┘      │        │
│        │               │                │              │        │
│        └───────────────┴────────────────┘              │        │
│                        │                               │        │
│                        └───────────────────────────────┘        │
│                                                                 │
└─────────────────────────────────────────────────────────────────┘
```

***

### 3. ฟังก์ชันสำคัญ (API Reference)

#### 3.1 Container Functions

| Function                       | Description                        | Parameters         |
| ------------------------------ | ---------------------------------- | ------------------ |
| `lv_obj_create(parent)`        | สร้าง Container (Base Object)      | parent             |
| `lv_obj_set_size(obj, w, h)`   | กำหนดขนาด                          | obj, width, height |
| `lv_obj_set_pos(obj, x, y)`    | กำหนดตำแหน่ง absolute ภายใน parent | obj, x, y          |
| `lv_obj_clear_flag(obj, flag)` | ลบ flag (เช่น disable scroll)      | obj, flag          |
| `lv_obj_invalidate(obj)`       | Force redraw                       | obj                |

#### 3.2 Flex Layout Functions

| Function                                         | Description         | Parameters                |
| ------------------------------------------------ | ------------------- | ------------------------- |
| `lv_obj_set_flex_flow(obj, flow)`                | ตั้ง flex direction | obj, `LV_FLEX_FLOW_*`     |
| `lv_obj_set_flex_align(obj, main, cross, track)` | ตั้ง alignment      | obj, 3x `LV_FLEX_ALIGN_*` |
| `lv_obj_set_flex_grow(obj, grow)`                | ยืดขยายอัตโนมัติ    | obj, grow factor (0-1)    |

#### 3.3 Alignment Functions

| Function                                 | Description                 | Parameters                           |
| ---------------------------------------- | --------------------------- | ------------------------------------ |
| `lv_obj_align(obj, align, x, y)`         | จัดตำแหน่งเทียบ parent      | obj, `LV_ALIGN_*`, x\_ofs, y\_ofs    |
| `lv_obj_align_to(obj, ref, align, x, y)` | จัดตำแหน่งเทียบ object อื่น | obj, ref\_obj, align, x\_ofs, y\_ofs |

#### 3.4 Important Flags & Style

```c
/* ปิด scroll บน container */
lv_obj_clear_flag(cont, LV_OBJ_FLAG_SCROLLABLE);

/* ปิด scroll บนหน้าจอหลัก */
lv_obj_clear_flag(lv_screen_active(), LV_OBJ_FLAG_SCROLLABLE);

/* Color theme constants */
#define AIC_COLOR_BG_DARK    lv_color_hex(0x1a1a2e)    /* พื้นหลังหลัก */
#define AIC_COLOR_BG_CARD    lv_color_hex(0x0f0f23)    /* พื้นหลัง card */
/* หรือใช้ lv_color_hex() โดยตรงก็ได้ */
```

#### 3.5 State Management Functions

| Function                         | Description                |
| -------------------------------- | -------------------------- |
| `lv_obj_add_state(obj, state)`   | เพิ่ม state (เช่น ON)      |
| `lv_obj_clear_state(obj, state)` | ลบ state (เช่น OFF)        |
| `lv_obj_has_state(obj, state)`   | ตรวจสอบ state (true/false) |

***

### 4. โค้ดตัวอย่าง (Code Examples)

#### 4.1 Complete Code - part1\_ex5\_gpio\_dashboard()

จากไฟล์ `part1_examples.c`:

```c
/*******************************************************************************
 * Example 5: GPIO Dashboard
 *
 * Combined widgets: LED, Switch, Button, Container
 * Platform: PSoC Edge E84 + LVGL v9.2.0
 ******************************************************************************/
#define EX5_NUM_GPIOS 4

/* Data structure สำหรับแต่ละ GPIO channel */
typedef struct {
    lv_obj_t *led;
    lv_obj_t *sw;
    lv_obj_t *label;
    const char *name;
    bool state;
} gpio_item_t;

/* Global array เก็บทุก channel */
static gpio_item_t ex5_gpios[EX5_NUM_GPIOS];

/* [Callback] เมื่อ switch ถูก toggle */
static void ex5_switch_cb(lv_event_t * e)
{
    gpio_item_t * gpio = (gpio_item_t *)lv_event_get_user_data(e);
    lv_obj_t * sw = lv_event_get_target(e);

    gpio->state = lv_obj_has_state(sw, LV_STATE_CHECKED);

    if(gpio->state) {
        lv_led_on(gpio->led);
        printf("%s: ON\r\n", gpio->name);
    } else {
        lv_led_off(gpio->led);
        printf("%s: OFF\r\n", gpio->name);
    }
}

/* [Callback] All ON button */
static void ex5_all_on_cb(lv_event_t * e)
{
    (void)e;
    for(int i = 0; i < EX5_NUM_GPIOS; i++) {
        ex5_gpios[i].state = true;
        lv_led_on(ex5_gpios[i].led);
        lv_obj_add_state(ex5_gpios[i].sw, LV_STATE_CHECKED);
        lv_obj_invalidate(ex5_gpios[i].sw);
        lv_obj_invalidate(ex5_gpios[i].led);
    }
    printf("All LEDs: ON\r\n");
}

/* [Callback] All OFF button */
static void ex5_all_off_cb(lv_event_t * e)
{
    (void)e;
    for(int i = 0; i < EX5_NUM_GPIOS; i++) {
        ex5_gpios[i].state = false;
        lv_led_off(ex5_gpios[i].led);
        lv_obj_clear_state(ex5_gpios[i].sw, LV_STATE_CHECKED);
        lv_obj_invalidate(ex5_gpios[i].sw);
        lv_obj_invalidate(ex5_gpios[i].led);
    }
    printf("All LEDs: OFF\r\n");
}

void part1_ex5_gpio_dashboard(void)
{
    const char *gpio_names[] = {"LED1", "LED2", "LED3", "LED4"};
    lv_color_t gpio_colors[] = {
        lv_palette_main(LV_PALETTE_RED),
        lv_palette_main(LV_PALETTE_GREEN),
        lv_palette_main(LV_PALETTE_BLUE),
        lv_palette_main(LV_PALETTE_YELLOW)
    };

    /* [1] Background + ปิด scroll หน้าจอหลัก */
    lv_obj_set_style_bg_color(lv_screen_active(),
                              lv_color_hex(0x1a1a2e), LV_PART_MAIN);
    lv_obj_clear_flag(lv_screen_active(), LV_OBJ_FLAG_SCROLLABLE);

    /* [2] Title */
    lv_obj_t * title = lv_label_create(lv_screen_active());
    lv_label_set_text(title, "Part 1 - Example 5: GPIO Dashboard");
    lv_obj_set_style_text_color(title, lv_color_hex(0xFFFFFF), 0);
    lv_obj_align(title, LV_ALIGN_TOP_MID, 0, 10);

    /* [3] Container - กรอบจัดกลุ่ม widget */
    lv_obj_t * cont = lv_obj_create(lv_screen_active());
    lv_obj_set_size(cont, 420, 200);
    lv_obj_align(cont, LV_ALIGN_CENTER, 0, 10);
    lv_obj_set_style_bg_color(cont, lv_color_hex(0x0f0f23), 0);
    lv_obj_set_style_border_width(cont, 2, 0);
    lv_obj_set_style_border_color(cont, lv_color_hex(0x444444), 0);
    lv_obj_clear_flag(cont, LV_OBJ_FLAG_SCROLLABLE);

    /* [4] สร้าง GPIO items ใน 2x2 grid */
    for(int i = 0; i < EX5_NUM_GPIOS; i++) {
        ex5_gpios[i].name = gpio_names[i];
        ex5_gpios[i].state = false;

        /* คำนวณ grid position */
        int x_pos = (i % 2) * 200 + 20;    /* Column: 20 หรือ 220 */
        int y_pos = (i / 2) * 80 + 20;     /* Row: 20 หรือ 100 */

        /* LED */
        ex5_gpios[i].led = lv_led_create(cont);
        lv_obj_set_size(ex5_gpios[i].led, 40, 40);
        lv_obj_set_pos(ex5_gpios[i].led, x_pos, y_pos);
        lv_led_set_color(ex5_gpios[i].led, gpio_colors[i]);
        lv_led_off(ex5_gpios[i].led);

        /* Label - จัดอยู่ขวาของ LED */
        ex5_gpios[i].label = lv_label_create(cont);
        lv_label_set_text(ex5_gpios[i].label, gpio_names[i]);
        lv_obj_set_style_text_color(ex5_gpios[i].label,
            lv_color_hex(0xFFFFFF), 0);
        lv_obj_align_to(ex5_gpios[i].label, ex5_gpios[i].led,
                        LV_ALIGN_OUT_RIGHT_MID, 10, 0);

        /* Switch - จัดอยู่ขวาของ Label */
        ex5_gpios[i].sw = lv_switch_create(cont);
        lv_obj_set_size(ex5_gpios[i].sw, 60, 30);
        lv_obj_align_to(ex5_gpios[i].sw, ex5_gpios[i].label,
                        LV_ALIGN_OUT_RIGHT_MID, 15, 0);
        lv_obj_add_event_cb(ex5_gpios[i].sw, ex5_switch_cb,
                           LV_EVENT_VALUE_CHANGED, &ex5_gpios[i]);
    }

    /* [5] All ON button */
    lv_obj_t * btn_all_on = lv_button_create(lv_screen_active());
    lv_obj_add_event_cb(btn_all_on, ex5_all_on_cb, LV_EVENT_CLICKED, NULL);
    lv_obj_align(btn_all_on, LV_ALIGN_BOTTOM_LEFT, 40, -50);
    lv_obj_set_style_bg_color(btn_all_on,
        lv_palette_main(LV_PALETTE_GREEN), 0);
    lv_obj_set_style_pad_hor(btn_all_on, 30, 0);
    lv_obj_set_style_pad_ver(btn_all_on, 15, 0);

    lv_obj_t * label_on = lv_label_create(btn_all_on);
    lv_label_set_text(label_on, "All ON");
    lv_obj_center(label_on);

    /* [6] All OFF button */
    lv_obj_t * btn_all_off = lv_button_create(lv_screen_active());
    lv_obj_add_event_cb(btn_all_off, ex5_all_off_cb, LV_EVENT_CLICKED, NULL);
    lv_obj_align(btn_all_off, LV_ALIGN_BOTTOM_RIGHT, -40, -50);
    lv_obj_set_style_bg_color(btn_all_off,
        lv_palette_main(LV_PALETTE_RED), 0);
    lv_obj_set_style_pad_hor(btn_all_off, 30, 0);
    lv_obj_set_style_pad_ver(btn_all_off, 15, 0);

    lv_obj_t * label_off = lv_label_create(btn_all_off);
    lv_label_set_text(label_off, "All OFF");
    lv_obj_center(label_off);
}
```

#### 4.2 Code Breakdown

**Part A: User Data Pattern**

```c
/* เมื่อสร้าง - ส่ง pointer ไปกับ callback */
lv_obj_add_event_cb(ex5_gpios[i].sw, ex5_switch_cb,
                   LV_EVENT_VALUE_CHANGED, &ex5_gpios[i]);
                                          ^^^^^^^^^^^^^^
                                          user_data: pointer ไปยัง struct

/* ใน callback - ดึง pointer กลับ */
static void ex5_switch_cb(lv_event_t * e)
{
    gpio_item_t * gpio = (gpio_item_t *)lv_event_get_user_data(e);
    /* ตอนนี้เรารู้แล้วว่า switch ตัวนี้คือ GPIO channel ไหน */
    printf("Toggled: %s\n", gpio->name);
}
```

**Part B: Grid Position Calculation**

```c
for(int i = 0; i < EX5_NUM_GPIOS; i++) {
    /* 2 columns, 2 rows */
    int x_pos = (i % 2) * 200 + 20;  /* i=0->20, i=1->220, i=2->20, i=3->220 */
    int y_pos = (i / 2) * 80 + 20;   /* i=0->20, i=1->20,  i=2->100, i=3->100 */

    lv_obj_set_pos(ex5_gpios[i].led, x_pos, y_pos);
}
```

**Part C: Relative Alignment (align\_to)**

```c
/* จัด Label ชิดขวาของ LED */
lv_obj_align_to(label, led, LV_ALIGN_OUT_RIGHT_MID, 10, 0);
/*              ^      ^     ^                      ^   ^
 *              |      |     |                      |   y offset
 *              |      |     |                      x offset (ห่าง 10px)
 *              |      |     alignment type
 *              |      reference object
 *              object ที่จะจัด
 */
```

**Part D: Batch Update with Invalidate**

```c
for(int i = 0; i < EX5_NUM_GPIOS; i++) {
    lv_led_on(ex5_gpios[i].led);
    lv_obj_add_state(ex5_gpios[i].sw, LV_STATE_CHECKED);

    /* Force redraw ทันที (ไม่ต้องรอ LVGL timer) */
    lv_obj_invalidate(ex5_gpios[i].sw);
    lv_obj_invalidate(ex5_gpios[i].led);
}
```

***

### 5. องค์ความรู้และเทคนิค

#### 5.1 Container Styling Pattern

```c
/* สร้าง container พร้อมธีม dark */
lv_obj_t * cont = lv_obj_create(parent);
lv_obj_set_size(cont, 420, 200);
lv_obj_align(cont, LV_ALIGN_CENTER, 0, 0);

/* Style: พื้นหลังเข้ม + border บาง */
lv_obj_set_style_bg_color(cont, lv_color_hex(0x0f0f23), 0);
lv_obj_set_style_border_width(cont, 2, 0);
lv_obj_set_style_border_color(cont, lv_color_hex(0x444444), 0);
lv_obj_set_style_radius(cont, 10, 0);    /* มุมโค้ง */
lv_obj_set_style_pad_all(cont, 10, 0);   /* ขอบใน */

/* ปิด scroll - สำคัญมากสำหรับ dashboard */
lv_obj_clear_flag(cont, LV_OBJ_FLAG_SCROLLABLE);
```

#### 5.2 Flex Layout สำหรับ Dashboard

```c
/* Flex Row: จัดแนวนอน */
lv_obj_set_flex_flow(cont, LV_FLEX_FLOW_ROW);
lv_obj_set_flex_align(cont,
    LV_FLEX_ALIGN_SPACE_EVENLY,   /* main axis: กระจายเท่ากัน */
    LV_FLEX_ALIGN_CENTER,         /* cross axis: กลาง */
    LV_FLEX_ALIGN_CENTER);        /* track: กลาง */

/* Flex Column Wrap: จัดแนวตั้ง ขึ้นแถวใหม่อัตโนมัติ */
lv_obj_set_flex_flow(cont, LV_FLEX_FLOW_ROW_WRAP);
lv_obj_set_style_flex_main_place(cont, LV_FLEX_ALIGN_SPACE_EVENLY, 0);
```

#### 5.3 Programmatic State Change + Event

```c
/* เปลี่ยน state จาก code */
lv_obj_add_state(sw, LV_STATE_CHECKED);

/* Force visual update */
lv_obj_invalidate(sw);

/* สำคัญ: add_state ไม่ trigger callback
 * ถ้าต้องการ callback ทำงานด้วย ใช้:
 */
lv_event_send(sw, LV_EVENT_VALUE_CHANGED, NULL);
```

#### 5.4 Color Theming Best Practices

```c
/* กำหนด color constants ไว้ที่เดียว */
/* สีพื้นหลังหลัก */
static const lv_color_t bg_dark  = {.red = 0x1a, .green = 0x1a, .blue = 0x2e};
/* สีพื้นหลัง card */
static const lv_color_t bg_card  = {.red = 0x0f, .green = 0x0f, .blue = 0x23};

/* หรือใช้ lv_color_hex() */
lv_obj_set_style_bg_color(obj, lv_color_hex(0x1a1a2e), 0);

/* LVGL Palette สำหรับสีมาตรฐาน */
lv_palette_main(LV_PALETTE_RED);      /* สีหลัก */
lv_palette_lighten(LV_PALETTE_RED, 2); /* สีอ่อนลง 2 ระดับ */
lv_palette_darken(LV_PALETTE_RED, 2);  /* สีเข้มขึ้น 2 ระดับ */
```

#### 5.5 Scalable Design Pattern

```c
/* เปลี่ยน NUM_GPIOS เพิ่ม/ลด channel ได้ทันที */
#define NUM_GPIOS 4    /* เปลี่ยนเป็น 6 หรือ 8 ได้เลย */

/* คำนวณ grid อัตโนมัติ */
#define COLS 2
int x = (i % COLS) * x_spacing + x_offset;
int y = (i / COLS) * y_spacing + y_offset;

/* ถ้า NUM_GPIOS=6 จะได้ 3 rows x 2 cols อัตโนมัติ */
```

***

### 6. แบบฝึกหัด (Exercises)

#### Exercise 1: 2-Column Sensor Dashboard (Intermediate)

สร้าง Dashboard แบบ 2 คอลัมน์:

* **ซ้าย**: Sensor Readings (4 ค่า) พร้อม LED สีตามระดับ
* **ขวา**: Controls (4 switches) สำหรับเปิด/ปิดอุปกรณ์

**Requirements:**

* คอลัมน์ซ้าย: Temperature, Humidity, Pressure, Light (ค่าจำลอง)
* คอลัมน์ขวา: Motor, Fan, Pump, Alarm (switch + LED)
* มีปุ่ม "Emergency Stop" (สีแดง) ปิดทุก output ทันที
* แสดง Active outputs: "2/4 Running"

**Expected Output:**

```
+---------------------------------------------------+
|            Industrial I/O Dashboard               |
|              Outputs: 2/4 Running                 |
+--------------------------+------------------------+
|     SENSORS (Input)      |    CONTROLS (Output)   |
+--------------------------+------------------------+
| [*] Temp:    28.5 C     | [*] Motor   [ON ]       |
| [*] Humid:   65.2 %     | [O] Fan     [OFF]       |
| [*] Press:   1013 hPa   | [*] Pump    [ON ]       |
| [*] Light:   850 lux    | [O] Alarm   [OFF]       |
+--------------------------+------------------------+
|           [ EMERGENCY STOP ]                      |
+---------------------------------------------------+
```

**Hints:**

* ใช้ 2 container วางเคียงกัน (ซ้าย sensor, ขวา control)
* Sensor LED ใช้ `lv_led_set_brightness()` แสดงระดับค่า
* Emergency Stop ใช้ loop เหมือน All OFF

***

#### Exercise 2: Tabbed Dashboard with TabView (Advanced)

สร้าง Dashboard แบบ TabView มี 3 tabs:

* **Tab 1 "Inputs"**: แสดงสถานะ Digital Input 4 ช่อง (LED + label)
* **Tab 2 "Outputs"**: ควบคุม Digital Output 4 ช่อง (Switch + LED)
* **Tab 3 "Settings"**: ปรับ Refresh Rate (Slider) + Auto-mode switch

**Requirements:**

* Tab 1: Input LEDs อัพเดทค่าสุ่มทุก 1 วินาที (ใช้ `lv_timer_create()`)
* Tab 2: Output switches ควบคุม LED + แสดงสถานะ
* Tab 3: Slider ปรับ refresh rate (100ms - 2000ms) + Auto switch

**Expected Output:**

```
+---------------------------------------------------+
| [ Inputs ] [ Outputs ] [ Settings ]     <-- Tabs  |
+---------------------------------------------------+
|                                                   |
|  Tab "Outputs" content:                           |
|                                                   |
|    [*] OUT0  [O ==== ]  OFF                       |
|    [O] OUT1  [ ==== O]  ON                        |
|    [*] OUT2  [O ==== ]  OFF                       |
|    [O] OUT3  [ ==== O]  ON                        |
|                                                   |
|    [ All ON ]  [ All OFF ]                        |
|                                                   |
+---------------------------------------------------+
```

**Hints:**

* `lv_tabview_create(parent)` สร้าง TabView
* `lv_tabview_add_tab(tv, "name")` เพิ่ม tab (ได้ container กลับมา)
* `lv_timer_create(timer_cb, period_ms, user_data)` สร้าง periodic timer
* Tab 3 slider callback เปลี่ยน timer period

> **ต่อไป Part II** **(Advance HMI Display)** จะเป็นการนำสิ่งที่เรียนมาควบคุม Hardware จริง!

***

### 8. References

* [LVGL Container (Base Object)](https://docs.lvgl.io/9.2/widgets/obj.html)
* [LVGL LED Widget](https://docs.lvgl.io/9.2/widgets/led.html)
* [LVGL Switch Widget](https://docs.lvgl.io/9.2/widgets/switch.html)
* [LVGL Button Widget](https://docs.lvgl.io/9.2/widgets/button.html)

***

**Previous Lab:** Lab 4: Switch Toggle **Next:** Week 3 Part II - Hardware Integration


# Hardware Interfacing Workshops

## Part I: GPIO Hardware Integration

***

## โค้ดโปรเจคสำหรับ GPIO-to-HMI Display

{% embed url="<https://github.com/Advance-Innovation-Centre-AIC/psoc-e84-e2-lvgl-aic-eec>" %}

{% hint style="info" %}

### **Part 1 Examples (LVGL Basics + GPIO):**

Section II (Hardware Integration):

* 6 = Hardware LED Control (3 LEDs)
* 7 = Hardware Button Status
* 8 = Hardware ADC (Potentiometer)
* 9 = Hardware GPIO Dashboard
* 10 = CAPSENSE UI Mockup
* 11 = CAPSENSE Hardware (I2C Direct)
  {% endhint %}

### ขั้นตอนการดาวโหลดจาก Github Repo และรันโปรแกรมตัวแรก - Label Demo

{% embed url="<https://www.youtube.com/watch?v=HvTe_VcUuXE>" fullWidth="true" %}

### ตัวอย่างการใช้ Eclipse ModusToolBox IDE

{% embed url="<https://www.youtube.com/watch?v=G4xLkdk53Ag>" fullWidth="true" %}

### AIC-EEC GPIO API

#### LED Control API

```c
#include "aic-eec/gpio.h"

/* LED Types */
typedef enum {
    AIC_LED_RED = 0,    // LED แดง (P16_7)
    AIC_LED_GREEN,      // LED เขียว (P16_6)
    AIC_LED_BLUE,       // LED น้ำเงิน (P16_5)
    AIC_LED_COUNT
} aic_led_t;

/* Functions */
void aic_gpio_init(void);                           // Initialize GPIO
void aic_gpio_led_set(aic_led_t led, bool state);   // Set LED ON/OFF
void aic_gpio_led_toggle(aic_led_t led);            // Toggle LED
bool aic_gpio_led_get(aic_led_t led);               // Get LED state
void aic_gpio_led_all_on(void);                     // All LEDs ON
void aic_gpio_led_all_off(void);                    // All LEDs OFF
const char* aic_gpio_led_name(aic_led_t led);       // Get LED name string

```

#### Button API

```c
/* Button Types */
typedef enum {
    AIC_BTN_USER = 0,   // USER Button 1 (SW2) - P8_3
    AIC_BTN_USER2,      // USER Button 2 (SW4) - P8_7
    AIC_BTN_COUNT
} aic_button_t;

/* Functions */
bool aic_gpio_button_read(aic_button_t btn);        // Read button state (with debounce)
bool aic_gpio_button_read_raw(aic_button_t btn);    // Read raw state (no debounce)
const char* aic_gpio_button_name(aic_button_t btn); // Get button name

```

#### Button Pin Configuration

| Button        | Macro           | Pin         | Pull-up  | Active     |
| ------------- | --------------- | ----------- | -------- | ---------- |
| USER Button 1 | `AIC_BTN_USER`  | P8\_3 (SW2) | Internal | Active Low |
| USER Button 2 | `AIC_BTN_USER2` | P8\_7 (SW4) | Internal | Active Low |

> **Note**: ปุ่มเป็น Active Low = กดแล้วอ่านค่าเป็น 0 แต่ API จะ return `true` เมื่อกด

#### PWM API

```c
/* PWM for LED brightness */
void aic_gpio_pwm_init(aic_led_t led);              // Initialize PWM
void aic_gpio_pwm_set_brightness(aic_led_t led, uint8_t brightness);
                                                    // brightness: 0-100%

```

#### Hardware Pin Configuration & PWM Limitation

> **สำคัญ**: ไม่ใช่ทุก LED ที่ทำ PWM dimming ได้!

| LED          | Pin    | PWM Support     | หมายเหตุ        |
| ------------ | ------ | --------------- | --------------- |
| LED1 (Red)   | P16\_7 | ❌ GPIO only     | ON/OFF เท่านั้น |
| LED2 (Green) | P16\_6 | ❌ GPIO only     | ON/OFF เท่านั้น |
| LED3 (Blue)  | P16\_5 | ✅ TCPWM0\_LINE5 | Dimming ได้     |

**เหตุผล**: ใน BSP (Board Support Package) เฉพาะ **Blue LED (P16\_5)** ที่ถูก route ไปที่ PWM output (TCPWM0) ผ่าน HSIOM (High Speed I/O Matrix) ส่วน Green และ Red เป็น GPIO ธรรมดา ทำได้แค่ ON/OFF

**ผลต่อตัวอย่าง**:

* **Ex6**: ปุ่ม ON/OFF ควบคุม Green LED, Slider ควบคุม Blue LED (PWM dimming)
* **Ex10**: PWM Brightness ใช้ได้กับ Blue LED เท่านั้น

#### API Summary Table

<table><thead><tr><th width="344.28759765625">Function</th><th width="190.8118896484375">หน้าที่</th><th>Return</th></tr></thead><tbody><tr><td><code>aic_gpio_init()</code></td><td>เริ่มต้น GPIO ทั้งหมด</td><td>void</td></tr><tr><td><code>aic_gpio_led_set(led, state)</code></td><td>ตั้งค่า LED</td><td>void</td></tr><tr><td><code>aic_gpio_led_toggle(led)</code></td><td>สลับสถานะ LED</td><td>void</td></tr><tr><td><code>aic_gpio_led_get(led)</code></td><td>อ่านสถานะ LED</td><td>true/false</td></tr><tr><td><code>aic_gpio_button_read(btn)</code></td><td>อ่านปุ่มกด</td><td>true=pressed</td></tr><tr><td><code>aic_gpio_pwm_set_brightness(led, val)</code></td><td>ตั้งความสว่าง</td><td>void</td></tr></tbody></table>

***


# LED Control

## Lab 6: Hardware LED Control

### 1. โครงสร้างภาพรวมของ Lab

#### Why? - ทำไมต้องเรียนรู้เรื่องนี้

นี่คือ Lab แรกที่เชื่อมต่อ **LVGL UI** เข้ากับ **Hardware จริง** บนบอร์ด PSoC Edge E84:

* **UI-to-Hardware Bridge**: ควบคุม LED จริงจากหน้าจอสัมผัส
* **GPIO Output**: เข้าใจการส่งสัญญาณออกทาง Digital Pin
* **PWM Dimming**: ควบคุมความสว่าง LED ด้วย Pulse Width Modulation
* **Industrial Application**: พื้นฐานของ HMI (Human-Machine Interface) ในโรงงาน

#### What? - จะได้เรียนรู้อะไร

1. **GPIO Initialization**: เรียก `aic_gpio_init()` ก่อนใช้งาน GPIO
2. **LED On/Off Control**: ใช้ `aic_gpio_led_set()` ควบคุม 3 สี (Red, Green, Blue)
3. **PWM Brightness**: ใช้ `aic_gpio_pwm_set_duty()` ปรับความสว่าง Blue LED
4. **LVGL Event → Hardware Action**: เมื่อ user กด Switch บนจอ → LED บนบอร์ดติด/ดับ

#### How? - ทำอย่างไร

1. Initialize GPIO subsystem ด้วย `aic_gpio_init()`
2. สร้าง LVGL Switch widgets สำหรับ LED แต่ละสี
3. สร้าง LVGL Slider สำหรับ PWM brightness
4. ใน Event Callback ให้เรียก `aic_gpio_led_set()` ควบคุม LED จริง

<figure><img src="/files/dyMUWXyq8KSIBFZbZBp6" alt=""><figcaption></figcaption></figure>

***

### ขั้นตอนการดาวโหลดจาก Github Repo และรันโปรแกรม Button Demo

{% embed url="<https://www.youtube.com/watch?v=hO5Z_OBwA6o>" fullWidth="true" %}

> **หมายเหตุ:** GitHub Repo --> <https://github.com/Advance-Innovation-Centre-AIC/psoc-e84-e2-lvgl-aic-eec>

***

## ดาวน์โหลด GitHub Repo&#x20;

{% embed url="<https://github.com/Advance-Innovation-Centre-AIC/psoc-e84-e2-lvgl-aic-eec>" %}

### 2. หลักการทำงาน (Technical Principles)

#### 2.1 LED Hardware Configuration

```
+-------------------------------------------------------------+
|             PSoC Edge E84 LED Configuration                  |
+-------------------------------------------------------------+
|                                                              |
|   LED           Pin       PWM Support    Control Method      |
|   ---------------------------------------------------------- |
|   Red (LED1)    P16_7     No  (GPIO)     ON/OFF only         |
|   Green (LED2)  P16_6     No  (GPIO)     ON/OFF only         |
|   Blue (LED3)   P16_5     Yes (TCPWM0)   Dimming 0-100%     |
|                                                              |
|   IMPORTANT: Only Blue LED supports PWM brightness control!  |
|                                                              |
+-------------------------------------------------------------+
```

#### 2.2 GPIO API Flow

```
+-------------------------------------------------------------+
|                    GPIO API FLOW                             |
+-------------------------------------------------------------+
|                                                              |
|   +---------------------+                                    |
|   |  aic_gpio_init()    |  <-- Call ONCE at startup          |
|   +----------+----------+                                    |
|              |                                               |
|   +----------+----------+                                    |
|   |                     |                                    |
|   v                     v                                    |
|   GPIO Control          PWM Control                          |
|   (Red/Green/Blue)      (Blue only)                          |
|   |                     |                                    |
|   v                     v                                    |
|   aic_gpio_led_set()    aic_gpio_pwm_init(AIC_LED_BLUE)      |
|   (led, true/false)     |                                    |
|                         v                                    |
|                         aic_gpio_pwm_set_duty()              |
|                         (AIC_LED_BLUE, 0-100)                |
|                                                              |
+-------------------------------------------------------------+
```

#### 2.3 LVGL Event -> Hardware Action

```
+-------------------------------------------------------------+
|              UI EVENT -> HARDWARE CONTROL                    |
+-------------------------------------------------------------+
|                                                              |
|   [LVGL Switch ON]                                           |
|        |                                                     |
|        v                                                     |
|   event_cb() called                                          |
|        |                                                     |
|        +---> lv_obj_has_state(sw, LV_STATE_CHECKED)          |
|        |         |                                           |
|        |    true |          false                            |
|        |         v              v                            |
|        |   aic_gpio_led_set    aic_gpio_led_set              |
|        |   (LED_RED, true)     (LED_RED, false)              |
|        |                                                     |
|   [LVGL Slider Changed]                                      |
|        |                                                     |
|        v                                                     |
|   slider_cb() called                                         |
|        |                                                     |
|        +---> duty = lv_slider_get_value(slider)              |
|        |                                                     |
|        +---> aic_gpio_pwm_set_duty(AIC_LED_BLUE, duty)       |
|                                                              |
+-------------------------------------------------------------+
```

***

### 3. ฟังก์ชันสำคัญ (API Reference)

#### 3.1 Hardware GPIO API (aic-eec.h)

<table><thead><tr><th width="298.5703125">Function</th><th>Description</th><th>Parameters</th></tr></thead><tbody><tr><td><code>aic_gpio_init()</code></td><td>Initialize GPIO subsystem</td><td>ไม่มี</td></tr><tr><td><code>aic_gpio_led_set(led, state)</code></td><td>ตั้งค่า LED ON/OFF</td><td><code>led</code>: AIC_LED_RED/GREEN/BLUE, <code>state</code>: true/false</td></tr><tr><td><code>aic_gpio_pwm_init(led)</code></td><td>Initialize PWM สำหรับ LED</td><td><code>led</code>: AIC_LED_BLUE เท่านั้น</td></tr><tr><td><code>aic_gpio_pwm_set_duty(led, duty)</code></td><td>ตั้งค่าความสว่าง</td><td><code>led</code>: AIC_LED_BLUE, <code>duty</code>: 0-100</td></tr></tbody></table>

#### 3.2 LED Type Constants

```c
AIC_LED_RED        // LED แดง  - GPIO ON/OFF only
AIC_LED_GREEN      // LED เขียว - GPIO ON/OFF only
AIC_LED_BLUE       // LED น้ำเงิน - GPIO + PWM dimming
```

#### 3.3 LVGL Functions ที่ใช้ในบทนี้

| Function                                  | Description                         |
| ----------------------------------------- | ----------------------------------- |
| `lv_switch_create(parent)`                | สร้าง Switch widget                 |
| `lv_slider_create(parent)`                | สร้าง Slider widget                 |
| `lv_slider_set_range(slider, min, max)`   | กำหนดช่วงค่า Slider                 |
| `lv_slider_get_value(slider)`             | อ่านค่าปัจจุบันของ Slider           |
| `lv_led_create(parent)`                   | สร้าง LED indicator widget          |
| `lv_led_on(led)` / `lv_led_off(led)`      | เปิด/ปิด LED indicator              |
| `lv_led_set_brightness(led, bright)`      | ตั้งความสว่าง LED indicator (0-255) |
| `lv_led_set_color(led, color)`            | ตั้งสี LED indicator                |
| `lv_obj_has_state(obj, LV_STATE_CHECKED)` | ตรวจสอบสถานะ Switch                 |

***

### 4. โค้ดตัวอย่าง (Code Examples)

#### 4.1 Minimal Example: Single LED Toggle

```c
#include "aic-eec.h"

/* ตัวแปร global สำหรับ UI widgets */
static lv_obj_t * led_indicator;

/* Callback เมื่อ Switch เปลี่ยนสถานะ */
static void red_switch_cb(lv_event_t * e)
{
    if (lv_event_get_code(e) != LV_EVENT_VALUE_CHANGED) return;

    lv_obj_t * sw = lv_event_get_target(e);
    bool is_on = lv_obj_has_state(sw, LV_STATE_CHECKED);

    /* [1] ควบคุม Hardware LED จริง */
    aic_gpio_led_set(AIC_LED_RED, is_on);

    /* [2] อัพเดท LVGL LED indicator */
    if (is_on) {
        lv_led_on(led_indicator);
    } else {
        lv_led_off(led_indicator);
    }
}
```

#### 4.2 Full Example: 3 LEDs + PWM Slider

```c
#include "aic-eec.h"

/* ===== Global Variables ===== */
static lv_obj_t * led_red_ind;
static lv_obj_t * led_green_ind;
static lv_obj_t * led_blue_ind;
static lv_obj_t * duty_label;

/* ===== Callback: Red LED Switch ===== */
static void ex6_red_cb(lv_event_t * e)
{
    if (lv_event_get_code(e) != LV_EVENT_VALUE_CHANGED) return;
    lv_obj_t * sw = lv_event_get_target(e);
    bool on = lv_obj_has_state(sw, LV_STATE_CHECKED);

    aic_gpio_led_set(AIC_LED_RED, on);       /* Hardware */
    on ? lv_led_on(led_red_ind) : lv_led_off(led_red_ind);  /* UI */
}

/* ===== Callback: Green LED Switch ===== */
static void ex6_green_cb(lv_event_t * e)
{
    if (lv_event_get_code(e) != LV_EVENT_VALUE_CHANGED) return;
    lv_obj_t * sw = lv_event_get_target(e);
    bool on = lv_obj_has_state(sw, LV_STATE_CHECKED);

    aic_gpio_led_set(AIC_LED_GREEN, on);     /* Hardware */
    on ? lv_led_on(led_green_ind) : lv_led_off(led_green_ind);
}

/* ===== Callback: Blue LED PWM Slider ===== */
static void ex6_slider_cb(lv_event_t * e)
{
    if (lv_event_get_code(e) != LV_EVENT_VALUE_CHANGED) return;
    lv_obj_t * slider = lv_event_get_target(e);
    int duty = lv_slider_get_value(slider);

    /* [1] Hardware: PWM duty cycle */
    aic_gpio_pwm_set_duty(AIC_LED_BLUE, duty);

    /* [2] UI: LED indicator brightness (scale 0-100 -> 0-255) */
    lv_led_set_brightness(led_blue_ind, (uint8_t)(duty * 255 / 100));

    /* [3] UI: Label update */
    lv_label_set_text_fmt(duty_label, "Duty: %d%%", duty);
}

/* ===== Main Function ===== */
void part1_ex6_hw_led_control(void)
{
    /* ============================== */
    /*    HARDWARE INITIALIZATION     */
    /* ============================== */
    aic_gpio_init();                       /* [1] GPIO subsystem */
    aic_gpio_pwm_init(AIC_LED_BLUE);       /* [2] PWM for Blue LED */

    /* ============================== */
    /*         LVGL UI SETUP          */
    /* ============================== */
    lv_obj_t * scr = lv_screen_active();
    lv_obj_set_style_bg_color(scr, lv_color_hex(0x1a1a2e), 0);

    /* --- Title --- */
    lv_obj_t * title = lv_label_create(scr);
    lv_label_set_text(title, "Lab 6: HW LED Control");
    lv_obj_set_style_text_color(title, lv_color_hex(0xFFFFFF), 0);
    lv_obj_set_style_text_font(title, &lv_font_montserrat_18, 0);
    lv_obj_align(title, LV_ALIGN_TOP_MID, 0, 10);

    /* --- Container for LED controls --- */
    lv_obj_t * cont = lv_obj_create(scr);
    lv_obj_set_size(cont, 440, 200);
    lv_obj_align(cont, LV_ALIGN_CENTER, 0, 10);
    lv_obj_set_style_bg_color(cont, lv_color_hex(0x16213e), 0);
    lv_obj_set_flex_flow(cont, LV_FLEX_FLOW_COLUMN);
    lv_obj_set_style_pad_row(cont, 10, 0);
    lv_obj_set_style_pad_all(cont, 15, 0);

    /* --- Row 1: Red LED --- */
    lv_obj_t * row1 = lv_obj_create(cont);
    lv_obj_set_size(row1, LV_PCT(100), 45);
    lv_obj_set_flex_flow(row1, LV_FLEX_FLOW_ROW);
    lv_obj_set_style_pad_all(row1, 5, 0);
    lv_obj_remove_flag(row1, LV_OBJ_FLAG_SCROLLABLE);

    led_red_ind = lv_led_create(row1);
    lv_led_set_color(led_red_ind, lv_palette_main(LV_PALETTE_RED));
    lv_obj_set_size(led_red_ind, 25, 25);
    lv_led_off(led_red_ind);

    lv_obj_t * lbl_red = lv_label_create(row1);
    lv_label_set_text(lbl_red, "Red LED");
    lv_obj_set_style_text_color(lbl_red, lv_color_hex(0xFFFFFF), 0);

    lv_obj_t * sw_red = lv_switch_create(row1);
    lv_obj_add_event_cb(sw_red, ex6_red_cb, LV_EVENT_VALUE_CHANGED, NULL);

    /* --- Row 2: Green LED --- */
    lv_obj_t * row2 = lv_obj_create(cont);
    lv_obj_set_size(row2, LV_PCT(100), 45);
    lv_obj_set_flex_flow(row2, LV_FLEX_FLOW_ROW);
    lv_obj_set_style_pad_all(row2, 5, 0);
    lv_obj_remove_flag(row2, LV_OBJ_FLAG_SCROLLABLE);

    led_green_ind = lv_led_create(row2);
    lv_led_set_color(led_green_ind, lv_palette_main(LV_PALETTE_GREEN));
    lv_obj_set_size(led_green_ind, 25, 25);
    lv_led_off(led_green_ind);

    lv_obj_t * lbl_green = lv_label_create(row2);
    lv_label_set_text(lbl_green, "Green LED");
    lv_obj_set_style_text_color(lbl_green, lv_color_hex(0xFFFFFF), 0);

    lv_obj_t * sw_green = lv_switch_create(row2);
    lv_obj_add_event_cb(sw_green, ex6_green_cb, LV_EVENT_VALUE_CHANGED, NULL);

    /* --- Row 3: Blue LED + PWM Slider --- */
    lv_obj_t * row3 = lv_obj_create(cont);
    lv_obj_set_size(row3, LV_PCT(100), 50);
    lv_obj_set_flex_flow(row3, LV_FLEX_FLOW_ROW);
    lv_obj_set_style_pad_all(row3, 5, 0);
    lv_obj_remove_flag(row3, LV_OBJ_FLAG_SCROLLABLE);

    led_blue_ind = lv_led_create(row3);
    lv_led_set_color(led_blue_ind, lv_palette_main(LV_PALETTE_BLUE));
    lv_obj_set_size(led_blue_ind, 25, 25);
    lv_led_off(led_blue_ind);

    lv_obj_t * lbl_blue = lv_label_create(row3);
    lv_label_set_text(lbl_blue, "Blue PWM");
    lv_obj_set_style_text_color(lbl_blue, lv_color_hex(0xFFFFFF), 0);

    lv_obj_t * slider = lv_slider_create(row3);
    lv_obj_set_width(slider, 180);
    lv_slider_set_range(slider, 0, 100);
    lv_slider_set_value(slider, 0, LV_ANIM_OFF);
    lv_obj_add_event_cb(slider, ex6_slider_cb, LV_EVENT_VALUE_CHANGED, NULL);

    duty_label = lv_label_create(row3);
    lv_label_set_text(duty_label, "Duty: 0%");
    lv_obj_set_style_text_color(duty_label, lv_color_hex(0x00BFFF), 0);
}
```

#### 4.3 อธิบายโค้ดทีละขั้นตอน

<table><thead><tr><th width="91.04547119140625">ขั้นตอน</th><th width="366.41619873046875">โค้ด</th><th>คำอธิบาย</th></tr></thead><tbody><tr><td>1</td><td><code>aic_gpio_init()</code></td><td>เริ่มต้น GPIO subsystem (<strong>ต้องเรียกก่อน</strong>)</td></tr><tr><td>2</td><td><code>aic_gpio_pwm_init(AIC_LED_BLUE)</code></td><td>เปิด PWM สำหรับ Blue LED</td></tr><tr><td>3</td><td><code>lv_switch_create()</code></td><td>สร้าง Switch widget สำหรับ Red/Green</td></tr><tr><td>4</td><td><code>lv_slider_create()</code></td><td>สร้าง Slider สำหรับ Blue PWM</td></tr><tr><td>5</td><td><code>lv_obj_add_event_cb(sw, cb, LV_EVENT_VALUE_CHANGED, ...)</code></td><td>ผูก callback</td></tr><tr><td>6</td><td><code>aic_gpio_led_set(AIC_LED_RED, on)</code></td><td>ใน callback: ควบคุม LED จริง</td></tr><tr><td>7</td><td><code>aic_gpio_pwm_set_duty(AIC_LED_BLUE, duty)</code></td><td>ใน callback: ควบคุม PWM</td></tr></tbody></table>

***

### 5. องค์ความรู้และเทคนิค

#### 5.1 Pattern: Event Callback -> Hardware Action

ทุกครั้งที่ต้องการควบคุม Hardware จาก UI ให้ใช้ pattern นี้:

```c
static void my_switch_cb(lv_event_t * e)
{
    /* [1] Filter event type */
    if (lv_event_get_code(e) != LV_EVENT_VALUE_CHANGED) return;

    /* [2] Read UI state */
    lv_obj_t * sw = lv_event_get_target(e);
    bool is_on = lv_obj_has_state(sw, LV_STATE_CHECKED);

    /* [3] Apply to Hardware */
    aic_gpio_led_set(AIC_LED_RED, is_on);

    /* [4] Update UI feedback */
    is_on ? lv_led_on(indicator) : lv_led_off(indicator);
}
```

#### 5.2 Pattern: PWM Duty Mapping

```c
/* LVGL Slider: 0-100 -> PWM duty: 0-100 (same range) */
int duty = lv_slider_get_value(slider);
aic_gpio_pwm_set_duty(AIC_LED_BLUE, duty);

/* LVGL LED indicator brightness: 0-255 */
lv_led_set_brightness(led_ind, (uint8_t)(duty * 255 / 100));
```

#### 5.3 สิ่งที่ต้องระวัง

| หัวข้อ                 | รายละเอียด                                                          |
| ---------------------- | ------------------------------------------------------------------- |
| **GPIO Init First**    | ต้องเรียก `aic_gpio_init()` ก่อนเสมอ ไม่งั้น LED ไม่ทำงาน           |
| **PWM Init**           | `aic_gpio_pwm_init()` รองรับ Blue LED เท่านั้น                      |
| **Event Filter**       | ตรวจสอบ `lv_event_get_code()` ทุกครั้ง ป้องกัน callback ถูกเรียกซ้ำ |
| **LVGL Thread Safety** | เรียก LVGL functions ได้เฉพาะใน LVGL context (callback, timer)      |
| **PWM Duty Range**     | 0 = ดับ, 100 = สว่างเต็ม, ค่านอกช่วงจะถูก clamp                     |

#### 5.4 Application ในอุตสาหกรรม

* **Factory HMI**: ควบคุม Status Indicator LED จากหน้าจอสัมผัส
* **Building Automation**: ควบคุมไฟ (ON/OFF + Dimming) ผ่าน Touch Panel
* **Medical Equipment**: LED Alert system ที่ผู้ใช้ควบคุมได้

***

### 6. แบบฝึกหัด (Exercises)

#### แบบฝึกหัดที่ 1: LED Pattern Sequence

**โจทย์**: สร้างปุ่ม "Start Pattern" ที่เมื่อกดแล้ว LED จะ toggle สลับกันเป็นลำดับ: Red -> Green -> Blue -> Red -> Green -> Blue (วนซ้ำ)

**ข้อกำหนด**:

* ใช้ `lv_timer_create()` สร้าง timer ที่ทำงานทุก 500ms
* แต่ละครั้ง timer callback ให้เปิด LED ตัวถัดไป และปิดตัวก่อนหน้า
* มีปุ่ม "Stop" เพื่อหยุด pattern และปิด LED ทั้งหมด
* แสดง Label บอกสถานะ: "Running: RED" / "Stopped"

**Hints**:

* ใช้ตัวแปร `static int current_led = 0;` เก็บ index LED ปัจจุบัน
* `lv_timer_create(cb, 500, NULL)` สร้าง timer
* `lv_timer_delete(timer)` หยุด timer

#### แบบฝึกหัดที่ 2: RGB Brightness Control Panel

**โจทย์**: สร้างหน้า Control Panel ที่มี Slider 3 ตัว สำหรับ Red, Green, Blue

**ข้อกำหนด**:

* Red Slider (0-1): 0 = OFF, 1 = ON (เพราะ Red ไม่มี PWM)
* Green Slider (0-1): 0 = OFF, 1 = ON (เพราะ Green ไม่มี PWM)
* Blue Slider (0-100): ควบคุม PWM duty cycle
* แสดง Preview Box ที่เปลี่ยนสีตาม RGB combination
* แสดงค่า R, G, B เป็นตัวเลข

**Hints**:

* ใช้ `lv_obj_set_style_bg_color()` เปลี่ยนสี Preview Box
* `lv_color_make(r, g, b)` สร้างสี โดย r, g, b เป็น 0-255

***


# Button Status

## Lab 7: Hardware Button Status

### 1. โครงสร้างภาพรวมของ Lab

#### Why? - ทำไมต้องเรียนรู้เรื่องนี้

การอ่านสถานะปุ่มกดเป็นพื้นฐานสำคัญของ Embedded System:

* **Physical Input**: รับ input จากผู้ใช้ผ่านปุ่มจริงบนบอร์ด
* **Polling Pattern**: เรียนรู้ Timer-based polling สำหรับอ่าน Hardware
* **Debouncing**: เข้าใจปัญหา Mechanical Bounce และวิธีกรอง
* **Active Low Logic**: เข้าใจ Hardware logic ของปุ่มกดแบบ Pull-up
* **Industrial Use Case**: Emergency Stop, Mode Select, Start/Stop buttons

#### What? - จะได้เรียนรู้อะไร

1. **Button API**: `aic_gpio_button_read_raw(AIC_BTN_USER)` อ่านปุ่มจริง
2. **Timer Polling**: ใช้ `lv_timer_create()` อ่านสถานะทุก 50ms
3. **Active Low Logic**: ปุ่มกด = return 0, ปล่อย = return 1
4. **Debounce Technique**: กรอง noise จาก mechanical switch
5. **UI Feedback**: แสดง LED widget + Label เปลี่ยนสีตามสถานะปุ่ม

#### How? - ทำอย่างไร

1. Initialize GPIO ด้วย `aic_gpio_init()`
2. สร้าง LVGL Timer ที่ poll ทุก 50ms
3. ใน timer callback อ่านสถานะปุ่มด้วย `aic_gpio_button_read_raw()`
4. อัพเดท UI ตามสถานะ: LED widget + Label + สีพื้นหลัง

<figure><img src="/files/36cIa41DeYZIcmpN7LHD" alt=""><figcaption></figcaption></figure>

***

### 2. หลักการทำงาน (Technical Principles)

#### 2.1 Button Hardware Configuration

```
+-------------------------------------------------------------+
|             PSoC Edge E84 Button Configuration               |
+-------------------------------------------------------------+
|                                                              |
|   Button         Pin     Macro           Active Logic        |
|   ---------------------------------------------------------- |
|   USER Button    P8_3    AIC_BTN_USER    Active Low          |
|                                                              |
|   Active Low Circuit:                                        |
|                                                              |
|        3.3V                                                  |
|         |                                                    |
|        [R] Pull-up Resistor (10K)                            |
|         |                                                    |
|    +----+---- GPIO Pin (P8_3)                                |
|    |                                                         |
|   [SW] Button                                                |
|    |                                                         |
|   GND                                                        |
|                                                              |
|   Released: Pin reads HIGH (1) -- pulled up to 3.3V          |
|   Pressed:  Pin reads LOW  (0) -- shorted to GND             |
|                                                              |
|   aic_gpio_button_read_raw() returns:                        |
|     0 = Pressed (active LOW)                                 |
|     1 = Released                                             |
|                                                              |
+-------------------------------------------------------------+
```

#### 2.2 Timer Polling Architecture

```
+-------------------------------------------------------------+
|                  TIMER POLLING PATTERN                      |
+-------------------------------------------------------------+
|                                                             |
|   LVGL Main Loop                                            |
|   +--------------------------------------------------+      |
|   |  lv_timer_handler()                              |      |
|   |       |                                          |      |
|   |       +---> Check all registered timers          |      |
|   |       |                                          |      |
|   |       +---> [poll_timer] 50ms elapsed?           |      |
|   |                  |                               |      |
|   |             Yes  |                               |      |
|   |                  v                               |      |
|   |          poll_btn_cb()                           |      |
|   |          {                                       |      |
|   |            raw = aic_gpio_button_read_raw()      |      |
|   |            if (raw == 0) -> PRESSED              |      |
|   |            else          -> RELEASED             |      |
|   |            update_ui(state)                      |      |
|   |          }                                       |      |
|   +--------------------------------------------------+      |
|                                                             |
|   Why 50ms interval?                                        |
|   +-- Fast enough: user feels instant response              |
|   +-- Slow enough: does not overload CPU                    |
|   +-- Natural debounce: 50ms > bounce time (~5-20ms)        |
|                                                             |
+-------------------------------------------------------------+
```

#### 2.3 Mechanical Bounce Problem

```
+-------------------------------------------------------------+
|                  SWITCH BOUNCE PROBLEM                       |
+-------------------------------------------------------------+
|                                                              |
|   Ideal Switch Press:                                        |
|                                                              |
|   HIGH --------+                                             |
|                |                                             |
|   LOW          +-----------------------------                |
|                ^                                             |
|              Press                                           |
|                                                              |
|   Real Switch Press (with bounce):                           |
|                                                              |
|   HIGH ----+  +-+  +--+                                      |
|            |  | |  |  |                                      |
|   LOW      +--+ +--+  +-----------------------------         |
|            |<- bounce ->|                                    |
|            ~5-20ms      Stable LOW                           |
|                                                              |
|   Solution: Software Debounce                                |
|   +-- Read button every 50ms (larger than bounce time)       |
|   +-- Require same state for 2-3 consecutive reads           |
|   +-- Only then acknowledge state change                     |
|                                                              |
+-------------------------------------------------------------+
```

#### 2.4 UI Layout

```
+--------------------------------------------------------------+
|           Part 1 Ex7: HW Button Status                       |
+--------------------------------------------------------------+
|                                                              |
|              [ LED Indicator ]                               |
|                                                              |
|              USER BUTTON (SW2)                               |
|                                                              |
|                Released                                      |
|              (text color: green)                             |
|                                                              |
|         Press Count: 0                                       |
|                                                              |
|   [Part II - HW] Press the USER button on the board          |
+--------------------------------------------------------------+
```

***

### 3. ฟังก์ชันสำคัญ (API Reference)

#### 3.1 Button Hardware API (aic-eec.h)

<table><thead><tr><th width="275.77911376953125">Function</th><th width="98.6739501953125">Returns</th><th>Description</th></tr></thead><tbody><tr><td><code>aic_gpio_init()</code></td><td>void</td><td>Initialize GPIO (เรียกครั้งเดียว)</td></tr><tr><td><code>aic_gpio_button_read_raw(btn)</code></td><td>int</td><td>อ่านค่าดิบ: 0=Pressed, 1=Released</td></tr></tbody></table>

#### 3.2 Button Constants

```c
AIC_BTN_USER       // ปุ่ม USER Button (SW2) บน P8_3
```

#### 3.3 LVGL Timer API

| Function                                    | Description          |
| ------------------------------------------- | -------------------- |
| `lv_timer_create(cb, period_ms, user_data)` | สร้าง periodic timer |
| `lv_timer_delete(timer)`                    | ลบ timer             |
| `lv_timer_set_period(timer, new_ms)`        | เปลี่ยน period       |
| `lv_timer_reset(timer)`                     | Reset countdown      |

#### 3.4 LVGL Functions ที่ใช้ในบทนี้

<table><thead><tr><th width="383.06610107421875">Function</th><th>Description</th></tr></thead><tbody><tr><td><code>lv_led_create(parent)</code></td><td>สร้าง LED indicator widget</td></tr><tr><td><code>lv_led_on(led)</code> / <code>lv_led_off(led)</code></td><td>เปิด/ปิด LED indicator</td></tr><tr><td><code>lv_led_set_color(led, color)</code></td><td>ตั้งสี LED</td></tr><tr><td><code>lv_label_set_text(label, text)</code></td><td>ตั้งข้อความ Label</td></tr><tr><td><code>lv_label_set_text_fmt(label, fmt, ...)</code></td><td>ตั้งข้อความแบบ format</td></tr><tr><td><code>lv_obj_set_style_text_color(obj, color, 0)</code></td><td>เปลี่ยนสีข้อความ</td></tr></tbody></table>

***

### 4. โค้ดตัวอย่าง (Code Examples)

#### 4.1 Minimal Example: Read Button and Update Label

```c
#include "aic-eec.h"

static lv_obj_t * status_label;

/* Timer callback: poll button every 50ms */
static void poll_btn_cb(lv_timer_t * t)
{
    int raw = aic_gpio_button_read_raw(AIC_BTN_USER);

    if (raw == 0) {
        /* Pressed (Active Low) */
        lv_label_set_text(status_label, "PRESSED");
        lv_obj_set_style_text_color(status_label,
            lv_palette_main(LV_PALETTE_RED), 0);
    } else {
        /* Released */
        lv_label_set_text(status_label, "Released");
        lv_obj_set_style_text_color(status_label,
            lv_palette_main(LV_PALETTE_GREEN), 0);
    }
}

void minimal_button_read(void)
{
    aic_gpio_init();

    status_label = lv_label_create(lv_screen_active());
    lv_label_set_text(status_label, "Released");
    lv_obj_center(status_label);

    /* สร้าง timer poll ทุก 50ms */
    lv_timer_create(poll_btn_cb, 50, NULL);
}
```

#### 4.2 Full Example: Button Status with Debounce + Press Counter

```c
#include "aic-eec.h"

/* ===== Global Variables ===== */
static lv_obj_t * led_indicator;
static lv_obj_t * status_label;
static lv_obj_t * count_label;

static int press_count = 0;
static bool prev_pressed = false;    /* สถานะรอบก่อน สำหรับ edge detection */
static int debounce_count = 0;       /* นับจำนวนครั้งที่อ่านค่าเดิมติดกัน */

#define DEBOUNCE_THRESHOLD  3  /* ต้องอ่านค่าเดิม 3 ครั้งติด (3x50ms = 150ms) */

/* ===== Timer Callback: Poll Button ===== */
static void poll_btn_cb(lv_timer_t * t)
{
    int raw = aic_gpio_button_read_raw(AIC_BTN_USER);
    bool is_pressed = (raw == 0);  /* Active Low: 0 = pressed */

    /* ===== Software Debounce ===== */
    static bool stable_state = false;
    static bool last_raw = false;

    if (is_pressed == last_raw) {
        debounce_count++;
    } else {
        debounce_count = 0;
    }
    last_raw = is_pressed;

    /* ยังไม่เสถียร -> ข้ามไป */
    if (debounce_count < DEBOUNCE_THRESHOLD) return;

    /* สถานะเสถียรแล้ว */
    stable_state = is_pressed;

    /* ===== Update UI ===== */
    if (stable_state) {
        /* PRESSED */
        lv_led_on(led_indicator);
        lv_label_set_text(status_label, "PRESSED");
        lv_obj_set_style_text_color(status_label,
            lv_palette_main(LV_PALETTE_RED), 0);
    } else {
        /* RELEASED */
        lv_led_off(led_indicator);
        lv_label_set_text(status_label, "Released");
        lv_obj_set_style_text_color(status_label,
            lv_palette_main(LV_PALETTE_GREEN), 0);
    }

    /* ===== Edge Detection: นับ Press ===== */
    if (stable_state && !prev_pressed) {
        /* Rising edge: just pressed */
        press_count++;
        lv_label_set_text_fmt(count_label, "Press Count: %d", press_count);
    }
    prev_pressed = stable_state;
}

/* ===== Main Function ===== */
void part1_ex7_hw_button_status(void)
{
    /* ============================== */
    /*    HARDWARE INITIALIZATION     */
    /* ============================== */
    aic_gpio_init();

    /* ============================== */
    /*         LVGL UI SETUP          */
    /* ============================== */
    lv_obj_t * scr = lv_screen_active();
    lv_obj_set_style_bg_color(scr, lv_color_hex(0x1a1a2e), 0);

    /* --- Title --- */
    lv_obj_t * title = lv_label_create(scr);
    lv_label_set_text(title, "Lab 7: HW Button Status");
    lv_obj_set_style_text_color(title, lv_color_hex(0xFFFFFF), 0);
    lv_obj_set_style_text_font(title, &lv_font_montserrat_18, 0);
    lv_obj_align(title, LV_ALIGN_TOP_MID, 0, 10);

    /* --- Container --- */
    lv_obj_t * cont = lv_obj_create(scr);
    lv_obj_set_size(cont, 350, 180);
    lv_obj_align(cont, LV_ALIGN_CENTER, 0, 10);
    lv_obj_set_style_bg_color(cont, lv_color_hex(0x16213e), 0);
    lv_obj_set_flex_flow(cont, LV_FLEX_FLOW_COLUMN);
    lv_obj_set_flex_align(cont, LV_FLEX_ALIGN_CENTER,
                          LV_FLEX_ALIGN_CENTER, LV_FLEX_ALIGN_CENTER);
    lv_obj_set_style_pad_row(cont, 12, 0);
    lv_obj_set_style_pad_all(cont, 15, 0);

    /* --- LED Indicator --- */
    led_indicator = lv_led_create(cont);
    lv_led_set_color(led_indicator, lv_palette_main(LV_PALETTE_CYAN));
    lv_obj_set_size(led_indicator, 50, 50);
    lv_led_off(led_indicator);

    /* --- Button Name --- */
    lv_obj_t * btn_name = lv_label_create(cont);
    lv_label_set_text(btn_name, "USER BUTTON (SW2)");
    lv_obj_set_style_text_color(btn_name, lv_color_hex(0xCCCCCC), 0);

    /* --- Status Label --- */
    status_label = lv_label_create(cont);
    lv_label_set_text(status_label, "Released");
    lv_obj_set_style_text_color(status_label,
        lv_palette_main(LV_PALETTE_GREEN), 0);
    lv_obj_set_style_text_font(status_label, &lv_font_montserrat_24, 0);

    /* --- Press Counter --- */
    count_label = lv_label_create(cont);
    lv_label_set_text(count_label, "Press Count: 0");
    lv_obj_set_style_text_color(count_label, lv_color_hex(0x00BFFF), 0);

    /* --- Footer --- */
    lv_obj_t * footer = lv_label_create(scr);
    lv_label_set_text(footer, "[Part II - HW] Press the USER button on the board");
    lv_obj_set_style_text_color(footer, lv_color_hex(0x888888), 0);
    lv_obj_align(footer, LV_ALIGN_BOTTOM_MID, 0, -10);

    /* ============================== */
    /*    START POLLING TIMER         */
    /* ============================== */
    lv_timer_create(poll_btn_cb, 50, NULL);
}
```

#### 4.3 อธิบายโค้ดทีละขั้นตอน

<table><thead><tr><th width="92.6328125">ขั้นตอน</th><th width="357.593017578125">โค้ด</th><th>คำอธิบาย</th></tr></thead><tbody><tr><td>1</td><td><code>aic_gpio_init()</code></td><td>เริ่มต้น GPIO subsystem</td></tr><tr><td>2</td><td><code>lv_timer_create(poll_btn_cb, 50, NULL)</code></td><td>สร้าง timer poll ทุก 50ms</td></tr><tr><td>3</td><td><code>aic_gpio_button_read_raw(AIC_BTN_USER)</code></td><td>อ่านค่าดิบ (0=pressed)</td></tr><tr><td>4</td><td>Debounce check</td><td>นับค่าเดิมติดกัน 3 ครั้ง = เสถียร</td></tr><tr><td>5</td><td>Edge detection</td><td><code>stable &#x26;&#x26; !prev</code> = just pressed, นับ press</td></tr><tr><td>6</td><td><code>lv_led_on/off()</code> + <code>lv_label_set_text()</code></td><td>อัพเดท UI ตามสถานะ</td></tr></tbody></table>

***

### 5. องค์ความรู้และเทคนิค

#### 5.1 Pattern: Hardware Polling with LVGL Timer

```c
/* Template สำหรับ poll hardware ใดก็ได้ */
static void hw_poll_cb(lv_timer_t * t)
{
    /* [1] อ่าน hardware */
    int value = read_hardware_sensor();

    /* [2] อัพเดท UI (safe - เราอยู่ใน LVGL context) */
    lv_label_set_text_fmt(my_label, "Value: %d", value);
}

void setup(void) {
    init_hardware();
    /* สร้าง timer สำหรับ polling */
    lv_timer_create(hw_poll_cb, 50, NULL);  /* 50ms interval */
}
```

#### 5.2 Pattern: Edge Detection (ตรวจจับจังหวะกด)

```c
static bool prev_state = false;

static void poll_cb(lv_timer_t * t)
{
    bool current = (aic_gpio_button_read_raw(AIC_BTN_USER) == 0);

    if (current && !prev_state) {
        /* FALLING EDGE: just pressed */
        on_button_press();
    }
    if (!current && prev_state) {
        /* RISING EDGE: just released */
        on_button_release();
    }
    prev_state = current;
}
```

#### 5.3 Pattern: Simple Debounce

```c
#define DEBOUNCE_MS  3  /* consecutive same-reads needed */
static int same_count = 0;
static bool last_raw = false;
static bool stable = false;

static void debounce_poll(lv_timer_t * t)
{
    bool raw = (aic_gpio_button_read_raw(AIC_BTN_USER) == 0);

    if (raw == last_raw) {
        if (++same_count >= DEBOUNCE_MS) {
            stable = raw;  /* สถานะเสถียร */
        }
    } else {
        same_count = 0;    /* เปลี่ยนแปลง -> reset */
    }
    last_raw = raw;

    /* ใช้ stable เท่านั้นสำหรับ logic */
    update_ui(stable);
}
```

#### 5.4 สิ่งที่ต้องระวัง

| หัวข้อ                 | รายละเอียด                                                         |
| ---------------------- | ------------------------------------------------------------------ |
| **Active Low**         | `read_raw()` คืน 0 เมื่อกด, 1 เมื่อปล่อย -- กลับจากสัญชาตญาณ       |
| **LVGL Thread Safety** | อัพเดท UI ได้เฉพาะใน LVGL context (timer callback, event callback) |
| **Timer Period**       | 50ms เป็นค่าที่ดี: เร็วพอสำหรับ UI, ช้าพอไม่กิน CPU                |
| **Debounce**           | ไม่ debounce = นับ press ผิด, ค่า flicker                          |
| **Static Variables**   | ตัวแปร state ต้องเป็น `static` เพราะ callback ถูกเรียกซ้ำหลายครั้ง |

#### 5.5 Application ในอุตสาหกรรม

* **Emergency Stop**: ปุ่มหยุดฉุกเฉินในโรงงาน ต้อง debounce + edge detect
* **Mode Selection**: ปุ่มเลือกโหมดทำงาน (Manual/Auto/Service)
* **Counting**: นับจำนวนชิ้นงานที่ผ่าน sensor (press = detect)

***

### 6. แบบฝึกหัด (Exercises)

#### แบบฝึกหัดที่ 1: Press Counter with Long-Press Detection

**โจทย์**: สร้างระบบนับการกดปุ่มที่แยก Short Press กับ Long Press

**ข้อกำหนด**:

* Short Press (กดน้อยกว่า 1 วินาที): เพิ่ม counter +1
* Long Press (กดค้าง >= 1 วินาที): Reset counter เป็น 0
* แสดงสถานะ: "Short Press!" (สีเขียว) / "Long Press - Reset!" (สีแดง)
* แสดง Press Duration ขณะกดค้างอยู่ (เช่น "Holding: 0.8s")
* LED indicator เปลี่ยนสีตามระยะเวลากด (เขียว -> เหลือง -> แดง)

**Hints**:

* ใช้ตัวแปร `static uint32_t press_start_tick = 0;` เก็บเวลาเริ่มกด
* `lv_tick_get()` ได้ค่า milliseconds ปัจจุบัน
* Long press threshold = 1000ms (20 timer ticks x 50ms)

#### แบบฝึกหัดที่ 2: Button-Triggered LED Toggle with Visual Feedback

**โจทย์**: กดปุ่ม USER แต่ละครั้ง ให้สลับสถานะ LED ตามลำดับ

**ข้อกำหนด**:

* กดครั้งที่ 1: Red LED ON
* กดครั้งที่ 2: Red OFF + Green LED ON
* กดครั้งที่ 3: Green OFF + Blue LED ON
* กดครั้งที่ 4: ปิดหมด แล้วกลับไปครั้งที่ 1
* แสดงสถานะบนจอ: LED ตัวไหนติด + หมายเลขครั้งที่กด
* LVGL LED indicators 3 ตัว แสดงสถานะตรงกับ Hardware LED

**Hints**:

* ใช้ `static int led_mode = 0;` และ `led_mode = (led_mode + 1) % 4;`
* ใช้ Edge Detection เพื่อนับเฉพาะจังหวะกดลง


# ADC Display

## Lab 8: Hardware ADC Display

### 1. โครงสร้างภาพรวมของ Lab

#### Why? - ทำไมต้องเรียนรู้เรื่องนี้

ADC (Analog-to-Digital Converter) เป็นสะพานเชื่อมระหว่างโลก Analog กับ Digital:

* **Sensor Reading**: พื้นฐานสำหรับอ่านค่า Sensor ทุกชนิด (อุณหภูมิ, แรงดัน, แสง)
* **Real-time Visualization**: แสดงค่าที่เปลี่ยนแปลงอย่างต่อเนื่องบน LVGL
* **Data Conversion**: แปลง Raw ADC -> Percentage -> Voltage
* **Industrial Monitoring**: พื้นฐาน SCADA, Process Monitoring, Quality Control

#### What? - จะได้เรียนรู้อะไร

1. **Sensor Init**: ต้องเรียก `aic_sensors_init()` ก่อนอ่านค่า ADC
2. **ADC Read**: `aic_adc_read()` คืนค่า 0-4095 (12-bit)
3. **Value Mapping**: แปลง Raw -> Percentage -> Voltage
4. **Read-only Widgets**: ใช้ Slider/Bar แสดงค่าโดยไม่ให้ user ปรับ
5. **Timer-based Polling**: อัพเดทค่า ADC แบบ Real-time ทุก 100ms

#### How? - ทำอย่างไร

1. Initialize sensors ด้วย `aic_sensors_init()`
2. สร้าง LVGL widgets: Bar, Label สำหรับแสดงค่า
3. สร้าง LVGL Timer poll ทุก 100ms
4. ใน timer callback อ่าน ADC แล้วอัพเดท UI

<figure><img src="/files/WiCk0ZJl2SXIEupauzcE" alt=""><figcaption></figcaption></figure>

***

### 2. หลักการทำงาน (Technical Principles)

#### 2.1 ADC Architecture on PSoC Edge E84

```
+-------------------------------------------------------------+
|              PSoC Edge E84 ADC Architecture                  |
+-------------------------------------------------------------+
|                                                              |
|   Potentiometer (VR1)                                        |
|   +---[===]---+                                              |
|   |           |                                              |
|  3.3V        GND                                             |
|       |                                                      |
|       +---> ADC Input Pin                                    |
|             |                                                |
|             v                                                |
|   +-------------------+                                      |
|   |  12-bit SAR ADC   |                                      |
|   |                   |                                      |
|   |  0V    -> 0       |                                      |
|   |  1.65V -> 2048    |                                      |
|   |  3.3V  -> 4095    |                                      |
|   +-------------------+                                      |
|             |                                                |
|             v                                                |
|   CM55 reads via aic_adc_read()                              |
|                                                              |
+-------------------------------------------------------------+
```

#### 2.2 ADC Value Conversion

```
+-------------------------------------------------------------+
|                    ADC VALUE CONVERSION                      |
+-------------------------------------------------------------+
|                                                              |
|   12-bit ADC Resolution:                                     |
|   +-- Raw Range: 0 to 4095 (2^12 - 1)                        |
|   +-- Voltage Ref: 3.3V                                      |
|                                                              |
|   Conversion Formulas:                                       |
|   =====================                                      |
|                                                              |
|   percent = (raw * 100) / 4095                               |
|   voltage = (raw * 3.3f) / 4095.0f                           |
|                                                              |
|   Examples:                                                  |
|   +--------------------+---------+---------+                 |
|   | Pot Position       | Raw     | Voltage |                 |
|   +--------------------+---------+---------+                 |
|   | Full CCW (min)     | 0       | 0.00V   |                 |
|   | 25%                | 1024    | 0.82V   |                 |
|   | 50% (middle)       | 2048    | 1.65V   |                 |
|   | 75%                | 3072    | 2.47V   |                 |
|   | Full CW (max)      | 4095    | 3.30V   |                 |
|   +--------------------+---------+---------+                 |
|                                                              |
+-------------------------------------------------------------+
```

#### 2.3 Polling Architecture

```
+-------------------------------------------------------------+
|                  ADC POLLING PATTERN                        |
+-------------------------------------------------------------+
|                                                             |
|   LVGL Timer (100ms interval)                               |
|   +--------------------------------------------------+      |
|   |  adc_poll_cb()                                   |      |
|   |  {                                               |      |
|   |    // [1] Read hardware                          |      |
|   |    uint16_t raw = aic_adc_read();                |      |
|   |                                                  |      |
|   |    // [2] Convert values                         |      |
|   |    int percent = raw * 100 / 4095;               |      |
|   |    float voltage = raw * 3.3f / 4095.0f;         |      |
|   |                                                  |      |
|   |    // [3] Update LVGL widgets                    |      |
|   |    lv_bar_set_value(bar, percent, ANIM_ON);      |      |
|   |    lv_label_set_text_fmt(lbl, "%d%%", percent);  |      |
|   |    lv_label_set_text_fmt(volt, "%.2fV", voltage);|      |
|   |  }                                               |      |
|   +--------------------------------------------------+      |
|                                                             |
|   Why 100ms interval (not 50ms)?                            |
|   +-- ADC value changes slowly (user turns pot)             |
|   +-- 100ms = smooth update, less CPU usage                 |
|   +-- 10 updates/second = enough for human eye              |
|                                                             |
+-------------------------------------------------------------+
```

#### 2.4 UI Layout

```
+-------------------------------------------------------------+
|           Part 1 Ex8: HW ADC Display                        |
+-------------------------------------------------------------+
|                                                             |
|   Raw: 2048          Voltage: 1.65V                         |
|                                                             |
|   +================================================+        |
|   |                 [BAR: 50%]                     |        |
|   +================================================+        |
|                                                             |
|                       50%                                   |
|                                                             |
|   [Part II - HW] Turn the potentiometer on the board        |
+-------------------------------------------------------------+
```

***

### 3. ฟังก์ชันสำคัญ (API Reference)

#### 3.1 Sensor/ADC Hardware API (aic-eec.h)

<table><thead><tr><th width="212.742919921875">Function</th><th width="136.6697998046875">Returns</th><th>Description</th></tr></thead><tbody><tr><td><code>aic_sensors_init()</code></td><td>void</td><td>Initialize sensor subsystem (<strong>ต้องเรียกก่อน</strong>)</td></tr><tr><td><code>aic_adc_read()</code></td><td>uint16_t</td><td>อ่านค่า Raw ADC (0-4095)</td></tr></tbody></table>

#### 3.2 Value Conversion (ทำเองในโค้ด)

```c
/* Raw -> Percentage (0-100) */
int percent = (int)((uint32_t)raw * 100 / 4095);

/* Raw -> Voltage (0.00 - 3.30V) */
float voltage = (float)raw * 3.3f / 4095.0f;
```

#### 3.3 LVGL Functions ที่ใช้ในบทนี้

<table><thead><tr><th width="425.2890625">Function</th><th>Description</th></tr></thead><tbody><tr><td><code>lv_bar_create(parent)</code></td><td>สร้าง Bar widget</td></tr><tr><td><code>lv_bar_set_range(bar, min, max)</code></td><td>กำหนดช่วงค่า Bar</td></tr><tr><td><code>lv_bar_set_value(bar, value, anim)</code></td><td>ตั้งค่า Bar</td></tr><tr><td><code>lv_slider_create(parent)</code></td><td>สร้าง Slider widget</td></tr><tr><td><code>lv_slider_set_range(slider, min, max)</code></td><td>กำหนดช่วงค่า Slider</td></tr><tr><td><code>lv_slider_set_value(slider, value, anim)</code></td><td>ตั้งค่า Slider</td></tr><tr><td><code>lv_obj_remove_flag(obj, LV_OBJ_FLAG_CLICKABLE)</code></td><td>ทำให้ Slider เป็น read-only</td></tr><tr><td><code>lv_label_set_text_fmt(lbl, fmt, ...)</code></td><td>แสดงข้อความแบบ format</td></tr><tr><td><code>lv_timer_create(cb, period, data)</code></td><td>สร้าง periodic timer</td></tr></tbody></table>

#### 3.4 ทำ Slider เป็น Read-only

```c
/* สร้าง slider ที่ user drag ไม่ได้ (แสดงค่าอย่างเดียว) */
lv_obj_t * slider = lv_slider_create(parent);
lv_obj_remove_flag(slider, LV_OBJ_FLAG_CLICKABLE);  /* <-- key! */
```

***

### 4. โค้ดตัวอย่าง (Code Examples)

#### 4.1 Minimal Example: ADC to Label

```c
#include "aic-eec.h"

static lv_obj_t * value_label;

/* Timer callback: read ADC every 100ms */
static void adc_poll_cb(lv_timer_t * t)
{
    uint16_t raw = aic_adc_read();
    int percent = (int)((uint32_t)raw * 100 / 4095);

    lv_label_set_text_fmt(value_label, "ADC: %d (%d%%)",
                          (int)raw, percent);
}

void minimal_adc_read(void)
{
    aic_sensors_init();   /* MUST call before aic_adc_read()! */

    value_label = lv_label_create(lv_screen_active());
    lv_label_set_text(value_label, "ADC: ---");
    lv_obj_center(value_label);

    lv_timer_create(adc_poll_cb, 100, NULL);
}
```

#### 4.2 Full Example: ADC with Bar + Voltage Display

```c
#include "aic-eec.h"

/* ===== Global Variables ===== */
static lv_obj_t * raw_label;
static lv_obj_t * percent_label;
static lv_obj_t * voltage_label;
static lv_obj_t * adc_bar;
static lv_obj_t * adc_slider;

/* ===== Timer Callback: Poll ADC ===== */
static void adc_poll_cb(lv_timer_t * t)
{
    /* [1] Read Hardware */
    uint16_t raw = aic_adc_read();

    /* [2] Convert */
    int percent = (int)((uint32_t)raw * 100 / 4095);
    float voltage = (float)raw * 3.3f / 4095.0f;

    /* [3] Update Labels */
    lv_label_set_text_fmt(raw_label, "Raw: %d / 4095", (int)raw);
    lv_label_set_text_fmt(percent_label, "%d%%", percent);
    lv_label_set_text_fmt(voltage_label, "Voltage: %.2fV", voltage);

    /* [4] Update Bar */
    lv_bar_set_value(adc_bar, percent, LV_ANIM_ON);

    /* [5] Update read-only Slider */
    lv_slider_set_value(adc_slider, percent, LV_ANIM_ON);
}

/* ===== Main Function ===== */
void part1_ex8_hw_adc_display(void)
{
    /* ============================== */
    /*    HARDWARE INITIALIZATION     */
    /* ============================== */
    aic_sensors_init();   /* CRITICAL: must call before adc_read! */

    /* ============================== */
    /*         LVGL UI SETUP          */
    /* ============================== */
    lv_obj_t * scr = lv_screen_active();
    lv_obj_set_style_bg_color(scr, lv_color_hex(0x1a1a2e), 0);

    /* --- Title --- */
    lv_obj_t * title = lv_label_create(scr);
    lv_label_set_text(title, "Lab 8: HW ADC Display");
    lv_obj_set_style_text_color(title, lv_color_hex(0xFFFFFF), 0);
    lv_obj_set_style_text_font(title, &lv_font_montserrat_18, 0);
    lv_obj_align(title, LV_ALIGN_TOP_MID, 0, 10);

    /* --- Container --- */
    lv_obj_t * cont = lv_obj_create(scr);
    lv_obj_set_size(cont, 440, 200);
    lv_obj_align(cont, LV_ALIGN_CENTER, 0, 10);
    lv_obj_set_style_bg_color(cont, lv_color_hex(0x16213e), 0);
    lv_obj_set_flex_flow(cont, LV_FLEX_FLOW_COLUMN);
    lv_obj_set_flex_align(cont, LV_FLEX_ALIGN_CENTER,
                          LV_FLEX_ALIGN_CENTER, LV_FLEX_ALIGN_CENTER);
    lv_obj_set_style_pad_row(cont, 8, 0);
    lv_obj_set_style_pad_all(cont, 15, 0);

    /* --- Row: Raw + Voltage --- */
    lv_obj_t * row_top = lv_obj_create(cont);
    lv_obj_set_size(row_top, LV_PCT(100), 30);
    lv_obj_set_flex_flow(row_top, LV_FLEX_FLOW_ROW);
    lv_obj_set_flex_align(row_top, LV_FLEX_ALIGN_SPACE_BETWEEN,
                          LV_FLEX_ALIGN_CENTER, LV_FLEX_ALIGN_CENTER);
    lv_obj_set_style_bg_opa(row_top, LV_OPA_TRANSP, 0);
    lv_obj_set_style_border_width(row_top, 0, 0);
    lv_obj_set_style_pad_all(row_top, 0, 0);
    lv_obj_remove_flag(row_top, LV_OBJ_FLAG_SCROLLABLE);

    raw_label = lv_label_create(row_top);
    lv_label_set_text(raw_label, "Raw: --- / 4095");
    lv_obj_set_style_text_color(raw_label, lv_color_hex(0xCCCCCC), 0);

    voltage_label = lv_label_create(row_top);
    lv_label_set_text(voltage_label, "Voltage: --.--V");
    lv_obj_set_style_text_color(voltage_label, lv_color_hex(0x00FF88), 0);

    /* --- Bar Widget --- */
    adc_bar = lv_bar_create(cont);
    lv_obj_set_size(adc_bar, LV_PCT(90), 25);
    lv_bar_set_range(adc_bar, 0, 100);
    lv_bar_set_value(adc_bar, 0, LV_ANIM_OFF);
    lv_obj_set_style_bg_color(adc_bar, lv_color_hex(0x333333), 0);
    lv_obj_set_style_bg_color(adc_bar, lv_palette_main(LV_PALETTE_BLUE),
                              LV_PART_INDICATOR);

    /* --- Percent Label (large) --- */
    percent_label = lv_label_create(cont);
    lv_label_set_text(percent_label, "0%");
    lv_obj_set_style_text_color(percent_label, lv_color_hex(0x00BFFF), 0);
    lv_obj_set_style_text_font(percent_label, &lv_font_montserrat_24, 0);

    /* --- Read-only Slider --- */
    adc_slider = lv_slider_create(cont);
    lv_obj_set_size(adc_slider, LV_PCT(90), 15);
    lv_slider_set_range(adc_slider, 0, 100);
    lv_slider_set_value(adc_slider, 0, LV_ANIM_OFF);
    lv_obj_remove_flag(adc_slider, LV_OBJ_FLAG_CLICKABLE);  /* Read-only! */
    lv_obj_set_style_bg_color(adc_slider, lv_color_hex(0x333333), 0);
    lv_obj_set_style_bg_color(adc_slider,
        lv_palette_main(LV_PALETTE_CYAN), LV_PART_INDICATOR);

    /* --- Footer --- */
    lv_obj_t * footer = lv_label_create(scr);
    lv_label_set_text(footer,
        "[Part II - HW] Turn the potentiometer on the board");
    lv_obj_set_style_text_color(footer, lv_color_hex(0x888888), 0);
    lv_obj_align(footer, LV_ALIGN_BOTTOM_MID, 0, -10);

    /* ============================== */
    /*    START POLLING TIMER         */
    /* ============================== */
    lv_timer_create(adc_poll_cb, 100, NULL);  /* 100ms = 10 Hz */
}
```

#### 4.3 อธิบายโค้ดทีละขั้นตอน

<table><thead><tr><th width="88.20452880859375">ขั้นตอน</th><th width="445.10650634765625">โค้ด</th><th>คำอธิบาย</th></tr></thead><tbody><tr><td>1</td><td><code>aic_sensors_init()</code></td><td>Initialize sensor subsystem (<strong>ห้ามลืม!</strong>)</td></tr><tr><td>2</td><td><code>lv_bar_create()</code> + <code>lv_slider_create()</code></td><td>สร้าง widgets แสดงค่า</td></tr><tr><td>3</td><td><code>lv_obj_remove_flag(slider, LV_OBJ_FLAG_CLICKABLE)</code></td><td>ทำ Slider เป็น read-only</td></tr><tr><td>4</td><td><code>lv_timer_create(adc_poll_cb, 100, NULL)</code></td><td>Poll ADC ทุก 100ms</td></tr><tr><td>5</td><td><code>aic_adc_read()</code></td><td>อ่านค่า Raw 0-4095</td></tr><tr><td>6</td><td><code>raw * 100 / 4095</code></td><td>แปลงเป็น Percentage</td></tr><tr><td>7</td><td><code>raw * 3.3f / 4095.0f</code></td><td>แปลงเป็น Voltage</td></tr><tr><td>8</td><td><code>lv_bar_set_value()</code> + <code>lv_label_set_text_fmt()</code></td><td>อัพเดท UI</td></tr></tbody></table>

***

### 5. องค์ความรู้และเทคนิค&#x20;

#### 5.1 Pattern: ADC Polling with Smoothing

```c
/* Moving Average Filter สำหรับลดค่า noise */
#define FILTER_SIZE  8
static uint16_t filter_buf[FILTER_SIZE];
static int filter_idx = 0;
static bool filter_full = false;

static uint16_t adc_read_filtered(void)
{
    filter_buf[filter_idx] = aic_adc_read();
    filter_idx = (filter_idx + 1) % FILTER_SIZE;
    if (filter_idx == 0) filter_full = true;

    int count = filter_full ? FILTER_SIZE : filter_idx;
    uint32_t sum = 0;
    for (int i = 0; i < count; i++) {
        sum += filter_buf[i];
    }
    return (uint16_t)(sum / count);
}
```

#### 5.2 Pattern: Read-only Widget

```c
/* วิธีที่ 1: ใช้ Slider เป็น read-only gauge */
lv_obj_t * gauge = lv_slider_create(parent);
lv_obj_remove_flag(gauge, LV_OBJ_FLAG_CLICKABLE);

/* วิธีที่ 2: ใช้ Bar (อ่านอย่างเดียวโดยธรรมชาติ) */
lv_obj_t * bar = lv_bar_create(parent);
lv_bar_set_value(bar, percent, LV_ANIM_ON);
```

#### 5.3 Pattern: Value Conversion

```c
/* Integer division (ไม่มี float, เหมาะสำหรับ embedded) */
int percent = (int)((uint32_t)raw * 100 / 4095);

/* Float division (สำหรับแสดง voltage ทศนิยม) */
float voltage = (float)raw * 3.3f / 4095.0f;

/* Map to custom range (e.g., temperature 0-150 degrees) */
int temp = (int)((uint32_t)raw * 150 / 4095);
```

#### 5.4 สิ่งที่ต้องระวัง

<table><thead><tr><th width="218.5526123046875">หัวข้อ</th><th>รายละเอียด</th></tr></thead><tbody><tr><td><strong>aic_sensors_init()</strong></td><td>ต้องเรียกก่อน <code>aic_adc_read()</code> เสมอ ไม่งั้น return 0</td></tr><tr><td><strong>Integer Overflow</strong></td><td><code>raw * 100</code> อาจ overflow ถ้า raw เป็น uint16_t; ใช้ <code>(uint32_t)raw * 100</code></td></tr><tr><td><strong>Float Format</strong></td><td>ใช้ <code>%.2f</code> สำหรับ 2 ทศนิยม; ใช้ <code>%.1f</code> สำหรับ 1 ทศนิยม</td></tr><tr><td><strong>ADC Noise</strong></td><td>ค่า ADC อาจกระเพื่อมเล็กน้อย; ใช้ Moving Average Filter</td></tr><tr><td><strong>Timer Period</strong></td><td>100ms เหมาะสำหรับ ADC; เร็วกว่านี้ไม่จำเป็นเพราะ pot หมุนช้า</td></tr><tr><td><strong>Animation</strong></td><td>ใช้ <code>LV_ANIM_ON</code> ให้ Bar เคลื่อนไหวนุ่มนวล</td></tr></tbody></table>

#### 5.5 Application ในอุตสาหกรรม

* **Process Monitoring**: อ่านค่า Pressure Sensor แสดง Bar graph
* **Quality Control**: วัดค่า Dimension sensor แสดง Pass/Fail
* **HVAC System**: อ่าน Temperature sensor แสดง Gauge
* **Water Treatment**: วัดค่า pH, Turbidity แสดง Dashboard

***

### 6. แบบฝึกหัด (Exercises)

#### แบบฝึกหัดที่ 1: Precision Voltage Display

**โจทย์**: สร้างหน้าจอ Voltmeter ที่แสดงค่าแรงดันจาก Potentiometer

**ข้อกำหนด**:

* แสดงค่า Voltage เป็นตัวเลขใหญ่ (font 24) แบบ 2 ทศนิยม: "1.65 V"
* แสดง Raw ADC value: "Raw: 2048 / 4095"
* แสดง Bar graph แบบเปลี่ยนสี:
  * 0.0V - 1.0V: สีเขียว (Safe)
  * 1.0V - 2.5V: สีเหลือง (Warning)
  * 2.5V - 3.3V: สีแดง (Danger)
* แสดง Min/Max ที่เคยอ่านได้ (เช่น "Min: 0.12V Max: 3.28V")
* มีปุ่ม "Reset Min/Max" สำหรับ clear ค่า

**Hints**:

* ใช้ `static float min_v = 3.3f, max_v = 0.0f;` เก็บ min/max
* เปลี่ยนสี Bar: `lv_obj_set_style_bg_color(bar, color, LV_PART_INDICATOR)`
* เปรียบเทียบ voltage กับ threshold ใน timer callback

#### แบบฝึกหัดที่ 2: ADC Threshold Alarm System

**โจทย์**: สร้างระบบ Alarm ที่ trigger เมื่อค่า ADC เกิน threshold

**ข้อกำหนด**:

* มี Slider สำหรับตั้ง Threshold (0-100%)
* แสดง Bar graph ค่า ADC ปัจจุบัน
* เมื่อ ADC > Threshold:
  * พื้นหลัง Container เปลี่ยนเป็นสีแดง
  * Label แสดง "ALARM!" สีแดงกะพริบ
  * Hardware LED (Red) ติด
* เมื่อ ADC <= Threshold:
  * พื้นหลังกลับปกติ
  * Label แสดง "Normal" สีเขียว
  * Hardware LED (Red) ดับ
* แสดง Threshold value: "Threshold: 75%"
* แสดง Current value: "Current: 80%"

**Hints**:

* ใช้ `aic_gpio_led_set(AIC_LED_RED, true/false)` ควบคุม LED
* กะพริบ Label: สลับ `lv_obj_add_flag(lbl, LV_OBJ_FLAG_HIDDEN)` / `remove_flag` ใน timer

***

### 7. References

* aic-eec Sensors API
* [LVGL Slider Widget](https://docs.lvgl.io/9.2/widgets/slider.html)
* [LVGL Bar Widget](https://docs.lvgl.io/9.2/widgets/bar.html)

***


# GPIO Dashboard

## Lab 9: Hardware GPIO Dashboard

### 1. โครงสร้างภาพรวมของ Lab

#### Why? - ทำไมต้องเรียนรู้เรื่องนี้

Dashboard ที่รวมทุก GPIO เป็นหัวใจของ Industrial HMI (Human-Machine Interface):

* **Complete Integration**: รวม LED + Button + ADC + PWM ไว้ในหน้าจอเดียว
* **Mixed I/O**: ควบคุม Output (LED) + อ่าน Input (Button, ADC) พร้อมกัน
* **Panel Layout**: จัดหน้าจอแบบ Panel สำหรับ Inputs/Outputs แยกกัน
* **Industrial Application**: คล้าย Control Panel ของเครื่องจักรในโรงงาน
* **Capstone Project**: รวมทุกสิ่งที่เรียนมาจาก Lab 6-8

#### What? - จะได้เรียนรู้อะไร

1. **Multi-device Control**: ควบคุม 3 LED + PWM + อ่าน Button + ADC
2. **Panel Layout**: จัด UI เป็น Input Panel (ซ้าย) + Output Panel (ขวา)
3. **Mixed Polling**: Timer callback อ่านทั้ง Button และ ADC พร้อมกัน
4. **Cross-control**: ADC ควบคุม PWM (analog input -> analog output)
5. **Status Indicators**: แสดงสถานะ Hardware ทั้งหมดแบบ Real-time

#### How? - ทำอย่างไร

1. Initialize ทุก Hardware: GPIO, PWM, Sensors
2. สร้าง Layout แบบ 2-panel: Input (ซ้าย) + Output (ขวา)
3. สร้าง Timer poll ทุก 50ms อ่าน Button + ADC
4. ใน timer callback อัพเดท UI + ควบคุม Hardware

<figure><img src="/files/O5RyaYLk7NYupY8SAnXZ" alt=""><figcaption></figcaption></figure>

***

### 2. หลักการทำงานและ Flowchart

#### 2.1 Dashboard Layout

```ini
┌─────────────────────────────────────────────────────────────┐
│              Week 3 Ex9: HW GPIO Dashboard                  │
├─────────────────────────────────────────────────────────────┤
│                                                             │
│  [Red LED]    Red    [Switch]    [All ON] [All OFF]         │
│  [Green LED]  Green  [Switch]                               │
│  [Blue LED]   Blue   (POT ctrl)                             │
│                                                             │
│ ┌─────────────────────┐     ┌─────────────────────┐         │
│ │   USER BTN2 (SW4)   │     │   POT -> Blue LED   │         │
│ │                     │     │                     │         │
│ │  ●    Released      │     │  ════════════════   │         │
│ │                     │     │        70%          │         │
│ └─────────────────────┘     └─────────────────────┘         │
│                     (C) 2026 AIC-EEC.com                    │
└─────────────────────────────────────────────────────────────┘

```

#### 2.2 Control Architecture

```ini
┌─────────────────────────────────────────────────────────────┐
│                  CONTROL ARCHITECTURE                       │
├─────────────────────────────────────────────────────────────┤
│                                                             │
│  User Controls (Switches)           Sensor Controls         │
│  ─────────────────────────         ─────────────────────    │
│  ┌────────────┐                    ┌────────────┐           │
│  │ Red Switch │──>aic_gpio_led_set │ Button SW4 │           │
│  │ Green Switch│  (toggle ON/OFF)  │ read state │           │
│  └────────────┘                    └────────────┘           │
│                                    ┌────────────┐           │
│  Batch Controls                    │ POT (ADC)  │           │
│  ─────────────────────────         │ read value │           │
│  ┌────────────┐                    └─────┬──────┘           │
│  │  All ON    │──>loop all LEDs         │                   │
│  │  All OFF   │                         ▼                   │
│  └────────────┘                    ┌────────────┐           │
│                                    │ Blue LED   │           │
│                                    │ PWM dimming│           │
│                                    └────────────┘           │
│                                                             │
└─────────────────────────────────────────────────────────────┘

```

***

### 3. ฟังก์ชันสำคัญ (API Reference)

#### 3.1 Hardware API ทั้งหมดที่ใช้

<table><thead><tr><th width="311.3721923828125">Function</th><th width="266.21728515625">Description</th><th>Category</th></tr></thead><tbody><tr><td><code>aic_gpio_init()</code></td><td>Initialize GPIO</td><td>Setup</td></tr><tr><td><code>aic_gpio_pwm_init(AIC_LED_BLUE)</code></td><td>Initialize PWM</td><td>Setup</td></tr><tr><td><code>aic_sensors_init()</code></td><td>Initialize sensors/ADC</td><td>Setup</td></tr><tr><td><code>aic_gpio_led_set(led, state)</code></td><td>Control LED ON/OFF</td><td>Output</td></tr><tr><td><code>aic_gpio_pwm_set_duty(led, duty)</code></td><td>Set PWM duty 0-100</td><td>Output</td></tr><tr><td><code>aic_gpio_button_read_raw(btn)</code></td><td>Read button (0=pressed)</td><td>Input</td></tr><tr><td><code>aic_adc_read()</code></td><td>Read ADC 0-4095</td><td>Input</td></tr></tbody></table>

#### 3.2 LVGL Layout Functions

<table><thead><tr><th width="439.95172119140625">Function</th><th>Description</th></tr></thead><tbody><tr><td><code>lv_obj_set_flex_flow(obj, LV_FLEX_FLOW_ROW)</code></td><td>จัดเรียงแนวนอน</td></tr><tr><td><code>lv_obj_set_flex_flow(obj, LV_FLEX_FLOW_COLUMN)</code></td><td>จัดเรียงแนวตั้ง</td></tr><tr><td><code>lv_obj_set_flex_align(obj, main, cross, track)</code></td><td>จัดตำแหน่ง Flex</td></tr><tr><td><code>lv_obj_set_size(obj, w, h)</code></td><td>กำหนดขนาด</td></tr><tr><td><code>LV_PCT(50)</code></td><td>ขนาด 50% ของ parent</td></tr></tbody></table>

#### 3.3 LVGL Widget Functions

| Function                                    | Description           |
| ------------------------------------------- | --------------------- |
| `lv_switch_create(parent)`                  | สร้าง Switch (toggle) |
| `lv_slider_create(parent)`                  | สร้าง Slider          |
| `lv_bar_create(parent)`                     | สร้าง Bar (progress)  |
| `lv_led_create(parent)`                     | สร้าง LED indicator   |
| `lv_button_create(parent)`                  | สร้าง Button          |
| `lv_label_create(parent)`                   | สร้าง Label           |
| `lv_obj_add_state(sw, LV_STATE_CHECKED)`    | ตั้ง Switch เป็น ON   |
| `lv_obj_remove_state(sw, LV_STATE_CHECKED)` | ตั้ง Switch เป็น OFF  |

***

### 4. โค้ดตัวอย่าง (Code Examples)

#### 4.1 Full Dashboard Code

```c
#include "aic-eec.h"

/* ===== Global Variables: Input Panel ===== */
static lv_obj_t * btn_led_ind;       /* Button status LED */
static lv_obj_t * btn_status_label;  /* Button status text */
static lv_obj_t * adc_bar;           /* ADC progress bar */
static lv_obj_t * adc_percent_label; /* ADC percentage */
static lv_obj_t * adc_voltage_label; /* ADC voltage */

/* ===== Global Variables: Output Panel ===== */
static lv_obj_t * led_inds[3];       /* LED indicators R,G,B */
static lv_obj_t * led_switches[2];   /* Switches for Red, Green */
static lv_obj_t * blue_slider;       /* PWM slider for Blue */
static lv_obj_t * blue_duty_label;   /* Blue duty % */

/* ===== Global Variables: Status Bar ===== */
static lv_obj_t * status_label;

/* ===== Forward Declarations ===== */
static void poll_timer_cb(lv_timer_t * t);
static void red_switch_cb(lv_event_t * e);
static void green_switch_cb(lv_event_t * e);
static void blue_slider_cb(lv_event_t * e);
static void all_on_cb(lv_event_t * e);
static void all_off_cb(lv_event_t * e);

/* ============================================================ */
/*                     CALLBACK FUNCTIONS                       */
/* ============================================================ */

/* Timer callback: poll Button + ADC every 50ms */
static void poll_timer_cb(lv_timer_t * t)
{
    /* === [1] Read Button === */
    int btn_raw = aic_gpio_button_read_raw(AIC_BTN_USER);
    bool btn_pressed = (btn_raw == 0);

    if (btn_pressed) {
        lv_led_on(btn_led_ind);
        lv_label_set_text(btn_status_label, "PRESSED");
        lv_obj_set_style_text_color(btn_status_label,
            lv_palette_main(LV_PALETTE_RED), 0);
    } else {
        lv_led_off(btn_led_ind);
        lv_label_set_text(btn_status_label, "Released");
        lv_obj_set_style_text_color(btn_status_label,
            lv_palette_main(LV_PALETTE_GREEN), 0);
    }

    /* === [2] Read ADC === */
    uint16_t adc_raw = aic_adc_read();
    int percent = (int)((uint32_t)adc_raw * 100 / 4095);
    float voltage = (float)adc_raw * 3.3f / 4095.0f;

    lv_bar_set_value(adc_bar, percent, LV_ANIM_ON);
    lv_label_set_text_fmt(adc_percent_label, "ADC: %d (%d%%)",
                          (int)adc_raw, percent);
    lv_label_set_text_fmt(adc_voltage_label, "%.2f V", voltage);

    /* === [3] Update Status Bar === */
    lv_label_set_text_fmt(status_label,
        "BTN=%s | ADC=%d | Blue=%d%%",
        btn_pressed ? "PRESS" : "REL",
        (int)adc_raw,
        lv_slider_get_value(blue_slider));
}

/* Red LED Switch callback */
static void red_switch_cb(lv_event_t * e)
{
    if (lv_event_get_code(e) != LV_EVENT_VALUE_CHANGED) return;
    lv_obj_t * sw = lv_event_get_target(e);
    bool on = lv_obj_has_state(sw, LV_STATE_CHECKED);
    aic_gpio_led_set(AIC_LED_RED, on);
    on ? lv_led_on(led_inds[0]) : lv_led_off(led_inds[0]);
}

/* Green LED Switch callback */
static void green_switch_cb(lv_event_t * e)
{
    if (lv_event_get_code(e) != LV_EVENT_VALUE_CHANGED) return;
    lv_obj_t * sw = lv_event_get_target(e);
    bool on = lv_obj_has_state(sw, LV_STATE_CHECKED);
    aic_gpio_led_set(AIC_LED_GREEN, on);
    on ? lv_led_on(led_inds[1]) : lv_led_off(led_inds[1]);
}

/* Blue LED PWM Slider callback */
static void blue_slider_cb(lv_event_t * e)
{
    if (lv_event_get_code(e) != LV_EVENT_VALUE_CHANGED) return;
    lv_obj_t * slider = lv_event_get_target(e);
    int duty = lv_slider_get_value(slider);

    aic_gpio_pwm_set_duty(AIC_LED_BLUE, duty);
    lv_led_set_brightness(led_inds[2], (uint8_t)(duty * 255 / 100));
    lv_label_set_text_fmt(blue_duty_label, "%d%%", duty);
}

/* All ON callback */
static void all_on_cb(lv_event_t * e)
{
    if (lv_event_get_code(e) != LV_EVENT_CLICKED) return;

    /* Hardware */
    aic_gpio_led_set(AIC_LED_RED, true);
    aic_gpio_led_set(AIC_LED_GREEN, true);
    aic_gpio_pwm_set_duty(AIC_LED_BLUE, 100);

    /* UI: LEDs */
    lv_led_on(led_inds[0]);
    lv_led_on(led_inds[1]);
    lv_led_set_brightness(led_inds[2], 255);

    /* UI: Sync switches */
    lv_obj_add_state(led_switches[0], LV_STATE_CHECKED);
    lv_obj_add_state(led_switches[1], LV_STATE_CHECKED);
    lv_slider_set_value(blue_slider, 100, LV_ANIM_ON);
    lv_label_set_text(blue_duty_label, "100%");
}

/* All OFF callback */
static void all_off_cb(lv_event_t * e)
{
    if (lv_event_get_code(e) != LV_EVENT_CLICKED) return;

    /* Hardware */
    aic_gpio_led_set(AIC_LED_RED, false);
    aic_gpio_led_set(AIC_LED_GREEN, false);
    aic_gpio_pwm_set_duty(AIC_LED_BLUE, 0);

    /* UI: LEDs */
    lv_led_off(led_inds[0]);
    lv_led_off(led_inds[1]);
    lv_led_set_brightness(led_inds[2], 0);

    /* UI: Sync switches */
    lv_obj_remove_state(led_switches[0], LV_STATE_CHECKED);
    lv_obj_remove_state(led_switches[1], LV_STATE_CHECKED);
    lv_slider_set_value(blue_slider, 0, LV_ANIM_ON);
    lv_label_set_text(blue_duty_label, "0%");
}

/* ============================================================ */
/*                  HELPER: Create Input Panel                  */
/* ============================================================ */
static lv_obj_t * create_input_panel(lv_obj_t * parent)
{
    lv_obj_t * panel = lv_obj_create(parent);
    lv_obj_set_size(panel, LV_PCT(48), LV_PCT(100));
    lv_obj_set_style_bg_color(panel, lv_color_hex(0x0f3460), 0);
    lv_obj_set_flex_flow(panel, LV_FLEX_FLOW_COLUMN);
    lv_obj_set_style_pad_all(panel, 8, 0);
    lv_obj_set_style_pad_row(panel, 6, 0);
    lv_obj_remove_flag(panel, LV_OBJ_FLAG_SCROLLABLE);

    /* Panel Title */
    lv_obj_t * lbl = lv_label_create(panel);
    lv_label_set_text(lbl, "-- INPUT --");
    lv_obj_set_style_text_color(lbl, lv_color_hex(0xFFAA00), 0);

    /* Button Section */
    lv_obj_t * btn_lbl = lv_label_create(panel);
    lv_label_set_text(btn_lbl, "USER Button (SW2)");
    lv_obj_set_style_text_color(btn_lbl, lv_color_hex(0xCCCCCC), 0);

    lv_obj_t * btn_row = lv_obj_create(panel);
    lv_obj_set_size(btn_row, LV_PCT(100), 35);
    lv_obj_set_flex_flow(btn_row, LV_FLEX_FLOW_ROW);
    lv_obj_set_flex_align(btn_row, LV_FLEX_ALIGN_START,
                          LV_FLEX_ALIGN_CENTER, LV_FLEX_ALIGN_CENTER);
    lv_obj_set_style_bg_opa(btn_row, LV_OPA_TRANSP, 0);
    lv_obj_set_style_border_width(btn_row, 0, 0);
    lv_obj_set_style_pad_all(btn_row, 0, 0);
    lv_obj_set_style_pad_column(btn_row, 10, 0);
    lv_obj_remove_flag(btn_row, LV_OBJ_FLAG_SCROLLABLE);

    btn_led_ind = lv_led_create(btn_row);
    lv_led_set_color(btn_led_ind, lv_palette_main(LV_PALETTE_CYAN));
    lv_obj_set_size(btn_led_ind, 25, 25);
    lv_led_off(btn_led_ind);

    btn_status_label = lv_label_create(btn_row);
    lv_label_set_text(btn_status_label, "Released");
    lv_obj_set_style_text_color(btn_status_label,
        lv_palette_main(LV_PALETTE_GREEN), 0);

    /* ADC Section */
    lv_obj_t * adc_lbl = lv_label_create(panel);
    lv_label_set_text(adc_lbl, "Potentiometer");
    lv_obj_set_style_text_color(adc_lbl, lv_color_hex(0xCCCCCC), 0);

    adc_bar = lv_bar_create(panel);
    lv_obj_set_size(adc_bar, LV_PCT(95), 15);
    lv_bar_set_range(adc_bar, 0, 100);
    lv_bar_set_value(adc_bar, 0, LV_ANIM_OFF);
    lv_obj_set_style_bg_color(adc_bar, lv_color_hex(0x333333), 0);
    lv_obj_set_style_bg_color(adc_bar,
        lv_palette_main(LV_PALETTE_CYAN), LV_PART_INDICATOR);

    adc_percent_label = lv_label_create(panel);
    lv_label_set_text(adc_percent_label, "ADC: 0 (0%)");
    lv_obj_set_style_text_color(adc_percent_label,
        lv_color_hex(0x00BFFF), 0);

    adc_voltage_label = lv_label_create(panel);
    lv_label_set_text(adc_voltage_label, "0.00 V");
    lv_obj_set_style_text_color(adc_voltage_label,
        lv_color_hex(0x00FF88), 0);

    return panel;
}

/* ============================================================ */
/*                  HELPER: Create Output Panel                 */
/* ============================================================ */
static lv_obj_t * create_output_panel(lv_obj_t * parent)
{
    lv_obj_t * panel = lv_obj_create(parent);
    lv_obj_set_size(panel, LV_PCT(48), LV_PCT(100));
    lv_obj_set_style_bg_color(panel, lv_color_hex(0x1a1a40), 0);
    lv_obj_set_flex_flow(panel, LV_FLEX_FLOW_COLUMN);
    lv_obj_set_style_pad_all(panel, 8, 0);
    lv_obj_set_style_pad_row(panel, 4, 0);
    lv_obj_remove_flag(panel, LV_OBJ_FLAG_SCROLLABLE);

    /* Panel Title */
    lv_obj_t * lbl = lv_label_create(panel);
    lv_label_set_text(lbl, "-- OUTPUT --");
    lv_obj_set_style_text_color(lbl, lv_color_hex(0xFF6600), 0);

    /* LED colors and names */
    lv_color_t colors[] = {
        lv_palette_main(LV_PALETTE_RED),
        lv_palette_main(LV_PALETTE_GREEN),
        lv_palette_main(LV_PALETTE_BLUE)
    };
    const char * names[] = {"Red", "Green", "Blue"};
    lv_event_cb_t cbs[] = {red_switch_cb, green_switch_cb, NULL};

    /* Red + Green rows (Switch control) */
    for (int i = 0; i < 2; i++) {
        lv_obj_t * row = lv_obj_create(panel);
        lv_obj_set_size(row, LV_PCT(100), 32);
        lv_obj_set_flex_flow(row, LV_FLEX_FLOW_ROW);
        lv_obj_set_flex_align(row, LV_FLEX_ALIGN_START,
                              LV_FLEX_ALIGN_CENTER,
                              LV_FLEX_ALIGN_CENTER);
        lv_obj_set_style_bg_opa(row, LV_OPA_TRANSP, 0);
        lv_obj_set_style_border_width(row, 0, 0);
        lv_obj_set_style_pad_all(row, 0, 0);
        lv_obj_set_style_pad_column(row, 8, 0);
        lv_obj_remove_flag(row, LV_OBJ_FLAG_SCROLLABLE);

        led_inds[i] = lv_led_create(row);
        lv_led_set_color(led_inds[i], colors[i]);
        lv_obj_set_size(led_inds[i], 20, 20);
        lv_led_off(led_inds[i]);

        lv_obj_t * name = lv_label_create(row);
        lv_label_set_text(name, names[i]);
        lv_obj_set_style_text_color(name, lv_color_hex(0xCCCCCC), 0);

        led_switches[i] = lv_switch_create(row);
        lv_obj_add_event_cb(led_switches[i], cbs[i],
                            LV_EVENT_VALUE_CHANGED, NULL);
    }

    /* Blue row (Slider control) */
    lv_obj_t * blue_row = lv_obj_create(panel);
    lv_obj_set_size(blue_row, LV_PCT(100), 32);
    lv_obj_set_flex_flow(blue_row, LV_FLEX_FLOW_ROW);
    lv_obj_set_flex_align(blue_row, LV_FLEX_ALIGN_START,
                          LV_FLEX_ALIGN_CENTER, LV_FLEX_ALIGN_CENTER);
    lv_obj_set_style_bg_opa(blue_row, LV_OPA_TRANSP, 0);
    lv_obj_set_style_border_width(blue_row, 0, 0);
    lv_obj_set_style_pad_all(blue_row, 0, 0);
    lv_obj_set_style_pad_column(blue_row, 6, 0);
    lv_obj_remove_flag(blue_row, LV_OBJ_FLAG_SCROLLABLE);

    led_inds[2] = lv_led_create(blue_row);
    lv_led_set_color(led_inds[2], colors[2]);
    lv_obj_set_size(led_inds[2], 20, 20);
    lv_led_off(led_inds[2]);

    blue_slider = lv_slider_create(blue_row);
    lv_obj_set_width(blue_slider, 100);
    lv_slider_set_range(blue_slider, 0, 100);
    lv_slider_set_value(blue_slider, 0, LV_ANIM_OFF);
    lv_obj_add_event_cb(blue_slider, blue_slider_cb,
                        LV_EVENT_VALUE_CHANGED, NULL);

    blue_duty_label = lv_label_create(blue_row);
    lv_label_set_text(blue_duty_label, "0%");
    lv_obj_set_style_text_color(blue_duty_label,
        lv_color_hex(0x00BFFF), 0);

    /* Batch Buttons */
    lv_obj_t * batch_row = lv_obj_create(panel);
    lv_obj_set_size(batch_row, LV_PCT(100), 35);
    lv_obj_set_flex_flow(batch_row, LV_FLEX_FLOW_ROW);
    lv_obj_set_flex_align(batch_row, LV_FLEX_ALIGN_CENTER,
                          LV_FLEX_ALIGN_CENTER, LV_FLEX_ALIGN_CENTER);
    lv_obj_set_style_bg_opa(batch_row, LV_OPA_TRANSP, 0);
    lv_obj_set_style_border_width(batch_row, 0, 0);
    lv_obj_set_style_pad_column(batch_row, 8, 0);
    lv_obj_remove_flag(batch_row, LV_OBJ_FLAG_SCROLLABLE);

    lv_obj_t * btn_on = lv_button_create(batch_row);
    lv_obj_set_size(btn_on, 70, 28);
    lv_obj_set_style_bg_color(btn_on,
        lv_palette_main(LV_PALETTE_GREEN), 0);
    lv_obj_add_event_cb(btn_on, all_on_cb, LV_EVENT_CLICKED, NULL);
    lv_obj_t * lo = lv_label_create(btn_on);
    lv_label_set_text(lo, "All ON");
    lv_obj_center(lo);

    lv_obj_t * btn_off = lv_button_create(batch_row);
    lv_obj_set_size(btn_off, 70, 28);
    lv_obj_set_style_bg_color(btn_off,
        lv_palette_main(LV_PALETTE_RED), 0);
    lv_obj_add_event_cb(btn_off, all_off_cb, LV_EVENT_CLICKED, NULL);
    lv_obj_t * lf = lv_label_create(btn_off);
    lv_label_set_text(lf, "All OFF");
    lv_obj_center(lf);

    return panel;
}

/* ============================================================ */
/*                      MAIN FUNCTION                           */
/* ============================================================ */
void part1_ex9_hw_gpio_dashboard(void)
{
    /* ============================== */
    /*    HARDWARE INITIALIZATION     */
    /* ============================== */
    aic_gpio_init();                       /* [1] GPIO */
    aic_gpio_pwm_init(AIC_LED_BLUE);       /* [2] PWM */
    aic_sensors_init();                    /* [3] ADC */

    /* ============================== */
    /*         LVGL UI SETUP          */
    /* ============================== */
    lv_obj_t * scr = lv_screen_active();
    lv_obj_set_style_bg_color(scr, lv_color_hex(0x0a0a1a), 0);

    /* --- Title --- */
    lv_obj_t * title = lv_label_create(scr);
    lv_label_set_text(title, "Lab 9: HW GPIO Dashboard");
    lv_obj_set_style_text_color(title, lv_color_hex(0xFFFFFF), 0);
    lv_obj_set_style_text_font(title, &lv_font_montserrat_16, 0);
    lv_obj_align(title, LV_ALIGN_TOP_MID, 0, 5);

    /* --- Main Container (2 panels side by side) --- */
    lv_obj_t * main_cont = lv_obj_create(scr);
    lv_obj_set_size(main_cont, 470, 195);
    lv_obj_align(main_cont, LV_ALIGN_CENTER, 0, 5);
    lv_obj_set_flex_flow(main_cont, LV_FLEX_FLOW_ROW);
    lv_obj_set_flex_align(main_cont, LV_FLEX_ALIGN_SPACE_BETWEEN,
                          LV_FLEX_ALIGN_CENTER, LV_FLEX_ALIGN_CENTER);
    lv_obj_set_style_bg_opa(main_cont, LV_OPA_TRANSP, 0);
    lv_obj_set_style_border_width(main_cont, 0, 0);
    lv_obj_set_style_pad_all(main_cont, 0, 0);
    lv_obj_set_style_pad_column(main_cont, 6, 0);
    lv_obj_remove_flag(main_cont, LV_OBJ_FLAG_SCROLLABLE);

    /* Create Panels */
    create_input_panel(main_cont);
    create_output_panel(main_cont);

    /* --- Status Bar --- */
    status_label = lv_label_create(scr);
    lv_label_set_text(status_label, "BTN=REL | ADC=0 | Blue=0%");
    lv_obj_set_style_text_color(status_label, lv_color_hex(0x888888), 0);
    lv_obj_align(status_label, LV_ALIGN_BOTTOM_MID, 0, -5);

    /* ============================== */
    /*    START POLLING TIMER         */
    /* ============================== */
    lv_timer_create(poll_timer_cb, 50, NULL);
}
```

#### 4.2 อธิบายโครงสร้างโค้ด

| ส่วน                    | หน้าที่                      | จำนวนบรรทัด |
| ----------------------- | ---------------------------- | ----------- |
| Global Variables        | เก็บ widget pointers ทั้งหมด | \~15        |
| `poll_timer_cb()`       | อ่าน Button + ADC ทุก 50ms   | \~25        |
| `red/green_switch_cb()` | ควบคุม Red/Green LED         | \~10 each   |
| `blue_slider_cb()`      | ควบคุม Blue LED PWM          | \~8         |
| `all_on/off_cb()`       | Batch control ทุก LED        | \~15 each   |
| `create_input_panel()`  | สร้าง UI ฝั่ง Input          | \~40        |
| `create_output_panel()` | สร้าง UI ฝั่ง Output         | \~60        |
| `part1_ex9_...()`       | Main function init + layout  | \~30        |

***

### 5. องค์ความรู้และเทคนิค

#### 5.1 Pattern: Panel-based Layout

```c
/* แบ่ง Dashboard เป็น panels */
lv_obj_t * main = lv_obj_create(scr);
lv_obj_set_flex_flow(main, LV_FLEX_FLOW_ROW);

/* Panel ซ้าย: Input (48% width) */
lv_obj_t * input = lv_obj_create(main);
lv_obj_set_size(input, LV_PCT(48), LV_PCT(100));

/* Panel ขวา: Output (48% width) */
lv_obj_t * output = lv_obj_create(main);
lv_obj_set_size(output, LV_PCT(48), LV_PCT(100));
```

#### 5.2 Pattern: Batch Control with UI Sync

```c
/* เมื่อกด All ON ต้อง sync ทั้ง Hardware + UI */
static void all_on_cb(lv_event_t * e)
{
    /* Hardware */
    aic_gpio_led_set(AIC_LED_RED, true);
    aic_gpio_led_set(AIC_LED_GREEN, true);

    /* UI: LED indicators */
    lv_led_on(led_red);
    lv_led_on(led_green);

    /* UI: Sync switches (important!) */
    lv_obj_add_state(sw_red, LV_STATE_CHECKED);
    lv_obj_add_state(sw_green, LV_STATE_CHECKED);
}
```

#### 5.3 Pattern: Mixed Poll + Event

```c
/* INPUT devices: ใช้ Timer Polling */
lv_timer_create(poll_cb, 50, NULL);  /* Button + ADC */

/* OUTPUT devices: ใช้ Event Callback */
lv_obj_add_event_cb(switch, cb, LV_EVENT_VALUE_CHANGED, NULL);

/* RULE: อ่าน Input = poll, เขียน Output = event */
```

#### 5.4 สิ่งที่ต้องระวัง

<table><thead><tr><th width="197.1605224609375">หัวข้อ</th><th>รายละเอียด</th></tr></thead><tbody><tr><td><strong>Init Order</strong></td><td><code>aic_gpio_init()</code> -> <code>aic_gpio_pwm_init()</code> -> <code>aic_sensors_init()</code></td></tr><tr><td><strong>UI Sync</strong></td><td>เมื่อ All ON/OFF ต้อง sync ทั้ง Hardware + Switch states + LED indicators</td></tr><tr><td><strong>Single Timer</strong></td><td>ใช้ timer เดียวอ่านทั้ง Button + ADC (ไม่ต้องแยก timer)</td></tr><tr><td><strong>LVGL Thread</strong></td><td>ทุก UI update ต้องอยู่ใน LVGL callback context</td></tr><tr><td><strong>PWM Blue Only</strong></td><td>Red/Green ใช้ Switch (ON/OFF), Blue ใช้ Slider (0-100%)</td></tr></tbody></table>

#### 5.5 Application ในอุตสาหกรรม

* **Factory Control Panel**: ควบคุมมอเตอร์ + อ่าน sensor + แสดงสถานะ
* **Building Management**: ควบคุมไฟ + อ่าน occupancy sensor + แสดง energy
* **Process Control**: ปรับ valve (slider) + อ่าน pressure (ADC) + alarm (LED)
* **Medical Device**: ตั้งค่า parameter + monitor patient vitals

***

### 6. แบบฝึกหัด (Exercises)

#### แบบฝึกหัดที่ 1: ADC-controlled LED Brightness (Auto Mode)

**โจทย์**: เพิ่มโหมด "Auto" ที่ ADC Potentiometer ควบคุมความสว่าง Blue LED โดยอัตโนมัติ

**ข้อกำหนด**:

* เพิ่ม Switch "Auto Mode" บน Output Panel
* เมื่อ Auto Mode = ON:
  * Blue Slider ถูก disable (สีจาง)
  * ค่า ADC (0-4095) ถูก map เป็น PWM duty (0-100)
  * Blue LED เปลี่ยนความสว่างตาม Potentiometer แบบ real-time
  * Slider เคลื่อนตามค่า ADC (read-only visual)
* เมื่อ Auto Mode = OFF:
  * Blue Slider กลับมาใช้งานได้ปกติ (Manual control)
* แสดงโหมดปัจจุบัน: "Auto: POT->Blue" หรือ "Manual"

**Hints**:

* ใช้ `static bool auto_mode = false;`
* `lv_obj_add_state(slider, LV_STATE_DISABLED)` / `lv_obj_remove_state()`
* ใน `poll_timer_cb`: ถ้า auto\_mode ให้ set PWM จาก ADC

#### แบบฝึกหัดที่ 2: Mini Alarm System

**โจทย์**: สร้างระบบ Alarm ย่อที่ใช้ Button arm/disarm และ ADC trigger

**ข้อกำหนด**:

* **สถานะ Disarmed** (เริ่มต้น):
  * แสดง "DISARMED" สีเขียว
  * LED ดับหมด
  * กดปุ่ม USER -> เปลี่ยนเป็น Armed
* **สถานะ Armed**:
  * แสดง "ARMED" สีเหลือง
  * Green LED ติด (indicator ว่า armed)
  * ถ้า ADC > 80% -> เปลี่ยนเป็น Alarm Triggered
  * กดปุ่ม USER -> กลับเป็น Disarmed
* **สถานะ Alarm Triggered**:
  * แสดง "!! ALARM !!" สีแดง กะพริบ
  * Red LED กะพริบ (toggle ทุก 200ms ใน timer)
  * Blue LED สว่าง 100%
  * กดปุ่ม USER -> กลับเป็น Disarmed
* แสดง ADC value เป็น Bar graph ตลอดเวลา
* แสดง Threshold line บน Bar (เส้นที่ 80%)

**Hints**:

* ใช้ `enum { DISARMED, ARMED, TRIGGERED }` สำหรับ state machine
* Edge detection สำหรับ button press (เปลี่ยนสถานะเฉพาะจังหวะกด)
* Timer 50ms สำหรับ poll; ใช้ counter นับ tick สำหรับกะพริบ (4 ticks = 200ms)


# CAPSENSE

## Lab 11: CAPSENSE Hardware (Direct I2C)

### Part 1 - LVGL Basics + CAPSENSE Touch Controller

### 1. โครงสร้างภาพรวม (Overview)

#### Why? - ทำไมต้องเรียนรู้เรื่องนี้

การอ่าน Touch Sensor ผ่าน I2C โดยตรงจาก CM55 เป็นทักษะสำคัญสำหรับระบบ Embedded:

* **Direct I2C Access**: CM55 อ่าน PSoC 4000T โดยตรง ไม่ผ่าน CM33 หรือ IPC
* **Shared Bus Management**: จัดการ I2C bus ที่ใช้ร่วมกับ Display Touch Controller
* **Edge Detection**: ตรวจจับเฉพาะเมื่อ state เปลี่ยน เพื่อประหยัด CPU
* **Error Handling**: จัดการ I2C communication error อย่างถูกวิธี
* **Real Hardware**: ต่อยอดจาก Ex10 (Mockup) มาเป็นข้อมูลจริงจาก Sensor

#### What? - จะได้เรียนรู้อะไร

1. **I2C Bus Sharing**: ปิด Display Touch ก่อนอ่าน CAPSENSE (shared SCB0)
2. **aic\_capsense API**: `aic_capsense_init()` + `aic_capsense_read()`
3. **Edge Detection Pattern**: เปรียบเทียบ prev vs current state
4. **I2C Error Recovery**: จัดการ 3 สถานะ (OK / Error / No Response)
5. **LED Hardware Control**: BTN0 -> Red, BTN1 -> Green, Slider -> Blue PWM

#### How? - ทำอย่างไร

1. เรียก `lv_port_indev_disable_touch()` ปิด Display Touch (คืน I2C bus)
2. Initialize GPIO + PWM + CAPSENSE
3. สร้าง UI เหมือน Ex10 (Slider panel + Button panels)
4. Timer poll 50ms อ่าน I2C + อัพเดท UI เฉพาะเมื่อ state เปลี่ยน

***

### 2. หลักการทำงาน (Technical Principles)

#### 2.1 I2C Bus Sharing Problem

```
+-------------------------------------------------------------+
|           I2C BUS SHARING (SCB0)                             |
+-------------------------------------------------------------+
|                                                              |
|   SCB0 I2C Bus (Shared!)                                     |
|   +--------------------------------------------------+       |
|   |   [Display Touch]        [PSoC 4000T CAPSENSE]   |       |
|   |    Controller              Address: 0x08         |       |
|   +--------------------------------------------------+       |
|                                                              |
|   PROBLEM: ทั้งสองตัวใช้ I2C bus เดียวกัน!                         |
|   SOLUTION: ปิด touch polling ก่อนเริ่มอ่าน CAPSENSE              |
|                                                              |
|   lv_port_indev_disable_touch()  <-- เรียกก่อน init            |
|                                                              |
+-------------------------------------------------------------+
```

#### 2.2 Data Flow Architecture

```
+-------------------------------------------------------------+
|         DIRECT I2C ARCHITECTURE (CM55 Only)                  |
+-------------------------------------------------------------+
|                                                              |
|   PSoC 4000T              CM55 (LVGL + I2C Master)           |
|   +------------+          +---------------------------+      |
|   | CSB1 (BTN0)|          |                           |      |
|   | CSB2 (BTN1)|--I2C---->| aic_capsense_read(&data)  |      |
|   | CSS1 (Sldr)|  0x08    |    |                      |      |
|   +------------+          |    v                      |      |
|                           | aic_capsense_data_t       |      |
|   Data: 3 bytes           |   .btn0_pressed (0/1)     |      |
|   [BTN0, BTN1, Slider]    |   .btn1_pressed (0/1)     |      |
|                           |   .slider_pos  (0-100)    |      |
|   NOTE: No CM33 needed!   |   .slider_active (0/1)    |      |
|                           |    |                      |      |
|                           |    v                      |      |
|                           | Edge Detect -> UI + LEDs  |      |
|                           +---------------------------+      |
+-------------------------------------------------------------+
```

#### 2.3 Edge Detection Pattern

```
WITHOUT Edge Detection (Bad):
  tick 1: btn0=1 -> update UI  (set TOUCHED)
  tick 2: btn0=1 -> update UI  (set TOUCHED again - unnecessary!)
  tick 3: btn0=1 -> update UI  (waste CPU every 50ms)

WITH Edge Detection (Good):
  tick 1: btn0=1, prev=0 -> CHANGED! update UI
  tick 2: btn0=1, prev=1 -> same, skip
  tick 3: btn0=0, prev=1 -> CHANGED! update UI

Implementation:
  if (btn0 != prev_btn0) {
      /* state changed! update UI */
      prev_btn0 = btn0;
  }
```

#### 2.4 I2C Error Status (Color Coding)

| สถานะ           | สี                | เงื่อนไข                          |
| --------------- | ----------------- | --------------------------------- |
| **OK**          | Green (0x00FF00)  | `aic_capsense_read()` return true |
| **Error**       | Red (0xFF0000)    | เคย connected แต่ตอนนี้ read fail |
| **No Response** | Yellow (0xFFFF00) | ไม่เคย connect สำเร็จเลย          |

#### 2.5 UI Layout

```
+-------------------------------------------------------------+
|          Part 1 Ex11: CAPSENSE (I2C)                        |
|          Mode: Direct I2C (CM55)                            |
+-------------------------------------------------------------+
|  +-- SLIDER (CSS1) ----------------------------- [*] --+    |
|  |  ========================================     (LED)  |    |
|  |  0%                                   100%    Blue   |    |
|  +------------------------------------------------------+    |
|                                                              |
|  +--- BTN0 ---+                          +--- BTN1 ---+     |
|  |   (CSB1)   |                          |   (CSB2)   |     |
|  |   (  *  )  |                          |   (  *  )  |     |
|  |    Red LED  |                          |  Green LED |     |
|  |   Ready     |                          |   Ready    |     |
|  +-------------+                          +-------------+    |
|                                                              |
|  CM55 reads PSoC 4000T directly via I2C (0x08)              |
|  I2C: cnt=150 OK                                            |
+-------------------------------------------------------------+
```

***

### 3. ฟังก์ชันสำคัญ (API Reference)

#### 3.1 CAPSENSE API

| Function                        | Description                     | Return |
| ------------------------------- | ------------------------------- | ------ |
| `aic_capsense_init()`           | Initialize I2C สำหรับ CAPSENSE  | `bool` |
| `aic_capsense_read(&data)`      | อ่านข้อมูลจาก PSoC 4000T        | `bool` |
| `aic_capsense_is_available()`   | ตรวจว่า CAPSENSE ตอบ I2C        | `bool` |
| `lv_port_indev_disable_touch()` | ปิด Display Touch (คืน I2C bus) | `void` |

#### 3.2 CAPSENSE Data Structure

```c
typedef struct {
    bool btn0_pressed;      /* Button 0 (CSB1): true = touched */
    bool btn1_pressed;      /* Button 1 (CSB2): true = touched */
    uint8_t slider_pos;     /* Slider position: 0-100 (%) */
    bool slider_active;     /* Slider is being touched */
} aic_capsense_data_t;
```

#### 3.3 Hardware LED + LVGL Widget API

| Function                                            | Description                      |
| --------------------------------------------------- | -------------------------------- |
| `aic_gpio_led_set(led, state)`                      | ควบคุม LED ON/OFF (Red, Green)   |
| `aic_gpio_pwm_set_brightness(AIC_LED_BLUE, val)`    | ตั้งความสว่าง Blue LED (0-100)   |
| `lv_slider_set_value(slider, val, anim)`            | ตั้งค่า Slider                   |
| `lv_obj_remove_flag(slider, LV_OBJ_FLAG_CLICKABLE)` | ทำให้ Slider read-only           |
| `lv_led_on(led)` / `lv_led_off(led)`                | เปิด/ปิด LED widget              |
| `lv_led_set_brightness(led, val)`                   | ตั้งความสว่าง LED widget (0-255) |

***

### 4. โค้ดตัวอย่าง (Code Examples)

#### 4.1 Full CAPSENSE Hardware Code

```c
#include "aic-eec.h"
#include "../aic-eec/sensors.h"

#define EX11_NUM_BUTTONS 2

/* ===== UI Elements ===== */
static lv_obj_t * ex11_btn_panels[EX11_NUM_BUTTONS];
static lv_obj_t * ex11_btn_leds[EX11_NUM_BUTTONS];
static lv_obj_t * ex11_btn_status[EX11_NUM_BUTTONS];
static lv_obj_t * ex11_slider;
static lv_obj_t * ex11_slider_value;
static lv_obj_t * ex11_output_led;
static lv_obj_t * ex11_status_label;
static lv_timer_t * ex11_poll_timer;

/* ===== Edge Detection State ===== */
static bool ex11_prev_btn0 = false;
static bool ex11_prev_btn1 = false;
static uint8_t ex11_prev_slider = 0;

/* ===== I2C Status Tracking ===== */
static uint32_t ex11_read_count = 0;
static uint32_t ex11_error_count = 0;
static bool ex11_connected = false;

/* ============================================================ */
/*        HELPER: Update UI with CAPSENSE data                  */
/* ============================================================ */
static void ex11_update_ui(bool btn0, bool btn1,
                           uint8_t slider_pos, bool slider_active)
{
    /* === Button 0 (CSB1) -> Red LED === */
    if (btn0 != ex11_prev_btn0) {
        if (btn0) {
            lv_obj_set_style_bg_color(ex11_btn_panels[0],
                lv_color_hex(0x00AA00), 0);
            lv_led_on(ex11_btn_leds[0]);
            lv_label_set_text(ex11_btn_status[0], "TOUCHED");
            lv_obj_set_style_text_color(ex11_btn_status[0],
                lv_color_hex(0x00FF00), 0);
            aic_gpio_led_set(AIC_LED_RED, true);
        } else {
            lv_obj_set_style_bg_color(ex11_btn_panels[0],
                lv_color_hex(0x333355), 0);
            lv_led_off(ex11_btn_leds[0]);
            lv_label_set_text(ex11_btn_status[0], "Ready");
            lv_obj_set_style_text_color(ex11_btn_status[0],
                lv_color_hex(0x888888), 0);
            aic_gpio_led_set(AIC_LED_RED, false);
        }
        ex11_prev_btn0 = btn0;
    }

    /* === Button 1 (CSB2) -> Green LED === */
    if (btn1 != ex11_prev_btn1) {
        if (btn1) {
            lv_obj_set_style_bg_color(ex11_btn_panels[1],
                lv_color_hex(0x00AA00), 0);
            lv_led_on(ex11_btn_leds[1]);
            lv_label_set_text(ex11_btn_status[1], "TOUCHED");
            lv_obj_set_style_text_color(ex11_btn_status[1],
                lv_color_hex(0x00FF00), 0);
            aic_gpio_led_set(AIC_LED_GREEN, true);
        } else {
            lv_obj_set_style_bg_color(ex11_btn_panels[1],
                lv_color_hex(0x333355), 0);
            lv_led_off(ex11_btn_leds[1]);
            lv_label_set_text(ex11_btn_status[1], "Ready");
            lv_obj_set_style_text_color(ex11_btn_status[1],
                lv_color_hex(0x888888), 0);
            aic_gpio_led_set(AIC_LED_GREEN, false);
        }
        ex11_prev_btn1 = btn1;
    }

    /* === Slider (CSS1) -> Blue LED PWM === */
    if (slider_pos != ex11_prev_slider) {
        lv_slider_set_value(ex11_slider, slider_pos, LV_ANIM_ON);
        lv_label_set_text_fmt(ex11_slider_value, "%d%%", slider_pos);

        uint8_t brightness = (uint8_t)((slider_pos * 255) / 100);
        if (slider_active) {
            lv_led_on(ex11_output_led);
            lv_led_set_brightness(ex11_output_led, brightness);
        } else {
            lv_led_off(ex11_output_led);
        }
        aic_gpio_pwm_set_brightness(AIC_LED_BLUE, slider_pos);
        ex11_prev_slider = slider_pos;
    }
}

/* ============================================================ */
/*         TIMER CALLBACK: Poll I2C every 50ms                  */
/* ============================================================ */
static void ex11_poll_timer_cb(lv_timer_t * timer)
{
    (void)timer;
    aic_capsense_data_t caps_data;

    if (aic_capsense_read(&caps_data)) {
        /* === I2C Read Success === */
        ex11_read_count++;
        if (!ex11_connected) ex11_connected = true;

        /* Status: Green = OK */
        lv_label_set_text_fmt(ex11_status_label,
            "I2C: cnt=%u OK", (unsigned int)ex11_read_count);
        lv_obj_set_style_text_color(ex11_status_label,
            lv_color_hex(0x00FF00), 0);

        /* Update UI with real CAPSENSE data */
        ex11_update_ui(caps_data.btn0_pressed,
                       caps_data.btn1_pressed,
                       caps_data.slider_pos,
                       caps_data.slider_active);
    } else {
        /* === I2C Read Failed === */
        ex11_error_count++;
        if (ex11_connected) {
            lv_label_set_text_fmt(ex11_status_label,
                "I2C Error (err=%u)",
                (unsigned int)ex11_error_count);
            lv_obj_set_style_text_color(ex11_status_label,
                lv_color_hex(0xFF0000), 0);
        } else {
            lv_label_set_text(ex11_status_label,
                "I2C: No response");
            lv_obj_set_style_text_color(ex11_status_label,
                lv_color_hex(0xFFFF00), 0);
        }
    }
}

/* ============================================================ */
/*                      MAIN FUNCTION                           */
/* ============================================================ */
void part1_ex11_capsense_hardware(void)
{
    /* [0] DISABLE DISPLAY TOUCH (MUST be first!) */
    lv_port_indev_disable_touch();

    /* [1] HARDWARE INITIALIZATION */
    aic_gpio_init();
    aic_gpio_pwm_init(AIC_LED_BLUE);
    aic_capsense_init();

    /* Reset edge detection state */
    ex11_prev_btn0 = false;
    ex11_prev_btn1 = false;
    ex11_prev_slider = 0;
    ex11_read_count = 0;
    ex11_error_count = 0;
    ex11_connected = false;

    /* [2] LVGL UI SETUP */
    lv_obj_t * scr = lv_screen_active();
    lv_obj_set_style_bg_color(scr, lv_color_hex(0x1a1a2e), 0);

    /* Title */
    lv_obj_t * title = lv_label_create(scr);
    lv_label_set_text(title, "Part 1 Ex11: CAPSENSE (I2C)");
    lv_obj_set_style_text_color(title, lv_color_hex(0xFFFFFF), 0);
    lv_obj_align(title, LV_ALIGN_TOP_MID, 0, 8);

    /* Connection Status */
    ex11_status_label = lv_label_create(scr);
    if (aic_capsense_is_available()) {
        lv_label_set_text(ex11_status_label, "Mode: Direct I2C (CM55)");
        lv_obj_set_style_text_color(ex11_status_label,
            lv_color_hex(0x00FF00), 0);
    } else {
        lv_label_set_text(ex11_status_label, "Mode: I2C not available");
        lv_obj_set_style_text_color(ex11_status_label,
            lv_color_hex(0xFFFF00), 0);
    }
    lv_obj_align(ex11_status_label, LV_ALIGN_TOP_MID, 0, 30);

    /* ===== SLIDER PANEL (TOP) ===== */
    lv_obj_t * slider_panel = lv_obj_create(scr);
    lv_obj_set_size(slider_panel, 420, 80);
    lv_obj_align(slider_panel, LV_ALIGN_TOP_MID, 0, 55);
    lv_obj_set_style_bg_color(slider_panel, lv_color_hex(0x0f0f23), 0);
    lv_obj_set_style_pad_all(slider_panel, 8, 0);
    lv_obj_clear_flag(slider_panel, LV_OBJ_FLAG_SCROLLABLE);

    lv_obj_t * slider_title = lv_label_create(slider_panel);
    lv_label_set_text(slider_title, "SLIDER (CSS1)");
    lv_obj_set_style_text_color(slider_title, lv_color_hex(0xFFFFFF), 0);
    lv_obj_align(slider_title, LV_ALIGN_TOP_LEFT, 10, 0);

    ex11_slider_value = lv_label_create(slider_panel);
    lv_label_set_text(ex11_slider_value, "0%");
    lv_obj_set_style_text_color(ex11_slider_value, lv_color_hex(0x00AAFF), 0);
    lv_obj_set_style_text_font(ex11_slider_value, &lv_font_montserrat_16, 0);
    lv_obj_align(ex11_slider_value, LV_ALIGN_TOP_RIGHT, -10, 0);

    ex11_slider = lv_slider_create(slider_panel);
    lv_obj_set_width(ex11_slider, 340);
    lv_obj_set_height(ex11_slider, 25);
    lv_obj_align(ex11_slider, LV_ALIGN_BOTTOM_MID, 0, -8);
    lv_slider_set_range(ex11_slider, 0, 100);
    lv_obj_set_style_bg_color(ex11_slider, lv_color_hex(0x333355), LV_PART_MAIN);
    lv_obj_set_style_bg_color(ex11_slider, lv_color_hex(0x00AAFF), LV_PART_INDICATOR);
    lv_obj_remove_flag(ex11_slider, LV_OBJ_FLAG_CLICKABLE); /* Read-only */

    ex11_output_led = lv_led_create(slider_panel);
    lv_obj_set_size(ex11_output_led, 25, 25);
    lv_obj_align(ex11_output_led, LV_ALIGN_BOTTOM_RIGHT, -5, -8);
    lv_led_set_color(ex11_output_led, lv_palette_main(LV_PALETTE_LIGHT_BLUE));
    lv_led_off(ex11_output_led);

    /* ===== BUTTON PANELS (BOTTOM) ===== */
    const char * btn_names[] = {"BTN0", "BTN1"};
    const char * btn_ids[] = {"(CSB1)", "(CSB2)"};
    uint32_t led_colors[] = {0xff0000, 0x00ff00};
    int btn_x_pos[] = {-110, 110};

    for (int i = 0; i < EX11_NUM_BUTTONS; i++) {
        ex11_btn_panels[i] = lv_obj_create(scr);
        lv_obj_set_size(ex11_btn_panels[i], 140, 150);
        lv_obj_align(ex11_btn_panels[i], LV_ALIGN_BOTTOM_MID,
            btn_x_pos[i], -55);
        lv_obj_set_style_bg_color(ex11_btn_panels[i],
            lv_color_hex(0x333355), 0);
        lv_obj_set_style_border_width(ex11_btn_panels[i], 3, 0);
        lv_obj_set_style_border_color(ex11_btn_panels[i],
            lv_color_hex(0x666699), 0);
        lv_obj_set_style_radius(ex11_btn_panels[i], 10, 0);
        lv_obj_set_style_pad_all(ex11_btn_panels[i], 5, 0);
        lv_obj_clear_flag(ex11_btn_panels[i], LV_OBJ_FLAG_SCROLLABLE);

        lv_obj_t * name = lv_label_create(ex11_btn_panels[i]);
        lv_label_set_text(name, btn_names[i]);
        lv_obj_set_style_text_color(name, lv_color_hex(0xFFFFFF), 0);
        lv_obj_set_style_text_font(name, &lv_font_montserrat_16, 0);
        lv_obj_align(name, LV_ALIGN_TOP_MID, 0, 2);

        lv_obj_t * id_lbl = lv_label_create(ex11_btn_panels[i]);
        lv_label_set_text(id_lbl, btn_ids[i]);
        lv_obj_set_style_text_color(id_lbl, lv_color_hex(0x888888), 0);
        lv_obj_align(id_lbl, LV_ALIGN_TOP_MID, 0, 22);

        ex11_btn_leds[i] = lv_led_create(ex11_btn_panels[i]);
        lv_obj_set_size(ex11_btn_leds[i], 50, 50);
        lv_obj_align(ex11_btn_leds[i], LV_ALIGN_CENTER, 0, 8);
        lv_led_set_color(ex11_btn_leds[i], lv_color_hex(led_colors[i]));
        lv_led_off(ex11_btn_leds[i]);

        ex11_btn_status[i] = lv_label_create(ex11_btn_panels[i]);
        lv_label_set_text(ex11_btn_status[i], "Ready");
        lv_obj_set_style_text_color(ex11_btn_status[i],
            lv_color_hex(0x888888), 0);
        lv_obj_align(ex11_btn_status[i], LV_ALIGN_BOTTOM_MID, 0, -2);
    }

    /* Description + Footer */
    lv_obj_t * desc = lv_label_create(scr);
    lv_label_set_text(desc, "CM55 reads PSoC 4000T directly via I2C (0x08)");
    lv_obj_set_style_text_color(desc, lv_color_hex(0x888888), 0);
    lv_obj_align(desc, LV_ALIGN_BOTTOM_MID, 0, -25);

    aic_create_footer(scr);

    /* [3] START I2C POLLING (50ms = 20Hz) */
    ex11_poll_timer = lv_timer_create(ex11_poll_timer_cb, 50, NULL);
}
```

#### 4.2 Initialization Sequence

```
[0] lv_port_indev_disable_touch()  <-- MUST be first!
     |   ปิด Display Touch เพื่อคืน I2C bus
[1] aic_gpio_init()               GPIO subsystem
[2] aic_gpio_pwm_init(BLUE)       PWM for Blue LED
[3] aic_capsense_init()            I2C for CAPSENSE
[4] Create LVGL UI                Slider + Buttons panels
[5] lv_timer_create(cb, 50)       Start I2C polling

WARNING: ถ้าไม่เรียก [0] ก่อน -> I2C bus conflict!
```

***

### 5. องค์ความรู้และเทคนิค (Patterns & Tips)

#### 5.1 Pattern: Shared I2C Bus Resolution

```c
/* PROBLEM: Display Touch + CAPSENSE ใช้ SCB0 I2C ร่วมกัน
 * SOLUTION: ปิด touch ก่อนใช้ CAPSENSE */
void part1_ex11_capsense_hardware(void)
{
    lv_port_indev_disable_touch();  /* Step 1: ปิด Touch */
    aic_capsense_init();            /* Step 2: CAPSENSE ใช้ I2C ได้ */
}
/* ผลกระทบ: หน้าจอจะไม่ตอบสนองต่อการสัมผัส
 * CAPSENSE กลายเป็น input device หลักแทน */
```

#### 5.2 Pattern: Edge Detection for Efficient Updates

```c
static bool prev_btn0 = false;
static uint8_t prev_slider = 0;

static void poll_cb(lv_timer_t * t)
{
    aic_capsense_data_t data;
    if (!aic_capsense_read(&data)) return;

    /* Button: update only on state change */
    if (data.btn0_pressed != prev_btn0) {
        aic_gpio_led_set(AIC_LED_RED, data.btn0_pressed);
        data.btn0_pressed ? lv_led_on(led) : lv_led_off(led);
        prev_btn0 = data.btn0_pressed;
    }

    /* Slider: update only on value change */
    if (data.slider_pos != prev_slider) {
        lv_slider_set_value(slider, data.slider_pos, LV_ANIM_ON);
        aic_gpio_pwm_set_brightness(AIC_LED_BLUE, data.slider_pos);
        prev_slider = data.slider_pos;
    }
}
```

#### 5.3 Pattern: Read-Only Slider

```c
/* Slider แสดงค่าจาก sensor - ผู้ใช้ลากไม่ได้ */
lv_obj_t * slider = lv_slider_create(parent);
lv_obj_remove_flag(slider, LV_OBJ_FLAG_CLICKABLE);  /* Read-only */

/* ใน timer: อัพเดทจาก sensor */
lv_slider_set_value(slider, sensor_value, LV_ANIM_ON);
```

#### 5.4 สิ่งที่ต้องระวัง

| หัวข้อ               | รายละเอียด                                                           |
| -------------------- | -------------------------------------------------------------------- |
| **Touch Disable**    | ต้องเรียก `lv_port_indev_disable_touch()` ก่อน `aic_capsense_init()` |
| **Init Order**       | disable\_touch -> gpio\_init -> pwm\_init -> capsense\_init          |
| **Edge Detection**   | เปรียบเทียบ prev กับ current ก่อน update UI ทุกครั้ง                 |
| **Format Specifier** | ใช้ `(unsigned int)` cast กับ `%u` สำหรับ uint32\_t                  |
| **Read-Only Slider** | ต้อง `lv_obj_remove_flag(slider, LV_OBJ_FLAG_CLICKABLE)`             |
| **I2C Address**      | PSoC 4000T ใช้ address `0x08`                                        |
| **No CM33**          | Ex11 อ่าน I2C โดยตรงจาก CM55 ไม่ต้องใช้ IPC                          |

#### 5.5 Ex10 (Mockup) vs Ex11 (Hardware)

| รายการ             | Ex10 Mockup          | Ex11 Hardware                        |
| ------------------ | -------------------- | ------------------------------------ |
| **Data Source**    | Auto-demo จำลอง      | I2C จาก PSoC 4000T จริง              |
| **Touch Screen**   | ใช้ได้ (Manual mode) | ปิด (disable\_touch)                 |
| **Hardware LED**   | ไม่มี                | BTN0->Red, BTN1->Green, Slider->Blue |
| **Error Handling** | ไม่จำเป็น            | Green/Red/Yellow status              |
| **Use Case**       | พัฒนา UI ไม่มี board | ทดสอบ hardware จริง                  |

#### 5.6 Direct I2C (Ex11) vs IPC (Part 4 Ex9)

| รายการ           | Direct I2C (Ex11)    | IPC (Part 4 Ex9)         |
| ---------------- | -------------------- | ------------------------ |
| **Architecture** | CM55 อ่าน I2C โดยตรง | CM33 อ่าน -> IPC -> CM55 |
| **Complexity**   | ง่าย (single core)   | ซับซ้อน (dual core)      |
| **Touch Screen** | ใช้ไม่ได้            | ใช้ได้ (I2C คนละ bus)    |
| **Latency**      | ต่ำ (direct)         | สูงกว่า (IPC overhead)   |
| **Scalability**  | จำกัด (bus sharing)  | ดี (CM33 จัดการ I/O)     |

***

### 6. แบบฝึกหัด (Exercises)

#### แบบฝึกหัดที่ 1: Touch Counter

**โจทย์**: นับจำนวนครั้งที่กด CAPSENSE Button แต่ละปุ่ม

**ข้อกำหนด**:

* นับ BTN0 touch count (rising edge: Released -> Touched)
* นับ BTN1 touch count แยกกัน
* แสดง "Count: 15" บน panel แต่ละปุ่ม
* แสดง Total touches (BTN0 + BTN1) ที่ footer

**Hints**:

* ใช้ `static uint32_t btn0_count = 0;`
* Rising edge: `if (btn0 != prev_btn0 && btn0)` คือจังหวะกดใหม่

#### แบบฝึกหัดที่ 2: CAPSENSE Color Mixer

**โจทย์**: ใช้ Slider ผสมสี + Buttons เลือก channel R/G/B

**ข้อกำหนด**:

* BTN0 กด: สลับ channel (Red -> Green -> Blue -> Red ...)
* BTN1 กด: Reset channel ปัจจุบันเป็น 0
* Slider: ปรับค่าสีของ channel ที่เลือก (0-100% -> 0-255)
* แสดง Color preview panel: `lv_color_make(r, g, b)`
* LED hardware แสดง channel ที่กำลังแก้ไข

**Hints**:

* `static uint8_t rgb[3] = {0, 0, 0}; static int ch = 0;`
* `lv_obj_set_style_bg_color(preview, lv_color_make(rgb[0], rgb[1], rgb[2]), 0);`
* `rgb[ch] = (uint8_t)(slider_pos * 255 / 100);`


# Sensor-to-HMI Display

## ส่วนที่ 1: ภาพรวม LVGL

### 1.1 LVGL คืออะไร?

**LVGL (Light and Versatile Graphics Library)** เป็น Open Source Graphics Library สำหรับ Embedded Systems

```
┌─────────────────────────────────────────────────────────────┐
│                     LVGL ARCHITECTURE                       │
├─────────────────────────────────────────────────────────────┤
│                                                             │
│  ┌──────────────────────────────────────────────────────┐   │
│  │              APPLICATION LAYER                       │   │
│  │  ┌────────┐  ┌────────┐  ┌────────┐  ┌────────┐      │   │
│  │  │ Button │  │ Label  │  │ Slider │  │ Chart  │      │   │
│  │  └───┬────┘  └───┬────┘  └───┬────┘  └───┬────┘      │   │
│  │      └───────────┴───────────┴───────────┘           │   │
│  │                      │                               │   │
│  │               ┌──────▼──────┐                        │   │
│  │               │  lv_obj_t   │  (Base Object)         │   │
│  └───────────────┴──────┬──────┴────────────────────────┘   │
│                         │                                   │
│  ┌──────────────────────┼───────────────────────────────┐   │
│  │                CORE LAYER                            │   │
│  │  ┌─────────┐  ┌──────▼────┐  ┌─────────┐             │   │
│  │  │  Timer  │  │  Display  │  │  Input  │             │   │
│  │  │ Handler │  │  Manager  │  │ Device  │             │   │
│  └──┴─────────┴──┴───────────┴──┴─────────┴─────────────┘   │
│                         │                                   │
│  ┌──────────────────────┼───────────────────────────────┐   │
│  │              HARDWARE LAYER                          │   │
│  │  ┌───────────────┐  ┌───────────────┐                │   │
│  │  │  LCD Display  │  │  Touch Panel  │                │   │
│  │  │  (MIPI-DSI)   │  │  (I2C)        │                │   │
│  └──┴───────────────┴──┴───────────────┴────────────────┘   │
│                                                             │
└─────────────────────────────────────────────────────────────┘
```

***

### 1.2 Display Options

| Display        | Resolution | Interface | Touch        |
| -------------- | ---------- | --------- | ------------ |
| 4.3" Waveshare | 800 x 480  | MIPI-DSI  | FT5406 (I2C) |
| 7" Waveshare   | 1024 x 600 | MIPI-DSI  | GT911 (I2C)  |

***

### 1.3 LVGL Core Concepts

| Concept             | คำอธิบาย                          |
| ------------------- | --------------------------------- |
| **Display**         | พื้นที่แสดงผลทั้งหมด              |
| **Screen**          | หน้าจอที่สลับได้ (container หลัก) |
| **Widget (Object)** | UI element เช่น Button, Label     |
| **Style**           | การตกแต่ง (สี, ขนาด, font)        |
| **Event**           | การตอบสนองต่อ user interaction    |

```c
/* Key LVGL Functions */
lv_init();                          /* Initialize LVGL */
lv_obj_t *scr = lv_scr_act();       /* Get active screen */
lv_obj_t *btn = lv_btn_create(scr); /* Create button on screen */
lv_timer_handler();                  /* Must call periodically! */
```

{% embed url="<https://detailed-dove.static.domains/lvgl-basic>" fullWidth="true" %}

### 1.4 LVGL Layout และ Positioning พื้นฐาน

> **หมายเหตุ**: ส่วนนี้เป็นพื้นฐานสำคัญที่ต้องเข้าใจก่อนเริ่มสร้าง UI จริง เพราะการวางตำแหน่งที่ผิดพลาดจะทำให้ Widget แสดงผลไม่ถูกต้องหรือหายไปจากจอ

#### หน้าจอและระบบพิกัด (Screen & Coordinate System)

**ข้อมูลจอภาพ PSoC Edge E84 Eval Kit**:

```
┌─────────────────────────────────────────────────────────────┐
│ Physical Display: 480 x 800 pixels (Vertical/Portrait)      │
│ Usable Area:      480 x 320 pixels (ส่วนที่ใช้งานจริง)           │
│ Origin (0,0):     มุมซ้ายบน (Top-Left Corner)                 │
│ X-axis:           → เพิ่มไปทางขวา (0 to 479)                  │
│ Y-axis:           ↓ เพิ่มไปทางล่าง (0 to 319)                  │
└─────────────────────────────────────────────────────────────┘
```

**ระบบพิกัดของ LVGL**:

```
     X=0                    X=240                  X=479
Y=0   ┌─────────────────────────────────────────────┐
      │ ○ Origin (0,0)                              │
      │                                             │
      │          X+ ───────────────────►            │
      │          │                                  │
      │          │                                  │
Y=160 │          │ Y+       ● CENTER                │
      │          │       (240,160)                  │
      │          ▼                                  │
      │                                             │
      │                                             │
Y=319 └─────────────────────────────────────────────┘
```

#### ประเภทการจัดตำแหน่ง (Alignment Types)

LVGL v9.2 มี 2 กลุ่มหลักของ alignment:

**กลุ่ม 1: Align ภายใน Parent (ใช้กับ `lv_obj_align`)**

| Constant                | ตำแหน่ง     | การใช้งานที่เหมาะสม  |
| ----------------------- | ----------- | -------------------- |
| `LV_ALIGN_TOP_LEFT`     | มุมซ้ายบน   | Default position     |
| `LV_ALIGN_TOP_MID`      | กลางบน      | Title, Header        |
| `LV_ALIGN_TOP_RIGHT`    | มุมขวาบน    | Close button, Status |
| `LV_ALIGN_LEFT_MID`     | กลางซ้าย    | Side panel items     |
| `LV_ALIGN_CENTER`       | กลางจอ      | Main content         |
| `LV_ALIGN_RIGHT_MID`    | กลางขวา     | Side panel items     |
| `LV_ALIGN_BOTTOM_LEFT`  | มุมซ้ายล่าง | Footer buttons       |
| `LV_ALIGN_BOTTOM_MID`   | กลางล่าง    | Description, Footer  |
| `LV_ALIGN_BOTTOM_RIGHT` | มุมขวาล่าง  | Action buttons       |

#### **แผนภาพ Alignment ภายใน Parent**:

```
┌────────────────────────────────────────────────────────┐
│ TOP_LEFT          TOP_MID           TOP_RIGHT          │
│    ●                 ●                  ●              │
│                                                        │
│                                                        │
│ LEFT_MID            CENTER           RIGHT_MID         │
│    ●                 ●                  ●              │
│                                                        │
│                                                        │
│ BOTTOM_LEFT       BOTTOM_MID        BOTTOM_RIGHT       │
│    ●                 ●                  ●              │
└────────────────────────────────────────────────────────┘
```

**กลุ่ม 2: Align ภายนอก Object อ้างอิง (ใช้กับ `lv_obj_align_to`)**

| Constant                    | ตำแหน่งจาก Object อ้างอิง |
| --------------------------- | ------------------------- |
| `LV_ALIGN_OUT_TOP_LEFT`     | ด้านบน ชิดซ้าย            |
| `LV_ALIGN_OUT_TOP_MID`      | ด้านบน กลาง               |
| `LV_ALIGN_OUT_TOP_RIGHT`    | ด้านบน ชิดขวา             |
| `LV_ALIGN_OUT_BOTTOM_LEFT`  | ด้านล่าง ชิดซ้าย          |
| `LV_ALIGN_OUT_BOTTOM_MID`   | ด้านล่าง กลาง             |
| `LV_ALIGN_OUT_BOTTOM_RIGHT` | ด้านล่าง ชิดขวา           |
| `LV_ALIGN_OUT_LEFT_TOP`     | ด้านซ้าย ชิดบน            |
| `LV_ALIGN_OUT_LEFT_MID`     | ด้านซ้าย กลาง             |
| `LV_ALIGN_OUT_LEFT_BOTTOM`  | ด้านซ้าย ชิดล่าง          |
| `LV_ALIGN_OUT_RIGHT_TOP`    | ด้านขวา ชิดบน             |
| `LV_ALIGN_OUT_RIGHT_MID`    | ด้านขวา กลาง              |
| `LV_ALIGN_OUT_RIGHT_BOTTOM` | ด้านขวา ชิดล่าง           |

#### ตัวอย่างการใช้ `OUT_*` Alignment:

```c
/* สร้าง Label ใต้ LED widget */
lv_obj_t * label = lv_label_create(lv_screen_active());
lv_label_set_text(label, "LED Status");
lv_obj_align_to(label, led_widget, LV_ALIGN_OUT_BOTTOM_MID, 0, 5);
/*                       ↑               ↑                  ↑  ↑
                    object          วางใต้ led           x=0, y=+5 (ห่างลงมา 5px) */
```


# UX/UI Workshops

### 1. ภาพรวมการบูรณาการ Sensor กับ LVGL

#### Sensor → Widget Mapping

<table><thead><tr><th width="155.48370361328125">Sensor Type</th><th width="178.94744873046875">ข้อมูล</th><th width="180.0362548828125">Widget ที่เหมาะสม</th><th>เหตุผล</th></tr></thead><tbody><tr><td><strong>ADC</strong></td><td>0-4095 (12-bit)</td><td>Slider, Bar, Arc</td><td>Linear value mapping</td></tr><tr><td><strong>Accelerometer</strong></td><td>±2g (m/s²)</td><td>Chart, Scale, Bar</td><td>3-axis real-time</td></tr><tr><td><strong>Gyroscope</strong></td><td>±2000°/s</td><td>Arc, Chart</td><td>Angular velocity</td></tr><tr><td><strong>Orientation</strong></td><td>6 states</td><td>Label, LED</td><td>Discrete states</td></tr><tr><td><strong>Temperature</strong></td><td>°C</td><td>Scale, Label</td><td>Single value</td></tr></tbody></table>

***


# Slider Bar

## Lab 1: Slider & Bar Widget (ADC Visualization)

***

### 1. โครงสร้างภาพรวมของ Lab

#### Why? - ทำไมต้องเรียนรู้เรื่องนี้

* **ADC Visualization**: ค่า ADC 0-4095 เป็นตัวเลขดิบที่อ่านยาก จำเป็นต้องแปลงเป็นภาพที่เข้าใจง่าย
* **Slider vs Bar**: เรียนรู้ความแตกต่างระหว่าง widget ที่รับ input (Slider) กับ widget ที่แสดงผลอย่างเดียว (Bar)
* **Value Mapping**: ฝึกการแปลงค่า raw ADC เป็น percentage และ voltage ซึ่งเป็นพื้นฐานของ Sensor Data Processing
* **Industrial Application**: Bar chart และ slider เป็นส่วนสำคัญของ SCADA/HMI ในงานอุตสาหกรรม

#### What? - จะได้เรียนรู้อะไร

1. **Slider Widget**: สร้าง slider พร้อม range, value, และ event callback
2. **Bar Widget**: สร้าง progress bar แบบ read-only สำหรับแสดงสถานะ
3. **ADC Mapping**: สูตรการแปลง ADC raw value เป็น percentage และ voltage
4. **Timer Update Pattern**: ใช้ `lv_timer_create()` อัพเดท UI แบบ periodic
5. **Event Callback**: จัดการ `LV_EVENT_VALUE_CHANGED` เพื่อตอบสนองต่อการเปลี่ยนแปลงค่า

#### How? - จะทำอย่างไร

1. สร้าง Slider แสดง ADC raw value (0-4095)
2. สร้าง Bar แสดง percentage (0-100%)
3. เพิ่ม Label แสดง Voltage คำนวณจาก ADC
4. ใช้ Timer จำลองค่า ADC ที่เปลี่ยนแปลงตามเวลา
5. เชื่อมต่อ Slider event กับ Bar update

<figure><img src="/files/Exbz93LUIszxjxroKpTv" alt=""><figcaption></figcaption></figure>

***

### 2. หลักการทำงานและ Flowchart

#### 2.1 Slider vs Bar Concept

```
┌─────────────────────────────────────────────────────────────┐
│                  SLIDER vs BAR CONCEPT                      │
├─────────────────────────────────────────────────────────────┤
│                                                             │
│   SLIDER (Interactive)                                      │
│   ┌──────────────────────────────────┐                      │
│   │   ══════════●══════              │  ← มี knob ลากได้      │
│   │          (draggable)             │                      │
│   └──────────────────────────────────┘                      │
│   Use Case: User adjusts setpoint, threshold                │
│                                                             │
│   BAR (Read-Only)                                           │
│   ┌──────────────────────────────────┐                      │
│   │   ████████████░░░░░░░░░░░░░░░░░  │  ← แสดงค่าอย่างเดียว    │
│   │           (no knob)              │                      │
│   └──────────────────────────────────┘                      │
│   Use Case: Show sensor value, progress, battery level      │
│                                                             │
└─────────────────────────────────────────────────────────────┘
```

#### 2.2 ADC Value Mapping Pipeline

```
┌─────────────────────────────────────────────────────────────┐
│                 ADC VALUE MAPPING PIPELINE                  │
├─────────────────────────────────────────────────────────────┤
│                                                             │
│   ADC Raw Value (0-4095, 12-bit)                            │
│         │                                                   │
│         ├──────────────────────────────────┐                │
│         ▼                                  ▼                │
│   ┌─────────────────┐           ┌─────────────────┐         │
│   │ Slider Display  │           │  % = raw x 100  │         │
│   │  Range: 0-4095  │           │     ─────────   │         │
│   └─────────────────┘           │       4095      │         │
│                                 └────────┬────────┘         │
│                                          │                  │
│                                          ▼                  │
│                                 ┌─────────────────┐         │
│                                 │  Bar Display    │         │
│                                 │  Range: 0-100%  │         │
│                                 └─────────────────┘         │
│         │                                                   │
│         ▼                                                   │
│   ┌─────────────────┐                                       │
│   │  V = raw x 3.3  │                                       │
│   │     ─────────   │  Voltage calculation                  │
│   │       4095      │                                       │
│   └────────┬────────┘                                       │
│            ▼                                                │
│   ┌─────────────────┐                                       │
│   │  Label: "1.65V" │  แสดงค่า voltage                       │
│   └─────────────────┘                                       │
│                                                             │
└─────────────────────────────────────────────────────────────┘
```

#### 2.3 Timer Update Flow

```
┌─────────────────────────────────────────────────────────────┐
│                   TIMER UPDATE FLOW                         │
├─────────────────────────────────────────────────────────────┤
│                                                             │
│   lv_timer_create(timer_cb, 100ms)                          │
│         │                                                   │
│         ▼                                                   │
│   ┌─────────────────┐                                       │
│   │ Read ADC Value  │  ← simulate_adc_read() หรือ HW         │
│   └────────┬────────┘                                       │
│            │                                                │
│            ▼                                                │
│   ┌─────────────────┐                                       │
│   │ Update Slider   │  → lv_slider_set_value()              │
│   └────────┬────────┘                                       │
│            │                                                │
│            ▼                                                │
│   ┌─────────────────┐                                       │
│   │ Calculate %     │  → pct = raw * 100 / 4095             │
│   └────────┬────────┘                                       │
│            │                                                │
│            ▼                                                │
│   ┌─────────────────┐                                       │
│   │ Update Bar      │  → lv_bar_set_value()                 │
│   └────────┬────────┘                                       │
│            │                                                │
│            ▼                                                │
│   ┌─────────────────┐                                       │
│   │ Update Labels   │  → lv_label_set_text_fmt()            │
│   └─────────────────┘                                       │
│                                                             │
│   ◄──── ทำซ้ำทุก 100ms ────►                                  │
│                                                             │
└─────────────────────────────────────────────────────────────┘
```

***

### 3. ฟังก์ชันสำคัญ (API Reference)

#### 3.1 Slider Functions

<table><thead><tr><th width="332.02557373046875">Function</th><th width="233.438232421875">Parameters</th><th>Description</th></tr></thead><tbody><tr><td><code>lv_slider_create(parent)</code></td><td>parent: lv_obj_t*</td><td>สร้าง slider widget บน parent</td></tr><tr><td><code>lv_slider_set_range(obj, min, max)</code></td><td>min, max: int32_t</td><td>กำหนดช่วงค่า min-max</td></tr><tr><td><code>lv_slider_set_value(obj, val, anim)</code></td><td>val: int32_t, anim: lv_anim_enable_t</td><td>ตั้งค่า slider</td></tr><tr><td><code>lv_slider_get_value(obj)</code></td><td>-</td><td>อ่านค่าปัจจุบัน (return int32_t)</td></tr><tr><td><code>lv_slider_set_mode(obj, mode)</code></td><td>mode: lv_slider_mode_t</td><td>NORMAL / SYMMETRICAL / RANGE</td></tr></tbody></table>

#### 3.2 Bar Functions

<table><thead><tr><th width="353.63067626953125">Function</th><th>Parameters</th><th>Description</th></tr></thead><tbody><tr><td><code>lv_bar_create(parent)</code></td><td>parent: lv_obj_t*</td><td>สร้าง bar widget (read-only)</td></tr><tr><td><code>lv_bar_set_range(obj, min, max)</code></td><td>min, max: int32_t</td><td>กำหนดช่วงค่า</td></tr><tr><td><code>lv_bar_set_value(obj, val, anim)</code></td><td>val: int32_t, anim: lv_anim_enable_t</td><td>ตั้งค่า bar</td></tr><tr><td><code>lv_bar_set_start_value(obj, val, anim)</code></td><td>val: int32_t</td><td>ตั้งค่าเริ่มต้น (สำหรับ range mode)</td></tr><tr><td><code>lv_bar_set_mode(obj, mode)</code></td><td>mode: lv_bar_mode_t</td><td>NORMAL / SYMMETRICAL / RANGE</td></tr></tbody></table>

#### 3.3 Common Styling

<table><thead><tr><th width="407.14984130859375">Function</th><th>Description</th></tr></thead><tbody><tr><td><code>lv_obj_set_size(obj, w, h)</code></td><td>กำหนดขนาด width x height</td></tr><tr><td><code>lv_obj_set_style_bg_color(obj, color, part)</code></td><td>เปลี่ยนสีพื้นหลัง</td></tr><tr><td><code>lv_obj_set_style_bg_color(obj, color, LV_PART_INDICATOR)</code></td><td>เปลี่ยนสี indicator (ส่วนที่เติม)</td></tr><tr><td><code>lv_obj_set_style_anim_duration(obj, ms, 0)</code></td><td>กำหนดเวลา animation</td></tr><tr><td><code>lv_obj_add_event_cb(obj, cb, LV_EVENT_VALUE_CHANGED, NULL)</code></td><td>เพิ่ม callback เมื่อค่าเปลี่ยน</td></tr></tbody></table>

#### 3.4 ADC Calculation Formulas

```c
/* ADC Constants (PSoC Edge E84) */
#define ADC_MAX      4095    /* 12-bit resolution: 2^12 - 1 */
#define ADC_VREF_MV  3300    /* Reference voltage: 3.3V = 3300mV */

/* Percentage calculation */
int32_t pct = (adc_value * 100) / ADC_MAX;

/* Voltage calculation (float) */
float voltage = ((float)adc_value / ADC_MAX) * (ADC_VREF_MV / 1000.0f);

/* Voltage calculation (integer mV - no float needed) */
int32_t voltage_mv = (adc_value * ADC_VREF_MV) / ADC_MAX;
```

***

### 4. โค้ดตัวอย่าง (Step-by-Step Code)

#### 4.1 Step 1: Global Variables และ Constants

```c
#include "lvgl.h"

/* ---- Constants ---- */
#define ADC_MAX      4095
#define ADC_VREF_MV  3300

/* ---- Global Widget Handles ---- */
static lv_obj_t * adc_slider;       /* Slider แสดง raw ADC */
static lv_obj_t * pct_bar;          /* Bar แสดง percentage */
static lv_obj_t * raw_label;        /* Label แสดง raw value */
static lv_obj_t * pct_label;        /* Label แสดง percentage */
static lv_obj_t * volt_label;       /* Label แสดง voltage */
static lv_timer_t * update_timer;   /* Timer สำหรับ auto-update */
```

#### 4.2 Step 2: Simulated ADC Read

```c
/*
 * simulate_adc_read() - จำลองค่า ADC ที่เปลี่ยนแปลง
 *
 * ใช้ sine wave + noise เพื่อให้ดูเหมือนสัญญาณจริง
 * ในการใช้งานจริง: แทนที่ด้วย aic_adc_read() หรือ HAL ADC API
 */
static uint16_t simulate_adc_read(void)
{
    static uint32_t tick = 0;
    tick++;

    /* Sine wave: center at 2048, amplitude 1500 */
    float angle = (float)tick * 0.05f;
    int32_t base = 2048 + (int32_t)(1500.0f * sinf(angle));

    /* Add small noise */
    int32_t noise = (lv_rand(0, 100) - 50);
    int32_t value = base + noise;

    /* Clamp to valid range */
    if (value < 0)    value = 0;
    if (value > 4095)  value = 4095;

    return (uint16_t)value;
}
```

#### 4.3 Step 3: Slider Event Callback

```c
/*
 * slider_event_cb() - เมื่อ user ลาก slider หรือค่าเปลี่ยนจาก timer
 *
 * ทำหน้าที่:
 * 1. อ่านค่า slider ปัจจุบัน
 * 2. คำนวณ percentage
 * 3. คำนวณ voltage
 * 4. อัพเดท bar และ labels ทั้งหมด
 */
static void slider_event_cb(lv_event_t * e)
{
    lv_obj_t * slider = lv_event_get_target(e);
    int32_t value = lv_slider_get_value(slider);

    /* คำนวณ percentage */
    int32_t pct = (value * 100) / ADC_MAX;

    /* คำนวณ voltage (mV) */
    int32_t voltage_mv = (value * ADC_VREF_MV) / ADC_MAX;

    /* อัพเดท Bar */
    lv_bar_set_value(pct_bar, pct, LV_ANIM_ON);

    /* อัพเดท Labels */
    lv_label_set_text_fmt(raw_label, "Raw: %d / %d", (int)value, ADC_MAX);
    lv_label_set_text_fmt(pct_label, "%d %%", (int)pct);
    lv_label_set_text_fmt(volt_label, "%d.%03d V",
                          (int)(voltage_mv / 1000),
                          (int)(voltage_mv % 1000));
}
```

#### 4.4 Step 4: Timer Callback สำหรับ Auto-Update

```c
/*
 * timer_cb() - ถูกเรียกทุก 100ms โดย LVGL timer system
 *
 * อ่านค่า ADC (จำลอง) แล้วอัพเดท slider
 * slider จะ trigger event callback อัตโนมัติ
 */
static void timer_cb(lv_timer_t * timer)
{
    (void)timer;

    /* อ่านค่า ADC (จำลอง หรือ hardware จริง) */
    uint16_t adc_value = simulate_adc_read();

    /* อัพเดท slider ค่า */
    lv_slider_set_value(adc_slider, adc_value, LV_ANIM_ON);

    /* ส่ง event เพื่อให้ callback ทำงาน */
    lv_obj_send_event(adc_slider, LV_EVENT_VALUE_CHANGED, NULL);
}
```

#### 4.5 Step 5: Main Function - สร้าง UI ทั้งหมด

```c
void part2_ex1_slider_bar(void)
{
    /* ---- Background สีเข้ม ---- */
    lv_obj_set_style_bg_color(lv_screen_active(),
                               lv_color_hex(0x1a1a2e), 0);

    /* ---- Title ---- */
    lv_obj_t * title = lv_label_create(lv_screen_active());
    lv_label_set_text(title, "ADC Visualization");
    lv_obj_set_style_text_color(title, lv_color_hex(0x00d4ff), 0);
    lv_obj_set_style_text_font(title, &lv_font_montserrat_24, 0);
    lv_obj_align(title, LV_ALIGN_TOP_MID, 0, 10);

    /* ---- Slider (ADC Raw Value) ---- */
    lv_obj_t * slider_label = lv_label_create(lv_screen_active());
    lv_label_set_text(slider_label, "ADC Raw Value (0-4095):");
    lv_obj_set_style_text_color(slider_label, lv_color_hex(0xcccccc), 0);
    lv_obj_align(slider_label, LV_ALIGN_TOP_LEFT, 20, 50);

    adc_slider = lv_slider_create(lv_screen_active());
    lv_obj_set_width(adc_slider, 280);
    lv_obj_align(adc_slider, LV_ALIGN_TOP_MID, 0, 75);
    lv_slider_set_range(adc_slider, 0, ADC_MAX);
    lv_slider_set_value(adc_slider, 2048, LV_ANIM_OFF);
    lv_obj_add_event_cb(adc_slider, slider_event_cb,
                         LV_EVENT_VALUE_CHANGED, NULL);

    /* ---- Raw Value Label ---- */
    raw_label = lv_label_create(lv_screen_active());
    lv_label_set_text(raw_label, "Raw: 2048 / 4095");
    lv_obj_set_style_text_color(raw_label, lv_color_white(), 0);
    lv_obj_align(raw_label, LV_ALIGN_TOP_MID, 0, 100);

    /* ---- Bar (Percentage) ---- */
    lv_obj_t * bar_label = lv_label_create(lv_screen_active());
    lv_label_set_text(bar_label, "Percentage:");
    lv_obj_set_style_text_color(bar_label, lv_color_hex(0xcccccc), 0);
    lv_obj_align(bar_label, LV_ALIGN_TOP_LEFT, 20, 130);

    pct_bar = lv_bar_create(lv_screen_active());
    lv_obj_set_size(pct_bar, 280, 25);
    lv_obj_align(pct_bar, LV_ALIGN_TOP_MID, 0, 155);
    lv_bar_set_range(pct_bar, 0, 100);
    lv_bar_set_value(pct_bar, 50, LV_ANIM_OFF);
    lv_obj_set_style_bg_color(pct_bar, lv_color_hex(0x333333), LV_PART_MAIN);
    lv_obj_set_style_bg_color(pct_bar,
                               lv_palette_main(LV_PALETTE_BLUE),
                               LV_PART_INDICATOR);

    /* ---- Percentage Label (บน Bar) ---- */
    pct_label = lv_label_create(lv_screen_active());
    lv_label_set_text(pct_label, "50 %");
    lv_obj_set_style_text_color(pct_label, lv_color_white(), 0);
    lv_obj_align_to(pct_label, pct_bar, LV_ALIGN_OUT_RIGHT_MID, 10, 0);

    /* ---- Voltage Display (ใหญ่ตรงกลาง) ---- */
    volt_label = lv_label_create(lv_screen_active());
    lv_label_set_text(volt_label, "1.650 V");
    lv_obj_set_style_text_color(volt_label, lv_color_hex(0x00ff88), 0);
    lv_obj_set_style_text_font(volt_label, &lv_font_montserrat_24, 0);
    lv_obj_align(volt_label, LV_ALIGN_CENTER, 0, 30);

    /* ---- Timer: Auto-update ทุก 100ms ---- */
    update_timer = lv_timer_create(timer_cb, 100, NULL);
}
```

#### 4.6 Data Flow Summary

```
simulate_adc_read()
        │
        ▼
  timer_cb() [ทุก 100ms]
        │
        ├── lv_slider_set_value()  → อัพเดท slider position
        │
        └── lv_obj_send_event()    → trigger callback
                    │
                    ▼
            slider_event_cb()
                    │
                    ├── คำนวณ pct, voltage
                    ├── lv_bar_set_value()      → อัพเดท bar
                    ├── lv_label_set_text_fmt()  → raw label
                    ├── lv_label_set_text_fmt()  → pct label
                    └── lv_label_set_text_fmt()  → volt label
```

***

### 5. องค์ความรู้และเทคนิค&#x20;

#### 5.1 Slider vs Bar - เมื่อไหร่ใช้อะไร

<table><thead><tr><th width="204.36224365234375">Feature</th><th>Slider</th><th>Bar</th></tr></thead><tbody><tr><td>User Input</td><td>ใช่ (ลากได้)</td><td>ไม่ (read-only)</td></tr><tr><td>Knob</td><td>มี knob ลากได้</td><td>ไม่มี</td></tr><tr><td>Use Case</td><td>ปรับ setpoint, threshold</td><td>แสดง progress, level</td></tr><tr><td>Event</td><td>LV_EVENT_VALUE_CHANGED</td><td>ไม่มี (ตั้งค่าจากโค้ด)</td></tr><tr><td>CPU Usage</td><td>สูงกว่า (รับ touch)</td><td>ต่ำกว่า</td></tr><tr><td>ตัวอย่างใช้งาน</td><td>Volume control, Brightness</td><td>Battery, Loading, Fuel</td></tr></tbody></table>

#### 5.2 Animation Options

```c
/* LV_ANIM_ON - เปลี่ยนแบบ smooth (แนะนำสำหรับ UI) */
lv_bar_set_value(bar, 75, LV_ANIM_ON);

/* LV_ANIM_OFF - เปลี่ยนทันที (สำหรับ high-speed update) */
lv_bar_set_value(bar, 75, LV_ANIM_OFF);
```

> **Tip**: ถ้า update rate สูง (< 50ms) ให้ใช้ `LV_ANIM_OFF` เพื่อลด CPU load

#### 5.3 ทำ Slider เป็น Read-Only

```c
/* วิธีที่ 1: Disable slider (สีจะเปลี่ยนเป็นจาง) */
lv_obj_add_state(adc_slider, LV_STATE_DISABLED);

/* วิธีที่ 2: ลบ flag clickable (สียังเหมือนเดิม) */
lv_obj_remove_flag(adc_slider, LV_OBJ_FLAG_CLICKABLE);
```

#### 5.4 เปลี่ยนสี Indicator ตามค่า

```c
/* Pattern: Color Threshold - ใช้บ่อยมากในงาน Industrial */
void update_bar_color_by_value(lv_obj_t * bar, int32_t pct)
{
    lv_color_t color;

    if (pct <= 20) {
        color = lv_palette_main(LV_PALETTE_RED);      /* วิกฤต */
    } else if (pct <= 50) {
        color = lv_palette_main(LV_PALETTE_ORANGE);    /* ต่ำ */
    } else {
        color = lv_palette_main(LV_PALETTE_GREEN);     /* ปกติ */
    }

    lv_obj_set_style_bg_color(bar, color, LV_PART_INDICATOR);
}
```

#### 5.5 Integer Math vs Float

```c
/* ไม่แนะนำ: ใช้ float บน embedded (ช้า, ใช้ FPU) */
float voltage = ((float)adc_value / 4095.0f) * 3.3f;
printf("%.3f V", voltage);  /* ต้องมี float support ใน printf */

/* แนะนำ: ใช้ integer math + แยกหน่วย */
int32_t mv = (adc_value * 3300) / 4095;
lv_label_set_text_fmt(label, "%d.%03d V", mv / 1000, mv % 1000);
/* เร็วกว่า, ไม่ต้องใช้ FPU, ไม่ต้อง printf float */
```

#### 5.6 Memory Pattern: Static Variables

```c
/* Widget handles ต้องเป็น static หรือ global
 * เพราะ LVGL timer/callback เรียกใช้ทีหลัง */
static lv_obj_t * my_bar;       /* ถูกต้อง */
static lv_timer_t * my_timer;   /* ถูกต้อง */

/* ห้าม: local variable ใน function */
void bad_example(void) {
    lv_obj_t * bar = lv_bar_create(...);  /* bar หายเมื่อ function จบ */
    /* callback จะ crash เพราะ pointer ไม่ valid แล้ว */
}
```

***

### 6. แบบฝึกหัด (Exercises)

#### Exercise 1: Battery Level Indicator

สร้าง Battery Level Indicator ที่ประกอบด้วย:

**Requirements:**

* Bar แสดงระดับแบตเตอรี่ (0-100%)
* Label แสดง percentage ตัวเลข
* **เปลี่ยนสี** ตามระดับ:
  * 0-20%: สีแดง (LV\_PALETTE\_RED) - ต่ำวิกฤต
  * 21-50%: สีส้ม (LV\_PALETTE\_ORANGE) - ต่ำ
  * 51-100%: สีเขียว (LV\_PALETTE\_GREEN) - ปกติ
* Timer จำลองค่าแบตเตอรี่ลดลงทุก 500ms (ลดครั้งละ 1%)
* เมื่อถึง 0% ให้รีเซ็ตเป็น 100% (จำลองการชาร์จ)

```
┌──────────────────────────────────────┐
│         Battery Monitor              │
│                                      │
│   ████████████████░░░░░░  73%        │
│   [████████████████      ]           │
│                                      │
│         Status: Normal               │
└──────────────────────────────────────┘
```

**Hints:**

* ใช้ `lv_bar_set_value()` อัพเดทค่า
* ใช้ `lv_obj_set_style_bg_color()` กับ `LV_PART_INDICATOR` เปลี่ยนสี
* สร้าง status label ที่เปลี่ยนข้อความตาม level

***

#### Exercise 2: Audio Mixer - Volume Control with Slider & Bar

สร้าง Audio Mixer ที่มี Slider ควบคุม Volume เชื่อมกับ Bar แสดงระดับ:

**Requirements:**

* Slider สำหรับปรับ Volume (0-100)
* Bar แสดง Volume Level แบบ real-time
* Label แสดงค่า Volume ปัจจุบัน
* **เพิ่ม Mute button**: กดแล้ว volume เป็น 0, กดอีกทีกลับค่าเดิม
* สี bar เปลี่ยนตาม volume:
  * 0: สีเทา (Muted)
  * 1-70: สีเขียว (Normal)
  * 71-90: สีเหลือง (Loud)
  * 91-100: สีแดง (Clipping!)

```
┌──────────────────────────────────────┐
│          Volume Mixer                │
│                                      │
│   VOL  ═══════════●═══  [65%]        │
│   LEVEL ████████████░░░░             │
│                                      │
│          [  MUTE  ]                  │
│                                      │
│         Status: Normal               │
└──────────────────────────────────────┘
```

**Hints:**

* ใช้ `lv_slider_get_value()` ใน event callback
* สร้าง `lv_button_create()` สำหรับ Mute button
* เก็บ `last_volume` ใน static variable สำหรับ mute/unmute

***

#### Exercise 3: Multi-Channel Energy Meter (ท้าทาย)

สร้าง Energy Meter แสดงกำลังไฟฟ้า 3 เฟส:

**Requirements:**

* Bar 3 อัน สำหรับ Phase A, B, C (0-1000 Watt)
* แต่ละ Phase มี label แสดง Watt
* Bar ด้านล่างแสดง Total Power (ผลรวม 3 Phase)
* Timer จำลองค่า power ที่เปลี่ยนแปลง
* Color coding: < 300W Green, 300-700W Yellow, > 700W Red

```
┌──────────────────────────────────────┐
│        3-Phase Energy Meter          │
│                                      │
│   Phase A  ████████░░░░  450W        │
│   Phase B  ██████░░░░░░  320W        │
│   Phase C  ████████████  780W        │
│   ─────────────────────────          │
│   TOTAL    ██████████░░  1550W       │
└──────────────────────────────────────┘
```

***

### 7. References

* [LVGL Slider](https://docs.lvgl.io/9.2/widgets/slider.html)
* [LVGL Bar](https://docs.lvgl.io/9.2/widgets/bar.html)
* [lv\_example\_slider\_1.c](https://github.com/lvgl/lvgl/blob/release/v9.2/examples/widgets/slider/lv_example_slider_1.c)

***


# Arc Gauge

## Lab 2: Arc Widget (Circular Gauge)

***

### 1. โครงสร้างภาพรวมของ Lab

#### Why? - ทำไมต้องเรียนรู้เรื่องนี้

* **Circular Display**: แสดงค่าแบบวงกลมที่สวยงามและอ่านง่าย เหมาะกับ gauge แบบมืออาชีพ
* **Angular Data**: เหมาะอย่างยิ่งกับข้อมูลที่มีขอบเขต เช่น Gyroscope, Compass, Temperature, Speed
* **Space Efficient**: Arc ใช้พื้นที่แบบ compact กว่า bar แต่ให้ข้อมูลเท่ากัน
* **Dashboard UI**: Circular gauge เป็นองค์ประกอบหลักของ dashboard สมัยใหม่ทั้งในรถยนต์และ Smart Home

#### What? - จะได้เรียนรู้อะไร

1. **Arc Widget**: สร้าง circular gauge ด้วย `lv_arc_create()`
2. **Rotation & Angles**: กำหนดมุมเริ่มต้น, sweep angle (270 degree gauge)
3. **Arc Styling**: ปรับความหนา, สี background, สี indicator
4. **Center Label**: แสดงค่าตัวเลขตรงกลาง arc
5. **Timer Animation**: อัพเดทค่าแบบ smooth ด้วย timer

#### How? - จะทำอย่างไร

1. สร้าง Arc widget กำหนด rotation ที่ 135 degree (เริ่มจากล่างซ้าย)
2. ตั้งค่า background angles เป็น 0-270 degree (sweep 270 degree)
3. เพิ่ม label ตรงกลางแสดงค่าปัจจุบัน
4. ใช้ timer อัพเดทค่าจาก simulated sensor
5. ปรับ style ให้ดูเป็น professional gauge

<figure><img src="/files/4H6WLe3wtPkZGOTSPt6j" alt=""><figcaption></figcaption></figure>

***

### 2. หลักการทำงานและ Flowchart

#### 2.1 Arc Geometry (ระบบมุมของ LVGL)

```
┌─────────────────────────────────────────────────────────────┐
│                   ARC ANGLE SYSTEM (LVGL)                   │
├─────────────────────────────────────────────────────────────┤
│                                                             │
│    LVGL ใช้ระบบมุม clockwise จาก 3 o'clock:                   │
│                                                             │
│                    0 (3 o'clock)                            │
│                       │                                     │
│                       │                                     │
│    270 (12 o'clock)───●───90 (6 o'clock)                    │
│                       │                                     │
│                       │                                     │
│                   180 (9 o'clock)                           │
│                                                             │
│    *** สำคัญ: มุมเพิ่มตามเข็มนาฬิกา (CW) ***                      │
│                                                             │
│    Default rotation = 0  → เริ่มที่ 3 o'clock                   │
│    rotation = 135       → เริ่มที่ bottom-left                  │
│    rotation = 90        → เริ่มที่ 6 o'clock                    │
│                                                             │
└─────────────────────────────────────────────────────────────┘
```

#### 2.2 Gauge Configuration (270-degree sweep)

```
┌─────────────────────────────────────────────────────────────┐
│            270-DEGREE GAUGE CONFIGURATION                   │
├─────────────────────────────────────────────────────────────┤
│                                                             │
│    การตั้งค่า gauge แบบ 270 degree (เปิดด้านล่าง):                │
│                                                             │
│    lv_arc_set_rotation(arc, 135);      ← เริ่มที่ล่างซ้าย         │
│    lv_arc_set_bg_angles(arc, 0, 270);  ← sweep 270 degree   │
│                                                             │
│              MIN                  MAX                       │
│               \    ╭────────╮    /                          │
│                \  ╱          ╲  /                           │
│                 ╱   135 degC  ╲                             │
│                │    ┌─────┐    │                            │
│                │    │ 45  │    │                            │
│                │    │ degC│    │  ← Center label            │
│                │    └─────┘    │                            │
│                 ╲  ████████  ╱   ← Indicator (filled)       │
│                  ╲  ██████  ╱                               │
│                   ╰════╝╔══╯                                │
│                    GAP (90 degree at bottom)                │
│                                                             │
│    ████ = Indicator (ค่าปัจจุบัน)                               │
│    ──── = Background (ส่วนที่เหลือ)                             │
│                                                             │
└─────────────────────────────────────────────────────────────┘
```

#### 2.3 Arc Parts (สำหรับ styling)

```
┌─────────────────────────────────────────────────────────────┐
│                    ARC PARTS                                │
├─────────────────────────────────────────────────────────────┤
│                                                             │
│   LV_PART_MAIN       → พื้นหลัง (background track)             │
│   LV_PART_INDICATOR  → ส่วนที่แสดงค่า (filled arc)              │
│   LV_PART_KNOB       → จุดหมุน (ถ้ามี interactive)              │
│                                                             │
│                  ╭────────────╮                             │
│                ╱  ░░░░░░░░░░░░ ╲  ← LV_PART_MAIN (gray)     │
│               │ ░░░░░░░░░░░░░░ │                            │
│               │                │                            │
│               │ ████████       │  ← LV_PART_INDICATOR (blue)│
│                ╲ ██████████  ╱                              │
│                  ╰════●════╯      ← LV_PART_KNOB            │
│                                                             │
└─────────────────────────────────────────────────────────────┘
```

***

### 3. ฟังก์ชันสำคัญ (API Reference)

#### 3.1 Arc Creation & Configuration

<table><thead><tr><th width="299.241455078125">Function</th><th>Parameters</th><th>Description</th></tr></thead><tbody><tr><td><code>lv_arc_create(parent)</code></td><td>parent: lv_obj_t*</td><td>สร้าง arc widget</td></tr><tr><td><code>lv_arc_set_range(obj, min, max)</code></td><td>min, max: int32_t</td><td>กำหนดช่วงค่า</td></tr><tr><td><code>lv_arc_set_value(obj, val)</code></td><td>val: int32_t</td><td>ตั้งค่า indicator</td></tr><tr><td><code>lv_arc_get_value(obj)</code></td><td>-</td><td>อ่านค่าปัจจุบัน</td></tr></tbody></table>

#### 3.2 Angle & Rotation

<table><thead><tr><th width="340.03692626953125">Function</th><th>Parameters</th><th>Description</th></tr></thead><tbody><tr><td><code>lv_arc_set_rotation(obj, deg)</code></td><td>deg: int32_t</td><td>หมุนจุดเริ่มต้น (องศา)</td></tr><tr><td><code>lv_arc_set_bg_angles(obj, start, end)</code></td><td>start, end: uint32_t</td><td>กำหนดมุม background track</td></tr><tr><td><code>lv_arc_set_angles(obj, start, end)</code></td><td>start, end: uint32_t</td><td>กำหนดมุม indicator</td></tr><tr><td><code>lv_arc_set_mode(obj, mode)</code></td><td>mode: lv_arc_mode_t</td><td>NORMAL / REVERSE / SYMMETRICAL</td></tr></tbody></table>

#### 3.3 Arc Styling

<table><thead><tr><th width="421.75213623046875">Function / Property</th><th>Description</th></tr></thead><tbody><tr><td><code>lv_obj_set_size(arc, w, h)</code></td><td>ขนาด (ต้องเป็นสี่เหลี่ยมจัตุรัส w=h)</td></tr><tr><td><code>lv_obj_set_style_arc_width(obj, px, part)</code></td><td>ความหนาของ arc (pixels)</td></tr><tr><td><code>lv_obj_set_style_arc_color(obj, color, part)</code></td><td>สีของ arc</td></tr><tr><td><code>lv_obj_set_style_arc_rounded(obj, bool, part)</code></td><td>ปลาย arc โค้งมน</td></tr></tbody></table>

#### 3.4 Make Arc Non-Interactive (Gauge Mode)

```c
/* ลบ knob และ click ออก → เป็น gauge แสดงค่าอย่างเดียว */
lv_obj_remove_style(arc, NULL, LV_PART_KNOB);
lv_obj_remove_flag(arc, LV_OBJ_FLAG_CLICKABLE);
```

***

### 4. โค้ดตัวอย่าง (Step-by-Step Code)

#### 4.1 Step 1: Global Variables

```c
#include "lvgl.h"
#include <math.h>

/* ---- Global Widget Handles ---- */
static lv_obj_t * gauge_arc;        /* Arc หลัก */
static lv_obj_t * value_label;      /* Label ค่าตรงกลาง */
static lv_obj_t * unit_label;       /* Label หน่วย */
static lv_obj_t * min_label;        /* Label ค่า min */
static lv_obj_t * max_label;        /* Label ค่า max */
static lv_timer_t * sensor_timer;   /* Timer อัพเดท sensor */
```

#### 4.2 Step 2: Simulated Sensor Data

```c
/*
 * simulate_temperature() - จำลองค่าอุณหภูมิ
 * Range: 15-45 degC, เปลี่ยนแบบ smooth
 */
static int32_t simulate_temperature(void)
{
    static uint32_t tick = 0;
    tick++;

    /* Slow sine wave: center 30, amplitude 15 */
    float angle = (float)tick * 0.02f;
    int32_t temp = 30 + (int32_t)(15.0f * sinf(angle));

    /* Add small noise +/- 1 degree */
    temp += (lv_rand(0, 2) - 1);

    /* Clamp to range */
    if (temp < 15) temp = 15;
    if (temp > 45) temp = 45;

    return temp;
}
```

#### 4.3 Step 3: Timer Callback

```c
/*
 * sensor_timer_cb() - อัพเดทค่าทุก 200ms
 */
static void sensor_timer_cb(lv_timer_t * timer)
{
    (void)timer;

    int32_t temp = simulate_temperature();

    /* อัพเดท Arc value */
    lv_arc_set_value(gauge_arc, temp);

    /* อัพเดท Center label */
    lv_label_set_text_fmt(value_label, "%d", (int)temp);

    /* เปลี่ยนสี indicator ตามค่า */
    lv_color_t color;
    if (temp <= 20) {
        color = lv_palette_main(LV_PALETTE_BLUE);       /* เย็น */
    } else if (temp <= 35) {
        color = lv_palette_main(LV_PALETTE_GREEN);      /* ปกติ */
    } else {
        color = lv_palette_main(LV_PALETTE_RED);        /* ร้อน */
    }

    lv_obj_set_style_arc_color(gauge_arc, color, LV_PART_INDICATOR);
}
```

#### 4.4 Step 4: Main Function - สร้าง Gauge UI

```c
void part2_ex2_arc_gauge(void)
{
    /* ---- Background สีเข้ม ---- */
    lv_obj_set_style_bg_color(lv_screen_active(),
                               lv_color_hex(0x0f0f23), 0);

    /* ---- Title ---- */
    lv_obj_t * title = lv_label_create(lv_screen_active());
    lv_label_set_text(title, "Temperature Gauge");
    lv_obj_set_style_text_color(title, lv_color_hex(0x00d4ff), 0);
    lv_obj_set_style_text_font(title, &lv_font_montserrat_24, 0);
    lv_obj_align(title, LV_ALIGN_TOP_MID, 0, 8);

    /* ---- Arc Gauge ---- */
    gauge_arc = lv_arc_create(lv_screen_active());
    lv_obj_set_size(gauge_arc, 180, 180);
    lv_obj_align(gauge_arc, LV_ALIGN_CENTER, 0, 5);

    /* ตั้งค่า gauge 270 degree */
    lv_arc_set_rotation(gauge_arc, 135);
    lv_arc_set_bg_angles(gauge_arc, 0, 270);
    lv_arc_set_range(gauge_arc, 15, 45);
    lv_arc_set_value(gauge_arc, 30);

    /* ลบ knob ทำเป็น read-only gauge */
    lv_obj_remove_style(gauge_arc, NULL, LV_PART_KNOB);
    lv_obj_remove_flag(gauge_arc, LV_OBJ_FLAG_CLICKABLE);

    /* Styling: background track */
    lv_obj_set_style_arc_width(gauge_arc, 15, LV_PART_MAIN);
    lv_obj_set_style_arc_color(gauge_arc,
                                lv_color_hex(0x2d2d44), LV_PART_MAIN);

    /* Styling: indicator */
    lv_obj_set_style_arc_width(gauge_arc, 15, LV_PART_INDICATOR);
    lv_obj_set_style_arc_color(gauge_arc,
                                lv_palette_main(LV_PALETTE_GREEN),
                                LV_PART_INDICATOR);
    lv_obj_set_style_arc_rounded(gauge_arc, true, LV_PART_INDICATOR);

    /* ---- Center Value Label ---- */
    value_label = lv_label_create(gauge_arc);
    lv_label_set_text(value_label, "30");
    lv_obj_set_style_text_color(value_label, lv_color_white(), 0);
    lv_obj_set_style_text_font(value_label, &lv_font_montserrat_24, 0);
    lv_obj_center(value_label);

    /* ---- Unit Label ---- */
    unit_label = lv_label_create(gauge_arc);
    lv_label_set_text(unit_label, "degC");
    lv_obj_set_style_text_color(unit_label, lv_color_hex(0x888888), 0);
    lv_obj_align(unit_label, LV_ALIGN_CENTER, 0, 22);

    /* ---- Min/Max Labels ---- */
    min_label = lv_label_create(lv_screen_active());
    lv_label_set_text(min_label, "15");
    lv_obj_set_style_text_color(min_label, lv_color_hex(0x6666ff), 0);
    lv_obj_align_to(min_label, gauge_arc, LV_ALIGN_OUT_BOTTOM_LEFT, 20, -15);

    max_label = lv_label_create(lv_screen_active());
    lv_label_set_text(max_label, "45");
    lv_obj_set_style_text_color(max_label, lv_color_hex(0xff4444), 0);
    lv_obj_align_to(max_label, gauge_arc, LV_ALIGN_OUT_BOTTOM_RIGHT, -20, -15);

    /* ---- Status label ---- */
    lv_obj_t * status = lv_label_create(lv_screen_active());
    lv_label_set_text(status, "Live Monitoring");
    lv_obj_set_style_text_color(status, lv_color_hex(0x555555), 0);
    lv_obj_align(status, LV_ALIGN_BOTTOM_MID, 0, -8);

    /* ---- Timer: อัพเดททุก 200ms ---- */
    sensor_timer = lv_timer_create(sensor_timer_cb, 200, NULL);
}
```

#### 4.5 UI Layout Summary

```
┌──────────────────────────────────────┐
│         Temperature Gauge            │
│                                      │
│              ╭═══════╮               │
│            ╱ ░░░░░░░░░ ╲             │
│           │ ░░░░░░░░░░░ │            │
│           │     30      │            │
│           │    degC     │            │
│            ╲ ████████ ╱              │
│        15   ╰═══╝╔══╯  45            │
│                                      │
│          Live Monitoring             │
└──────────────────────────────────────┘
```

***

### 5. องค์ความรู้และเทคนิค

#### 5.1 Arc Size ต้องเป็นสี่เหลี่ยมจัตุรัส

```c
/* ถูกต้อง: Width = Height */
lv_obj_set_size(arc, 200, 200);   /* สี่เหลี่ยมจัตุรัส */

/* ผิด: Width != Height → arc จะบิดเบี้ยว */
lv_obj_set_size(arc, 200, 150);   /* ไม่แนะนำ */
```

#### 5.2 Common Rotation Patterns

```c
/* 270-degree gauge (เปิดด้านล่าง) - ยอดนิยม */
lv_arc_set_rotation(arc, 135);
lv_arc_set_bg_angles(arc, 0, 270);

/* 180-degree gauge (ครึ่งวงกลมบน) */
lv_arc_set_rotation(arc, 180);
lv_arc_set_bg_angles(arc, 0, 180);

/* 360-degree gauge (วงกลมเต็ม เริ่มจาก 12 นาฬิกา) */
lv_arc_set_rotation(arc, 270);
lv_arc_set_bg_angles(arc, 0, 360);
```

#### 5.3 Center Label Pattern

```c
/* วิธีที่ดีที่สุด: สร้าง label เป็น child ของ arc */
lv_obj_t * label = lv_label_create(arc);  /* parent = arc */
lv_obj_center(label);                      /* อยู่ตรงกลาง arc เสมอ */

/* ไม่แนะนำ: สร้างแยกแล้ว align_to */
lv_obj_t * label = lv_label_create(lv_screen_active());
lv_obj_align_to(label, arc, LV_ALIGN_CENTER, 0, 0);
/* ถ้าย้าย arc, label จะไม่ตามไป */
```

#### 5.4 Multiple Arcs (Nested Gauges)

```c
/* สร้าง arc ซ้อนกัน สำหรับแสดงหลายค่า */
lv_obj_t * outer = lv_arc_create(lv_screen_active());
lv_obj_set_size(outer, 200, 200);
lv_obj_set_style_arc_width(outer, 12, LV_PART_INDICATOR);

lv_obj_t * inner = lv_arc_create(lv_screen_active());
lv_obj_set_size(inner, 170, 170);   /* เล็กกว่า outer */
lv_obj_set_style_arc_width(inner, 12, LV_PART_INDICATOR);

lv_obj_align(outer, LV_ALIGN_CENTER, 0, 0);
lv_obj_align(inner, LV_ALIGN_CENTER, 0, 0);
```

#### 5.5 Color Zones ด้วย Multiple Indicator Colors

```c
/* Pattern: เปลี่ยนสี indicator ตามค่า
 * ใช้ในงาน speedometer, temperature gauge */
void update_arc_color_zone(lv_obj_t * arc, int32_t value,
                           int32_t yellow_threshold,
                           int32_t red_threshold)
{
    lv_color_t color;

    if (value < yellow_threshold) {
        color = lv_palette_main(LV_PALETTE_GREEN);
    } else if (value < red_threshold) {
        color = lv_palette_main(LV_PALETTE_YELLOW);
    } else {
        color = lv_palette_main(LV_PALETTE_RED);
    }

    lv_obj_set_style_arc_color(arc, color, LV_PART_INDICATOR);
}
```

#### 5.6 Performance Tips

```c
/* 1. Arc width ไม่ควรเกิน 30px (render ช้า) */
lv_obj_set_style_arc_width(arc, 15, LV_PART_INDICATOR);  /* OK */
lv_obj_set_style_arc_width(arc, 50, LV_PART_INDICATOR);  /* ช้า */

/* 2. ลด update rate ถ้าไม่ต้องการ real-time */
lv_timer_create(cb, 200, NULL);  /* 5 FPS เพียงพอสำหรับ temp */
lv_timer_create(cb, 50, NULL);   /* 20 FPS สำหรับ speedometer */

/* 3. ใช้ LV_ANIM_OFF ถ้า update ถี่มาก */
```

***

### 6. แบบฝึกหัด (Exercises)

#### Exercise 1: Speedometer (0-200 km/h)

สร้าง Speedometer ที่แสดงความเร็ว 0-200 km/h:

**Requirements:**

* Arc 270-degree gauge แสดงความเร็ว
* Center label แสดง "120 km/h" (ค่าปัจจุบัน)
* **3 Color zones** บน indicator:
  * 0-80 km/h: สีเขียว (Safe zone)
  * 81-140 km/h: สีเหลือง (Caution zone)
  * 141-200 km/h: สีแดง (Danger zone)
* Timer จำลองความเร็วที่เปลี่ยนแปลง (เร่ง/ลดสลับกัน)
* Min/Max labels ที่ขอบ gauge ("0" และ "200")

```
┌──────────────────────────────────────┐
│           Speedometer                │
│                                      │
│              ╭═══════╮               │
│            ╱ ████░░░░░ ╲             │
│           │ ████░░░░░░░ │            │
│           │    120      │            │
│           │    km/h     │            │
│            ╲ ████████ ╱              │
│        0    ╰═══╝╔══╯  200           │
│                                      │
└──────────────────────────────────────┘
```

**Hints:**

* `lv_arc_set_range(arc, 0, 200)`
* ใช้ `update_arc_color_zone()` pattern จาก Section 5.5
* จำลองความเร็ว: เริ่ม 0, เพิ่มทีละ 3-5, ถึง 200 แล้วลดกลับ

***

#### Exercise 2: Temperature Gauge with Animated Needle (-10 to 50 degC)

สร้าง Temperature Gauge ที่มี animation แบบ smooth:

**Requirements:**

* Arc 270-degree แสดงอุณหภูมิ -10 ถึง 50 degC
* Center label แสดงค่าอุณหภูมิ + unit
* **Line needle** ชี้ค่าปัจจุบัน (ใช้ `lv_line_create()`)
* Color zones ตามอุณหภูมิ:
  * -10 ถึง 5 degC: สีฟ้า (Cold)
  * 6 ถึง 35 degC: สีเขียว (Normal)
  * 36 ถึง 50 degC: สีแดง (Hot)
* Status label แสดง "Cold" / "Normal" / "Hot"
* Timer จำลองอุณหภูมิเปลี่ยนทุก 300ms

```
┌──────────────────────────────────────┐
│         Temperature Gauge            │
│                                      │
│              ╭═══════╮               │
│            ╱ ████████░ ╲             │
│           │ █████  ╱░░░ │            │
│           │    22 ╱     │ ← needle   │
│           │   degC      │            │
│            ╲ ████████ ╱              │
│       -10   ╰═══╝╔══╯  50            │
│                                      │
│          Status: Normal              │
└──────────────────────────────────────┘
```

**Hints:**

* Needle: ใช้ `lv_line_create()` กับ **static** point array
* คำนวณมุมเข็ม: `angle = 135 + (value - min) * 270 / (max - min)`
* ใช้ `sin()` / `cos()` คำนวณ endpoint ของ line
* อัพเดท line points ใน timer callback

***

### 7. References

* [LVGL Arc](https://docs.lvgl.io/9.2/widgets/arc.html)
* [lv\_example\_arc\_1.c](https://github.com/lvgl/lvgl/blob/release/v9.2/examples/widgets/arc/lv_example_arc_1.c)

***


# Chart Timeseries

## Lab 3: Chart Widget (Time-Series Data)

***

### 1. โครงสร้างภาพรวมของ Lab

#### Why? - ทำไมต้องเรียนรู้เรื่องนี้

* **Trend Analysis**: Chart แสดงแนวโน้มข้อมูลตามเวลา ทำให้เห็นรูปแบบที่ตัวเลขอย่างเดียวมองไม่เห็น
* **Multi-Sensor**: เปรียบเทียบข้อมูลจากหลาย sensor พร้อมกันบนกราฟเดียว
* **Real-time Monitoring**: ดู sensor data แบบ live scrolling เหมือน oscilloscope
* **Industry Standard**: Line chart เป็น visualization ที่ใช้มากที่สุดใน SCADA, DCS, และ IoT Dashboard

#### What? - จะได้เรียนรู้อะไร

1. **Chart Widget**: สร้าง line chart ด้วย `lv_chart_create()`
2. **Data Series**: เพิ่ม series หลายเส้นด้วย `lv_chart_add_series()`
3. **Auto-Scrolling**: ข้อมูลเลื่อนอัตโนมัติ (ring buffer) ด้วย `lv_chart_set_next_value()`
4. **Point Count**: กำหนดจำนวนจุดแสดงผล (50-100 จุดที่แนะนำ)
5. **Chart Styling**: ปรับ line width, ซ่อน data points, grid lines

#### How? - จะทำอย่างไร

1. สร้าง Chart widget กำหนด type เป็น `LV_CHART_TYPE_LINE`
2. เพิ่ม 3 series สำหรับ Accelerometer X, Y, Z
3. ใช้ timer อัพเดทข้อมูลทุก 100ms
4. จำลอง sine wave + noise เป็น accelerometer data
5. แสดง labels บอกค่าปัจจุบันของแต่ละ axis

<figure><img src="/files/LnVCMT8WhBTvurKcI4N7" alt=""><figcaption></figcaption></figure>

***

### 2. หลักการทำงานและ Flowchart

#### 2.1 Chart Data Flow (Ring Buffer)

```
┌─────────────────────────────────────────────────────────────┐
│                  CHART DATA FLOW                            │
├─────────────────────────────────────────────────────────────┤
│                                                             │
│   lv_chart_set_next_value() ทำงานแบบ Ring Buffer:           │
│                                                             │
│   Point Count = 8 (ตัวอย่าง)                                  │
│                                                             │
│   เวลา t=0:  [10][20][30][40][50][60][70][80]               │
│                                                             │
│   เวลา t=1:  [20][30][40][50][60][70][80][NEW]  ← เพิ่มขวา    │
│               └─── เลื่อนทั้งหมดไปซ้าย ───┘                      │
│                                                             │
│   เวลา t=2:  [30][40][50][60][70][80][85][NEW]              │
│                                                             │
│   *** ไม่ต้องจัดการ buffer เอง! LVGL จัดการให้ ***               │
│                                                             │
│   กราฟจะ scroll อัตโนมัติ เหมือน oscilloscope                   │
│                                                             │
└─────────────────────────────────────────────────────────────┘
```

#### 2.2 Multiple Series Display

```
┌─────────────────────────────────────────────────────────────┐
│                 MULTI-SERIES CHART                          │
├─────────────────────────────────────────────────────────────┤
│                                                             │
│   Y-axis                                                    │
│   1000 ┤                                                    │
│    800 ┤  ─── X (Red)                                       │
│    600 ┤  ─── Y (Green)           ╱╲                        │
│    400 ┤  ─── Z (Blue)          ╱    ╲      ╱╲              │
│    200 ┤                  ╱╲  ╱        ╲  ╱    ╲            │
│      0 ┤────────────────╱──╲╱──────────╲╱──────╲──► Time    │
│   -200 ┤             ╱╲                                     │
│   -400 ┤           ╱    ╲                                   │
│   -600 ┤         ╱        ╲                                 │
│   -800 ┤                                                    │
│  -1000 ┤                                                    │
│         ├───┬───┬───┬───┬───┬───┬───┬───┬───┬───┤           │
│         0   10  20  30  40  50  60  70  80  90 100          │
│                    Point Index (time)                       │
│                                                             │
│   แต่ละ series มี buffer แยก, อัพเดทพร้อมกัน                     │
│                                                             │
└─────────────────────────────────────────────────────────────┘
```

#### 2.3 Sensor Data Scaling

```
┌─────────────────────────────────────────────────────────────┐
│               ACCELEROMETER DATA SCALING                    │
├─────────────────────────────────────────────────────────────┤
│                                                             │
│   Accelerometer Output:                                     │
│   - Range: -2g to +2g                                       │
│   - Resolution: float (m/s^2)                               │
│   - Example: ax = 1.23 m/s^2                                │
│                                                             │
│   LVGL Chart ใช้ int (lv_chart_set_next_value):              │
│   - ต้องแปลง float → int                                     │
│   - คูณ 100 เพื่อรักษาทศนิยม 2 ตำแหน่ง                            │
│                                                             │
│   ax_raw = 1.23 m/s^2                                       │
│         │                                                   │
│         ▼                                                   │
│   ax_int = (int)(1.23 * 100) = 123                          │
│         │                                                   │
│         ▼                                                   │
│   lv_chart_set_next_value(chart, ser_x, 123)                │
│         │                                                   │
│         ▼                                                   │
│   Chart Y-axis range: -2000 to +2000                        │
│   (= -20.00 to +20.00 m/s^2)                                │
│                                                             │
└─────────────────────────────────────────────────────────────┘
```

***

### 3. ฟังก์ชันสำคัญ (API Reference)

#### 3.1 Chart Creation & Type

<table><thead><tr><th width="368.63067626953125">Function</th><th width="245.00146484375">Parameters</th><th>Description</th></tr></thead><tbody><tr><td><code>lv_chart_create(parent)</code></td><td>parent: lv_obj_t*</td><td>สร้าง chart widget</td></tr><tr><td><code>lv_chart_set_type(chart, type)</code></td><td>type: lv_chart_type_t</td><td>LINE, BAR, SCATTER</td></tr><tr><td><code>lv_chart_set_point_count(chart, cnt)</code></td><td>cnt: uint32_t</td><td>จำนวนจุดที่แสดง (แนะนำ 50-100)</td></tr><tr><td><code>lv_chart_set_range(chart, axis, min, max)</code></td><td>axis: LV_CHART_AXIS_PRIMARY_Y</td><td>กำหนดช่วง Y-axis</td></tr></tbody></table>

#### 3.2 Data Series

<table><thead><tr><th width="364.52911376953125">Function</th><th>Parameters</th><th>Description</th></tr></thead><tbody><tr><td><code>lv_chart_add_series(chart, color, axis)</code></td><td>color, axis</td><td>เพิ่ม data series ใหม่</td></tr><tr><td><code>lv_chart_set_next_value(chart, ser, val)</code></td><td>ser, val: int32_t</td><td>เพิ่มจุดใหม่ (auto-scroll)</td></tr><tr><td><code>lv_chart_set_all_value(chart, ser, val)</code></td><td>ser, val: int32_t</td><td>ตั้งทุกจุดเป็นค่าเดียวกัน</td></tr><tr><td><code>lv_chart_refresh(chart)</code></td><td>-</td><td>บังคับ redraw chart</td></tr></tbody></table>

#### 3.3 Chart Styling

| Function                                                  | Description                          |
| --------------------------------------------------------- | ------------------------------------ |
| `lv_obj_set_style_line_width(chart, px, LV_PART_ITEMS)`   | ความหนาเส้น                          |
| `lv_obj_set_style_size(chart, 0, 0, LV_PART_INDICATOR)`   | ซ่อน data point dots                 |
| `lv_chart_set_div_line_count(chart, h, v)`                | จำนวนเส้น grid (h=แนวนอน, v=แนวตั้ง) |
| `lv_obj_set_style_line_color(chart, color, LV_PART_MAIN)` | สีเส้น grid                          |
| `lv_obj_set_style_line_opa(chart, opa, LV_PART_MAIN)`     | ความโปร่งใสของ grid                  |

#### 3.4 Chart Axis

| Function                                                                                       | Description      |
| ---------------------------------------------------------------------------------------------- | ---------------- |
| `lv_chart_set_range(chart, LV_CHART_AXIS_PRIMARY_Y, min, max)`                                 | กำหนดช่วง Y ซ้าย |
| `lv_chart_set_range(chart, LV_CHART_AXIS_SECONDARY_Y, min, max)`                               | กำหนดช่วง Y ขวา  |
| `lv_chart_set_axis_tick(chart, axis, major_len, minor_len, major_cnt, minor_cnt, draw_labels)` | ตั้ง tick marks  |

***

### 4. โค้ดตัวอย่าง (Step-by-Step Code)

#### 4.1 Step 1: Global Variables

```c
#include "lvgl.h"
#include <math.h>

/* ---- Chart Handles ---- */
static lv_obj_t * accel_chart;          /* Chart widget */
static lv_chart_series_t * ser_x;       /* Series X (Red) */
static lv_chart_series_t * ser_y;       /* Series Y (Green) */
static lv_chart_series_t * ser_z;       /* Series Z (Blue) */

/* ---- Labels ---- */
static lv_obj_t * x_label;
static lv_obj_t * y_label;
static lv_obj_t * z_label;

/* ---- Timer ---- */
static lv_timer_t * chart_timer;

/* ---- Constants ---- */
#define CHART_POINT_COUNT   80    /* จำนวนจุดที่แสดง */
#define SCALE_FACTOR        100   /* x100 สำหรับแปลง float->int */
#define Y_RANGE             1500  /* +/- 15.00 m/s^2 */
```

#### 4.2 Step 2: Simulated Accelerometer Data

```c
/*
 * simulate_accel() - จำลองข้อมูล accelerometer 3 แกน
 *
 * X: sine wave (การเคลื่อนที่ซ้าย-ขวา)
 * Y: cosine wave (การเคลื่อนที่หน้า-หลัง)
 * Z: ค่าคงที่ ~981 (gravity) + noise
 *
 * Output: int32_t ที่คูณ 100 แล้ว (เช่น 981 = 9.81 m/s^2)
 */
static void simulate_accel(int32_t * ax, int32_t * ay, int32_t * az)
{
    static uint32_t tick = 0;
    tick++;

    float t = (float)tick * 0.08f;

    /* X-axis: sine wave, amplitude 5 m/s^2 */
    *ax = (int32_t)(500.0f * sinf(t));
    *ax += (lv_rand(0, 40) - 20);  /* noise +/- 0.20 */

    /* Y-axis: cosine wave, amplitude 3 m/s^2 */
    *ay = (int32_t)(300.0f * cosf(t * 0.7f));
    *ay += (lv_rand(0, 30) - 15);

    /* Z-axis: gravity (9.81 m/s^2 = 981) + vibration */
    *az = 981 + (int32_t)(50.0f * sinf(t * 3.0f));
    *az += (lv_rand(0, 20) - 10);
}
```

#### 4.3 Step 3: Timer Callback

```c
/*
 * chart_timer_cb() - อัพเดท chart ทุก 100ms
 */
static void chart_timer_cb(lv_timer_t * timer)
{
    (void)timer;

    int32_t ax, ay, az;
    simulate_accel(&ax, &ay, &az);

    /* เพิ่มจุดใหม่ให้แต่ละ series (auto-scroll) */
    lv_chart_set_next_value(accel_chart, ser_x, ax);
    lv_chart_set_next_value(accel_chart, ser_y, ay);
    lv_chart_set_next_value(accel_chart, ser_z, az);

    /* อัพเดท labels แสดงค่าปัจจุบัน */
    lv_label_set_text_fmt(x_label, "X: %d.%02d",
                          (int)(ax / 100), abs((int)(ax % 100)));
    lv_label_set_text_fmt(y_label, "Y: %d.%02d",
                          (int)(ay / 100), abs((int)(ay % 100)));
    lv_label_set_text_fmt(z_label, "Z: %d.%02d",
                          (int)(az / 100), abs((int)(az % 100)));
}
```

#### 4.4 Step 4: Main Function - สร้าง Chart UI

```c
void part2_ex3_chart_timeseries(void)
{
    /* ---- Background ---- */
    lv_obj_set_style_bg_color(lv_screen_active(),
                               lv_color_hex(0x0a0a1a), 0);

    /* ---- Title ---- */
    lv_obj_t * title = lv_label_create(lv_screen_active());
    lv_label_set_text(title, "Accelerometer Monitor");
    lv_obj_set_style_text_color(title, lv_color_hex(0x00d4ff), 0);
    lv_obj_set_style_text_font(title, &lv_font_montserrat_24, 0);
    lv_obj_align(title, LV_ALIGN_TOP_MID, 0, 5);

    /* ---- Chart ---- */
    accel_chart = lv_chart_create(lv_screen_active());
    lv_obj_set_size(accel_chart, 280, 140);
    lv_obj_align(accel_chart, LV_ALIGN_CENTER, 0, -10);

    /* ตั้งค่า Chart */
    lv_chart_set_type(accel_chart, LV_CHART_TYPE_LINE);
    lv_chart_set_point_count(accel_chart, CHART_POINT_COUNT);
    lv_chart_set_range(accel_chart, LV_CHART_AXIS_PRIMARY_Y,
                       -Y_RANGE, Y_RANGE);

    /* Grid lines */
    lv_chart_set_div_line_count(accel_chart, 5, 8);
    lv_obj_set_style_line_color(accel_chart,
                                 lv_color_hex(0x333355), LV_PART_MAIN);
    lv_obj_set_style_line_opa(accel_chart, LV_OPA_50, LV_PART_MAIN);

    /* Chart background */
    lv_obj_set_style_bg_color(accel_chart,
                               lv_color_hex(0x111122), 0);
    lv_obj_set_style_border_color(accel_chart,
                                   lv_color_hex(0x333355), 0);

    /* Line width (ความหนาเส้นกราฟ) */
    lv_obj_set_style_line_width(accel_chart, 2, LV_PART_ITEMS);

    /* ซ่อน data point dots */
    lv_obj_set_style_size(accel_chart, 0, 0, LV_PART_INDICATOR);

    /* ---- เพิ่ม 3 Series ---- */
    ser_x = lv_chart_add_series(accel_chart,
                lv_palette_main(LV_PALETTE_RED),
                LV_CHART_AXIS_PRIMARY_Y);

    ser_y = lv_chart_add_series(accel_chart,
                lv_palette_main(LV_PALETTE_GREEN),
                LV_CHART_AXIS_PRIMARY_Y);

    ser_z = lv_chart_add_series(accel_chart,
                lv_palette_main(LV_PALETTE_BLUE),
                LV_CHART_AXIS_PRIMARY_Y);

    /* เริ่มต้นค่า 0 ทุกจุด */
    lv_chart_set_all_value(accel_chart, ser_x, 0);
    lv_chart_set_all_value(accel_chart, ser_y, 0);
    lv_chart_set_all_value(accel_chart, ser_z, 981);

    /* ---- Legend Labels ---- */
    x_label = lv_label_create(lv_screen_active());
    lv_label_set_text(x_label, "X: 0.00");
    lv_obj_set_style_text_color(x_label,
                                 lv_palette_main(LV_PALETTE_RED), 0);
    lv_obj_align(x_label, LV_ALIGN_BOTTOM_LEFT, 15, -10);

    y_label = lv_label_create(lv_screen_active());
    lv_label_set_text(y_label, "Y: 0.00");
    lv_obj_set_style_text_color(y_label,
                                 lv_palette_main(LV_PALETTE_GREEN), 0);
    lv_obj_align(y_label, LV_ALIGN_BOTTOM_MID, 0, -10);

    z_label = lv_label_create(lv_screen_active());
    lv_label_set_text(z_label, "Z: 9.81");
    lv_obj_set_style_text_color(z_label,
                                 lv_palette_main(LV_PALETTE_BLUE), 0);
    lv_obj_align(z_label, LV_ALIGN_BOTTOM_RIGHT, -15, -10);

    /* ---- Timer: อัพเดททุก 100ms ---- */
    chart_timer = lv_timer_create(chart_timer_cb, 100, NULL);
}
```

#### 4.5 UI Layout

```
┌──────────────────────────────────────┐
│       Accelerometer Monitor          │
│                                      │
│  ┌──────────────────────────────┐    │
│  │  1500 ┤     ╱╲               │    │
│  │  1000 ┤───╱──╲──────────Z    │    │
│  │   500 ┤ ╱      ╲     ╱╲      │    │
│  │     0 ┤╱────────╲──╱──╲──X   │    │
│  │  -500 ┤          ╲╱    ╲Y    │    │
│  │ -1000 ┤                      │    │
│  │ -1500 ┤                      │    │
│  └──────────────────────────────┘    │
│                                      │
│  X: 3.42    Y: -1.87    Z: 9.81      │
└──────────────────────────────────────┘
```

***

### 5. องค์ความรู้และเทคนิค

#### 5.1 Point Count Guidelines

| Application    | Points  | Update Rate | Notes                 |
| -------------- | ------- | ----------- | --------------------- |
| Temperature    | 50-100  | 1-5 sec     | ช้า, ดูแนวโน้ม        |
| Accelerometer  | 80-150  | 50-100ms    | กลาง, ดู vibration    |
| Audio Waveform | 200-500 | 10-20ms     | เร็ว, ดูรูปคลื่น      |
| Power Meter    | 60-120  | 1 sec       | กลาง, ดู load pattern |

> **สำคัญ**: point\_count ยิ่งมาก ยิ่งใช้ RAM มาก แต่ละ series ใช้ `point_count * sizeof(lv_coord_t)` bytes

#### 5.2 Float to Int Conversion Pattern

```c
/* Pattern มาตรฐานสำหรับ embedded chart */

/* 1. กำหนด scale factor */
#define SCALE  100  /* ทศนิยม 2 ตำแหน่ง */

/* 2. แปลง float → int ก่อนเก็บ */
float sensor_value = 3.14f;
int32_t chart_value = (int32_t)(sensor_value * SCALE);  /* 314 */

/* 3. ส่งค่า int ให้ chart */
lv_chart_set_next_value(chart, series, chart_value);

/* 4. แสดงผลกลับเป็น float ที่ label */
lv_label_set_text_fmt(label, "%d.%02d",
                      chart_value / SCALE,
                      abs(chart_value % SCALE));

/* หมายเหตุ: abs() จำเป็นสำหรับค่าลบ
 * -314 / 100 = -3, -314 % 100 = -14
 * ต้องแสดง "-3.14" ไม่ใช่ "-3.-14" */
```

#### 5.3 ซ่อน Data Points (Clean Lines)

```c
/* Default: มี dot ที่ทุกจุด → ดูรก */
/* ซ่อน dot ให้เหลือแค่เส้น */
lv_obj_set_style_size(chart, 0, 0, LV_PART_INDICATOR);

/* ถ้าต้องการแสดงเฉพาะจุดสุดท้าย: ทำไม่ได้โดยตรง
 * ต้อง custom draw event (ระดับ advanced) */
```

#### 5.4 Y-Range Auto vs Fixed

```c
/* Fixed range (แนะนำ สำหรับ known sensor range) */
lv_chart_set_range(chart, LV_CHART_AXIS_PRIMARY_Y, -2000, 2000);
/* ดี: stable display, ไม่กระตุก
 * เสีย: ถ้าค่าเปลี่ยนน้อยจะเห็นเป็นเส้นตรง */

/* Auto-range (ต้องทำเอง ไม่มี built-in) */
static int32_t y_min = INT32_MAX, y_max = INT32_MIN;
void auto_range_update(int32_t value) {
    if (value < y_min) y_min = value;
    if (value > y_max) y_max = value;
    int32_t margin = (y_max - y_min) / 10;  /* 10% margin */
    lv_chart_set_range(chart, LV_CHART_AXIS_PRIMARY_Y,
                       y_min - margin, y_max + margin);
}
```

#### 5.5 Pause/Resume Chart

```c
/* Pattern: Pause/Resume ด้วย timer control */
static bool is_paused = false;

void toggle_pause(void) {
    is_paused = !is_paused;
    if (is_paused) {
        lv_timer_pause(chart_timer);
    } else {
        lv_timer_resume(chart_timer);
    }
}
```

#### 5.6 Performance Optimization

```c
/* 1. ลด point count (ลด memory + render time) */
lv_chart_set_point_count(chart, 60);  /* ไม่เกิน 150 */

/* 2. ลด update rate */
lv_timer_create(cb, 200, NULL);  /* 5 FPS แทน 10 FPS */

/* 3. ใช้ LV_CHART_UPDATE_MODE_SHIFT (default, ดีอยู่แล้ว) */
lv_chart_set_update_mode(chart, LV_CHART_UPDATE_MODE_SHIFT);

/* 4. ซ่อน data points (ลด render ถ้ามี 100+ จุด) */
lv_obj_set_style_size(chart, 0, 0, LV_PART_INDICATOR);
```

***

### 6. แบบฝึกหัด (Exercises)

#### Exercise 1: Dual-Axis Environmental Chart (Temperature + Humidity)

สร้าง Chart แสดง Temperature และ Humidity พร้อม Legend:

**Requirements:**

* Chart แบบ LINE แสดง 2 series
* **Temperature** (Primary Y-axis): range 0-50 degC, สีแดง
* **Humidity** (Secondary Y-axis): range 0-100%, สีฟ้า
* Point count: 60 จุด (แสดง 1 นาทีที่ 1 จุด/วินาที)
* **Legend box** แสดงสีและชื่อ series
* Labels แสดงค่าปัจจุบันของ Temp และ Humidity
* Timer จำลองค่าที่เปลี่ยนแปลง (ทุก 1 วินาที)

```
┌──────────────────────────────────────┐
│     Environment Monitor              │
│                                      │
│  50degC ┌───────────────────┐ 100%   │
│         │  ╱╲    Temp ───   │        │
│         │ ╱  ╲  Humid ---   │        │
│         │╱    ╲─────╲       │        │
│         │      ╲     ╲──    │        │
│  0degC  └───────────────────┘ 0%     │
│                                      │
│  ■ Temp: 28 degC  ■ Humid: 65%       │
└──────────────────────────────────────┘
```

**Hints:**

* ใช้ `LV_CHART_AXIS_PRIMARY_Y` สำหรับ Temp, `LV_CHART_AXIS_SECONDARY_Y` สำหรับ Humidity
* สร้าง legend ด้วย container + label + color rectangle

***

#### Exercise 2: Chart with Auto-Scaling Y-Axis and Grid Lines

สร้าง Chart ที่ Y-axis ปรับ range อัตโนมัติตามข้อมูล:

**Requirements:**

* Chart แสดง 1 series (Vibration data)
* **Auto-scaling**: Y-axis ปรับ min/max ตามข้อมูลจริง + 10% margin
* Grid lines: 5 แนวนอน, 10 แนวตั้ง
* **Y-axis labels** แสดง min/max value ปัจจุบัน
* Point count: 100 จุด
* Timer จำลอง vibration data (sine + random amplitude)
* เพิ่ม **Pause/Resume** button

```
┌──────────────────────────────────────┐
│    Vibration Analyzer                │
│                                      │
│  +523 ┌──────────────────────┐       │
│       │  ╱╲  ╱╲  ╱╲          │       │
│     0 │─╱──╲╱──╲╱──╲─────────│       │
│       │              ╲╱╲  ╱╲ │       │
│  -489 └───────────────────╲╱─┘       │
│                                      │
│  Current: 234   [PAUSE]              │
└──────────────────────────────────────┘
```

**Hints:**

* ติดตาม y\_min, y\_max ใน timer callback
* ใช้ `lv_chart_set_range()` ทุกรอบ update
* Reset y\_min/y\_max ทุก N samples เพื่อให้ range ลดลงได้

***

### 7. References

* [LVGL Chart](https://docs.lvgl.io/9.2/widgets/chart.html)
* [lv\_example\_chart\_1.c](https://github.com/lvgl/lvgl/blob/release/v9.2/examples/widgets/chart/lv_example_chart_1.c)

***


# Scale Temperature

## Lab 4: Scale Widget (Temperature Gauge)

***

### 1. โครงสร้างภาพรวมของ Lab

#### Why? - ทำไมต้องเรียนรู้เรื่องนี้

* **Professional Gauge**: Scale widget สร้างเครื่องมือวัดที่ดูเหมือนเครื่องมือจริง มี tick marks และ labels
* **Color Zones**: แสดง warning zones ด้วยสี (blue=cold, green=normal, red=hot) ซึ่งเป็นมาตรฐานในอุตสาหกรรม
* **Needle Display**: เข็มชี้ค่าปัจจุบันเหมือน analog gauge ดั้งเดิม
* **Multiple Modes**: ใช้ได้ทั้งแบบ vertical (thermometer) และ round (pressure gauge)
* **Industry Standard**: Scale/Gauge เป็นองค์ประกอบหลักของ SCADA, HMI, และ BMS (Building Management System)

#### What? - จะได้เรียนรู้อะไร

1. **Scale Widget**: สร้าง gauge ด้วย `lv_scale_create()`
2. **Tick Marks**: กำหนด total ticks, major tick interval, tick length
3. **Scale Sections**: เพิ่ม color zones (blue, green, red)
4. **Needle Line**: สร้างเข็มชี้ด้วย `lv_line_create()` บน scale
5. **Scale Modes**: HORIZONTAL, VERTICAL, ROUND\_INNER, ROUND\_OUTER

#### How? - จะทำอย่างไร

1. สร้าง Scale widget ในโหมด `LV_SCALE_MODE_ROUND_OUTER`
2. กำหนด tick count, major tick interval, label format
3. เพิ่ม 3 sections สำหรับ color zones
4. สร้าง needle line ชี้ค่าปัจจุบัน
5. ใช้ timer อัพเดทค่าจาก simulated sensor

<figure><img src="/files/4kvlWO80Jf3Y3w5PZuvr" alt=""><figcaption></figcaption></figure>

***

### 2. หลักการทำงานและ Flowchart

#### 2.1 Scale Anatomy

```
┌─────────────────────────────────────────────────────────────┐
│                    SCALE ANATOMY                            │
├─────────────────────────────────────────────────────────────┤
│                                                             │
│   ROUND_OUTER Mode (Gauge):                                 │
│                                                             │
│              Labels (ตัวเลข)                                 │
│                 │                                           │
│                 ▼                                           │
│           0    10    20    30    40    50                   │
│          ╭─┬─┬─┬──┬─┬─┬──┬─┬─┬──┬─┬─╮                       │
│         ╱  │ │ │  │ │ │  │ │ │  │ │ │╲                      │
│        │   │ │ │  │ │ │  │ │ │  │ │ │ │                     │
│        │   │     │         │   │      │                     │
│        │  Minor  │  Major  │  Minor   │                     │
│        │  Ticks  │  Ticks  │  Ticks   │                     │
│        │         │         │          │                     │
│        │         │  NEEDLE │          │                     │
│        │         │    ╲    │          │                     │
│         ╲        │     ●──────────   ╱                      │
│          ╰───────┴──────────────────╯                       │
│                                                             │
│   Major Tick: ยาว, มี label ตัวเลข                            │
│   Minor Tick: สั้น, ไม่มี label                                 │
│   Needle: เข็มชี้ค่า (lv_line widget)                           │
│                                                             │
└─────────────────────────────────────────────────────────────┘
```

#### 2.2 Scale Modes

```
┌─────────────────────────────────────────────────────────────┐
│                   SCALE MODES                               │
├─────────────────────────────────────────────────────────────┤
│                                                             │
│   1. LV_SCALE_MODE_HORIZONTAL (แนวนอน)                      │
│      0───────10───────20───────30───────40                  │
│      |||  ||||  ||||  ||||  ||||                            │
│                                                             │
│   2. LV_SCALE_MODE_VERTICAL (แนวตั้ง - thermometer)           │
│      40 ─┤                                                  │
│         ─┤                                                  │
│      30 ─┤                                                  │
│         ─┤                                                  │
│      20 ─┤                                                  │
│         ─┤                                                  │
│      10 ─┤                                                  │
│         ─┤                                                  │
│       0 ─┤                                                  │
│                                                             │
│   3. LV_SCALE_MODE_ROUND_OUTER (gauge - ticks ด้านนอก)       │
│           ╭──┬──╮                                           │
│          ╱ 0  50 ╲                                          │
│         │ ┤    ├  │                                         │
│          ╲ ┤  ├  ╱                                          │
│           ╰──┴──╯                                           │
│                                                             │
│   4. LV_SCALE_MODE_ROUND_INNER (gauge - ticks ด้านใน)        │
│           ╭──────╮                                          │
│          ╱  ├  ├  ╲                                         │
│         │  0    50 │                                        │
│          ╲  ├  ├  ╱                                         │
│           ╰──────╯                                          │
│                                                             │
└─────────────────────────────────────────────────────────────┘
```

#### 2.3 Color Sections (Temperature Zones)

```
┌─────────────────────────────────────────────────────────────┐
│                  COLOR SECTIONS                             │
├─────────────────────────────────────────────────────────────┤
│                                                             │
│   Temperature Gauge (-10 to 50 degC):                       │
│                                                             │
│   Section 1: COLD (Blue)     -10 to 10 degC                 │
│   Section 2: NORMAL (Green)   10 to 35 degC                 │
│   Section 3: HOT (Red)        35 to 50 degC                 │
│                                                             │
│           -10    10     35    50                            │
│           ╭──────┬──────┬──────╮                            │
│          ╱ BLUE  │GREEN │ RED   ╲                           │
│         │ ██████ │██████│██████ │                           │
│         │  COLD  │NORMAL│ HOT   │                           │
│          ╲ ██████│██████│█████ ╱                            │
│           ╰──────┴──────┴─────╯                             │
│                                                             │
│   lv_scale_section_t * sec1, * sec2, * sec3;                │
│   sec1 = lv_scale_add_section(scale);                       │
│   lv_scale_section_set_range(sec1, -10, 10);                │
│   lv_scale_section_set_style(sec1, LV_PART_INDICATOR, &s);  │
│                                                             │
└─────────────────────────────────────────────────────────────┘
```

***

### 3. ฟังก์ชันสำคัญ (API Reference)

#### 3.1 Scale Creation & Range

<table><thead><tr><th width="374.41546630859375">Function</th><th width="159.068115234375">Parameters</th><th>Description</th></tr></thead><tbody><tr><td><code>lv_scale_create(parent)</code></td><td>parent: lv_obj_t*</td><td>สร้าง scale widget</td></tr><tr><td><code>lv_scale_set_mode(scale, mode)</code></td><td>mode: lv_scale_mode_t</td><td>HORIZONTAL/VERTICAL/ROUND_INNER/ROUND_OUTER</td></tr><tr><td><code>lv_scale_set_range(scale, min, max)</code></td><td>min, max: int32_t</td><td>กำหนดช่วงค่า</td></tr><tr><td><code>lv_scale_set_total_tick_count(scale, cnt)</code></td><td>cnt: uint32_t</td><td>จำนวน tick ทั้งหมด</td></tr><tr><td><code>lv_scale_set_major_tick_every(scale, nth)</code></td><td>nth: uint32_t</td><td>ทุกกี่ tick เป็น major</td></tr></tbody></table>

#### 3.2 Tick Configuration

<table><thead><tr><th width="445.6512451171875">Function</th><th width="125.538330078125">Parameters</th><th>Description</th></tr></thead><tbody><tr><td><code>lv_scale_set_label_show(scale, show)</code></td><td>show: bool</td><td>แสดง/ซ่อน labels</td></tr><tr><td><code>lv_obj_set_style_length(scale, px, LV_PART_INDICATOR)</code></td><td>px: int32_t</td><td>ความยาว major tick</td></tr><tr><td><code>lv_obj_set_style_length(scale, px, LV_PART_ITEMS)</code></td><td>px: int32_t</td><td>ความยาว minor tick</td></tr></tbody></table>

#### 3.3 Round Scale Angles

<table><thead><tr><th width="337.757080078125">Function</th><th>Parameters</th><th>Description</th></tr></thead><tbody><tr><td><code>lv_scale_set_rotation(scale, deg)</code></td><td>deg: int32_t</td><td>มุมเริ่มต้น (เช่น 135)</td></tr><tr><td><code>lv_scale_set_angle_range(scale, deg)</code></td><td>deg: uint32_t</td><td>sweep angle (เช่น 270)</td></tr></tbody></table>

#### 3.4 Scale Sections (Color Zones)

<table><thead><tr><th width="400.19677734375">Function</th><th width="182.9361572265625">Parameters</th><th>Description</th></tr></thead><tbody><tr><td><code>lv_scale_add_section(scale)</code></td><td>-</td><td>สร้าง section ใหม่ (return pointer)</td></tr><tr><td><code>lv_scale_section_set_range(sec, min, max)</code></td><td>min, max: int32_t</td><td>กำหนดช่วงค่าของ section</td></tr><tr><td><code>lv_scale_section_set_style(sec, part, style)</code></td><td>part, style</td><td>กำหนด style สำหรับ section</td></tr></tbody></table>

***

### 4. โค้ดตัวอย่าง (Step-by-Step Code)

#### 4.1 Step 1: Global Variables และ Styles

```c
#include "lvgl.h"
#include <math.h>

/* ---- Widget Handles ---- */
static lv_obj_t * temp_scale;        /* Scale widget */
static lv_obj_t * needle_line;       /* Needle (lv_line) */
static lv_obj_t * value_label;       /* Center value label */
static lv_obj_t * status_label;      /* Status text */
static lv_timer_t * temp_timer;      /* Update timer */

/* ---- Needle points (ต้องเป็น static!) ---- */
static lv_point_precise_t needle_points[2];

/* ---- Section Styles ---- */
static lv_style_t style_cold;        /* Blue zone */
static lv_style_t style_normal;      /* Green zone */
static lv_style_t style_hot;         /* Red zone */

/* ---- Constants ---- */
#define TEMP_MIN        (-10)
#define TEMP_MAX        50
#define SCALE_SIZE      200           /* ขนาด scale (pixels) */
#define NEEDLE_LENGTH   75            /* ความยาวเข็ม */
```

#### 4.2 Step 2: Initialize Section Styles

```c
/*
 * init_section_styles() - สร้าง style สำหรับแต่ละ color zone
 *
 * ต้องเรียกก่อนสร้าง scale sections
 */
static void init_section_styles(void)
{
    /* Cold zone: Blue */
    lv_style_init(&style_cold);
    lv_style_set_arc_color(&style_cold,
                            lv_palette_main(LV_PALETTE_BLUE));
    lv_style_set_line_color(&style_cold,
                             lv_palette_main(LV_PALETTE_BLUE));
    lv_style_set_arc_width(&style_cold, 6);

    /* Normal zone: Green */
    lv_style_init(&style_normal);
    lv_style_set_arc_color(&style_normal,
                            lv_palette_main(LV_PALETTE_GREEN));
    lv_style_set_line_color(&style_normal,
                             lv_palette_main(LV_PALETTE_GREEN));
    lv_style_set_arc_width(&style_normal, 6);

    /* Hot zone: Red */
    lv_style_init(&style_hot);
    lv_style_set_arc_color(&style_hot,
                            lv_palette_main(LV_PALETTE_RED));
    lv_style_set_line_color(&style_hot,
                             lv_palette_main(LV_PALETTE_RED));
    lv_style_set_arc_width(&style_hot, 6);
}
```

#### 4.3 Step 3: Needle Update Function

```c
/*
 * update_needle_position() - คำนวณตำแหน่งเข็มจากค่า temperature
 *
 * มุมเข็ม = rotation + (value - min) / (max - min) * angle_range
 * rotation = 135, angle_range = 270
 */
static void update_needle_position(int32_t temp)
{
    /* Clamp to range */
    if (temp < TEMP_MIN) temp = TEMP_MIN;
    if (temp > TEMP_MAX) temp = TEMP_MAX;

    /* คำนวณ normalized position (0.0 to 1.0) */
    float normalized = (float)(temp - TEMP_MIN) /
                       (float)(TEMP_MAX - TEMP_MIN);

    /* คำนวณมุม (degrees) */
    float angle_deg = 135.0f + normalized * 270.0f;

    /* แปลง degrees to radians */
    float angle_rad = angle_deg * 3.14159f / 180.0f;

    /* จุดศูนย์กลางของ scale (relative to screen) */
    int32_t cx = 160;  /* ตรงกลางจอ */
    int32_t cy = 125;

    /* คำนวณ endpoint ของเข็ม */
    needle_points[0].x = cx;
    needle_points[0].y = cy;
    needle_points[1].x = cx + (int32_t)(NEEDLE_LENGTH * cosf(angle_rad));
    needle_points[1].y = cy + (int32_t)(NEEDLE_LENGTH * sinf(angle_rad));

    /* อัพเดท line widget */
    lv_line_set_points(needle_line, needle_points, 2);
}
```

#### 4.4 Step 4: Timer Callback

```c
/*
 * temp_timer_cb() - อัพเดทอุณหภูมิทุก 300ms
 */
static void temp_timer_cb(lv_timer_t * timer)
{
    (void)timer;

    /* จำลองอุณหภูมิ */
    static uint32_t tick = 0;
    tick++;

    float t = (float)tick * 0.02f;
    int32_t temp = 20 + (int32_t)(25.0f * sinf(t));
    temp += (lv_rand(0, 4) - 2);   /* noise +/- 2 */

    if (temp < TEMP_MIN) temp = TEMP_MIN;
    if (temp > TEMP_MAX)  temp = TEMP_MAX;

    /* อัพเดท needle */
    update_needle_position(temp);

    /* อัพเดท value label */
    lv_label_set_text_fmt(value_label, "%d degC", (int)temp);

    /* อัพเดทสีตัวเลขและ status */
    lv_color_t color;
    const char * status;

    if (temp <= 10) {
        color = lv_palette_main(LV_PALETTE_BLUE);
        status = "COLD";
    } else if (temp <= 35) {
        color = lv_palette_main(LV_PALETTE_GREEN);
        status = "NORMAL";
    } else {
        color = lv_palette_main(LV_PALETTE_RED);
        status = "HOT!";
    }

    lv_obj_set_style_text_color(value_label, color, 0);
    lv_label_set_text(status_label, status);
    lv_obj_set_style_text_color(status_label, color, 0);
}
```

#### 4.5 Step 5: Main Function - สร้าง Gauge UI

```c
void part2_ex4_scale_temperature(void)
{
    /* ---- Initialize styles ---- */
    init_section_styles();

    /* ---- Background ---- */
    lv_obj_set_style_bg_color(lv_screen_active(),
                               lv_color_hex(0x0f0f23), 0);

    /* ---- Title ---- */
    lv_obj_t * title = lv_label_create(lv_screen_active());
    lv_label_set_text(title, "Temperature Gauge");
    lv_obj_set_style_text_color(title, lv_color_hex(0x00d4ff), 0);
    lv_obj_set_style_text_font(title, &lv_font_montserrat_24, 0);
    lv_obj_align(title, LV_ALIGN_TOP_MID, 0, 5);

    /* ---- Scale Widget ---- */
    temp_scale = lv_scale_create(lv_screen_active());
    lv_obj_set_size(temp_scale, SCALE_SIZE, SCALE_SIZE);
    lv_obj_align(temp_scale, LV_ALIGN_CENTER, 0, 0);

    /* Round mode (gauge) */
    lv_scale_set_mode(temp_scale, LV_SCALE_MODE_ROUND_OUTER);
    lv_scale_set_range(temp_scale, TEMP_MIN, TEMP_MAX);

    /* Angle: 270-degree sweep เริ่มจากล่างซ้าย */
    lv_scale_set_rotation(temp_scale, 135);
    lv_scale_set_angle_range(temp_scale, 270);

    /* Tick configuration */
    lv_scale_set_total_tick_count(temp_scale, 31);    /* 31 ticks */
    lv_scale_set_major_tick_every(temp_scale, 5);     /* ทุก 5 ticks = major */
    lv_scale_set_label_show(temp_scale, true);

    /* Tick styling - major */
    lv_obj_set_style_length(temp_scale, 12, LV_PART_INDICATOR);
    lv_obj_set_style_line_width(temp_scale, 2, LV_PART_INDICATOR);
    lv_obj_set_style_line_color(temp_scale,
                                 lv_color_hex(0xcccccc), LV_PART_INDICATOR);

    /* Tick styling - minor */
    lv_obj_set_style_length(temp_scale, 6, LV_PART_ITEMS);
    lv_obj_set_style_line_width(temp_scale, 1, LV_PART_ITEMS);
    lv_obj_set_style_line_color(temp_scale,
                                 lv_color_hex(0x666666), LV_PART_ITEMS);

    /* Label styling */
    lv_obj_set_style_text_color(temp_scale,
                                 lv_color_hex(0xaaaaaa), LV_PART_INDICATOR);

    /* Main arc (background track) */
    lv_obj_set_style_arc_color(temp_scale,
                                lv_color_hex(0x333344), LV_PART_MAIN);
    lv_obj_set_style_arc_width(temp_scale, 4, LV_PART_MAIN);

    /* ---- Color Sections ---- */

    /* Section 1: Cold (-10 to 10) - Blue */
    lv_scale_section_t * sec_cold = lv_scale_add_section(temp_scale);
    lv_scale_section_set_range(sec_cold, TEMP_MIN, 10);
    lv_scale_section_set_style(sec_cold, LV_PART_MAIN, &style_cold);
    lv_scale_section_set_style(sec_cold, LV_PART_INDICATOR, &style_cold);
    lv_scale_section_set_style(sec_cold, LV_PART_ITEMS, &style_cold);

    /* Section 2: Normal (10 to 35) - Green */
    lv_scale_section_t * sec_normal = lv_scale_add_section(temp_scale);
    lv_scale_section_set_range(sec_normal, 10, 35);
    lv_scale_section_set_style(sec_normal, LV_PART_MAIN, &style_normal);
    lv_scale_section_set_style(sec_normal, LV_PART_INDICATOR, &style_normal);
    lv_scale_section_set_style(sec_normal, LV_PART_ITEMS, &style_normal);

    /* Section 3: Hot (35 to 50) - Red */
    lv_scale_section_t * sec_hot = lv_scale_add_section(temp_scale);
    lv_scale_section_set_range(sec_hot, 35, TEMP_MAX);
    lv_scale_section_set_style(sec_hot, LV_PART_MAIN, &style_hot);
    lv_scale_section_set_style(sec_hot, LV_PART_INDICATOR, &style_hot);
    lv_scale_section_set_style(sec_hot, LV_PART_ITEMS, &style_hot);

    /* ---- Needle Line ---- */
    needle_line = lv_line_create(lv_screen_active());
    lv_obj_set_style_line_width(needle_line, 3, 0);
    lv_obj_set_style_line_color(needle_line,
                                 lv_color_hex(0xff8800), 0);
    lv_obj_set_style_line_rounded(needle_line, true, 0);

    /* ตำแหน่งเริ่มต้น (20 degC) */
    update_needle_position(20);

    /* ---- Center pivot dot ---- */
    lv_obj_t * pivot = lv_obj_create(lv_screen_active());
    lv_obj_set_size(pivot, 10, 10);
    lv_obj_set_style_radius(pivot, LV_RADIUS_CIRCLE, 0);
    lv_obj_set_style_bg_color(pivot, lv_color_hex(0xff8800), 0);
    lv_obj_set_style_border_width(pivot, 0, 0);
    lv_obj_align(pivot, LV_ALIGN_CENTER, 0, 0);

    /* ---- Value Label ---- */
    value_label = lv_label_create(lv_screen_active());
    lv_label_set_text(value_label, "20 degC");
    lv_obj_set_style_text_color(value_label,
                                 lv_palette_main(LV_PALETTE_GREEN), 0);
    lv_obj_set_style_text_font(value_label, &lv_font_montserrat_24, 0);
    lv_obj_align(value_label, LV_ALIGN_CENTER, 0, 40);

    /* ---- Status Label ---- */
    status_label = lv_label_create(lv_screen_active());
    lv_label_set_text(status_label, "NORMAL");
    lv_obj_set_style_text_color(status_label,
                                 lv_palette_main(LV_PALETTE_GREEN), 0);
    lv_obj_align(status_label, LV_ALIGN_BOTTOM_MID, 0, -8);

    /* ---- Timer: อัพเดททุก 300ms ---- */
    temp_timer = lv_timer_create(temp_timer_cb, 300, NULL);
}
```

#### 4.6 UI Layout

```
┌──────────────────────────────────────┐
│         Temperature Gauge            │
│                                      │
│       -10    10     35    50         │
│        ╭──┬──┬──┬──┬──┬──╮           │
│       ╱BLUE │GREEN │ RED  ╲          │
│      │ ║║║║ │║║║║║ │║║║║║  │         │
│      │      │   ╱  │       │         │
│      │      │  ●───│       │         │
│       ╲ ║║║║│║║║║║ │║║║║  ╱          │
│        ╰──┴──┴──┴──┴──┴──╯           │
│                                      │
│            20 degC                   │
│            NORMAL                    │
└──────────────────────────────────────┘
```

***

### 5. องค์ความรู้และเทคนิค&#x20;

#### 5.1 Scale Modes Comparison

| Mode         | Shape             | Use Case      | Example             |
| ------------ | ----------------- | ------------- | ------------------- |
| HORIZONTAL   | แนวนอน            | Ruler, level  | Signal strength bar |
| VERTICAL     | แนวตั้ง           | Thermometer   | Mercury thermometer |
| ROUND\_OUTER | วงกลม (ticks นอก) | Gauge มาตรฐาน | Speedometer         |
| ROUND\_INNER | วงกลม (ticks ใน)  | Gauge compact | Watch dial          |

#### 5.2 Tick Count Formula

```c
/*
 * การคำนวณ tick count:
 * - Range: min to max
 * - total_tick_count = (ตัวเลข major tick ทั้งหมด - 1) * minor_per_major + 1
 *
 * ตัวอย่าง: Range -10 to 50, major ทุก 10 degrees
 * - Major labels: -10, 0, 10, 20, 30, 40, 50 = 7 labels
 * - Minor between majors: 4 (ขีดเล็กระหว่าง major)
 * - major_tick_every = 5 (ทุก 5 minor ticks เป็น 1 major)
 * - total = (7-1) * 5 + 1 = 31 ticks
 */
lv_scale_set_total_tick_count(scale, 31);
lv_scale_set_major_tick_every(scale, 5);
```

#### 5.3 Needle Angle Calculation

```c
/*
 * สูตรคำนวณมุมเข็ม (สำหรับ 270-degree gauge, rotation 135):
 *
 * angle = start_rotation + (value - min) / (max - min) * sweep
 *
 * start_rotation = 135 degrees
 * sweep = 270 degrees
 *
 * ตัวอย่าง: temp = 20, range -10 to 50
 * normalized = (20 - (-10)) / (50 - (-10)) = 30/60 = 0.5
 * angle = 135 + 0.5 * 270 = 270 degrees
 * → เข็มชี้ตรงกลาง (12 o'clock position)
 */
```

#### 5.4 Section Style Pattern

```c
/* Pattern: สร้าง style แยกสำหรับแต่ละ section
 *
 * สำคัญ: style ต้องเป็น static หรือ global
 * เพราะ LVGL reference ไปที่ style pointer ตลอดเวลา
 */
static lv_style_t my_style;         /* ถูกต้อง: static */
lv_style_init(&my_style);
lv_style_set_arc_color(&my_style, lv_palette_main(LV_PALETTE_RED));
lv_style_set_line_color(&my_style, lv_palette_main(LV_PALETTE_RED));

/* ห้าม: local style ใน function */
void bad_example(void) {
    lv_style_t local_style;          /* ผิด: หายเมื่อ function จบ */
    lv_style_init(&local_style);     /* scale จะ crash ทีหลัง */
}
```

#### 5.5 Line Points ต้อง Static

```c
/* สำคัญมาก: lv_line ต้องการ static point array
 * เพราะ LVGL ไม่ copy ข้อมูล แค่เก็บ pointer */

static lv_point_precise_t points[2];    /* ถูกต้อง: static */
points[0].x = 100; points[0].y = 100;
points[1].x = 200; points[1].y = 50;
lv_line_set_points(line, points, 2);

/* ห้าม: local array */
void bad_needle(void) {
    lv_point_precise_t pts[2];     /* ผิด: หายเมื่อ function จบ */
    pts[0].x = 100; ...
    lv_line_set_points(line, pts, 2);  /* เข็มจะแสดงผิด/crash */
}
```

#### 5.6 Multiple Scales ซ้อนกัน

```c
/* สร้าง dual scale สำหรับ Temperature + Humidity */
lv_obj_t * outer = lv_scale_create(lv_screen_active());
lv_obj_set_size(outer, 200, 200);
lv_scale_set_mode(outer, LV_SCALE_MODE_ROUND_OUTER);
lv_scale_set_range(outer, 0, 50);    /* Temp degC */

lv_obj_t * inner = lv_scale_create(lv_screen_active());
lv_obj_set_size(inner, 160, 160);    /* เล็กกว่า */
lv_scale_set_mode(inner, LV_SCALE_MODE_ROUND_INNER);
lv_scale_set_range(inner, 0, 100);   /* Humidity % */

/* จัดให้อยู่ตรงกลางเดียวกัน */
lv_obj_align(outer, LV_ALIGN_CENTER, 0, 0);
lv_obj_align(inner, LV_ALIGN_CENTER, 0, 0);
```

***

### 6. แบบฝึกหัด (Exercises)

#### Exercise 1: Pressure Gauge (0-100 PSI with 3 Color Zones)

สร้าง Pressure Gauge สำหรับ Industrial Monitoring:

**Requirements:**

* Scale mode: ROUND\_OUTER, 270-degree sweep
* Range: 0-100 PSI
* **3 Color zones:**
  * 0-30 PSI: สีเขียว (Normal operating pressure)
  * 31-70 PSI: สีเหลือง (Elevated pressure)
  * 71-100 PSI: สีแดง (Critical! Over-pressure warning)
* Needle ชี้ค่าปัจจุบัน
* Center label: "XX PSI"
* Status label: "Normal" / "Warning" / "CRITICAL!"
* Major tick ทุก 10 PSI (0, 10, 20, ..., 100)
* Timer จำลองค่า pressure ที่เปลี่ยนแปลง

```
┌──────────────────────────────────────┐
│        Pressure Gauge                │
│                                      │
│        0   20  40  60  80 100        │
│        ╭──┬──┬──┬──┬──┬──╮           │
│       ╱GREEN│YELLOW│ RED  ╲          │
│      │ ║║║║ │║║║║║ │║║║║║  │         │
│      │      │  ╱   │       │         │
│      │      │ ●────│       │         │
│       ╲ ║║║║│║║║║║ │║║║║  ╱          │
│        ╰──┴──┴──┴──┴──┴──╯           │
│                                      │
│           45 PSI                     │
│           Warning                    │
└──────────────────────────────────────┘
```

**Hints:**

* total\_tick\_count = 51 (0 ถึง 100, ทุก 2 PSI)
* major\_tick\_every = 5 (ทุก 10 PSI)
* ใช้ pattern จาก Section 4.3 สำหรับ needle calculation

***

#### Exercise 2: Combined Temperature + Humidity Display with Dual Scales

สร้างจอแสดงผล Temperature และ Humidity แบบ dual gauge:

**Requirements:**

* **Gauge 1** (ซ้าย): Temperature Scale
  * Mode: ROUND\_OUTER, size 130x130
  * Range: -10 to 50 degC
  * Sections: Blue (cold), Green (normal), Red (hot)
  * Needle + center value
* **Gauge 2** (ขวา): Humidity Scale
  * Mode: ROUND\_OUTER, size 130x130
  * Range: 0-100 %RH
  * Sections: Red (dry), Green (normal), Blue (humid)
  * Needle + center value
* Timer จำลองค่าที่เปลี่ยนสัมพันธ์กัน (temp สูง → humidity ต่ำ)
* Label ด้านล่างแสดง "Comfort Index" (Good/Fair/Poor)

```
┌──────────────────────────────────────┐
│   Temperature & Humidity Monitor     │
│                                      │
│   ╭──────╮           ╭──────╮        │
│  ╱  25    ╲         ╱  60    ╲       │
│ │  degC    │       │  %RH     │      │
│  ╲  ●──   ╱         ╲  ●──   ╱       │
│   ╰──────╯           ╰──────╯        │
│     TEMP               HUMID         │
│                                      │
│     Comfort Index: Good              │
└──────────────────────────────────────┘
```

**Hints:**

* ใช้ `lv_obj_align()` จัดวางซ้าย-ขวา
* แต่ละ gauge มี needle\_points แยกกัน (static array แยก)
* Comfort Index: Temp 20-26 + Humid 40-60 = "Good"

***

### 7. References

* [LVGL Scale](https://docs.lvgl.io/9.2/widgets/scale.html)
* [lv\_example\_scale\_4.c](https://github.com/lvgl/lvgl/blob/release/v9.2/examples/widgets/scale/lv_example_scale_4.c)

***


# Sensor Dashboard

## Lab 5: Sensor Dashboard (TabView)

***

### 1. โครงสร้างภาพรวมของ Lab

#### Why? - ทำไมต้องเรียนรู้เรื่องนี้

* **Multi-Page UI**: ในระบบ IoT จริง เรามีข้อมูลจากหลาย Sensor ที่ต้องแสดงผลพร้อมกัน TabView ช่วยจัดกลุ่มข้อมูลอย่างเป็นระบบ
* **Organized Layout**: Dashboard ที่ดีจัดกลุ่ม content ตามประเภท ไม่แสดงทุกอย่างบนหน้าเดียว
* **Real-World Pattern**: รูปแบบ Tab-based Dashboard ใช้แพร่หลายในระบบ SCADA, HMI, และ IoT Monitoring

#### What? - จะได้เรียนรู้อะไร

1. **TabView Widget**: สร้าง multi-tab interface ด้วย `lv_tabview_create()`
2. **Tab Content Management**: แต่ละ tab มี widgets ของตัวเอง แยกจัดการอิสระ
3. **Tab Bar Styling**: ปรับแต่ง tab bar, ปุ่ม tab, สีพื้นหลัง
4. **Tab Switching**: ควบคุมการเปลี่ยน tab ทั้งด้วยการกด และ programmatic
5. **Scroll Control**: ปิด scrolling ที่ไม่ต้องการบน content area

#### How? - จะทำอย่างไร

1. สร้าง TabView กับ tab bar ด้านบน (80px)
2. เพิ่ม Tab 1: IMU data - แสดง accelerometer X/Y/Z ด้วย Line Chart
3. เพิ่ม Tab 2: ADC data - แสดงค่า ADC ด้วย Bar + Label แสดงแรงดัน
4. ใช้ timer callback อัพเดทข้อมูลทุก tab ทุก 100ms
5. ปรับแต่ง tab button styling ให้ดูเป็นมืออาชีพ

<figure><img src="/files/4tJ3J48pK6OlEDumA6m6" alt=""><figcaption></figcaption></figure>

***

### 2. หลักการทำงาน

#### 2.1 TabView Architecture

TabView เป็น widget ที่รวม Tab Bar (ปุ่มเลือก) กับ Content Area (พื้นที่แสดงผล) เข้าด้วยกัน เมื่อกดปุ่ม tab จะสลับแสดง content ของ tab นั้น

```
TabView Object Hierarchy:

  lv_tabview (parent)
  ├── Tab Bar (lv_obj - button container)
  │   ├── Button "IMU"     ← lv_tabview_get_tab_bar()
  │   └── Button "ADC"
  └── Content (lv_obj - page container)
      ├── Tab Page 0 (IMU)  ← lv_tabview_add_tab()
      │   ├── Title Label
      │   ├── Chart Widget
      │   └── Value Labels
      └── Tab Page 1 (ADC)
          ├── Title Label
          ├── Bar Widget
          └── Value Label
```

#### 2.2 Screen Layout

```
┌─────────────────────────────────────────────────────────────┐
│                   SENSOR DASHBOARD                          │
├─────────────────────────────────────────────────────────────┤
│                                                             │
│   ┌───────────────────────────────────────────────────────┐ │
│   │     [  IMU  ]      [  ADC  ]       <-- Tab Bar (80px) │ │
│   └───────────────────────────────────────────────────────┘ │
│   ┌───────────────────────────────────────────────────────┐ │
│   │                                                       │ │
│   │              Content Area (480 x 240)                 │ │
│   │                                                       │ │
│   │   IMU Tab:                                            │ │
│   │     Chart (3 series: X=Red, Y=Green, Z=Blue)          │ │
│   │     Value Labels: X: +0.50  Y: -0.30  Z: +9.81        │ │
│   │                                                       │ │
│   │   ADC Tab:                                            │ │
│   │     [==============BAR================]               │ │
│   │     ADC: 2048 (1.65V)                                 │ │
│   │                                                       │ │
│   └───────────────────────────────────────────────────────┘ │
│                                                             │
│   Screen Size: 480 x 320                                    │
│   Tab Bar: 80px height                                      │
│   Content: 480 x 240                                        │
│                                                             │
└─────────────────────────────────────────────────────────────┘
```

#### 2.3 Data Flow

```
┌─────────────────────────────────────────────────────────────┐
│                     DATA FLOW                               │
├─────────────────────────────────────────────────────────────┤
│                                                             │
│   lv_timer_create(timer_cb, 100ms)                          │
│       │                                                     │
│       ▼ ทุก 100ms                                            │
│   dashboard_timer_cb()                                      │
│       │                                                     │
│       ├── simulate_adc_read()                               │
│       │     │                                               │
│       │     ├── pct = (adc * 100) / 4095                    │
│       │     ├── lv_bar_set_value(bar, pct)                  │
│       │     └── lv_label_set_text_fmt("ADC: %d (%.2fV)")    │
│       │                                                     │
│       └── simulate_imu_accel(&ax, &ay, &az)                 │
│            │                                                │
│            ├── lv_chart_set_next_value(chart, ser_x, ax*100)│
│            ├── lv_chart_set_next_value(chart, ser_y, ay*100)│
│            ├── lv_chart_set_next_value(chart, ser_z, az*100)│
│            └── lv_label_set_text_fmt("X:%+.1f Y:%+.1f")     │
│                                                             │
└─────────────────────────────────────────────────────────────┘
```

#### 2.4 Tab Bar Position Options

```
  LV_DIR_TOP (default)        LV_DIR_BOTTOM
  ┌──────────────────┐        ┌──────────────────┐
  │ [Tab1] [Tab2]    │        │                  │
  ├──────────────────┤        │    Content       │
  │                  │        │                  │
  │    Content       │        ├──────────────────┤
  │                  │        │ [Tab1] [Tab2]    │
  └──────────────────┘        └──────────────────┘

  LV_DIR_LEFT                 LV_DIR_RIGHT
  ┌────┬─────────────┐        ┌─────────────┬────┐
  │Tab1│             │        │             │Tab1│
  │    │   Content   │        │   Content   │    │
  │Tab2│             │        │             │Tab2│
  └────┴─────────────┘        └─────────────┴────┘
```

***

### 3. ฟังก์ชันสำคัญ

#### 3.1 TabView Functions

<table><thead><tr><th width="366.922607421875">Function</th><th width="212.2479248046875">Description</th><th>ตัวอย่าง</th></tr></thead><tbody><tr><td><code>lv_tabview_create(parent)</code></td><td>สร้าง TabView</td><td><code>lv_tabview_create(lv_screen_active())</code></td></tr><tr><td><code>lv_tabview_set_tab_bar_position(tv, dir)</code></td><td>ตำแหน่ง tab bar</td><td><code>...(tv, LV_DIR_TOP)</code></td></tr><tr><td><code>lv_tabview_set_tab_bar_size(tv, size)</code></td><td>ความสูง/กว้าง tab bar</td><td><code>...(tv, 80)</code></td></tr><tr><td><code>lv_tabview_add_tab(tv, "name")</code></td><td>เพิ่ม tab ใหม่ (return tab page)</td><td><code>lv_tabview_add_tab(tv, "IMU")</code></td></tr><tr><td><code>lv_tabview_get_tab_bar(tv)</code></td><td>รับ tab bar object สำหรับ styling</td><td><code>lv_tabview_get_tab_bar(tv)</code></td></tr><tr><td><code>lv_tabview_get_content(tv)</code></td><td>รับ content container</td><td><code>lv_tabview_get_content(tv)</code></td></tr><tr><td><code>lv_tabview_get_tab_active(tv)</code></td><td>ดูว่า tab ไหน active (0-based)</td><td><code>uint32_t idx = ...</code></td></tr><tr><td><code>lv_tabview_set_active(tv, idx, anim)</code></td><td>เปลี่ยน tab ด้วยโค้ด</td><td><code>...(tv, 1, LV_ANIM_ON)</code></td></tr></tbody></table>

#### 3.2 Tab Bar Position Constants

| Direction       | Description              | Content Size (480x320 screen) |
| --------------- | ------------------------ | ----------------------------- |
| `LV_DIR_TOP`    | Tab bar ด้านบน (default) | 480 x (320 - tab\_size)       |
| `LV_DIR_BOTTOM` | Tab bar ด้านล่าง         | 480 x (320 - tab\_size)       |
| `LV_DIR_LEFT`   | Tab bar ด้านซ้าย         | (480 - tab\_size) x 320       |
| `LV_DIR_RIGHT`  | Tab bar ด้านขวา          | (480 - tab\_size) x 320       |

#### 3.3 Critical Pattern - ปิด Scrolling

```c
/* CRITICAL: ต้องปิด scrolling บน content container
 * ไม่งั้นเวลา swipe จะเลื่อนหน้าแทนที่จะเปลี่ยน tab */
lv_obj_remove_flag(lv_tabview_get_content(tabview), LV_OBJ_FLAG_SCROLLABLE);
```

#### 3.4 Simulation Functions (PC Simulator)

```c
/* จำลองค่า ADC (0-4095) - ขยับช้า ๆ ขึ้นลง */
static uint16_t simulate_adc_read(void)
{
    static float phase = 0.0f;
    phase += 0.02f;
    return (uint16_t)(2048 + 1800 * sinf(phase));
}

/* จำลองค่า IMU accelerometer (m/s^2) */
static void simulate_imu_accel(float *ax, float *ay, float *az)
{
    static float t = 0.0f;
    t += 0.05f;
    *ax = 0.5f * sinf(t * 1.0f);
    *ay = 0.3f * cosf(t * 0.7f);
    *az = 9.81f + 0.2f * sinf(t * 2.0f);
}
```

***

### 4. โค้ดตัวอย่าง

#### 4.1 Global Variables

```c
#include "lvgl.h"
#include <math.h>

#define ADC_MAX         4095
#define CHART_POINTS    50

/* ADC Tab widgets */
static lv_obj_t * adc_bar;
static lv_obj_t * adc_label;

/* IMU Tab widgets */
static lv_obj_t * imu_chart;
static lv_chart_series_t * imu_ser_x;
static lv_chart_series_t * imu_ser_y;
static lv_chart_series_t * imu_ser_z;
static lv_obj_t * imu_labels[3];

/* Timer */
static lv_timer_t * dash_timer;
```

#### 4.2 Simulation Helpers

```c
static uint16_t simulate_adc_read(void)
{
    static float phase = 0.0f;
    phase += 0.02f;
    return (uint16_t)(2048 + 1800 * sinf(phase));
}

static void simulate_imu_accel(float *ax, float *ay, float *az)
{
    static float t = 0.0f;
    t += 0.05f;
    *ax = 0.5f * sinf(t * 1.0f);
    *ay = 0.3f * cosf(t * 0.7f);
    *az = 9.81f + 0.2f * sinf(t * 2.0f);
}
```

#### 4.3 Timer Callback - อัพเดทข้อมูลทุก Tab

```c
static void dashboard_timer_cb(lv_timer_t * timer)
{
    (void)timer;

    /* ===== Update ADC Tab ===== */
    uint16_t adc = simulate_adc_read();
    int32_t pct = (adc * 100) / ADC_MAX;
    lv_bar_set_value(adc_bar, pct, LV_ANIM_ON);

    float volt = ((float)adc / ADC_MAX) * 3.3f;
    lv_label_set_text_fmt(adc_label, "ADC: %d (%.2fV)", adc, (double)volt);

    /* ===== Update IMU Tab ===== */
    float ax, ay, az;
    simulate_imu_accel(&ax, &ay, &az);

    /* Scale float to int for chart (multiply by 100) */
    lv_chart_set_next_value(imu_chart, imu_ser_x, (int32_t)(ax * 100));
    lv_chart_set_next_value(imu_chart, imu_ser_y, (int32_t)(ay * 100));
    lv_chart_set_next_value(imu_chart, imu_ser_z, (int32_t)(az * 100));

    /* Update value labels */
    lv_label_set_text_fmt(imu_labels[0], "X:%+.1f", (double)ax);
    lv_label_set_text_fmt(imu_labels[1], "Y:%+.1f", (double)ay);
    lv_label_set_text_fmt(imu_labels[2], "Z:%+.1f", (double)az);
}
```

#### 4.4 สร้าง IMU Tab Content

```c
static void create_imu_tab(lv_obj_t * parent)
{
    /* Title */
    lv_obj_t * title = lv_label_create(parent);
    lv_label_set_text(title, "Accelerometer (m/s2)");
    lv_obj_set_style_text_font(title, &lv_font_montserrat_24, 0);
    lv_obj_align(title, LV_ALIGN_TOP_MID, 0, 5);

    /* Chart - Line type, 50 data points */
    imu_chart = lv_chart_create(parent);
    lv_obj_set_size(imu_chart, 380, 180);
    lv_obj_align(imu_chart, LV_ALIGN_CENTER, -30, 10);
    lv_chart_set_type(imu_chart, LV_CHART_TYPE_LINE);
    lv_chart_set_point_count(imu_chart, CHART_POINTS);
    lv_chart_set_range(imu_chart, LV_CHART_AXIS_PRIMARY_Y, -200, 1200);

    /* ซ่อน point indicator เพื่อให้เห็นแค่เส้น */
    lv_obj_set_style_size(imu_chart, 0, 0, LV_PART_INDICATOR);
    lv_obj_set_style_line_width(imu_chart, 2, LV_PART_ITEMS);

    /* สร้าง 3 series: X(Red), Y(Green), Z(Blue) */
    lv_color_t colors[] = {
        lv_palette_main(LV_PALETTE_RED),
        lv_palette_main(LV_PALETTE_GREEN),
        lv_palette_main(LV_PALETTE_BLUE)
    };

    imu_ser_x = lv_chart_add_series(imu_chart, colors[0],
                                     LV_CHART_AXIS_PRIMARY_Y);
    imu_ser_y = lv_chart_add_series(imu_chart, colors[1],
                                     LV_CHART_AXIS_PRIMARY_Y);
    imu_ser_z = lv_chart_add_series(imu_chart, colors[2],
                                     LV_CHART_AXIS_PRIMARY_Y);

    /* Value labels - แสดงค่าปัจจุบัน */
    const char * axis_names[] = {"X:", "Y:", "Z:"};
    for(int i = 0; i < 3; i++) {
        imu_labels[i] = lv_label_create(parent);
        lv_label_set_text_fmt(imu_labels[i], "%s 0.0", axis_names[i]);
        lv_obj_set_style_text_color(imu_labels[i], colors[i], 0);
        lv_obj_set_style_text_font(imu_labels[i], &lv_font_montserrat_24, 0);
        lv_obj_align(imu_labels[i], LV_ALIGN_RIGHT_MID, -10, -50 + i * 50);
    }
}
```

#### 4.5 สร้าง ADC Tab Content

```c
static void create_adc_tab(lv_obj_t * parent)
{
    /* Title */
    lv_obj_t * title = lv_label_create(parent);
    lv_label_set_text(title, "ADC Monitor");
    lv_obj_set_style_text_font(title, &lv_font_montserrat_24, 0);
    lv_obj_align(title, LV_ALIGN_TOP_MID, 0, 20);

    /* Bar widget - แสดง % ของค่า ADC */
    adc_bar = lv_bar_create(parent);
    lv_obj_set_size(adc_bar, 400, 50);
    lv_obj_align(adc_bar, LV_ALIGN_CENTER, 0, 0);
    lv_bar_set_range(adc_bar, 0, 100);
    lv_bar_set_value(adc_bar, 0, LV_ANIM_OFF);

    /* สี indicator ของ bar */
    lv_obj_set_style_bg_color(adc_bar, lv_palette_main(LV_PALETTE_BLUE),
                              LV_PART_INDICATOR);

    /* Label - แสดงค่า ADC ดิบ + แรงดัน */
    adc_label = lv_label_create(parent);
    lv_label_set_text(adc_label, "ADC: 0 (0.00V)");
    lv_obj_set_style_text_font(adc_label, &lv_font_montserrat_24, 0);
    lv_obj_align(adc_label, LV_ALIGN_CENTER, 0, 60);
}
```

#### 4.6 Main Function

```c
void part2_ex5_sensor_dashboard(void)
{
    /* ===== สร้าง TabView ===== */
    lv_obj_t * tabview = lv_tabview_create(lv_screen_active());
    lv_tabview_set_tab_bar_position(tabview, LV_DIR_TOP);
    lv_tabview_set_tab_bar_size(tabview, 80);

    /* ===== Style Tab Bar ===== */
    lv_obj_t * tab_btns = lv_tabview_get_tab_bar(tabview);
    lv_obj_set_style_bg_color(tab_btns,
        lv_palette_darken(LV_PALETTE_GREY, 3), 0);
    lv_obj_set_style_text_color(tab_btns,
        lv_palette_lighten(LV_PALETTE_GREY, 5), 0);

    /* ===== สร้าง Tabs ===== */
    lv_obj_t * tab_imu = lv_tabview_add_tab(tabview, "IMU");
    lv_obj_t * tab_adc = lv_tabview_add_tab(tabview, "ADC");

    /* ===== Style Tab Content (พื้นหลังสีขาว) ===== */
    lv_obj_set_style_bg_color(tab_imu, lv_color_hex(0xFFFFFF), 0);
    lv_obj_set_style_bg_opa(tab_imu, LV_OPA_COVER, 0);
    lv_obj_set_style_bg_color(tab_adc, lv_color_hex(0xFFFFFF), 0);
    lv_obj_set_style_bg_opa(tab_adc, LV_OPA_COVER, 0);

    /* ===== Populate Tab Content ===== */
    create_imu_tab(tab_imu);
    create_adc_tab(tab_adc);

    /* ===== CRITICAL: ปิด scrolling ===== */
    lv_obj_remove_flag(lv_tabview_get_content(tabview),
                       LV_OBJ_FLAG_SCROLLABLE);

    /* ===== Timer - อัพเดทข้อมูลทุก 100ms ===== */
    dash_timer = lv_timer_create(dashboard_timer_cb, 100, NULL);
}
```

***

### 5. องค์ความรู้และเทคนิค

#### 5.1 Tab Bar Sizing - ขนาดของ Tab Bar

```c
/* Tab bar size ขึ้นอยู่กับ position */

/* TOP/BOTTOM: size = ความสูง */
lv_tabview_set_tab_bar_position(tabview, LV_DIR_TOP);
lv_tabview_set_tab_bar_size(tabview, 80);  /* 80px height */
/* Content: 480 x (320 - 80) = 480 x 240 */

/* LEFT/RIGHT: size = ความกว้าง */
lv_tabview_set_tab_bar_position(tabview, LV_DIR_LEFT);
lv_tabview_set_tab_bar_size(tabview, 80);  /* 80px width */
/* Content: (480 - 80) x 320 = 400 x 320 */
```

#### 5.2 Tab Content Parent - ข้อควรระวัง

```c
/* Widgets ใน tab ต้องใช้ tab page เป็น parent ไม่ใช่ lv_screen_active() */
void create_tab_content(lv_obj_t * tab_parent)
{
    /* tab_parent มาจาก lv_tabview_add_tab() */
    lv_obj_t * widget = lv_label_create(tab_parent);  /* ถูกต้อง */

    /* อย่าทำแบบนี้: */
    /* lv_obj_t * widget = lv_label_create(lv_screen_active()); */
}
```

#### 5.3 Tab Button Styling - ปรับแต่งปุ่ม Tab

```c
lv_obj_t * tab_btns = lv_tabview_get_tab_bar(tabview);

/* สีพื้นหลัง tab bar */
lv_obj_set_style_bg_color(tab_btns,
    lv_palette_darken(LV_PALETTE_GREY, 3), 0);

/* สีตัวอักษร tab buttons */
lv_obj_set_style_text_color(tab_btns,
    lv_palette_lighten(LV_PALETTE_GREY, 5), 0);

/* เส้นใต้ tab ที่ active */
lv_obj_set_style_border_side(tab_btns,
    LV_BORDER_SIDE_BOTTOM,
    LV_PART_ITEMS | LV_STATE_CHECKED);
lv_obj_set_style_border_color(tab_btns,
    lv_palette_main(LV_PALETTE_ORANGE),
    LV_PART_ITEMS | LV_STATE_CHECKED);
lv_obj_set_style_border_width(tab_btns, 3,
    LV_PART_ITEMS | LV_STATE_CHECKED);
```

#### 5.4 Programmatic Tab Switching

```c
/* เปลี่ยน tab ด้วยโค้ด (ใช้สำหรับ auto-rotate) */
lv_tabview_set_active(tabview, 1, LV_ANIM_ON);   /* ไปยัง tab index 1 */

/* อ่าน tab ที่ active อยู่ */
uint32_t active_idx = lv_tabview_get_tab_active(tabview);
```

#### 5.5 Performance Tip - อัพเดทเฉพาะ Tab ที่ Active

```c
/* ลด CPU load โดยอัพเดทเฉพาะ tab ที่มองเห็น */
static void optimized_timer_cb(lv_timer_t * timer)
{
    uint32_t active = lv_tabview_get_tab_active(tabview_ref);
    switch(active) {
        case 0: update_imu_tab(); break;
        case 1: update_adc_tab(); break;
    }
}
```

***

### 6. แบบฝึกหัด

#### Exercise 1: เพิ่ม Tab ที่ 3 - System Status

**โจทย์:** เพิ่ม tab "System" ที่แสดงข้อมูล System Status:

* **Uptime**: เวลาตั้งแต่เริ่มต้น (วินาที) อัพเดททุก 1 วินาที
* **Memory Usage**: แสดงเป็น Bar (จำลอง 40-70%)
* **CPU Load**: แสดงเป็น Arc gauge (จำลอง 20-80%)

**การประยุกต์ใช้งานจริง:**

* ระบบ Monitoring ในโรงงาน ต้องมีหน้า System Health เสมอ
* ใช้ตรวจสอบว่า Embedded Device ทำงานปกติหรือไม่

**Hint:**

* ใช้ `static uint32_t uptime_sec` นับเวลาใน timer callback
* ถ้า timer ทำงานทุก 100ms → นับ 10 ครั้ง = 1 วินาที
* ใช้ `lv_label_set_text_fmt()` แสดง uptime

***

#### Exercise 2: Auto-Rotating Tabs

**โจทย์:** สร้างระบบ Auto-Rotate ที่เปลี่ยน tab ทุก 5 วินาทีอัตโนมัติ:

* เปลี่ยน tab ไปข้างหน้าทีละ tab
* เมื่อถึง tab สุดท้าย ย้อนกลับ tab แรก
* แสดงตัวนับถอยหลัง "Next tab in: 3s" ที่มุมล่างขวา
* เมื่อผู้ใช้กดเลือก tab เอง ให้ reset ตัวนับถอยหลัง

**การประยุกต์ใช้งานจริง:**

* Digital Signage ในห้องควบคุมโรงงาน
* Kiosk Mode ใน Dashboard ที่ไม่มีคนดูแลตลอดเวลา
* หน้าจอ Overview สำหรับผู้บริหารดูภาพรวม

**Hint:**

* ใช้ `lv_tabview_set_active(tv, next_idx, LV_ANIM_ON)`
* นับ counter ใน timer callback: `static uint32_t auto_counter`
* Reset counter เมื่อ `auto_counter >= 50` (50 x 100ms = 5s)

***

#### Exercise 3: Tab Content with Color Theme

**โจทย์:** ปรับแต่งแต่ละ tab ให้มี color theme แตกต่างกัน:

* IMU Tab: พื้นหลังสีน้ำเงินเข้ม (#16213E) ตัวอักษรสีขาว
* ADC Tab: พื้นหลังสีเขียวเข้ม (#1A3C34) ตัวอักษรสีขาว
* System Tab: พื้นหลังสีม่วงเข้ม (#2D1B3D) ตัวอักษรสีขาว

**Hint:**

* ใช้ `lv_obj_set_style_bg_color(tab, lv_color_hex(0x16213E), 0)`
* Label สีขาว: `lv_obj_set_style_text_color(label, lv_color_hex(0xFFFFFF), 0)`

***

### 7. References

* [LVGL TabView](https://docs.lvgl.io/9.2/widgets/tabview.html)
* [lv\_example\_tabview\_1.c](https://github.com/lvgl/lvgl/blob/release/v9.2/examples/widgets/tabview/lv_example_tabview_1.c)

***


# Chart Dashboard

## Lab 6: Chart Dashboard (Multiple Chart Types)

***

### 1. โครงสร้างภาพรวมของ Lab

#### Why? - ทำไมต้องเรียนรู้เรื่องนี้

* **Data Visualization**: ข้อมูลเดียวกันแสดงได้หลายรูปแบบ เลือก chart ที่เหมาะกับลักษณะข้อมูล
* **Chart Type Selection**: Bar chart เหมาะกับเปรียบเทียบค่า, Line chart เหมาะกับ time-series, Scatter chart เหมาะกับดูความสัมพันธ์
* **Professional Dashboard**: รูปแบบ multi-chart dashboard ใช้ในอุตสาหกรรม SCADA, Process Control

#### What? - จะได้เรียนรู้อะไร

1. **Bar Chart**: เปรียบเทียบค่า X, Y, Z แบบ side-by-side ด้วย `LV_CHART_TYPE_BAR`
2. **Area Chart**: แสดง trend พร้อม fill ด้านล่าง (Line + Opacity)
3. **Scatter Chart**: แสดงความสัมพันธ์ X vs Y ด้วย `LV_CHART_TYPE_SCATTER`
4. **Line Chart**: Multi-series time-series
5. **2x2 Grid Layout**: จัดวาง 4 charts ในหน้าเดียว

#### How? - จะทำอย่างไร

1. สร้าง 2x2 grid layout บนหน้าจอ (480x320)
2. มุมซ้ายบน: Bar Chart - เปรียบเทียบ Accel X/Y/Z
3. มุมขวาบน: Area Chart - Magnitude over time
4. มุมซ้ายล่าง: Scatter Chart - X vs Y correlation
5. มุมขวาล่าง: Line Chart - Gyroscope Roll/Pitch/Yaw
6. Single timer อัพเดททุก chart ทุก 100ms

<figure><img src="/files/rjo6DkPtclX2RFvE3yrL" alt=""><figcaption></figcaption></figure>

***

### 2. ฟังก์ชันสำคัญ

#### 2.1 Chart Type Constants

<table><thead><tr><th width="207.4801025390625">Constant</th><th width="179.8721923828125">Description</th><th>Update Method</th></tr></thead><tbody><tr><td><code>LV_CHART_TYPE_LINE</code></td><td>เส้นเชื่อมจุด (default)</td><td><code>lv_chart_set_next_value()</code></td></tr><tr><td><code>LV_CHART_TYPE_BAR</code></td><td>แท่ง bar graph</td><td><code>lv_chart_set_value_by_id()</code> + <code>refresh()</code></td></tr><tr><td><code>LV_CHART_TYPE_SCATTER</code></td><td>จุดกระจาย (x, y)</td><td><code>lv_chart_set_next_value2()</code></td></tr></tbody></table>

#### 2.2 Bar Chart Functions

<table><thead><tr><th width="420.54833984375">Function</th><th>Description</th></tr></thead><tbody><tr><td><code>lv_chart_set_type(chart, LV_CHART_TYPE_BAR)</code></td><td>ตั้งเป็น Bar chart</td></tr><tr><td><code>lv_chart_set_point_count(chart, n)</code></td><td>จำนวน bars (เช่น 3 สำหรับ X/Y/Z)</td></tr><tr><td><code>lv_chart_set_value_by_id(chart, ser, id, val)</code></td><td>อัพเดทค่า bar ตาม index</td></tr><tr><td><code>lv_chart_refresh(chart)</code></td><td><strong>REQUIRED</strong> - รีเฟรชหลังอัพเดท</td></tr><tr><td><code>lv_obj_set_style_pad_column(chart, px, 0)</code></td><td>ระยะห่างระหว่าง bars</td></tr></tbody></table>

#### 2.3 Scatter Chart Functions

<table><thead><tr><th width="534.6072387695312">Function</th><th>Description</th></tr></thead><tbody><tr><td><code>lv_chart_set_type(chart, LV_CHART_TYPE_SCATTER)</code></td><td>ตั้งเป็น Scatter chart</td></tr><tr><td><code>lv_chart_set_range(chart, LV_CHART_AXIS_PRIMARY_X, min, max)</code></td><td>ช่วงแกน X (<strong>ต้อง set</strong>)</td></tr><tr><td><code>lv_chart_set_range(chart, LV_CHART_AXIS_PRIMARY_Y, min, max)</code></td><td>ช่วงแกน Y</td></tr><tr><td><code>lv_chart_set_next_value2(chart, ser, x, y)</code></td><td>เพิ่มจุด (x, y)</td></tr></tbody></table>

#### 2.4 Area Chart (Line + Fill)

```c
/* Area Chart = Line Chart + Background Opacity บน LV_PART_ITEMS */
lv_chart_set_type(chart, LV_CHART_TYPE_LINE);
lv_obj_set_style_bg_opa(chart, LV_OPA_50, LV_PART_ITEMS);  /* Fill 50% */
```

#### 2.5 Chart Styling Functions

<table><thead><tr><th width="506.55682373046875">Function</th><th>Description</th></tr></thead><tbody><tr><td><code>lv_obj_set_style_size(chart, w, h, LV_PART_INDICATOR)</code></td><td>ขนาดจุด (0,0 = ซ่อน)</td></tr><tr><td><code>lv_obj_set_style_line_width(chart, px, LV_PART_ITEMS)</code></td><td>ความหนาเส้น</td></tr><tr><td><code>lv_chart_set_div_line_count(chart, h, v)</code></td><td>เส้น grid (horizontal, vertical)</td></tr><tr><td><code>lv_obj_set_style_bg_opa(chart, opa, LV_PART_ITEMS)</code></td><td>Area fill opacity</td></tr></tbody></table>

***

### 3. โค้ดตัวอย่าง

#### 3.1 Global Variables

```c
#include "lvgl.h"
#include <math.h>

#define CHART_POINTS    50
#define SCATTER_POINTS  30
#define CHART_W         220
#define CHART_H         110

/* Bar Chart */
static lv_obj_t * bar_chart;
static lv_chart_series_t * bar_ser;
static lv_obj_t * bar_value_label;

/* Area Chart */
static lv_obj_t * area_chart;
static lv_chart_series_t * area_ser;
static lv_obj_t * area_value_label;

/* Scatter Chart */
static lv_obj_t * scatter_chart;
static lv_chart_series_t * scatter_ser;
static lv_obj_t * scatter_value_label;

/* Line Chart */
static lv_obj_t * line_chart;
static lv_chart_series_t * line_ser[3];
static lv_obj_t * line_value_label;

static lv_timer_t * chart_timer;
```

#### 3.2 Simulation Helpers

```c
static void simulate_imu_accel(float *ax, float *ay, float *az)
{
    static float t = 0.0f;
    t += 0.05f;
    *ax = 0.5f * sinf(t * 1.0f) + 0.1f * sinf(t * 3.7f);
    *ay = 0.3f * cosf(t * 0.7f) + 0.05f * sinf(t * 5.1f);
    *az = 9.81f + 0.2f * sinf(t * 2.0f);
}

static void simulate_imu_gyro(float *gx, float *gy, float *gz)
{
    static float t = 0.0f;
    t += 0.04f;
    *gx = 0.3f * sinf(t * 1.5f);
    *gy = 0.2f * cosf(t * 1.2f);
    *gz = 0.15f * sinf(t * 0.8f);
}
```

#### 3.3 Timer Callback - อัพเดททุก Chart

```c
static void chart_timer_cb(lv_timer_t * timer)
{
    (void)timer;

    float ax, ay, az, gx, gy, gz;
    simulate_imu_accel(&ax, &ay, &az);
    simulate_imu_gyro(&gx, &gy, &gz);

    /* ===== BAR CHART: Accel X/Y/Z comparison ===== */
    int32_t bx = (int32_t)((ax + 2.0f) * 25.0f);  /* -2..+2 -> 0..100 */
    int32_t by = (int32_t)((ay + 2.0f) * 25.0f);
    int32_t bz = (int32_t)((az / 10.0f) * 10.0f);
    bx = LV_CLAMP(0, bx, 100);
    by = LV_CLAMP(0, by, 100);
    bz = LV_CLAMP(0, bz, 100);

    lv_chart_set_value_by_id(bar_chart, bar_ser, 0, bx);
    lv_chart_set_value_by_id(bar_chart, bar_ser, 1, by);
    lv_chart_set_value_by_id(bar_chart, bar_ser, 2, bz);
    lv_chart_refresh(bar_chart);  /* REQUIRED for bar chart */

    lv_label_set_text_fmt(bar_value_label,
        "X:%.1f Y:%.1f Z:%.1f", (double)ax, (double)ay, (double)az);

    /* ===== AREA CHART: Magnitude over time ===== */
    float mag = sqrtf(ax * ax + ay * ay + az * az);
    int32_t mag_scaled = (int32_t)(mag * 10.0f);
    if(mag_scaled > 150) mag_scaled = 150;

    lv_chart_set_next_value(area_chart, area_ser, mag_scaled);
    lv_label_set_text_fmt(area_value_label, "Mag: %.2f m/s2",
                          (double)mag);

    /* ===== SCATTER CHART: X vs Y ===== */
    int32_t sx = (int32_t)((ax + 2.0f) * 50.0f);  /* -2..+2 -> 0..200 */
    int32_t sy = (int32_t)((ay + 2.0f) * 50.0f);
    lv_chart_set_next_value2(scatter_chart, scatter_ser, sx, sy);
    lv_label_set_text_fmt(scatter_value_label,
        "X:%.2f Y:%.2f", (double)ax, (double)ay);

    /* ===== LINE CHART: Gyroscope Roll/Pitch/Yaw ===== */
    int32_t gr = (int32_t)((gx + 1.0f) * 50.0f);  /* -1..+1 -> 0..100 */
    int32_t gp = (int32_t)((gy + 1.0f) * 50.0f);
    int32_t gyw = (int32_t)((gz + 1.0f) * 50.0f);

    lv_chart_set_next_value(line_chart, line_ser[0], gr);
    lv_chart_set_next_value(line_chart, line_ser[1], gp);
    lv_chart_set_next_value(line_chart, line_ser[2], gyw);

    lv_label_set_text_fmt(line_value_label,
        "R:%.2f P:%.2f Y:%.2f", (double)gx, (double)gy, (double)gz);
}
```

#### 3.4 สร้าง Bar Chart (มุมซ้ายบน)

```c
static void create_bar_chart(lv_obj_t * parent)
{
    /* Title */
    lv_obj_t * title = lv_label_create(parent);
    lv_label_set_text(title, "Bar: Accel X/Y/Z");
    lv_obj_set_style_text_font(title, &lv_font_montserrat_14, 0);
    lv_obj_align(title, LV_ALIGN_TOP_LEFT, 10, 5);

    /* Bar Chart */
    bar_chart = lv_chart_create(parent);
    lv_obj_set_size(bar_chart, CHART_W, CHART_H);
    lv_obj_align(bar_chart, LV_ALIGN_TOP_LEFT, 10, 25);
    lv_chart_set_type(bar_chart, LV_CHART_TYPE_BAR);
    lv_chart_set_point_count(bar_chart, 3);  /* X, Y, Z */
    lv_chart_set_range(bar_chart, LV_CHART_AXIS_PRIMARY_Y, 0, 100);

    bar_ser = lv_chart_add_series(bar_chart,
                  lv_palette_main(LV_PALETTE_BLUE),
                  LV_CHART_AXIS_PRIMARY_Y);

    /* เพิ่มระยะห่างระหว่าง bars */
    lv_obj_set_style_pad_column(bar_chart, 30, 0);

    /* Value label */
    bar_value_label = lv_label_create(parent);
    lv_label_set_text(bar_value_label, "X:0 Y:0 Z:0");
    lv_obj_set_style_text_font(bar_value_label, &lv_font_montserrat_12, 0);
    lv_obj_align(bar_value_label, LV_ALIGN_TOP_LEFT, 10, CHART_H + 30);
}
```

#### 3.5 สร้าง Area Chart (มุมขวาบน)

```c
static void create_area_chart(lv_obj_t * parent)
{
    /* Title */
    lv_obj_t * title = lv_label_create(parent);
    lv_label_set_text(title, "Area: Magnitude");
    lv_obj_set_style_text_font(title, &lv_font_montserrat_14, 0);
    lv_obj_align(title, LV_ALIGN_TOP_LEFT, 250, 5);

    /* Area Chart (Line + Fill) */
    area_chart = lv_chart_create(parent);
    lv_obj_set_size(area_chart, CHART_W, CHART_H);
    lv_obj_align(area_chart, LV_ALIGN_TOP_LEFT, 250, 25);
    lv_chart_set_type(area_chart, LV_CHART_TYPE_LINE);
    lv_chart_set_point_count(area_chart, CHART_POINTS);
    lv_chart_set_range(area_chart, LV_CHART_AXIS_PRIMARY_Y, 0, 150);

    area_ser = lv_chart_add_series(area_chart,
                   lv_palette_main(LV_PALETTE_RED),
                   LV_CHART_AXIS_PRIMARY_Y);

    /* Area fill effect */
    lv_obj_set_style_bg_opa(area_chart, LV_OPA_50, LV_PART_ITEMS);
    lv_obj_set_style_size(area_chart, 3, 3, LV_PART_INDICATOR);
    lv_obj_set_style_line_width(area_chart, 2, LV_PART_ITEMS);
    lv_chart_set_div_line_count(area_chart, 4, 6);

    /* Value label */
    area_value_label = lv_label_create(parent);
    lv_label_set_text(area_value_label, "Mag: 0.00 m/s2");
    lv_obj_set_style_text_font(area_value_label, &lv_font_montserrat_12, 0);
    lv_obj_set_style_text_color(area_value_label,
        lv_palette_main(LV_PALETTE_RED), 0);
    lv_obj_align(area_value_label, LV_ALIGN_TOP_LEFT, 250, CHART_H + 30);
}
```

#### 3.6 สร้าง Scatter Chart (มุมซ้ายล่าง)

```c
static void create_scatter_chart(lv_obj_t * parent)
{
    /* Title */
    lv_obj_t * title = lv_label_create(parent);
    lv_label_set_text(title, "Scatter: X vs Y");
    lv_obj_set_style_text_font(title, &lv_font_montserrat_14, 0);
    lv_obj_align(title, LV_ALIGN_TOP_LEFT, 10, 170);

    /* Scatter Chart */
    scatter_chart = lv_chart_create(parent);
    lv_obj_set_size(scatter_chart, CHART_W, CHART_H);
    lv_obj_align(scatter_chart, LV_ALIGN_TOP_LEFT, 10, 190);
    lv_chart_set_type(scatter_chart, LV_CHART_TYPE_SCATTER);
    lv_chart_set_point_count(scatter_chart, SCATTER_POINTS);

    /* IMPORTANT: ต้อง set ทั้ง X range และ Y range */
    lv_chart_set_range(scatter_chart, LV_CHART_AXIS_PRIMARY_X, 0, 200);
    lv_chart_set_range(scatter_chart, LV_CHART_AXIS_PRIMARY_Y, 0, 200);

    scatter_ser = lv_chart_add_series(scatter_chart,
                      lv_palette_main(LV_PALETTE_BLUE),
                      LV_CHART_AXIS_PRIMARY_Y);

    /* จุดใหญ่ ๆ ให้เห็นชัด */
    lv_obj_set_style_size(scatter_chart, 8, 8, LV_PART_INDICATOR);
    lv_obj_set_style_bg_opa(scatter_chart, LV_OPA_70, LV_PART_INDICATOR);
    lv_chart_set_div_line_count(scatter_chart, 4, 4);

    /* Value label */
    scatter_value_label = lv_label_create(parent);
    lv_label_set_text(scatter_value_label, "X:0 Y:0");
    lv_obj_set_style_text_font(scatter_value_label, &lv_font_montserrat_12, 0);
    lv_obj_align(scatter_value_label, LV_ALIGN_TOP_LEFT, 10, CHART_H + 195);
}
```

#### 3.7 สร้าง Line Chart (มุมขวาล่าง)

```c
static void create_line_chart(lv_obj_t * parent)
{
    /* Title */
    lv_obj_t * title = lv_label_create(parent);
    lv_label_set_text(title, "Line: Gyro R/P/Y");
    lv_obj_set_style_text_font(title, &lv_font_montserrat_14, 0);
    lv_obj_align(title, LV_ALIGN_TOP_LEFT, 250, 170);

    /* Line Chart */
    line_chart = lv_chart_create(parent);
    lv_obj_set_size(line_chart, CHART_W, CHART_H);
    lv_obj_align(line_chart, LV_ALIGN_TOP_LEFT, 250, 190);
    lv_chart_set_type(line_chart, LV_CHART_TYPE_LINE);
    lv_chart_set_point_count(line_chart, CHART_POINTS);
    lv_chart_set_range(line_chart, LV_CHART_AXIS_PRIMARY_Y, 0, 100);

    /* ซ่อนจุด แสดงแค่เส้น */
    lv_obj_set_style_size(line_chart, 0, 0, LV_PART_INDICATOR);
    lv_obj_set_style_line_width(line_chart, 2, LV_PART_ITEMS);
    lv_chart_set_div_line_count(line_chart, 4, 4);

    /* 3 series: Roll(Red), Pitch(Green), Yaw(Blue) */
    lv_color_t colors[] = {
        lv_palette_main(LV_PALETTE_RED),
        lv_palette_main(LV_PALETTE_GREEN),
        lv_palette_main(LV_PALETTE_BLUE)
    };
    for(int i = 0; i < 3; i++) {
        line_ser[i] = lv_chart_add_series(line_chart, colors[i],
                                           LV_CHART_AXIS_PRIMARY_Y);
    }

    /* Value label */
    line_value_label = lv_label_create(parent);
    lv_label_set_text(line_value_label, "R:0 P:0 Y:0");
    lv_obj_set_style_text_font(line_value_label, &lv_font_montserrat_12, 0);
    lv_obj_align(line_value_label, LV_ALIGN_TOP_LEFT, 250, CHART_H + 195);
}
```

#### 3.8 Main Function

```c
void part2_ex6_chart_dashboard(void)
{
    /* พื้นหลังสีเทาอ่อน */
    lv_obj_set_style_bg_color(lv_screen_active(),
        lv_color_hex(0xF0F0F0), LV_PART_MAIN);

    /* สร้าง 4 charts ใน grid 2x2 */
    lv_obj_t * screen = lv_screen_active();
    create_bar_chart(screen);
    create_area_chart(screen);
    create_scatter_chart(screen);
    create_line_chart(screen);

    /* Single timer สำหรับอัพเดททุก chart */
    chart_timer = lv_timer_create(chart_timer_cb, 100, NULL);
}
```

***

### 4. องค์ความรู้และเทคนิค

#### 4.1 เลือก Chart Type ที่เหมาะสม

<table><thead><tr><th width="310.5198974609375">ลักษณะข้อมูล</th><th width="174.3245849609375">Chart Type ที่เหมาะ</th><th>เหตุผล</th></tr></thead><tbody><tr><td>เปรียบเทียบค่าหลาย ๆ ตัว ณ เวลาเดียว</td><td><strong>Bar</strong></td><td>เห็นความแตกต่างชัดเจน</td></tr><tr><td>ข้อมูลเปลี่ยนแปลงตามเวลา</td><td><strong>Line</strong></td><td>เห็น trend ชัด</td></tr><tr><td>ข้อมูลเปลี่ยนแปลงตามเวลา + ปริมาณ</td><td><strong>Area</strong> (Line+Fill)</td><td>เห็นทั้ง trend และ volume</td></tr><tr><td>ความสัมพันธ์ระหว่าง 2 ตัวแปร</td><td><strong>Scatter</strong></td><td>เห็น correlation pattern</td></tr><tr><td>สัดส่วน/เปอร์เซ็นต์</td><td><strong>Arc/Bar</strong></td><td>เห็นสัดส่วนชัด</td></tr></tbody></table>

#### 4.2 Bar Chart Gotchas

```c
/* BAR Chart: 3 ข้อควรจำ */

/* 1. point_count = จำนวน bars (ไม่ใช่ data points) */
lv_chart_set_point_count(chart, 3);  /* 3 bars: X, Y, Z */

/* 2. ใช้ set_value_by_id (ไม่ใช่ set_next_value) */
lv_chart_set_value_by_id(chart, ser, 0, val_x);  /* bar index 0 */
lv_chart_set_value_by_id(chart, ser, 1, val_y);  /* bar index 1 */

/* 3. MUST call refresh หลังอัพเดท */
lv_chart_refresh(chart);
```

#### 4.3 Scatter Chart Gotchas

```c
/* SCATTER Chart: 2 ข้อควรจำ */

/* 1. ต้อง set ทั้ง X range และ Y range */
lv_chart_set_range(chart, LV_CHART_AXIS_PRIMARY_X, 0, 200);
lv_chart_set_range(chart, LV_CHART_AXIS_PRIMARY_Y, 0, 200);

/* 2. ใช้ set_next_value2 (ส่งทั้ง x และ y) */
lv_chart_set_next_value2(chart, ser, x_val, y_val);
```

#### 4.4 Data Scaling Pattern

```c
/* Pattern: แปลงค่า float range เป็น int range สำหรับ chart */

/* Accel: -2.0..+2.0 -> 0..100 */
int32_t scaled = (int32_t)((value + 2.0f) * 25.0f);
scaled = LV_CLAMP(0, scaled, 100);

/* Gyro: -1.0..+1.0 -> 0..100 */
int32_t scaled = (int32_t)((value + 1.0f) * 50.0f);

/* General formula: */
/* scaled = (value - src_min) / (src_max - src_min) * (dst_max - dst_min) + dst_min */
```

#### 4.5 Grid Layout Tips

```c
/* คำนวณ layout สำหรับ 2x2 grid บนหน้าจอ 480x320 */
#define SCREEN_W    480
#define SCREEN_H    320
#define MARGIN      10
#define CHART_W     ((SCREEN_W - 3 * MARGIN) / 2)   /* ~220 */
#define CHART_H     ((SCREEN_H - 3 * MARGIN - 40) / 2)  /* ~110 (reserve 40 for labels) */

/* ตำแหน่ง: */
/* Top-Left:     (MARGIN, 25) */
/* Top-Right:    (MARGIN + CHART_W + MARGIN, 25) */
/* Bottom-Left:  (MARGIN, 25 + CHART_H + 40) */
/* Bottom-Right: (MARGIN + CHART_W + MARGIN, 25 + CHART_H + 40) */
```

***

### 5. แบบฝึกหัด

#### Exercise 1: Weather Dashboard

**โจทย์:** สร้าง Weather Dashboard แบบ 2x2 grid แสดง 4 charts:

| ตำแหน่ง  | Chart Type | ข้อมูล           | Range       |
| -------- | ---------- | ---------------- | ----------- |
| ซ้ายบน   | Line       | Temperature (C)  | 20-40       |
| ขวาบน    | Area       | Humidity (%)     | 40-100      |
| ซ้ายล่าง | Bar        | Pressure (hPa)   | 990-1030    |
| ขวาล่าง  | Scatter    | Temp vs Humidity | correlation |

* จำลองข้อมูลให้สมจริง (อุณหภูมิสัมพันธ์กับความชื้น)
* แต่ละ chart มี title และ value label
* อัพเดททุก 200ms

**การประยุกต์ใช้งานจริง:**

* สถานีตรวจอากาศ (Weather Station)
* ระบบ HVAC ในอาคาร
* Smart Agriculture - ตรวจสอบสภาพอากาศในฟาร์ม

***

#### Exercise 2: Chart Type Selector

**โจทย์:** เพิ่ม Dropdown ที่ด้านบนของหน้าจอ ให้ผู้ใช้เลือกประเภท Chart สำหรับ Accelerometer data:

* ตัวเลือก: "Line\nBar\nScatter"
* เมื่อเปลี่ยน dropdown จะทำลาย chart เก่าและสร้างใหม่ตาม type ที่เลือก
* ข้อมูลที่แสดงเหมือนกัน (Accel X/Y/Z) แต่เปลี่ยนวิธีแสดงผล

**การประยุกต์ใช้งานจริง:**

* Data Analytics Dashboard ที่ให้ผู้ใช้เลือกมุมมองข้อมูล
* Lab Equipment Software ที่วิศวกรต้องวิเคราะห์ข้อมูลหลายมุมมอง

**Hint:**

* `lv_dropdown_create(parent)` สร้าง dropdown
* `lv_dropdown_set_options(dd, "Line\nBar\nScatter")`
* Event callback: `lv_dropdown_get_selected(dd)` return 0, 1, 2
* ลบ chart เก่า: `lv_obj_delete(old_chart)`

***

### 6. References

* [LVGL Chart](https://docs.lvgl.io/9.2/widgets/chart.html)
* [lv\_example\_chart\_1.c](https://github.com/lvgl/lvgl/blob/release/v9.2/examples/widgets/chart/lv_example_chart_1.c)
* [LVGL TabView](https://docs.lvgl.io/9.2/widgets/tabview.html)

***


# Hardware Interfacing Workshops

## Part II: Sensor Hardware Integration & Visualization

***

## โค้ดโปรเจคสำหรับ Sensor-to-HMI Display

{% embed url="<https://github.com/Advance-Innovation-Centre-AIC/psoc-e84-e2-lvgl-aic-eec>" %}

{% hint style="info" %}

### Part 2 Examples (Sensor Visualization)**:**

Section II (Real Hardware):

* 7 = Real IMU Visualization (based on Ex3)
* 8 = Real Sensor Dashboard (based on Ex5)
* 9 = Real Arc Gauge (based on Ex2, uses POTEN)
* 10 = Real Scale Gauge (based on Ex4, uses POTEN)
* 11 = Real Chart Dashboard (based on Ex6, uses IMU)
  {% endhint %}

***

### สารบัญ

1. ภาพรวม Part II
2. aic-eec Sensor API
3. ตัวอย่างที่ 7: Real IMU Visualization
4. ตัวอย่างที่ 8: Real Sensor Dashboard
5. ตัวอย่างที่ 9: Real Arc Gauge with Tilt Analysis
6. ตัวอย่างที่ 10: Real Scale Gauge with Tilt Analysis 6B. ตัวอย่างที่ 11: Real Chart Dashboard (4 Chart Types)
7. Complementary Filter - การวิเคราะห์มุมเอียง
8. แบบฝึกหัด

***

### 1. ภาพรวม Part II

#### Sensor Hardware บนบอร์ด

<table><thead><tr><th width="193.19671630859375">Sensor</th><th width="143.30328369140625">Chip</th><th width="140.3770751953125">Interface</th><th>ข้อมูล</th></tr></thead><tbody><tr><td><strong>ADC</strong></td><td>SAR ADC</td><td>Analog</td><td>Potentiometer (0-3.3V)</td></tr><tr><td><strong>IMU</strong></td><td>BMI270</td><td>I2C</td><td>Accelerometer, Gyroscope</td></tr><tr><td><strong>Temperature</strong></td><td>Internal</td><td>ADC</td><td>Chip temperature</td></tr></tbody></table>

***

### 2. aic-eec Sensor API

#### 2.1 ADC API

```c
#include "aic-eec/sensors.h"

/* ADC Channels */
typedef enum {
    AIC_ADC_CH0 = 0,    // Potentiometer
    AIC_ADC_CH_COUNT
} aic_adc_channel_t;

/* ADC Functions */
void aic_sensors_init(void);                          // Initialize sensors
uint16_t aic_adc_read(aic_adc_channel_t ch);          // Raw (0-4095)
float aic_adc_read_voltage(aic_adc_channel_t ch);     // Voltage (0-3.3V)
uint8_t aic_adc_read_percent(aic_adc_channel_t ch);   // Percent (0-100%)
float aic_adc_read_temperature(void);                  // Chip temp (°C)
```

#### 2.2 IMU API (BMI270)

```c
/* Orientation Types */
typedef enum {
    AIC_ORIENT_UNKNOWN = 0,
    AIC_ORIENT_FLAT_UP,       // หงายขึ้น
    AIC_ORIENT_FLAT_DOWN,     // คว่ำลง
    AIC_ORIENT_PORTRAIT,      // แนวตั้ง
    AIC_ORIENT_LANDSCAPE,     // แนวนอน
    AIC_ORIENT_TILT_LEFT,     // เอียงซ้าย
    AIC_ORIENT_TILT_RIGHT     // เอียงขวา
} aic_orientation_t;

/* IMU Functions */
bool aic_imu_read_accel(float *ax, float *ay, float *az);  // Accelerometer (g)
bool aic_imu_read_gyro(float *gx, float *gy, float *gz);   // Gyroscope (rad/s)
aic_orientation_t aic_imu_get_orientation(void);            // Orientation
const char* aic_imu_orientation_name(aic_orientation_t o);  // Name string
```

#### API Summary

| Function                       | หน้าที่            | Return     |
| ------------------------------ | ------------------ | ---------- |
| `aic_sensors_init()`           | เริ่มต้น Sensors   | void       |
| `aic_adc_read(ch)`             | อ่าน ADC raw       | 0-4095     |
| `aic_adc_read_voltage(ch)`     | อ่าน Voltage       | 0.0-3.3V   |
| `aic_adc_read_percent(ch)`     | อ่าน Percent       | 0-100%     |
| `aic_imu_read_accel(ax,ay,az)` | อ่าน Accelerometer | true/false |
| `aic_imu_read_gyro(gx,gy,gz)`  | อ่าน Gyroscope     | true/false |
| `aic_imu_get_orientation()`    | คำนวณ Orientation  | enum       |

#### 2.3 Tilt Analysis API (NEW)

```c
#include "aic-eec/tilt.h"

/* Tilt Functions - Complementary Filter */
bool aic_tilt_init(const aic_tilt_config_t *config);  // NULL for defaults
bool aic_tilt_update_from_imu(void);                  // Auto-read IMU
float aic_tilt_get_roll(void);                         // Roll angle (deg)
float aic_tilt_get_pitch(void);                        // Pitch angle (deg)
uint8_t aic_tilt_get_roll_percent(void);               // -90..+90 → 0..100%
uint8_t aic_tilt_get_pitch_percent(void);              // -90..+90 → 0..100%
void aic_tilt_reset(void);                             // Reset filter
void aic_tilt_set_alpha(float alpha);                  // Adjust filter (0.0-1.0)
```

| Function                       | หน้าที่                       | Return      |
| ------------------------------ | ----------------------------- | ----------- |
| `aic_tilt_init(config)`        | เริ่มต้น Complementary Filter | true/false  |
| `aic_tilt_update_from_imu()`   | อ่าน IMU และอัพเดท filter     | true/false  |
| `aic_tilt_get_roll()`          | มุม Roll (เอียงซ้าย-ขวา)      | -180..+180° |
| `aic_tilt_get_pitch()`         | มุม Pitch (เอียงหน้า-หลัง)    | -90..+90°   |
| `aic_tilt_get_roll_percent()`  | Roll เป็นเปอร์เซ็นต์          | 0-100%      |
| `aic_tilt_get_pitch_percent()` | Pitch เป็นเปอร์เซ็นต์         | 0-100%      |

#### WHY: ทำไมใช้ aic-eec API?

1. **Abstraction** - ซ่อนความซับซ้อนของ HAL/Driver
2. **Consistency** - API รูปแบบเดียวกันทั้งโปรเจค
3. **Testability** - สามารถ mock ได้ง่าย
4. **Reusability** - ใช้ซ้ำได้หลาย examples

***

### 3. ตัวอย่างที่ 7: Real ADC Visualization

#### เป้าหมาย

แสดงค่า ADC จาก Potentiometer จริงด้วย Slider และ Bar

#### Comparison: Part I vs Part II

```c
/* Part I (Simulated) */
uint16_t value = simulate_adc_read();  // Random value

/* Part II (Real Hardware) */
uint16_t value = aic_adc_read(AIC_ADC_CH0);  // Real potentiometer
```

#### โค้ดหลัก

```c
#include "week4_examples.h"
#include "../aic-eec/sensors.h"

static lv_obj_t *real_adc_slider = NULL;
static lv_obj_t *real_adc_bar = NULL;
static lv_obj_t *real_adc_value_label = NULL;
static lv_obj_t *real_adc_voltage_label = NULL;
static lv_timer_t *real_adc_timer = NULL;

static void real_adc_timer_cb(lv_timer_t *timer)
{
    (void)timer;

    /* อ่าน ADC จริง */
    uint16_t raw = aic_adc_read(AIC_ADC_CH0);
    uint8_t percent = aic_adc_read_percent(AIC_ADC_CH0);
    float voltage = aic_adc_read_voltage(AIC_ADC_CH0);

    /* Update Slider (read-only display) */
    lv_slider_set_value(real_adc_slider, percent, LV_ANIM_ON);

    /* Update Bar */
    lv_bar_set_value(real_adc_bar, percent, LV_ANIM_ON);

    /* Update Labels */
    lv_label_set_text_fmt(real_adc_value_label,
                          "Raw: %u  (%u%%)", raw, percent);
    lv_label_set_text_fmt(real_adc_voltage_label,
                          "Voltage: %.3f V", voltage);
}

void week4_ex7_real_adc_display(void)
{
    /* Initialize sensors */
    aic_sensors_init();

    lv_obj_t *scr = lv_screen_active();
    lv_obj_set_style_bg_color(scr, lv_color_hex(0x1a1a2e), 0);

    /* Title */
    lv_obj_t *title = lv_label_create(scr);
    lv_label_set_text(title, "Week 4 Ex7: Real ADC Visualization");
    lv_obj_set_style_text_color(title, lv_color_hex(0x00ff88), 0);
    lv_obj_align(title, LV_ALIGN_TOP_MID, 0, 10);

    /* Slider (read-only) */
    real_adc_slider = lv_slider_create(scr);
    lv_obj_set_width(real_adc_slider, 350);
    lv_slider_set_range(real_adc_slider, 0, 100);
    lv_obj_align(real_adc_slider, LV_ALIGN_CENTER, 0, -30);
    lv_obj_remove_flag(real_adc_slider, LV_OBJ_FLAG_CLICKABLE);

    /* Vertical Bar */
    real_adc_bar = lv_bar_create(scr);
    lv_obj_set_size(real_adc_bar, 40, 120);
    lv_bar_set_range(real_adc_bar, 0, 100);
    lv_obj_align(real_adc_bar, LV_ALIGN_RIGHT_MID, -40, 0);

    /* Value Labels */
    real_adc_value_label = lv_label_create(scr);
    lv_label_set_text(real_adc_value_label, "Raw: 0  (0%)");
    lv_obj_set_style_text_color(real_adc_value_label, lv_color_hex(0xffff00), 0);
    lv_obj_align(real_adc_value_label, LV_ALIGN_CENTER, -50, 40);

    real_adc_voltage_label = lv_label_create(scr);
    lv_label_set_text(real_adc_voltage_label, "Voltage: 0.000 V");
    lv_obj_set_style_text_color(real_adc_voltage_label, lv_color_hex(0x00ffff), 0);
    lv_obj_align(real_adc_voltage_label, LV_ALIGN_CENTER, -50, 70);

    /* Timer - อ่านทุก 100ms */
    real_adc_timer = lv_timer_create(real_adc_timer_cb, 100, NULL);
}
```

#### Layout

```ini
┌─────────────────────────────────────────────────────────┐
│       Week 4 Ex7: Real ADC Visualization                │
├─────────────────────────────────────────────────────────┤
│                      ADC Level                          │
│  ╔════════════════════════════════════════╗      ┌───┐  │
│  ║▓▓▓▓▓▓▓▓▓▓▓▓▓▓▓▓▓▓▓▓░░░░░░░░░░░░░░░░░░  ║      │   │  │
│  ╚════════════════════════════════════════╝      │BAR│  │
│                                                  │   │  │
│            Raw: 2048  (50%)                      └───┘  │
│            Voltage: 1.650 V                             │
│                                                         │
│         Turn the potentiometer on the board             │
└─────────────────────────────────────────────────────────┘
```

***

### 4. ตัวอย่างที่ 8: Real IMU Visualization

#### เป้าหมาย

แสดงข้อมูล Accelerometer 3 แกน จาก BMI270 แบบ Real-time

#### Comparison: Part I vs Part II

```c
/* Part I (Simulated) */
float ax, ay, az;
simulate_imu_accel(&ax, &ay, &az);  // Sine wave simulation

/* Part II (Real Hardware) */
float ax, ay, az;
aic_imu_read_accel(&ax, &ay, &az);  // Real BMI270 data
```

#### โค้ดหลัก

```c
static lv_obj_t *imu_chart = NULL;
static lv_chart_series_t *imu_ser_x = NULL;
static lv_chart_series_t *imu_ser_y = NULL;
static lv_chart_series_t *imu_ser_z = NULL;
static lv_obj_t *imu_orient_label = NULL;
static lv_timer_t *imu_timer = NULL;

static void imu_timer_cb(lv_timer_t *timer)
{
    (void)timer;

    /* อ่าน IMU จริง */
    float ax, ay, az;
    if (!aic_imu_read_accel(&ax, &ay, &az)) {
        return;  // Read failed
    }

    /* Map จาก -2g..+2g เป็น 0..100 สำหรับ Chart */
    int32_t x_val = (int32_t)((ax + 2.0f) * 25.0f);
    int32_t y_val = (int32_t)((ay + 2.0f) * 25.0f);
    int32_t z_val = (int32_t)((az + 2.0f) * 25.0f);

    /* Clamp values */
    if (x_val < 0) x_val = 0; if (x_val > 100) x_val = 100;
    if (y_val < 0) y_val = 0; if (y_val > 100) y_val = 100;
    if (z_val < 0) z_val = 0; if (z_val > 100) z_val = 100;

    /* Update Chart */
    lv_chart_set_next_value(imu_chart, imu_ser_x, x_val);
    lv_chart_set_next_value(imu_chart, imu_ser_y, y_val);
    lv_chart_set_next_value(imu_chart, imu_ser_z, z_val);

    /* Update Labels */
    lv_label_set_text_fmt(imu_x_label, "X: %.2f g", ax);
    lv_label_set_text_fmt(imu_y_label, "Y: %.2f g", ay);
    lv_label_set_text_fmt(imu_z_label, "Z: %.2f g", az);

    /* Update Orientation */
    aic_orientation_t orient = aic_imu_get_orientation();
    lv_label_set_text_fmt(imu_orient_label, "Orientation: %s",
                          aic_imu_orientation_name(orient));
}

void week4_ex8_real_imu_display(void)
{
    aic_sensors_init();

    lv_obj_t *scr = lv_screen_active();

    /* Chart สำหรับ 3 แกน */
    imu_chart = lv_chart_create(scr);
    lv_obj_set_size(imu_chart, 320, 140);
    lv_obj_align(imu_chart, LV_ALIGN_CENTER, -50, 10);
    lv_chart_set_type(imu_chart, LV_CHART_TYPE_LINE);
    lv_chart_set_point_count(imu_chart, 100);
    lv_chart_set_range(imu_chart, LV_CHART_AXIS_PRIMARY_Y, 0, 100);

    /* Add series (X=Red, Y=Green, Z=Blue) */
    imu_ser_x = lv_chart_add_series(imu_chart, lv_color_hex(0xff0000),
                                     LV_CHART_AXIS_PRIMARY_Y);
    imu_ser_y = lv_chart_add_series(imu_chart, lv_color_hex(0x00ff00),
                                     LV_CHART_AXIS_PRIMARY_Y);
    imu_ser_z = lv_chart_add_series(imu_chart, lv_color_hex(0x0088ff),
                                     LV_CHART_AXIS_PRIMARY_Y);

    /* Initialize with center value (50 = 0g) */
    lv_chart_set_all_value(imu_chart, imu_ser_x, 50);
    lv_chart_set_all_value(imu_chart, imu_ser_y, 50);
    lv_chart_set_all_value(imu_chart, imu_ser_z, 50);

    /* Timer - อ่านทุก 50ms (20 Hz) */
    imu_timer = lv_timer_create(imu_timer_cb, 50, NULL);
}
```

#### Data Mapping

```ini
IMU Accelerometer Data → Chart Value
────────────────────────────────────
   -2.0g  →   0  (bottom)
   -1.0g  →  25
    0.0g  →  50  (center/rest)
   +1.0g  →  75
   +2.0g  → 100  (top)

Formula: chart_value = (accel + 2.0) * 25
```

#### WHY: ทำไมต้อง Map ค่า?

* LVGL Chart รับค่าเป็น integer (0-100)
* IMU Accelerometer ส่งค่าเป็น float (-2.0 ถึง +2.0 g)
* ต้อง map เพื่อแสดงผลได้ถูกต้อง

***

### 5. ตัวอย่างที่ 9: Real Sensor Dashboard

#### เป้าหมาย

รวม ADC + IMU + Orientation + Temperature ในหน้าเดียว

#### Layout

```ini
┌─────────────────────────────────────────────────────────┐
│          Week 4 Ex9: Real Sensor Dashboard              │
├────────────────┬────────────────────────┬───────────────┤
│   ADC (Pot)    │   IMU Accelerometer    │  Orientation  │
│    ┌────┐      │  ┌──────────────────┐  │               │
│    │    │      │  │  X ─────         │  │   FLAT_UP     │
│    │ 65%│      │  │  Y ─────         │  │               │
│    │1.2V│      │  │  Z ─────         │  │  Temp: 32°C   │
│    └────┘      │  └──────────────────┘  │               │
└────────────────┴────────────────────────┴───────────────┘
```

#### โค้ดโครงสร้าง

```c
static void dash_sensor_timer_cb(lv_timer_t *timer)
{
    (void)timer;

    /* Read ADC */
    uint8_t adc_percent = aic_adc_read_percent(AIC_ADC_CH0);
    float voltage = aic_adc_read_voltage(AIC_ADC_CH0);
    lv_arc_set_value(dash_adc_arc, adc_percent);
    lv_label_set_text_fmt(dash_adc_label, "%u%%\n%.2fV", adc_percent, voltage);

    /* Read IMU */
    float ax, ay, az;
    if (aic_imu_read_accel(&ax, &ay, &az)) {
        /* Update chart... */

        /* Update orientation */
        aic_orientation_t orient = aic_imu_get_orientation();
        lv_label_set_text_fmt(dash_orient_label, "%s",
                              aic_imu_orientation_name(orient));
    }

    /* Read Temperature */
    float temp = aic_adc_read_temperature();
    lv_label_set_text_fmt(dash_temp_label, "Temp: %.1f C", temp);
}

void week4_ex9_real_sensor_dashboard(void)
{
    aic_sensors_init();

    /* ADC Panel with Arc gauge */
    /* IMU Panel with Chart */
    /* Orientation Panel */

    /* Timer - 100ms interval */
    dash_timer = lv_timer_create(dash_sensor_timer_cb, 100, NULL);
}
```

***

### 5B. ตัวอย่างที่ 9: Real Arc Gauge (Roll Angle)

#### เป้าหมาย

แสดงมุม Roll (เอียงซ้าย-ขวา) ด้วย Arc Gauge โดยใช้ Complementary Filter

#### Algorithm

```
angle = 0.98 * (angle + gyro*dt) + 0.02 * accel_angle
```

#### Code Pattern

```c
static void ex9_timer_cb(lv_timer_t *timer)
{
    /* Update tilt from IMU (Complementary Filter) */
    aic_tilt_update_from_imu();

    /* Get Roll angle and percentage */
    float roll = aic_tilt_get_roll();      /* -180 to +180 degrees */
    uint8_t pct = aic_tilt_get_roll_percent();  /* 0-100% */

    lv_arc_set_value(arc, pct);
    lv_label_set_text_fmt(label, "Roll: %.1f°", roll);
}

void week4_ex9_real_arc_gauge(void)
{
    aic_sensors_init();
    aic_tilt_init(NULL);  /* Use defaults: alpha=0.98, dt=0.1s */

    /* Create Arc (same as Ex2) */
    ex9_arc = lv_arc_create(lv_screen_active());
    lv_arc_set_range(ex9_arc, 0, 100);
    /* ... */

    lv_timer_create(ex9_timer_cb, 100, NULL);
}
```

**Status:** ✅ Approved

***

### 6. ตัวอย่างที่ 10: Real Scale Gauge (Pitch Angle)

#### เป้าหมาย

แสดงมุม Pitch (เอียงหน้า-หลัง) ด้วย Scale Gauge with Needle

#### Pitch vs Roll

| Angle     | Axis   | Motion         | Example            |
| --------- | ------ | -------------- | ------------------ |
| **Roll**  | X-axis | เอียงซ้าย-ขวา  | เครื่องบินเอียงปีก |
| **Pitch** | Y-axis | เอียงหน้า-หลัง | เครื่องบินก้ม-เงย  |

#### Percentage Mapping

```
-90° (ก้มลง)  → 0%
  0° (ระนาบ)  → 50%
+90° (เงยขึ้น) → 100%
```

#### Code Pattern

```c
static void ex10_timer_cb(lv_timer_t *timer)
{
    /* Update tilt from IMU (Complementary Filter) */
    aic_tilt_update_from_imu();

    /* Get Pitch angle and percentage */
    float pitch = aic_tilt_get_pitch();      /* -90 to +90 degrees */
    uint8_t pct = aic_tilt_get_pitch_percent();  /* 0-100% */

    lv_label_set_text_fmt(value_label, "%d", pct);
    lv_label_set_text_fmt(raw_label, "Pitch: %.1f°", pitch);

    /* Update needle position on scale gauge */
    lv_scale_set_line_needle_value(scale, needle, needle_len, pct);
}

void week4_ex10_real_scale_gauge(void)
{
    aic_sensors_init();
    aic_tilt_init(NULL);  /* Use defaults */

    /* Create Scale (based on Ex4) */
    ex10_scale = lv_scale_create(lv_screen_active());
    lv_scale_set_mode(ex10_scale, LV_SCALE_MODE_ROUND_OUTER);
    lv_scale_set_range(ex10_scale, 0, 100);

    /* Custom labels */
    static const char *labels[] = {"0", "25", "50", "75", "100", NULL};
    lv_scale_set_text_src(ex10_scale, labels);

    /* Create needle */
    ex10_needle_line = lv_line_create(lv_screen_active());
    lv_scale_set_line_needle_value(ex10_scale, ex10_needle_line, 85, 50);

    lv_timer_create(ex10_timer_cb, 100, NULL);
}
```

#### Layout

```
┌───────────────────────────────────────┐
│   Week 4 Ex10: Scale Gauge (Pitch)    │
├───────────────────────────────────────┤
│                                       │
│          0    25    50   75   100     │
│           ╲         │        ╱        │
│            ╲   ─────┼─────  ╱         │
│             ╲       │      ╱          │
│              ╲  ┌───────┐ ╱           │
│               ╲ │  50%  │╱            │
│                ╲│       │             │
│                 └───────┘             │
│          Pitch: 0.0 deg               │
│                                       │
│  [Part II] Complementary Filter       │
│  Tilt board forward/backward          │
├───────────────────────────────────────┤
│  ADC: 50% │ IMU: OK │ Err: 0          │
└───────────────────────────────────────┘
```

**Status:** ✅ Approved

***

### 6B. ตัวอย่างที่ 11: Real Chart Dashboard (4 Chart Types)

#### เป้าหมาย

แสดง Real Sensor Data ใน 4 รูปแบบ Chart ผ่าน TabView

#### 4 Tabs Overview

| Tab         | Chart Type   | Data Source    | Technique                     |
| ----------- | ------------ | -------------- | ----------------------------- |
| **Bar**     | Bar Chart    | Accel X/Y/Z    | 3 Colored Series (R/G/B)      |
| **Area**    | Faded Area   | Tilt Magnitude | lv\_example\_chart\_5 pattern |
| **Scatter** | Scatter Plot | Roll vs Pitch  | Tilt Ball effect              |
| **Line**    | Line Chart   | Gyroscope      | Ex7 stable pattern            |

#### Tab 1: Bar Chart (Accel X/Y/Z)

```c
/* 3 colored series: Red=X, Green=Y, Blue=Z */
ex11_bar_ser_x = lv_chart_add_series(chart, lv_palette_main(LV_PALETTE_RED), ...);
ex11_bar_ser_y = lv_chart_add_series(chart, lv_palette_main(LV_PALETTE_GREEN), ...);
ex11_bar_ser_z = lv_chart_add_series(chart, lv_palette_main(LV_PALETTE_BLUE), ...);

/* Scale: -5 to +5 m/s² → 0 to 100 */
int32_t bar_x = (int32_t)((ax + 5.0f) * 10.0f);
lv_chart_set_value_by_id(chart, ex11_bar_ser_x, 0, bar_x);
```

#### Tab 2: Faded Area Chart (Tilt Magnitude)

**เทคนิค lv\_example\_chart\_5:**

```c
/* Enable draw task events */
lv_obj_add_event_cb(chart, ex11_area_draw_cb, LV_EVENT_DRAW_TASK_ADDED, NULL);
lv_obj_add_flag(chart, LV_OBJ_FLAG_SEND_DRAW_TASK_EVENTS);

/* In callback: draw triangle + rectangle with gradient */
static void ex11_area_draw_cb(lv_event_t *e) {
    if(base_dsc->part == LV_PART_ITEMS &&
       lv_draw_task_get_type(draw_task) == LV_DRAW_TASK_TYPE_LINE) {
        /* Draw triangle below line segment */
        lv_draw_triangle_dsc_t tri_dsc;
        tri_dsc.bg_grad.dir = LV_GRAD_DIR_VER;
        tri_dsc.bg_grad.stops[0].opa = 255 - fract_upper;  /* Top: opaque */
        tri_dsc.bg_grad.stops[1].opa = 255 - fract_lower;  /* Bottom: less opaque */
        lv_draw_triangle(base_dsc->layer, &tri_dsc);

        /* Draw rectangle below triangle (fades to transparent) */
        lv_draw_rect_dsc_t rect_dsc;
        rect_dsc.bg_grad.stops[1].opa = 0;  /* Bottom: transparent */
        lv_draw_rect(base_dsc->layer, &rect_dsc, &rect_area);
    }
}
```

**Data: Tilt Magnitude**

```c
float tilt_mag = sqrtf(roll*roll + pitch*pitch);  /* 0-90 degrees */
lv_chart_set_next_value(chart, series, (int32_t)tilt_mag);
```

#### Tab 3: Scatter Chart (Roll vs Pitch)

**แนวคิด: Tilt Ball**

* เอียงบอร์ดเหมือนกระดานกลิ้งลูกบอล
* Roll = ซ้าย-ขวา, Pitch = หน้า-หลัง

```c
/* Map -90..+90 degrees → 0..200 (center = 100) */
int32_t scatter_x = (int32_t)((roll + 90.0f) * (200.0f / 180.0f));
int32_t scatter_y = (int32_t)((pitch + 90.0f) * (200.0f / 180.0f));
lv_chart_set_next_value2(chart, series, scatter_x, scatter_y);
```

#### Tab 4: Line Chart (Gyroscope)

**ใช้ Ex7 Pattern ที่ stable:**

```c
/* Range: -1500 to 1500 (proven stable) */
lv_chart_set_range(chart, LV_CHART_AXIS_PRIMARY_Y, -1500, 1500);

/* Scale: gyro * 100 */
int32_t gx_scaled = (int32_t)(gx * 100);
lv_chart_set_next_value(chart, series, gx_scaled);
```

#### Optimization: Update Active Tab Only

```c
/* Get active tab index */
uint32_t active_tab = lv_tabview_get_tab_active(ex11_tabview);

switch(active_tab) {
    case 0: /* Update Bar chart only */ break;
    case 1: /* Update Area chart only */ break;
    case 2: /* Update Scatter chart only */ break;
    case 3: /* Update Line chart only */ break;
}
```

**เหตุผล:** ลด CPU load เพราะไม่ต้องอัพเดท 4 charts ทุก 100ms

**Status:** ✅ Approved

***

### 7. Complementary Filter - การวิเคราะห์มุมเอียง

#### ทำไมต้องใช้ Complementary Filter?

| Sensor            | ข้อดี                    | ข้อเสีย                               |
| ----------------- | ------------------------ | ------------------------------------- |
| **Accelerometer** | วัดทิศทาง gravity ได้ตรง | มี noise และถูก vibration รบกวน       |
| **Gyroscope**     | ตอบสนองเร็ว, ไม่มี noise | Drift ตลอดเวลา (integration ของ bias) |
| **Complementary** | รวมข้อดีทั้งสอง          | ต้อง tune alpha parameter             |

#### Algorithm

```
angle = alpha * (angle + gyro_rate * dt) + (1-alpha) * accel_angle

where:
  alpha = 0.98  → trust gyro 98% (fast response)
  (1-alpha) = 0.02 → trust accel 2% (drift correction)
  dt = 0.1s → sample period (100ms timer)
```

#### การคำนวณ Accel Angle

```c
/* Roll from Accelerometer */
float roll_accel = atan2f(ay, az) * (180.0f / M_PI);

/* Pitch from Accelerometer */
float pitch_accel = atan2f(-ax, sqrtf(ay*ay + az*az)) * (180.0f / M_PI);
```

#### ข้อควรระวัง

1. **Gimbal Lock**: เมื่อ Pitch ใกล้ ±90° จะมีปัญหาในการคำนวณ Roll
2. **Initial Condition**: ต้องให้ accel angle เป็นค่าเริ่มต้น
3. **Sampling Rate**: dt ต้องตรงกับ timer interval

***

### 8. แบบฝึกหัด

#### แบบฝึกหัดที่ 1: ADC Threshold Alert

* ตั้ง threshold ด้วย Slider (0-100%)
* เมื่อ ADC เกิน threshold → LED ติด + เปลี่ยนสี Bar
* แสดงสถานะ "NORMAL" / "ALERT"

#### แบบฝึกหัดที่ 2: IMU Tilt Indicator

* แสดง orientation ด้วยรูปภาพ/icon
* เปลี่ยนสีพื้นหลังตาม orientation
* เพิ่ม Gyroscope chart (angular velocity)

#### แบบฝึกหัดที่ 3: Multi-Channel ADC

* แสดง ADC หลาย channels (ถ้ามี)
* เปรียบเทียบค่าด้วย grouped bar chart
* Export data ผ่าน UART

#### แบบฝึกหัดที่ 4: Data Logger

* บันทึกข้อมูล ADC/IMU ทุก 1 วินาที
* แสดงกราฟย้อนหลัง 60 วินาที
* เพิ่มปุ่ม Start/Stop/Clear

***

### 5A. CM33-CM55 IPC Architecture (Ex7-11)

#### สถาปัตยกรรม Dual-Core

PSoC Edge E84 ใช้ dual-core architecture:

* **CM33 (Non-Secure)**: อ่าน BMI270 ผ่าน I2C, เขียนลง Shared Memory
* **CM55 (FreeRTOS + LVGL)**: อ่าน Shared Memory, แสดงผลบน Display

```
┌─────────────┐    I2C     ┌─────────────┐
│   BMI270    │◄──────────►│    CM33     │
│  IMU Sensor │            │ (I2C Read)  │
└─────────────┘            └──────┬──────┘
                                  │ Write
                           ┌──────▼──────┐
                           │   Shared    │  0x261C0000
                           │   Memory    │  (256KB)
                           └──────┬──────┘
                                  │ Read
                           ┌──────▼──────┐
                           │    CM55     │
                           │  (LVGL UI)  │
                           └─────────────┘
```

#### Shared Memory Structure (imu\_shared.h)

```c
typedef struct {
    uint32_t magic;         /* 0x1AACC00D - verification */
    uint32_t write_lock;    /* Odd=writing, Even=done */
    float accel_x, accel_y, accel_z;  /* m/s² */
    float gyro_x, gyro_y, gyro_z;     /* rad/s */
    uint32_t error_count;   /* I2C error counter */
} imu_shared_t;

#define IMU_SHARED_PTR ((volatile imu_shared_t *)0x261C0040)
```

#### Synchronization Pattern

```c
/* CM33 Writer - imu_shared_update() */
imu->write_lock++;    // Make odd (writing)
__DSB();              // Memory barrier
imu->accel_x = ax;    // Write data
imu->accel_y = ay;
imu->accel_z = az;
__DSB();
imu->write_lock++;    // Make even (done)

/* CM55 Reader - aic_imu_read_accel() */
uint32_t lock1 = imu->write_lock;
if (lock1 & 1) return false;  // Odd = skip (CM33 writing)
/* Read data */
uint32_t lock2 = imu->write_lock;
if (lock1 != lock2) return false;  // Changed = inconsistent
return true;
```


# IMU Display

## Lab 7: Real IMU Display

### Part 2 - Sensor Visualization

### 1. โครงสร้างภาพรวมของ Lab

#### Why? - ทำไมต้องเรียนรู้เรื่องนี้

* **Real Data**: เปลี่ยนจาก simulation เป็นข้อมูลจาก sensor จริง (BMI270 Accelerometer)
* **IPC Architecture**: เข้าใจการส่งข้อมูลระหว่าง CM33 (sensor core) กับ CM55 (display core)
* **API Transition**: เรียนรู้วิธีแก้โค้ดจาก simulation เป็น hardware โดยแก้ไขน้อยที่สุด
* **Error Handling**: จัดการกรณี sensor ยังไม่พร้อมอ่านค่า

#### What? - จะได้เรียนรู้อะไร

1. **Sensor API**: ใช้ `imu_shared_read_accel()` อ่านค่า accelerometer ผ่าน shared memory
2. **Hardware Init**: เรียก `aic_sensors_init()` ก่อนใช้ sensor API
3. **IPC Architecture**: CM33 อ่าน BMI270 ผ่าน I2C → เขียน Shared Memory → CM55 อ่านแสดงผล
4. **Error Handling**: ตรวจสอบ return value ก่อนใช้ข้อมูล
5. **Debug Throttling**: พิมพ์ debug message แบบ throttled ไม่ให้ console ท่วม

#### How? - จะทำอย่างไร

1. เพิ่ม `aic_sensors_init()` ก่อนสร้าง UI
2. ใน timer callback เปลี่ยนจาก `simulate_imu_accel()` เป็น `imu_shared_read_accel()`
3. เพิ่ม error check: ถ้า return false ให้ skip update
4. UI code เหมือนกับที่ทำบน PC Simulator (Lab 3)
5. เพิ่ม debug print แบบ throttled

<figure><img src="/files/LnVCMT8WhBTvurKcI4N7" alt=""><figcaption></figcaption></figure>

***

### 2. หลักการทำงาน

#### 2.1 CM33-CM55 IPC Architecture

PSoC Edge E84 มี 2 cores ทำงานร่วมกัน: CM33 จัดการ hardware (sensor, GPIO, WiFi) และ CM55 จัดการ display (LVGL). การส่งข้อมูลระหว่าง core ใช้ Shared Memory.

```
┌─────────────────────────────────────────────────────────────┐
│               CM33-CM55 COMMUNICATION                       │
├─────────────────────────────────────────────────────────────┤
│                                                             │
│   ┌──────────────────┐                 ┌──────────────────┐ │
│   │     CM33-NS      │                 │       CM55       │ │
│   │  (Sensor Core)   │                 │   (LVGL Core)    │ │
│   ├──────────────────┤                 ├──────────────────┤ │
│   │  BMI270 Driver   │                 │  LVGL Graphics   │ │
│   │  - I2C Comm      │                 │  - Chart Widget  │ │
│   │  - 100Hz polling │                 │  - Timer 100ms   │ │
│   │  - Raw Data Read │                 │  - Label Update  │ │
│   └────────┬─────────┘                 └────────▲─────────┘ │
│            │                                    │           │
│            │ Write                         Read │           │
│            ▼                                    │           │
│   ┌──────────────────────────────────────────────┐          │
│   │         Shared Memory (0x261C0000)           │          │
│   │  ┌──────────────────────────────────────┐    │          │
│   │  │ update_count | ax | ay | az | gx |...│    │          │
│   │  └──────────────────────────────────────┘    │          │
│   │  * CM33 writes continuously                  │          │
│   │  * CM55 reads on timer callback              │          │
│   └──────────────────────────────────────────────┘          │
│                                                             │
└─────────────────────────────────────────────────────────────┘
```

#### 2.2 Simulation vs Hardware - ความแตกต่าง

```
┌─────────────────────────────────────────────────────────────┐
│          PC SIMULATOR (Lab 3)                               │
├─────────────────────────────────────────────────────────────┤
│                                                             │
│   Timer (100ms)                                             │
│       │                                                     │
│       ▼                                                     │
│   simulate_imu_accel(&ax, &ay, &az)  ← ค่าจำลอง sin/cos      │
│       │                                                     │
│       ▼                                                     │
│   lv_chart_set_next_value(chart, ser, ax * 100)             │
│                                                             │
└─────────────────────────────────────────────────────────────┘

┌─────────────────────────────────────────────────────────────┐
│          HARDWARE (Lab 7 - นี่แหละ!)                          │
├─────────────────────────────────────────────────────────────┤
│                                                             │
│   aic_sensors_init()     ← เรียกครั้งเดียวตอนเริ่มต้น              │
│                                                             │
│   Timer (100ms)                                             │
│       │                                                     │
│       ▼                                                     │
│   imu_shared_read_accel(&ax, &ay, &az)  ← ค่าจาก BMI270      │
│       │                                                     │
│       ├── return false → return;  (sensor ยังไม่พร้อม)         │
│       │                                                     │
│       ▼  return true                                        │
│   lv_chart_set_next_value(chart, ser, ax * 100)             │
│                                                             │
│   สังเกต: UI code เหมือนกัน! แค่เปลี่ยน data source               │
│                                                             │
└─────────────────────────────────────────────────────────────┘
```

#### 2.3 UI Layout

```
┌─────────────────────────────────────────────────────────────┐
│      "Part 2 Ex7: Real IMU Display"                         │
├─────────────────────────────────────────────────────────────┤
│      "Accelerometer - REAL BMI270 DATA"                     │
│  ┌───────────────────────────────────────────────────────┐  │
│  │                  LINE CHART (440x230)                 │  │
│  │                                                       │  │
│  │   3 Series:                                           │  │
│  │   --- X (Red)   ~~~~~~~~~~~~~~~~~~~~~~~~~~~~          │  │
│  │   --- Y (Green) ~~~~~~~~~~~~~~~~~~~~~~~~~~~~          │  │
│  │   --- Z (Blue)  ~~~~~~~~~~~~~~~~~~~~~~~~~~~~          │  │
│  │                                                       │  │
│  │   50 data points                                      │  │
│  │   Y range: -1500 to +1500 (for +/-15 m/s2 x 100)      │  │
│  │                                                       │  │
│  └───────────────────────────────────────────────────────┘  │
│                                          X: +0.50           │
│                                          Y: -0.30           │
│                                          Z: +9.81           │
│      "[HW] Using imu_shared_read_accel()"                   │
└─────────────────────────────────────────────────────────────┘
```

***

### 3. ฟังก์ชันสำคัญ

#### 3.1 Sensor API Functions

<table><thead><tr><th width="341.6988525390625">Function</th><th width="244.5198974609375">Description</th><th>Return</th></tr></thead><tbody><tr><td><code>aic_sensors_init()</code></td><td>Initialize sensor subsystem (เรียกครั้งเดียว)</td><td>void</td></tr><tr><td><code>imu_shared_read_accel(&#x26;ax, &#x26;ay, &#x26;az)</code></td><td>อ่าน accelerometer ผ่าน shared memory</td><td>bool (true=valid)</td></tr><tr><td><code>imu_shared_read_gyro(&#x26;gx, &#x26;gy, &#x26;gz)</code></td><td>อ่าน gyroscope ผ่าน shared memory</td><td>bool (true=valid)</td></tr></tbody></table>

#### 3.2 API Signature

```c
/* อ่านค่า accelerometer จาก shared memory
 * ค่าที่ได้เป็น m/s^2
 * return: true = ข้อมูลใหม่พร้อมใช้, false = sensor ยังไม่พร้อม
 */
bool imu_shared_read_accel(float *ax, float *ay, float *az);
```

#### 3.3 Key Differences: Sim vs HW

<table><thead><tr><th width="195.07598876953125">รายการ</th><th>PC Simulator</th><th>Hardware (PSoC Edge)</th></tr></thead><tbody><tr><td>Init</td><td>ไม่ต้อง</td><td><code>aic_sensors_init()</code></td></tr><tr><td>Read</td><td><code>simulate_imu_accel()</code></td><td><code>imu_shared_read_accel()</code></td></tr><tr><td>Error</td><td>Always returns (ค่าจำลอง)</td><td>อาจ return false</td></tr><tr><td>Data Range</td><td>Predictable (sin/cos)</td><td>Real noise + gravity</td></tr><tr><td>Z-axis</td><td>~9.81 constant</td><td>~9.81 + noise</td></tr><tr><td>Build</td><td>CMake + GCC (PC)</td><td>ModusToolbox + GCC_ARM</td></tr></tbody></table>

#### 3.4 Include Files

```c
/* สำหรับ hardware build */
#include "aic-eec/aic-eec.h"       /* aic_sensors_init() */
#include "aic-eec/sensors.h"        /* sensor type definitions */
#include "../../shared/imu_shared.h" /* imu_shared_read_accel() */
```

***

### 4. โค้ดตัวอย่าง

#### 4.1 Global Variables

```c
#include "lvgl.h"
#include <math.h>
#include <stdio.h>

/* Sensor API headers (hardware only) */
#ifdef CYBSP_ENABLED
#include "aic-eec/aic-eec.h"
#include "../../shared/imu_shared.h"
#endif

#define CHART_POINTS  50

/* Chart widgets */
static lv_obj_t * ex7_chart;
static lv_chart_series_t * ex7_ser_x;
static lv_chart_series_t * ex7_ser_y;
static lv_chart_series_t * ex7_ser_z;
static lv_obj_t * ex7_labels[3];
static lv_timer_t * ex7_timer;
```

#### 4.2 Timer Callback - อ่านค่า IMU จริง

```c
static void ex7_timer_cb(lv_timer_t * timer)
{
    (void)timer;

    float ax, ay, az;

#ifdef CYBSP_ENABLED
    /* ===== HARDWARE: อ่านค่าจาก BMI270 จริง ===== */
    if(!imu_shared_read_accel(&ax, &ay, &az)) {
        return;  /* IMU ยังไม่พร้อม - ข้ามรอบนี้ */
    }
#else
    /* ===== PC SIMULATOR: ใช้ค่าจำลอง ===== */
    static float t = 0.0f;
    t += 0.05f;
    ax = 0.5f * sinf(t);
    ay = 0.3f * cosf(t * 0.7f);
    az = 9.81f + 0.2f * sinf(t * 2.0f);
#endif

    /* ===== Scale & Update Chart ===== */
    int32_t x_val = (int32_t)(ax * 100);
    int32_t y_val = (int32_t)(ay * 100);
    int32_t z_val = (int32_t)(az * 100);

    lv_chart_set_next_value(ex7_chart, ex7_ser_x, x_val);
    lv_chart_set_next_value(ex7_chart, ex7_ser_y, y_val);
    lv_chart_set_next_value(ex7_chart, ex7_ser_z, z_val);

    /* ===== Update Labels ===== */
    lv_label_set_text_fmt(ex7_labels[0], "X: %+.2f", (double)ax);
    lv_label_set_text_fmt(ex7_labels[1], "Y: %+.2f", (double)ay);
    lv_label_set_text_fmt(ex7_labels[2], "Z: %+.2f", (double)az);

    /* ===== Debug Print (throttled) ===== */
    static uint32_t count = 0;
    count++;
    if(count % 10 == 0) {  /* ทุก 1 วินาที (10 x 100ms) */
        printf("[IMU] X:%+.2f Y:%+.2f Z:%+.2f\r\n",
               (double)ax, (double)ay, (double)az);
    }
}
```

#### 4.3 Main Function

```c
void part2_ex7_real_imu_display(void)
{
    /* ===== HARDWARE INITIALIZATION ===== */
#ifdef CYBSP_ENABLED
    aic_sensors_init();  /* Initialize BMI270 IMU */
#endif

    /* ===== Background ===== */
    lv_obj_set_style_bg_color(lv_screen_active(),
                              lv_color_hex(0x16213e), LV_PART_MAIN);

    /* ===== Title ===== */
    lv_obj_t * title = lv_label_create(lv_screen_active());
    lv_label_set_text(title, "Part 2 Ex7: Real IMU Display");
    lv_obj_set_style_text_color(title, lv_color_hex(0xFFFFFF), 0);
    lv_obj_set_style_text_font(title, &lv_font_montserrat_16, 0);
    lv_obj_align(title, LV_ALIGN_TOP_MID, 0, 5);

    /* Subtitle - บอกว่าใช้ data จริง */
    lv_obj_t * subtitle = lv_label_create(lv_screen_active());
    lv_label_set_text(subtitle, "Accelerometer - REAL BMI270 DATA");
    lv_obj_set_style_text_color(subtitle, lv_color_hex(0x00FF88), 0);
    lv_obj_set_style_text_font(subtitle, &lv_font_montserrat_14, 0);
    lv_obj_align(subtitle, LV_ALIGN_TOP_MID, 0, 25);

    /* ===== Chart ===== */
    ex7_chart = lv_chart_create(lv_screen_active());
    lv_obj_set_size(ex7_chart, 440, 230);
    lv_obj_align(ex7_chart, LV_ALIGN_CENTER, -10, 15);
    lv_chart_set_type(ex7_chart, LV_CHART_TYPE_LINE);
    lv_chart_set_point_count(ex7_chart, CHART_POINTS);

    /* Range: -1500 to 1500 (สำหรับ +/-15 m/s2 x 100) */
    lv_chart_set_range(ex7_chart, LV_CHART_AXIS_PRIMARY_Y, -1500, 1500);

    /* ซ่อน point indicator */
    lv_obj_set_style_size(ex7_chart, 0, 0, LV_PART_INDICATOR);
    lv_obj_set_style_line_width(ex7_chart, 2, LV_PART_ITEMS);
    lv_chart_set_div_line_count(ex7_chart, 5, 8);

    /* สีพื้นหลัง chart */
    lv_obj_set_style_bg_color(ex7_chart, lv_color_hex(0x1a1a2e), 0);
    lv_obj_set_style_bg_opa(ex7_chart, LV_OPA_COVER, 0);
    lv_obj_set_style_border_color(ex7_chart, lv_color_hex(0x333355), 0);

    /* ===== Series: X(Red), Y(Green), Z(Blue) ===== */
    lv_color_t colors[] = {
        lv_palette_main(LV_PALETTE_RED),
        lv_palette_main(LV_PALETTE_GREEN),
        lv_palette_main(LV_PALETTE_BLUE)
    };

    ex7_ser_x = lv_chart_add_series(ex7_chart, colors[0],
                                     LV_CHART_AXIS_PRIMARY_Y);
    ex7_ser_y = lv_chart_add_series(ex7_chart, colors[1],
                                     LV_CHART_AXIS_PRIMARY_Y);
    ex7_ser_z = lv_chart_add_series(ex7_chart, colors[2],
                                     LV_CHART_AXIS_PRIMARY_Y);

    /* ===== Value Labels ===== */
    const char * names[] = {"X:", "Y:", "Z:"};
    for(int i = 0; i < 3; i++) {
        ex7_labels[i] = lv_label_create(lv_screen_active());
        lv_label_set_text_fmt(ex7_labels[i], "%s 0.00", names[i]);
        lv_obj_set_style_text_color(ex7_labels[i], colors[i], 0);
        lv_obj_set_style_text_font(ex7_labels[i], &lv_font_montserrat_16, 0);
        lv_obj_align(ex7_labels[i], LV_ALIGN_RIGHT_MID, -5, -30 + i * 30);
    }

    /* ===== Footer Label ===== */
    lv_obj_t * footer = lv_label_create(lv_screen_active());
    lv_label_set_text(footer, "[HW] Using imu_shared_read_accel()");
    lv_obj_set_style_text_color(footer, lv_color_hex(0x888888), 0);
    lv_obj_set_style_text_font(footer, &lv_font_montserrat_12, 0);
    lv_obj_align(footer, LV_ALIGN_BOTTOM_MID, 0, -5);

    /* ===== Timer - Polling ทุก 50ms (20 Hz) ===== */
    ex7_timer = lv_timer_create(ex7_timer_cb, 50, NULL);
}
```

***

### 5. องค์ความรู้และเทคนิค

#### 5.1 Error Handling Pattern - ต้องตรวจสอบเสมอ

```c
/* Pattern: ตรวจ return value ก่อนใช้ข้อมูล */
float ax, ay, az;
if(!imu_shared_read_accel(&ax, &ay, &az)) {
    /* sensor ยังไม่พร้อม - 3 ทางเลือก: */

    /* ทางเลือก 1: Skip update */
    return;

    /* ทางเลือก 2: ใช้ค่าล่าสุด (ไม่ทำอะไร เพราะ labels ยังแสดงค่าเดิม) */

    /* ทางเลือก 3: แสดง status */
    lv_label_set_text(status_label, "Waiting for sensor...");
    return;
}
/* ถ้ามาถึงบรรทัดนี้ ax, ay, az ใช้ได้อย่างปลอดภัย */
```

#### 5.2 Debug Print Throttling

```c
/* Problem: printf ทุก 50ms = 20 บรรทัดต่อวินาที → console ท่วม */
/* Solution: พิมพ์ทุก N ครั้ง */

static uint32_t count = 0;
count++;

/* ทุก 1 วินาที (20 x 50ms = 1s) */
if(count % 20 == 0) {
    printf("[IMU] X:%+.2f Y:%+.2f Z:%+.2f\r\n",
           (double)ax, (double)ay, (double)az);
}

/* หรือใช้ modulo 10 สำหรับ 100ms timer → ทุก 1 วินาที */
```

#### 5.3 Shared Memory Debug

```c
/* ตรวจสอบว่า CM33 ส่งข้อมูลมาจริง */
#include "../../shared/imu_shared.h"

static void debug_ipc_status(void)
{
    /* ดู update count ของ CM33 */
    extern volatile imu_shared_data_t imu_shared;
    uint32_t cm33_count = imu_shared.update_count;

    static uint32_t last_count = 0;
    if(cm33_count == last_count) {
        printf("[WARN] CM33 not updating IMU data!\r\n");
    }
    last_count = cm33_count;
}
```

#### 5.4 Polling Rate Considerations

```c
/* เลือก polling rate ที่เหมาะสม */

/* 50ms (20 Hz) - แนะนำสำหรับ real-time display */
lv_timer_create(timer_cb, 50, NULL);
/* เหตุผล: BMI270 output rate ~100Hz, 20Hz display เพียงพอ */
/* CPU load ต่ำกว่า, LVGL ไม่ต้อง redraw บ่อย */

/* 100ms (10 Hz) - เหมาะสำหรับ slow-changing data */
lv_timer_create(timer_cb, 100, NULL);
/* ประหยัด CPU มากขึ้น แต่ motion อาจดูไม่ smooth */

/* 20ms (50 Hz) - สำหรับ high-speed motion tracking */
lv_timer_create(timer_cb, 20, NULL);
/* CPU load สูง, chart update เร็วมาก */
```

#### 5.5 Chart Range for Real IMU Data

```c
/* BMI270 accelerometer range: +/-16g (default +/-2g) */
/* 1g = 9.81 m/s^2 */

/* สำหรับ +/-2g range (default): */
/* Max value: 2 * 9.81 = 19.62 m/s^2 */
/* Scaled (x100): 1962 */
/* Chart range: -2000 to 2000 (ปลอดภัย) */

lv_chart_set_range(chart, LV_CHART_AXIS_PRIMARY_Y, -2000, 2000);

/* สำหรับแสดง gravity (Z-axis ~981):  */
/* Range: -1500 to 1500 (เห็น Z oscillate around 981) */
lv_chart_set_range(chart, LV_CHART_AXIS_PRIMARY_Y, -1500, 1500);
```

***

### 6. แบบฝึกหัด

#### Exercise 1: Tilt Angle Display (Arc Gauge)

**โจทย์:** คำนวณมุมเอียง (Tilt Angle) จากข้อมูล accelerometer และแสดงเป็น Arc gauge

**หลักการ:**

```
Roll  = atan2(ay, az) * 180 / PI    (มุมเอียงซ้าย-ขวา)
Pitch = atan2(-ax, sqrt(ay*ay + az*az)) * 180 / PI  (มุมเอียงหน้า-หลัง)
```

**Requirements:**

* เพิ่ม Arc gauge 2 วง: Roll และ Pitch
* Range: -90 ถึง +90 องศา (map เป็น 0-180 สำหรับ arc)
* แสดงค่ามุมเป็นตัวเลขใต้ arc
* สี: Roll = แดง, Pitch = น้ำเงิน

**การประยุกต์ใช้งานจริง:**

* ระบบ Anti-Tipping ของรถ Forklift ในโรงงาน
* ระบบเตือนเมื่อโครงสร้างอาคารเอียงเกินกำหนด
* Drone flight controller แสดงมุมบิน

**Hint:**

* ใช้ `atan2f()` จาก `<math.h>`
* `M_PI` อาจไม่มีใน embedded → ใช้ `3.14159265f`
* Arc range: `lv_arc_set_range(arc, 0, 180)` → ค่ากลาง 90 = ระดับ

***

#### Exercise 2: Motion Detection Alarm

**โจทย์:** สร้างระบบตรวจจับการสั่นสะเทือน (Vibration Detection) พร้อมระบบเตือน:

**Requirements:**

* คำนวณ magnitude: `mag = sqrt(ax^2 + ay^2 + az^2)`
* ตั้ง threshold 3 ระดับ:
  * Normal: mag = 9.5-10.1 (สีเขียว)
  * Warning: mag < 9.5 หรือ mag > 10.1 (สีเหลือง)
  * Alarm: mag < 8.0 หรือ mag > 12.0 (สีแดง กระพริบ)
* แสดง LED indicator บนหน้าจอที่เปลี่ยนสีตามระดับ
* เก็บจำนวน alarm events แสดงเป็นตัวเลข
* แสดง magnitude ปัจจุบันและค่า peak

**การประยุกต์ใช้งานจริง:**

* ระบบ Vibration Monitoring ของเครื่องจักรในโรงงาน (Predictive Maintenance)
* ระบบเตือนแผ่นดินไหวพื้นฐาน (Seismic Alert)
* ตรวจสอบความสมบูรณ์ของโครงสร้าง (Structural Health Monitoring)

**Hint:**

* `sqrtf()` จาก `<math.h>`
* LED กระพริบ: ใช้ `lv_led_toggle()` เมื่อ alarm
* Peak tracking: `if(mag > peak) peak = mag;`

***

### 7. References

* [LVGL Chart](https://docs.lvgl.io/9.2/widgets/chart.html)
* [PSoC Edge BMI270 IMU](https://www.infineon.com/cms/en/product/sensor/imu-sensor/)
* [Inter-Processor Communication](https://www.infineon.com/dgdl/Infineon-AN235302...)

***


# Sensor Dashboard

## Lab 8: Real Sensor Dashboard

### Part 2 - Sensor Visualization

### 1. โครงสร้างภาพรวมของ Lab

#### Why? - ทำไมต้องเรียนรู้เรื่องนี้

* **Multi-Sensor Integration**: ในระบบ IoT จริง มี sensor หลายตัวที่ต้องอ่านค่าและแสดงผลพร้อมกัน
* **Real APIs**: ใช้ `aic_adc_read()` + `imu_shared_read_accel()` ร่วมกัน
* **TabView Organization**: จัดการข้อมูลจากหลาย sensor ด้วย tabs
* **Single Timer Pattern**: อัพเดทข้อมูลจากหลาย sensor ใน callback เดียว

#### What? - จะได้เรียนรู้อะไร

1. **Multiple Sensor APIs**: อ่านค่าจาก ADC (potentiometer) และ IMU (accelerometer) พร้อมกัน
2. **TabView + Real Data**: รวม Lab 5 (TabView) กับ Lab 7 (Real IMU) เข้าด้วยกัน
3. **Data Mapping**: แปลงค่า sensor แต่ละตัวให้เหมาะกับ widget ที่แสดงผล
4. **Hardware Polling**: อ่านค่าจากหลาย sensor ใน timer เดียว
5. **Graceful Degradation**: จัดการเมื่อ sensor บางตัวไม่พร้อม

#### How? - จะทำอย่างไร

1. เรียก `aic_sensors_init()` ก่อนสร้าง UI
2. สร้าง TabView 2 tabs: IMU Charts + ADC Gauge
3. Timer callback อ่านค่าจากทุก sensor API
4. Tab 1: แสดง ADC ด้วย Bar + Value label
5. Tab 2: แสดง accelerometer X/Y/Z ด้วย Line Chart
6. Tab 3: แสดง Gyro ด้วย Arc gauge + Value label

<figure><img src="/files/4tJ3J48pK6OlEDumA6m6" alt=""><figcaption></figcaption></figure>

***

### 2. หลักการทำงานและ Flowchart

#### 2.1 Dashboard Architecture

```
┌─────────────────────────────────────────────────────────────┐
│             SENSOR DASHBOARD ARCHITECTURE                   │
├─────────────────────────────────────────────────────────────┤
│                                                             │
│   ┌──────────────────────────────────────────────────────┐  │
│   │                  SENSOR LAYER                        │  │
│   │   ┌─────────┐  ┌─────────────┐  ┌─────────────┐      │  │
│   │   │   ADC   │  │Accelerometer│  │  Gyroscope  │      │  │
│   │   │ (POTEN) │  │  (BMI270)   │  │  (BMI270)   │      │  │
│   │   └────┬────┘  └──────┬──────┘  └──────┬──────┘      │  │
│   └────────┼──────────────┼─────────────────┼────────────┘  │
│            │              │                 │               │
│            ▼              ▼                 ▼               │
│   ┌──────────────────────────────────────────────────────┐  │
│   │                  API LAYER                           │  │
│   │aic_adc_read() aic_imu_read_accel() aic_imu_read_gyro()  │
│   └────────┬──────────────┬─────────────────┬───────────┘   │
│            │              │                 │               │
│            ▼              ▼                 ▼               │
│   ┌──────────────────────────────────────────────────────┐  │
│   │             TIMER CALLBACK (100ms)                   │  │
│   │   - Read all sensors                                 │  │
│   │   - Scale data for widgets                           │  │
│   │   - Update UI elements                               │  │
│   └──────────────────────────────────────────────────────┘  │
│                                                             │
└─────────────────────────────────────────────────────────────┘
```

#### 2.2 TabView Layout

```
┌─────────────────────────────────────────────────────────────┐
│  [  ADC  ] [  Accel  ] [  Gyro  ]    ← Tab Bar (80px)       │
├─────────────────────────────────────────────────────────────┤
│                                                             │
│   ╔═══════════════════════════════════════════════════════╗ │
│   ║                    Tab Content                        ║ │
│   ║                    480 x 240                          ║ │
│   ║                                                       ║ │
│   ║   ADC Tab:                                            ║ │
│   ║     [=========BAR (450x60)==========]                 ║ │
│   ║            "ADC: 2048 (1.65V)"                        ║ │
│   ║                                                       ║ │
│   ║   Accel Tab:                                          ║ │
│   ║     [CHART 400x210]  X: +0.5                          ║ │
│   ║                      Y: -0.3                          ║ │
│   ║                      Z: +9.8                          ║ │
│   ║                                                       ║ │
│   ║   Gyro Tab:                                           ║ │
│   ║     (Arc)    (Arc)    (Arc)                           ║ │
│   ║     Roll     Pitch    Yaw                             ║ │
│   ║     0.00     0.00     0.00                            ║ │
│   ╚═══════════════════════════════════════════════════════╝ │
└─────────────────────────────────────────────────────────────┘
```

#### 2.3 Data Mapping

```
┌─────────────────────────────────────────────────────────────┐
│                 DATA MAPPING                                │
├─────────────────────────────────────────────────────────────┤
│                                                             │
│   ADC (0-4095):                                             │
│     pct = (adc * 100) / 4095     → Bar (0-100%)             │
│     volt = (adc / 4095) * 3.3V   → Label                    │
│                                                             │
│   Accelerometer (float m/s²):                               │
│     scaled = (int32_t)(ax * 100) → Chart (-1500 to 1500)    │
│                                                             │
│   Gyroscope (float rad/s, ±1.0):                            │
│     pct = (int32_t)((gx + 1.0) * 50) → Arc (0-100%)         │
│         -1.0 rad/s → 0%                                     │
│          0.0 rad/s → 50%                                    │
│         +1.0 rad/s → 100%                                   │
│                                                             │
└─────────────────────────────────────────────────────────────┘
```

***

### 3. ฟังก์ชันสำคัญ

#### 3.1 Sensor APIs ที่ใช้ใน Lab นี้

<table><thead><tr><th width="343.31463623046875">Function</th><th width="100.86358642578125">Return</th><th>Description</th></tr></thead><tbody><tr><td><code>aic_sensors_init()</code></td><td>void</td><td>Initialize ทุก sensor (เรียกครั้งเดียว)</td></tr><tr><td><code>aic_adc_read(AIC_ADC_CH0)</code></td><td>uint16_t</td><td>อ่าน ADC channel 0 (0-4095)</td></tr><tr><td><code>imu_shared_read_accel(&#x26;ax, &#x26;ay, &#x26;az)</code></td><td>bool</td><td>อ่าน accelerometer (m/s2)</td></tr></tbody></table>

#### 3.2 ADC API Detail

```c
/* ADC อ่านค่า potentiometer ที่ต่ออยู่กับ channel 0 */
/* Return: 0-4095 (12-bit resolution) */
/* 0    = 0V (GND) */
/* 4095 = 3.3V (VCC) */
uint16_t adc_value = aic_adc_read(AIC_ADC_CH0);
```

#### 3.3 Widget Functions ที่ใช้

<table><thead><tr><th width="87.14990234375">Tab</th><th width="156.38848876953125">Widget</th><th>Key Functions</th></tr></thead><tbody><tr><td>IMU</td><td>lv_chart (LINE)</td><td><code>lv_chart_set_next_value()</code></td></tr><tr><td>ADC</td><td>lv_bar</td><td><code>lv_bar_set_value()</code>, <code>lv_bar_set_range()</code></td></tr><tr><td>ADC</td><td>lv_arc</td><td><code>lv_arc_set_value()</code>, <code>lv_arc_set_range()</code></td></tr><tr><td>Both</td><td>lv_label</td><td><code>lv_label_set_text_fmt()</code></td></tr></tbody></table>

#### 3.4 Include Files

```c
#include "lvgl.h"
#include <math.h>
#include <stdio.h>

#ifdef CYBSP_ENABLED
#include "aic-eec/aic-eec.h"
#include "aic-eec/sensors.h"
#include "../../shared/imu_shared.h"
#endif
```

***

### 4. โค้ดตัวอย่าง

#### 4.1 Global Variables

```c
#define ADC_MAX         4095
#define CHART_POINTS    50

/* IMU Tab widgets */
static lv_obj_t * ex8_accel_chart;
static lv_chart_series_t * ex8_accel_ser[3];
static lv_obj_t * ex8_accel_labels[3];

/* ADC Tab widgets */
static lv_obj_t * ex8_adc_arc;
static lv_obj_t * ex8_adc_bar;
static lv_obj_t * ex8_adc_label;
static lv_obj_t * ex8_adc_pct_label;

/* Timer */
static lv_timer_t * ex8_timer;
```

#### 4.2 Simulation Helpers (PC Simulator)

```c
#ifndef CYBSP_ENABLED
static uint16_t simulate_adc_read(void)
{
    static float phase = 0.0f;
    phase += 0.02f;
    return (uint16_t)(2048 + 1800 * sinf(phase));
}

static bool simulate_imu_accel(float *ax, float *ay, float *az)
{
    static float t = 0.0f;
    t += 0.05f;
    *ax = 0.5f * sinf(t);
    *ay = 0.3f * cosf(t * 0.7f);
    *az = 9.81f + 0.2f * sinf(t * 2.0f);
    return true;
}
#endif
```

#### 4.3 Timer Callback - อ่านค่าจากทุก Sensor

```c
static void ex8_timer_cb(lv_timer_t * timer)
{
    (void)timer;

    /* ===== ADC (Potentiometer) ===== */
    uint16_t adc;
#ifdef CYBSP_ENABLED
    adc = aic_adc_read(AIC_ADC_CH0);
#else
    adc = simulate_adc_read();
#endif

    int32_t pct = (adc * 100) / ADC_MAX;
    float volt = ((float)adc / ADC_MAX) * 3.3f;

    lv_arc_set_value(ex8_adc_arc, pct);
    lv_bar_set_value(ex8_adc_bar, pct, LV_ANIM_ON);
    lv_label_set_text_fmt(ex8_adc_label,
        "ADC: %d (%.2fV)", adc, (double)volt);
    lv_label_set_text_fmt(ex8_adc_pct_label, "%d%%", (int)pct);

    /* ===== ACCELEROMETER (BMI270) ===== */
    float ax, ay, az;
    bool imu_ok;
#ifdef CYBSP_ENABLED
    imu_ok = imu_shared_read_accel(&ax, &ay, &az);
#else
    imu_ok = simulate_imu_accel(&ax, &ay, &az);
#endif

    if(imu_ok) {
        /* Scale & update chart */
        lv_chart_set_next_value(ex8_accel_chart, ex8_accel_ser[0],
                                (int32_t)(ax * 100));
        lv_chart_set_next_value(ex8_accel_chart, ex8_accel_ser[1],
                                (int32_t)(ay * 100));
        lv_chart_set_next_value(ex8_accel_chart, ex8_accel_ser[2],
                                (int32_t)(az * 100));

        /* Update labels */
        lv_label_set_text_fmt(ex8_accel_labels[0], "X:%+.1f", (double)ax);
        lv_label_set_text_fmt(ex8_accel_labels[1], "Y:%+.1f", (double)ay);
        lv_label_set_text_fmt(ex8_accel_labels[2], "Z:%+.1f", (double)az);
    }

    /* ===== Debug Print (throttled) ===== */
    static uint32_t count = 0;
    count++;
    if(count % 10 == 0) {
        printf("[DASH] ADC:%d (%.2fV) IMU:%s X:%+.2f Y:%+.2f Z:%+.2f\r\n",
               adc, (double)volt,
               imu_ok ? "OK" : "N/A",
               (double)ax, (double)ay, (double)az);
    }
}
```

#### 4.4 สร้าง IMU Tab

```c
static void ex8_create_imu_tab(lv_obj_t * parent)
{
    /* Title */
    lv_obj_t * title = lv_label_create(parent);
    lv_label_set_text(title, "Accelerometer - REAL BMI270");
    lv_obj_set_style_text_font(title, &lv_font_montserrat_18, 0);
    lv_obj_align(title, LV_ALIGN_TOP_MID, 0, 5);

    /* Chart */
    ex8_accel_chart = lv_chart_create(parent);
    lv_obj_set_size(ex8_accel_chart, 380, 180);
    lv_obj_align(ex8_accel_chart, LV_ALIGN_CENTER, -30, 10);
    lv_chart_set_type(ex8_accel_chart, LV_CHART_TYPE_LINE);
    lv_chart_set_point_count(ex8_accel_chart, CHART_POINTS);
    lv_chart_set_range(ex8_accel_chart,
        LV_CHART_AXIS_PRIMARY_Y, -1500, 1500);

    /* ซ่อน point indicator */
    lv_obj_set_style_size(ex8_accel_chart, 0, 0, LV_PART_INDICATOR);
    lv_obj_set_style_line_width(ex8_accel_chart, 2, LV_PART_ITEMS);
    lv_chart_set_div_line_count(ex8_accel_chart, 5, 8);

    /* 3 Series: X(Red), Y(Green), Z(Blue) */
    lv_color_t colors[] = {
        lv_palette_main(LV_PALETTE_RED),
        lv_palette_main(LV_PALETTE_GREEN),
        lv_palette_main(LV_PALETTE_BLUE)
    };

    for(int i = 0; i < 3; i++) {
        ex8_accel_ser[i] = lv_chart_add_series(ex8_accel_chart,
            colors[i], LV_CHART_AXIS_PRIMARY_Y);

        ex8_accel_labels[i] = lv_label_create(parent);
        lv_label_set_text(ex8_accel_labels[i], "0.0");
        lv_obj_set_style_text_color(ex8_accel_labels[i], colors[i], 0);
        lv_obj_set_style_text_font(ex8_accel_labels[i],
            &lv_font_montserrat_16, 0);
        lv_obj_align(ex8_accel_labels[i], LV_ALIGN_RIGHT_MID,
            -5, -40 + i * 40);
    }
}
```

#### 4.5 สร้าง ADC Tab (Arc + Bar)

```c
static void ex8_create_adc_tab(lv_obj_t * parent)
{
    /* Title */
    lv_obj_t * title = lv_label_create(parent);
    lv_label_set_text(title, "ADC Monitor - REAL Potentiometer");
    lv_obj_set_style_text_font(title, &lv_font_montserrat_18, 0);
    lv_obj_align(title, LV_ALIGN_TOP_MID, 0, 5);

    /* Arc Gauge */
    ex8_adc_arc = lv_arc_create(parent);
    lv_obj_set_size(ex8_adc_arc, 140, 140);
    lv_obj_align(ex8_adc_arc, LV_ALIGN_CENTER, 0, -20);
    lv_arc_set_range(ex8_adc_arc, 0, 100);
    lv_arc_set_value(ex8_adc_arc, 0);
    lv_arc_set_bg_angles(ex8_adc_arc, 135, 45);
    lv_obj_set_style_arc_color(ex8_adc_arc,
        lv_palette_main(LV_PALETTE_BLUE), LV_PART_INDICATOR);
    lv_obj_set_style_arc_width(ex8_adc_arc, 15, LV_PART_MAIN);
    lv_obj_set_style_arc_width(ex8_adc_arc, 15, LV_PART_INDICATOR);
    lv_obj_remove_style(ex8_adc_arc, NULL, LV_PART_KNOB);

    /* Percentage label ตรงกลาง arc */
    ex8_adc_pct_label = lv_label_create(parent);
    lv_label_set_text(ex8_adc_pct_label, "0%");
    lv_obj_set_style_text_font(ex8_adc_pct_label,
        &lv_font_montserrat_24, 0);
    lv_obj_center(ex8_adc_pct_label);
    lv_obj_align(ex8_adc_pct_label, LV_ALIGN_CENTER, 0, -20);

    /* Bar (ใต้ arc) */
    ex8_adc_bar = lv_bar_create(parent);
    lv_obj_set_size(ex8_adc_bar, 350, 30);
    lv_obj_align(ex8_adc_bar, LV_ALIGN_CENTER, 0, 60);
    lv_bar_set_range(ex8_adc_bar, 0, 100);
    lv_obj_set_style_bg_color(ex8_adc_bar,
        lv_palette_main(LV_PALETTE_BLUE), LV_PART_INDICATOR);

    /* Value label */
    ex8_adc_label = lv_label_create(parent);
    lv_label_set_text(ex8_adc_label, "ADC: 0 (0.00V)");
    lv_obj_set_style_text_font(ex8_adc_label,
        &lv_font_montserrat_18, 0);
    lv_obj_align(ex8_adc_label, LV_ALIGN_CENTER, 0, 95);
}
```

#### 4.6 Main Function

```c
void part2_ex8_real_sensor_dashboard(void)
{
    /* ===== HARDWARE INITIALIZATION ===== */
#ifdef CYBSP_ENABLED
    aic_sensors_init();
#endif

    /* ===== CREATE TABVIEW ===== */
    lv_obj_t * tabview = lv_tabview_create(lv_screen_active());
    lv_tabview_set_tab_bar_position(tabview, LV_DIR_TOP);
    lv_tabview_set_tab_bar_size(tabview, 80);

    /* Style Tab Bar */
    lv_obj_t * tab_btns = lv_tabview_get_tab_bar(tabview);
    lv_obj_set_style_bg_color(tab_btns,
        lv_palette_darken(LV_PALETTE_GREY, 3), 0);
    lv_obj_set_style_text_color(tab_btns,
        lv_palette_lighten(LV_PALETTE_GREY, 5), 0);

    /* ===== CREATE TABS ===== */
    lv_obj_t * tab_imu = lv_tabview_add_tab(tabview, "IMU");
    lv_obj_t * tab_adc = lv_tabview_add_tab(tabview, "ADC");

    /* Style Tab Content */
    lv_obj_set_style_bg_color(tab_imu, lv_color_hex(0xFFFFFF), 0);
    lv_obj_set_style_bg_opa(tab_imu, LV_OPA_COVER, 0);
    lv_obj_set_style_bg_color(tab_adc, lv_color_hex(0xFFFFFF), 0);
    lv_obj_set_style_bg_opa(tab_adc, LV_OPA_COVER, 0);

    /* ===== POPULATE TABS ===== */
    ex8_create_imu_tab(tab_imu);
    ex8_create_adc_tab(tab_adc);

    /* ===== CRITICAL: ปิด scrolling ===== */
    lv_obj_remove_flag(lv_tabview_get_content(tabview),
                       LV_OBJ_FLAG_SCROLLABLE);

    /* ===== TIMER: อัพเดทข้อมูลทุก 100ms ===== */
    ex8_timer = lv_timer_create(ex8_timer_cb, 100, NULL);
}
```

***

### 5. องค์ความรู้และเทคนิค

#### 5.1 Single Timer สำหรับ Multiple Sensors

```c
/* ข้อดีของการใช้ timer เดียวอ่านทุก sensor: */

/* 1. Synchronized data - ทุก sensor อ่านค่าพร้อมกัน */
/* 2. Consistent UI update - ทุก widget อัพเดทพร้อมกัน */
/* 3. Less memory - timer object เดียว */
/* 4. Easier to manage - ลบ timer เดียว cleanup หมด */

static void single_timer_cb(lv_timer_t * timer)
{
    /* อ่านทุก sensor ใน callback เดียว */
    read_and_update_adc();
    read_and_update_imu();
    read_and_update_gyro();
}
```

#### 5.2 Graceful Degradation

```c
/* เมื่อ sensor บางตัวไม่พร้อม ให้ UI ยังทำงานต่อได้ */

static void robust_timer_cb(lv_timer_t * timer)
{
    /* ADC มักพร้อมเสมอ */
    uint16_t adc = aic_adc_read(AIC_ADC_CH0);
    update_adc_widgets(adc);  /* อัพเดทได้เลย */

    /* IMU อาจไม่พร้อมตอนเริ่มต้น */
    float ax, ay, az;
    if(imu_shared_read_accel(&ax, &ay, &az)) {
        update_imu_widgets(ax, ay, az);  /* อัพเดทเมื่อพร้อม */
    }
    /* ถ้า IMU ไม่พร้อม → Chart + Labels ยังแสดงค่าเดิม */
}
```

#### 5.3 ADC Arc Color Change ตามค่า

```c
/* เปลี่ยนสี arc ตาม % value - visual feedback */
static void update_adc_color(int32_t pct)
{
    lv_color_t color;
    if(pct < 30) {
        color = lv_palette_main(LV_PALETTE_GREEN);
    } else if(pct < 70) {
        color = lv_palette_main(LV_PALETTE_YELLOW);
    } else {
        color = lv_palette_main(LV_PALETTE_RED);
    }
    lv_obj_set_style_arc_color(ex8_adc_arc, color, LV_PART_INDICATOR);
    lv_obj_set_style_bg_color(ex8_adc_bar, color, LV_PART_INDICATOR);
}
```

#### 5.4 Active Tab Optimization

```c
/* Performance: อัพเดทเฉพาะ tab ที่มองเห็น */
static lv_obj_t * tabview_ref;

static void optimized_timer_cb(lv_timer_t * timer)
{
    uint32_t active = lv_tabview_get_tab_active(tabview_ref);

    switch(active) {
        case 0:  /* IMU Tab */
            /* อ่าน IMU อย่างเดียว */
            read_and_update_imu();
            break;
        case 1:  /* ADC Tab */
            /* อ่าน ADC อย่างเดียว */
            read_and_update_adc();
            break;
    }

    /* ข้อเสีย: ข้อมูล tab ที่ซ่อนอยู่จะหยุดอัพเดท */
    /* ข้อดี: ลด CPU load 50% (อ่าน sensor 1 ตัวแทน 2 ตัว) */
}
```

#### 5.5 Tab Content Styling Tips

```c
/* ตั้งสีพื้นหลัง tab content เป็นสีขาว */
lv_obj_set_style_bg_color(tab, lv_color_hex(0xFFFFFF), 0);
lv_obj_set_style_bg_opa(tab, LV_OPA_COVER, 0);

/* ปิด scrolling - สำคัญมาก! */
lv_obj_remove_flag(lv_tabview_get_content(tabview),
                   LV_OBJ_FLAG_SCROLLABLE);

/* ถ้าต้องการปิด scroll เฉพาะ tab: */
lv_obj_remove_flag(tab_imu, LV_OBJ_FLAG_SCROLLABLE);
lv_obj_remove_flag(tab_adc, LV_OBJ_FLAG_SCROLLABLE);
```

***

### 6. แบบฝึกหัด

#### Exercise 1: Min/Max Tracking

**โจทย์:** เพิ่มระบบ Min/Max Tracking สำหรับแต่ละ sensor:

**Requirements:**

* สำหรับ ADC: แสดง Min voltage, Max voltage, Current voltage
* สำหรับ IMU: แสดง Min/Max ของแต่ละแกน (X, Y, Z)
* เพิ่มปุ่ม "Reset" เพื่อ clear ค่า min/max
* แสดงเป็น label ใต้ widget หลัก

**Layout:**

```bash
ADC Tab:
  [Arc Gauge]
  [Bar]
  Current: 1.65V  |  Min: 0.12V  |  Max: 3.28V
  [RESET]

IMU Tab:
  [Chart]
  X: +0.50 | Min:-0.82 | Max:+0.91
  Y: -0.30 | Min:-0.65 | Max:+0.48
  Z: +9.81 | Min:+9.52 | Max:+10.12
```

**การประยุกต์ใช้งานจริง:**

* Quality Control: ตรวจสอบว่าค่า sensor อยู่ในช่วงที่กำหนด
* Predictive Maintenance: ติดตาม peak values เพื่อวิเคราะห์สภาพเครื่องจักร
* Environmental Monitoring: บันทึกค่าสูงสุด/ต่ำสุดของอุณหภูมิ

**Hint:**

* ใช้ `static float min_x = FLT_MAX, max_x = -FLT_MAX;`
* ปุ่ม Reset: `lv_btn_create()` + event callback

***

#### Exercise 2: Data Logging Table

**โจทย์:** เพิ่ม Tab ที่ 3 "Log" แสดงข้อมูล 10 readings ล่าสุดในรูปแบบตาราง:

**Requirements:**

* ใช้ `lv_table_create()` สร้างตาราง
* 4 คอลัมน์: Time, ADC, Accel X, Accel Z
* 10 แถว (circular buffer - เมื่อครบ 10 แถวให้เริ่มเขียนทับแถวเก่า)
* บันทึกค่าทุก 1 วินาที (ไม่ใช่ทุก 100ms)
* แถวล่าสุดแสดงด้วยสีพื้นหลังเด่น

**Layout:**

```bash
Log Tab:
  | Time  | ADC  | X(m/s2) | Z(m/s2) |
  |-------|------|---------|---------|
  | 00:01 | 2048 |  +0.50  |  +9.81  |
  | 00:02 | 1825 |  +0.32  |  +9.79  |
  | ...   | ...  |   ...   |   ...   |
  | 00:10 | 3012 |  -0.15  |  +9.85  |
```

**การประยุกต์ใช้งานจริง:**

* Data Logger ในอุตสาหกรรมอาหาร (บันทึกอุณหภูมิห้องเย็น)
* Flight Data Recorder (บันทึกข้อมูลระหว่างบิน)
* Process Control: บันทึกค่า parameter ย้อนหลัง

**Hint:**

* `lv_table_set_cell_value(table, row, col, "text")`
* Circular buffer: `write_idx = (write_idx + 1) % 10`
* Time format: \`lv\_label\_set\_text\_fmt(label, "%02d:%02d", min, sec)

***

### 7. References

* [LVGL TabView](https://docs.lvgl.io/9.2/widgets/tabview.html)
* [LVGL Arc](https://docs.lvgl.io/9.2/widgets/arc.html)
* [lv\_example\_tabview\_2](https://github.com/lvgl/lvgl/blob/release/v9.2/examples/widgets/tabview/lv_example_tabview_2.c)

***


# Arc Gauge

## Lab 9: Real Arc Gauge (Roll Angle)

### Part 2 - Sensor Visualization

### 1. โครงสร้างภาพรวมของ Lab

#### Why? - ทำไมต้องเรียนรู้เรื่องนี้

* **Sensor Fusion**: เข้าใจวิธีการรวมข้อมูลจาก sensor 2 ตัว (Accelerometer + Gyroscope) เข้าด้วยกันเพื่อให้ได้ผลลัพธ์ที่ดีกว่าการใช้ sensor ตัวเดียว
* **Complementary Filter**: เรียนรู้ algorithm พื้นฐานที่ใช้จริงในอุตสาหกรรม (drone, robot, motion tracker)
* **Tilt API**: ใช้ module `aic_tilt` ที่ abstract ความซับซ้อนของ filter ให้เรียกใช้ง่าย
* **Arc Gauge + Real Data**: นำ Arc Gauge จาก Lab 2 มาแสดงข้อมูล Roll Angle จริงจาก IMU

#### What? - จะได้เรียนรู้อะไร

1. **Complementary Filter**: หลักการรวม Accel (ช้าแต่ stable) กับ Gyro (เร็วแต่ drift)
2. **Tilt API**: ใช้ `aic_tilt_init()`, `aic_tilt_update_from_imu()`, `aic_tilt_get_roll()`, `aic_tilt_get_roll_percent()`
3. **Arc Gauge Integration**: แสดงมุมเอียง (Roll Angle) บน Arc widget แบบ real-time
4. **Percentage Mapping**: แปลงมุม (-90 to +90) เป็นเปอร์เซ็นต์ (0-100%) สำหรับ widget
5. **Hardware Init Pattern**: `aic_sensors_init()` + `aic_tilt_init(NULL)` ก่อนสร้าง UI

#### How? - จะทำอย่างไร

1. เรียก `aic_sensors_init()` เพื่อ initialize BMI270 IMU
2. เรียก `aic_tilt_init(NULL)` เพื่อ initialize Complementary Filter (ค่า default: alpha=0.98, dt=0.1s)
3. สร้าง Arc Gauge UI เหมือน Lab 2 (part2\_ex2\_arc\_gauge)
4. ใน timer callback (100ms): เรียก `aic_tilt_update_from_imu()` แล้วอ่าน `aic_tilt_get_roll()` + `aic_tilt_get_roll_percent()`
5. อัพเดท Arc value + labels ด้วยค่ามุมจริง

<figure><img src="/files/4H6WLe3wtPkZGOTSPt6j" alt=""><figcaption></figcaption></figure>

***

### 2. หลักการทำงานและ Flowchart

#### 2.1 Why Complementary Filter?

```
┌─────────────────────────────────────────────────────────────┐
│         SENSOR CHARACTERISTICS                              │
├─────────────────────────────────────────────────────────────┤
│                                                             │
│   ACCELEROMETER:                                            │
│   ┌─────────────────────────────────────────┐               │
│   │  + Measures gravity direction           │               │
│   │  + Stable over time (no drift)          │               │
│   │  - Noisy (vibration sensitive)          │               │
│   │  - Slow response                        │               │
│   │  = Good for LOW frequency               │               │
│   └─────────────────────────────────────────┘               │
│                                                             │
│   GYROSCOPE:                                                │
│   ┌─────────────────────────────────────────┐               │
│   │  + Fast response                        │               │
│   │  + Smooth readings                      │               │
│   │  - Drifts over time (integration error) │               │
│   │  = Good for HIGH frequency              │               │
│   └─────────────────────────────────────────┘               │
│                                                             │
│   COMPLEMENTARY FILTER = Best of both!                      │
│                                                             │
└─────────────────────────────────────────────────────────────┘
```

#### 2.2 Complementary Filter Formula

```
┌─────────────────────────────────────────────────────────────┐
│         COMPLEMENTARY FILTER                                │
├─────────────────────────────────────────────────────────────┤
│                                                             │
│   angle = α × (angle + gyro × dt) + (1-α) × accel_angle     │
│                                                             │
│   where:                                                    │
│     α = 0.98 (trust gyro 98%)                               │
│     dt = time delta (e.g., 0.01 sec at 100Hz)               │
│     gyro = angular velocity (rad/s → deg/s)                 │
│     accel_angle = atan2(ay, az) for Roll                    │
│                 = atan2(ax, az) for Pitch                   │
│                                                             │
│   ┌───────────────────────────────────────────────────────┐ │
│   │   HIGH PASS FILTER        LOW PASS FILTER             │ │
│   │   (Gyro: fast changes)    (Accel: slow/stable)        │ │
│   │                                                       │ │
│   │   0.98 × gyro_angle   +   0.02 × accel_angle          │ │
│   │        ↓                       ↓                      │ │
│   │   Quick response         Drift correction             │ │
│   └───────────────────────────────────────────────────────┘ │
│                                                             │
└─────────────────────────────────────────────────────────────┘
```

#### 2.3 Roll Angle Measurement

```
┌─────────────────────────────────────────────────────────────┐
│              ROLL ANGLE (Left-Right Tilt)                   │
├─────────────────────────────────────────────────────────────┤
│                                                             │
│   Top View of Board:                                        │
│                                                             │
│         Roll = 0°              Roll = +45°                  │
│       (Level)                (Tilt Right)                   │
│                                                             │
│       ┌─────────┐              ┌─────────┐                  │
│       │  PSOC   │              │  PSOC  ╲│                  │
│       │  EDGE   │              │  EDGE   ╲                  │
│       │  E84    │              │  E84    │                  │
│       └─────────┘              └─────────╱                  │
│                                         ╱                   │
│                                                             │
│   Formula: roll = atan2(ay, az) × 180/π                     │
│                                                             │
│   Range:                                                    │
│     -180° (tilt far left) to +180° (tilt far right)         │
│     0° = level                                              │
│                                                             │
└─────────────────────────────────────────────────────────────┘
```

***

### 3. ฟังก์ชันสำคัญ

#### 3.1 Tilt API Functions

<table><thead><tr><th width="261.890625">Function</th><th width="97.53125">Return</th><th>Description</th></tr></thead><tbody><tr><td><code>aic_tilt_init(config)</code></td><td>bool</td><td>Initialize Complementary Filter (NULL = defaults)</td></tr><tr><td><code>aic_tilt_update_from_imu()</code></td><td>bool</td><td>อ่าน Accel+Gyro แล้วอัพเดท filter (เรียกทุก 100ms)</td></tr><tr><td><code>aic_tilt_get_roll()</code></td><td>float</td><td>Roll angle (degrees, -180 to +180)</td></tr><tr><td><code>aic_tilt_get_pitch()</code></td><td>float</td><td>Pitch angle (degrees, -90 to +90)</td></tr><tr><td><code>aic_tilt_get_roll_percent()</code></td><td>uint8_t</td><td>Roll mapped to 0-100%</td></tr><tr><td><code>aic_tilt_get_pitch_percent()</code></td><td>uint8_t</td><td>Pitch mapped to 0-100%</td></tr><tr><td><code>aic_tilt_reset()</code></td><td>void</td><td>Reset filter state to zero</td></tr><tr><td><code>aic_tilt_set_alpha(alpha)</code></td><td>void</td><td>ตั้งค่า filter coefficient (0.0-1.0)</td></tr><tr><td><code>aic_tilt_set_dt(dt)</code></td><td>void</td><td>ตั้งค่า sample period (seconds)</td></tr></tbody></table>

#### 3.2 Tilt Init API Signature

```c
/**
 * @brief Initialize the tilt analysis module
 *
 * @param config  Pointer to configuration (NULL for defaults):
 *                - alpha = 0.98 (98% gyro, 2% accel)
 *                - dt = 0.1s (100ms sample period)
 * @return true if successful
 */
bool aic_tilt_init(const aic_tilt_config_t *config);

/* Configuration structure */
typedef struct {
    float alpha;   /* Complementary filter coefficient (0.0-1.0) */
    float dt;      /* Sample period in seconds */
} aic_tilt_config_t;
```

#### 3.3 Tilt Update API Signature

```c
/**
 * @brief Convenience function: Update from IMU shared memory
 *
 * Reads accelerometer AND gyroscope from the sensors module,
 * then applies Complementary Filter to estimate tilt angles.
 *
 * Internally calls:
 *   aic_imu_read_accel() + aic_imu_read_gyro() + aic_tilt_update()
 *
 * @return true if update successful (both accel and gyro available)
 */
bool aic_tilt_update_from_imu(void);
```

#### 3.4 Key Differences: Lab 2 (Sim) vs Lab 9 (HW)

<table><thead><tr><th width="150.7578125">รายการ</th><th width="263.852294921875">Lab 2 (Simulator)</th><th>Lab 9 (Hardware)</th></tr></thead><tbody><tr><td>Init</td><td>ไม่ต้อง</td><td><code>aic_sensors_init()</code> + <code>aic_tilt_init(NULL)</code></td></tr><tr><td>Data Source</td><td>Counter (0-100 loop)</td><td>Complementary Filter (Accel+Gyro)</td></tr><tr><td>Update</td><td><code>value = (value + 1) % 101</code></td><td><code>aic_tilt_update_from_imu()</code></td></tr><tr><td>Value</td><td>Simulated percentage</td><td><code>aic_tilt_get_roll_percent()</code></td></tr><tr><td>Error Check</td><td>ไม่มี</td><td>ตรวจ return false จาก update</td></tr><tr><td>Data Range</td><td>0-100 fixed</td><td>-90 to +90 (mapped to 0-100)</td></tr><tr><td>Behavior</td><td>Linear sweep</td><td>Real physical tilt angle</td></tr></tbody></table>

#### 3.5 Include Files

```c
/* Tilt Analysis module */
#include "../aic-eec/aic-eec.h"       /* aic_sensors_init() */
#include "../aic-eec/sensors.h"        /* sensor type definitions */
#include "../aic-eec/tilt.h"           /* aic_tilt_init(), aic_tilt_get_roll() */
#include "../../shared/imu_shared.h"   /* imu_shared_read_accel/gyro() */
```

***

### 4. โค้ดตัวอย่าง

#### 4.1 Global Variables

```c
#include "part2_examples.h"
#include "../aic-eec/aic-eec.h"
#include "../aic-eec/sensors.h"
#include "../aic-eec/tilt.h"      /* Tilt Analysis with Complementary Filter */
#include "../../shared/imu_shared.h"
#include <stdio.h>
#include <math.h>

/* Static variables - same as Ex2 */
static lv_obj_t * ex9_arc;
static lv_obj_t * ex9_value_label;
static lv_obj_t * ex9_raw_label;
static lv_timer_t * ex9_timer;
```

#### 4.2 Timer Callback - Tilt Analysis (Complementary Filter)

```c
/* Timer callback - uses Tilt Analysis (Complementary Filter) */
static void ex9_timer_cb(lv_timer_t * timer)
{
    (void)timer;

    /* Update tilt estimation from IMU (accel + gyro fusion) */
    if(!aic_tilt_update_from_imu()) {
        return;  /* IMU not ready */
    }

    /* Get roll angle and percentage */
    float roll = aic_tilt_get_roll();
    uint8_t pct = aic_tilt_get_roll_percent();

    lv_arc_set_value(ex9_arc, pct);
    lv_label_set_text_fmt(ex9_value_label, "%d%%", (int)pct);
    lv_label_set_text_fmt(ex9_raw_label, "Roll: %.1f deg", (double)roll);
}
```

**ภายใน `aic_tilt_update_from_imu()` จะทำ 3 ขั้นตอน:** อ่าน Accel -> อ่าน Gyro -> คำนวณ Complementary Filter โดยอัตโนมัติ ถ้า sensor ตัวใดตัวหนึ่งไม่พร้อมจะ return false

#### 4.3 Main Function

```c
void part2_ex9_real_arc_gauge(void)
{
    /* ===== HARDWARE INITIALIZATION (Part II addition) ===== */
    aic_sensors_init();
    aic_tilt_init(NULL);  /* Initialize Tilt Analysis with defaults */

    /* ===== UI CODE FROM Ex2 (part2_ex2_arc_gauge) ===== */

    /* Background */
    lv_obj_set_style_bg_color(lv_screen_active(),
                              lv_color_hex(0x0f0f23), LV_PART_MAIN);

    /* Title - Updated for Tilt */
    lv_obj_t * title = lv_label_create(lv_screen_active());
    lv_label_set_text(title, "Part 2 Ex9: Arc Gauge (Roll Angle)");
    lv_obj_set_style_text_color(title, lv_color_hex(0xFFFFFF), 0);
    lv_obj_align(title, LV_ALIGN_TOP_MID, 0, 10);

    /* Create Arc - same as Ex2 */
    ex9_arc = lv_arc_create(lv_screen_active());
    lv_obj_set_size(ex9_arc, 200, 200);
    lv_arc_set_rotation(ex9_arc, 135);
    lv_arc_set_bg_angles(ex9_arc, 0, 270);
    lv_arc_set_range(ex9_arc, 0, 100);
    lv_arc_set_value(ex9_arc, 50);
    lv_obj_center(ex9_arc);

    /* Style the arc - same as Ex2 */
    lv_obj_set_style_arc_width(ex9_arc, 20, LV_PART_MAIN);
    lv_obj_set_style_arc_width(ex9_arc, 20, LV_PART_INDICATOR);
    lv_obj_set_style_arc_color(ex9_arc,
                               lv_palette_main(LV_PALETTE_CYAN),
                               LV_PART_INDICATOR);

    /* Remove knob for read-only display */
    lv_obj_remove_style(ex9_arc, NULL, LV_PART_KNOB);
    lv_obj_remove_flag(ex9_arc, LV_OBJ_FLAG_CLICKABLE);

    /* Value label in center - same as Ex2 */
    ex9_value_label = lv_label_create(lv_screen_active());
    lv_label_set_text(ex9_value_label, "50%");
    lv_obj_set_style_text_color(ex9_value_label, lv_color_hex(0xFFFFFF), 0);
    lv_obj_set_style_text_font(ex9_value_label, &lv_font_montserrat_24, 0);
    lv_obj_center(ex9_value_label);

    /* Roll angle label */
    ex9_raw_label = lv_label_create(lv_screen_active());
    lv_label_set_text(ex9_raw_label, "Roll: 0.0 deg");
    lv_obj_set_style_text_color(ex9_raw_label, lv_color_hex(0x00FF00), 0);
    lv_obj_align(ex9_raw_label, LV_ALIGN_CENTER, 0, 130);

    /* Auto-update timer - uses Tilt Analysis */
    ex9_timer = lv_timer_create(ex9_timer_cb, 100, NULL);

    /* Description - Updated for Tilt */
    lv_obj_t * desc = lv_label_create(lv_screen_active());
    lv_label_set_text(desc, "[Part II] Complementary Filter (Accel + Gyro)\n"
                           "Tilt board left/right to change gauge");
    lv_obj_set_style_text_color(desc, lv_color_hex(0xAAAAAA), 0);
    lv_obj_set_style_text_align(desc, LV_TEXT_ALIGN_CENTER, 0);
    lv_obj_align(desc, LV_ALIGN_BOTTOM_MID, 0, -30);

    /* Footer */
    aic_create_footer(lv_screen_active());

    printf("[Week4] Ex9: Arc Gauge (Roll Angle) with Complementary Filter\r\n");
}
```

***

### 5. องค์ความรู้และเทคนิค

#### 5.1 Complementary Filter - ทำไมต้องใช้?

ปัญหาของการใช้ sensor ตัวเดียว:

```
┌─────────────────────────────────────────────────────────────┐
│   ACCELEROMETER ONLY (atan2 of gravity vector)              │
│                                                             │
│   Problem 1: NOISY (สัญญาณรบกวน)                             │
│                                                             │
│   angle  ~~~~╱╲~~╱╲~~╱╲~~  ← ค่ากระเพื่อมตลอดเวลา              │
│          ───────────────── ← ค่าจริงที่ต้องการ                   │
│                                                             │
│   Problem 2: AFFECTED BY VIBRATION                          │
│   เมื่อบอร์ดสั่น accelerometer อ่านค่า linear acceleration         │
│   ผิดพลาดเพราะไม่ใช่เฉพาะ gravity                              │
│                                                             │
├─────────────────────────────────────────────────────────────┤
│   GYROSCOPE ONLY (integration of angular velocity)          │
│                                                             │
│   Problem: DRIFT (ค่าเลื่อนไปเรื่อยๆ)                            │
│                                                             │
│   angle  ──────────╱                                        │
│          ─────────────── ← ค่าจริงที่ต้องการ                     │
│                   ▲                                         │
│                   │ drift ที่เพิ่มขึ้นเรื่อยๆ                       │
│                                                             │
│   เมื่อ integrate gyro rate: angle += gyro * dt               │
│   noise/bias เล็กๆ สะสมเป็น drift ใหญ่ขึ้นเรื่อยๆ                  │
│                                                             │
├─────────────────────────────────────────────────────────────┤
│   COMPLEMENTARY FILTER (Best of Both Worlds!)               │
│                                                             │
│   angle  ──────────────── ← Smooth + No drift!              │
│          ──────────────── ← ค่าจริง                           │
│                                                             │
│   Gyro: ให้ fast response (98% weight)                       │
│   Accel: ให้ long-term stability, correct drift (2% weight)  │
│                                                             │
└─────────────────────────────────────────────────────────────┘
```

#### 5.2 Tilt API Usage Pattern

```c
/* Pattern 1: Basic usage (recommended for Lab 9) */
aic_sensors_init();
aic_tilt_init(NULL);  /* Default: alpha=0.98, dt=0.1s */

/* In timer callback (every 100ms): */
if(aic_tilt_update_from_imu()) {
    float roll = aic_tilt_get_roll();          /* -180..+180 deg */
    uint8_t pct = aic_tilt_get_roll_percent(); /* 0..100 */
    /* Update UI */
}
```

```c
/* Pattern 2: Custom configuration */
aic_tilt_config_t config = {
    .alpha = 0.95f,  /* Less gyro weight = more stable but slower */
    .dt = 0.05f      /* 50ms update rate */
};
aic_tilt_init(&config);

/* Pattern 3: Runtime adjustment */
aic_tilt_set_alpha(0.90f);  /* ลด gyro weight */
aic_tilt_set_dt(0.05f);     /* เปลี่ยนเป็น 50ms */
aic_tilt_reset();            /* Reset filter (เมื่อวางบอร์ดใหม่) */
```

#### 5.3 Alpha Parameter - ผลกระทบต่อการตอบสนอง

```c
/* alpha สูง (0.98-0.99): Fast response, อาจ drift เล็กน้อย */
/*   เหมาะสำหรับ: Motion tracking, game controller            */
aic_tilt_set_alpha(0.98f);

/* alpha ปานกลาง (0.90-0.95): Balanced */
/*   เหมาะสำหรับ: General purpose, tilt display               */
aic_tilt_set_alpha(0.93f);

/* alpha ต่ำ (0.80-0.90): Very stable, slow response */
/*   เหมาะสำหรับ: Static measurement, structural monitoring   */
aic_tilt_set_alpha(0.85f);

/* Comparison:
 *   alpha=0.98 → Gyro 98%, Accel 2%  → เร็วแต่อาจ drift
 *   alpha=0.90 → Gyro 90%, Accel 10% → สมดุล
 *   alpha=0.80 → Gyro 80%, Accel 20% → ช้าแต่ stable มาก
 */
```

#### 5.4 Complementary Filter - สูตรคำนวณภายใน (tilt.c)

```c
/* Step 1: Accel angle = atan2(gravity components) */
accel_roll  = atan2f(ay, az) * RAD_TO_DEG;
accel_pitch = atan2f(-ax, sqrtf(ay*ay + az*az)) * RAD_TO_DEG;

/* Step 2: Gyro integration = previous angle + rate * dt */
gyro_roll  = prev_roll  + (gx * RAD_TO_DEG) * dt;
gyro_pitch = prev_pitch + (gy * RAD_TO_DEG) * dt;

/* Step 3: Complementary Filter fusion */
roll  = 0.98f * gyro_roll  + 0.02f * accel_roll;
pitch = 0.98f * gyro_pitch + 0.02f * accel_pitch;

/* Step 4: Map to percentage for UI widget */
/* -90 deg = 0%,  0 deg = 50%,  +90 deg = 100% */
uint8_t pct = (uint8_t)((clamp(roll, -90, 90) + 90.0f) / 180.0f * 100.0f);
```

#### 5.5 Calibration Tips - เมื่อค่าไม่ตรง

```c
/* Tip 1: ตรวจสอบว่า board วางระดับแล้ว roll/pitch ควรใกล้ 0 */
/* ถ้าไม่เป็น 0 แสดงว่า sensor มี offset */

/* Tip 2: Reset filter หลังวางบอร์ดระดับ */
aic_tilt_reset();
/* filter จะ reinitialize จาก accelerometer ในรอบถัดไป */

/* Tip 3: ถ้า drift เยอะ ลอง alpha ต่ำลง */
aic_tilt_set_alpha(0.93f);  /* ให้ accel correct drift มากขึ้น */

/* Tip 4: ตรวจสอบ dt ให้ตรงกับ timer period */
/* ถ้า timer = 50ms แต่ dt = 0.1s → ผลคำนวณจะผิด */
aic_tilt_set_dt(0.05f);  /* ตรงกับ 50ms timer */
```

#### 5.6 Comparison: Tilt API vs Manual Calculation

```c
/* วิธี 1: ใช้ Tilt API (แนะนำ) */
aic_tilt_update_from_imu();
float roll = aic_tilt_get_roll();  /* Easy, correct, handles init/normalize */

/* วิธี 2: Accel only (noisy, no gyro fusion) */
float roll_accel = atan2f(ay, az) * 57.2957795f;

/* วิธี 3: Manual Complementary Filter */
static float roll = 0.0f;
roll = 0.98f * (roll + gx * 57.2957795f * 0.1f) + 0.02f * atan2f(ay, az) * 57.2957795f;
/* Must handle init, normalize, clamp manually */
```

***

### 6. แบบฝึกหัด

#### Exercise 1: Dual Arc Gauge (Roll + Pitch)

**โจทย์:** สร้างหน้าจอที่แสดง Arc Gauge 2 วงสำหรับ Roll และ Pitch พร้อมกัน

**Requirements:**

* Arc 2 วง: Roll (ซ้าย, สี Cyan) และ Pitch (ขวา, สี Orange)
* ขนาด 150x150 pixels ต่อวง
* แต่ละวงมี percentage label ตรงกลาง + angle label ใต้วง
* ใช้ `aic_tilt_get_roll_percent()` และ `aic_tilt_get_pitch_percent()`
* เปลี่ยนสี indicator เมื่อเอียงเกิน 45 องศา (สีแดง)
* ใช้ timer 100ms เดียวอัพเดททั้ง 2 วง

**Layout:**

```
┌─────────────────────────────────────────────┐
│     "Dual Tilt Monitor"                     │
│                                             │
│    "Roll"             "Pitch"               │
│   ╭━━━━━╮            ╭━━━━━╮                │
│  ╱ CYAN  ╲          ╱ ORANGE╲               │
│  │  45%   │          │  62%  │              │
│  ╲       ╱          ╲       ╱               │
│   ╰━━━━━╯            ╰━━━━━╯                │
│  "-9.5 deg"         "+21.6 deg"             │
│                                             │
│     "[HW] Complementary Filter"             │
└─────────────────────────────────────────────┘
```

**การประยุกต์ใช้งานจริง:**

* **Drone Flight Controller**: แสดงมุม Roll (เอียงซ้าย-ขวา) และ Pitch (เอียงหน้า-หลัง) ของ quadcopter เพื่อให้ pilot เห็น attitude ของ drone แบบ real-time
* **เครน/รถยก (Crane/Forklift)**: ระบบ Anti-Tipping ที่แจ้งเตือนเมื่อรถเอียงเกินมุมปลอดภัย ป้องกันการพลิกคว่ำขณะยกของหนัก
* **Marine Vessel Monitoring**: แสดง Roll/Pitch ของเรือเพื่อตรวจสอบเสถียรภาพ

**Hint:**

* วาง Arc ด้วย `LV_ALIGN_CENTER` offset X = -90 (Roll) และ +90 (Pitch)
* เปลี่ยนสี: `lv_obj_set_style_arc_color(arc, color, LV_PART_INDICATOR)`
* ตรวจมุมเกิน: `if(fabsf(roll) > 45.0f) { /* change to red */ }`

***

#### Exercise 2: Tilt Alarm with History Chart

**โจทย์:** สร้างระบบตรวจจับมุมเอียงเกินกำหนดพร้อม Line Chart แสดงประวัติ:

**Requirements:**

* Arc Gauge แสดง Roll angle ปัจจุบัน (เหมือน Lab 9)
* Line Chart (350x120) ใต้ Arc แสดง history 50 จุดของ Roll angle
* ระบบเตือน 3 ระดับ:
  * Safe: |roll| < 15 deg (สีเขียว)
  * Warning: |roll| 15-30 deg (สีเหลือง)
  * Danger: |roll| > 30 deg (สีแดง + label กระพริบ)
* แสดง alarm count, max tilt angle ที่เคยวัดได้
* ปุ่ม "RESET" สำหรับ clear alarm count + tilt history

**Layout:**

```
┌─────────────────────────────────────────────┐
│     "Tilt Alarm Monitor"                    │
│                                             │
│        ╭━━━━━╮     Status: SAFE (green)     │
│       ╱       ╲    Alarms: 3                │
│       │  45%   │    Max: 28.5 deg           │
│       ╲       ╱                             │
│        ╰━━━━━╯                              │
│     "Roll: -5.2 deg"                        │
│                                             │
│   ┌─────────────────────────────────────┐   │
│   │    CHART: Roll History (50 pts)     │   │
│   │   ~~~~~~~~~~~~~~~~~~~~~~~~~~~~      │   │
│   │   ---  15 deg threshold ---         │   │
│   └─────────────────────────────────────┘   │
│                              [RESET]        │
└─────────────────────────────────────────────┘
```

**การประยุกต์ใช้งานจริง:**

* **Structural Health Monitoring**: ติดตั้งบนเสา/อาคาร ตรวจจับความเอียงและแจ้งเตือนเมื่อเกินเกณฑ์ปลอดภัย เก็บข้อมูลย้อนหลังเพื่อวิเคราะห์แนวโน้ม
* **Industrial Equipment Leveling**: ตรวจสอบว่าเครื่องจักร CNC หรือเครื่องพิมพ์ 3D อยู่ระดับหรือไม่ แจ้งเตือนเมื่อพื้นทรุดตัว
* **Vehicle Roll-over Prevention**: ระบบ ESP/ESC ในรถยนต์ที่ตรวจจับมุมเอียงเพื่อป้องกันรถพลิกคว่ำ

**Hint:**

* Chart range: `-90` to `+90` (raw degrees, not percentage)
* `lv_chart_set_next_value(chart, ser, (int32_t)roll)`
* กระพริบ label: toggle visibility ใน timer `lv_obj_add_flag()/lv_obj_remove_flag(LV_OBJ_FLAG_HIDDEN)`
* Peak tracking: `if(fabsf(roll) > max_tilt) max_tilt = fabsf(roll);`

***

### 7. References

* [Complementary Filter Explained](https://www.pieter-jan.com/node/11)
* [LVGL Arc](https://docs.lvgl.io/9.2/widgets/arc.html)
* [BMI270 IMU Datasheet](https://www.bosch-sensortec.com/products/motion-sensors/imus/bmi270/)

***


# Scale Gauge

## Lab 10: Real Scale Gauge (Pitch Angle)

### Part 2 - Sensor Visualization

### 1. โครงสร้างภาพรวมของ Lab

#### Why? - ทำไมต้องเรียนรู้เรื่องนี้

* **Real Gauge + Real Sensor**: นำ Scale widget จาก Lab 4 (simulation) มาใช้กับข้อมูล Pitch Angle จริงจาก IMU
* **Pitch Angle**: วัดการเอียงหน้า/หลังของบอร์ด ซึ่งใช้งานได้จริงในหลายแอปพลิเคชัน เช่น ระบบเตือนความลาดชัน
* **Complementary Filter**: เรียนรู้อัลกอริทึมที่รวม Accelerometer + Gyroscope เพื่อผลลัพธ์ที่แม่นยำ
* **Scale Widget Mastery**: เข้าใจการใช้ lv\_scale แบบ ROUND\_OUTER กับ needle line, color sections, custom labels
* **Roll vs Pitch**: เข้าใจความแตกต่างระหว่าง Roll (Lab 9) กับ Pitch (Lab 10)

#### What? - จะได้เรียนรู้อะไร

1. **Tilt API (Pitch)**: ใช้ `aic_tilt_get_pitch()` และ `aic_tilt_get_pitch_percent()` อ่านมุมเอียงหน้า/หลัง
2. **Scale Widget**: สร้าง round gauge ด้วย ticks, labels, sections, needle
3. **Color Sections**: กำหนดโซนสี (75-100 = แดง) สำหรับ warning zone
4. **Needle Positioning**: ใช้ `lv_scale_set_line_needle_value()` ขยับเข็มตามค่า sensor
5. **Custom Labels**: แสดง "0", "25", "50", "75", "100" แทน default labels
6. **Style Layers**: จัดการ 3 layers ของ scale: MAIN (arc), INDICATOR (major ticks), ITEMS (minor ticks)

#### How? - จะทำอย่างไร

1. Initialize hardware ด้วย `aic_sensors_init()` + `aic_tilt_init(NULL)`
2. สร้าง Scale widget ในโหมด `LV_SCALE_MODE_ROUND_OUTER` ขนาด 200x200
3. กำหนด 21 ticks, major ทุก 5 ticks, range 0-100
4. เพิ่ม color section สำหรับ high zone (75-100 = สีแดง)
5. สร้าง needle line ด้วย `lv_line_create()` บน scale
6. Timer callback (100ms) เรียก `aic_tilt_update_from_imu()` แล้วอัพเดท needle + labels

<figure><img src="/files/4kvlWO80Jf3Y3w5PZuvr" alt=""><figcaption></figcaption></figure>

***

### 2. หลักการทำงานและ Flowchart

#### 2.1 Pitch Angle Measurement

```
┌─────────────────────────────────────────────────────────────┐
│              PITCH ANGLE (Forward-Backward Tilt)            │
├─────────────────────────────────────────────────────────────┤
│                                                             │
│   Side View of Board:                                       │
│                                                             │
│       Pitch = 0°            Pitch = +45°                    │
│       (Level)              (Tilt Forward)                   │
│                                                             │
│       ─────────              ╱────────                      │
│       │ PSOC  │            ╱  PSOC  │                       │
│       │ EDGE  │          ╱    EDGE  │                       │
│       ─────────        ╱──────────                          │
│                                                             │
│   Formula: pitch = atan2(ax, az) × 180/π                    │
│                                                             │
│   Range:                                                    │
│     -90° (tilt backward) to +90° (tilt forward)             │
│     0° = level                                              │
│                                                             │
│   Note: Pitch range is smaller than Roll because            │
│         at ±90° the Z-axis becomes horizontal               │
│                                                             │
└─────────────────────────────────────────────────────────────┘
```

#### 2.2 Scale Widget Structure

```
┌─────────────────────────────────────────────────────────────┐
│                 SCALE WIDGET STRUCTURE                      │
├─────────────────────────────────────────────────────────────┤
│                                                             │
│                      LV_PART_MAIN                           │
│                   (Arc background)                          │
│                         ╱╲                                  │
│                        ╱  ╲                                 │
│                       ╱    ╲                                │
│               100    ╱      ╲    0                          │
│                ┃    │        │    ┃   LV_PART_INDICATOR     │
│             75 ┃    │   50   │    ┃ 25  (Major ticks)       │
│                ┃    │   ▲    │    ┃                         │
│                 ╲   │ NEEDLE │   ╱    LV_PART_ITEMS         │
│                  ╲  │        │  ╱      (Minor ticks)        │
│                   ╲ │        │ ╱                            │
│                    ╲│        │╱                             │
│                                                             │
│   Sections:                                                 │
│     Blue: 0-75 (Normal zone)                                │
│     Red: 75-100 (High alert zone)                           │
│                                                             │
└─────────────────────────────────────────────────────────────┘
```

#### 2.3 UI Layout

```
┌─────────────────────────────────────────────────────────────┐
│       "Week 4 Ex10: Scale Gauge (Pitch Angle)"              │
├─────────────────────────────────────────────────────────────┤
│                                                             │
│                   100    75                                 │
│                    ╲     │     ╱ 25                         │
│                     ╲    │    ╱                             │
│                      ╲   │50 ╱                              │
│                       ╲  │  ╱                               │
│                        ╲ ▲ ╱      ← Needle (orange)         │
│                         ─┴─                                 │
│                          0                                  │
│                                                             │
│                        "50"  ← Value Label                  │
│                                                             │
│                 Pitch: 0.0 deg ← Raw Angle Label            │
│                                                             │
│     "[Part II] Complementary Filter (Accel + Gyro)"         │
│     "Tilt board forward/backward to move the needle"        │
└─────────────────────────────────────────────────────────────┘
```

***

### 3. ฟังก์ชันสำคัญ

#### 3.1 Tilt API Functions

<table><thead><tr><th width="278.26141357421875">Function</th><th width="97.48370361328125">Return</th><th>Description</th></tr></thead><tbody><tr><td><code>aic_sensors_init()</code></td><td>void</td><td>Initialize sensor subsystem (เรียกครั้งเดียว)</td></tr><tr><td><code>aic_tilt_init(NULL)</code></td><td>bool</td><td>Initialize Complementary Filter (defaults: alpha=0.98, dt=0.1)</td></tr><tr><td><code>aic_tilt_update_from_imu()</code></td><td>bool</td><td>อัพเดท filter จาก BMI270 (true = สำเร็จ)</td></tr><tr><td><code>aic_tilt_get_pitch()</code></td><td>float</td><td>Pitch angle in degrees (-90 to +90)</td></tr><tr><td><code>aic_tilt_get_pitch_percent()</code></td><td>uint8_t</td><td>Pitch as percentage (0-100%)</td></tr><tr><td><code>aic_tilt_get_roll()</code></td><td>float</td><td>Roll angle in degrees (-180 to +180)</td></tr><tr><td><code>aic_tilt_get_roll_percent()</code></td><td>uint8_t</td><td>Roll as percentage (0-100%)</td></tr><tr><td><code>aic_tilt_reset()</code></td><td>void</td><td>Reset filter state to zero</td></tr><tr><td><code>aic_tilt_set_alpha(float)</code></td><td>void</td><td>เปลี่ยน filter coefficient (0.0-1.0)</td></tr></tbody></table>

#### 3.2 Scale Widget APIs

<table><thead><tr><th width="480.34234619140625">Function</th><th>Description</th></tr></thead><tbody><tr><td><code>lv_scale_create(parent)</code></td><td>สร้าง Scale widget</td></tr><tr><td><code>lv_scale_set_mode(scale, LV_SCALE_MODE_ROUND_OUTER)</code></td><td>ตั้ง mode เป็น round gauge</td></tr><tr><td><code>lv_scale_set_total_tick_count(scale, 21)</code></td><td>จำนวน tick ทั้งหมด</td></tr><tr><td><code>lv_scale_set_major_tick_every(scale, 5)</code></td><td>Major tick ทุก N ticks</td></tr><tr><td><code>lv_scale_set_range(scale, 0, 100)</code></td><td>กำหนดช่วงค่า min-max</td></tr><tr><td><code>lv_scale_set_label_show(scale, true)</code></td><td>แสดง labels</td></tr><tr><td><code>lv_scale_set_text_src(scale, labels)</code></td><td>ใช้ custom labels</td></tr><tr><td><code>lv_scale_set_line_needle_value(scale, line, len, val)</code></td><td>ตั้งตำแหน่งเข็ม</td></tr><tr><td><code>lv_scale_add_section(scale)</code></td><td>เพิ่ม color section</td></tr><tr><td><code>lv_scale_section_set_range(section, min, max)</code></td><td>กำหนดช่วงของ section</td></tr><tr><td><code>lv_scale_section_set_style(section, part, style)</code></td><td>ตั้ง style ของ section</td></tr></tbody></table>

#### 3.3 Pitch Angle to Percentage Mapping

```c
/* Pitch: -90 to +90 degrees -> 0% to 100% */
/*   -90 deg = 0%   (tilted backward fully)  */
/*     0 deg = 50%  (level)                   */
/*   +90 deg = 100% (tilted forward fully)    */

/* Built-in API: */
uint8_t pct = aic_tilt_get_pitch_percent();

/* Manual calculation (for reference): */
float pitch = aic_tilt_get_pitch();  /* -90 to +90 */
uint8_t pct = (uint8_t)((pitch + 90.0f) * (100.0f / 180.0f));
```

#### 3.4 Include Files

```c
#include "lvgl.h"
#include <math.h>
#include <stdio.h>

/* Sensor & Tilt API headers (hardware only) */
#ifdef CYBSP_ENABLED
#include "aic-eec/aic-eec.h"
#include "aic-eec/sensors.h"
#include "aic-eec/tilt.h"
#include "../../shared/imu_shared.h"
#endif
```

***

### 4. โค้ดตัวอย่าง

#### 4.1 Global Variables

```c
#include "lvgl.h"
#include <math.h>
#include <stdio.h>

/* Sensor & Tilt API headers */
#ifdef CYBSP_ENABLED
#include "aic-eec/aic-eec.h"
#include "aic-eec/sensors.h"
#include "aic-eec/tilt.h"
#include "../../shared/imu_shared.h"
#endif

/* Scale gauge widgets */
static lv_obj_t * ex10_scale;
static lv_obj_t * ex10_value_label;
static lv_obj_t * ex10_raw_label;      /* Shows pitch angle in degrees */
static lv_obj_t * ex10_needle_line;
static lv_timer_t * ex10_timer;

static int32_t ex10_needle_length = 85; /* Needle length - almost reaching labels */
```

#### 4.2 Timer Callback - อ่านค่า Pitch จาก Complementary Filter

```c
static void ex10_timer_cb(lv_timer_t * timer)
{
    (void)timer;

    float pitch;
    uint8_t pct;

#ifdef CYBSP_ENABLED
    /* ===== HARDWARE: Update tilt from BMI270 ===== */
    if(!aic_tilt_update_from_imu()) {
        return;  /* IMU not ready - skip this cycle */
    }

    /* Get pitch angle and percentage */
    pitch = aic_tilt_get_pitch();          /* -90 to +90 degrees */
    pct   = aic_tilt_get_pitch_percent();  /* 0 to 100% */
#else
    /* ===== PC SIMULATOR: Simulated pitch ===== */
    static float t = 0.0f;
    t += 0.03f;
    pitch = 45.0f * sinf(t);              /* -45 to +45 degrees */
    pct   = (uint8_t)((pitch + 90.0f) * (100.0f / 180.0f));
#endif

    /* ===== Update value label (center of gauge) ===== */
    lv_label_set_text_fmt(ex10_value_label, "%d", (int)pct);

    /* ===== Update raw pitch angle label ===== */
    lv_label_set_text_fmt(ex10_raw_label, "Pitch: %.1f deg", (double)pitch);

    /* ===== Update needle position ===== */
    lv_scale_set_line_needle_value(ex10_scale, ex10_needle_line,
                                    ex10_needle_length, pct);
}
```

#### 4.3 Main Function - สร้าง UI ทั้งหมด

```c
void part2_ex10_real_scale_gauge(void)
{
    /* ===== HARDWARE INITIALIZATION ===== */
#ifdef CYBSP_ENABLED
    aic_sensors_init();
    aic_tilt_init(NULL);  /* Initialize Complementary Filter with defaults */
#endif

    /* ===== Background ===== */
    lv_obj_set_style_bg_color(lv_screen_active(),
                              lv_color_hex(0x1a1a2e), LV_PART_MAIN);

    /* ===== Title ===== */
    lv_obj_t * title = lv_label_create(lv_screen_active());
    lv_label_set_text(title, "Part 2 Ex10: Scale Gauge (Pitch Angle)");
    lv_obj_set_style_text_color(title, lv_color_hex(0xFFFFFF), 0);
    lv_obj_align(title, LV_ALIGN_TOP_MID, 0, 10);

    /*=========================================================================
     * Create Scale - Following lv_example_scale_4 pattern
     *=========================================================================*/
    ex10_scale = lv_scale_create(lv_screen_active());
    lv_obj_set_size(ex10_scale, 200, 200);
    lv_scale_set_label_show(ex10_scale, true);
    lv_scale_set_mode(ex10_scale, LV_SCALE_MODE_ROUND_OUTER);
    lv_obj_align(ex10_scale, LV_ALIGN_CENTER, 0, 0);

    /* Range: 0-100 */
    lv_scale_set_total_tick_count(ex10_scale, 21);
    lv_scale_set_major_tick_every(ex10_scale, 5);

    /* Tick length styling */
    lv_obj_set_style_length(ex10_scale, 5, LV_PART_ITEMS);      /* Minor tick */
    lv_obj_set_style_length(ex10_scale, 10, LV_PART_INDICATOR); /* Major tick */
    lv_scale_set_range(ex10_scale, 0, 100);

    /* Custom labels for gauge */
    static const char * custom_labels[] = {"0", "25", "50", "75", "100", NULL};
    lv_scale_set_text_src(ex10_scale, custom_labels);

    /*=========================================================================
     * Indicator style (Major ticks) - Blue color
     *=========================================================================*/
    static lv_style_t ex10_indicator_style;
    lv_style_init(&ex10_indicator_style);

    /* Label style properties */
    lv_style_set_text_font(&ex10_indicator_style, LV_FONT_DEFAULT);
    lv_style_set_text_color(&ex10_indicator_style,
                             lv_palette_darken(LV_PALETTE_BLUE, 3));

    /* Major tick properties */
    lv_style_set_line_color(&ex10_indicator_style,
                             lv_palette_darken(LV_PALETTE_BLUE, 3));
    lv_style_set_width(&ex10_indicator_style, 10);       /* Tick length */
    lv_style_set_line_width(&ex10_indicator_style, 2);   /* Tick width */
    lv_obj_add_style(ex10_scale, &ex10_indicator_style, LV_PART_INDICATOR);

    /*=========================================================================
     * Minor ticks style - Lighter blue
     *=========================================================================*/
    static lv_style_t ex10_minor_ticks_style;
    lv_style_init(&ex10_minor_ticks_style);
    lv_style_set_line_color(&ex10_minor_ticks_style,
                             lv_palette_lighten(LV_PALETTE_BLUE, 2));
    lv_style_set_width(&ex10_minor_ticks_style, 5);      /* Tick length */
    lv_style_set_line_width(&ex10_minor_ticks_style, 2); /* Tick width */
    lv_obj_add_style(ex10_scale, &ex10_minor_ticks_style, LV_PART_ITEMS);

    /*=========================================================================
     * Main arc/line style
     *=========================================================================*/
    static lv_style_t ex10_main_line_style;
    lv_style_init(&ex10_main_line_style);
    lv_style_set_arc_color(&ex10_main_line_style,
                            lv_palette_darken(LV_PALETTE_BLUE, 3));
    lv_style_set_arc_width(&ex10_main_line_style, 3);
    lv_obj_add_style(ex10_scale, &ex10_main_line_style, LV_PART_MAIN);

    /*=========================================================================
     * Section: High zone (75-100) - Red color
     *=========================================================================*/
    lv_scale_section_t * high_section = lv_scale_add_section(ex10_scale);
    lv_scale_section_set_range(high_section, 75, 100);

    static lv_style_t ex10_high_section_main_style;
    lv_style_init(&ex10_high_section_main_style);
    lv_style_set_arc_color(&ex10_high_section_main_style,
                            lv_palette_main(LV_PALETTE_RED));
    lv_style_set_arc_width(&ex10_high_section_main_style, 3);
    lv_scale_section_set_style(high_section, LV_PART_MAIN,
                                &ex10_high_section_main_style);

    static lv_style_t ex10_high_section_indicator_style;
    lv_style_init(&ex10_high_section_indicator_style);
    lv_style_set_line_color(&ex10_high_section_indicator_style,
                             lv_palette_darken(LV_PALETTE_RED, 3));
    lv_style_set_text_color(&ex10_high_section_indicator_style,
                             lv_palette_darken(LV_PALETTE_RED, 3));
    lv_scale_section_set_style(high_section, LV_PART_INDICATOR,
                                &ex10_high_section_indicator_style);

    static lv_style_t ex10_high_section_items_style;
    lv_style_init(&ex10_high_section_items_style);
    lv_style_set_line_color(&ex10_high_section_items_style,
                             lv_palette_main(LV_PALETTE_RED));
    lv_scale_section_set_style(high_section, LV_PART_ITEMS,
                                &ex10_high_section_items_style);

    /*=========================================================================
     * Needle Line - Shows current value position
     *=========================================================================*/
    ex10_needle_line = lv_line_create(ex10_scale);

    /* Needle style - Orange color for visibility */
    static lv_style_t ex10_needle_style;
    lv_style_init(&ex10_needle_style);
    lv_style_set_line_width(&ex10_needle_style, 2);  /* Thin needle */
    lv_style_set_line_color(&ex10_needle_style,
                             lv_palette_main(LV_PALETTE_ORANGE));
    lv_style_set_line_rounded(&ex10_needle_style, true);
    lv_obj_add_style(ex10_needle_line, &ex10_needle_style, 0);

    /* Set initial needle position */
    lv_scale_set_line_needle_value(ex10_scale, ex10_needle_line,
                                    ex10_needle_length, 50);

    /*=========================================================================
     * Value label (center of gauge)
     *=========================================================================*/
    ex10_value_label = lv_label_create(lv_screen_active());
    lv_label_set_text(ex10_value_label, "50");
    lv_obj_set_style_text_color(ex10_value_label,
                                 lv_color_hex(0xFFFFFF), 0);
    lv_obj_set_style_text_font(ex10_value_label,
                                &lv_font_montserrat_24, 0);
    lv_obj_align(ex10_value_label, LV_ALIGN_CENTER, 0, 0);

    /*=========================================================================
     * Pitch angle label - shows actual degrees
     *=========================================================================*/
    ex10_raw_label = lv_label_create(lv_screen_active());
    lv_label_set_text(ex10_raw_label, "Pitch: 0.0 deg");
    lv_obj_set_style_text_color(ex10_raw_label,
                                 lv_color_hex(0x00FF00), 0);
    lv_obj_align(ex10_raw_label, LV_ALIGN_CENTER, 0, 120);

    /*=========================================================================
     * Description labels
     *=========================================================================*/
    lv_obj_t * desc = lv_label_create(lv_screen_active());
    lv_label_set_text(desc, "[Part II] Complementary Filter (Accel + Gyro)\n"
                           "Tilt board forward/backward to move the needle");
    lv_obj_set_style_text_color(desc, lv_color_hex(0xAAAAAA), 0);
    lv_obj_set_style_text_align(desc, LV_TEXT_ALIGN_CENTER, 0);
    lv_obj_align(desc, LV_ALIGN_BOTTOM_MID, 0, -25);

    /*=========================================================================
     * Footer
     *=========================================================================*/
    aic_create_footer(lv_screen_active());

    /*=========================================================================
     * Timer for Tilt Analysis updates (100ms = 10 Hz)
     *=========================================================================*/
    ex10_timer = lv_timer_create(ex10_timer_cb, 100, NULL);

    printf("[Part2] Ex10: Scale Gauge (Pitch Angle) "
           "with Complementary Filter\r\n");
}
```

***

### 5. องค์ความรู้และเทคนิค

#### 5.1 Scale Style Layers - 3 ชั้นของ Style

Scale widget มี 3 ชั้นที่ต้องกำหนด style แยกกัน:

<table><thead><tr><th width="84.21588134765625">Layer</th><th width="187.95098876953125">Part</th><th>ควบคุม</th><th>Properties</th></tr></thead><tbody><tr><td>1</td><td><code>LV_PART_MAIN</code></td><td>เส้น arc หลัก</td><td><code>arc_color</code>, <code>arc_width</code></td></tr><tr><td>2</td><td><code>LV_PART_INDICATOR</code></td><td>Major ticks + Labels</td><td><code>line_color</code>, <code>text_color</code>, <code>width</code>, <code>line_width</code></td></tr><tr><td>3</td><td><code>LV_PART_ITEMS</code></td><td>Minor ticks</td><td><code>line_color</code>, <code>width</code>, <code>line_width</code></td></tr></tbody></table>

```c
/* ตัวอย่างย่อ: ตั้ง style ทั้ง 3 layers */
static lv_style_t main_s, ind_s, items_s;

lv_style_init(&main_s);
lv_style_set_arc_color(&main_s, lv_palette_darken(LV_PALETTE_BLUE, 3));
lv_style_set_arc_width(&main_s, 3);
lv_obj_add_style(scale, &main_s, LV_PART_MAIN);

lv_style_init(&ind_s);
lv_style_set_line_color(&ind_s, lv_palette_darken(LV_PALETTE_BLUE, 3));
lv_style_set_text_color(&ind_s, lv_palette_darken(LV_PALETTE_BLUE, 3));
lv_style_set_width(&ind_s, 10);        /* Major tick length */
lv_style_set_line_width(&ind_s, 2);    /* Major tick thickness */
lv_obj_add_style(scale, &ind_s, LV_PART_INDICATOR);

lv_style_init(&items_s);
lv_style_set_line_color(&items_s, lv_palette_lighten(LV_PALETTE_BLUE, 2));
lv_style_set_width(&items_s, 5);       /* Minor tick length */
lv_obj_add_style(scale, &items_s, LV_PART_ITEMS);
```

#### 5.2 Section Coloring - เพิ่มโซนสี

```c
/* Section เปลี่ยนสีของ arc, ticks, labels ในช่วงที่กำหนด */
/* ต้องตั้ง style ให้ครบทั้ง 3 parts: */
lv_scale_section_t * section = lv_scale_add_section(scale);
lv_scale_section_set_range(section, 75, 100);

lv_scale_section_set_style(section, LV_PART_MAIN,      &red_arc_style);
lv_scale_section_set_style(section, LV_PART_INDICATOR,  &red_tick_style);
lv_scale_section_set_style(section, LV_PART_ITEMS,      &red_minor_style);
/* สามารถเพิ่มหลาย sections: Green(0-25), Yellow(25-75), Red(75-100) */
```

#### 5.3 Needle Line vs Image Needle

```c
/* Line Needle (ใช้ใน Lab นี้) - ง่าย, ไม่ต้องมี image asset */
lv_obj_t * needle = lv_line_create(scale);
lv_scale_set_line_needle_value(scale, needle, 85, 50);
/* ข้อดี: ง่าย, RAM น้อย, ปรับ style ได้ */
/* ข้อจำกัด: เส้นตรงเท่านั้น, ไม่มีหัวลูกศร */

/* Image Needle (Advanced) - สวยกว่าแต่ต้องมี image */
/* lv_scale_set_image_needle_value(scale, img, 50); */
```

#### 5.4 Pitch vs Roll - เมื่อไหร่ใช้อันไหน

<table><thead><tr><th width="151.07745361328125">รายการ</th><th>Pitch (Lab 10)</th><th>Roll (Lab 9)</th></tr></thead><tbody><tr><td><strong>ทิศทาง</strong></td><td>เอียงหน้า/หลัง</td><td>เอียงซ้าย/ขวา</td></tr><tr><td><strong>Range</strong></td><td>-90 to +90 deg</td><td>-180 to +180 deg</td></tr><tr><td><strong>สูตร</strong></td><td>atan2(-ax, sqrt(ay^2+az^2))</td><td>atan2(ay, az)</td></tr><tr><td><strong>Use Case</strong></td><td>Slope, crane arm, nose up/down</td><td>Anti-tip, balance, bank L/R</td></tr><tr><td><strong>Widget</strong></td><td>Scale (lv_scale)</td><td>Arc (lv_arc)</td></tr></tbody></table>

#### 5.5 Custom Labels vs Auto Labels

```c
/* Auto labels: LVGL สร้างตัวเลขอัตโนมัติจาก range */
/* Custom labels: กำหนดเอง (ต้องเป็น static, ปิดด้วย NULL) */
static const char * labels[] = {"0", "25", "50", "75", "100", NULL};
lv_scale_set_text_src(scale, labels);
/* จำนวน labels = จำนวน major ticks (21 ticks / 5 = 5 labels + NULL) */
```

#### 5.6 Complementary Filter Tuning

```c
/* Default: alpha=0.98, dt=0.1 (เหมาะสำหรับส่วนใหญ่) */
aic_tilt_init(NULL);

/* Custom: ปรับ alpha ตามการใช้งาน */
aic_tilt_config_t config = { .alpha = 0.98f, .dt = 0.1f };
aic_tilt_init(&config);
/* alpha สูง (0.99): smooth แต่ drift มากขึ้น */
/* alpha ต่ำ (0.90): noise มากขึ้น แต่ stable กว่า */
```

***

### 6. แบบฝึกหัด

#### Exercise 1: Multi-Zone Scale Gauge

**โจทย์:** เพิ่ม color sections ให้ Scale gauge ครอบคลุมทั้ง 3 โซน:

**Requirements:**

* Low zone (0-25): สีเขียว - บอร์ดเอียงหลังมาก
* Normal zone (25-75): สีน้ำเงิน (default) - บอร์ดอยู่ในช่วงปกติ
* High zone (75-100): สีแดง - บอร์ดเอียงหน้ามาก
* เปลี่ยนสี value label ตาม zone ปัจจุบัน (เขียว/ขาว/แดง)
* เพิ่ม status label: "BACKWARD", "LEVEL", "FORWARD"

**การประยุกต์ใช้งานจริง:**

* Road Grade Warning, Anti-Rollover, Digital Level

**Hint:**

* สร้าง section เพิ่มสำหรับ low zone (0-25)
* ใน timer callback: ตรวจ `pct < 25`, `pct > 75` เพื่อเปลี่ยนสี label
* `lv_obj_set_style_text_color(label, color, 0)` เปลี่ยนสี label

***

#### Exercise 2: Dual Scale Dashboard (Roll + Pitch)

**โจทย์:** สร้าง dashboard แสดง 2 Scale gauges: Roll (ซ้าย) กับ Pitch (ขวา) พร้อมกัน

**Requirements:**

* Scale 2 อัน ขนาด 160x160 วางซ้าย-ขวา
* Scale ซ้าย: Roll angle (สี Cyan)
* Scale ขวา: Pitch angle (สี Orange)
* แต่ละอันมี needle line + value label
* เพิ่ม label กลาง: "Tilt Dashboard"
* Tilt magnitude label ด้านล่าง: "Tilt: XX.X deg"

**การประยุกต์ใช้งานจริง:**

* Flight Instrument: Artificial Horizon
* Crane Safety Monitor: ตรวจสอบความเอียง 2 แกน
* Platform Leveling: ปรับระดับแท่นรองรับอุปกรณ์

**Hint:**

* Scale ซ้าย: `lv_obj_align(scale, LV_ALIGN_CENTER, -110, -20)`
* Scale ขวา: `lv_obj_align(scale, LV_ALIGN_CENTER, 110, -20)`
* ขนาด 160x160 (เล็กกว่า 200x200 ของ Lab 10 เดิม)
* Tilt magnitude: `sqrtf(roll*roll + pitch*pitch)`
* ทั้งคู่ใช้ `aic_tilt_update_from_imu()` ครั้งเดียวใน timer

***

### 7. References

* [LVGL Scale](https://docs.lvgl.io/9.2/widgets/scale.html)
* [lv\_example\_scale\_4](https://github.com/lvgl/lvgl/blob/release/v9.2/examples/widgets/scale/lv_example_scale_4.c)
* [Complementary Filter Tutorial](https://www.pieter-jan.com/node/11)

***


# Chart Dashboard

## Lab 11: Real Chart Dashboard

### Part 2 - Sensor Visualization

### 1. โครงสร้างภาพรวมของ Lab

#### Why? - ทำไมต้องเรียนรู้เรื่องนี้

* **Multi-Chart Visualization**: ในระบบ monitoring จริง ข้อมูล sensor เดียวกันแสดงได้หลายรูปแบบ ต้องเลือก chart type ที่เหมาะกับลักษณะข้อมูล
* **Active Tab Optimization**: เมื่อมี chart หลายตัว การอัพเดทเฉพาะ chart ที่มองเห็นช่วยลด CPU load อย่างมาก (ลดได้ 75%)
* **Custom Draw Events**: เทคนิค faded area chart ใช้ draw callback ซึ่งเป็นความสามารถขั้นสูงของ LVGL ที่ใช้ในระบบ production จริง
* **Tilt Analysis**: รวม Complementary Filter (Accel + Gyro fusion) เพื่อคำนวณ Roll/Pitch angle ที่แม่นยำ
* **Professional Dashboard**: รูปแบบ multi-chart dashboard ที่ใช้ใน SCADA, Process Control, และ Industrial IoT

#### What? - จะได้เรียนรู้อะไร

1. **Bar Chart (Real Data)**: เปรียบเทียบ Accel X/Y/Z แบบ side-by-side ด้วย `LV_CHART_TYPE_BAR` + colored series
2. **Area Chart (Faded)**: แสดง Tilt Magnitude พร้อม gradient fill ด้วย custom draw callback (`LV_EVENT_DRAW_TASK_ADDED`)
3. **Scatter Chart (2D Mapping)**: แสดง Roll vs Pitch เป็น "Tilt Ball" ด้วย `LV_CHART_TYPE_SCATTER` + `lv_chart_set_next_value2()`
4. **Line Chart (Multi-Series)**: แสดง Gyroscope Roll/Pitch/Yaw เป็น time-series
5. **TabView LEFT Layout**: จัดวาง 4 charts ใน tabs ด้านซ้าย (vertical tab bar 80px)
6. **Active Tab Optimization**: อัพเดทเฉพาะ tab ที่มองเห็นด้วย `lv_tabview_get_tab_active()`
7. **Tilt Integration**: ใช้ `aic_tilt_init()` + `aic_tilt_update_from_imu()` สำหรับ Area และ Scatter tabs

#### How? - จะทำอย่างไร

1. เรียก `aic_sensors_init()` + `aic_tilt_init(NULL)` ก่อนสร้าง UI
2. สร้าง TabView แบบ LEFT tab bar (80px) พร้อม 4 tabs: Bar, Area, Scatter, Line
3. แต่ละ tab สร้าง chart ด้วยฟังก์ชันแยก (`ex11_create_xxx_tab()`)
4. Timer callback (100ms) อ่าน IMU + Gyro + Tilt แล้วอัพเดทเฉพาะ active tab
5. Tab Area ใช้ custom draw callback สำหรับ faded gradient effect

<figure><img src="/files/rjo6DkPtclX2RFvE3yrL" alt=""><figcaption></figcaption></figure>

***

### 2. หลักการทำงานและ Flowchart

#### 2.1 Dashboard Architecture

```
┌─────────────────────────────────────────────────────────────┐
│              CHART DASHBOARD ARCHITECTURE                   │
├─────────────────────────────────────────────────────────────┤
│                                                             │
│   ┌──────────────────────────────────────────────────────┐  │
│   │                 SENSOR LAYER                         │  │
│   │                                                      │  │
│   │   ┌───────────────┐    ┌───────────────┐             │  │
│   │   │  Accelerometer│    │   Gyroscope   │             │  │
│   │   │   ax, ay, az  │    │   gx, gy, gz  │             │  │
│   │   └───────┬───────┘    └───────┬───────┘             │  │
│   │           │                    │                     │  │
│   │           └────────┬───────────┘                     │  │
│   │                    │                                 │  │
│   │           ┌────────▼────────┐                        │  │
│   │           │  Tilt Analysis  │                        │  │
│   │           │   Roll, Pitch   │                        │  │
│   │           └────────┬────────┘                        │  │
│   └────────────────────┼─────────────────────────────────┘  │
│                        │                                    │
│   ┌────────────────────▼─────────────────────────────────┐  │
│   │              TIMER CALLBACK                          │  │
│   │                                                      │  │
│   │   1. Read all sensors                                │  │
│   │   2. Get active_tab = lv_tabview_get_tab_active()    │  │
│   │   3. switch(active_tab) - Update ONLY that chart     │  │
│   │                                                      │  │
│   └──────────────────────────────────────────────────────┘  │
│                                                             │
└─────────────────────────────────────────────────────────────┘
```

#### 2.2 Tab Layout (Side Tabs)

```
┌─────────────────────────────────────────────────────────────┐
│  ┌────────┐                                                 │
│  │  Bar   │  ╔═══════════════════════════════════════════╗  │
│  │ Chart  │  ║         Tab Content (400x320)             ║  │
│  ├────────┤  ║                                           ║  │
│  │  Area  │  ║   Tab 0: Bar Chart (Accel X/Y/Z)          ║  │
│  │ Chart  │  ║      [====X====]  X: +0.5                 ║  │
│  ├────────┤  ║      [====Y====]  Y: -0.3                 ║  │
│  │Scatter │  ║      [====Z====]  Z: +9.8                 ║  │
│  │ Chart  │  ║                                           ║  │
│  ├────────┤  ║   Tab 1: Area Chart (Tilt Magnitude)      ║  │
│  │  Line  │  ║      ╱╲    ╱╲                             ║  │
│  │ Chart  │  ║     ╱  ╲  ╱  ╲╱╲                          ║  │
│  └────────┘  ║    ╱    ╲╱      ╲  (faded fill)           ║  │
│              ║                                           ║  │
│   Tab Bar    ║   Tab 2: Scatter (Roll vs Pitch)          ║  │
│    80px      ║           •  •                            ║  │
│              ║        •   •   •  (motion pattern)        ║  │
│              ║                                           ║  │
│              ║   Tab 3: Line Chart (Gyroscope)           ║  │
│              ║      ─── Roll                             ║  │
│              ║      ─── Pitch                            ║  │
│              ║      ─── Yaw                              ║  │
│              ╚═══════════════════════════════════════════╝  │
└─────────────────────────────────────────────────────────────┘
```

#### 2.3 Chart Data Sources

```
┌─────────────────────────────────────────────────────────────┐
│                    DATA SOURCES PER TAB                     │
├─────────────────────────────────────────────────────────────┤
│                                                             │
│   Tab 0: Bar Chart                                          │
│     Source: aic_imu_read_accel(&ax, &ay, &az)               │
│     Mapping: -5..+5 m/s² → 0..100 (sensitive)               │
│                                                             │
│   Tab 1: Area Chart                                         │
│     Source: aic_tilt_get_roll(), aic_tilt_get_pitch()       │
│     Mapping: magnitude = sqrt(roll² + pitch²) degrees       │
│     Range: 0..90 degrees                                    │
│                                                             │
│   Tab 2: Scatter Chart                                      │
│     Source: Roll, Pitch from Tilt Analysis                  │
│     X-axis: Roll (-90..+90 → 0..200)                        │
│     Y-axis: Pitch (-90..+90 → 0..200)                       │
│     Center = 100,100 (level position)                       │
│                                                             │
│   Tab 3: Line Chart                                         │
│     Source: aic_imu_read_gyro(&gx, &gy, &gz)                │
│     Mapping: -2..+2 rad/s → -200..+200                      │
│                                                             │
└─────────────────────────────────────────────────────────────┘
```

***

### 3. ฟังก์ชันสำคัญ

#### 3.1 Sensor & Tilt APIs

<table><thead><tr><th width="315.70098876953125">Function</th><th width="87.8572998046875">Return</th><th>Description</th></tr></thead><tbody><tr><td><code>aic_sensors_init()</code></td><td>void</td><td>Initialize sensor subsystem (เรียกครั้งเดียว)</td></tr><tr><td><code>aic_tilt_init(NULL)</code></td><td>void</td><td>Initialize Complementary Filter สำหรับ Tilt</td></tr><tr><td><code>aic_imu_read_accel(&#x26;ax, &#x26;ay, &#x26;az)</code></td><td>bool</td><td>อ่าน accelerometer (m/s2)</td></tr><tr><td><code>aic_imu_read_gyro(&#x26;gx, &#x26;gy, &#x26;gz)</code></td><td>bool</td><td>อ่าน gyroscope (rad/s)</td></tr><tr><td><code>aic_tilt_update_from_imu()</code></td><td>bool</td><td>อัพเดท tilt estimation (accel + gyro fusion)</td></tr><tr><td><code>aic_tilt_get_roll()</code></td><td>float</td><td>อ่าน roll angle (degrees)</td></tr><tr><td><code>aic_tilt_get_pitch()</code></td><td>float</td><td>อ่าน pitch angle (degrees)</td></tr></tbody></table>

#### 3.2 Chart Type APIs

<table><thead><tr><th width="130.30963134765625">Chart Type</th><th width="250.8011474609375">Create</th><th>Update</th><th>Description</th></tr></thead><tbody><tr><td>BAR</td><td><code>lv_chart_set_type(chart, LV_CHART_TYPE_BAR)</code></td><td><code>lv_chart_set_value_by_id(chart, ser, id, val)</code></td><td>แท่งเปรียบเทียบค่า</td></tr><tr><td>LINE</td><td><code>lv_chart_set_type(chart, LV_CHART_TYPE_LINE)</code></td><td><code>lv_chart_set_next_value(chart, ser, val)</code></td><td>เส้น time-series</td></tr><tr><td>SCATTER</td><td><code>lv_chart_set_type(chart, LV_CHART_TYPE_SCATTER)</code></td><td><code>lv_chart_set_next_value2(chart, ser, x, y)</code></td><td>จุด X-Y correlation</td></tr></tbody></table>

#### 3.3 TabView APIs

<table><thead><tr><th width="440.62640380859375">Function</th><th>Description</th></tr></thead><tbody><tr><td><code>lv_tabview_create(parent)</code></td><td>สร้าง TabView</td></tr><tr><td><code>lv_tabview_set_tab_bar_position(tv, LV_DIR_LEFT)</code></td><td>Tab bar ด้านซ้าย</td></tr><tr><td><code>lv_tabview_set_tab_bar_size(tv, 80)</code></td><td>ความกว้าง tab bar 80px</td></tr><tr><td><code>lv_tabview_add_tab(tv, "name")</code></td><td>เพิ่ม tab ใหม่</td></tr><tr><td><code>lv_tabview_get_tab_active(tv)</code></td><td>อ่าน active tab index (0, 1, 2, 3)</td></tr><tr><td><code>lv_tabview_get_tab_bar(tv)</code></td><td>อ่าน tab button bar object</td></tr><tr><td><code>lv_tabview_get_content(tv)</code></td><td>อ่าน content container</td></tr></tbody></table>

#### 3.4 Draw Callback APIs (สำหรับ Faded Area)

<table><thead><tr><th width="361.688232421875">Function</th><th>Description</th></tr></thead><tbody><tr><td><code>lv_obj_add_event_cb(obj, cb, LV_EVENT_DRAW_TASK_ADDED, NULL)</code></td><td>Register draw callback</td></tr><tr><td><code>lv_obj_add_flag(obj, LV_OBJ_FLAG_SEND_DRAW_TASK_EVENTS)</code></td><td>Enable draw task events</td></tr><tr><td><code>lv_event_get_draw_task(e)</code></td><td>อ่าน draw task จาก event</td></tr><tr><td><code>lv_draw_task_get_draw_dsc(task)</code></td><td>อ่าน draw descriptor</td></tr><tr><td><code>lv_draw_task_get_type(task)</code></td><td>อ่าน draw type (LINE, RECT, etc.)</td></tr><tr><td><code>lv_draw_triangle(layer, &#x26;dsc)</code></td><td>วาดสามเหลี่ยม (gradient fill)</td></tr><tr><td><code>lv_draw_rect(layer, &#x26;dsc, &#x26;area)</code></td><td>วาดสี่เหลี่ยม (fade to transparent)</td></tr></tbody></table>

#### 3.5 Include Files

```c
#include "lvgl.h"
#include <math.h>
#include <stdio.h>

#ifdef CYBSP_ENABLED
#include "aic-eec/aic-eec.h"
#include "aic-eec/sensors.h"
#include "aic-eec/tilt.h"
#include "../../shared/imu_shared.h"
#endif
```

***

### 4. โค้ดตัวอย่าง

#### 4.1 Global Variables & Defines

```c
#define EX11_CHART_POINTS    50
#define EX11_SCATTER_POINTS  30

/* Tab 1: Bar Chart - current X, Y, Z values with colors */
static lv_obj_t * ex11_bar_chart;
static lv_chart_series_t * ex11_bar_ser_x;  /* Red for X */
static lv_chart_series_t * ex11_bar_ser_y;  /* Green for Y */
static lv_chart_series_t * ex11_bar_ser_z;  /* Blue for Z */
static lv_obj_t * ex11_bar_labels[3];

/* Tab 2: Area Chart - tilt magnitude over time */
static lv_obj_t * ex11_area_chart;
static lv_chart_series_t * ex11_area_ser;
static lv_obj_t * ex11_area_label;

/* Tab 3: Scatter Chart - Roll vs Pitch (Tilt Ball) */
static lv_obj_t * ex11_scatter_chart;
static lv_chart_series_t * ex11_scatter_ser;
static lv_obj_t * ex11_scatter_label;

/* Tab 4: Line Chart - Gyroscope time series */
static lv_obj_t * ex11_line_chart;
static lv_chart_series_t * ex11_line_ser[3];
static lv_obj_t * ex11_line_labels[3];

/* Timer and TabView reference */
static lv_timer_t * ex11_chart_timer;
static lv_obj_t * ex11_tabview;
```

#### 4.2 Simulation Helpers (PC Simulator)

```c
#ifndef CYBSP_ENABLED
static bool simulate_imu_accel(float *ax, float *ay, float *az)
{
    static float t = 0.0f;
    t += 0.05f;
    *ax = 2.0f * sinf(t);
    *ay = 1.5f * cosf(t * 0.7f);
    *az = 9.81f + 0.5f * sinf(t * 2.0f);
    return true;
}

static bool simulate_imu_gyro(float *gx, float *gy, float *gz)
{
    static float t = 0.0f;
    t += 0.03f;
    *gx = 0.8f * sinf(t * 1.2f);
    *gy = 0.5f * cosf(t * 0.8f);
    *gz = 0.3f * sinf(t * 1.5f);
    return true;
}

static float sim_roll = 0.0f, sim_pitch = 0.0f;

static bool simulate_tilt_update(void)
{
    static float t = 0.0f;
    t += 0.05f;
    sim_roll = 30.0f * sinf(t * 0.5f);
    sim_pitch = 20.0f * cosf(t * 0.3f);
    return true;
}
#endif
```

#### 4.3 Timer Callback - Active Tab Optimization

นี่คือหัวใจสำคัญของ Lab นี้ -- timer callback ที่อ่านข้อมูลจากทุก sensor แต่อัพเดทเฉพาะ chart ของ tab ที่กำลังแสดงผลอยู่:

```c
static void ex11_chart_timer_cb(lv_timer_t * timer)
{
    (void)timer;

    /* ===== Read ALL sensor data ===== */
    float ax, ay, az;
    float gx, gy, gz;

#ifdef CYBSP_ENABLED
    if(!aic_imu_read_accel(&ax, &ay, &az)) {
        ax = 0; ay = 0; az = 9.81f;
    }
    if(!aic_imu_read_gyro(&gx, &gy, &gz)) {
        gx = 0; gy = 0; gz = 0;
    }
    aic_tilt_update_from_imu();
    float roll = aic_tilt_get_roll();
    float pitch = aic_tilt_get_pitch();
#else
    simulate_imu_accel(&ax, &ay, &az);
    simulate_imu_gyro(&gx, &gy, &gz);
    simulate_tilt_update();
    float roll = sim_roll;
    float pitch = sim_pitch;
#endif

    /* ===== Get active tab index ===== */
    /* 0=Bar, 1=Area, 2=Scatter, 3=Line */
    uint32_t active_tab = lv_tabview_get_tab_active(ex11_tabview);

    /* ===== Update ONLY the active tab ===== */
    switch(active_tab) {

        case 0: /* Tab 1: Bar Chart - Accel X/Y/Z */
        {
            /* Scale: -5 to +5 m/s2 -> 0 to 100 */
            int32_t bar_x = (int32_t)((ax + 5.0f) * 10.0f);
            int32_t bar_y = (int32_t)((ay + 5.0f) * 10.0f);
            int32_t bar_z = (int32_t)((az + 5.0f) * 10.0f);

            /* Clamp to range */
            if(bar_x < 0) bar_x = 0; if(bar_x > 100) bar_x = 100;
            if(bar_y < 0) bar_y = 0; if(bar_y > 100) bar_y = 100;
            if(bar_z < 0) bar_z = 0; if(bar_z > 100) bar_z = 100;

            /* Update each colored bar */
            lv_chart_set_value_by_id(ex11_bar_chart,
                ex11_bar_ser_x, 0, bar_x);
            lv_chart_set_value_by_id(ex11_bar_chart,
                ex11_bar_ser_y, 0, bar_y);
            lv_chart_set_value_by_id(ex11_bar_chart,
                ex11_bar_ser_z, 0, bar_z);
            lv_chart_refresh(ex11_bar_chart);

            lv_label_set_text_fmt(ex11_bar_labels[0],
                "X: %.1f", (double)ax);
            lv_label_set_text_fmt(ex11_bar_labels[1],
                "Y: %.1f", (double)ay);
            lv_label_set_text_fmt(ex11_bar_labels[2],
                "Z: %.1f", (double)az);
            break;
        }

        case 1: /* Tab 2: Area Chart - Tilt Magnitude */
        {
            /* Tilt magnitude: sqrt(roll^2 + pitch^2) */
            float tilt_mag = sqrtf(roll * roll + pitch * pitch);
            int32_t tilt_scaled = (int32_t)(tilt_mag);
            if(tilt_scaled > 90) tilt_scaled = 90;

            lv_chart_set_next_value(ex11_area_chart,
                ex11_area_ser, tilt_scaled);
            lv_label_set_text_fmt(ex11_area_label,
                "Tilt: %.1f deg (R:%.1f P:%.1f)",
                (double)tilt_mag, (double)roll, (double)pitch);
            break;
        }

        case 2: /* Tab 3: Scatter - Roll vs Pitch */
        {
            /* Map: -90..+90 -> 0..200 (center=100) */
            int32_t scatter_x = (int32_t)(
                (roll + 90.0f) * (200.0f / 180.0f));
            int32_t scatter_y = (int32_t)(
                (pitch + 90.0f) * (200.0f / 180.0f));

            if(scatter_x < 0) scatter_x = 0;
            if(scatter_x > 200) scatter_x = 200;
            if(scatter_y < 0) scatter_y = 0;
            if(scatter_y > 200) scatter_y = 200;

            lv_chart_set_next_value2(ex11_scatter_chart,
                ex11_scatter_ser, scatter_x, scatter_y);
            lv_label_set_text_fmt(ex11_scatter_label,
                "Roll: %.1f  Pitch: %.1f",
                (double)roll, (double)pitch);
            break;
        }

        case 3: /* Tab 4: Line Chart - Gyroscope */
        {
            /* Scale by 100 (Ex7 pattern) */
            int32_t gx_scaled = (int32_t)(gx * 100);
            int32_t gy_scaled = (int32_t)(gy * 100);
            int32_t gz_scaled = (int32_t)(gz * 100);

            lv_chart_set_next_value(ex11_line_chart,
                ex11_line_ser[0], gx_scaled);
            lv_chart_set_next_value(ex11_line_chart,
                ex11_line_ser[1], gy_scaled);
            lv_chart_set_next_value(ex11_line_chart,
                ex11_line_ser[2], gz_scaled);

            lv_label_set_text_fmt(ex11_line_labels[0],
                "Gx: %.2f", (double)gx);
            lv_label_set_text_fmt(ex11_line_labels[1],
                "Gy: %.2f", (double)gy);
            lv_label_set_text_fmt(ex11_line_labels[2],
                "Gz: %.2f", (double)gz);
            break;
        }
    }
}
```

#### 4.4 Tab 1: Bar Chart - Real Accel X/Y/Z

```c
static void ex11_create_bar_chart_tab(lv_obj_t * parent)
{
    /* Title */
    lv_obj_t * title = lv_label_create(parent);
    lv_label_set_text(title, "Bar: Real Accel X/Y/Z");
    lv_obj_set_style_text_font(title, LV_FONT_DEFAULT, 0);
    lv_obj_align(title, LV_ALIGN_TOP_MID, 0, 5);

    /* Create Bar Chart - 3 colored bars for X, Y, Z */
    ex11_bar_chart = lv_chart_create(parent);
    lv_obj_set_size(ex11_bar_chart, 390, 280);
    lv_obj_align(ex11_bar_chart, LV_ALIGN_CENTER, 0, 0);
    lv_chart_set_type(ex11_bar_chart, LV_CHART_TYPE_BAR);
    lv_chart_set_point_count(ex11_bar_chart, 1);
    lv_chart_set_range(ex11_bar_chart,
        LV_CHART_AXIS_PRIMARY_Y, 0, 100);

    /* Add 3 colored series: X=Red, Y=Green, Z=Blue */
    ex11_bar_ser_x = lv_chart_add_series(ex11_bar_chart,
        lv_palette_main(LV_PALETTE_RED),
        LV_CHART_AXIS_PRIMARY_Y);
    ex11_bar_ser_y = lv_chart_add_series(ex11_bar_chart,
        lv_palette_main(LV_PALETTE_GREEN),
        LV_CHART_AXIS_PRIMARY_Y);
    ex11_bar_ser_z = lv_chart_add_series(ex11_bar_chart,
        lv_palette_main(LV_PALETTE_BLUE),
        LV_CHART_AXIS_PRIMARY_Y);

    /* Set initial values */
    lv_chart_set_value_by_id(ex11_bar_chart,
        ex11_bar_ser_x, 0, 50);
    lv_chart_set_value_by_id(ex11_bar_chart,
        ex11_bar_ser_y, 0, 50);
    lv_chart_set_value_by_id(ex11_bar_chart,
        ex11_bar_ser_z, 0, 98);

    /* Style: spacing between colored bars */
    lv_obj_set_style_pad_column(ex11_bar_chart, 30, 0);

    /* Value labels below chart */
    const char *axis_names[] = {"X", "Y", "Z"};
    lv_color_t colors[] = {
        lv_palette_main(LV_PALETTE_RED),
        lv_palette_main(LV_PALETTE_GREEN),
        lv_palette_main(LV_PALETTE_BLUE)
    };

    for(int i = 0; i < 3; i++) {
        ex11_bar_labels[i] = lv_label_create(parent);
        lv_label_set_text_fmt(ex11_bar_labels[i],
            "%s: 0.00", axis_names[i]);
        lv_obj_set_style_text_color(
            ex11_bar_labels[i], colors[i], 0);
        lv_obj_align(ex11_bar_labels[i],
            LV_ALIGN_BOTTOM_LEFT, 30 + i * 120, -5);
    }
}
```

#### 4.5 Faded Area Draw Callback

นี่คือ draw callback ที่สร้าง gradient fill ใต้เส้น chart ซึ่งอ้างอิงจาก `lv_example_chart_5` ของ LVGL:

```c
static void ex11_area_draw_cb(lv_event_t * e)
{
    lv_draw_task_t * draw_task = lv_event_get_draw_task(e);
    lv_draw_dsc_base_t * base_dsc =
        lv_draw_task_get_draw_dsc(draw_task);

    /* Only process line items (chart line segments) */
    if(base_dsc->part != LV_PART_ITEMS) return;
    if(lv_draw_task_get_type(draw_task) !=
        LV_DRAW_TASK_TYPE_LINE) return;

    lv_obj_t * obj = lv_event_get_target(e);
    lv_area_t coords;
    lv_obj_get_coords(obj, &coords);

    /* Get series color for gradient */
    const lv_chart_series_t * ser =
        lv_chart_get_series_next(obj, NULL);
    lv_color_t ser_color =
        lv_chart_get_series_color(obj, ser);

    lv_draw_line_dsc_t * draw_line_dsc =
        lv_draw_task_get_draw_dsc(draw_task);

    /* ===== TRIANGLE: Fill between line and lowest point ===== */
    lv_draw_triangle_dsc_t tri_dsc;
    lv_draw_triangle_dsc_init(&tri_dsc);
    tri_dsc.p[0].x = draw_line_dsc->p1.x;
    tri_dsc.p[0].y = draw_line_dsc->p1.y;
    tri_dsc.p[1].x = draw_line_dsc->p2.x;
    tri_dsc.p[1].y = draw_line_dsc->p2.y;
    tri_dsc.p[2].x = draw_line_dsc->p1.y < draw_line_dsc->p2.y
        ? draw_line_dsc->p1.x : draw_line_dsc->p2.x;
    tri_dsc.p[2].y = LV_MAX(draw_line_dsc->p1.y,
                             draw_line_dsc->p2.y);
    tri_dsc.bg_grad.dir = LV_GRAD_DIR_VER;

    /* Calculate opacity based on Y position */
    int32_t full_h = lv_obj_get_height(obj);
    int32_t fract_upper = (int32_t)(
        LV_MIN(draw_line_dsc->p1.y, draw_line_dsc->p2.y)
        - coords.y1) * 255 / full_h;
    int32_t fract_lower = (int32_t)(
        LV_MAX(draw_line_dsc->p1.y, draw_line_dsc->p2.y)
        - coords.y1) * 255 / full_h;

    tri_dsc.bg_grad.stops[0].color = ser_color;
    tri_dsc.bg_grad.stops[0].opa = 255 - fract_upper;
    tri_dsc.bg_grad.stops[0].frac = 0;
    tri_dsc.bg_grad.stops[1].color = ser_color;
    tri_dsc.bg_grad.stops[1].opa = 255 - fract_lower;
    tri_dsc.bg_grad.stops[1].frac = 255;

    lv_draw_triangle(base_dsc->layer, &tri_dsc);

    /* ===== RECTANGLE: Fade from lowest point to bottom ===== */
    lv_draw_rect_dsc_t rect_dsc;
    lv_draw_rect_dsc_init(&rect_dsc);
    rect_dsc.bg_grad.dir = LV_GRAD_DIR_VER;
    rect_dsc.bg_grad.stops[0].color = ser_color;
    rect_dsc.bg_grad.stops[0].frac = 0;
    rect_dsc.bg_grad.stops[0].opa = 255 - fract_lower;
    rect_dsc.bg_grad.stops[1].color = ser_color;
    rect_dsc.bg_grad.stops[1].frac = 255;
    rect_dsc.bg_grad.stops[1].opa = 0;

    lv_area_t rect_area;
    rect_area.x1 = (int32_t)draw_line_dsc->p1.x;
    rect_area.x2 = (int32_t)draw_line_dsc->p2.x - 1;
    rect_area.y1 = (int32_t)LV_MAX(draw_line_dsc->p1.y,
                                     draw_line_dsc->p2.y) - 1;
    rect_area.y2 = (int32_t)coords.y2;
    lv_draw_rect(base_dsc->layer, &rect_dsc, &rect_area);
}
```

#### 4.6 Tab 2: Area Chart - Tilt Magnitude

```c
static void ex11_create_area_chart_tab(lv_obj_t * parent)
{
    /* Title */
    lv_obj_t * title = lv_label_create(parent);
    lv_label_set_text(title, "Area: Tilt Magnitude (deg)");
    lv_obj_set_style_text_font(title, LV_FONT_DEFAULT, 0);
    lv_obj_align(title, LV_ALIGN_TOP_MID, 0, 5);

    /* Create Area Chart - tilt angle over time */
    ex11_area_chart = lv_chart_create(parent);
    lv_obj_set_size(ex11_area_chart, 390, 285);
    lv_obj_align(ex11_area_chart, LV_ALIGN_CENTER, 0, 0);
    lv_obj_set_style_pad_all(ex11_area_chart, 0, 0);
    lv_chart_set_type(ex11_area_chart, LV_CHART_TYPE_LINE);
    lv_chart_set_point_count(ex11_area_chart,
        EX11_CHART_POINTS);
    lv_chart_set_range(ex11_area_chart,
        LV_CHART_AXIS_PRIMARY_Y, 0, 90);

    /* Add horizontal reference lines */
    lv_chart_set_div_line_count(ex11_area_chart, 5, 8);

    /* CRITICAL: Enable draw task events for faded area */
    lv_obj_add_event_cb(ex11_area_chart,
        ex11_area_draw_cb,
        LV_EVENT_DRAW_TASK_ADDED, NULL);
    lv_obj_add_flag(ex11_area_chart,
        LV_OBJ_FLAG_SEND_DRAW_TASK_EVENTS);

    /* Add series */
    ex11_area_ser = lv_chart_add_series(ex11_area_chart,
        lv_palette_main(LV_PALETTE_RED),
        LV_CHART_AXIS_PRIMARY_Y);

    /* Show points and line */
    lv_obj_set_style_size(ex11_area_chart, 4, 4,
        LV_PART_INDICATOR);
    lv_obj_set_style_line_width(ex11_area_chart, 3,
        LV_PART_ITEMS);

    /* Value label */
    ex11_area_label = lv_label_create(parent);
    lv_label_set_text(ex11_area_label, "Tilt: 0.0 deg");
    lv_obj_set_style_text_color(ex11_area_label,
        lv_palette_main(LV_PALETTE_RED), 0);
    lv_obj_align(ex11_area_label,
        LV_ALIGN_BOTTOM_MID, 0, -5);
}
```

#### 4.7 Tab 3: Scatter Chart - Roll vs Pitch (Tilt Ball)

```c
static void ex11_create_scatter_chart_tab(lv_obj_t * parent)
{
    /* Title */
    lv_obj_t * title = lv_label_create(parent);
    lv_label_set_text(title,
        "Scatter: Roll vs Pitch (Tilt Ball)");
    lv_obj_set_style_text_font(title, LV_FONT_DEFAULT, 0);
    lv_obj_align(title, LV_ALIGN_TOP_MID, 0, 5);

    /* Create Scatter Chart - square-ish for scatter */
    ex11_scatter_chart = lv_chart_create(parent);
    lv_obj_set_size(ex11_scatter_chart, 290, 280);
    lv_obj_align(ex11_scatter_chart,
        LV_ALIGN_CENTER, 0, 0);
    lv_chart_set_type(ex11_scatter_chart,
        LV_CHART_TYPE_SCATTER);
    lv_chart_set_point_count(ex11_scatter_chart,
        EX11_SCATTER_POINTS);

    /* X and Y ranges */
    lv_chart_set_range(ex11_scatter_chart,
        LV_CHART_AXIS_PRIMARY_X, 0, 200);
    lv_chart_set_range(ex11_scatter_chart,
        LV_CHART_AXIS_PRIMARY_Y, 0, 200);

    /* Add scatter series */
    ex11_scatter_ser = lv_chart_add_series(
        ex11_scatter_chart,
        lv_palette_main(LV_PALETTE_BLUE),
        LV_CHART_AXIS_PRIMARY_Y);

    /* Style: larger points, semi-transparent */
    lv_obj_set_style_size(ex11_scatter_chart,
        10, 10, LV_PART_INDICATOR);
    lv_obj_set_style_bg_opa(ex11_scatter_chart,
        LV_OPA_70, LV_PART_INDICATOR);

    /* Grid lines */
    lv_chart_set_div_line_count(ex11_scatter_chart, 5, 5);

    /* Value label */
    ex11_scatter_label = lv_label_create(parent);
    lv_label_set_text(ex11_scatter_label,
        "Roll: 0.0  Pitch: 0.0");
    lv_obj_set_style_text_color(ex11_scatter_label,
        lv_palette_main(LV_PALETTE_BLUE), 0);
    lv_obj_align(ex11_scatter_label,
        LV_ALIGN_BOTTOM_MID, 0, -5);
}
```

#### 4.8 Tab 4: Line Chart - Gyroscope R/P/Y

```c
static void ex11_create_line_chart_tab(lv_obj_t * parent)
{
    /* Title */
    lv_obj_t * title = lv_label_create(parent);
    lv_label_set_text(title, "Line: Real Gyro R/P/Y");
    lv_obj_set_style_text_font(title, LV_FONT_DEFAULT, 0);
    lv_obj_align(title, LV_ALIGN_TOP_MID, 0, 5);

    /* Create Line Chart - Ex7's stable pattern */
    ex11_line_chart = lv_chart_create(parent);
    lv_obj_set_size(ex11_line_chart, 390, 275);
    lv_obj_align(ex11_line_chart,
        LV_ALIGN_CENTER, 0, -5);
    lv_chart_set_type(ex11_line_chart,
        LV_CHART_TYPE_LINE);
    lv_chart_set_point_count(ex11_line_chart,
        EX11_CHART_POINTS);

    /* Range: -1500 to 1500 (same as Ex7) */
    lv_chart_set_range(ex11_line_chart,
        LV_CHART_AXIS_PRIMARY_Y, -1500, 1500);

    /* Hide points, line width 2px */
    lv_obj_set_style_size(ex11_line_chart, 0, 0,
        LV_PART_INDICATOR);
    lv_obj_set_style_line_width(ex11_line_chart, 2,
        LV_PART_ITEMS);

    /* Grid lines */
    lv_chart_set_div_line_count(ex11_line_chart, 5, 5);

    /* Add 3 series: Roll(Red), Pitch(Green), Yaw(Blue) */
    lv_color_t colors[] = {
        lv_palette_main(LV_PALETTE_RED),
        lv_palette_main(LV_PALETTE_GREEN),
        lv_palette_main(LV_PALETTE_BLUE)
    };
    const char *names[] = {"Roll", "Pitch", "Yaw"};

    for(int i = 0; i < 3; i++) {
        ex11_line_ser[i] = lv_chart_add_series(
            ex11_line_chart, colors[i],
            LV_CHART_AXIS_PRIMARY_Y);

        ex11_line_labels[i] = lv_label_create(parent);
        lv_label_set_text_fmt(ex11_line_labels[i],
            "%s: 0.00", names[i]);
        lv_obj_set_style_text_color(
            ex11_line_labels[i], colors[i], 0);
        lv_obj_align(ex11_line_labels[i],
            LV_ALIGN_BOTTOM_LEFT, 20 + i * 125, -5);
    }
}
```

#### 4.9 Main Function - Assembling the Dashboard

```c
void part2_ex11_real_chart_dashboard(void)
{
    /* ===== HARDWARE INITIALIZATION ===== */
#ifdef CYBSP_ENABLED
    aic_sensors_init();
    aic_tilt_init(NULL);  /* Complementary Filter */
#endif

    /* ===== Create TabView (LEFT tab bar) ===== */
    ex11_tabview = lv_tabview_create(lv_screen_active());
    lv_obj_t * tabview = ex11_tabview;
    lv_tabview_set_tab_bar_position(tabview, LV_DIR_LEFT);
    lv_tabview_set_tab_bar_size(tabview, 80);

    /* Style the TabView background */
    lv_obj_set_style_bg_color(tabview,
        lv_palette_lighten(LV_PALETTE_BLUE, 2), 0);

    /* Style tab buttons */
    lv_obj_t * tab_btns = lv_tabview_get_tab_bar(tabview);
    lv_obj_set_style_bg_color(tab_btns,
        lv_palette_darken(LV_PALETTE_GREY, 3), 0);
    lv_obj_set_style_text_color(tab_btns,
        lv_palette_lighten(LV_PALETTE_GREY, 5), 0);
    lv_obj_set_style_border_side(tab_btns,
        LV_BORDER_SIDE_RIGHT,
        LV_PART_ITEMS | LV_STATE_CHECKED);

    /* ===== Create 4 Tabs ===== */
    lv_obj_t * tab_bar = lv_tabview_add_tab(tabview, "Bar");
    lv_obj_t * tab_area = lv_tabview_add_tab(tabview, "Area");
    lv_obj_t * tab_scatter = lv_tabview_add_tab(tabview,
        "Scatter");
    lv_obj_t * tab_line = lv_tabview_add_tab(tabview, "Line");

    /* Style tab content backgrounds */
    lv_obj_t * tabs[] = {tab_bar, tab_area,
                         tab_scatter, tab_line};
    for(int i = 0; i < 4; i++) {
        lv_obj_set_style_bg_color(tabs[i],
            lv_color_hex(0xF5F5F5), 0);
        lv_obj_set_style_bg_opa(tabs[i],
            LV_OPA_COVER, 0);
    }

    /* ===== Populate each tab ===== */
    ex11_create_bar_chart_tab(tab_bar);
    ex11_create_area_chart_tab(tab_area);
    ex11_create_scatter_chart_tab(tab_scatter);
    ex11_create_line_chart_tab(tab_line);

    /* CRITICAL: Disable scrolling on content */
    lv_obj_remove_flag(
        lv_tabview_get_content(tabview),
        LV_OBJ_FLAG_SCROLLABLE);

    /* ===== Timer: 100ms update ===== */
    ex11_chart_timer = lv_timer_create(
        ex11_chart_timer_cb, 100, NULL);

    /* ===== Footer ===== */
    aic_create_footer(lv_screen_active());

    printf("[Part2] Ex11: Real Chart Dashboard started\r\n");
}
```

***

### 5. องค์ความรู้และเทคนิค

#### 5.1 Active Tab Optimization - ทำไมต้องอัพเดทเฉพาะ Tab ที่มองเห็น

```c
/* ===== Problem: Update ทุก chart ทุกรอบ ===== */
/* 4 charts x 100ms = CPU load สูง, frame rate ต่ำ */
/* chart ที่ซ่อนอยู่ก็ต้อง redraw ทั้งที่ไม่มีคนเห็น */

/* ===== Solution: Update เฉพาะ active tab ===== */
uint32_t active = lv_tabview_get_tab_active(tabview);

switch(active) {
    case 0: update_bar_chart();     break;
    case 1: update_area_chart();    break;
    case 2: update_scatter_chart(); break;
    case 3: update_line_chart();    break;
}

/* ===== ข้อดี ===== */
/* 1. CPU load ลดลง 75% (update 1 chart แทน 4) */
/* 2. Frame rate สูงขึ้น */
/* 3. Sensor data ยังอ่านทุกรอบ (ไม่พลาดข้อมูล) */

/* ===== ข้อเสีย ===== */
/* 1. Tab ที่ซ่อนจะไม่มีข้อมูลใหม่ */
/* 2. เมื่อสลับ tab, chart จะแสดงข้อมูลเก่า */
/* 3. Area/Line chart จะขาดช่วง (gap) */

/* ===== Trade-off: เมื่อไหร่ใช้ pattern นี้ ===== */
/* - 4+ charts              -> ใช้ Active Tab Optimization */
/* - 2-3 charts (เบา ๆ)      -> อัพเดททุก chart ก็ได้ */
/* - Real-time critical     -> ต้องอัพเดททุกตัว */
```

#### 5.2 Area Chart - Custom Draw Callback อธิบาย

```c
/* ===== ทำไม Area Chart ไม่ใช่ built-in feature? ===== */
/* LVGL v9 ไม่มี chart type "AREA" โดยตรง */
/* ต้องสร้างเองโดยวาด shape ใต้เส้น line chart */

/* ===== ขั้นตอนการทำงาน ===== */

/* 1. Register callback + enable flag */
lv_obj_add_event_cb(chart, draw_cb,
    LV_EVENT_DRAW_TASK_ADDED, NULL);
lv_obj_add_flag(chart,
    LV_OBJ_FLAG_SEND_DRAW_TASK_EVENTS);

/* 2. ใน callback: ตรวจว่าเป็น line segment */
if(base_dsc->part == LV_PART_ITEMS &&
   lv_draw_task_get_type(task) == LV_DRAW_TASK_TYPE_LINE)
{
    /* 3. ดึง P1, P2 ของ line segment */
    /* P1 = จุดเริ่มต้น, P2 = จุดสิ้นสุด */

    /* 4. วาด TRIANGLE ระหว่าง P1, P2, จุดต่ำสุด */
    /* Triangle มี vertical gradient: */
    /*   - ด้านบน: opacity สูง (เห็นชัด) */
    /*   - ด้านล่าง: opacity ต่ำ (จาง) */

    /* 5. วาด RECTANGLE จากจุดต่ำสุดถึงก้น chart */
    /* Rectangle fade จาก opacity ต่ำ → โปร่งใส */
}

/* ===== ผลลัพธ์ ===== */
/* เส้น chart มี gradient fill ใต้เส้น */
/* ค่าสูง = สีเข้ม, ค่าต่ำ = สีจาง */
/* สวยงามและอ่านง่าย */
```

#### 5.3 Scatter Chart - 2D Mapping Pattern

```c
/* ===== Scatter Chart ต่างจาก Line Chart อย่างไร? ===== */

/* Line Chart: set_next_value(chart, ser, y_value) */
/* - X-axis = auto (time index: 0, 1, 2, ...) */
/* - Y-axis = value ที่กำหนด */
/* - เหมาะกับ time-series */

/* Scatter Chart: set_next_value2(chart, ser, x_val, y_val) */
/* - X-axis = value ที่กำหนด (ไม่ใช่ time index) */
/* - Y-axis = value ที่กำหนด */
/* - เหมาะกับ X-Y correlation / 2D mapping */

/* ===== Roll vs Pitch Mapping ===== */
/* Roll:  -90 to +90 degrees -> 0 to 200 (center = 100) */
/* Pitch: -90 to +90 degrees -> 0 to 200 (center = 100) */

int32_t scatter_x = (int32_t)((roll + 90.0f) * (200.0f / 180.0f));
int32_t scatter_y = (int32_t)((pitch + 90.0f) * (200.0f / 180.0f));

/* เมื่อบอร์ดวางราบ: scatter_x = 100, scatter_y = 100 (center) */
/* เอียงซ้าย: scatter_x < 100 */
/* เอียงขวา: scatter_x > 100 */
/* เอียงหน้า: scatter_y < 100 */
/* เอียงหลัง: scatter_y > 100 */

/* ===== ต้องตั้ง range ทั้ง X และ Y ===== */
lv_chart_set_range(chart, LV_CHART_AXIS_PRIMARY_X, 0, 200);
lv_chart_set_range(chart, LV_CHART_AXIS_PRIMARY_Y, 0, 200);

/* ===== Point Count สำหรับ Scatter ===== */
/* 30 points = trail effect (เห็นทิศทางการเคลื่อนที่) */
/* เมื่อเกิน 30 จุด, จุดเก่าสุดจะหายไป */
lv_chart_set_point_count(chart, 30);
```

#### 5.4 Data Scaling Patterns

```c
/* ===== Pattern 1: Linear Mapping ===== */
/* Map value from range [in_min, in_max] to [out_min, out_max] */
/* Formula: out = (val - in_min) / (in_max - in_min) * (out_max - out_min) + out_min */

/* Accel (-5..+5) -> Bar (0..100) */
int32_t bar = (int32_t)((ax + 5.0f) * 10.0f);
/* When ax=-5: bar=0, ax=0: bar=50, ax=+5: bar=100 */

/* ===== Pattern 2: Scale Factor ===== */
/* Multiply by constant to convert float to int */
/* Gyro (rad/s, small values) -> Chart int */
int32_t gx_scaled = (int32_t)(gx * 100);
/* gx=0.12 -> 12, gx=-1.50 -> -150 */

/* ===== Pattern 3: Magnitude Calculation ===== */
/* Combine multiple axes into single value */
float tilt_mag = sqrtf(roll * roll + pitch * pitch);
/* Range: 0 (flat) to ~127 (max tilt) */
/* Clamp to 0-90 for chart */

/* ===== Pattern 4: Center Mapping ===== */
/* Map bipolar range to positive range with center */
/* Roll (-90..+90) -> Scatter (0..200, center=100) */
int32_t x = (int32_t)((roll + 90.0f) * (200.0f / 180.0f));

/* ===== Always Clamp! ===== */
if(val < min) val = min;
if(val > max) val = max;
```

#### 5.5 Bar Chart: set\_value\_by\_id vs set\_next\_value

```c
/* ===== set_next_value (สำหรับ Line/Area) ===== */
/* เพิ่มจุดใหม่ทางขวา, จุดเก่าเลื่อนซ้าย */
/* เหมาะกับ time-series ที่ข้อมูลเข้ามาเรื่อย ๆ */
lv_chart_set_next_value(chart, series, value);

/* ===== set_value_by_id (สำหรับ Bar) ===== */
/* อัพเดทค่าที่ตำแหน่ง (id) ที่กำหนด */
/* เหมาะกับ Bar chart ที่แต่ละแท่งแทน category */
lv_chart_set_value_by_id(chart, series, 0, value);
/* id=0 = แท่งแรก (และแท่งเดียว เพราะ point_count=1) */

/* ===== สำคัญ: lv_chart_refresh() ===== */
/* หลัง set_value_by_id ต้องเรียก refresh */
/* เพราะ set_value_by_id ไม่ trigger redraw อัตโนมัติ */
lv_chart_set_value_by_id(chart, ser_x, 0, bar_x);
lv_chart_set_value_by_id(chart, ser_y, 0, bar_y);
lv_chart_set_value_by_id(chart, ser_z, 0, bar_z);
lv_chart_refresh(chart);  /* MUST call after set_value_by_id */

/* set_next_value ไม่ต้อง refresh (ทำอัตโนมัติ) */
```

#### 5.6 Tilt Analysis: Complementary Filter

```c
/* ===== ทำไมไม่ใช้ Accelerometer อย่างเดียว? ===== */
/* Accel: วัดทิศทางแรงโน้มถ่วง -> คำนวณมุมได้ */
/* แต่: noisy มาก + ถ้ามี vibration จะผิดพลาด */

/* ===== ทำไมไม่ใช้ Gyroscope อย่างเดียว? ===== */
/* Gyro: วัดความเร็วเชิงมุม -> integrate ได้มุม */
/* แต่: drift ตลอดเวลา (มุมเพิ่มขึ้นเรื่อย ๆ) */

/* ===== Complementary Filter: Best of Both ===== */
/* angle = alpha * (angle + gyro*dt) + (1-alpha) * accel_angle */
/* alpha = 0.98 (trust gyro 98% for short-term) */
/* 1-alpha = 0.02 (trust accel 2% for long-term) */

/* ===== ใน Lab นี้: ===== */
/* 1. aic_tilt_init(NULL)           -> Initialize filter */
/* 2. aic_tilt_update_from_imu()    -> Fusion step (ทุก 100ms) */
/* 3. aic_tilt_get_roll()           -> Filtered roll angle */
/* 4. aic_tilt_get_pitch()          -> Filtered pitch angle */

/* ===== ใช้ใน Tab ไหน? ===== */
/* Tab 1 (Area): magnitude = sqrt(roll^2 + pitch^2) */
/* Tab 2 (Scatter): x = roll, y = pitch */
```

***

### 6. แบบฝึกหัด

#### Exercise 1: FFT Frequency Display Tab

**โจทย์:** เพิ่ม Tab ที่ 5 "FFT" แสดง Frequency Spectrum ของ accelerometer Z-axis:

**Requirements:**

* เก็บข้อมูล Z-axis 64 samples ล่าสุด (circular buffer)
* คำนวณ Simple DFT (Discrete Fourier Transform) ขนาด 64 จุด
* แสดงเป็น Bar chart: แกน X = frequency bin (0-32), แกน Y = magnitude
* อัพเดทผลลัพธ์ทุก 64 samples ใหม่ (ไม่ใช่ทุก sample)
* แสดง dominant frequency (ความถี่ที่มี magnitude สูงสุด)

**Layout:**

```bash
FFT Tab:
  "FFT: Z-axis Frequency Spectrum"
  ┌──────────────────────────────┐
  │  BAR CHART (32 bars)         │
  │  ████                        │
  │  ████ ██                     │
  │  ████ ██ ██ ██               │
  │  0Hz  5Hz 10Hz 15Hz          │
  └──────────────────────────────┘
  "Dominant: 3.5 Hz | Power: 42.3"
```

**การประยุกต์ใช้งานจริง:**

* Vibration Analysis: ตรวจจับ resonance frequency ของเครื่องจักร
* Predictive Maintenance: ตรวจสอบ bearing wear จาก vibration spectrum
* Structural Health Monitoring: ตรวจสอบ natural frequency ของสะพาน/อาคาร

**Hint:**

* DFT bin k: `mag[k] = sqrt(real[k]^2 + imag[k]^2)` where `real[k] = sum(x[n] * cos(2*PI*k*n/N))` and `imag[k] = sum(x[n] * sin(2*PI*k*n/N))`
* Frequency resolution: `f_res = sample_rate / N = 10Hz / 64 = 0.156 Hz/bin`
* ใช้ `lv_chart_set_point_count(chart, 32)` (แสดงเฉพาะครึ่งแรกของ DFT)
* `lv_chart_set_value_by_id()` สำหรับอัพเดทแต่ละ bar

***

#### Exercise 2: Recording and Playback

**โจทย์:** เพิ่มปุ่ม Record/Playback สำหรับบันทึกข้อมูล sensor แล้วเล่นซ้ำ:

**Requirements:**

* ปุ่ม "REC" สีแดง: เริ่มบันทึกข้อมูล (accel + gyro + tilt) สูงสุด 500 samples
* ปุ่ม "STOP" สีเทา: หยุดบันทึก
* ปุ่ม "PLAY" สีเขียว: เล่นข้อมูลที่บันทึกไว้กลับใน chart
* แสดง recording status: "Recording... 123/500" หรือ "Playing... 45/123"
* เมื่อ playback, timer อ่านจาก buffer แทน sensor จริง

**Layout:**

```bash
เพิ่มบริเวณล่างของแต่ละ tab:
  [REC] [STOP] [PLAY]  "Idle | 0 samples"
```

**การประยุกต์ใช้งานจริง:**

* Flight Data Recorder: บันทึกข้อมูลการบินสำหรับวิเคราะห์ภายหลัง
* Sports Analytics: บันทึก motion ของนักกีฬาแล้วเล่นซ้ำเพื่อวิเคราะห์ท่าทาง
* Quality Control: บันทึก vibration pattern สำหรับเปรียบเทียบกับ reference

**Hint:**

* ใช้ struct สำหรับ sample: `typedef struct { float ax, ay, az, gx, gy, gz, roll, pitch; } sensor_sample_t;`
* Static array: `static sensor_sample_t recording[500];`
* State machine: `IDLE -> RECORDING -> STOPPED -> PLAYING -> IDLE`
* Playback timer: ใช้ timer เดิม แต่เปลี่ยน data source

***

### 7. References

* [LVGL Chart](https://docs.lvgl.io/9.2/widgets/chart.html)
* [lv\_example\_chart\_5](https://github.com/lvgl/lvgl/blob/release/v9.2/examples/widgets/chart/lv_example_chart_5.c) (Area effect)
* [LVGL TabView](https://docs.lvgl.io/9.2/widgets/tabview.html)

***


# Spectrum Analyzer


# UX/UI Design


# Waveform Generator

## Lab 1: Waveform Generator

### Part 3 - Oscilloscope & Signal Processing

***

### 1. โครงสร้างภาพรวมของ Lab

#### Why? - ทำไมต้องเรียนรู้เรื่องนี้

* **Signal Fundamentals**: สัญญาณพื้นฐาน (Sine, Square, Triangle, Sawtooth) เป็นรากฐานของวิศวกรรมไฟฟ้าทุกสาขา ไม่ว่าจะเป็น Power Systems, Communications หรือ Control Systems
* **DSP Foundation**: การสร้างและแสดงผล Waveform เป็นก้าวแรกสู่ Digital Signal Processing ที่ใช้ในงานวิเคราะห์ Power Quality, Audio Processing และ Vibration Analysis
* **Testing & Calibration**: Function Generator เป็นเครื่องมือพื้นฐานในห้อง Lab สำหรับทดสอบวงจร การสร้างได้ด้วยซอฟต์แวร์ช่วยลดต้นทุนและเพิ่มความยืดหยุ่น
* **EE Application**: ใน Power Systems ใช้สร้างสัญญาณจำลอง 50 Hz AC, ใน Communications ใช้สร้าง Carrier Wave, ใน Control ใช้สร้าง Test Signal

#### What? - จะได้เรียนรู้อะไร

1. **Waveform Mathematics**: สูตรคณิตศาสตร์ของ Square, Sine, Triangle, Sawtooth
2. **Chart as Oscilloscope**: ใช้ `lv_chart` แสดง waveform 200+ จุด แบบ real-time
3. **User Controls**: Dropdown เลือกชนิด waveform, Slider ปรับ frequency และ amplitude
4. **Buffer Management**: จัดการ sample buffer สำหรับ waveform generation
5. **Mapping Technique**: แปลงค่าจาก signal domain (-1000..+1000) เป็น display domain (0..100)

#### How? - จะทำอย่างไร

1. สร้าง Chart แสดง waveform ด้วย `lv_chart_create()` กำหนด 200 จุด
2. เขียนฟังก์ชัน generate สำหรับ waveform แต่ละชนิด
3. เพิ่ม Dropdown เลือกประเภท wave
4. เพิ่ม Slider สำหรับ frequency (10-1000 Hz) และ amplitude (100-1000)
5. เชื่อม callbacks เพื่ออัพเดท waveform ตามการเปลี่ยนแปลง

<figure><img src="/files/wfjs1DwsJ5LshUlhfhBf" alt=""><figcaption></figcaption></figure>

***

### 2. ฟังก์ชันสำคัญ

#### 2.1 Waveform Generation Functions

| Function              | Description          | สูตร                             |
| --------------------- | -------------------- | -------------------------------- |
| `generate_sine()`     | สร้างคลื่นไซน์       | y = A \* sin(2*PI*f\*n/Fs)       |
| `generate_square()`   | สร้างคลื่นสี่เหลี่ยม | y = A \* sign(sin(2*PI*f\*n/Fs)) |
| `generate_triangle()` | สร้างคลื่นสามเหลี่ยม | y = A \* (4\*                    |
| `generate_sawtooth()` | สร้างคลื่นฟันเลื่อย  | y = A \* (2\*phase - 1)          |

#### 2.2 LVGL Chart API

| Function                                        | Description          |
| ----------------------------------------------- | -------------------- |
| `lv_chart_create(parent)`                       | สร้าง chart widget   |
| `lv_chart_set_type(chart, LV_CHART_TYPE_LINE)`  | กำหนดเป็น line chart |
| `lv_chart_set_point_count(chart, 200)`          | จำนวนจุดที่แสดง      |
| `lv_chart_set_range(chart, axis, min, max)`     | กำหนดช่วงแกน Y       |
| `lv_chart_add_series(chart, color, axis)`       | เพิ่ม data series    |
| `lv_chart_set_value_by_id(chart, ser, id, val)` | กำหนดค่าจุด          |
| `lv_chart_refresh(chart)`                       | อัพเดทการแสดงผล      |
| `lv_chart_set_div_line_count(chart, h, v)`      | เส้น grid            |

#### 2.3 Waveform Type Enum

```c
typedef enum {
    WAVE_SQUARE = 0,
    WAVE_SINE,
    WAVE_TRIANGLE,
    WAVE_SAWTOOTH,
    WAVE_COUNT
} waveform_type_t;
```

***

### 3. Code เต็ม

#### 3.1 Constants and Global Variables

```c
#include "lvgl.h"
#include <math.h>
#include <stdlib.h>

#ifndef M_PI
#define M_PI 3.14159265358979323846
#endif

#define BUFFER_SIZE     256
#define DISPLAY_POINTS  200
#define SAMPLE_RATE     10000
#define DEFAULT_FREQ    100
#define DEFAULT_AMP     1000

/* Waveform type enum */
typedef enum {
    WAVE_SQUARE = 0,
    WAVE_SINE,
    WAVE_TRIANGLE,
    WAVE_SAWTOOTH,
    WAVE_COUNT
} waveform_type_t;

/* Global variables */
static int16_t wave_buffer[BUFFER_SIZE];
static lv_obj_t *wave_chart = NULL;
static lv_chart_series_t *wave_series = NULL;
static lv_obj_t *freq_label = NULL;
static lv_obj_t *amp_label = NULL;
static lv_obj_t *info_label = NULL;
static waveform_type_t current_wave = WAVE_SINE;
static uint32_t current_freq = DEFAULT_FREQ;
static int16_t current_amplitude = DEFAULT_AMP;
```

#### 3.2 Waveform Generation Functions

```c
/* สร้างคลื่นไซน์ */
static void generate_sine(int16_t *buf, uint16_t count,
                           uint32_t freq, uint32_t fs, int16_t amp)
{
    for (uint16_t i = 0; i < count; i++) {
        double t = (double)i / (double)fs;
        buf[i] = (int16_t)(amp * sin(2.0 * M_PI * freq * t));
    }
}

/* สร้างคลื่นสี่เหลี่ยม */
static void generate_square(int16_t *buf, uint16_t count,
                              uint32_t freq, uint32_t fs, int16_t amp)
{
    for (uint16_t i = 0; i < count; i++) {
        double t = (double)i / (double)fs;
        double val = sin(2.0 * M_PI * freq * t);
        buf[i] = (val >= 0) ? amp : -amp;
    }
}

/* สร้างคลื่นสามเหลี่ยม */
static void generate_triangle(int16_t *buf, uint16_t count,
                                uint32_t freq, uint32_t fs, int16_t amp)
{
    for (uint16_t i = 0; i < count; i++) {
        double phase = fmod((double)i * freq / fs, 1.0);
        double val = 4.0 * fabs(phase - 0.5) - 1.0;
        buf[i] = (int16_t)(amp * val);
    }
}

/* สร้างคลื่นฟันเลื่อย */
static void generate_sawtooth(int16_t *buf, uint16_t count,
                                uint32_t freq, uint32_t fs, int16_t amp)
{
    for (uint16_t i = 0; i < count; i++) {
        double phase = fmod((double)i * freq / fs, 1.0);
        double val = 2.0 * phase - 1.0;
        buf[i] = (int16_t)(amp * val);
    }
}
```

#### 3.3 Waveform Update and Chart Display

```c
/* สร้าง waveform ตาม type ที่เลือก */
static void generate_waveform(void)
{
    switch (current_wave) {
        case WAVE_SQUARE:
            generate_square(wave_buffer, BUFFER_SIZE,
                           current_freq, SAMPLE_RATE, current_amplitude);
            break;
        case WAVE_SINE:
            generate_sine(wave_buffer, BUFFER_SIZE,
                         current_freq, SAMPLE_RATE, current_amplitude);
            break;
        case WAVE_TRIANGLE:
            generate_triangle(wave_buffer, BUFFER_SIZE,
                             current_freq, SAMPLE_RATE, current_amplitude);
            break;
        case WAVE_SAWTOOTH:
            generate_sawtooth(wave_buffer, BUFFER_SIZE,
                             current_freq, SAMPLE_RATE, current_amplitude);
            break;
        default:
            break;
    }

    /* อัพเดท Chart - Map จาก -amplitude..+amplitude ไปเป็น 0..100 */
    if (wave_chart && wave_series) {
        for (int i = 0; i < DISPLAY_POINTS; i++) {
            int32_t val = ((int32_t)wave_buffer[i] + current_amplitude) * 100
                          / (2 * current_amplitude);
            if (val < 0) val = 0;
            if (val > 100) val = 100;
            lv_chart_set_value_by_id(wave_chart, wave_series, i, val);
        }
        lv_chart_refresh(wave_chart);
    }

    /* อัพเดท Info label */
    if (info_label) {
        float cycles = (float)current_freq * DISPLAY_POINTS / SAMPLE_RATE;
        float period_ms = 1000.0f / current_freq;
        lv_label_set_text_fmt(info_label,
            "Cycles: %.1f  |  Period: %.1f ms",
            (double)cycles, (double)period_ms);
    }
}
```

#### 3.4 Event Callbacks

```c
/* Dropdown callback - เลือกชนิด waveform */
static void wave_dropdown_cb(lv_event_t *e)
{
    if (lv_event_get_code(e) != LV_EVENT_VALUE_CHANGED) return;
    lv_obj_t *dropdown = lv_event_get_target(e);
    current_wave = (waveform_type_t)lv_dropdown_get_selected(dropdown);
    generate_waveform();
}

/* Frequency slider callback */
static void freq_slider_cb(lv_event_t *e)
{
    if (lv_event_get_code(e) != LV_EVENT_VALUE_CHANGED) return;
    lv_obj_t *slider = lv_event_get_target(e);
    current_freq = (uint32_t)lv_slider_get_value(slider);
    lv_label_set_text_fmt(freq_label, "%u Hz", (unsigned int)current_freq);
    generate_waveform();
}

/* Amplitude slider callback */
static void amp_slider_cb(lv_event_t *e)
{
    if (lv_event_get_code(e) != LV_EVENT_VALUE_CHANGED) return;
    lv_obj_t *slider = lv_event_get_target(e);
    current_amplitude = (int16_t)lv_slider_get_value(slider);
    lv_label_set_text_fmt(amp_label, "Amp: %d", (int)current_amplitude);
    generate_waveform();
}
```

#### 3.5 Main Function

```c
void part3_ex1_waveform_generator(void)
{
    lv_obj_t *scr = lv_screen_active();
    lv_obj_set_style_bg_color(scr, lv_color_hex(0x0a0a1e), 0);

    /* ===== Title ===== */
    lv_obj_t *title = lv_label_create(scr);
    lv_label_set_text(title, "Part 3 Ex1: Waveform Generator");
    lv_obj_set_style_text_color(title, lv_color_hex(0x00ff88), 0);
    lv_obj_align(title, LV_ALIGN_TOP_MID, 0, 5);

    /* ===== Waveform Chart ===== */
    wave_chart = lv_chart_create(scr);
    lv_obj_set_size(wave_chart, 380, 150);
    lv_obj_align(wave_chart, LV_ALIGN_TOP_MID, 0, 30);
    lv_chart_set_type(wave_chart, LV_CHART_TYPE_LINE);
    lv_chart_set_point_count(wave_chart, DISPLAY_POINTS);
    lv_chart_set_range(wave_chart, LV_CHART_AXIS_PRIMARY_Y, 0, 100);
    lv_chart_set_div_line_count(wave_chart, 4, 5);

    /* สไตล์ oscilloscope - พื้นหลังดำ เส้น grid สีเข้ม */
    lv_obj_set_style_bg_color(wave_chart, lv_color_hex(0x001a00), 0);
    lv_obj_set_style_line_color(wave_chart, lv_color_hex(0x003300), LV_PART_MAIN);
    lv_obj_set_style_border_color(wave_chart, lv_color_hex(0x00ff00), 0);
    lv_obj_set_style_border_width(wave_chart, 1, 0);
    lv_obj_set_style_size(wave_chart, 0, 0, LV_PART_INDICATOR);

    /* เพิ่ม series สีเขียว (oscilloscope style) */
    wave_series = lv_chart_add_series(wave_chart,
                     lv_color_hex(0x00ff00),
                     LV_CHART_AXIS_PRIMARY_Y);

    /* ===== Dropdown เลือก Waveform ===== */
    lv_obj_t *dropdown = lv_dropdown_create(scr);
    lv_dropdown_set_options(dropdown, "Square\nSine\nTriangle\nSawtooth");
    lv_dropdown_set_selected(dropdown, WAVE_SINE);
    lv_obj_set_width(dropdown, 120);
    lv_obj_align(dropdown, LV_ALIGN_BOTTOM_LEFT, 10, -55);
    lv_obj_add_event_cb(dropdown, wave_dropdown_cb,
                        LV_EVENT_VALUE_CHANGED, NULL);

    /* ===== Frequency Slider ===== */
    lv_obj_t *freq_lbl = lv_label_create(scr);
    lv_label_set_text(freq_lbl, "Freq:");
    lv_obj_set_style_text_color(freq_lbl, lv_color_hex(0xaaaaaa), 0);
    lv_obj_align(freq_lbl, LV_ALIGN_BOTTOM_LEFT, 145, -70);

    lv_obj_t *freq_slider = lv_slider_create(scr);
    lv_slider_set_range(freq_slider, 10, 1000);
    lv_slider_set_value(freq_slider, DEFAULT_FREQ, LV_ANIM_OFF);
    lv_obj_set_width(freq_slider, 160);
    lv_obj_align(freq_slider, LV_ALIGN_BOTTOM_LEFT, 185, -70);
    lv_obj_add_event_cb(freq_slider, freq_slider_cb,
                        LV_EVENT_VALUE_CHANGED, NULL);

    freq_label = lv_label_create(scr);
    lv_label_set_text_fmt(freq_label, "%u Hz", DEFAULT_FREQ);
    lv_obj_set_style_text_color(freq_label, lv_color_hex(0x00ffff), 0);
    lv_obj_align(freq_label, LV_ALIGN_BOTTOM_RIGHT, -10, -70);

    /* ===== Amplitude Slider ===== */
    lv_obj_t *amp_lbl_title = lv_label_create(scr);
    lv_label_set_text(amp_lbl_title, "Amp:");
    lv_obj_set_style_text_color(amp_lbl_title, lv_color_hex(0xaaaaaa), 0);
    lv_obj_align(amp_lbl_title, LV_ALIGN_BOTTOM_LEFT, 145, -45);

    lv_obj_t *amp_slider = lv_slider_create(scr);
    lv_slider_set_range(amp_slider, 100, 1000);
    lv_slider_set_value(amp_slider, DEFAULT_AMP, LV_ANIM_OFF);
    lv_obj_set_width(amp_slider, 160);
    lv_obj_align(amp_slider, LV_ALIGN_BOTTOM_LEFT, 185, -45);
    lv_obj_add_event_cb(amp_slider, amp_slider_cb,
                        LV_EVENT_VALUE_CHANGED, NULL);

    amp_label = lv_label_create(scr);
    lv_label_set_text_fmt(amp_label, "Amp: %d", DEFAULT_AMP);
    lv_obj_set_style_text_color(amp_label, lv_color_hex(0xffff00), 0);
    lv_obj_align(amp_label, LV_ALIGN_BOTTOM_RIGHT, -10, -45);

    /* ===== Info Label ===== */
    info_label = lv_label_create(scr);
    lv_obj_set_style_text_color(info_label, lv_color_hex(0x888888), 0);
    lv_obj_align(info_label, LV_ALIGN_BOTTOM_MID, 0, -10);

    /* สร้าง waveform แรก */
    generate_waveform();
}
```

***

### 4. องค์ความรู้และเทคนิค

#### 4.1 Nyquist Theorem - ทฤษฎีไนควิสต์

```c
/* ทฤษฎี Nyquist: sample_rate >= 2 * max_frequency
 *
 * Sample rate ของเรา: 10000 Hz
 * ความถี่สูงสุดที่แสดงได้: 5000 Hz
 *
 * ถ้า freq > sample_rate/2 จะเกิด Aliasing
 * (สัญญาณบิดเบี้ยว ไม่ตรงกับความเป็นจริง)
 *
 * ในงาน Power Systems:
 * - สัญญาณ 50 Hz -> ต้อง sample อย่างน้อย 100 Hz
 * - วิเคราะห์ harmonics ถึง 50th (2500 Hz) -> sample >= 5000 Hz
 */
```

#### 4.2 Cycles per Display

```c
/* จำนวนรอบที่เห็นบนจอ:
 *
 * display_points = 200 samples
 * sample_rate = 10000 Hz
 * display_time = 200/10000 = 0.02s = 20ms
 *
 * ที่ 50 Hz (ไฟฟ้ากระแสสลับ): 50 * 0.02 = 1 cycle
 * ที่ 100 Hz:                  100 * 0.02 = 2 cycles
 * ที่ 500 Hz:                  500 * 0.02 = 10 cycles
 * ที่ 1000 Hz:                 1000 * 0.02 = 20 cycles
 *
 * สูตร: cycles = freq * display_points / sample_rate
 */
```

#### 4.3 Amplitude Mapping

```c
/* การ Map ค่าจาก Signal Domain ไปเป็น Display Domain
 *
 * Signal: -amplitude to +amplitude (int16_t)
 * Chart:  0 to 100 (percentage)
 *
 * สูตร: chart_val = (signal_val + amplitude) * 100 / (2 * amplitude)
 *
 * ตัวอย่าง amplitude = 1000:
 * -1000 -> (0)    * 100/2000 = 0
 *     0 -> (1000) * 100/2000 = 50
 * +1000 -> (2000) * 100/2000 = 100
 *
 * ต้อง clamp ค่าให้อยู่ในช่วง 0-100 เสมอ
 */
```

#### 4.4 Chart Performance Tips

```c
/* เทคนิคเพิ่มประสิทธิภาพ Chart:
 *
 * 1. ซ่อน indicator dots (ลด rendering load)
 *    lv_obj_set_style_size(chart, 0, 0, LV_PART_INDICATOR);
 *
 * 2. ใช้จำนวนจุดที่เหมาะสม (200 จุดเพียงพอสำหรับ oscilloscope)
 *    lv_chart_set_point_count(chart, 200);
 *
 * 3. ใช้ lv_chart_set_value_by_id() + lv_chart_refresh()
 *    แทน lv_chart_set_next_value() เมื่อต้องอัพเดททุกจุดพร้อมกัน
 *
 * 4. Dark background ลดการ redraw:
 *    lv_obj_set_style_bg_color(chart, lv_color_hex(0x001a00), 0);
 */
```

***

### 5. แบบฝึกหัด

#### Exercise 1: Noise Injection (เพิ่ม Noise ให้สัญญาณ)

**โจทย์:** เพิ่ม Slider สำหรับ Noise Level (0-500) ที่จะบวก random noise เข้าไปในสัญญาณ

* เพิ่ม slider ปรับระดับ noise (0 = clean, 500 = maximum noise)
* ใช้ `rand()` สร้าง random values แล้วบวกเข้าไปหลัง generate
* แสดงค่า SNR (Signal-to-Noise Ratio) โดยประมาณ

**คำใบ้:**

```c
/* Noise injection pattern */
for (int i = 0; i < BUFFER_SIZE; i++) {
    int16_t noise = (rand() % (2 * noise_level + 1)) - noise_level;
    wave_buffer[i] += noise;
}
```

#### Exercise 2: Dual-Channel Display (แสดง 2 ช่องสัญญาณ)

**โจทย์:** สร้างการแสดงผล 2 ช่องสัญญาณบน chart เดียวกัน (เหมือน oscilloscope 2 channels)

* Channel 1 (สีเขียว): waveform ที่เลือกจาก dropdown
* Channel 2 (สีเหลือง): sine wave ที่ความถี่ 2 เท่าของ Channel 1
* ใช้ `lv_chart_add_series()` เพิ่ม series ที่สอง
* เพิ่มปุ่ม toggle เปิด/ปิด Channel 2

**คำใบ้:**

```c
/* เพิ่ม series ที่สอง */
static lv_chart_series_t *ch2_series = NULL;
ch2_series = lv_chart_add_series(wave_chart,
                 lv_color_hex(0xffff00),  /* สีเหลือง */
                 LV_CHART_AXIS_PRIMARY_Y);
```

***

### 6. References

* [LVGL Chart](https://docs.lvgl.io/9.2/widgets/chart.html)
* [LVGL Dropdown](https://docs.lvgl.io/9.2/widgets/dropdown.html)
* [Signal Processing Basics](https://www.dspguide.com/)

***


# Noise Generator

## Lab 2: Noise Generator

### Part 3 - Oscilloscope & Signal Processing

***

### 1. โครงสร้างภาพรวมของ Lab

#### Why? - ทำไมต้องเรียนรู้เรื่องนี้

* **Real-World Signals**: สัญญาณจริงในทุกระบบมี Noise ปนเสมอ ไม่ว่าจะเป็นสาย Power, Sensor Reading หรือ Communication Channel
* **Signal-to-Noise Ratio (SNR)**: SNR เป็น metric สำคัญที่สุดในวิศวกรรมไฟฟ้า ใช้วัดคุณภาพสัญญาณในระบบ Power, Audio และ Communications
* **Filter Design Foundation**: การเข้าใจ Noise เป็นพื้นฐานสำหรับการออกแบบ Filter ทั้ง Hardware (RC, LC) และ Software (Moving Average, FIR, IIR)
* **EE Application**: ในระบบ Power Quality ต้องแยก Fundamental (50Hz) ออกจาก Noise, ใน Sensor System ต้องกรอง EMI Noise ออกจากข้อมูล

#### What? - จะได้เรียนรู้อะไร

1. **White Noise Generation**: สร้าง random noise ด้วย `rand()` และเข้าใจคุณสมบัติ
2. **Gaussian-like Noise**: สร้าง noise แบบ Gaussian ด้วยเทคนิค Central Limit Theorem
3. **SNR Concept**: ทำความเข้าใจ Signal-to-Noise Ratio ทั้งแบบ Linear และ dB
4. **Signal + Noise Visualization**: แสดงสัญญาณ Clean กับ Noisy แยกหรือซ้อนกัน
5. **RMS Calculation**: วัดค่า RMS ของ Noise สำหรับคำนวณ SNR

#### How? - จะทำอย่างไร

1. สร้าง Sine wave เป็นสัญญาณ Clean
2. สร้าง White noise ด้วย `rand()`
3. รวม Clean + Noise แล้วแสดงผลบน Chart
4. เพิ่ม Slider ปรับระดับ Noise (ควบคุม SNR)
5. แสดงค่า SNR แบบ real-time

<figure><img src="/files/iUJDGZjz2lgNU7jjKfhP" alt=""><figcaption></figcaption></figure>

***

### 2. หลักการทำงานและ Flowchart

#### 2.1 White Noise Characteristics

```
┌─────────────────────────────────────────────────────────────┐
│                    WHITE NOISE                              │
├─────────────────────────────────────────────────────────────┤
│                                                             │
│   Time Domain:                                              │
│                                                             │
│   ▃▅█▂▇▃▆▁▄█▅▂▇▃▅▁▄▇▂▃█▅▆▁▄▅▃▇▂█▄▅▃▆▁▇▂▅▃█▄▆▁               │
│                                                             │
│   - Random amplitude at each sample                         │
│   - No pattern or periodicity                               │
│   - Contains all frequencies equally                        │
│                                                             │
│   Frequency Domain:                                         │
│                                                             │
│   ▓▓▓▓▓▓▓▓▓▓▓▓▓▓▓▓▓▓▓▓▓▓▓▓▓▓▓▓▓▓▓▓  ← Flat spectrum         │
│   ─────────────────────────────────                         │
│   0 Hz                          Fs/2                        │
│                                                             │
└─────────────────────────────────────────────────────────────┘
```

#### 2.2 RMS Calculation

```
┌─────────────────────────────────────────────────────────────┐
│                  RMS (Root Mean Square)                     │
├─────────────────────────────────────────────────────────────┤
│                                                             │
│   Formula:                                                  │
│                                                             │
│         ┌─────────────────────────────┐                     │
│         │    1   N-1                  │                     │
│   RMS = │   ─── Σ  x[i]²              │                     │
│         │    N  i=0                   │                     │
│         └─────────────────────────────┘                     │
│                                                             │
│   Example:                                                  │
│   Samples: [100, -50, 75, -100, 50]                         │
│   Squares: [10000, 2500, 5625, 10000, 2500]                 │
│   Mean: 30625 / 5 = 6125                                    │
│   RMS: sqrt(6125) = 78.3                                    │
│                                                             │
│   For noise with amplitude ±1000:                           │
│   Theoretical RMS ≈ 1000 / √3 ≈ 577                         │
│                                                             │
└─────────────────────────────────────────────────────────────┘
```

***

### 3. ฟังก์ชันสำคัญ

#### 3.1 Noise Generation

<table><thead><tr><th>Function</th><th width="198.5738525390625">Description</th><th>Algorithm</th></tr></thead><tbody><tr><td><code>generate_white_noise()</code></td><td>Uniform random noise</td><td><code>rand() % (2*amp+1) - amp</code></td></tr><tr><td><code>generate_gaussian_noise()</code></td><td>Gaussian-like noise</td><td>เฉลี่ย 12 ค่า <code>rand()</code> (CLT)</td></tr><tr><td><code>calc_rms()</code></td><td>คำนวณ RMS</td><td><code>sqrt(mean(x^2))</code></td></tr><tr><td><code>calc_snr_db()</code></td><td>คำนวณ SNR (dB)</td><td><code>20*log10(rms_signal/rms_noise)</code></td></tr></tbody></table>

#### 3.2 LVGL Timer API

<table><thead><tr><th width="339.5078125">Function</th><th>Description</th></tr></thead><tbody><tr><td><code>lv_timer_create(cb, period_ms, data)</code></td><td>สร้าง timer สำหรับ real-time update</td></tr><tr><td><code>lv_timer_pause(timer)</code></td><td>หยุด timer ชั่วคราว</td></tr><tr><td><code>lv_timer_resume(timer)</code></td><td>กลับมาทำงานต่อ</td></tr></tbody></table>

***

### 4. Code เต็ม

#### 4.1 Constants and Global Variables

```c
#include "lvgl.h"
#include <math.h>
#include <stdlib.h>
#include <string.h>

#ifndef M_PI
#define M_PI 3.14159265358979323846
#endif

#define BUFFER_SIZE     256
#define DISPLAY_POINTS  200
#define SAMPLE_RATE     10000
#define SIGNAL_FREQ     100
#define SIGNAL_AMP      1000

/* Global variables */
static int16_t clean_buffer[BUFFER_SIZE];   /* สัญญาณ Clean */
static int16_t noise_buffer[BUFFER_SIZE];   /* Noise เท่านั้น */
static int16_t noisy_buffer[BUFFER_SIZE];   /* Clean + Noise */
static lv_obj_t *ex2_chart = NULL;
static lv_chart_series_t *clean_series = NULL;  /* สีเขียว */
static lv_chart_series_t *noisy_series = NULL;  /* สีแดง */
static lv_obj_t *snr_label = NULL;
static lv_obj_t *rms_label = NULL;
static lv_obj_t *noise_val_label = NULL;
static lv_obj_t *btn_label = NULL;
static lv_timer_t *noise_timer = NULL;
static int16_t noise_amplitude = 200;
static bool noise_running = true;
static bool use_gaussian = false;
```

#### 4.2 Noise Generation Functions

```c
/* White noise: Uniform distribution */
static void generate_white_noise(int16_t *buf, uint16_t count, int16_t amp)
{
    for (uint16_t i = 0; i < count; i++) {
        buf[i] = (int16_t)((rand() % (2 * amp + 1)) - amp);
    }
}

/* Gaussian-like noise ด้วย Central Limit Theorem
 * เฉลี่ยค่า random 12 ค่า จะได้การกระจายแบบ Gaussian โดยประมาณ
 */
static void generate_gaussian_noise(int16_t *buf, uint16_t count, int16_t amp)
{
    for (uint16_t i = 0; i < count; i++) {
        int32_t sum = 0;
        for (int j = 0; j < 12; j++) {
            sum += rand() % 1001;  /* 0-1000 */
        }
        /* sum อยู่ในช่วง 0-12000, center = 6000 */
        /* scale ให้อยู่ในช่วง -amp..+amp */
        buf[i] = (int16_t)((sum - 6000) * amp / 3000);
    }
}

/* สร้าง Clean sine wave */
static void generate_clean_signal(void)
{
    for (uint16_t i = 0; i < BUFFER_SIZE; i++) {
        double t = (double)i / (double)SAMPLE_RATE;
        clean_buffer[i] = (int16_t)(SIGNAL_AMP *
                          sin(2.0 * M_PI * SIGNAL_FREQ * t));
    }
}
```

#### 4.3 RMS and SNR Calculation

```c
/* คำนวณ RMS */
static float calc_rms(const int16_t *buf, uint16_t count)
{
    double sum_sq = 0;
    for (uint16_t i = 0; i < count; i++) {
        sum_sq += (double)buf[i] * buf[i];
    }
    return (float)sqrt(sum_sq / count);
}

/* คำนวณ SNR (dB) */
static float calc_snr_db(float rms_signal, float rms_noise)
{
    if (rms_noise < 0.001f) return 99.9f;  /* Noise ต่ำมาก */
    return 20.0f * log10f(rms_signal / rms_noise);
}
```

#### 4.4 Chart Update Function

```c
static void update_display(void)
{
    if (!ex2_chart) return;

    /* สร้าง Noise */
    if (use_gaussian) {
        generate_gaussian_noise(noise_buffer, BUFFER_SIZE, noise_amplitude);
    } else {
        generate_white_noise(noise_buffer, BUFFER_SIZE, noise_amplitude);
    }

    /* รวม Clean + Noise */
    for (uint16_t i = 0; i < BUFFER_SIZE; i++) {
        noisy_buffer[i] = clean_buffer[i] + noise_buffer[i];
    }

    /* Map ค่าไปยัง Chart (ใช้ range ที่กว้างกว่าเพื่อรองรับ noise) */
    int16_t total_range = SIGNAL_AMP + noise_amplitude;
    if (total_range < SIGNAL_AMP) total_range = SIGNAL_AMP;

    for (int i = 0; i < DISPLAY_POINTS; i++) {
        /* Clean signal - สีเขียว */
        int32_t clean_val = ((int32_t)clean_buffer[i] + total_range) * 100
                            / (2 * total_range);
        if (clean_val < 0) clean_val = 0;
        if (clean_val > 100) clean_val = 100;
        lv_chart_set_value_by_id(ex2_chart, clean_series, i, clean_val);

        /* Noisy signal - สีแดง */
        int32_t noisy_val = ((int32_t)noisy_buffer[i] + total_range) * 100
                            / (2 * total_range);
        if (noisy_val < 0) noisy_val = 0;
        if (noisy_val > 100) noisy_val = 100;
        lv_chart_set_value_by_id(ex2_chart, noisy_series, i, noisy_val);
    }
    lv_chart_refresh(ex2_chart);

    /* คำนวณและแสดง RMS / SNR */
    float rms_sig = calc_rms(clean_buffer, BUFFER_SIZE);
    float rms_noi = calc_rms(noise_buffer, BUFFER_SIZE);
    float snr = calc_snr_db(rms_sig, rms_noi);

    if (snr_label) {
        lv_label_set_text_fmt(snr_label, "SNR: %.1f dB", (double)snr);
    }
    if (rms_label) {
        lv_label_set_text_fmt(rms_label, "RMS(S): %.0f  RMS(N): %.0f",
                              (double)rms_sig, (double)rms_noi);
    }
}
```

#### 4.5 Timer and Event Callbacks

```c
/* Timer callback - อัพเดทข้อมูลทุก 100ms */
static void noise_timer_cb(lv_timer_t *timer)
{
    (void)timer;
    if (!noise_running) return;
    update_display();
}

/* Noise level slider callback */
static void noise_slider_cb(lv_event_t *e)
{
    if (lv_event_get_code(e) != LV_EVENT_VALUE_CHANGED) return;
    lv_obj_t *slider = lv_event_get_target(e);
    noise_amplitude = (int16_t)lv_slider_get_value(slider);
    lv_label_set_text_fmt(noise_val_label, "%d", (int)noise_amplitude);
    if (!noise_running) update_display();
}

/* Start/Stop button callback */
static void start_stop_cb(lv_event_t *e)
{
    if (lv_event_get_code(e) != LV_EVENT_CLICKED) return;
    noise_running = !noise_running;
    lv_label_set_text(btn_label, noise_running ? "Stop" : "Start");
}

/* Gaussian/Uniform toggle callback */
static void gaussian_toggle_cb(lv_event_t *e)
{
    if (lv_event_get_code(e) != LV_EVENT_CLICKED) return;
    use_gaussian = !use_gaussian;

    lv_obj_t *btn = lv_event_get_target(e);
    lv_obj_t *label = lv_obj_get_child(btn, 0);
    lv_label_set_text(label, use_gaussian ? "Gaussian" : "Uniform");
}
```

#### 4.6 Main Function

```c
void part3_ex2_noise_generator(void)
{
    lv_obj_t *scr = lv_screen_active();
    lv_obj_set_style_bg_color(scr, lv_color_hex(0x0a0a1e), 0);

    /* สร้าง Clean signal ครั้งเดียว */
    generate_clean_signal();

    /* ===== Title ===== */
    lv_obj_t *title = lv_label_create(scr);
    lv_label_set_text(title, "Part 3 Ex2: Noise Generator & SNR");
    lv_obj_set_style_text_color(title, lv_color_hex(0x00ff88), 0);
    lv_obj_align(title, LV_ALIGN_TOP_MID, 0, 5);

    /* ===== Chart ===== */
    ex2_chart = lv_chart_create(scr);
    lv_obj_set_size(ex2_chart, 400, 150);
    lv_obj_align(ex2_chart, LV_ALIGN_TOP_MID, 0, 30);
    lv_chart_set_type(ex2_chart, LV_CHART_TYPE_LINE);
    lv_chart_set_point_count(ex2_chart, DISPLAY_POINTS);
    lv_chart_set_range(ex2_chart, LV_CHART_AXIS_PRIMARY_Y, 0, 100);
    lv_chart_set_div_line_count(ex2_chart, 4, 5);

    /* Dark oscilloscope style */
    lv_obj_set_style_bg_color(ex2_chart, lv_color_hex(0x001a00), 0);
    lv_obj_set_style_line_color(ex2_chart, lv_color_hex(0x003300), LV_PART_MAIN);
    lv_obj_set_style_border_color(ex2_chart, lv_color_hex(0x006600), 0);
    lv_obj_set_style_border_width(ex2_chart, 1, 0);
    lv_obj_set_style_size(ex2_chart, 0, 0, LV_PART_INDICATOR);

    /* Clean signal series (สีเขียว) */
    clean_series = lv_chart_add_series(ex2_chart,
                       lv_color_hex(0x00ff00), LV_CHART_AXIS_PRIMARY_Y);

    /* Noisy signal series (สีแดง) */
    noisy_series = lv_chart_add_series(ex2_chart,
                       lv_color_hex(0xff4444), LV_CHART_AXIS_PRIMARY_Y);

    /* ===== Noise Level Slider ===== */
    lv_obj_t *noise_lbl = lv_label_create(scr);
    lv_label_set_text(noise_lbl, "Noise Level:");
    lv_obj_set_style_text_color(noise_lbl, lv_color_hex(0xaaaaaa), 0);
    lv_obj_align(noise_lbl, LV_ALIGN_LEFT_MID, 10, 50);

    lv_obj_t *noise_slider = lv_slider_create(scr);
    lv_slider_set_range(noise_slider, 0, 1000);
    lv_slider_set_value(noise_slider, noise_amplitude, LV_ANIM_OFF);
    lv_obj_set_width(noise_slider, 200);
    lv_obj_align(noise_slider, LV_ALIGN_CENTER, 20, 50);
    lv_obj_add_event_cb(noise_slider, noise_slider_cb,
                        LV_EVENT_VALUE_CHANGED, NULL);

    noise_val_label = lv_label_create(scr);
    lv_label_set_text_fmt(noise_val_label, "%d", (int)noise_amplitude);
    lv_obj_set_style_text_color(noise_val_label, lv_color_hex(0xff6666), 0);
    lv_obj_align(noise_val_label, LV_ALIGN_RIGHT_MID, -15, 50);

    /* ===== SNR and RMS Labels ===== */
    snr_label = lv_label_create(scr);
    lv_label_set_text(snr_label, "SNR: -- dB");
    lv_obj_set_style_text_color(snr_label, lv_color_hex(0x00ffff), 0);
    lv_obj_set_style_text_font(snr_label, &lv_font_montserrat_16, 0);
    lv_obj_align(snr_label, LV_ALIGN_BOTTOM_LEFT, 10, -40);

    rms_label = lv_label_create(scr);
    lv_label_set_text(rms_label, "RMS(S): --  RMS(N): --");
    lv_obj_set_style_text_color(rms_label, lv_color_hex(0x888888), 0);
    lv_obj_align(rms_label, LV_ALIGN_BOTTOM_RIGHT, -10, -40);

    /* ===== Control Buttons ===== */
    /* Start/Stop */
    lv_obj_t *btn_ss = lv_btn_create(scr);
    lv_obj_set_size(btn_ss, 80, 30);
    lv_obj_align(btn_ss, LV_ALIGN_BOTTOM_LEFT, 10, -5);
    lv_obj_add_event_cb(btn_ss, start_stop_cb, LV_EVENT_CLICKED, NULL);

    btn_label = lv_label_create(btn_ss);
    lv_label_set_text(btn_label, "Stop");
    lv_obj_center(btn_label);

    /* Gaussian/Uniform toggle */
    lv_obj_t *btn_gauss = lv_btn_create(scr);
    lv_obj_set_size(btn_gauss, 100, 30);
    lv_obj_align(btn_gauss, LV_ALIGN_BOTTOM_LEFT, 100, -5);
    lv_obj_add_event_cb(btn_gauss, gaussian_toggle_cb,
                        LV_EVENT_CLICKED, NULL);

    lv_obj_t *gauss_lbl = lv_label_create(btn_gauss);
    lv_label_set_text(gauss_lbl, "Uniform");
    lv_obj_center(gauss_lbl);

    /* ===== Timer ===== */
    noise_timer = lv_timer_create(noise_timer_cb, 100, NULL);

    /* แสดงผลครั้งแรก */
    update_display();
}
```

***

### 5. องค์ความรู้และเทคนิค

#### 5.1 Pseudo-Random Number Generator (PRNG)

```c
/* rand() ใน C stdlib เป็น Pseudo-Random Number Generator
 * ให้ลำดับตัวเลขที่ดูสุ่ม แต่จริงๆ เป็น deterministic
 *
 * Simple Linear Congruential Generator:
 * X(n+1) = (a * X(n) + c) mod m
 *
 * สำหรับ White Noise:
 * - ทุกค่ามีโอกาสเกิดเท่ากัน (Uniform Distribution)
 * - ไม่มี pattern หรือ periodicity
 * - Flat frequency spectrum (พลังงานเท่ากันทุกความถี่)
 *
 * การตั้ง seed:
 * srand(42);  // ให้ผลซ้ำเดิมทุกครั้ง (ดีสำหรับ debug)
 * srand(time(NULL));  // ให้ผลต่างทุกครั้ง
 */
```

#### 5.2 Central Limit Theorem สำหรับ Gaussian Noise

```c
/* Central Limit Theorem (CLT):
 * ถ้าเฉลี่ยค่าสุ่มหลายๆ ค่า ผลลัพธ์จะเข้าใกล้ Gaussian Distribution
 *
 * เทคนิค: เฉลี่ย 12 ค่า rand() (เลือก 12 เพราะ variance = 1)
 *
 * ข้อดี:
 * - ไม่ต้องใช้ Box-Muller transform (ซับซ้อน)
 * - เหมาะกับ Embedded ที่มี resource จำกัด
 *
 * ข้อเสีย:
 * - ไม่ใช่ Gaussian จริงๆ (tail ถูกตัด)
 * - ต้องเรียก rand() 12 ครั้งต่อ sample
 */
```

#### 5.3 SNR in Decibels

```c
/* SNR สามารถแสดงเป็น dB (Decibel) ซึ่งเป็น logarithmic scale
 *
 * SNR_dB = 20 * log10(A_signal / A_noise)     [Amplitude]
 * SNR_dB = 10 * log10(P_signal / P_noise)     [Power]
 *
 * ข้อดีของ dB:
 * - ช่วงกว้าง (0.001 ถึง 1000000) แสดงเป็นตัวเลขเล็กๆ ได้
 * - การคูณกลายเป็นการบวก (cascade system)
 *
 * ตัวอย่าง:
 * A_signal = 1000, A_noise = 100
 * SNR = 20 * log10(1000/100) = 20 * log10(10) = 20 dB
 *
 * A_signal = 1000, A_noise = 10
 * SNR = 20 * log10(1000/10) = 20 * log10(100) = 40 dB
 */
```

#### 5.4 Start/Stop Pattern สำหรับ Real-time Display

```c
/* Pattern สำหรับ Timer-based real-time update:
 *
 * 1. สร้าง timer ด้วย lv_timer_create()
 * 2. ใน callback ตรวจ running flag
 * 3. ปุ่ม toggle เปลี่ยน flag
 *
 * เป็น pattern มาตรฐานที่ใช้ได้กับทุก Lab
 */
static bool running = true;

void timer_cb(lv_timer_t *t) {
    if (!running) return;   /* ข้ามถ้าหยุดอยู่ */
    /* ... update data and display ... */
}

void toggle_cb(lv_event_t *e) {
    running = !running;
    lv_label_set_text(label, running ? "Stop" : "Start");
}
```

***

### 6. แบบฝึกหัด

#### Exercise 1: Adjustable SNR Display (ปรับ SNR ด้วย Slider)

**โจทย์:** แก้ไขให้ Slider แสดงเป็น SNR (dB) โดยตรงแทนที่จะเป็น Noise Level

* Slider ช่วง 0-60 dB
* คำนวณ noise\_amplitude จาก SNR ที่ต้องการ: `noise_amp = signal_amp / 10^(SNR_dB/20)`
* เมื่อ SNR = 0 dB, noise amplitude = signal amplitude
* เมื่อ SNR = 60 dB, noise amplitude ต่ำมาก (เกือบ clean)
* แสดง color indicator: Green (>30dB), Yellow (10-30dB), Red (<10dB)

**คำใบ้:**

```c
/* คำนวณ noise amplitude จาก SNR */
float snr_linear = powf(10.0f, snr_db / 20.0f);
int16_t noise_amp = (int16_t)(SIGNAL_AMP / snr_linear);
```

#### Exercise 2: Moving Average Filter (ตัว Filter พื้นฐาน)

**โจทย์:** เพิ่ม Moving Average Filter เพื่อลด noise และแสดงผลลัพธ์

* เพิ่ม series ที่ 3 (สีฟ้า) สำหรับสัญญาณที่ผ่าน filter
* ใช้ Moving Average ขนาด N (เลือกจาก dropdown: 3, 5, 7, 11, 15)
* แสดง SNR ก่อนและหลัง filter เปรียบเทียบ
* สังเกตว่า filter ทำให้สัญญาณ delay และสูญเสีย high-frequency

**คำใบ้:**

```c
/* Simple Moving Average Filter */
void moving_average(const int16_t *input, int16_t *output,
                    uint16_t count, uint8_t window)
{
    for (int i = 0; i < count; i++) {
        int32_t sum = 0;
        int start = i - window / 2;
        int end = i + window / 2;
        int valid = 0;
        for (int j = start; j <= end; j++) {
            if (j >= 0 && j < count) {
                sum += input[j];
                valid++;
            }
        }
        output[i] = (int16_t)(sum / valid);
    }
}
```

***

### 7. References

* [White Noise](https://en.wikipedia.org/wiki/White_noise)
* [RMS Calculation](https://en.wikipedia.org/wiki/Root_mean_square)
* [LVGL Button](https://docs.lvgl.io/9.2/widgets/button.html)

***


# Audio Waveform

## Lab 3: Audio Waveform Display

### Part 3 - Oscilloscope & Signal Processing

***

### 1. โครงสร้างภาพรวมของ Lab

#### Why? - ทำไมต้องเรียนรู้เรื่องนี้

* **Harmonics in Power Systems**: ในระบบไฟฟ้า Harmonics (ฮาร์มอนิกส์) คือปัญหาสำคัญ สัญญาณ 50 Hz อุดมคติจะถูกบิดเบี้ยวด้วย harmonic ที่ 3rd (150Hz), 5th (250Hz), 7th (350Hz) ทำให้เกิดปัญหา power quality
* **Sound & Music**: เสียงเป็น waveform ที่ซับซ้อน เกิดจากการรวม harmonics หลายตัว ความแตกต่างของเสียงเครื่องดนตรีแต่ละชิ้น (Timbre) มาจากสัดส่วน harmonics ที่ต่างกัน
* **Fourier Series**: ทุก periodic waveform สามารถสลายเป็นผลรวมของ sine waves (harmonics) ได้ นี่คือพื้นฐานของ Fourier Analysis ที่ใช้ในงาน EE ทุกสาขา
* **EE Application**: วิเคราะห์ THD (Total Harmonic Distortion) ในระบบไฟฟ้า, ออกแบบ Active Harmonic Filter, Audio Equalizer

#### What? - จะได้เรียนรู้อะไร

1. **Musical Frequencies**: ความถี่โน้ตดนตรี (A4=440Hz, C4=261.6Hz)
2. **Harmonics Theory**: Fundamental + 2nd + 3rd harmonics และผลต่อ waveform shape
3. **Waveform Synthesis**: สร้าง waveform ซับซ้อนจาก sine waves หลายตัว
4. **Timbre Concept**: ทำไมเสียงเปียโนกับไวโอลินถึงต่างกันที่ความถี่เดียวกัน
5. **AM Modulation**: Amplitude Modulation พื้นฐาน (carrier \* modulating)

#### How? - จะทำอย่างไร

1. สร้างปุ่มโน้ตดนตรี C, D, E, F, G, A, B
2. แต่ละปุ่มสร้าง sine wave ที่ความถี่ของโน้ตนั้น
3. เพิ่ม slider ปรับระดับ Harmonic (2nd, 3rd)
4. แสดง waveform ที่เปลี่ยนรูปร่างตาม harmonic content
5. สังเกตความสัมพันธ์ระหว่าง harmonic content กับ waveform shape

<figure><img src="/files/ENJZMAmULhv24uUNna0a" alt=""><figcaption></figcaption></figure>

***

### 2. หลักการทำงานและ Flowchart

#### 2.1 Musical Note Frequencies

```
┌─────────────────────────────────────────────────────────────────┐
│                MUSICAL NOTE FREQUENCIES                         │
├─────────────────────────────────────────────────────────────────┤
│                                                                 │
│  Octave 4 (Middle):                                             │
│  ┌──────┬──────┬──────┬──────┬──────┬──────┬──────┐             │
│  │  C4  │  D4  │  E4  │  F4  │  G4  │  A4  │  B4  │             │
│  │261.6 │293.7 │329.6 │349.2 │392.0 │440.0 │493.9 │ Hz          │
│  └──────┴──────┴──────┴──────┴──────┴──────┴──────┘             │
│                                                                 │
│  ความสัมพันธ์:                                                     │
│  - Octave ขึ้น = frequency x 2  (A4=440 -> A5=880 Hz)             │
│  - Octave ลง = frequency / 2   (A4=440 -> A3=220 Hz)            │
│  - Semitone ratio = 2^(1/12) = 1.05946                          │
│                                                                 │
│  Standard Tuning: A4 = 440 Hz (ISO 16)                          │
│  ไฟฟ้าไทย:       50 Hz (ต่ำกว่า G1 = 49.0 Hz เล็กน้อย)               │
│                                                                 │
└─────────────────────────────────────────────────────────────────┘
```

***

### 3. ฟังก์ชันสำคัญ

#### 3.1 Audio Constants

<table><thead><tr><th width="138.77984619140625">Constant</th><th width="179.9268798828125">Value</th><th>Description</th></tr></thead><tbody><tr><td><code>NOTE_C4</code></td><td>262</td><td>โน้ต C (โด)</td></tr><tr><td><code>NOTE_D4</code></td><td>294</td><td>โน้ต D (เร)</td></tr><tr><td><code>NOTE_E4</code></td><td>330</td><td>โน้ต E (มี)</td></tr><tr><td><code>NOTE_F4</code></td><td>349</td><td>โน้ต F (ฟา)</td></tr><tr><td><code>NOTE_G4</code></td><td>392</td><td>โน้ต G (ซอล)</td></tr><tr><td><code>NOTE_A4</code></td><td>440</td><td>โน้ต A (ลา) - Standard Tuning</td></tr><tr><td><code>NOTE_B4</code></td><td>494</td><td>โน้ต B (ที)</td></tr></tbody></table>

#### 3.2 Synthesis Functions

<table><thead><tr><th width="304.22723388671875">Function</th><th>Description</th></tr></thead><tbody><tr><td><code>generate_with_harmonics()</code></td><td>สร้าง waveform พร้อม harmonics</td></tr><tr><td><code>add_harmonic()</code></td><td>เพิ่ม harmonic ลงใน buffer</td></tr><tr><td><code>update_waveform_display()</code></td><td>อัพเดท chart</td></tr></tbody></table>

***

### 4. Code เต็ม

#### 4.1 Constants and Global Variables

```c
#include "lvgl.h"
#include <math.h>
#include <stdlib.h>

#ifndef M_PI
#define M_PI 3.14159265358979323846
#endif

#define BUFFER_SIZE     512
#define DISPLAY_POINTS  200
#define SAMPLE_RATE     44100
#define NUM_NOTES       7

/* Musical note frequencies (Octave 4) */
static const uint32_t note_freqs[NUM_NOTES] = {
    262, 294, 330, 349, 392, 440, 494
};
static const char *note_names[NUM_NOTES] = {
    "C4", "D4", "E4", "F4", "G4", "A4", "B4"
};

/* Global variables */
static int16_t audio_buffer[BUFFER_SIZE];
static lv_obj_t *audio_chart = NULL;
static lv_chart_series_t *audio_series = NULL;
static lv_obj_t *note_label = NULL;
static lv_obj_t *harm2_label = NULL;
static lv_obj_t *harm3_label = NULL;
static uint32_t current_note_freq = 440;
static uint8_t current_note_idx = 5;  /* A4 */
static float harm2_level = 0.0f;  /* 2nd harmonic (0.0 - 1.0) */
static float harm3_level = 0.0f;  /* 3rd harmonic (0.0 - 1.0) */
```

#### 4.2 Waveform Synthesis with Harmonics

```c
/* สร้าง waveform พร้อม harmonics */
static void generate_with_harmonics(int16_t *buf, uint16_t count,
                                      uint32_t freq, uint32_t fs,
                                      float h2, float h3)
{
    /* Normalization factor: ป้องกัน clipping เมื่อรวม harmonics */
    float total_amp = 1.0f + fabsf(h2) + fabsf(h3);

    for (uint16_t i = 0; i < count; i++) {
        double t = (double)i / (double)fs;

        /* Fundamental (1st harmonic) */
        double val = sin(2.0 * M_PI * freq * t);

        /* 2nd harmonic (2 * frequency) */
        val += h2 * sin(2.0 * M_PI * (2 * freq) * t);

        /* 3rd harmonic (3 * frequency) */
        val += h3 * sin(2.0 * M_PI * (3 * freq) * t);

        /* Normalize และ scale ไปที่ int16_t range */
        val = val / total_amp;
        buf[i] = (int16_t)(val * 1000);
    }
}

/* อัพเดท chart display */
static void update_waveform_display(void)
{
    generate_with_harmonics(audio_buffer, BUFFER_SIZE,
                            current_note_freq, SAMPLE_RATE,
                            harm2_level, harm3_level);

    if (!audio_chart || !audio_series) return;

    for (int i = 0; i < DISPLAY_POINTS; i++) {
        /* ใช้ stride เพื่อแสดง waveform ที่ดีขึ้น */
        int idx = i * BUFFER_SIZE / DISPLAY_POINTS;
        if (idx >= BUFFER_SIZE) idx = BUFFER_SIZE - 1;

        int32_t val = ((int32_t)audio_buffer[idx] + 1000) * 100 / 2000;
        if (val < 0) val = 0;
        if (val > 100) val = 100;
        lv_chart_set_value_by_id(audio_chart, audio_series, i, val);
    }
    lv_chart_refresh(audio_chart);

    /* อัพเดท note label */
    if (note_label) {
        lv_label_set_text_fmt(note_label, "%s = %u Hz",
                              note_names[current_note_idx],
                              (unsigned int)current_note_freq);
    }
}
```

#### 4.3 Event Callbacks

```c
/* Piano key button callback */
static void note_btn_cb(lv_event_t *e)
{
    if (lv_event_get_code(e) != LV_EVENT_CLICKED) return;
    lv_obj_t *btn = lv_event_get_target(e);
    uint32_t idx = (uint32_t)(uintptr_t)lv_obj_get_user_data(btn);

    if (idx < NUM_NOTES) {
        current_note_idx = idx;
        current_note_freq = note_freqs[idx];
        update_waveform_display();

        /* Highlight selected button */
        lv_obj_t *parent = lv_obj_get_parent(btn);
        for (int i = 0; i < (int)lv_obj_get_child_count(parent); i++) {
            lv_obj_t *child = lv_obj_get_child(parent, i);
            lv_obj_set_style_bg_color(child, lv_color_hex(0x333355), 0);
        }
        lv_obj_set_style_bg_color(btn, lv_color_hex(0x00aa66), 0);
    }
}

/* 2nd Harmonic slider callback */
static void harm2_slider_cb(lv_event_t *e)
{
    if (lv_event_get_code(e) != LV_EVENT_VALUE_CHANGED) return;
    lv_obj_t *slider = lv_event_get_target(e);
    int32_t pct = lv_slider_get_value(slider);
    harm2_level = (float)pct / 100.0f;
    lv_label_set_text_fmt(harm2_label, "2nd: %d%%", (int)pct);
    update_waveform_display();
}

/* 3rd Harmonic slider callback */
static void harm3_slider_cb(lv_event_t *e)
{
    if (lv_event_get_code(e) != LV_EVENT_VALUE_CHANGED) return;
    lv_obj_t *slider = lv_event_get_target(e);
    int32_t pct = lv_slider_get_value(slider);
    harm3_level = (float)pct / 100.0f;
    lv_label_set_text_fmt(harm3_label, "3rd: %d%%", (int)pct);
    update_waveform_display();
}
```

#### 4.4 Main Function

```c
void part3_ex3_audio_waveform(void)
{
    lv_obj_t *scr = lv_screen_active();
    lv_obj_set_style_bg_color(scr, lv_color_hex(0x0a0a1e), 0);

    /* ===== Title ===== */
    lv_obj_t *title = lv_label_create(scr);
    lv_label_set_text(title, "Part 3 Ex3: Audio Waveform & Harmonics");
    lv_obj_set_style_text_color(title, lv_color_hex(0x00ff88), 0);
    lv_obj_align(title, LV_ALIGN_TOP_MID, 0, 5);

    /* ===== Waveform Chart ===== */
    audio_chart = lv_chart_create(scr);
    lv_obj_set_size(audio_chart, 400, 130);
    lv_obj_align(audio_chart, LV_ALIGN_TOP_MID, 0, 28);
    lv_chart_set_type(audio_chart, LV_CHART_TYPE_LINE);
    lv_chart_set_point_count(audio_chart, DISPLAY_POINTS);
    lv_chart_set_range(audio_chart, LV_CHART_AXIS_PRIMARY_Y, 0, 100);
    lv_chart_set_div_line_count(audio_chart, 4, 5);

    lv_obj_set_style_bg_color(audio_chart, lv_color_hex(0x001a00), 0);
    lv_obj_set_style_line_color(audio_chart, lv_color_hex(0x003300),
                                LV_PART_MAIN);
    lv_obj_set_style_border_color(audio_chart, lv_color_hex(0x006600), 0);
    lv_obj_set_style_border_width(audio_chart, 1, 0);
    lv_obj_set_style_size(audio_chart, 0, 0, LV_PART_INDICATOR);

    audio_series = lv_chart_add_series(audio_chart,
                       lv_color_hex(0x00ff00), LV_CHART_AXIS_PRIMARY_Y);

    /* ===== Piano Key Buttons ===== */
    /* Container สำหรับปุ่มโน้ต */
    lv_obj_t *key_cont = lv_obj_create(scr);
    lv_obj_set_size(key_cont, 400, 45);
    lv_obj_align(key_cont, LV_ALIGN_CENTER, 0, 20);
    lv_obj_set_style_bg_opa(key_cont, LV_OPA_TRANSP, 0);
    lv_obj_set_style_border_width(key_cont, 0, 0);
    lv_obj_set_style_pad_all(key_cont, 2, 0);
    lv_obj_set_flex_flow(key_cont, LV_FLEX_FLOW_ROW);
    lv_obj_set_flex_align(key_cont, LV_FLEX_ALIGN_SPACE_EVENLY,
                          LV_FLEX_ALIGN_CENTER, LV_FLEX_ALIGN_CENTER);
    lv_obj_remove_flag(key_cont, LV_OBJ_FLAG_SCROLLABLE);

    const char *key_labels[] = {"C", "D", "E", "F", "G", "A", "B"};
    for (int i = 0; i < NUM_NOTES; i++) {
        lv_obj_t *btn = lv_btn_create(key_cont);
        lv_obj_set_size(btn, 48, 35);
        lv_obj_set_style_bg_color(btn, lv_color_hex(0x333355), 0);
        lv_obj_set_style_radius(btn, 4, 0);
        lv_obj_set_user_data(btn, (void*)(uintptr_t)i);
        lv_obj_add_event_cb(btn, note_btn_cb, LV_EVENT_CLICKED, NULL);

        lv_obj_t *lbl = lv_label_create(btn);
        lv_label_set_text(lbl, key_labels[i]);
        lv_obj_center(lbl);

        /* Highlight A4 (default) */
        if (i == 5) {
            lv_obj_set_style_bg_color(btn, lv_color_hex(0x00aa66), 0);
        }
    }

    /* ===== Harmonic Sliders ===== */
    /* 2nd Harmonic */
    lv_obj_t *h2_title = lv_label_create(scr);
    lv_label_set_text(h2_title, "2nd Harm:");
    lv_obj_set_style_text_color(h2_title, lv_color_hex(0xaaaaaa), 0);
    lv_obj_align(h2_title, LV_ALIGN_BOTTOM_LEFT, 10, -45);

    lv_obj_t *h2_slider = lv_slider_create(scr);
    lv_slider_set_range(h2_slider, 0, 100);
    lv_slider_set_value(h2_slider, 0, LV_ANIM_OFF);
    lv_obj_set_width(h2_slider, 160);
    lv_obj_align(h2_slider, LV_ALIGN_BOTTOM_LEFT, 100, -45);
    lv_obj_add_event_cb(h2_slider, harm2_slider_cb,
                        LV_EVENT_VALUE_CHANGED, NULL);

    harm2_label = lv_label_create(scr);
    lv_label_set_text(harm2_label, "2nd: 0%");
    lv_obj_set_style_text_color(harm2_label, lv_color_hex(0xffaa00), 0);
    lv_obj_align(harm2_label, LV_ALIGN_BOTTOM_LEFT, 270, -45);

    /* 3rd Harmonic */
    lv_obj_t *h3_title = lv_label_create(scr);
    lv_label_set_text(h3_title, "3rd Harm:");
    lv_obj_set_style_text_color(h3_title, lv_color_hex(0xaaaaaa), 0);
    lv_obj_align(h3_title, LV_ALIGN_BOTTOM_LEFT, 10, -20);

    lv_obj_t *h3_slider = lv_slider_create(scr);
    lv_slider_set_range(h3_slider, 0, 100);
    lv_slider_set_value(h3_slider, 0, LV_ANIM_OFF);
    lv_obj_set_width(h3_slider, 160);
    lv_obj_align(h3_slider, LV_ALIGN_BOTTOM_LEFT, 100, -20);
    lv_obj_add_event_cb(h3_slider, harm3_slider_cb,
                        LV_EVENT_VALUE_CHANGED, NULL);

    harm3_label = lv_label_create(scr);
    lv_label_set_text(harm3_label, "3rd: 0%");
    lv_obj_set_style_text_color(harm3_label, lv_color_hex(0xff6600), 0);
    lv_obj_align(harm3_label, LV_ALIGN_BOTTOM_LEFT, 270, -20);

    /* ===== Note Info Label ===== */
    note_label = lv_label_create(scr);
    lv_obj_set_style_text_color(note_label, lv_color_hex(0x00ffff), 0);
    lv_obj_set_style_text_font(note_label, &lv_font_montserrat_16, 0);
    lv_obj_align(note_label, LV_ALIGN_BOTTOM_RIGHT, -15, -45);

    /* แสดง waveform แรก (A4 pure sine) */
    update_waveform_display();
}
```

***

### 5. องค์ความรู้และเทคนิค

#### 5.1 Fourier Series - ผลรวมของ Harmonics

```c
/* ทุก Periodic waveform สามารถเขียนเป็น Fourier Series:
 *
 * x(t) = a0/2 + SUM(an*cos(n*w*t) + bn*sin(n*w*t))
 *
 * สำหรับ Square wave (odd harmonics only):
 * x(t) = (4/PI) * [sin(wt) + sin(3wt)/3 + sin(5wt)/5 + ...]
 *
 * สำหรับ Triangle wave:
 * x(t) = (8/PI^2) * [sin(wt) - sin(3wt)/9 + sin(5wt)/25 - ...]
 *
 * สำหรับ Sawtooth wave (all harmonics):
 * x(t) = (2/PI) * [sin(wt) - sin(2wt)/2 + sin(3wt)/3 - ...]
 *
 * ยิ่งเพิ่ม harmonics มากขึ้น waveform ยิ่งเข้าใกล้รูปร่างจริง
 */
```

#### 5.2 Harmonic Distortion ในระบบไฟฟ้า

```c
/* THD (Total Harmonic Distortion):
 *
 * THD% = sqrt(V2^2 + V3^2 + V4^2 + ...) / V1 * 100
 *
 * มาตรฐาน IEEE 519:
 * - THD < 5% สำหรับระบบจ่ายไฟทั่วไป
 * - THD < 3% สำหรับโรงพยาบาล
 *
 * สาเหตุของ Harmonics ในระบบไฟฟ้า:
 * - Rectifier (3rd, 5th, 7th, 11th, 13th)
 * - VFD (Variable Frequency Drive)
 * - LED Driver
 * - Switching Power Supply
 *
 * ผลกระทบ:
 * - สายไฟร้อนเกิน (Neutral conductor)
 * - หม้อแปลงร้อนเกิน (Eddy current loss)
 * - Capacitor bank เสียหาย (Resonance)
 */
```

#### 5.3 Normalization เพื่อป้องกัน Clipping

```c
/* เมื่อรวม harmonics หลายตัว ค่ารวมอาจเกิน int16_t range
 * ต้อง normalize ก่อน scale
 *
 * total_amplitude = |A1| + |A2| + |A3| + ...
 * normalized_val = val / total_amplitude
 *
 * ตัวอย่าง:
 * Fundamental = 1.0, 2nd = 0.5, 3rd = 0.33
 * total = 1.0 + 0.5 + 0.33 = 1.83
 * Max possible = 1.0 (guaranteed not clipping)
 */
float total_amp = 1.0f + fabsf(h2) + fabsf(h3);
val = val / total_amp;  /* Now -1.0 to +1.0 */
```

#### 5.4 Display Stride สำหรับ High Sample Rate

```c
/* เมื่อ sample_rate สูง (44100 Hz) แต่ display_points น้อย (200)
 * ต้องใช้ stride เพื่อแสดงจำนวนรอบที่เหมาะสม
 *
 * BUFFER_SIZE = 512 samples at 44100 Hz = 11.6 ms
 * A4 (440 Hz): 440 * 0.0116 = 5.1 cycles ใน buffer
 *
 * stride = BUFFER_SIZE / DISPLAY_POINTS = 512/200 = 2.56
 * แสดงทุก ~2.5 sample
 */
int idx = i * BUFFER_SIZE / DISPLAY_POINTS;
```

***

### 6. แบบฝึกหัด

#### Exercise 1: Piano Key Display (แสดง Waveform ตามปุ่มกด)

**โจทย์:** ปรับปรุง Piano keys ให้มีฟีเจอร์เพิ่มเติม:

* แสดง Frequency spectrum bar ข้างๆ chart (Fundamental + Harmonics แต่ละตัว)
* เพิ่มโน้ต sharp/flat (#/b) ระหว่างปุ่ม (C#, D#, F#, G#, A#) เป็นปุ่มสีดำ
* เมื่อกดปุ่มโน้ต ให้แสดง period (ms) และ wavelength (m) ด้วย
* Wavelength = speed\_of\_sound / frequency (speed\_of\_sound = 343 m/s ที่ 20C)

**คำใบ้:**

```c
/* Sharp note frequencies */
static const uint32_t sharp_freqs[] = {
    277, 311, 370, 415, 466  /* C#4, D#4, F#4, G#4, A#4 */
};

/* Wavelength calculation */
float wavelength_m = 343.0f / (float)frequency;
lv_label_set_text_fmt(info, "T=%.2f ms  L=%.2f m",
    1000.0/(double)freq, 343.0/(double)freq);
```

#### Exercise 2: AM Modulation (Amplitude Modulation)

**โจทย์:** สร้าง AM Modulation visualization:

* Carrier: sine wave ที่ 1000 Hz (adjustable)
* Modulating signal: sine wave ที่ 50 Hz (adjustable)
* AM formula: `output = (1 + m * mod_signal) * carrier`
* เพิ่ม Slider ปรับ modulation depth (m = 0 to 1)
* แสดง 2 charts: ด้านบน = modulated signal, ด้านล่าง = modulating signal (envelope)
* แสดงค่า Modulation Index (%)

**คำใบ้:**

```c
/* AM Modulation */
for (int i = 0; i < BUFFER_SIZE; i++) {
    double t = (double)i / SAMPLE_RATE;
    double carrier = sin(2.0 * M_PI * carrier_freq * t);
    double modulating = sin(2.0 * M_PI * mod_freq * t);
    double am_signal = (1.0 + mod_depth * modulating) * carrier;
    buf[i] = (int16_t)(am_signal * 500);
}
```

***

### 7. References

* [I2S Audio Interface](https://en.wikipedia.org/wiki/I%C2%B2S)
* [Musical Note Frequencies](https://pages.mtu.edu/~suits/notefreqs.html)

***


# Mic Visualizer

## Lab 4: Microphone Visualizer

### Part 3 - Oscilloscope & Signal Processing

***

### 1. โครงสร้างภาพรวมของ Lab

#### Why? - ทำไมต้องเรียนรู้เรื่องนี้

* **Audio Level Monitoring**: VU Meter เป็นเครื่องมือพื้นฐานในทุกระบบที่เกี่ยวกับเสียง ตั้งแต่สตูดิโอบันทึกเสียงจนถึงระบบ PA ในอาคาร
* **Peak Detection**: การตรวจจับค่า Peak เป็นเทคนิคสำคัญในระบบ Power Systems (surge detection), Audio (clipping prevention) และ Vibration Monitoring
* **Threshold-based Alarming**: ระบบเตือนภัยในโรงงาน (noise level > 85 dBA), ระบบ Power Quality (voltage sag/swell) ใช้หลักการ threshold เดียวกัน
* **Real-time Data Streaming**: Pattern การรับข้อมูลต่อเนื่องจาก sensor แล้วแสดงผลแบบ real-time ใช้ได้กับทุก sensor ไม่เฉพาะ microphone

#### What? - จะได้เรียนรู้อะไร

1. **Simulated Mic Input**: จำลองสัญญาณ PDM Microphone (เพราะ PC Sim ไม่มี mic จริง)
2. **VU Meter Display**: สร้าง Level Meter ด้วย `lv_bar` พร้อมสี gradient
3. **Peak Detection & Hold**: ตรวจจับค่า Peak แล้วค้างไว้ก่อนลดลง
4. **Color Threshold**: Green (safe) / Yellow (warning) / Red (critical)
5. **Clipping Detection**: ตรวจจับเมื่อสัญญาณเกิน threshold

#### How? - จะทำอย่างไร

1. จำลองข้อมูล Microphone ด้วย Sine + Noise (amplitude แปรผัน)
2. สร้าง Waveform chart แสดง signal
3. สร้าง VU Meter Bar แนวตั้ง พร้อมสี zone
4. คำนวณ Peak-to-Peak, RMS, Level % แบบ real-time
5. เพิ่ม Peak Hold indicator และ Clipping warning

<figure><img src="/files/CG1Go1B8spq9uN8u8kAT" alt=""><figcaption></figcaption></figure>

***

### 2. หลักการทำงานและ Flowchart

#### 2.1 PDM Microphone

```
┌─────────────────────────────────────────────────────────────┐
│                   PDM MICROPHONE                            │
├─────────────────────────────────────────────────────────────┤
│                                                             │
│   PDM = Pulse Density Modulation                            │
│                                                             │
│   Sound → PDM Mic → 1-bit stream → Decimation → 16-bit PCM  │
│                                                             │
│   ┌─────┐     ┌──────────┐     ┌───────────┐                │
│   │ Mic │────▶│PDM Data  │────▶│ Decimator │────▶ Samples   │
│   └─────┘     │(1-bit)   │     │ Filter    │     (int16_t)  │
│               └──────────┘     └───────────┘                │
│                                                             │
│   Output: 16-bit signed samples at configured sample rate   │
│                                                             │
└─────────────────────────────────────────────────────────────┘
```

#### 2.2 VU Meter Concept

```
┌─────────────────────────────────────────────────────────────┐
│                     VU METER                                │
├─────────────────────────────────────────────────────────────┤
│                                                             │
│   Peak-to-Peak → Level (%)                                  │
│                                                             │
│   Silent:    Vpp ≈ 0        Level ≈ 0%                      │
│   Quiet:     Vpp ≈ 5000     Level ≈ 8%                      │
│   Normal:    Vpp ≈ 20000    Level ≈ 30%                     │
│   Loud:      Vpp ≈ 50000    Level ≈ 75%                     │
│   Clipping:  Vpp = 65535    Level = 100%                    │
│                                                             │
│   ┌───────────────────────────────────────┐                 │
│   │████████████████░░░░░░░░░░░░░░░░░░░░░░ │  Level: 45%     │
│   └───────────────────────────────────────┘                 │
│                                                             │
└─────────────────────────────────────────────────────────────┘
```

***

### 3. ฟังก์ชันสำคัญ

#### 3.1 Simulated Mic API

<table><thead><tr><th width="251.47161865234375">Function</th><th>Description</th></tr></thead><tbody><tr><td><code>sim_mic_generate()</code></td><td>สร้างสัญญาณจำลอง microphone</td></tr><tr><td><code>calc_peak_to_peak()</code></td><td>คำนวณ Peak-to-Peak</td></tr><tr><td><code>calc_rms()</code></td><td>คำนวณ RMS</td></tr></tbody></table>

#### 3.2 VU Meter Functions

<table><thead><tr><th width="250.9176025390625">Function</th><th>Description</th></tr></thead><tbody><tr><td><code>update_vu_meter()</code></td><td>อัพเดทค่าและสี VU bar</td></tr><tr><td><code>update_peak_hold()</code></td><td>อัพเดท Peak Hold indicator</td></tr><tr><td><code>check_clipping()</code></td><td>ตรวจจับ clipping</td></tr></tbody></table>

***

### 4. Code เต็ม

#### 4.1 Constants and Global Variables

```c
#include "lvgl.h"
#include <math.h>
#include <stdlib.h>

#ifndef M_PI
#define M_PI 3.14159265358979323846
#endif

#define MIC_BUFFER_SIZE     512
#define DISPLAY_POINTS      200
#define MIC_SAMPLE_RATE     22050
#define PEAK_HOLD_TIME_MS   2000
#define PEAK_DECAY_RATE     1
#define CLIP_THRESHOLD      90   /* % level ที่ถือว่า clipping */
#define MAX_AMPLITUDE       32767

/* Global variables */
static int16_t mic_buffer[MIC_BUFFER_SIZE];
static lv_obj_t *mic_chart = NULL;
static lv_chart_series_t *mic_series = NULL;
static lv_obj_t *vu_bar = NULL;
static lv_obj_t *level_label = NULL;
static lv_obj_t *peak_label = NULL;
static lv_obj_t *rms_label = NULL;
static lv_obj_t *clip_warning = NULL;
static lv_timer_t *mic_timer = NULL;

static uint8_t current_level = 0;
static uint8_t peak_level = 0;
static uint32_t peak_timestamp = 0;
static int16_t sim_volume = 15000;  /* Simulated volume */
static uint32_t sim_phase = 0;      /* Phase counter */
```

#### 4.2 Simulated Microphone

```c
/* จำลองสัญญาณ Microphone
 * ใช้ sine wave หลายความถี่ + noise + amplitude variation
 * เพื่อให้ดูเหมือนเสียงจริง
 */
static void sim_mic_generate(int16_t *buf, uint16_t count, int16_t volume)
{
    for (uint16_t i = 0; i < count; i++) {
        double t = (double)(sim_phase + i) / MIC_SAMPLE_RATE;

        /* สร้างสัญญาณจำลองเสียง (หลายความถี่) */
        double val = 0;
        val += 0.5 * sin(2.0 * M_PI * 330 * t);   /* E4 */
        val += 0.3 * sin(2.0 * M_PI * 440 * t);   /* A4 */
        val += 0.2 * sin(2.0 * M_PI * 660 * t);   /* E5 */

        /* Amplitude variation (เหมือนเสียงพูด - ดังเบาสลับ) */
        double envelope = 0.5 + 0.5 * sin(2.0 * M_PI * 3.0 * t);
        val *= envelope;

        /* เพิ่ม random noise */
        int16_t noise = (rand() % 2001) - 1000;  /* +/- 1000 */
        buf[i] = (int16_t)(val * volume) + (noise * volume / 32000);
    }
    sim_phase += count;
}

/* คำนวณ Peak-to-Peak */
static int16_t calc_peak_to_peak(const int16_t *buf, uint16_t count)
{
    int16_t min_val = buf[0];
    int16_t max_val = buf[0];
    for (uint16_t i = 1; i < count; i++) {
        if (buf[i] < min_val) min_val = buf[i];
        if (buf[i] > max_val) max_val = buf[i];
    }
    return max_val - min_val;
}

/* คำนวณ RMS */
static float calc_rms(const int16_t *buf, uint16_t count)
{
    double sum_sq = 0;
    for (uint16_t i = 0; i < count; i++) {
        sum_sq += (double)buf[i] * buf[i];
    }
    return (float)sqrt(sum_sq / count);
}
```

#### 4.3 VU Meter Update Functions

```c
/* อัพเดทสี VU bar ตามระดับ */
static void update_vu_color(uint8_t level)
{
    lv_color_t color;
    if (level <= 60) {
        color = lv_color_hex(0x00cc44);  /* Green */
    } else if (level <= 80) {
        color = lv_color_hex(0xffcc00);  /* Yellow */
    } else {
        color = lv_color_hex(0xff2222);  /* Red */
    }
    lv_obj_set_style_bg_color(vu_bar, color, LV_PART_INDICATOR);
}

/* อัพเดท Peak Hold */
static void update_peak_hold(uint8_t level)
{
    uint32_t now = lv_tick_get();

    if (level > peak_level) {
        peak_level = level;
        peak_timestamp = now;
    }

    /* Decay หลังจาก hold time */
    if (lv_tick_elaps(peak_timestamp) > PEAK_HOLD_TIME_MS) {
        if (peak_level > level + PEAK_DECAY_RATE) {
            peak_level -= PEAK_DECAY_RATE;
        } else {
            peak_level = level;
        }
    }

    if (peak_label) {
        lv_label_set_text_fmt(peak_label, "Peak: %d%%",
                              (int)peak_level);
    }
}

/* ตรวจจับ Clipping */
static void check_clipping(uint8_t level)
{
    if (!clip_warning) return;

    if (level >= CLIP_THRESHOLD) {
        lv_obj_remove_flag(clip_warning, LV_OBJ_FLAG_HIDDEN);
        /* กระพริบสีแดง */
        static bool blink = false;
        blink = !blink;
        lv_obj_set_style_text_color(clip_warning,
            blink ? lv_color_hex(0xff0000) : lv_color_hex(0xff8888), 0);
    } else {
        lv_obj_add_flag(clip_warning, LV_OBJ_FLAG_HIDDEN);
    }
}
```

#### 4.4 Timer Callback

```c
static void mic_timer_cb(lv_timer_t *timer)
{
    (void)timer;

    /* จำลองข้อมูลจาก Microphone */
    sim_mic_generate(mic_buffer, MIC_BUFFER_SIZE, sim_volume);

    /* อัพเดท Waveform chart */
    if (mic_chart && mic_series) {
        for (int i = 0; i < DISPLAY_POINTS; i++) {
            int idx = i * MIC_BUFFER_SIZE / DISPLAY_POINTS;
            /* Map int16_t (-32768..+32767) to 0..100 */
            int32_t val = ((int32_t)mic_buffer[idx] + MAX_AMPLITUDE)
                          * 100 / (2 * MAX_AMPLITUDE);
            if (val < 0) val = 0;
            if (val > 100) val = 100;
            lv_chart_set_value_by_id(mic_chart, mic_series, i, val);
        }
        lv_chart_refresh(mic_chart);
    }

    /* คำนวณ Level */
    int16_t vpp = calc_peak_to_peak(mic_buffer, MIC_BUFFER_SIZE);
    current_level = (uint8_t)((uint32_t)vpp * 100 / (2 * MAX_AMPLITUDE));
    if (current_level > 100) current_level = 100;

    /* คำนวณ RMS */
    float rms = calc_rms(mic_buffer, MIC_BUFFER_SIZE);

    /* อัพเดท VU Meter */
    lv_bar_set_value(vu_bar, current_level, LV_ANIM_ON);
    update_vu_color(current_level);
    update_peak_hold(current_level);
    check_clipping(current_level);

    /* อัพเดท Labels */
    if (level_label) {
        lv_label_set_text_fmt(level_label, "Level: %d%%",
                              (int)current_level);
    }
    if (rms_label) {
        lv_label_set_text_fmt(rms_label, "RMS: %d",
                              (int)rms);
    }
}
```

#### 4.5 Main Function

```c
void part3_ex4_mic_visualizer(void)
{
    lv_obj_t *scr = lv_screen_active();
    lv_obj_set_style_bg_color(scr, lv_color_hex(0x0a0a1e), 0);

    /* ===== Title ===== */
    lv_obj_t *title = lv_label_create(scr);
    lv_label_set_text(title, "Part 3 Ex4: Mic Visualizer");
    lv_obj_set_style_text_color(title, lv_color_hex(0x00ff88), 0);
    lv_obj_align(title, LV_ALIGN_TOP_MID, 0, 5);

    /* ===== Waveform Chart ===== */
    mic_chart = lv_chart_create(scr);
    lv_obj_set_size(mic_chart, 340, 140);
    lv_obj_align(mic_chart, LV_ALIGN_TOP_LEFT, 10, 28);
    lv_chart_set_type(mic_chart, LV_CHART_TYPE_LINE);
    lv_chart_set_point_count(mic_chart, DISPLAY_POINTS);
    lv_chart_set_range(mic_chart, LV_CHART_AXIS_PRIMARY_Y, 0, 100);
    lv_chart_set_div_line_count(mic_chart, 4, 5);

    lv_obj_set_style_bg_color(mic_chart, lv_color_hex(0x001a00), 0);
    lv_obj_set_style_line_color(mic_chart, lv_color_hex(0x003300),
                                LV_PART_MAIN);
    lv_obj_set_style_border_color(mic_chart, lv_color_hex(0x006600), 0);
    lv_obj_set_style_border_width(mic_chart, 1, 0);
    lv_obj_set_style_size(mic_chart, 0, 0, LV_PART_INDICATOR);

    mic_series = lv_chart_add_series(mic_chart,
                     lv_color_hex(0x00ff00), LV_CHART_AXIS_PRIMARY_Y);

    /* ===== VU Meter Bar (แนวตั้ง) ===== */
    vu_bar = lv_bar_create(scr);
    lv_obj_set_size(vu_bar, 35, 140);
    lv_bar_set_range(vu_bar, 0, 100);
    lv_bar_set_value(vu_bar, 0, LV_ANIM_OFF);
    lv_obj_align(vu_bar, LV_ALIGN_TOP_RIGHT, -15, 28);

    /* VU Bar styling */
    lv_obj_set_style_bg_color(vu_bar, lv_color_hex(0x1a1a2e), LV_PART_MAIN);
    lv_obj_set_style_bg_color(vu_bar, lv_color_hex(0x00cc44),
                              LV_PART_INDICATOR);
    lv_obj_set_style_border_color(vu_bar, lv_color_hex(0x444466), 0);
    lv_obj_set_style_border_width(vu_bar, 1, 0);
    lv_obj_set_style_radius(vu_bar, 4, 0);

    /* VU zone labels */
    lv_obj_t *vu_red = lv_label_create(scr);
    lv_label_set_text(vu_red, "R");
    lv_obj_set_style_text_color(vu_red, lv_color_hex(0xff4444), 0);
    lv_obj_align_to(vu_red, vu_bar, LV_ALIGN_OUT_RIGHT_TOP, 5, 10);

    lv_obj_t *vu_yel = lv_label_create(scr);
    lv_label_set_text(vu_yel, "Y");
    lv_obj_set_style_text_color(vu_yel, lv_color_hex(0xffcc00), 0);
    lv_obj_align_to(vu_yel, vu_bar, LV_ALIGN_OUT_RIGHT_MID, 5, -15);

    lv_obj_t *vu_grn = lv_label_create(scr);
    lv_label_set_text(vu_grn, "G");
    lv_obj_set_style_text_color(vu_grn, lv_color_hex(0x00cc44), 0);
    lv_obj_align_to(vu_grn, vu_bar, LV_ALIGN_OUT_RIGHT_BOTTOM, 5, -10);

    /* ===== Info Panel ===== */
    level_label = lv_label_create(scr);
    lv_label_set_text(level_label, "Level: 0%");
    lv_obj_set_style_text_color(level_label, lv_color_hex(0x00ff00), 0);
    lv_obj_align(level_label, LV_ALIGN_BOTTOM_LEFT, 10, -45);

    peak_label = lv_label_create(scr);
    lv_label_set_text(peak_label, "Peak: 0%");
    lv_obj_set_style_text_color(peak_label, lv_color_hex(0xffcc00), 0);
    lv_obj_align(peak_label, LV_ALIGN_BOTTOM_MID, 0, -45);

    rms_label = lv_label_create(scr);
    lv_label_set_text(rms_label, "RMS: 0");
    lv_obj_set_style_text_color(rms_label, lv_color_hex(0x888888), 0);
    lv_obj_align(rms_label, LV_ALIGN_BOTTOM_RIGHT, -10, -45);

    /* ===== Volume Control ===== */
    lv_obj_t *vol_lbl = lv_label_create(scr);
    lv_label_set_text(vol_lbl, "Volume:");
    lv_obj_set_style_text_color(vol_lbl, lv_color_hex(0xaaaaaa), 0);
    lv_obj_align(vol_lbl, LV_ALIGN_BOTTOM_LEFT, 10, -15);

    lv_obj_t *vol_slider = lv_slider_create(scr);
    lv_slider_set_range(vol_slider, 1000, 32000);
    lv_slider_set_value(vol_slider, sim_volume, LV_ANIM_OFF);
    lv_obj_set_width(vol_slider, 180);
    lv_obj_align(vol_slider, LV_ALIGN_BOTTOM_LEFT, 80, -15);
    lv_obj_add_event_cb(vol_slider, volume_slider_cb,
                        LV_EVENT_VALUE_CHANGED, NULL);

    /* ===== Clipping Warning ===== */
    clip_warning = lv_label_create(scr);
    lv_label_set_text(clip_warning, "! CLIP !");
    lv_obj_set_style_text_color(clip_warning, lv_color_hex(0xff0000), 0);
    lv_obj_set_style_text_font(clip_warning, &lv_font_montserrat_16, 0);
    lv_obj_align(clip_warning, LV_ALIGN_BOTTOM_RIGHT, -10, -15);
    lv_obj_add_flag(clip_warning, LV_OBJ_FLAG_HIDDEN);

    /* ===== Timer (50ms for smooth display) ===== */
    mic_timer = lv_timer_create(mic_timer_cb, 50, NULL);
}

/* Volume slider callback */
static void volume_slider_cb(lv_event_t *e)
{
    if (lv_event_get_code(e) != LV_EVENT_VALUE_CHANGED) return;
    lv_obj_t *slider = lv_event_get_target(e);
    sim_volume = (int16_t)lv_slider_get_value(slider);
}
```

***

### 5. องค์ความรู้และเทคนิค

#### 5.1 VU Meter vs Peak Meter

```c
/* VU Meter (Volume Unit):
 * - แสดงค่า average level (ballistic response ~300ms)
 * - ตอบสนองช้ากว่า peak
 * - ใช้ในการตั้งระดับเสียง (mixing console)
 *
 * Peak Meter:
 * - แสดงค่า peak สูงสุดทันที
 * - ตอบสนองเร็ว (< 1ms)
 * - ใช้ป้องกัน clipping (digital audio)
 *
 * ในระบบ Power Systems:
 * - เหมือน RMS Voltmeter vs Peak Voltmeter
 * - RMS ใช้คำนวณพลังงาน
 * - Peak ใช้ตรวจจับ transient/surge
 */
```

#### 5.2 Peak Hold Algorithm

```c
/* Peak Hold Pattern:
 *
 * 1. เก็บค่า peak สูงสุดที่เคยเกิด
 * 2. ค้างค่า peak ไว้ HOLD_TIME (เช่น 2 วินาที)
 * 3. หลังจาก hold time ให้ค่า peak ค่อยๆ ลดลง (decay)
 * 4. ถ้ามีค่าใหม่สูงกว่า ให้อัพเดท peak
 *
 * ใช้ได้กับ: audio level, voltage peak, current peak,
 * vibration peak, temperature peak
 */

/* Decay types: */
/* Linear decay: peak -= constant */
peak_level -= 1;

/* Exponential decay: peak *= factor */
peak_level = peak_level * 95 / 100;  /* 5% decay per update */
```

#### 5.3 Color Gradient for Level

```c
/* เทคนิคเปลี่ยนสีตามระดับ:
 *
 * Discrete zones (ง่าย):
 * Green < 60% < Yellow < 80% < Red
 *
 * Continuous gradient (สวยกว่า):
 * Interpolate RGB ตามค่า level
 */
lv_color_t level_to_color(uint8_t level)
{
    if (level < 60) {
        /* Green to Yellow (interpolate) */
        uint8_t r = (level * 255) / 60;
        return lv_color_make(r, 200, 0);
    } else if (level < 80) {
        /* Yellow to Red */
        uint8_t g = 200 - ((level - 60) * 200 / 20);
        return lv_color_make(255, g, 0);
    } else {
        return lv_color_make(255, 0, 0);  /* Red */
    }
}
```

#### 5.4 Timer Rate vs Responsiveness

```c
/* Timer rate กำหนด responsiveness ของ display:
 *
 * 200ms: อัพเดทช้า, CPU load ต่ำ (เพียงพอสำหรับ temperature)
 * 100ms: พอดี (10 Hz) สำหรับ level meter ทั่วไป
 *  50ms: smooth (20 Hz) สำหรับ audio visualization
 *  33ms: 30 fps สำหรับ waveform display
 *  16ms: 60 fps (max framerate ของ LVGL)
 *
 * Trade-off: ยิ่ง timer เร็ว ยิ่ง smooth แต่ CPU load สูง
 */
#define TIMER_PERIOD_MS  50  /* 20 Hz - ดีสำหรับ audio viz */
```

***

### 6. แบบฝึกหัด

#### Exercise 1: Audio Level Meter with Peak Hold Indicator

**โจทย์:** สร้าง VU Meter แบบมืออาชีพ:

* เพิ่ม Peak Hold indicator เป็นเส้นขีดบาง ๆ บน VU bar (ไม่ใช่แค่ text)
* สร้างเป็น object ขนาดเล็ก (เส้นสีขาว) ที่เลื่อนตำแหน่ง Y ตาม peak\_level
* เพิ่ม dB scale ข้าง VU bar (-40dB, -20dB, -10dB, -6dB, -3dB, 0dB)
* แปลง level% เป็น dB: `dB = 20 * log10(level/100)`

**คำใบ้:**

```c
/* Peak indicator object */
static lv_obj_t *peak_indicator = NULL;
peak_indicator = lv_obj_create(scr);
lv_obj_set_size(peak_indicator, 35, 3);  /* เส้นบาง */
lv_obj_set_style_bg_color(peak_indicator, lv_color_hex(0xffffff), 0);

/* อัพเดทตำแหน่ง Y ตาม peak_level */
int16_t y_offset = 140 - (peak_level * 140 / 100);
lv_obj_align_to(peak_indicator, vu_bar, LV_ALIGN_TOP_LEFT, 0, y_offset);
```

#### Exercise 2: Clipping Detector with History

**โจทย์:** สร้างระบบตรวจจับ Clipping พร้อมประวัติ:

* นับจำนวนครั้งที่เกิด clipping (clip count)
* แสดง clip count บนจอ
* เมื่อ clipping เกิด 3 ครั้งใน 5 วินาที ให้แสดง warning ใหญ่กลางจอ
* เพิ่มปุ่ม Reset เพื่อ clear clip count
* เปลี่ยน border สี chart เป็นสีแดงเมื่อ clipping

**คำใบ้:**

```c
static uint16_t clip_count = 0;
static uint32_t clip_times[10] = {0};  /* Circular buffer */
static uint8_t clip_idx = 0;

void record_clip(void) {
    clip_times[clip_idx] = lv_tick_get();
    clip_idx = (clip_idx + 1) % 10;
    clip_count++;
}

/* นับ clips ใน 5 วินาทีล่าสุด */
int count_recent_clips(uint32_t window_ms) {
    uint32_t now = lv_tick_get();
    int count = 0;
    for (int i = 0; i < 10; i++) {
        if (clip_times[i] > 0 && (now - clip_times[i]) < window_ms) {
            count++;
        }
    }
    return count;
}
```

***

### 7. References

* [PDM Microphones](https://www.analog.com/en/technical-articles/pdm-microphones.html)
* [VU Meter Standards](https://en.wikipedia.org/wiki/VU_meter)

***


# Spectrum Analyzer

## Lab 6: Spectrum Analyzer

### Part 3 - Oscilloscope & Signal Processing

***

### 1. โครงสร้างภาพรวมของ Lab

#### Why? - ทำไมต้องเรียนรู้เรื่องนี้

* **FFT คือหัวใจของ Signal Analysis**: Fast Fourier Transform เปลี่ยนสัญญาณจาก Time Domain ไปเป็น Frequency Domain ช่วยให้เห็น "ส่วนประกอบความถี่" ของสัญญาณ ซึ่งมองไม่เห็นจาก oscilloscope ธรรมดา
* **Power Quality Analysis**: ในระบบไฟฟ้า FFT ใช้วิเคราะห์ Harmonics, THD (Total Harmonic Distortion), Inter-harmonics เพื่อประเมินคุณภาพไฟฟ้าตาม IEEE 519
* **Vibration Monitoring**: ในโรงงาน FFT ใช้ตรวจจับปัญหาเครื่องจักร (bearing fault, imbalance, misalignment) จาก vibration spectrum
* **Smart Energy**: Power meter รุ่นใหม่ใช้ FFT วิเคราะห์กำลังไฟฟ้าแบบ real-time สำหรับ Smart Grid, Energy Audit
* **EE Application**: ออกแบบ Anti-aliasing filter, Power Quality Analyzer, Vibration-based Predictive Maintenance, Audio Equalizer

#### What? - จะได้เรียนรู้อะไร

1. **FFT Concept**: Time Domain to Frequency Domain transformation
2. **Simplified FFT Implementation**: DFT algorithm สำหรับ embedded (ไม่ต้องใช้ library)
3. **Bar Chart Spectrum Display**: แสดง frequency bins ด้วย bar chart
4. **Frequency Resolution & Nyquist**: เข้าใจ bin resolution, maximum frequency
5. **Peak Frequency Detection**: ค้นหาความถี่ที่มีพลังงานสูงสุด
6. **Dual View**: Time domain + Frequency domain แสดงพร้อมกัน

#### How? - จะทำอย่างไร

1. สร้างสัญญาณ test (sine, square, ฯลฯ) ที่เลือกได้
2. คำนวณ FFT (Simplified DFT) ของสัญญาณ
3. แสดง spectrum ด้วย Bar chart (bins สีฟ้า)
4. ค้นหาและแสดง peak frequency
5. เพิ่ม gain control สำหรับปรับ sensitivity
6. สร้าง dual view (waveform + spectrum)

<figure><img src="/files/YmRwDX5554uosnKg5BdE" alt=""><figcaption></figcaption></figure>

***

### 2. หลักการทำงานและ Flowchart

#### 2.1 FFT Concept

```
┌─────────────────────────────────────────────────────────────┐
│                    FFT CONCEPT                              │
├─────────────────────────────────────────────────────────────┤
│                                                             │
│   Time Domain (Waveform)       Frequency Domain (Spectrum)  │
│                                                             │
│      ╭──╮   ╭──╮                      ▓                     │
│     ╱    ╲ ╱    ╲                     ▓                     │
│   ╱       ╲       ╲     FFT          ▓▓                     │
│                        ─────►        ▓▓▓                    │
│   Input: N samples               ▓▓▓▓▓▓▓                    │
│   (e.g., 256)                  ─────────────                │
│                                0   f1  f2  fmax (Hz)        │
│                                                             │
│   Output: N/2 frequency bins                                │
│                                                             │
└─────────────────────────────────────────────────────────────┘
```

#### 2.2 Frequency Bins

```
┌─────────────────────────────────────────────────────────────┐
│                   FREQUENCY BINS                            │
├─────────────────────────────────────────────────────────────┤
│                                                             │
│   FFT Size: 256                                             │
│   Sample Rate: 44100 Hz                                     │
│   Bins: 128 (= 256/2)                                       │
│                                                             │
│   Bin Resolution = Sample Rate / FFT Size                   │
│                  = 44100 / 256 = 172.3 Hz                   │
│                                                             │
│   Bin 0:    0 - 172 Hz    (DC + low freq)                   │
│   Bin 1:  172 - 344 Hz                                      │
│   Bin 2:  344 - 517 Hz                                      │
│   ...                                                       │
│   Bin 127: 21756 - 22050 Hz (Nyquist)                       │
│                                                             │
│   Maximum frequency = Sample Rate / 2 = 22050 Hz            │
│                                                             │
└─────────────────────────────────────────────────────────────┘
```

***

### 3. ฟังก์ชันสำคัญ

#### 3.1 FFT Functions

<table><thead><tr><th width="288.73016357421875">Function</th><th>Description</th></tr></thead><tbody><tr><td><code>simple_dft()</code></td><td>Simplified DFT calculation</td></tr><tr><td><code>find_peak_frequency()</code></td><td>ค้นหา dominant frequency</td></tr><tr><td><code>generate_test_signal()</code></td><td>สร้างสัญญาณทดสอบ</td></tr></tbody></table>

#### 3.2 LVGL Bar Chart Setup

<table><thead><tr><th width="414.08526611328125">Function</th><th>Description</th></tr></thead><tbody><tr><td><code>lv_chart_set_type(chart, LV_CHART_TYPE_BAR)</code></td><td>Bar chart mode</td></tr><tr><td><code>lv_obj_set_style_pad_column(chart, 2, 0)</code></td><td><strong>CRITICAL</strong>: spacing ระหว่าง bar</td></tr></tbody></table>

***

### 4. Code เต็ม

#### 4.1 Constants and Global Variables

```c
#include "lvgl.h"
#include <math.h>
#include <stdlib.h>

#ifndef M_PI
#define M_PI 3.14159265358979323846
#endif

#define FFT_SIZE            256
#define FFT_BINS            (FFT_SIZE / 2)
#define FFT_DISPLAY_BINS    64
#define FFT_SAMPLE_RATE     10000
#define TIME_DISPLAY_PTS    200

typedef enum {
    FFT_WAVE_SINE = 0,
    FFT_WAVE_SQUARE,
    FFT_WAVE_TRIANGLE,
    FFT_WAVE_SAWTOOTH,
    FFT_WAVE_DUAL_SINE,  /* 2 sine waves */
} fft_wave_type_t;

/* Buffers */
static int16_t fft_time_buffer[FFT_SIZE];
static uint16_t fft_mag_buffer[FFT_BINS];

/* UI elements */
static lv_obj_t *time_chart = NULL;
static lv_obj_t *fft_chart = NULL;
static lv_chart_series_t *time_series = NULL;
static lv_chart_series_t *fft_series = NULL;
static lv_obj_t *peak_freq_label = NULL;
static lv_timer_t *fft_timer = NULL;

static fft_wave_type_t fft_wave_type = FFT_WAVE_SINE;
static uint32_t fft_signal_freq = 440;
static uint8_t fft_gain = 50;
```

#### 4.2 Simplified DFT Implementation

```c
/* Simplified DFT - O(N^2) แต่เข้าใจง่าย
 * สำหรับ production ให้ใช้ FFT library (CMSIS-DSP, kiss_fft)
 */
static void simple_dft(const int16_t *input, uint16_t *output,
                        uint16_t N)
{
    uint16_t half_N = N / 2;

    for (uint16_t k = 0; k < half_N; k++) {
        double real_sum = 0;
        double imag_sum = 0;

        for (uint16_t n = 0; n < N; n++) {
            double angle = 2.0 * M_PI * k * n / N;
            real_sum += input[n] * cos(angle);
            imag_sum -= input[n] * sin(angle);
        }

        /* Magnitude = sqrt(real^2 + imag^2) */
        double mag = sqrt(real_sum * real_sum +
                         imag_sum * imag_sum);

        /* Normalize */
        output[k] = (uint16_t)(mag / N * 2);
    }
}

/* ค้นหา Peak frequency (skip DC bin) */
static uint32_t find_peak_frequency(const uint16_t *fft_output,
                                      uint16_t bins,
                                      uint32_t sample_rate)
{
    uint16_t max_val = 0;
    uint16_t max_idx = 1;  /* Skip DC (bin 0) */

    for (uint16_t i = 1; i < bins; i++) {
        if (fft_output[i] > max_val) {
            max_val = fft_output[i];
            max_idx = i;
        }
    }

    /* Convert bin index to frequency */
    float bin_resolution = (float)sample_rate / (bins * 2);
    return (uint32_t)(max_idx * bin_resolution);
}
```

#### 4.3 Signal Generation

```c
static void generate_test_signal(int16_t *buf, uint16_t count,
                                   fft_wave_type_t type, uint32_t freq)
{
    for (uint16_t i = 0; i < count; i++) {
        double t = (double)i / FFT_SAMPLE_RATE;
        double val = 0;

        switch (type) {
            case FFT_WAVE_SINE:
                val = sin(2.0 * M_PI * freq * t);
                break;

            case FFT_WAVE_SQUARE:
                val = (sin(2.0 * M_PI * freq * t) >= 0) ? 1.0 : -1.0;
                break;

            case FFT_WAVE_TRIANGLE: {
                double phase = fmod((double)i * freq / FFT_SAMPLE_RATE, 1.0);
                val = 4.0 * fabs(phase - 0.5) - 1.0;
                break;
            }

            case FFT_WAVE_SAWTOOTH: {
                double phase = fmod((double)i * freq / FFT_SAMPLE_RATE, 1.0);
                val = 2.0 * phase - 1.0;
                break;
            }

            case FFT_WAVE_DUAL_SINE:
                /* 2 sine waves: fundamental + 2.5x frequency */
                val = 0.7 * sin(2.0 * M_PI * freq * t)
                    + 0.5 * sin(2.0 * M_PI * freq * 2.5 * t);
                break;
        }

        /* เพิ่ม noise เล็กน้อย */
        int16_t noise = (rand() % 101) - 50;
        buf[i] = (int16_t)(val * 1000) + noise;
    }
}
```

#### 4.4 Display Update

```c
static void update_fft_display(void)
{
    /* สร้างสัญญาณ */
    generate_test_signal(fft_time_buffer, FFT_SIZE,
                         fft_wave_type, fft_signal_freq);

    /* คำนวณ DFT */
    simple_dft(fft_time_buffer, fft_mag_buffer, FFT_SIZE);

    /* อัพเดท Time Domain chart */
    if (time_chart && time_series) {
        for (int i = 0; i < TIME_DISPLAY_PTS; i++) {
            int idx = i * FFT_SIZE / TIME_DISPLAY_PTS;
            int32_t val = ((int32_t)fft_time_buffer[idx] + 1100) * 100
                          / 2200;
            if (val < 0) val = 0;
            if (val > 100) val = 100;
            lv_chart_set_value_by_id(time_chart, time_series, i, val);
        }
        lv_chart_refresh(time_chart);
    }

    /* หาค่า max สำหรับ normalization (skip DC) */
    uint16_t fft_max = 1;
    for (int i = 1; i < FFT_BINS; i++) {
        if (fft_mag_buffer[i] > fft_max) fft_max = fft_mag_buffer[i];
    }

    /* อัพเดท FFT Bar chart */
    if (fft_chart && fft_series) {
        for (int i = 0; i < FFT_DISPLAY_BINS; i++) {
            int idx = i * FFT_BINS / FFT_DISPLAY_BINS;
            int32_t val = (int32_t)fft_mag_buffer[idx] * 100
                          * fft_gain / (fft_max * 50);
            if (val > 100) val = 100;
            if (val < 0) val = 0;
            lv_chart_set_value_by_id(fft_chart, fft_series, i, val);
        }
        lv_chart_refresh(fft_chart);
    }

    /* Peak frequency */
    uint32_t peak = find_peak_frequency(fft_mag_buffer, FFT_BINS,
                                         FFT_SAMPLE_RATE);
    if (peak_freq_label) {
        lv_label_set_text_fmt(peak_freq_label, "Peak: %u Hz",
                              (unsigned int)peak);
    }
}
```

#### 4.5 Callbacks

```c
static void fft_wave_cb(lv_event_t *e)
{
    if (lv_event_get_code(e) != LV_EVENT_VALUE_CHANGED) return;
    lv_obj_t *dd = lv_event_get_target(e);
    fft_wave_type = (fft_wave_type_t)lv_dropdown_get_selected(dd);
    update_fft_display();
}

static void fft_gain_cb(lv_event_t *e)
{
    if (lv_event_get_code(e) != LV_EVENT_VALUE_CHANGED) return;
    lv_obj_t *slider = lv_event_get_target(e);
    fft_gain = (uint8_t)lv_slider_get_value(slider);
}

static void fft_timer_cb(lv_timer_t *timer)
{
    (void)timer;
    update_fft_display();
}
```

#### 4.6 Main Function

```c
void part3_ex6_spectrum_analyzer(void)
{
    lv_obj_t *scr = lv_screen_active();
    lv_obj_set_style_bg_color(scr, lv_color_hex(0x0a0a1e), 0);

    /* ===== Title Row ===== */
    lv_obj_t *title = lv_label_create(scr);
    lv_label_set_text(title, "Part 3 Ex6: Spectrum Analyzer");
    lv_obj_set_style_text_color(title, lv_color_hex(0xff6600), 0);
    lv_obj_align(title, LV_ALIGN_TOP_LEFT, 10, 3);

    /* Peak frequency label */
    peak_freq_label = lv_label_create(scr);
    lv_label_set_text(peak_freq_label, "Peak: -- Hz");
    lv_obj_set_style_text_color(peak_freq_label,
                                lv_color_hex(0xffff00), 0);
    lv_obj_align(peak_freq_label, LV_ALIGN_TOP_RIGHT, -10, 3);

    /* ===== Wave Type Dropdown ===== */
    lv_obj_t *wave_dd = lv_dropdown_create(scr);
    lv_dropdown_set_options(wave_dd,
        "Sine\nSquare\nTriangle\nSawtooth\nDual Sine");
    lv_dropdown_set_selected(wave_dd, 0);
    lv_obj_set_width(wave_dd, 110);
    lv_obj_align(wave_dd, LV_ALIGN_TOP_LEFT, 10, 22);
    lv_obj_add_event_cb(wave_dd, fft_wave_cb,
                        LV_EVENT_VALUE_CHANGED, NULL);

    /* Gain slider */
    lv_obj_t *gain_lbl = lv_label_create(scr);
    lv_label_set_text(gain_lbl, "Gain:");
    lv_obj_set_style_text_color(gain_lbl, lv_color_hex(0x00ffff), 0);
    lv_obj_align(gain_lbl, LV_ALIGN_TOP_LEFT, 140, 28);

    lv_obj_t *gain_slider = lv_slider_create(scr);
    lv_slider_set_range(gain_slider, 10, 100);
    lv_slider_set_value(gain_slider, 50, LV_ANIM_OFF);
    lv_obj_set_width(gain_slider, 120);
    lv_obj_align(gain_slider, LV_ALIGN_TOP_LEFT, 185, 28);
    lv_obj_add_event_cb(gain_slider, fft_gain_cb,
                        LV_EVENT_VALUE_CHANGED, NULL);

    /* ===== Time Domain Chart (ด้านบน) ===== */
    time_chart = lv_chart_create(scr);
    lv_obj_set_size(time_chart, 440, 90);
    lv_obj_align(time_chart, LV_ALIGN_TOP_MID, 0, 50);
    lv_chart_set_type(time_chart, LV_CHART_TYPE_LINE);
    lv_chart_set_point_count(time_chart, TIME_DISPLAY_PTS);
    lv_chart_set_range(time_chart, LV_CHART_AXIS_PRIMARY_Y, 0, 100);
    lv_chart_set_div_line_count(time_chart, 2, 5);

    lv_obj_set_style_bg_color(time_chart, lv_color_hex(0x001a00), 0);
    lv_obj_set_style_line_color(time_chart, lv_color_hex(0x002200),
                                LV_PART_MAIN);
    lv_obj_set_style_border_color(time_chart, lv_color_hex(0x004400), 0);
    lv_obj_set_style_border_width(time_chart, 1, 0);
    lv_obj_set_style_size(time_chart, 0, 0, LV_PART_INDICATOR);

    time_series = lv_chart_add_series(time_chart,
                      lv_color_hex(0x00ff00), LV_CHART_AXIS_PRIMARY_Y);

    /* ===== FFT Bar Chart (ด้านล่าง) ===== */
    fft_chart = lv_chart_create(scr);
    lv_obj_set_size(fft_chart, 440, 110);
    lv_obj_align(fft_chart, LV_ALIGN_BOTTOM_MID, 0, -22);
    lv_chart_set_type(fft_chart, LV_CHART_TYPE_BAR);
    lv_chart_set_point_count(fft_chart, FFT_DISPLAY_BINS);
    lv_chart_set_range(fft_chart, LV_CHART_AXIS_PRIMARY_Y, 0, 100);
    lv_chart_set_div_line_count(fft_chart, 4, 5);

    /* CRITICAL: Bar spacing */
    lv_obj_set_style_pad_column(fft_chart, 2, 0);

    /* Cyan theme */
    lv_obj_set_style_bg_color(fft_chart, lv_color_hex(0x001a1a), 0);
    lv_obj_set_style_line_color(fft_chart, lv_color_hex(0x003333),
                                LV_PART_MAIN);
    lv_obj_set_style_border_color(fft_chart, lv_color_hex(0x006666), 0);
    lv_obj_set_style_border_width(fft_chart, 1, 0);

    fft_series = lv_chart_add_series(fft_chart,
                     lv_color_hex(0x00ffff), LV_CHART_AXIS_PRIMARY_Y);

    /* Initialize bars to 0 */
    for (int i = 0; i < FFT_DISPLAY_BINS; i++) {
        lv_chart_set_value_by_id(fft_chart, fft_series, i, 0);
    }

    /* Frequency scale labels */
    lv_obj_t *f0 = lv_label_create(scr);
    lv_label_set_text(f0, "0 Hz");
    lv_obj_set_style_text_color(f0, lv_color_hex(0x666666), 0);
    lv_obj_align(f0, LV_ALIGN_BOTTOM_LEFT, 15, -5);

    lv_obj_t *fmax = lv_label_create(scr);
    lv_label_set_text_fmt(fmax, "%u Hz",
                          (unsigned int)(FFT_SAMPLE_RATE / 2));
    lv_obj_set_style_text_color(fmax, lv_color_hex(0x666666), 0);
    lv_obj_align(fmax, LV_ALIGN_BOTTOM_RIGHT, -15, -5);

    /* ===== Timer ===== */
    fft_timer = lv_timer_create(fft_timer_cb, 200, NULL);

    /* แสดงผลครั้งแรก */
    update_fft_display();
}
```

***

### 5. องค์ความรู้และเทคนิค

#### 5.1 CRITICAL: Bar Chart Spacing

```c
/* ถ้าไม่ใส่ pad_column, bars จะรวมเป็นก้อนเดียว (solid block)!
 *
 * WRONG:
 * lv_chart_set_type(chart, LV_CHART_TYPE_BAR);
 * // ไม่มี pad_column -> solid block
 *
 * CORRECT:
 * lv_chart_set_type(chart, LV_CHART_TYPE_BAR);
 * lv_obj_set_style_pad_column(chart, 2, 0);  // 2px spacing
 *
 * ค่า pad_column ที่แนะนำ:
 * - 1px: bars แน่นมาก (สำหรับ 128+ bins)
 * - 2px: spacing ปกติ (สำหรับ 64 bins)
 * - 3-4px: spacing กว้าง (สำหรับ 32 bins หรือน้อยกว่า)
 */
```

#### 5.2 Windowing Functions (สำหรับปรับปรุง FFT)

```c
/* Window function ลด "spectral leakage" ทำให้ FFT แม่นยำขึ้น
 *
 * Rectangular (ไม่มี window): leakage สูง แต่ resolution ดี
 * Hanning: ลด leakage ดี compromise ที่นิยมใช้
 * Hamming: คล้าย Hanning แต่ sidelobe ต่ำกว่า
 *
 * Hanning window:
 * w[n] = 0.5 * (1 - cos(2*PI*n/(N-1)))
 */
static void apply_hanning(int16_t *buf, uint16_t N)
{
    for (uint16_t i = 0; i < N; i++) {
        double w = 0.5 * (1.0 - cos(2.0 * M_PI * i / (N - 1)));
        buf[i] = (int16_t)(buf[i] * w);
    }
}
```

#### 5.3 Spectrum Characteristics ของ Waveform แต่ละชนิด

```c
/* Spectrum ของ waveform แต่ละชนิดมีลักษณะเฉพาะ:
 *
 * Sine Wave:
 * - 1 peak ที่ fundamental frequency
 * - No harmonics (pure tone)
 *
 * Square Wave:
 * - Peaks ที่ odd harmonics (1st, 3rd, 5th, 7th, ...)
 * - Amplitude ลดลงเป็น 1/n
 * - Rich harmonic content
 *
 * Triangle Wave:
 * - Peaks ที่ odd harmonics เหมือน square
 * - แต่ amplitude ลดลงเป็น 1/n^2 (เร็วกว่า)
 * - Harmonics น้อยกว่า square wave
 *
 * Sawtooth Wave:
 * - Peaks ที่ ทุก harmonic (odd + even)
 * - Amplitude ลดลงเป็น 1/n
 * - Richest harmonic content
 *
 * ใช้ Spectrum Analyzer ยืนยัน Fourier Series ได้!
 */
```

#### 5.4 DFT vs FFT Performance

```c
/* DFT (Discrete Fourier Transform):
 * - O(N^2) complexity
 * - N=256: 65,536 operations
 * - ง่ายในการ implement
 * - เหมาะสำหรับการเรียนรู้
 *
 * FFT (Fast Fourier Transform):
 * - O(N*log2(N)) complexity
 * - N=256: 256 * 8 = 2,048 operations (32x เร็วกว่า!)
 * - ต้องใช้ library (CMSIS-DSP, kiss_fft)
 * - N ต้องเป็น power of 2
 *
 * สำหรับ PSoC Edge:
 * - CM55 มี DSP instructions สำหรับ FFT
 * - ใช้ CMSIS-DSP arm_rfft_q15() หรือ arm_rfft_f32()
 * - Real-time FFT ได้ง่ายสำหรับ N <= 1024
 */
```

***

### 6. แบบฝึกหัด

#### Exercise 1: Spectrum Display with Peak Marker

**โจทย์:** เพิ่ม Peak marker และ frequency label บน FFT chart:

* วาดเส้นแนวตั้ง (หรือ marker) ที่ตำแหน่ง peak frequency
* แสดง frequency label ที่จุด peak
* เพิ่ม "2nd Peak" detection (ความถี่ที่มีพลังงานสูงเป็นอันดับ 2)
* แสดง power ratio ระหว่าง 1st peak กับ 2nd peak

#### Exercise 2: Dual View Synchronized

**โจทย์:** สร้าง Time + Frequency dual view ที่ synchronized:

* Time domain chart (บน) แสดง waveform
* Frequency domain chart (ล่าง) แสดง spectrum
* เพิ่ม Slider ปรับ frequency (100-2000 Hz)
* เมื่อปรับ frequency ทั้ง 2 charts อัพเดทพร้อมกัน
* แสดง bin number และ frequency ของ peak
* ประยุกต์ใช้: Power Quality Analysis - สังเกต harmonics เมื่อเปลี่ยนจาก sine เป็น square

***

### 7. References

* [FFT Explained](https://www.youtube.com/watch?v=spUNpyF58BY)
* [ARM CMSIS-DSP FFT](https://arm-software.github.io/CMSIS_5/DSP/html/group__RealFFT.html)
* [Window Functions](https://en.wikipedia.org/wiki/Window_function)

***


# Real-time Spectrum Analyzer

## Lab 7: Spectrum Analyzer in Action

### Part 3 - Oscilloscope & Signal Processing

### 1. โครงสร้างภาพรวมของ Lab

#### Why? - ทำไมต้องเรียนรู้เรื่องนี้

* **Hardware-in-the-Loop**: การเชื่อมต่อ UI กับ Hardware จริงเป็นทักษะสำคัญที่สุดของ Embedded Engineer ระบบ SCADA, HMI, และ Industrial Controller ล้วนต้อง map ข้อมูลจาก sensor ไปยัง parameter ของระบบ และแสดงผลแบบ real-time
* **ADC-to-Parameter Mapping**: ในระบบจริง เราต้องแปลงค่า ADC (0-100%) ไปเป็นพารามิเตอร์ที่มีความหมาย เช่น ความถี่ (100-5000 Hz), Duty Cycle (10-90%), Temperature Setpoint เป็นต้น ทักษะนี้ใช้ในทุกระบบ Control
* **Phase Accumulator**: เป็น pattern พื้นฐานของ Direct Digital Synthesis (DDS) ที่ใช้ในการสร้างสัญญาณดิจิทัล, PWM Controller, Motor Drive, และ Audio Synthesizer
* **Read-Only UI Sync**: การแสดง slider ที่ sync กับค่าจาก hardware input โดยไม่ให้ผู้ใช้แก้ไขผ่าน UI เป็น pattern ที่ใช้บ่อยในระบบ monitoring
* **EE Application**: Function Generator ที่ควบคุมด้วย POTEN + แสดงผลบน LED PWM เป็นพื้นฐานของ Signal Generator, Motor Speed Controller, Dimmer, Power Supply Regulation

#### What? - จะได้เรียนรู้อะไร

1. **Hardware ADC Integration**: อ่านค่า Potentiometer ผ่าน `aic_adc_read_percent()` แบบ real-time
2. **Parameter Mapping**: แปลง ADC 0-100% เป็น Frequency (100-5000 Hz) และ Duty Cycle (10-90%)
3. **Phase Accumulator**: สร้าง waveform output ไปยัง LED ด้วย phase accumulator pattern
4. **PWM LED Control**: ส่งค่า brightness (0-100%) ไปยัง LED3 Blue ผ่าน `aic_gpio_pwm_set_brightness()`
5. **Read-Only Slider**: ทำ slider ให้แสดงค่าจาก hardware โดยไม่รับ touch input
6. **3-Panel Navigation**: Custom panel (Scope/Gen/FFT) แทน TabView เพื่อพื้นที่ chart สูงสุด
7. **Real-Time Signal Processing**: FFT analysis ที่ใช้ค่าความถี่จาก POTEN จริง

#### How? - จะทำอย่างไร

1. Initialize hardware: `aic_scope_init()`, `aic_fft_init()`, `aic_gpio_init()`, `aic_gpio_pwm_init()`, `aic_sensors_init()`
2. สร้าง 3 panels (Scope/Gen/FFT) พร้อม navigation bar ด้านซ้าย
3. ใน timer callback (33ms) อ่านค่า POTEN และ map เป็น parameter ตาม active panel
4. Scope Tab: POTEN ควบคุม frequency, แสดง waveform + measurements
5. Gen Tab: POTEN ควบคุม duty cycle, output switch เปิด/ปิด LED3 PWM
6. FFT Tab: วิเคราะห์ spectrum ของ waveform ที่ POTEN กำหนดความถี่

<figure><img src="/files/eMO3009b0WNmQ5djTu6N" alt=""><figcaption></figcaption></figure>

***

### 2. หลักการทำงานและ Flowchart

#### 2.1 Hardware Connection Diagram

```
┌─────────────────────────────────────────────────────────────────┐
│         PSoC Edge E84 - HARDWARE CONNECTIONS                    │
├─────────────────────────────────────────────────────────────────┤
│                                                                 │
│   POTEN: 3.3V --[10K POT]-- ADC CH0 -- GND                      │
│   API: aic_adc_read_percent(AIC_ADC_CH0) -> 0-100%              │
│                                                                 │
│   LED3:  P16_5 --[R 330]-- LED3 (Blue) -- GND                   │
│   API: aic_gpio_pwm_set_brightness(AIC_LED_BLUE, 0-100)         │
│                                                                 │
│   ┌──────────┐     ┌─────────────┐     ┌──────────────┐         │
│   │  POTEN   │────>│  CM55 Core  │────>│  LED3 (Blue) │         │
│   │ ADC CH0  │     │  LVGL + PWM │     │  PWM P16_5   │         │
│   └──────────┘     └─────────────┘     └──────────────┘         │
│      Input          Processing           Output                 │
│                                                                 │
└─────────────────────────────────────────────────────────────────┘
```

***

### 3. ฟังก์ชันสำคัญ

#### 3.1 Hardware APIs

<table><thead><tr><th width="419.671142578125">Function</th><th>Description</th></tr></thead><tbody><tr><td><code>aic_gpio_init()</code></td><td>Initialize GPIO subsystem</td></tr><tr><td><code>aic_gpio_pwm_init(AIC_LED_BLUE)</code></td><td>Initialize PWM on LED3 Blue (P16_5)</td></tr><tr><td><code>aic_sensors_init()</code></td><td>Initialize sensor/ADC subsystem</td></tr><tr><td><code>aic_adc_read_percent(AIC_ADC_CH0)</code></td><td>Read potentiometer value (0-100%)</td></tr><tr><td><code>aic_gpio_pwm_set_brightness(AIC_LED_BLUE, pct)</code></td><td>Set LED3 brightness (0-100%)</td></tr><tr><td><code>aic_gpio_pwm_get_brightness(AIC_LED_BLUE)</code></td><td>Get current LED3 brightness</td></tr></tbody></table>

#### 3.2 Scope APIs

<table><thead><tr><th width="421.610107421875">Function</th><th>Description</th></tr></thead><tbody><tr><td><code>aic_scope_init()</code></td><td>Initialize scope subsystem</td></tr><tr><td><code>aic_fft_init(256)</code></td><td>Initialize FFT with 256-point size</td></tr><tr><td><code>aic_scope_generate_wave(buf, count, &#x26;config)</code></td><td>Generate waveform samples</td></tr><tr><td><code>aic_fft_calculate(input, output)</code></td><td>Calculate FFT spectrum</td></tr><tr><td><code>aic_fft_dominant_frequency(fft, bins, Fs)</code></td><td>Find peak frequency from FFT</td></tr><tr><td><code>aic_signal_peak_to_peak(buf, count)</code></td><td>Calculate Vpp (raw)</td></tr><tr><td><code>aic_signal_rms(buf, count)</code></td><td>Calculate RMS (raw)</td></tr></tbody></table>

#### 3.3 LVGL Read-Only Slider Pattern

<table><thead><tr><th width="202.7073974609375">Technique</th><th>Code</th></tr></thead><tbody><tr><td>Remove clickable flag</td><td><code>lv_obj_remove_flag(slider, LV_OBJ_FLAG_CLICKABLE)</code></td></tr><tr><td>Set value from code</td><td><code>lv_slider_set_value(slider, val, LV_ANIM_OFF)</code></td></tr><tr><td>Purpose</td><td>Slider reflects hardware input, user cannot drag</td></tr></tbody></table>

***

### 4. Code เต็ม

#### 4.1 Constants and Configuration

```c
#include "part3_hw_scope_example.h"
#include "part3_examples.h"
#include "../aic-eec/aic-eec.h"
#include "../aic-eec/scope.h"
#include "../aic-eec/gpio.h"
#include "../aic-eec/sensors.h"
#include <stdio.h>
#include <string.h>
#include <math.h>

/*******************************************************************************
 * Configuration
 ******************************************************************************/

#define HW_SCOPE_CHART_POINTS      200

/* Widget sizes - touch-friendly */
#define HW_DROPDOWN_WIDTH          110
#define HW_DROPDOWN_HEIGHT         35
#define HW_SLIDER_WIDTH            140
#define HW_SLIDER_HEIGHT           25
#define HW_SLIDER_EXT_CLICK        15
#define HW_SWITCH_WIDTH            55
#define HW_SWITCH_HEIGHT           28
#define HW_BUTTON_WIDTH            60
#define HW_BUTTON_HEIGHT           32
#define HW_LED_SIZE                20

#define HW_FFT_SIZE                256
#define HW_FFT_BINS                (HW_FFT_SIZE / 2)
#define HW_FFT_CHART_BINS          64

#define HW_SAMPLE_RATE             48000
#define HW_GEN_SAMPLE_RATE         10000
#define HW_DEFAULT_FREQUENCY       1000
#define HW_DEFAULT_AMPLITUDE       16000

#define HW_SCOPE_UPDATE_MS         33      /* 30 FPS */

/* Frequency range for POTEN control in Scope Tab */
#define HW_MIN_FREQUENCY           100
#define HW_MAX_FREQUENCY           5000

/* PWM frequency for LED output (fixed) */
#define HW_LED_PWM_FREQUENCY       1000
```

#### 4.2 Global Variables (สรุปสำคัญ)

```c
/* Panel navigation */
static lv_obj_t *hw_nav_btns[3], *hw_panels[3];
static uint8_t hw_active_panel = 0;

/* Scope panel: chart + controls + measurements + POTEN label */
static lv_obj_t *hw_scope_chart, *hw_scope_freq_slider;
static lv_obj_t *hw_scope_pot_label;   /* "POT: XX%" */

/* Gen panel: chart + duty slider + output switch + LED status */
static lv_obj_t *hw_gen_chart, *hw_gen_duty_slider, *hw_gen_switch;
static lv_obj_t *hw_gen_pot_label;     /* "POT: XX% -> Duty: XX%" */
static lv_obj_t *hw_gen_led_status;    /* "LED3: OFF/XX%" */

/* FFT panel: bar chart + gain slider + peak label */
static lv_obj_t *hw_fft_chart, *hw_fft_gain_slider;

/* State */
static aic_wave_type_t hw_wave_type = AIC_WAVE_SINE;
static uint32_t hw_frequency = HW_DEFAULT_FREQUENCY;
static uint8_t hw_duty = 50;
static bool hw_is_running = true;
static bool hw_gen_output_enabled = false;

/* Phase accumulator for LED PWM output */
static uint32_t hw_led_phase = 0;
static uint32_t hw_led_phase_inc = 0;

/* Buffers */
static int16_t hw_waveform_buffer[HW_SCOPE_CHART_POINTS];
static uint16_t hw_fft_output[HW_FFT_BINS];

/* (ดู source code เต็มใน part3_hw_scope_example.c สำหรับ variables ทั้งหมด) */
```

#### 4.3 LED PWM Output - Phase Accumulator

```c
/*******************************************************************************
 * LED PWM Output Control
 *
 * Generates waveform output to LED3 based on Gen Tab settings.
 * Uses phase accumulator for smooth waveform generation.
 *
 * Phase Accumulator Pattern:
 *   phase += increment     (increment = freq * 65536 / tick_rate)
 *   phase wraps at 65536   (16-bit resolution)
 *   Convert phase -> brightness based on waveform type
 ******************************************************************************/
static void hw_update_led_output(void)
{
    if (!hw_gen_output_enabled) {
        aic_gpio_pwm_set_brightness(AIC_LED_BLUE, 0);
        return;
    }

    /* Calculate phase increment based on generator frequency */
    /* Phase wraps at 65536 for smooth output */
    hw_led_phase_inc = (hw_gen_frequency * 65536) /
                       (1000 / HW_SCOPE_UPDATE_MS);
    hw_led_phase += hw_led_phase_inc;

    /* Convert phase (0-65535) to brightness (0-100%) */
    uint8_t brightness = 0;

    switch (hw_wave_type) {
        case AIC_WAVE_SQUARE: {
            /* Square wave with duty cycle threshold */
            uint32_t duty_threshold = (uint32_t)hw_duty * 65536 / 100;
            uint16_t phase_16 = hw_led_phase & 0xFFFF;
            brightness = (phase_16 < duty_threshold) ? 100 : 0;
            break;
        }

        case AIC_WAVE_SINE: {
            /* Sine wave: sinf() lookup for smooth LED dimming */
            float phase_rad = (float)(hw_led_phase & 0xFFFF)
                              / 65536.0f * 2.0f * 3.14159f;
            float sine_val = sinf(phase_rad);
            brightness = (uint8_t)((sine_val + 1.0f) * 50.0f);
            break;
        }

        case AIC_WAVE_TRIANGLE: {
            /* Triangle wave: linear ramp up then down */
            uint16_t phase_16 = hw_led_phase & 0xFFFF;
            if (phase_16 < 32768) {
                brightness = (uint8_t)(phase_16 * 100 / 32768);
            } else {
                brightness = (uint8_t)((65535 - phase_16) * 100 / 32768);
            }
            break;
        }

        case AIC_WAVE_SAWTOOTH: {
            /* Sawtooth wave: linear ramp up then reset */
            uint16_t phase_16 = hw_led_phase & 0xFFFF;
            brightness = (uint8_t)(phase_16 * 100 / 65535);
            break;
        }

        default:
            brightness = 50;  /* Default 50% */
            break;
    }

    aic_gpio_pwm_set_brightness(AIC_LED_BLUE, brightness);
}
```

#### 4.4 Timer Callback - Hardware Input Processing

```c
static void hw_timer_cb(lv_timer_t *timer)
{
    (void)timer;

    /* Touch Keep-Alive: ป้องกัน touch controller หลับ */
    static uint32_t touch_keepalive_cnt = 0;
    if (++touch_keepalive_cnt >= 30) {
        touch_keepalive_cnt = 0;
        lv_indev_t *indev = lv_indev_get_next(NULL);
        while (indev) {
            if (lv_indev_get_type(indev) == LV_INDEV_TYPE_POINTER) {
                lv_indev_reset(indev, NULL);
                break;
            }
            indev = lv_indev_get_next(indev);
        }
    }

    /* Read POTEN value (0-100%) */
    uint8_t pot_percent = aic_adc_read_percent(AIC_ADC_CH0);

    /* Update based on active panel */
    if (hw_active_panel == 0) {
        /*===============================================================
         * SCOPE PANEL - POTEN controls FREQUENCY
         *=============================================================*/
        if (hw_is_running && hw_scope_chart && hw_scope_series) {
            /* Map POTEN (0-100%) to frequency (100-5000 Hz) */
            uint32_t freq_range = HW_MAX_FREQUENCY - HW_MIN_FREQUENCY;
            hw_frequency = HW_MIN_FREQUENCY +
                           (pot_percent * freq_range / 100);

            /* Update frequency display */
            if (hw_scope_freq_label) {
                if (hw_frequency >= 1000) {
                    lv_label_set_text_fmt(hw_scope_freq_label,
                        "%.1fkHz", (double)hw_frequency / 1000.0);
                } else {
                    lv_label_set_text_fmt(hw_scope_freq_label,
                        "%uHz", (unsigned int)hw_frequency);
                }
            }

            /* Update slider to match POTEN (read-only) */
            if (hw_scope_freq_slider) {
                int32_t slider_val =
                    (int32_t)sqrtf((float)(hw_frequency - 100));
                if (slider_val > 100) slider_val = 100;
                lv_slider_set_value(hw_scope_freq_slider,
                                    slider_val, LV_ANIM_OFF);
            }

            /* Show POTEN percentage */
            if (hw_scope_pot_label) {
                lv_label_set_text_fmt(hw_scope_pot_label,
                    "POT: %u%%", (unsigned int)pot_percent);
            }

            /* Generate waveform with current settings */
            aic_wavegen_config_t config = {
                .type = hw_wave_type,
                .frequency_hz = hw_frequency,
                .sample_rate_hz = HW_SAMPLE_RATE,
                .amplitude = hw_amplitude,
                .dc_offset = 0,
                .duty_percent = hw_duty
            };

            aic_scope_generate_wave(hw_waveform_buffer,
                                    HW_SCOPE_CHART_POINTS, &config);

            for (int i = 0; i < HW_SCOPE_CHART_POINTS; i++) {
                int32_t scaled = 50 +
                    (hw_waveform_buffer[i] * 40) / 32767;
                lv_chart_set_value_by_id(hw_scope_chart,
                    hw_scope_series, i, scaled);
            }
            lv_chart_refresh(hw_scope_chart);

            /* Update measurements */
            int32_t p2p = aic_signal_peak_to_peak(
                hw_waveform_buffer, HW_SCOPE_CHART_POINTS);
            float vpp = (float)p2p / 32767.0f * 3.3f;
            int16_t rms_raw = aic_signal_rms(
                hw_waveform_buffer, HW_SCOPE_CHART_POINTS);
            float rms = (float)rms_raw / 32767.0f * 3.3f;

            if (hw_scope_vpp_label) {
                lv_label_set_text_fmt(hw_scope_vpp_label,
                    "Vpp: %.2fV", (double)vpp);
            }
            if (hw_scope_freq_meas_label) {
                lv_label_set_text_fmt(hw_scope_freq_meas_label,
                    "Freq: %uHz", (unsigned int)hw_frequency);
            }
            if (hw_scope_rms_label) {
                lv_label_set_text_fmt(hw_scope_rms_label,
                    "RMS: %.2fV", (double)rms);
            }
        }
    }
    else if (hw_active_panel == 1) {
        /*===============================================================
         * GENERATOR PANEL - POTEN controls DUTY CYCLE
         *=============================================================*/
        if (hw_gen_chart && hw_gen_series) {
            /* Map POTEN (0-100%) to Duty Cycle (10-90%) */
            hw_duty = 10 + (pot_percent * 80 / 100);
            if (hw_duty < 10) hw_duty = 10;
            if (hw_duty > 90) hw_duty = 90;

            /* Update duty slider to match POTEN */
            if (hw_gen_duty_slider) {
                lv_slider_set_value(hw_gen_duty_slider,
                                    hw_duty, LV_ANIM_OFF);
            }

            /* Update duty label */
            if (hw_gen_duty_label) {
                lv_label_set_text_fmt(hw_gen_duty_label,
                    "%u%%", (unsigned int)hw_duty);
            }

            /* Show POTEN->Duty mapping */
            if (hw_gen_pot_label) {
                lv_label_set_text_fmt(hw_gen_pot_label,
                    "POT: %u%% -> Duty: %u%%",
                    (unsigned int)pot_percent,
                    (unsigned int)hw_duty);
            }

            /* Generate waveform preview */
            aic_wavegen_config_t config = {
                .type = hw_wave_type,
                .frequency_hz = hw_gen_frequency,
                .sample_rate_hz = HW_GEN_SAMPLE_RATE,
                .amplitude = hw_amplitude,
                .dc_offset = 0,
                .duty_percent = hw_duty
            };

            aic_scope_generate_wave(hw_waveform_buffer,
                                    HW_SCOPE_CHART_POINTS, &config);

            for (int i = 0; i < HW_SCOPE_CHART_POINTS; i++) {
                int32_t scaled = 50 +
                    (hw_waveform_buffer[i] * 40) / 32767;
                lv_chart_set_value_by_id(hw_gen_chart,
                    hw_gen_series, i, scaled);
            }
            lv_chart_refresh(hw_gen_chart);

            /* Update LED output via phase accumulator */
            hw_update_led_output();

            /* Update LED status display */
            if (hw_gen_led_status) {
                if (hw_gen_output_enabled) {
                    uint8_t cur = aic_gpio_pwm_get_brightness(
                                      AIC_LED_BLUE);
                    lv_label_set_text_fmt(hw_gen_led_status,
                        "LED3: %u%%", (unsigned int)cur);
                    lv_obj_set_style_text_color(hw_gen_led_status,
                        lv_color_hex(0x00FF00), 0);
                } else {
                    lv_label_set_text(hw_gen_led_status, "LED3: OFF");
                    lv_obj_set_style_text_color(hw_gen_led_status,
                        lv_color_hex(0xFF6666), 0);
                }
            }
        }
    }
    else if (hw_active_panel == 2) {
        /*===============================================================
         * FFT PANEL - Same POTEN->freq mapping as Scope
         * Generate 256 samples -> aic_fft_calculate() -> Bar chart
         * Normalize with gain, show dominant frequency
         *=============================================================*/
        /* (โครงสร้างเดียวกับ Scope แต่ใช้ FFT แทน waveform display) */
        /* ดู source code เต็มใน part3_hw_scope_example.c */
    }

    hw_last_pot_percent = pot_percent;
}
```

#### 4.5 Event Callbacks

```c
/* Wave type dropdown callback (shared by Scope + Gen panels) */
static void hw_wave_type_cb(lv_event_t *e)
{
    if (lv_event_get_code(e) != LV_EVENT_VALUE_CHANGED) return;
    lv_obj_t *dropdown = lv_event_get_target(e);
    hw_wave_type = (aic_wave_type_t)lv_dropdown_get_selected(dropdown);
}

/* Scope freq slider - read-only, controlled by POTEN */
static void hw_freq_slider_cb(lv_event_t *e)
{
    if (lv_event_get_code(e) != LV_EVENT_VALUE_CHANGED) return;
    /* In HW mode, slider is read-only (controlled by POTEN) */
}

/* Run/Stop button */
static void hw_run_btn_cb(lv_event_t *e)
{
    if (lv_event_get_code(e) != LV_EVENT_CLICKED) return;

    hw_is_running = !hw_is_running;

    if (hw_scope_run_led) {
        if (hw_is_running) {
            lv_led_on(hw_scope_run_led);
        } else {
            lv_led_off(hw_scope_run_led);
        }
    }

    lv_obj_t *btn = lv_event_get_target(e);
    lv_obj_t *label = lv_obj_get_child(btn, 0);
    if (label) {
        lv_label_set_text(label,
                          hw_is_running ? "Stop" : "Run");
    }
}

/* Gen panel: Frequency slider (user-controlled, 10-500 Hz) */
static void hw_gen_freq_slider_cb(lv_event_t *e)
{
    if (lv_event_get_code(e) != LV_EVENT_VALUE_CHANGED) return;
    lv_obj_t *slider = lv_event_get_target(e);
    int32_t val = lv_slider_get_value(slider);

    hw_gen_frequency = (uint32_t)val;
    if (hw_gen_frequency < 10) hw_gen_frequency = 10;

    if (hw_gen_freq_label) {
        lv_label_set_text_fmt(hw_gen_freq_label,
            "%uHz", (unsigned int)hw_gen_frequency);
    }
}

/* Gen panel: Duty slider - read-only, controlled by POTEN */
static void hw_gen_duty_slider_cb(lv_event_t *e)
{
    if (lv_event_get_code(e) != LV_EVENT_VALUE_CHANGED) return;
    /* In HW mode, this slider syncs with POTEN */
}

/* Gen panel: OUTPUT switch - enables/disables LED3 */
static void hw_gen_switch_cb(lv_event_t *e)
{
    if (lv_event_get_code(e) != LV_EVENT_VALUE_CHANGED) return;
    lv_obj_t *sw = lv_event_get_target(e);
    hw_gen_output_enabled = lv_obj_has_state(sw, LV_STATE_CHECKED);

    if (hw_gen_output_enabled) {
        hw_led_phase = 0;  /* Reset phase on enable */
    } else {
        aic_gpio_pwm_set_brightness(AIC_LED_BLUE, 0);
    }
}

/* FFT panel: Gain slider */
static void hw_fft_gain_slider_cb(lv_event_t *e)
{
    if (lv_event_get_code(e) != LV_EVENT_VALUE_CHANGED) return;
    lv_obj_t *slider = lv_event_get_target(e);
    hw_fft_gain = (uint8_t)lv_slider_get_value(slider);
}

/* Navigation button callback (panel switching) */
static void hw_nav_btn_cb(lv_event_t *e)
{
    if (lv_event_get_code(e) != LV_EVENT_CLICKED) return;

    int panel_idx = (int)(intptr_t)lv_event_get_user_data(e);

    for (int i = 0; i < 3; i++) {
        if (hw_panels[i]) {
            if (i == panel_idx) {
                lv_obj_remove_flag(hw_panels[i], LV_OBJ_FLAG_HIDDEN);
            } else {
                lv_obj_add_flag(hw_panels[i], LV_OBJ_FLAG_HIDDEN);
            }
        }
        if (hw_nav_btns[i]) {
            if (i == panel_idx) {
                lv_obj_set_style_bg_color(hw_nav_btns[i],
                    lv_color_hex(0x00ff88), 0);
                lv_obj_set_style_text_color(hw_nav_btns[i],
                    lv_color_hex(0x000000), 0);
            } else {
                lv_obj_set_style_bg_color(hw_nav_btns[i],
                    lv_color_hex(0x1a1a2e), 0);
                lv_obj_set_style_text_color(hw_nav_btns[i],
                    lv_color_hex(0xAAAAAA), 0);
            }
        }
    }
    hw_active_panel = panel_idx;
}
```

#### 4.6 Panel Creation Functions

```c
/*******************************************************************************
 * Create Scope Panel - Green theme, waveform display
 ******************************************************************************/
static void hw_create_scope_panel(lv_obj_t *panel)
{
    int32_t chart_w = hw_chart_width;
    int32_t chart_h = hw_chart_height;

    /* Chart with oscilloscope style */
    hw_scope_chart = lv_chart_create(panel);
    lv_obj_set_size(hw_scope_chart, chart_w, chart_h);
    lv_obj_align(hw_scope_chart, LV_ALIGN_TOP_LEFT, 0, 0);
    lv_chart_set_type(hw_scope_chart, LV_CHART_TYPE_LINE);
    lv_chart_set_point_count(hw_scope_chart, HW_SCOPE_CHART_POINTS);
    lv_chart_set_range(hw_scope_chart,
                       LV_CHART_AXIS_PRIMARY_Y, 0, 100);

    /* Green-on-dark oscilloscope theme */
    lv_obj_set_style_bg_color(hw_scope_chart,
                              lv_color_hex(0x001100), 0);
    lv_obj_set_style_line_color(hw_scope_chart,
                                lv_color_hex(0x003300), LV_PART_MAIN);
    lv_obj_set_style_size(hw_scope_chart, 0, 0, LV_PART_INDICATOR);
    lv_obj_set_style_line_width(hw_scope_chart, 2, LV_PART_ITEMS);
    lv_chart_set_div_line_count(hw_scope_chart, 4, 5);
    lv_obj_set_style_border_width(hw_scope_chart, 1, 0);
    lv_obj_set_style_border_color(hw_scope_chart,
                                  lv_color_hex(0x004400), 0);

    hw_scope_series = lv_chart_add_series(hw_scope_chart,
        lv_color_hex(0x00ff00), LV_CHART_AXIS_PRIMARY_Y);

    /* ROW 1: Dropdown | Freq Slider (read-only) | POT label | Run */
    hw_scope_dropdown = lv_dropdown_create(panel);
    lv_dropdown_set_options(hw_scope_dropdown,
        "Square\nSine\nTriangle\nSawtooth\nNoise\nPulse");
    lv_dropdown_set_selected(hw_scope_dropdown, 1);
    lv_obj_set_size(hw_scope_dropdown,
                    HW_DROPDOWN_WIDTH, HW_DROPDOWN_HEIGHT);
    lv_obj_align(hw_scope_dropdown, LV_ALIGN_BOTTOM_LEFT, 5, -50);
    lv_obj_add_event_cb(hw_scope_dropdown, hw_wave_type_cb,
                        LV_EVENT_VALUE_CHANGED, NULL);

    /* Frequency slider: READ-ONLY (syncs with POTEN) */
    hw_scope_freq_slider = lv_slider_create(panel);
    lv_obj_set_size(hw_scope_freq_slider,
                    HW_SLIDER_WIDTH - 20, HW_SLIDER_HEIGHT);
    lv_slider_set_range(hw_scope_freq_slider, 0, 100);
    lv_slider_set_value(hw_scope_freq_slider, 30, LV_ANIM_OFF);
    lv_obj_align(hw_scope_freq_slider,
                 LV_ALIGN_BOTTOM_MID, -40, -55);
    lv_obj_remove_flag(hw_scope_freq_slider,
                       LV_OBJ_FLAG_CLICKABLE);  /* Read-only! */

    hw_scope_freq_label = lv_label_create(panel);
    lv_label_set_text(hw_scope_freq_label, "1.0kHz");
    lv_obj_set_style_text_color(hw_scope_freq_label,
                                lv_color_hex(0x00ff00), 0);
    lv_obj_align_to(hw_scope_freq_label, hw_scope_freq_slider,
                    LV_ALIGN_OUT_RIGHT_MID, 5, 0);

    /* POTEN indicator (yellow) */
    hw_scope_pot_label = lv_label_create(panel);
    lv_label_set_text(hw_scope_pot_label, "POT: --%");
    lv_obj_set_style_text_color(hw_scope_pot_label,
                                lv_color_hex(0xFFFF00), 0);
    lv_obj_align(hw_scope_pot_label,
                 LV_ALIGN_BOTTOM_RIGHT, -80, -55);

    /* Run LED + Button */
    hw_scope_run_led = lv_led_create(panel);
    lv_obj_set_size(hw_scope_run_led, HW_LED_SIZE, HW_LED_SIZE);
    lv_led_set_color(hw_scope_run_led,
                     lv_palette_main(LV_PALETTE_GREEN));
    lv_obj_align(hw_scope_run_led,
                 LV_ALIGN_BOTTOM_RIGHT, -70, -55);
    lv_led_on(hw_scope_run_led);

    hw_scope_run_btn = lv_button_create(panel);
    lv_obj_set_size(hw_scope_run_btn,
                    HW_BUTTON_WIDTH, HW_BUTTON_HEIGHT);
    lv_obj_align(hw_scope_run_btn,
                 LV_ALIGN_BOTTOM_RIGHT, -5, -50);
    lv_obj_t *run_label = lv_label_create(hw_scope_run_btn);
    lv_label_set_text(run_label, "Stop");
    lv_obj_center(run_label);
    lv_obj_add_event_cb(hw_scope_run_btn, hw_run_btn_cb,
                        LV_EVENT_CLICKED, NULL);

    /* ROW 2: Measurements */
    hw_scope_vpp_label = lv_label_create(panel);
    lv_label_set_text(hw_scope_vpp_label, "Vpp: --");
    lv_obj_set_style_text_color(hw_scope_vpp_label,
                                lv_color_hex(0x00ff00), 0);
    lv_obj_align(hw_scope_vpp_label,
                 LV_ALIGN_BOTTOM_LEFT, 5, -10);

    hw_scope_freq_meas_label = lv_label_create(panel);
    lv_label_set_text(hw_scope_freq_meas_label, "Freq: --");
    lv_obj_set_style_text_color(hw_scope_freq_meas_label,
                                lv_color_hex(0xffff00), 0);
    lv_obj_align(hw_scope_freq_meas_label,
                 LV_ALIGN_BOTTOM_MID, 0, -10);

    hw_scope_rms_label = lv_label_create(panel);
    lv_label_set_text(hw_scope_rms_label, "RMS: --");
    lv_obj_set_style_text_color(hw_scope_rms_label,
                                lv_color_hex(0x00ffff), 0);
    lv_obj_align(hw_scope_rms_label,
                 LV_ALIGN_BOTTOM_RIGHT, -5, -10);
}

/*******************************************************************************
 * Create Generator Panel - Orange theme (key differences from Scope)
 ******************************************************************************/
static void hw_create_gen_panel(lv_obj_t *panel)
{
    /* Chart: Orange theme (0x110800 bg, 0xff8800 series) */
    /* Layout เหมือน Scope แต่เปลี่ยนสีเป็น Orange */

    /* KEY DIFFERENCE 1: Frequency slider is USER-CONTROLLED */
    hw_gen_freq_slider = lv_slider_create(panel);
    lv_slider_set_range(hw_gen_freq_slider, 10, 500);
    /* ไม่มี lv_obj_remove_flag(LV_OBJ_FLAG_CLICKABLE) */
    /* ผู้ใช้ drag ได้ (10-500 Hz สำหรับ visible LED effect) */

    /* KEY DIFFERENCE 2: Duty slider is READ-ONLY (POTEN) */
    hw_gen_duty_slider = lv_slider_create(panel);
    lv_slider_set_range(hw_gen_duty_slider, 10, 90);
    lv_obj_remove_flag(hw_gen_duty_slider,
                       LV_OBJ_FLAG_CLICKABLE);  /* Read-only! */

    /* KEY DIFFERENCE 3: OUTPUT switch controls LED3 */
    hw_gen_switch = lv_switch_create(panel);
    lv_obj_add_event_cb(hw_gen_switch, hw_gen_switch_cb,
                        LV_EVENT_VALUE_CHANGED, NULL);

    /* KEY DIFFERENCE 4: POTEN->Duty + LED status labels */
    hw_gen_pot_label = lv_label_create(panel);
    lv_label_set_text(hw_gen_pot_label, "POT: --% -> Duty: --%");

    hw_gen_led_status = lv_label_create(panel);
    lv_label_set_text(hw_gen_led_status, "LED3: OFF");

    /* (ดู source code เต็มสำหรับ layout coordinates) */
}

/*******************************************************************************
 * Create FFT Panel - Cyan theme, bar chart
 ******************************************************************************/
static void hw_create_fft_panel(lv_obj_t *panel)
{
    /* Bar chart: Cyan theme (0x001a1a bg, 0x00ffff series) */
    hw_fft_chart = lv_chart_create(panel);
    lv_chart_set_type(hw_fft_chart, LV_CHART_TYPE_BAR);
    lv_chart_set_point_count(hw_fft_chart, HW_FFT_CHART_BINS);
    /* CRITICAL: Bar spacing */
    lv_obj_set_style_pad_column(hw_fft_chart, 2, 0);

    /* Gain slider + Peak frequency label */
    hw_fft_gain_slider = lv_slider_create(panel);
    lv_slider_set_range(hw_fft_gain_slider, 10, 100);
    lv_obj_add_event_cb(hw_fft_gain_slider,
        hw_fft_gain_slider_cb, LV_EVENT_VALUE_CHANGED, NULL);

    hw_fft_dominant_label = lv_label_create(panel);
    lv_label_set_text(hw_fft_dominant_label, "Peak: -- Hz");

    /* (ดู source code เต็มสำหรับ layout coordinates) */
}
```

#### 4.7 Main Function

```c
void part3_ex8_hw_scope(void)
{
    /* === Initialize subsystems === */
    aic_scope_init();
    aic_fft_init(HW_FFT_SIZE);
    aic_gpio_init();                    /* GPIO subsystem */
    aic_gpio_pwm_init(AIC_LED_BLUE);   /* PWM on LED3 Blue */
    aic_sensors_init();                 /* ADC for POTEN */

    /* === Screen layout === */
    lv_obj_t *screen = lv_screen_active();
    int32_t screen_w = lv_obj_get_width(screen);
    int32_t screen_h = lv_obj_get_height(screen);

    int32_t nav_width = 70;
    int32_t footer_height = 22;
    hw_chart_width = screen_w - nav_width;
    hw_chart_height = screen_h - footer_height - 88;

    lv_obj_set_style_bg_color(screen, lv_color_hex(0x0a0a1e), 0);

    /* === Navigation bar (LEFT, 70px) === */
    /* 3 buttons: Scope, Gen, FFT at Y=50, 170, 290 */
    /* Active button: green (0x00ff88), Inactive: dark (0x1a1a2e) */
    /* ใช้ hw_nav_btn_cb กับ user_data = panel index */

    /* === Content panels (3 panels, show/hide) === */
    /* panel[0]=Scope (visible), panel[1]=Gen, panel[2]=FFT (hidden) */
    hw_create_scope_panel(hw_panels[0]);
    hw_create_gen_panel(hw_panels[1]);
    hw_create_fft_panel(hw_panels[2]);

    aic_create_footer(screen);

    /* === Timer: 33ms (30 FPS) === */
    hw_timer = lv_timer_create(hw_timer_cb, HW_SCOPE_UPDATE_MS, NULL);
}
```

***

### 5. องค์ความรู้และเทคนิค

#### 5.1 CRITICAL: Read-Only Slider Synced with Hardware

```c
/* Pattern: Slider ที่แสดงค่าจาก Hardware (ผู้ใช้ drag ไม่ได้)
 *
 * ขั้นตอน:
 * 1. สร้าง slider ปกติ
 * 2. ลบ flag CLICKABLE ออก
 * 3. ใน timer callback ตั้งค่าจาก hardware
 *
 * WRONG: (ผู้ใช้ drag ได้ แต่ค่าจะถูก overwrite ทุก 33ms)
 *   lv_obj_t *slider = lv_slider_create(panel);
 *   // ไม่ได้ลบ clickable flag
 *
 * CORRECT: (ผู้ใช้ drag ไม่ได้ แสดงค่าจาก POTEN)
 *   lv_obj_t *slider = lv_slider_create(panel);
 *   lv_obj_remove_flag(slider, LV_OBJ_FLAG_CLICKABLE);
 *   // ใน timer: lv_slider_set_value(slider, hw_val, LV_ANIM_OFF);
 *
 * ใช้กับ: Motor Speed Feedback, Temperature Readback,
 *         Pressure Gauge, Position Sensor Display
 */
```

#### 5.2 Phase Accumulator - DDS Pattern

```c
/* Phase Accumulator = หัวใจของ Direct Digital Synthesis (DDS)
 *
 * phase (32-bit) += increment  // ทุก timer tick
 * increment = freq * 65536 / tick_rate
 * ใช้ lower 16 bits (0-65535) เป็น waveform phase
 *
 * ข้อดี: Sub-Hz resolution, continuous phase, memory efficient
 * ข้อเสีย: Accuracy ขึ้นกับ timer jitter
 *
 * ใช้ในงานจริง: DDS chip (AD9850), Motor SVPWM, Audio Synth
 */
void set_frequency(uint32_t freq_hz, uint32_t tick_rate)
{
    phase_inc = (freq_hz * 65536) / tick_rate;
    /* phase ไม่ reset = continuous transition (ไม่กระตุก) */
}
```

#### 5.3 Hardware Scope vs Simulation Scope

```c
/* Ex8 = Ex7 + Hardware I/O
 * Freq/Duty: Slider(drag) -> POTEN(physical), Slider=read-only
 * LED Output: printf() -> PWM LED3 (Blue)
 * Input: None -> ADC CH0
 * Init: scope+fft -> +gpio+sensors
 * ที่เหลือเหมือนกัน: Timer 33ms, Software waveform/FFT
 */
```

#### 5.4 ADC-to-Parameter Mapping Patterns

```c
/* Linear: param = MIN + (adc * (MAX - MIN) / 100)
 * Log:    freq = MIN * exp(adc * log(MAX/MIN) / 100)  (audio)
 * Deadband: if (adc < 5%) output = 0;  (motor control)
 */
```

#### 5.5 Touch Keep-Alive Pattern

```c
/* Touch controller อาจ "หลับ" หลังจากไม่มี touch สักพัก
 * แก้โดย reset input device ทุก ~1 sec ใน timer callback:
 *   if (++cnt >= 30) { cnt=0; lv_indev_reset(indev, NULL); }
 * จำเป็นสำหรับ always-on display (SCADA, Dashboard)
 */
```

***

### 6. แบบฝึกหัด

#### Exercise 1: ADC Smoothing Filter

**โจทย์:** เพิ่ม Exponential Moving Average (EMA) filter ให้กับค่า ADC เพื่อลด noise:

* เก็บค่าก่อนหน้า `prev_pot` (static variable)
* คำนวณ: `filtered = (alpha * raw) + ((1 - alpha) * prev_pot)` โดย alpha = 0.3
* ใช้ integer math: `filtered = (3 * raw + 7 * prev) / 10`
* แสดง "RAW: XX% FLT: XX%" บน UI เทียบค่า raw vs filtered
* สังเกตว่า waveform ปรับ frequency ได้ smooth ขึ้นเมื่อหมุน POTEN เร็ว

#### Exercise 2: Dual POTEN Mode

**โจทย์:** เพิ่ม Mode Switch ให้ POTEN ควบคุมได้ 2 แบบใน Scope Tab:

* เพิ่ม Switch "FREQ/AMP" สำหรับเลือกว่า POTEN ควบคุม Frequency หรือ Amplitude
* Mode FREQ: เหมือนเดิม (100-5000 Hz)
* Mode AMP: POTEN ควบคุม amplitude (10-100%)
* แสดง mode ปัจจุบันบน UI: "Mode: FREQ" หรือ "Mode: AMP"
* เมื่อเปลี่ยน mode ค่าที่ไม่ได้ควบคุมจะ lock ไว้ที่ค่าล่าสุด
* ประยุกต์ใช้: Oscilloscope แบบ knob เดียวที่ปรับได้หลาย parameter


# Multi-Core Communication


# IPC Fundamentals

## Lab 1: IPC Fundamentals (Ping, Logging, Sensor Data)

### Part 4 - IPC & Event Bus

***

### 1. ภาพรวมของ Lab

#### Why? - ทำไมต้องเรียนรู้เรื่องนี้

* **Multi-Core Communication**: ระบบ Embedded สมัยใหม่ใช้หลาย Core ทำงานร่วมกัน ต้องมีกลไกสื่อสารระหว่าง Core ที่เชื่อถือได้
* **IPC (Inter-Processor Communication)**: เทคนิคพื้นฐานที่ใช้ในระบบ Industrial, Automotive, IoT ทุกประเภท
* **Remote Logging**: ไม่ใช่ทุก Core จะมี UART console ต้องส่ง log ผ่าน IPC เพื่อ debug และ diagnostics
* **Distributed Sensing**: ในระบบ Multi-Core sensor อยู่คนละ Core กับ UI ต้องส่งข้อมูลผ่าน IPC
* **Thread Safety**: เรียนรู้ pattern ที่ถูกต้องสำหรับการอัปเดต UI จาก IPC callback

#### What? - จะได้เรียนรู้อะไร

1. **IPC Pipe Architecture**: โครงสร้างการสื่อสารระหว่าง CM33-NS กับ CM55
2. **Ping-Pong Protocol**: ส่ง PING → รับ PONG วัดเวลา Round-Trip
3. **Remote Logging**: CM55 ส่ง log ผ่าน IPC → CM33 พิมพ์ออก UART พร้อมระบบ Log Levels
4. **Sensor Request-Response**: CM55 ร้องขอ → CM33 อ่าน sensor → ส่งกลับผ่าน IPC
5. **Flag-Based Pattern**: วิธีอัปเดต LVGL UI อย่างปลอดภัยจาก IPC callback

#### How? - จะทำอย่างไร

Lab นี้แบ่งเป็น 3 ส่วน:

* **Part A**: สร้าง Ping-Pong ทดสอบ IPC พื้นฐาน วัด Round-Trip Time
* **Part B**: สร้างระบบ Logging ส่ง log จาก CM55 ไป CM33 console
* **Part C**: ส่งข้อมูล Sensor (IMU/ADC) ผ่าน IPC แสดงผลบน Chart

***

### 2. หลักการทางเทคนิค

#### 2.1 สถาปัตยกรรม Multi-Core ของ PSoC Edge E84

```
┌─────────────────────────────────────────────────────────────────────────┐
│                         PSoC Edge E84                                   │
├─────────────────────────────────────────────────────────────────────────┤
│                                                                         │
│  ┌──────────────────────┐         ┌──────────────────────┐              │
│  │   Cortex-M33 (NS)    │         │   Cortex-M55         │              │
│  │   120 MHz            │         │   400 MHz            │              │
│  ├──────────────────────┤         ├──────────────────────┤              │
│  │  - WiFi/BLE drivers  │         │  - LVGL Display      │              │
│  │  - Sensor I2C (IMU)  │         │  - UI Rendering      │              │
│  │  - GPIO (LED/Button) │         │  - IPC Receiver      │              │
│  │  - ADC               │         │  - Event Bus         │              │
│  │  - UART (printf)     │         │  - DSP/ML Processing │              │
│  │  - IPC Sender        │         │                      │              │
│  └──────────┬───────────┘         └───────────┬──────────┘              │
│             │                                 │                         │
│             │        IPC Pipe (Hardware)      │                         │
│             └─────────────────────────────────┘                         │
│                                                                         │
│  Boot Order: CM33-S → CM33-NS → cm33_ipc_init() → Cy_SysEnableCM55()    │
│                                                                         │
└─────────────────────────────────────────────────────────────────────────┘
```

#### 2.2 ทำไม CM55 ถึง printf() ไม่ได้?

```
CM33-NS มี UART (retarget-io)  →  printf() ได้
CM55 ไม่มี UART                →  printf() ไม่ได้!

วิธีแก้: CM55 ส่ง Log ผ่าน IPC ไปยัง CM33-NS ให้ printf() แทน
         ใช้ macro: CM55_LOGI(), CM55_LOGE(), CM55_LOGW(), CM55_LOGD()
```

#### 2.3 IPC Message Structure

```c
/* จาก ipc_shared.h */
typedef struct {
    uint16_t client_id;             /* Destination client ID */
    uint16_t intr_mask;             /* Release mask (Pipe Driver ใช้) */
    uint32_t cmd;                   /* Command type (ipc_cmd_t) */
    uint32_t value;                 /* Numeric payload */
    char     data[IPC_DATA_MAX_LEN];/* String/binary payload (128 bytes) */
} ipc_msg_t;
```

#### 2.4 Flag-Based Pattern (Thread Safety) - CRITICAL

```
┌─────────────────────────────────────────────────────────────────────────┐
│                  !! LVGL ไม่ใช่ Thread-Safe !!                            │
├─────────────────────────────────────────────────────────────────────────┤
│                                                                         │
│  LVGL ทำงานใน LVGL Task เท่านั้น                                           │
│  IPC Callback ทำงานใน IPC Task (คนละ Task กัน)                           │
│                                                                         │
│  ถ้าเรียก lv_label_set_text() จาก IPC callback โดยตรง:                    │
│  → CRASH! Race condition! Memory corruption!                            │
│                                                                         │
│  วิธีถูกต้อง: ใช้ Flag-Based Pattern                                         │
│                                                                         │
│  ┌─────────────┐  flag=true  ┌─────────────┐  อ่าน flag  ┌──────────┐    │
│  │ IPC Callback│ ──────────► │  volatile   │ ◄──────────│ LVGL     │    │
│  │ (IPC Task)  │  เก็บ data   │  flag+data  │  อัปเดต UI  │ Timer    │    │
│  └─────────────┘             └─────────────┘            └──────────┘    │
│                                                                         │
│  Key: ใช้ volatile keyword เพื่อป้องกัน compiler optimization                │
│                                                                         │
└─────────────────────────────────────────────────────────────────────────┘
```

**ตัวอย่าง Pattern:**

```c
/* ===== Shared Variables (volatile เพราะใช้ข้าม Task) ===== */
static volatile bool     ping_received = false;   /* flag */
static volatile uint32_t pong_time_ms  = 0;       /* data */

/* ===== IPC Callback (ทำงานใน IPC Task) ===== */
void ipc_rx_callback(const ipc_msg_t *msg, void *user_data)
{
    if (msg->cmd == IPC_CMD_PONG) {
        /* เก็บข้อมูล + ตั้ง flag เท่านั้น */
        /* ห้ามเรียก lv_xxx() ที่นี่!! */
        pong_time_ms = lv_tick_get() - ping_start_time;
        ping_received = true;
    }
}

/* ===== LVGL Timer Callback (ทำงานใน LVGL Task - ปลอดภัย) ===== */
void ui_timer_cb(lv_timer_t *timer)
{
    if (ping_received) {
        ping_received = false;  /* Reset flag */
        /* ตอนนี้ปลอดภัยที่จะเรียก LVGL functions */
        lv_label_set_text_fmt(label_result,
            "Pong! RTT: %u ms", (unsigned int)pong_time_ms);
    }
}
```

#### 2.5 Sensor Data Flow Architecture

```
┌─────────────────────────────────────────────────────────────────────────┐
│                  Sensor Data Request-Response Flow                      │
├─────────────────────────────────────────────────────────────────────────┤
│                                                                         │
│  CM55 (Display)                          CM33-NS (Sensors)              │
│  ┌──────────────────┐                   ┌──────────────────────┐        │
│  │  LVGL Timer      │                   │  Sensor Hub          │        │
│  │  (ทุก 100ms)      │                   │                      │        │
│  │                  │  1. Request       │  ┌────────────────┐  │        │
│  │  cm55_ipc_       │ ────────────────► │  │ BMI270 IMU     │  │        │
│  │  request_sensor()│  IPC_CMD_SENSOR   │  │ - Accel X,Y,Z  │  │        │
│  │                  │  _REQ             │  │ - Gyro X,Y,Z   │  │        │
│  │                  │                   │  └────────────────┘  │        │
│  │                  │  2. Response      │                      │        │
│  │  ipc_callback()  │ ◄──────────────── │  ┌────────────────┐  │        │
│  │  ├── flag=true   │  IPC_CMD_SENSOR   │  │ ADC            │  │        │
│  │  └── store data  │  _DATA            │  │ - Potentiometer│  │        │
│  │                  │                   │  └────────────────┘  │        │
│  │  LVGL Timer      │                   │  3. CM33 อ่าน sensor  │        │
│  │  ├── check flag  │                   │     แปลงค่า           │        │
│  │  ├── update Chart│                   │     pack เป็น         │        │
│  │  └── update Label│                   │     ipc_imu_data_t   │        │
│  └──────────────────┘                   └──────────────────────┘        │
│                                                                         │
└─────────────────────────────────────────────────────────────────────────┘
```

***

### Part A: IPC Ping-Pong (Ex1)

#### IPC Commands ที่ใช้

| Command        | Value | ทิศทาง      | คำอธิบาย              |
| -------------- | ----- | ----------- | --------------------- |
| `IPC_CMD_PING` | 0x42  | CM55 → CM33 | ส่งสัญญาณ Ping        |
| `IPC_CMD_PONG` | 0x43  | CM33 → CM55 | CM33 ตอบกลับอัตโนมัติ |

#### Ping-Pong Flow

```
  CM55 (LVGL)                              CM33-NS
  ──────────                               ────────
       │                                       │
       │  1. User กด Button "Ping"             │
       │  2. บันทึก start_time                   │
       │  3. cm55_ipc_send_cmd(PING, 0)        │
       │ ────────── IPC_CMD_PING ──────────►   │
       │                                       │  4. รับ PING
       │                                       │  5. ส่ง PONG กลับ (อัตโนมัติ)
       │   ◄────────── IPC_CMD_PONG ────────── │
       │  6. IPC callback ถูกเรียก               │
       │  7. คำนวณ round_trip_time             │
       │  8. ตั้ง flag = true                    │
       │                                       │
       │  9. LVGL timer ตรวจพบ flag            │
       │ 10. อัปเดต Label บน UI                 │
       │                                       │
```

#### Step-by-Step Implementation

**Step 1: ตั้งค่า Example Selector**

```c
/* proj_cm55/example_selector.h */
#define SELECTED_WEEK       6    /* Part 4 ใช้ Week 6 slot */
#define SELECTED_EXAMPLE    1    /* Example 1: IPC Ping */
```

**Step 2: Include Headers**

```c
/* part4_ex1_ipc_ping.c */
#include "lvgl.h"
#include "ipc/cm55_ipc_pipe.h"

#include <stdbool.h>
#include <stdint.h>
```

**Step 3: ประกาศ Global Variables**

```c
/*******************************************************************************
 * Global / Shared Variables
 ******************************************************************************/

/* LVGL Objects */
static lv_obj_t *label_title   = NULL;
static lv_obj_t *label_status  = NULL;
static lv_obj_t *label_rtt     = NULL;
static lv_obj_t *btn_ping      = NULL;
static lv_obj_t *led_indicator = NULL;

/* Flag-Based Pattern Variables (volatile!) */
static volatile bool     pong_received    = false;
static volatile uint32_t pong_rtt_ms      = 0;
static volatile uint32_t ping_start_tick  = 0;

/* Statistics */
static uint32_t ping_count  = 0;
static uint32_t pong_count  = 0;
static uint32_t total_rtt   = 0;
```

**Step 4: IPC Callback Function**

```c
/*******************************************************************************
 * IPC Receive Callback
 *
 * CRITICAL: ฟังก์ชันนี้ถูกเรียกจาก IPC Task ไม่ใช่ LVGL Task
 *           ห้ามเรียก lv_xxx() functions ที่นี่!!
 ******************************************************************************/
static void ipc_ping_callback(const ipc_msg_t *msg, void *user_data)
{
    (void)user_data;

    if (msg->cmd == IPC_CMD_PONG) {
        /* คำนวณ Round-Trip Time */
        uint32_t now = lv_tick_get();
        pong_rtt_ms = now - ping_start_tick;

        /* ตั้ง flag ให้ LVGL timer อัปเดต UI */
        pong_received = true;
    }
}
```

**Step 5: LVGL Timer Callback (UI Update)**

```c
/*******************************************************************************
 * LVGL Timer Callback - ตรวจสอบ flag ทุก 50ms
 *
 * ฟังก์ชันนี้ทำงานใน LVGL context จึงเรียก lv_xxx() ได้อย่างปลอดภัย
 ******************************************************************************/
static void ping_timer_cb(lv_timer_t *timer)
{
    (void)timer;

    if (pong_received) {
        pong_received = false;  /* Reset flag ก่อน */
        pong_count++;

        /* อัปเดตผลลัพธ์ */
        lv_label_set_text_fmt(label_rtt,
            "RTT: %u ms", (unsigned int)pong_rtt_ms);

        /* อัปเดต LED indicator เป็นสีเขียว */
        lv_led_set_color(led_indicator, lv_palette_main(LV_PALETTE_GREEN));
        lv_led_on(led_indicator);

        /* อัปเดตสถานะ */
        total_rtt += pong_rtt_ms;
        uint32_t avg = (pong_count > 0) ? (total_rtt / pong_count) : 0;
        lv_label_set_text_fmt(label_status,
            "Ping: %u  Pong: %u  Avg: %u ms",
            (unsigned int)ping_count,
            (unsigned int)pong_count,
            (unsigned int)avg);

        /* Log ผ่าน IPC */
        CM55_LOGI("PONG received! RTT=%u ms", (unsigned int)pong_rtt_ms);
    }
}
```

**Step 6: Button Event Callback**

```c
/*******************************************************************************
 * Button "Ping" Event Handler
 ******************************************************************************/
static void btn_ping_event_cb(lv_event_t *e)
{
    lv_event_code_t code = lv_event_get_code(e);

    /* กรอง event - รับเฉพาะ CLICKED */
    if (code != LV_EVENT_CLICKED) return;

    /* ตรวจสอบ IPC พร้อมใช้งาน */
    if (!cm55_ipc_is_init()) {
        lv_label_set_text(label_status, "IPC not initialized!");
        lv_led_set_color(led_indicator, lv_palette_main(LV_PALETTE_RED));
        return;
    }

    /* บันทึกเวลาเริ่มต้น */
    ping_start_tick = lv_tick_get();
    ping_count++;

    /* อัปเดต UI - กำลังรอ */
    lv_label_set_text(label_rtt, "Pinging...");
    lv_led_set_color(led_indicator, lv_palette_main(LV_PALETTE_YELLOW));
    lv_led_on(led_indicator);

    /* ส่ง PING command ไปยัง CM33-NS */
    cy_en_ipc_pipe_status_t status = cm55_ipc_send_cmd(IPC_CMD_PING, ping_count);

    if (status != CY_IPC_PIPE_SUCCESS) {
        lv_label_set_text(label_rtt, "Send failed!");
        lv_led_set_color(led_indicator, lv_palette_main(LV_PALETTE_RED));
        CM55_LOGE("PING send failed: %d", (int)status);
    }
}
```

**Step 7: สร้าง UI Layout (Main Entry Point)**

```c
/*******************************************************************************
 * Main Entry Point
 ******************************************************************************/
void part4_ex1_ipc_ping(void)
{
    /* ===== ล้างหน้าจอ ===== */
    lv_obj_t *scr = lv_screen_active();
    lv_obj_clean(scr);
    lv_obj_set_style_bg_color(scr, lv_color_hex(0x1a1a2e), 0);

    /* ===== Title ===== */
    label_title = lv_label_create(scr);
    lv_label_set_text(label_title, "IPC Ping-Pong");
    lv_obj_set_style_text_font(label_title, &lv_font_montserrat_24, 0);
    lv_obj_set_style_text_color(label_title, lv_color_hex(0x00ffff), 0);
    lv_obj_align(label_title, LV_ALIGN_TOP_MID, 0, 10);

    /* ===== LED Indicator ===== */
    led_indicator = lv_led_create(scr);
    lv_obj_set_size(led_indicator, 30, 30);
    lv_obj_align(led_indicator, LV_ALIGN_TOP_RIGHT, -20, 10);
    lv_led_set_color(led_indicator, lv_palette_main(LV_PALETTE_GREY));
    lv_led_off(led_indicator);

    /* ===== RTT Result Label ===== */
    label_rtt = lv_label_create(scr);
    lv_label_set_text(label_rtt, "RTT: -- ms");
    lv_obj_set_style_text_font(label_rtt, &lv_font_montserrat_20, 0);
    lv_obj_set_style_text_color(label_rtt, lv_color_white(), 0);
    lv_obj_align(label_rtt, LV_ALIGN_CENTER, 0, -30);

    /* ===== Status Label ===== */
    label_status = lv_label_create(scr);
    lv_label_set_text(label_status, "Ping: 0  Pong: 0  Avg: -- ms");
    lv_obj_set_style_text_font(label_status, &lv_font_montserrat_14, 0);
    lv_obj_set_style_text_color(label_status, lv_color_hex(0xaaaaaa), 0);
    lv_obj_align(label_status, LV_ALIGN_CENTER, 0, 10);

    /* ===== Ping Button ===== */
    btn_ping = lv_button_create(scr);
    lv_obj_set_size(btn_ping, 160, 50);
    lv_obj_align(btn_ping, LV_ALIGN_BOTTOM_MID, 0, -30);
    lv_obj_set_style_bg_color(btn_ping,
        lv_palette_main(LV_PALETTE_BLUE), 0);
    lv_obj_add_event_cb(btn_ping, btn_ping_event_cb,
        LV_EVENT_CLICKED, NULL);

    lv_obj_t *btn_label = lv_label_create(btn_ping);
    lv_label_set_text(btn_label, "PING");
    lv_obj_set_style_text_font(btn_label, &lv_font_montserrat_18, 0);
    lv_obj_center(btn_label);

    /* ===== Register IPC Callback ===== */
    cm55_ipc_register_callback(ipc_ping_callback, NULL);

    /* ===== สร้าง LVGL Timer สำหรับ poll flag ===== */
    lv_timer_create(ping_timer_cb, 50, NULL);  /* ทุก 50ms */

    CM55_LOGI("Part4 Ex1: IPC Ping-Pong initialized");
}
```

***

### Part B: IPC Logging System (Ex2)

#### Log Level System

```
┌─────────────────────────────────────────────────────────────────────────┐
│                      Log Level Hierarchy                                │
├─────────────────────────────────────────────────────────────────────────┤
│                                                                         │
│  Level     IPC Command        Macro           สี        ใช้เมื่อ            │
│  ─────     ───────────        ─────           ──        ──────          │
│  ERROR     IPC_CMD_LOG_ERROR  CM55_LOGE()     แดง       ข้อผิดพลาดร้าย     │
│  WARN      IPC_CMD_LOG_WARN   CM55_LOGW()     เหลือง    เตือนภัย           │
│  INFO      IPC_CMD_LOG_INFO   CM55_LOGI()     เขียว     ข้อมูลปกติ          │
│  DEBUG     IPC_CMD_LOG_DEBUG  CM55_LOGD()     ขาว       debug เท่านั้น     │
│                                                                         │
│  ตัวกรอง: เมื่อตั้ง level = WARN                                             │
│           จะแสดง: ERROR + WARN เท่านั้น                                    │
│           ไม่แสดง: INFO + DEBUG                                          │
│                                                                         │
│  Production: ตั้ง level = ERROR หรือ WARN                                  │
│  Development: ตั้ง level = DEBUG (แสดงทั้งหมด)                              │
│                                                                         │
└─────────────────────────────────────────────────────────────────────────┘
```

#### IPC Log Command Reference

<table><thead><tr><th>Command</th><th width="122.49005126953125">Value</th><th>ทิศทาง</th><th>คำอธิบาย</th></tr></thead><tbody><tr><td><code>IPC_CMD_LOG</code></td><td>0x90</td><td>CM55 → CM33</td><td>Log ทั่วไป (ไม่ระบุ level)</td></tr><tr><td><code>IPC_CMD_LOG_LEVEL</code></td><td>0x91</td><td>CM55 → CM33</td><td>ตั้ง log level filter</td></tr><tr><td><code>IPC_CMD_LOG_ERROR</code></td><td>0x92</td><td>CM55 → CM33</td><td>Error level log</td></tr><tr><td><code>IPC_CMD_LOG_WARN</code></td><td>0x93</td><td>CM55 → CM33</td><td>Warning level log</td></tr><tr><td><code>IPC_CMD_LOG_INFO</code></td><td>0x94</td><td>CM55 → CM33</td><td>Info level log</td></tr><tr><td><code>IPC_CMD_LOG_DEBUG</code></td><td>0x95</td><td>CM55 → CM33</td><td>Debug level log</td></tr></tbody></table>

#### Log Macros (จาก cm55\_ipc\_pipe.h)

```c
/* ใช้ได้เฉพาะใน CM55 */
CM55_LOGE("Sensor init failed: %d", error_code);
CM55_LOGW("Battery low: %d%%", battery_pct);
CM55_LOGI("System started, version %s", version);
CM55_LOGD("Register 0x%02X = 0x%04X", reg, val);

/* ภายในจะถูกแปลงเป็น */
cm55_ipc_log_level(IPC_CMD_LOG_ERROR, "Sensor init failed: %d", error_code);
/* → ส่ง ipc_msg_t { cmd=0x92, data="Sensor init failed: -1" } → CM33 printf */
```

#### Step-by-Step Implementation

**Step 1: ประกาศ Constants และ Variables**

```c
/* part4_ex2_ipc_log.c */
#include "lvgl.h"
#include "ipc/cm55_ipc_pipe.h"

#include <stdbool.h>
#include <stdint.h>
#include <string.h>
#include <stdio.h>

/*******************************************************************************
 * Constants
 ******************************************************************************/
#define LOG_HISTORY_MAX     20      /* จำนวน log สูงสุดที่เก็บ */
#define LOG_MSG_MAX_LEN     64      /* ความยาวข้อความสูงสุด */
#define LOG_DISPLAY_BUF     2048    /* Buffer สำหรับ TextArea */

/* Log Level Names */
static const char *log_level_names[] = {
    "ERROR", "WARN", "INFO", "DEBUG"
};

/* Log Level Colors (hex) */
static const uint32_t log_level_colors[] = {
    0xFF4444,   /* ERROR - แดง */
    0xFFAA00,   /* WARN  - เหลือง */
    0x44FF44,   /* INFO  - เขียว */
    0xCCCCCC    /* DEBUG - ขาว */
};

typedef enum {
    LOG_LEVEL_ERROR = 0,
    LOG_LEVEL_WARN,
    LOG_LEVEL_INFO,
    LOG_LEVEL_DEBUG,
    LOG_LEVEL_COUNT
} log_level_t;

/*******************************************************************************
 * Log Entry Structure
 ******************************************************************************/
typedef struct {
    log_level_t level;
    uint32_t    timestamp;
    char        message[LOG_MSG_MAX_LEN];
} log_entry_t;

/*******************************************************************************
 * Global Variables
 ******************************************************************************/

/* LVGL Objects */
static lv_obj_t *label_title     = NULL;
static lv_obj_t *dropdown_level  = NULL;
static lv_obj_t *btn_send        = NULL;
static lv_obj_t *textarea_log    = NULL;
static lv_obj_t *label_count     = NULL;

/* Log History */
static log_entry_t log_history[LOG_HISTORY_MAX];
static uint32_t    log_count        = 0;
static log_level_t current_filter   = LOG_LEVEL_DEBUG;  /* แสดงทั้งหมด */
static uint32_t    log_seq          = 0;  /* Sequence number */
static char        display_buf[LOG_DISPLAY_BUF];
```

**Step 2: Log Management Functions**

```c
/*******************************************************************************
 * Log Management
 ******************************************************************************/

/* เพิ่ม log entry ใหม่ */
static void log_add_entry(log_level_t level, const char *message)
{
    /* Circular buffer: เขียนทับรายการเก่าสุด */
    uint32_t idx = log_count % LOG_HISTORY_MAX;

    log_history[idx].level = level;
    log_history[idx].timestamp = lv_tick_get() / 1000;  /* วินาที */
    strncpy(log_history[idx].message, message, LOG_MSG_MAX_LEN - 1);
    log_history[idx].message[LOG_MSG_MAX_LEN - 1] = '\0';

    log_count++;
    log_seq++;
}

/* สร้าง display string จาก log history */
static void log_build_display(void)
{
    display_buf[0] = '\0';
    int pos = 0;
    uint32_t total = (log_count < LOG_HISTORY_MAX) ? log_count : LOG_HISTORY_MAX;
    uint32_t start = (log_count < LOG_HISTORY_MAX) ? 0 : (log_count % LOG_HISTORY_MAX);

    for (uint32_t i = 0; i < total; i++) {
        uint32_t idx = (start + i) % LOG_HISTORY_MAX;
        log_entry_t *entry = &log_history[idx];

        /* กรองตาม current_filter */
        if (entry->level > current_filter) continue;

        /* Format: [LEVEL] HH:MM:SS message */
        int written = snprintf(display_buf + pos,
            LOG_DISPLAY_BUF - pos,
            "[%s] %02u:%02u:%02u %s\n",
            log_level_names[entry->level],
            (unsigned int)((entry->timestamp / 3600) % 24),
            (unsigned int)((entry->timestamp / 60) % 60),
            (unsigned int)(entry->timestamp % 60),
            entry->message);

        if (written > 0) pos += written;
        if (pos >= LOG_DISPLAY_BUF - 1) break;
    }

    if (pos == 0) {
        strcpy(display_buf, "(no logs matching filter)");
    }
}
```

**Step 3: Send Log via IPC + Update Local Display**

```c
/*******************************************************************************
 * Send Log (via IPC to CM33 console + local display)
 ******************************************************************************/
static void send_log_message(log_level_t level, const char *message)
{
    /* 1. ส่งผ่าน IPC ไปยัง CM33 console */
    switch (level) {
        case LOG_LEVEL_ERROR:
            CM55_LOGE("%s", message);
            break;
        case LOG_LEVEL_WARN:
            CM55_LOGW("%s", message);
            break;
        case LOG_LEVEL_INFO:
            CM55_LOGI("%s", message);
            break;
        case LOG_LEVEL_DEBUG:
            CM55_LOGD("%s", message);
            break;
        default:
            break;
    }

    /* 2. เก็บ log ในหน่วยความจำ */
    log_add_entry(level, message);

    /* 3. อัปเดต TextArea */
    log_build_display();
    lv_textarea_set_text(textarea_log, display_buf);

    /* 4. Scroll ลงล่างสุดอัตโนมัติ */
    lv_textarea_set_cursor_pos(textarea_log, LV_TEXTAREA_CURSOR_LAST);

    /* 5. อัปเดต counter */
    lv_label_set_text_fmt(label_count,
        "Total: %u logs", (unsigned int)log_count);
}
```

**Step 4: Event Handlers**

```c
/*******************************************************************************
 * Button "Send" Event Handler
 ******************************************************************************/
static void btn_send_event_cb(lv_event_t *e)
{
    if (lv_event_get_code(e) != LV_EVENT_CLICKED) return;

    /* อ่าน level จาก dropdown */
    uint32_t selected = lv_dropdown_get_selected(dropdown_level);
    log_level_t level = (log_level_t)selected;

    /* สร้างข้อความตัวอย่างตาม level */
    char msg[LOG_MSG_MAX_LEN];
    switch (level) {
        case LOG_LEVEL_ERROR:
            snprintf(msg, sizeof(msg),
                "Sensor read failed (code=%d)", (int)(log_seq % 10));
            break;
        case LOG_LEVEL_WARN:
            snprintf(msg, sizeof(msg),
                "IPC buffer 80%% full (seq=%u)", (unsigned int)log_seq);
            break;
        case LOG_LEVEL_INFO:
            snprintf(msg, sizeof(msg),
                "System OK, uptime=%us", (unsigned int)(lv_tick_get() / 1000));
            break;
        case LOG_LEVEL_DEBUG:
            snprintf(msg, sizeof(msg),
                "Register dump: addr=0x%02X val=0x%04X",
                (unsigned int)(log_seq & 0xFF),
                (unsigned int)(log_seq * 7 & 0xFFFF));
            break;
        default:
            break;
    }

    send_log_message(level, msg);
}

/*******************************************************************************
 * Dropdown (Filter Level) Event Handler
 ******************************************************************************/
static void dropdown_filter_event_cb(lv_event_t *e)
{
    if (lv_event_get_code(e) != LV_EVENT_VALUE_CHANGED) return;

    lv_obj_t *dd = lv_event_get_target(e);
    current_filter = (log_level_t)lv_dropdown_get_selected(dd);

    /* Rebuild display with new filter */
    log_build_display();
    lv_textarea_set_text(textarea_log, display_buf);

    CM55_LOGI("Log filter changed to: %s", log_level_names[current_filter]);
}
```

**Step 5: สร้าง UI Layout (Main Entry Point)**

```c
/*******************************************************************************
 * Main Entry Point
 ******************************************************************************/
void part4_ex2_ipc_log(void)
{
    /* ===== ล้างหน้าจอ ===== */
    lv_obj_t *scr = lv_screen_active();
    lv_obj_clean(scr);
    lv_obj_set_style_bg_color(scr, lv_color_hex(0x0d1117), 0);

    /* ===== Title ===== */
    label_title = lv_label_create(scr);
    lv_label_set_text(label_title, "IPC Logging System");
    lv_obj_set_style_text_font(label_title, &lv_font_montserrat_20, 0);
    lv_obj_set_style_text_color(label_title, lv_color_hex(0x58a6ff), 0);
    lv_obj_align(label_title, LV_ALIGN_TOP_MID, 0, 8);

    /* ===== Control Panel (Row: Dropdown + Button) ===== */
    lv_obj_t *panel = lv_obj_create(scr);
    lv_obj_set_size(panel, 300, 50);
    lv_obj_align(panel, LV_ALIGN_TOP_MID, 0, 38);
    lv_obj_set_style_bg_color(panel, lv_color_hex(0x161b22), 0);
    lv_obj_set_style_border_color(panel, lv_color_hex(0x30363d), 0);
    lv_obj_set_flex_flow(panel, LV_FLEX_FLOW_ROW);
    lv_obj_set_flex_align(panel,
        LV_FLEX_ALIGN_SPACE_EVENLY,
        LV_FLEX_ALIGN_CENTER,
        LV_FLEX_ALIGN_CENTER);
    lv_obj_remove_flag(panel, LV_OBJ_FLAG_SCROLLABLE);

    /* Dropdown - Log Level */
    dropdown_level = lv_dropdown_create(panel);
    lv_dropdown_set_options(dropdown_level,
        "ERROR\nWARN\nINFO\nDEBUG");
    lv_dropdown_set_selected(dropdown_level, LOG_LEVEL_INFO);
    lv_obj_set_width(dropdown_level, 120);

    /* Button - Send */
    btn_send = lv_button_create(panel);
    lv_obj_set_size(btn_send, 80, 35);
    lv_obj_set_style_bg_color(btn_send,
        lv_palette_main(LV_PALETTE_GREEN), 0);
    lv_obj_add_event_cb(btn_send, btn_send_event_cb,
        LV_EVENT_CLICKED, NULL);

    lv_obj_t *btn_label = lv_label_create(btn_send);
    lv_label_set_text(btn_label, "Send");
    lv_obj_center(btn_label);

    /* ===== Filter Dropdown ===== */
    lv_obj_t *filter_panel = lv_obj_create(scr);
    lv_obj_set_size(filter_panel, 300, 40);
    lv_obj_align(filter_panel, LV_ALIGN_TOP_MID, 0, 92);
    lv_obj_set_style_bg_color(filter_panel, lv_color_hex(0x161b22), 0);
    lv_obj_set_style_border_width(filter_panel, 0, 0);
    lv_obj_set_flex_flow(filter_panel, LV_FLEX_FLOW_ROW);
    lv_obj_set_flex_align(filter_panel,
        LV_FLEX_ALIGN_START,
        LV_FLEX_ALIGN_CENTER,
        LV_FLEX_ALIGN_CENTER);
    lv_obj_remove_flag(filter_panel, LV_OBJ_FLAG_SCROLLABLE);

    lv_obj_t *filter_label = lv_label_create(filter_panel);
    lv_label_set_text(filter_label, "Filter:");
    lv_obj_set_style_text_color(filter_label, lv_color_hex(0x8b949e), 0);

    lv_obj_t *dd_filter = lv_dropdown_create(filter_panel);
    lv_dropdown_set_options(dd_filter,
        "ERROR only\nWARN+\nINFO+\nDEBUG (all)");
    lv_dropdown_set_selected(dd_filter, LOG_LEVEL_DEBUG);
    lv_obj_set_width(dd_filter, 140);
    lv_obj_add_event_cb(dd_filter, dropdown_filter_event_cb,
        LV_EVENT_VALUE_CHANGED, NULL);

    /* ===== Log TextArea ===== */
    textarea_log = lv_textarea_create(scr);
    lv_obj_set_size(textarea_log, 300, 130);
    lv_obj_align(textarea_log, LV_ALIGN_BOTTOM_MID, 0, -30);
    lv_textarea_set_text(textarea_log, "(no logs yet)");
    lv_textarea_set_cursor_click_pos(textarea_log, false);
    lv_obj_set_style_bg_color(textarea_log, lv_color_hex(0x010409), 0);
    lv_obj_set_style_text_color(textarea_log, lv_color_hex(0xc9d1d9), 0);
    lv_obj_set_style_text_font(textarea_log, &lv_font_montserrat_12, 0);
    lv_obj_set_style_border_color(textarea_log, lv_color_hex(0x30363d), 0);

    /* ===== Log Counter ===== */
    label_count = lv_label_create(scr);
    lv_label_set_text(label_count, "Total: 0 logs");
    lv_obj_set_style_text_font(label_count, &lv_font_montserrat_12, 0);
    lv_obj_set_style_text_color(label_count, lv_color_hex(0x484f58), 0);
    lv_obj_align(label_count, LV_ALIGN_BOTTOM_MID, 0, -10);

    /* ===== Initial log messages ===== */
    send_log_message(LOG_LEVEL_INFO, "Logging system initialized");
    send_log_message(LOG_LEVEL_DEBUG, "IPC Pipe ready");

    CM55_LOGI("Part4 Ex2: IPC Logging System initialized");
}
```

***

### Part C: IPC Sensor Data (Ex3)

#### IPC Sensor Data Structures

**IMU Data (จาก ipc\_shared.h)**

```c
typedef struct __attribute__((packed)) {
    int16_t accel_x;        /* Accelerometer X (raw or scaled) */
    int16_t accel_y;        /* Accelerometer Y */
    int16_t accel_z;        /* Accelerometer Z */
    int16_t gyro_x;         /* Gyroscope X */
    int16_t gyro_y;         /* Gyroscope Y */
    int16_t gyro_z;         /* Gyroscope Z */
    uint32_t timestamp;     /* Timestamp (ms) */
} ipc_imu_data_t;           /* Total: 16 bytes */
```

**ADC Data (จาก ipc\_shared.h)**

```c
typedef struct __attribute__((packed)) {
    uint16_t adc_ch0;       /* ADC Channel 0 (potentiometer) */
    uint16_t adc_ch1;       /* ADC Channel 1 */
    uint16_t adc_ch2;       /* ADC Channel 2 */
    uint16_t adc_ch3;       /* ADC Channel 3 */
    uint32_t timestamp;     /* Timestamp (ms) */
} ipc_adc_data_t;           /* Total: 12 bytes */
```

**การ Pack ข้อมูลใน IPC Message**

```
ipc_msg_t structure (total ~144 bytes):
┌──────────┬──────────┬──────────┬────────────────────────────────────┐
│client_id │intr_mask │   cmd    │              data[128]             │
│ (2 bytes)│ (2 bytes)│ (4 bytes)│    ← ipc_imu_data_t อยู่ตรงนี้         │
│          │          │ SENSOR   │    (16 bytes ของ 128 bytes)        │
│          │          │ _DATA    │                                    │
└──────────┴──────────┴──────────┴────────────────────────────────────┘

วิธีอ่าน:
    ipc_imu_data_t *imu = (ipc_imu_data_t *)msg->data;
    int16_t ax = imu->accel_x;
```

#### IPC Sensor Commands

<table><thead><tr><th>Command</th><th width="127.17047119140625">Value</th><th>ทิศทาง</th><th>คำอธิบาย</th></tr></thead><tbody><tr><td><code>IPC_CMD_SENSOR_REQ</code></td><td>0xA0</td><td>CM55 → CM33</td><td>ร้องขอข้อมูล sensor</td></tr><tr><td><code>IPC_CMD_SENSOR_DATA</code></td><td>0xA1</td><td>CM33 → CM55</td><td>ส่งข้อมูล sensor กลับ</td></tr><tr><td><code>IPC_CMD_IMU_DATA</code></td><td>0xA2</td><td>CM33 → CM55</td><td>ข้อมูล IMU โดยเฉพาะ</td></tr><tr><td><code>IPC_CMD_ADC_DATA</code></td><td>0xA3</td><td>CM33 → CM55</td><td>ข้อมูล ADC โดยเฉพาะ</td></tr></tbody></table>

#### Request-Response Sequence

```
  CM55                                     CM33-NS
  ────                                     ───────
   │                                          │
   │ cm55_ipc_request_sensor(IPC_CMD_IMU_DATA)│
   │ ──── IPC_CMD_SENSOR_REQ ──────────────►  │
   │      (value = IPC_CMD_IMU_DATA)          │
   │                                          │  mtb_bmi270_read()
   │                                          │  pack ipc_imu_data_t
   │   ◄───── IPC_CMD_IMU_DATA ─────────────  │
   │          data = ipc_imu_data_t           │
   │                                          │
   │ ipc_callback():                          │
   │   memcpy(&imu_buf, msg->data, sizeof)    │
   │   imu_data_ready = true;                 │
   │                                          │
   │ LVGL timer:                              │
   │   if (imu_data_ready) → update chart     │
   │                                          │
```

#### IPC Buffer Warning (CRITICAL)

> PSoC Edge IPC Pipe ใช้ **rx\_buffer เดียว** ถ้าส่ง request ติดกันเร็วเกินไป ข้อมูลจะถูก overwrite **วิธีแก้:** 1) ใช้ timer คนละตัวที่ offset กัน (ใช้ใน Lab นี้) 2) ให้ CM33 ส่ง IMU+ADC รวมกัน 3) ใช้ FreeRTOS Queue

#### Step-by-Step Implementation

**Step 1: ประกาศ Variables และ Structures**

```c
/* part4_ex3_ipc_sensor.c */
#include "lvgl.h"
#include "ipc/cm55_ipc_pipe.h"

#include <stdbool.h>
#include <stdint.h>
#include <string.h>

/*******************************************************************************
 * Constants
 ******************************************************************************/
#define CHART_POINT_COUNT   50      /* จำนวนจุดใน Chart */
#define SENSOR_POLL_MS      100     /* อ่าน sensor ทุก 100ms */
#define ACCEL_SCALE         100     /* Scale factor สำหรับ chart (x100) */

/*******************************************************************************
 * LVGL Objects
 ******************************************************************************/
static lv_obj_t *label_title     = NULL;
static lv_obj_t *chart_accel     = NULL;
static lv_chart_series_t *ser_x  = NULL;
static lv_chart_series_t *ser_y  = NULL;
static lv_chart_series_t *ser_z  = NULL;
static lv_obj_t *label_accel     = NULL;
static lv_obj_t *label_adc      = NULL;
static lv_obj_t *label_rate     = NULL;

/*******************************************************************************
 * Flag-Based Pattern Variables (volatile!)
 ******************************************************************************/
static volatile bool imu_data_ready       = false;
static volatile bool adc_data_ready       = false;

/* Buffers สำหรับเก็บข้อมูลจาก IPC callback */
static volatile ipc_imu_data_t imu_buffer;
static volatile ipc_adc_data_t adc_buffer;

/*******************************************************************************
 * Statistics
 ******************************************************************************/
static uint32_t sample_count      = 0;
static uint32_t last_rate_tick    = 0;
static uint32_t last_rate_count   = 0;
static uint32_t samples_per_sec   = 0;
```

**Step 2: IPC Callback (รับข้อมูล Sensor)**

```c
/*******************************************************************************
 * IPC Receive Callback
 *
 * CRITICAL: ทำงานใน IPC Task - ห้ามเรียก lv_xxx()!
 * เก็บข้อมูลลง buffer + ตั้ง flag เท่านั้น
 ******************************************************************************/
static void ipc_sensor_callback(const ipc_msg_t *msg, void *user_data)
{
    (void)user_data;

    switch (msg->cmd) {
        case IPC_CMD_IMU_DATA: {
            /* Copy IMU data จาก IPC message */
            const ipc_imu_data_t *imu = (const ipc_imu_data_t *)msg->data;
            memcpy((void *)&imu_buffer, imu, sizeof(ipc_imu_data_t));
            imu_data_ready = true;
            break;
        }

        case IPC_CMD_ADC_DATA: {
            /* Copy ADC data จาก IPC message */
            const ipc_adc_data_t *adc = (const ipc_adc_data_t *)msg->data;
            memcpy((void *)&adc_buffer, adc, sizeof(ipc_adc_data_t));
            adc_data_ready = true;
            break;
        }

        case IPC_CMD_PONG:
            /* Ignore PONG จาก Lab 1 */
            break;

        default:
            CM55_LOGW("Unknown sensor cmd: 0x%X", (unsigned int)msg->cmd);
            break;
    }
}
```

**Step 3: Sensor Request Timers**

```c
/*******************************************************************************
 * Sensor Request Timer
 * ส่ง request ไปยัง CM33 ทุก SENSOR_POLL_MS
 ******************************************************************************/
static void sensor_request_timer_cb(lv_timer_t *timer)
{
    (void)timer;

    if (!cm55_ipc_is_init()) return;

    /* ร้องขอ IMU data */
    cm55_ipc_request_sensor(IPC_CMD_IMU_DATA);

    /*
     * IMPORTANT: ต้องเว้นช่วงระหว่าง IPC sends
     * เพราะ IPC ใช้ single rx_buffer
     * ถ้าส่งติดกันเร็วเกินไป จะ overwrite กัน
     *
     * วิธีแก้: ร้องขอ ADC ใน timer แยก หรือ
     *          ให้ CM33 ส่ง IMU+ADC รวมกัน
     */
}

/* Timer แยกสำหรับ ADC (offset 50ms จาก IMU) */
static void adc_request_timer_cb(lv_timer_t *timer)
{
    (void)timer;

    if (!cm55_ipc_is_init()) return;

    /* ร้องขอ ADC data */
    cm55_ipc_request_sensor(IPC_CMD_ADC_DATA);
}
```

**Step 4: UI Update Timer (อ่าน flag + อัปเดต Chart)**

```c
/*******************************************************************************
 * UI Update Timer - ตรวจสอบ flag ทุก 50ms
 * ทำงานใน LVGL context จึงเรียก lv_xxx() ได้อย่างปลอดภัย
 ******************************************************************************/
static void ui_update_timer_cb(lv_timer_t *timer)
{
    (void)timer;

    /* ===== IMU Data Update ===== */
    if (imu_data_ready) {
        imu_data_ready = false;
        sample_count++;

        /* อ่านข้อมูลจาก buffer (copy เพื่อความปลอดภัย) */
        ipc_imu_data_t imu;
        memcpy(&imu, (void *)&imu_buffer, sizeof(ipc_imu_data_t));

        /* อัปเดต Chart */
        lv_chart_set_next_value(chart_accel, ser_x, imu.accel_x / ACCEL_SCALE);
        lv_chart_set_next_value(chart_accel, ser_y, imu.accel_y / ACCEL_SCALE);
        lv_chart_set_next_value(chart_accel, ser_z, imu.accel_z / ACCEL_SCALE);

        /* อัปเดต Labels */
        lv_label_set_text_fmt(label_accel,
            "Accel  X:%d  Y:%d  Z:%d",
            (int)imu.accel_x, (int)imu.accel_y, (int)imu.accel_z);
    }

    /* ===== ADC Data Update ===== */
    if (adc_data_ready) {
        adc_data_ready = false;

        ipc_adc_data_t adc;
        memcpy(&adc, (void *)&adc_buffer, sizeof(ipc_adc_data_t));

        lv_label_set_text_fmt(label_adc,
            "ADC  CH0:%u  CH1:%u",
            (unsigned int)adc.adc_ch0,
            (unsigned int)adc.adc_ch1);
    }

    /* ===== Sample Rate Calculation ===== */
    uint32_t now = lv_tick_get();
    if (now - last_rate_tick >= 1000) {
        samples_per_sec = sample_count - last_rate_count;
        last_rate_count = sample_count;
        last_rate_tick = now;

        lv_label_set_text_fmt(label_rate,
            "Rate: %u sps | Total: %u",
            (unsigned int)samples_per_sec,
            (unsigned int)sample_count);
    }
}
```

**Step 5: สร้าง UI Layout (Main Entry Point)**

```c
/*******************************************************************************
 * Main Entry Point
 ******************************************************************************/
void part4_ex3_ipc_sensor(void)
{
    /* ===== ล้างหน้าจอ ===== */
    lv_obj_t *scr = lv_screen_active();
    lv_obj_clean(scr);
    lv_obj_set_style_bg_color(scr, lv_color_hex(0x0d1117), 0);

    /* ===== Title ===== */
    label_title = lv_label_create(scr);
    lv_label_set_text(label_title, "IPC Sensor Monitor");
    lv_obj_set_style_text_font(label_title, &lv_font_montserrat_20, 0);
    lv_obj_set_style_text_color(label_title, lv_color_hex(0x58a6ff), 0);
    lv_obj_align(label_title, LV_ALIGN_TOP_MID, 0, 5);

    /* ===== Accelerometer Chart ===== */
    chart_accel = lv_chart_create(scr);
    lv_obj_set_size(chart_accel, 290, 110);
    lv_obj_align(chart_accel, LV_ALIGN_TOP_MID, 0, 32);
    lv_chart_set_type(chart_accel, LV_CHART_TYPE_LINE);
    lv_chart_set_point_count(chart_accel, CHART_POINT_COUNT);
    lv_chart_set_range(chart_accel, LV_CHART_AXIS_PRIMARY_Y, -200, 200);
    lv_obj_set_style_bg_color(chart_accel, lv_color_hex(0x010409), 0);
    lv_obj_set_style_border_color(chart_accel, lv_color_hex(0x30363d), 0);
    lv_obj_set_style_line_width(chart_accel, 2, LV_PART_ITEMS);
    lv_obj_set_style_size(chart_accel, 0, 0, LV_PART_INDICATOR);

    /* Series: X(Red), Y(Green), Z(Blue) */
    ser_x = lv_chart_add_series(chart_accel,
        lv_palette_main(LV_PALETTE_RED), LV_CHART_AXIS_PRIMARY_Y);
    ser_y = lv_chart_add_series(chart_accel,
        lv_palette_main(LV_PALETTE_GREEN), LV_CHART_AXIS_PRIMARY_Y);
    ser_z = lv_chart_add_series(chart_accel,
        lv_palette_main(LV_PALETTE_BLUE), LV_CHART_AXIS_PRIMARY_Y);

    /* ===== Legend ===== */
    lv_obj_t *legend_panel = lv_obj_create(scr);
    lv_obj_set_size(legend_panel, 290, 22);
    lv_obj_align(legend_panel, LV_ALIGN_TOP_MID, 0, 145);
    lv_obj_set_style_bg_opa(legend_panel, LV_OPA_TRANSP, 0);
    lv_obj_set_style_border_width(legend_panel, 0, 0);
    lv_obj_set_style_pad_all(legend_panel, 0, 0);
    lv_obj_set_flex_flow(legend_panel, LV_FLEX_FLOW_ROW);
    lv_obj_set_flex_align(legend_panel,
        LV_FLEX_ALIGN_CENTER, LV_FLEX_ALIGN_CENTER, LV_FLEX_ALIGN_CENTER);
    lv_obj_remove_flag(legend_panel, LV_OBJ_FLAG_SCROLLABLE);

    /* X legend */
    lv_obj_t *lx = lv_label_create(legend_panel);
    lv_label_set_text(lx, "X");
    lv_obj_set_style_text_color(lx, lv_palette_main(LV_PALETTE_RED), 0);
    lv_obj_set_style_text_font(lx, &lv_font_montserrat_14, 0);

    lv_obj_t *sep1 = lv_label_create(legend_panel);
    lv_label_set_text(sep1, "   ");

    /* Y legend */
    lv_obj_t *ly = lv_label_create(legend_panel);
    lv_label_set_text(ly, "Y");
    lv_obj_set_style_text_color(ly, lv_palette_main(LV_PALETTE_GREEN), 0);
    lv_obj_set_style_text_font(ly, &lv_font_montserrat_14, 0);

    lv_obj_t *sep2 = lv_label_create(legend_panel);
    lv_label_set_text(sep2, "   ");

    /* Z legend */
    lv_obj_t *lz = lv_label_create(legend_panel);
    lv_label_set_text(lz, "Z");
    lv_obj_set_style_text_color(lz, lv_palette_main(LV_PALETTE_BLUE), 0);
    lv_obj_set_style_text_font(lz, &lv_font_montserrat_14, 0);

    /* ===== Accel Values Label ===== */
    label_accel = lv_label_create(scr);
    lv_label_set_text(label_accel, "Accel  X:--  Y:--  Z:--");
    lv_obj_set_style_text_font(label_accel, &lv_font_montserrat_14, 0);
    lv_obj_set_style_text_color(label_accel, lv_color_hex(0xc9d1d9), 0);
    lv_obj_align(label_accel, LV_ALIGN_TOP_MID, 0, 170);

    /* ===== ADC Values Label ===== */
    label_adc = lv_label_create(scr);
    lv_label_set_text(label_adc, "ADC  CH0:--  CH1:--");
    lv_obj_set_style_text_font(label_adc, &lv_font_montserrat_14, 0);
    lv_obj_set_style_text_color(label_adc, lv_color_hex(0x8b949e), 0);
    lv_obj_align(label_adc, LV_ALIGN_TOP_MID, 0, 192);

    /* ===== Sample Rate Label ===== */
    label_rate = lv_label_create(scr);
    lv_label_set_text(label_rate, "Rate: -- sps | Total: 0");
    lv_obj_set_style_text_font(label_rate, &lv_font_montserrat_12, 0);
    lv_obj_set_style_text_color(label_rate, lv_color_hex(0x484f58), 0);
    lv_obj_align(label_rate, LV_ALIGN_BOTTOM_MID, 0, -8);

    /* ===== Register IPC Callback ===== */
    cm55_ipc_register_callback(ipc_sensor_callback, NULL);

    /* ===== Create Timers ===== */
    /* Request IMU ทุก 100ms */
    lv_timer_create(sensor_request_timer_cb, SENSOR_POLL_MS, NULL);

    /* Request ADC ทุก 100ms (offset 50ms จาก IMU) */
    lv_timer_t *adc_timer = lv_timer_create(adc_request_timer_cb,
        SENSOR_POLL_MS, NULL);
    /* หน่วงเวลาเริ่มต้น 50ms เพื่อไม่ให้ชนกับ IMU request */
    lv_timer_set_repeat_count(adc_timer, -1);

    /* UI update ทุก 50ms */
    lv_timer_create(ui_update_timer_cb, 50, NULL);

    /* Initialize timing */
    last_rate_tick = lv_tick_get();

    CM55_LOGI("Part4 Ex3: IPC Sensor Monitor initialized");
}
```

***

### 3. แบบฝึกหัด

#### Exercise 1: Ping Statistics (Min/Max/Avg RTT)

เพิ่มการวิเคราะห์สถิติ Ping-Pong:

* RTT: min / max / average
* Packet loss rate (%)
* แสดงผลบน Label เพิ่มเติม

**Hints:**

```c
static uint32_t rtt_min = UINT32_MAX;
static uint32_t rtt_max = 0;
static uint32_t rtt_sum = 0;

/* ใน ping_timer_cb() */
if (pong_rtt_ms < rtt_min) rtt_min = pong_rtt_ms;
if (pong_rtt_ms > rtt_max) rtt_max = pong_rtt_ms;
rtt_sum += pong_rtt_ms;
uint32_t rtt_avg = rtt_sum / pong_count;
uint32_t loss = ((ping_count - pong_count) * 100) / ping_count;
```

#### Exercise 2: Data Rate Monitor (Sensor)

เพิ่มการวัดอัตราข้อมูล sensor:

* แยก IMU sps กับ ADC sps
* เปรียบเทียบ actual rate กับ target rate (10 Hz)
* แสดงเป็น % ของ target
* เปลี่ยนสีเตือนเมื่อ rate ต่ำกว่า 80%

**Hints:**

```c
static uint32_t imu_sample_count = 0;
static uint32_t adc_sample_count = 0;

/* คำนวณ rate ทุก 1 วินาที */
if (now - last_rate_tick >= 1000) {
    imu_sps = imu_sample_count - last_imu_count;
    uint32_t target = 1000 / SENSOR_POLL_MS;  /* 10 Hz */
    uint32_t pct = (imu_sps * 100) / target;

    lv_label_set_text_fmt(label_rate,
        "IMU: %u/%u sps (%u%%)  ADC: %u sps",
        imu_sps, target, pct, adc_sps);
}
```

#### Exercise 3: Color-Coded Log Viewer

สร้าง log viewer ที่แสดงแต่ละ level ด้วยสีต่างกัน:

* ERROR: สีแดง, WARN: สีเหลือง, INFO: สีเขียว, DEBUG: สีเทา
* ปุ่ม "Clear" ล้าง log ทั้งหมด
* จำนวน log แต่ละ level (E:3 W:5 I:10 D:2)

**Hints:**

LVGL TextArea ไม่รองรับหลายสี ต้องใช้ approach อื่น:

```c
/* ใช้หลาย Label ใน Scrollable Container */
lv_obj_t *log_container = lv_obj_create(scr);
lv_obj_set_flex_flow(log_container, LV_FLEX_FLOW_COLUMN);

void add_log_label(log_level_t level, const char *text) {
    lv_obj_t *lbl = lv_label_create(log_container);
    lv_label_set_text(lbl, text);
    lv_obj_set_style_text_color(lbl,
        lv_color_hex(log_level_colors[level]), 0);
    lv_obj_scroll_to_view(lbl, LV_ANIM_ON);
}
```

***

### 4. Quick Reference / Cheat Sheet

```c
/*******************************************************************************
 * IPC API (CM55 Side)
 ******************************************************************************/
cm55_ipc_init();                              /* Initialize IPC */
cm55_ipc_is_init();                           /* Check if ready */
cm55_ipc_send_cmd(IPC_CMD_PING, value);       /* Send command */
cm55_ipc_send_retry(&msg, 10);                /* Send with retry */
cm55_ipc_register_callback(cb_func, NULL);    /* Register RX callback */
cm55_ipc_request_sensor(IPC_CMD_IMU_DATA);    /* Request IMU */
cm55_ipc_request_sensor(IPC_CMD_ADC_DATA);    /* Request ADC */

/*******************************************************************************
 * IPC Message Structure
 ******************************************************************************/
typedef struct {
    uint16_t client_id;             /* Destination */
    uint16_t intr_mask;             /* Pipe driver */
    uint32_t cmd;                   /* IPC_CMD_xxx */
    uint32_t value;                 /* Numeric data */
    char     data[128];             /* String data */
} ipc_msg_t;

/* Initialize and send */
ipc_msg_t msg;
IPC_MSG_INIT(&msg, IPC_CMD_LOG_INFO);
snprintf(msg.data, IPC_DATA_MAX_LEN, "Temperature: %d C", temp);
cm55_ipc_send_retry(&msg, 5);

/*******************************************************************************
 * Logging Macros (CM55 → CM33 console)
 ******************************************************************************/
CM55_LOGI("info: %d", val);                   /* Info level (0x94) */
CM55_LOGE("error: %s", msg);                  /* Error level (0x92) */
CM55_LOGW("warning");                          /* Warning level (0x93) */
CM55_LOGD("debug data: 0x%X", data);          /* Debug level (0x95) */

/* Low-level API */
cm55_ipc_log("general log message");
cm55_ipc_log_level(IPC_CMD_LOG_ERROR, "formatted %d", val);
cm55_ipc_send_data(IPC_CMD_LOG, "raw string data");

/*******************************************************************************
 * Sensor Data Structures
 ******************************************************************************/
ipc_imu_data_t imu;                             /* 16 bytes packed */
  .accel_x, .accel_y, .accel_z                  /* int16_t */
  .gyro_x,  .gyro_y,  .gyro_z                   /* int16_t */
  .timestamp                                     /* uint32_t */

ipc_adc_data_t adc;                             /* 12 bytes packed */
  .adc_ch0 ~ .adc_ch3                           /* uint16_t */
  .timestamp                                     /* uint32_t */

/* Cast จาก IPC message */
ipc_imu_data_t *imu = (ipc_imu_data_t *)msg->data;

/*******************************************************************************
 * Flag-Based Pattern (CRITICAL!)
 ******************************************************************************/
static volatile bool flag = false;            /* Shared flag */
static volatile int32_t shared_data = 0;      /* Shared data */

/* IPC callback: ตั้ง flag + เก็บ data */
/* LVGL timer:   อ่าน flag + อัปเดต UI */

/*******************************************************************************
 * Timing
 ******************************************************************************/
uint32_t start = lv_tick_get();               /* Get current tick (ms) */
uint32_t elapsed = lv_tick_get() - start;     /* Elapsed time */

/*******************************************************************************
 * LVGL Chart API (v9.2)
 ******************************************************************************/
lv_chart_create(parent);
lv_chart_set_type(chart, LV_CHART_TYPE_LINE);
lv_chart_set_point_count(chart, 50);
lv_chart_set_range(chart, LV_CHART_AXIS_PRIMARY_Y, -200, 200);
lv_chart_add_series(chart, color, LV_CHART_AXIS_PRIMARY_Y);
lv_chart_set_next_value(chart, series, value);

/*******************************************************************************
 * LVGL TextArea API (v9.2)
 ******************************************************************************/
lv_textarea_create(parent);
lv_textarea_set_text(ta, "content");
lv_textarea_add_text(ta, "append");
lv_textarea_set_cursor_pos(ta, LV_TEXTAREA_CURSOR_LAST);

/*******************************************************************************
 * LVGL Dropdown API (v9.2)
 ******************************************************************************/
lv_dropdown_create(parent);
lv_dropdown_set_options(dd, "A\nB\nC");
lv_dropdown_get_selected(dd);                  /* Get index (0-based) */
```

#### Application ในงาน Industrial

| Use Case                   | คำอธิบาย                                                 |
| -------------------------- | -------------------------------------------------------- |
| **System Health Monitor**  | วัด latency ระหว่าง Core ตรวจจับ hang                    |
| **Watchdog Ping**          | Core A ping Core B ทุก 1 วินาที ถ้าไม่ตอบ → reset        |
| **Production Diagnostics** | บันทึก error log สำหรับวิเคราะห์ปัญหาในโรงงาน            |
| **Field Service**          | ช่างซ่อมอ่าน log จากหน้าจอเครื่องโดยไม่ต้องต่อ PC        |
| **Condition Monitoring**   | วัดการสั่นสะเทือนของเครื่องจักรเพื่อพยากรณ์การบำรุงรักษา |
| **Process Control**        | แสดงค่า sensor ของกระบวนการผลิตแบบ real-time             |
| **Remote Monitoring**      | ส่ง log ผ่าน WiFi/BLE ไปยัง cloud dashboard              |
| **Quality Inspection**     | ตรวจจับค่าผิดปกติในสายการผลิต                            |

***

### 5. References

* LVGL Docs: <https://docs.lvgl.io/master/>
* PSoC Edge E84: Infineon documentation
* ModusToolbox: <https://www.infineon.com/modustoolbox>
* LVGL Chart Widget: <https://docs.lvgl.io/master/widgets/chart.html>
* LVGL TextArea Widget: <https://docs.lvgl.io/master/widgets/textarea.html>


# Event Bus

## Lab 2: Event Bus Integration (EventBus + Advanced IPC)

### Part 4 - IPC & Event Bus

***

### 1. โครงสร้างภาพรวม (Overview)

#### Why? - ทำไมต้องเรียนรู้เรื่องนี้

**Event-Driven Architecture** คือรูปแบบสถาปัตยกรรมที่ใช้ในระบบ Industrial, SCADA, IoT ทุกระดับ:

* **Loose Coupling**: ลด dependency ระหว่างโมดูล ทำให้ขยายระบบได้ง่าย
* **Publish-Subscribe**: หลายโมดูลสามารถ subscribe event เดียวกัน ไม่ต้องรู้จักกัน
* **Scalability**: เพิ่ม subscriber ได้โดยไม่ต้องแก้ publisher

ในระบบ Embedded จริง ไม่มี feature ใดทำงานอิสระ ทุกอย่างต้อง **บูรณาการ** เข้าด้วยกัน:

* **Smart Factory HMI**: หน้าจอเดียวต้องแสดง sensor data + ควบคุม actuator + แสดง event log + monitor สถานะระบบ
* **Medical Device**: Patient monitor ต้องรวม ECG + SpO2 + Blood Pressure + Alarm ทั้งหมด
* **Automotive Dashboard**: Instrument cluster ต้องรวม speed + RPM + fuel + warning lights
* **Building Management System**: HVAC control + lighting + security + energy monitoring ในระบบเดียว

Lab นี้เป็นแบบ **progressive learning** -- เริ่มจาก Part A ที่สร้าง Event Bus ด้วย simulated/IPC data แล้วก้าวสู่ Part B ที่บูรณาการ Event Bus + IPC + Logging + GPIO real hardware เข้าด้วยกัน

#### What? - จะได้เรียนรู้อะไร

**Part A (Ex4 - Event Bus):**

1. **Event Bus Pattern**: Publish-Subscribe สำหรับ Embedded Systems
2. **Event Types**: EVENT\_IMU, EVENT\_ADC, EVENT\_BUTTON
3. **Multiple Subscribers**: หลาย handler ต่อ 1 event
4. **State Machine**: ออกแบบ state machine ที่ขับเคลื่อนด้วย event

**Part B (Ex8 - Advanced Integration):**

1. **System Integration**: รวม 4 subsystems (IPC, EventBus, Logging, Hardware)
2. **Layout Helpers**: ใช้ `aic_col_create()`, `aic_row_create()`, `aic_full_size()`, `aic_pad()` สร้าง UI อย่างรวดเร็ว
3. **Event Bus Pub/Sub**: Decouple sensor reads จาก UI updates ผ่าน publish/subscribe
4. **IPC Statistics Monitoring**: ติดตาม TX/RX/Error counts แบบ real-time
5. **Multi-Sensor Dashboard**: แสดง IMU + ADC + Button + LED ในหน้าเดียว
6. **Combined Init Pattern**: ลำดับการ initialize subsystems ที่ถูกต้อง

#### How? - จะทำอย่างไร

**Part A:** สร้าง Event Bus infrastructure (subscribe, publish, dispatch) + UI แสดง event log + statistics โดยรับข้อมูลจาก IPC callback ผ่าน flag-based pattern

**Part B:** สร้าง Dashboard บน CM55 ด้วย layout helpers ที่ประกอบด้วย LED row, Button state, IMU display, ADC display, Stats row -- โดยรวม IPC + EventBus + Logging + GPIO เข้าด้วยกัน

***

### 2. หลักการทางเทคนิค (Technical Principles)

#### 2.1 Event-Driven Architecture

```
+-----------------------------------------------------------------------+
|               Event-Driven Architecture Overview                      |
+-----------------------------------------------------------------------+
|                                                                       |
|  Traditional (Polling):                                               |
|  +----------------------------------------------+                     |
|  |  while(1) {                                  |                     |
|  |      if (button_pressed()) handle_btn();     | <- Wastes CPU       |
|  |      if (sensor_ready())  read_sensor();     |    checking things  |
|  |      if (timer_expired()) update_ui();       |    that haven't     |
|  |  }                                           |    happened yet     |
|  +----------------------------------------------+                     |
|                                                                       |
|  Event-Driven:                                                        |
|  +----------------------------------------------+                     |
|  |                 EVENT BUS                    |                     |
|  |                                              |                     |
|  |  Publishers              Subscribers         |                     |
|  |  ----------              -----------         |                     |
|  |  IPC Callback --+   +-- UI Handler           |                     |
|  |  Button ISR  ---+   +-- Log Handler          |                     |
|  |  Timer       ---+   +-- LED Handler          |                     |
|  |  Sensor      ---+   +-- State Machine        |                     |
|  |                                              |                     |
|  |  Publisher ไม่ต้องรู้ว่า Subscriber คือใคร         |                     |
|  |  Subscriber ไม่ต้องรู้ว่า Publisher คือใคร         |                     |
|  +----------------------------------------------+                     |
|                                                                       |
+-----------------------------------------------------------------------+
```

#### 2.2 Publish-Subscribe Flow

```
 Publisher                    Event Bus                 Subscribers
 ---------                   ---------                 -----------
    |                            |                         |
    | publish(EVENT_IMU, data)   |                         |
    | -------------------------> |                         |
    |                            | dispatch to all         |
    |                            | subscribers of          |
    |                            | EVENT_IMU               |
    |                            | ----------------------> | handler_1(data)
    |                            | ----------------------> | handler_2(data)
    |                            | ----------------------> | handler_3(data)
    |                            |                         |
    |                            |                         |
    | publish(EVENT_BUTTON, data)|                         |
    | -------------------------> |                         |
    |                            | ----------------------> | btn_handler(data)
    |                            |                         |
```

#### 2.3 Event Bus Architecture (Part A)

```
+-----------------------------------------------------------------------+
|                     Event Bus Architecture                            |
+-----------------------------------------------------------------------+
|                                                                       |
|  +-------------+                    +------------------------------+  |
|  | IPC Callback |   flag-based      |        EVENT BUS             |  |
|  | (IPC Task)   | ---------------->  |                             |  |
|  | imu_ready=1  |   imu_data        |  subscribers[EVENT_IMU][]    |  |
|  | btn_ready=1  |   btn_data        |  +-- [0] ui_chart_handler    |  |
|  +-------------+                    |  +-- [1] log_handler         |  |
|                                      |  +-- [2] threshold_handler  |  |
|  +-------------+   publish()         |  +-- [3] (empty)            |  |
|  | LVGL Timer   | ---------------->  |                             |  |
|  | (50ms poll)  |                    |  subscribers[EVENT_BUTTON][]|  |
|  | check flags  |                    |  +-- [0] led_toggle_handler |  |
|  | -> publish() |                    |  +-- [1] state_handler      |  |
|  +-------------+                    |  +-- [2] log_handler         |  |
|                                      |                             |  |
|  +-------------+   publish()         |  subscribers[EVENT_ADC][]   |  |
|  | Timer        | ---------------->  |  +-- [0] gauge_handler      |  |
|  | (1s tick)    |                    |  +-- [1] threshold_handler  |  |
|  | EVENT_TIMER  |                    |                             |  |
|  +-------------+                    +------------------------------+  |
|                                                                       |
|  KEY: ทุกอย่างทำงานใน LVGL context (thread-safe)                        |
|       IPC callback ใช้ flag-based pattern ก่อน publish                  |
|                                                                       |
+-----------------------------------------------------------------------+
```

#### 2.4 Integration Architecture (Part B)

```
+===================================================================+
|           ADVANCED FEATURES - INTEGRATION ARCHITECTURE            |
+===================================================================+
|                                                                   |
|  CM55 Core (LVGL + Application Logic)                             |
|  =============================================                    |
|                                                                   |
|  +----------------+  +----------------+  +------------------+     |
|  |   IPC Layer    |  |  Event Bus     |  |  Logging System  |     |
|  |                |  |                |  |                  |     |
|  | cm55_ipc_*()   |  | aic_event_*()  |  | aic_log_init()   |     |
|  | set_led()      |  | subscribe()    |  | CM55_LOGI()      |     |
|  | get_stats()    |  | publish_imu()  |  | CM55_LOGW()      |     |
|  | is_init()      |  | publish_adc()  |  | CM55_LOGE()      |     |
|  +-------+--------+  +-------+--------+  +--------+---------+     |
|          |                    |                     |             |
|          v                    v                     v             |
|  +------------------------------------------------------------+   |
|  |               LVGL UI Dashboard                            |   |
|  |                                                            |   |
|  | [Title] Part 4 Ex8: Advanced                               |   |
|  | [Subtitle] IPC + EventBus + Logging + HW                   |   |
|  |                                                            |   |
|  | [LED Row]  [*R][L1]  [*G][L2]  [*B][L3]     <- IPC send    |   |
|  |                                                            |   |
|  | [Button]   BTN1: Released/Pressed            <- GPIO read  |   |
|  |                                                            |   |
|  | [IMU]      Accel (EventBus)                  <- EventBus   |   |
|  |            X: +0.05  Y: -0.12  Z: +9.81                    |   |
|  |                                                            |   |
|  | [ADC]      ADC: 2048 (1.65V)                 <- EventBus   |   |
|  |                                                            |   |
|  | [Stats]    Events: 42  IPC TX:10 RX:8 Err:0  <- Monitor    |   |
|  +------------------------------------------------------------+   |
|                                                                   |
|  ========================== IPC PIPE ==========================   |
|                                                                   |
|  CM33-NS Core (Hardware + Sensors)                                |
|  =============================================                    |
|  +----------+ +----------+ +----------+ +----------+              |
|  | LED GPIO | |  Button  | |   IMU    | |   ADC    |              |
|  | Handler  | |  Poller  | |  Reader  | |  Reader  |              |
|  +----------+ +----------+ +----------+ +----------+              |
|                                                                   |
+===================================================================+
```

#### 2.5 Initialization Sequence (Part B -- Critical!)

```
+===================================================================+
|              INITIALIZATION SEQUENCE (CRITICAL ORDER)             |
+===================================================================+
|                                                                   |
|  +-------------------+                                            |
|  |   Start Ex8       |                                            |
|  +--------+----------+                                            |
|           |                                                       |
|           v                                                       |
|  +-------------------+   aic_gpio_init() ต้องมาก่อน                 |
|  | 1. GPIO Init      |   --> return bool (ready/not ready)        |
|  |  aic_gpio_init()  |   --> ถ้า false: ข้าม HW functions           | 
|  +--------+----------+                                            |
|           |                                                       |
|           v                                                       |
|  +-------------------+   aic_sensors_init() ต้องมาก่อน              |
|  | 2. Sensors Init   |   aic_adc_read() เสมอ!                     |
|  | aic_sensors_init()|                                            |
|  +--------+----------+                                            |
|           |                                                       |
|           v                                                       |
|  +-------------------+   Event Bus ต้อง init ก่อน subscribe         |
|  | 3. Event Bus Init |                                            |
|  |  aic_event_init() |                                            |
|  +--------+----------+                                            |
|           |                                                       |
|           v                                                       |
|  +-------------------+   Logging ใช้ได้ทันทีหลัง init                  |
|  | 4. Logging Init   |                                            |
|  |  aic_log_init()   |                                            |
|  +--------+----------+                                            |
|           |                                                       |
|           v                                                       |
|  +-------------------+   สร้าง UI objects                          |
|  | 5. Build UI       |   (ต้องสร้างก่อน subscribe)                   |
|  |  Layout helpers   |                                            |
|  +--------+----------+                                            |
|           |                                                       |
|           v                                                       |
|  +-------------------+   ตอนนี้ UI objects พร้อมแล้ว                  |
|  | 6. Subscribe      |   จึง subscribe event ได้                    |
|  |  aic_event_sub()  |                                            |
|  +--------+----------+                                            |
|           |                                                       |
|           v                                                       |
|  +-------------------+   Timer เริ่มทำงาน                           |
|  | 7. Create Timer   |   --> ระบบเริ่มทำงานจริง                      |
|  | lv_timer_create() |                                            |
|  +-------------------+                                            |
|                                                                   |
+===================================================================+
```

***

### 3. Part A: Event Bus (Ex4 - Simulated + IPC Data)

Part A สอนการสร้าง Event Bus infrastructure ตั้งแต่ต้น -- ออกแบบ event types, subscriber system, publish/dispatch mechanism แล้วทดสอบด้วย IPC data + timer events

#### 3.1 Event Types

```c
/*******************************************************************************
 * Event Type Definitions
 ******************************************************************************/
typedef enum {
    EVENT_NONE = 0,

    /* Sensor Events */
    EVENT_IMU,              /* IMU data received */
    EVENT_ADC,              /* ADC data received */
    EVENT_TEMP,             /* Temperature data */

    /* Input Events */
    EVENT_BUTTON,           /* Button press/release */
    EVENT_TOUCH,            /* Touch screen event */

    /* System Events */
    EVENT_IPC_CONNECTED,    /* IPC pipe established */
    EVENT_IPC_ERROR,        /* IPC communication error */
    EVENT_TIMER,            /* Periodic timer tick */

    /* Application Events */
    EVENT_THRESHOLD,        /* Sensor value exceeded threshold */
    EVENT_STATE_CHANGE,     /* State machine transition */

    EVENT_TYPE_COUNT        /* จำนวน event types ทั้งหมด */
} event_type_t;
```

#### 3.2 Event Data Structure

```c
/*******************************************************************************
 * Event Data
 ******************************************************************************/
typedef struct {
    event_type_t type;          /* ประเภท event */
    uint32_t     timestamp;     /* เวลาที่เกิด event (ms) */
    int32_t      value;         /* ค่าตัวเลข */
    void         *data;         /* ข้อมูลเพิ่มเติม (optional) */
} event_t;

/* Event Names (สำหรับ display) */
static const char *event_names[] = {
    "NONE", "IMU", "ADC", "TEMP",
    "BUTTON", "TOUCH",
    "IPC_OK", "IPC_ERR", "TIMER",
    "THRESH", "STATE"
};
```

#### 3.3 Event Bus Core

```c
/*******************************************************************************
 * Event Bus Infrastructure
 ******************************************************************************/
#define MAX_SUBSCRIBERS_PER_EVENT  4
#define EVENT_QUEUE_SIZE          16

/* Subscriber callback type */
typedef void (*event_handler_t)(const event_t *event, void *user_data);

/* Subscriber entry */
typedef struct {
    event_handler_t handler;
    void           *user_data;
    bool            active;
} subscriber_t;

/* Event Bus */
static subscriber_t subscribers[EVENT_TYPE_COUNT][MAX_SUBSCRIBERS_PER_EVENT];
static uint32_t event_counts[EVENT_TYPE_COUNT];     /* จำนวน events ต่อ type */
static uint32_t total_events = 0;

/*******************************************************************************
 * Subscribe to an event type
 * return: subscriber index (0-3) or -1 on failure
 ******************************************************************************/
static int event_subscribe(event_type_t type, event_handler_t handler,
                           void *user_data)
{
    if (type >= EVENT_TYPE_COUNT || handler == NULL) return -1;

    for (int i = 0; i < MAX_SUBSCRIBERS_PER_EVENT; i++) {
        if (!subscribers[type][i].active) {
            subscribers[type][i].handler   = handler;
            subscribers[type][i].user_data = user_data;
            subscribers[type][i].active    = true;
            return i;
        }
    }
    return -1;  /* Full */
}

/*******************************************************************************
 * Unsubscribe from an event type
 ******************************************************************************/
static void event_unsubscribe(event_type_t type, int index)
{
    if (type < EVENT_TYPE_COUNT && index >= 0
        && index < MAX_SUBSCRIBERS_PER_EVENT) {
        subscribers[type][index].active = false;
    }
}

/*******************************************************************************
 * Publish an event (dispatch to all subscribers)
 *
 * NOTE: เรียกจาก LVGL context เท่านั้น!
 * ถ้าต้อง publish จาก IPC callback ให้ใช้ flag-based pattern
 ******************************************************************************/
static void event_publish(event_type_t type, int32_t value, void *data)
{
    if (type >= EVENT_TYPE_COUNT) return;

    event_t event = {
        .type      = type,
        .timestamp = lv_tick_get(),
        .value     = value,
        .data      = data
    };

    event_counts[type]++;
    total_events++;

    /* Dispatch to all active subscribers */
    for (int i = 0; i < MAX_SUBSCRIBERS_PER_EVENT; i++) {
        if (subscribers[type][i].active) {
            subscribers[type][i].handler(&event,
                subscribers[type][i].user_data);
        }
    }
}

/*******************************************************************************
 * Initialize Event Bus
 ******************************************************************************/
static void event_bus_init(void)
{
    memset(subscribers, 0, sizeof(subscribers));
    memset(event_counts, 0, sizeof(event_counts));
    total_events = 0;
}
```

#### 3.4 Step-by-Step Implementation

**Step 1: ประกาศ Variables**

```c
/* part4_ex4_event_bus.c */
#include "lvgl.h"
#include "ipc/cm55_ipc_pipe.h"

#include <stdbool.h>
#include <stdint.h>
#include <string.h>
#include <stdio.h>

/*******************************************************************************
 * LVGL Objects
 ******************************************************************************/
static lv_obj_t *label_title      = NULL;
static lv_obj_t *label_state      = NULL;
static lv_obj_t *label_event_log  = NULL;
static lv_obj_t *label_stats      = NULL;
static lv_obj_t *led_status       = NULL;
static lv_obj_t *chart_events     = NULL;

/* Chart series (event frequency per type) */
static lv_chart_series_t *ser_freq = NULL;

/*******************************************************************************
 * Flag-Based Pattern (IPC -> Event Bus bridge)
 ******************************************************************************/
static volatile bool     imu_event_pending    = false;
static volatile bool     button_event_pending = false;
static volatile bool     adc_event_pending    = false;
static volatile int32_t  pending_imu_value    = 0;
static volatile int32_t  pending_btn_value    = 0;
static volatile int32_t  pending_adc_value    = 0;

/*******************************************************************************
 * Event Log (ring buffer)
 ******************************************************************************/
#define EVENT_LOG_SIZE  10
#define EVENT_LOG_BUF   1024

static char event_log_entries[EVENT_LOG_SIZE][64];
static uint32_t event_log_idx = 0;
static char event_log_display[EVENT_LOG_BUF];
```

**Step 2: IPC Callback (Bridge to Event Bus)**

```c
/*******************************************************************************
 * IPC Receive Callback
 *
 * CRITICAL: ทำงานใน IPC Task - ห้ามเรียก event_publish() โดยตรง!
 * ตั้ง flag เพื่อให้ LVGL timer publish event แทน
 ******************************************************************************/
static void ipc_event_callback(const ipc_msg_t *msg, void *user_data)
{
    (void)user_data;

    switch (msg->cmd) {
        case IPC_CMD_IMU_DATA: {
            const ipc_imu_data_t *imu = (const ipc_imu_data_t *)msg->data;
            /* ส่งค่า magnitude ของ accel */
            pending_imu_value = (int32_t)imu->accel_x;
            imu_event_pending = true;
            break;
        }

        case IPC_CMD_BUTTON_EVENT: {
            pending_btn_value = (int32_t)msg->value;  /* 1=pressed, 0=released */
            button_event_pending = true;
            break;
        }

        case IPC_CMD_ADC_DATA: {
            const ipc_adc_data_t *adc = (const ipc_adc_data_t *)msg->data;
            pending_adc_value = (int32_t)adc->adc_ch0;
            adc_event_pending = true;
            break;
        }

        default:
            break;
    }
}
```

**Step 3: Event Handlers (Subscribers)**

```c
/*******************************************************************************
 * Event Log Handler - จดบันทึกทุก event
 ******************************************************************************/
static void event_log_handler(const event_t *event, void *user_data)
{
    (void)user_data;

    uint32_t ts = event->timestamp / 1000;
    snprintf(event_log_entries[event_log_idx % EVENT_LOG_SIZE],
        64, "%02u:%02u:%02u [%s] val=%d",
        (unsigned int)((ts / 3600) % 24),
        (unsigned int)((ts / 60) % 60),
        (unsigned int)(ts % 60),
        event_names[event->type],
        (int)event->value);
    event_log_idx++;

    /* สร้าง display string */
    event_log_display[0] = '\0';
    int pos = 0;
    uint32_t total = (event_log_idx < EVENT_LOG_SIZE)
        ? event_log_idx : EVENT_LOG_SIZE;
    uint32_t start = (event_log_idx < EVENT_LOG_SIZE)
        ? 0 : (event_log_idx % EVENT_LOG_SIZE);

    for (uint32_t i = 0; i < total; i++) {
        uint32_t idx = (start + i) % EVENT_LOG_SIZE;
        int w = snprintf(event_log_display + pos,
            EVENT_LOG_BUF - pos, "%s\n", event_log_entries[idx]);
        if (w > 0) pos += w;
    }

    lv_label_set_text(label_event_log, event_log_display);
}

/*******************************************************************************
 * UI Stats Handler - อัปเดตสถิติ
 ******************************************************************************/
static void event_stats_handler(const event_t *event, void *user_data)
{
    (void)event;
    (void)user_data;

    lv_label_set_text_fmt(label_stats,
        "Total:%u  IMU:%u  ADC:%u  BTN:%u  TMR:%u",
        (unsigned int)total_events,
        (unsigned int)event_counts[EVENT_IMU],
        (unsigned int)event_counts[EVENT_ADC],
        (unsigned int)event_counts[EVENT_BUTTON],
        (unsigned int)event_counts[EVENT_TIMER]);
}

/*******************************************************************************
 * LED Handler - กระพริบ LED เมื่อมี event
 ******************************************************************************/
static void event_led_handler(const event_t *event, void *user_data)
{
    (void)user_data;

    switch (event->type) {
        case EVENT_IMU:
            lv_led_set_color(led_status,
                lv_palette_main(LV_PALETTE_BLUE));
            break;
        case EVENT_BUTTON:
            lv_led_set_color(led_status,
                lv_palette_main(LV_PALETTE_GREEN));
            break;
        case EVENT_ADC:
            lv_led_set_color(led_status,
                lv_palette_main(LV_PALETTE_YELLOW));
            break;
        case EVENT_THRESHOLD:
            lv_led_set_color(led_status,
                lv_palette_main(LV_PALETTE_RED));
            break;
        default:
            lv_led_set_color(led_status,
                lv_palette_main(LV_PALETTE_GREY));
            break;
    }
    lv_led_on(led_status);
}

/*******************************************************************************
 * Threshold Handler - ตรวจจับค่าเกิน threshold
 ******************************************************************************/
#define IMU_THRESHOLD  5000   /* ค่า accelerometer ที่ถือว่าสูง */

static void event_threshold_handler(const event_t *event, void *user_data)
{
    (void)user_data;

    if (event->type == EVENT_IMU) {
        int32_t abs_val = (event->value >= 0) ? event->value : -(event->value);
        if (abs_val > IMU_THRESHOLD) {
            /* Publish threshold event */
            event_publish(EVENT_THRESHOLD, event->value, NULL);
            CM55_LOGW("Threshold exceeded! IMU=%d", (int)event->value);
        }
    }
}
```

**Step 4: Bridge Timer (Flag -> Event Bus)**

```c
/*******************************************************************************
 * Bridge Timer - แปลง IPC flags เป็น Event Bus events
 * ทำงานใน LVGL context จึง publish ได้อย่างปลอดภัย
 ******************************************************************************/
static void bridge_timer_cb(lv_timer_t *timer)
{
    (void)timer;

    /* ===== IMU Event ===== */
    if (imu_event_pending) {
        imu_event_pending = false;
        event_publish(EVENT_IMU, pending_imu_value, NULL);
    }

    /* ===== Button Event ===== */
    if (button_event_pending) {
        button_event_pending = false;
        event_publish(EVENT_BUTTON, pending_btn_value, NULL);
    }

    /* ===== ADC Event ===== */
    if (adc_event_pending) {
        adc_event_pending = false;
        event_publish(EVENT_ADC, pending_adc_value, NULL);
    }
}

/*******************************************************************************
 * Periodic Timer - publish EVENT_TIMER ทุก 5 วินาที
 ******************************************************************************/
static void periodic_timer_cb(lv_timer_t *timer)
{
    (void)timer;
    uint32_t uptime = lv_tick_get() / 1000;
    event_publish(EVENT_TIMER, (int32_t)uptime, NULL);
}

/*******************************************************************************
 * Sensor Request Timer - ร้องขอ sensor data จาก CM33
 ******************************************************************************/
static void sensor_poll_timer_cb(lv_timer_t *timer)
{
    (void)timer;
    if (!cm55_ipc_is_init()) return;
    cm55_ipc_request_sensor(IPC_CMD_IMU_DATA);
}
```

**Step 5: สร้าง UI Layout + Main Entry**

```c
/*******************************************************************************
 * Main Entry Point
 ******************************************************************************/
void part4_ex4_event_bus(void)
{
    /* ===== Initialize Event Bus ===== */
    event_bus_init();

    /* ===== ล้างหน้าจอ ===== */
    lv_obj_t *scr = lv_screen_active();
    lv_obj_clean(scr);
    lv_obj_set_style_bg_color(scr, lv_color_hex(0x0d1117), 0);

    /* ===== Title ===== */
    label_title = lv_label_create(scr);
    lv_label_set_text(label_title, "Event Bus System");
    lv_obj_set_style_text_font(label_title, &lv_font_montserrat_20, 0);
    lv_obj_set_style_text_color(label_title, lv_color_hex(0xd2a8ff), 0);
    lv_obj_align(label_title, LV_ALIGN_TOP_MID, 0, 5);

    /* ===== State Label ===== */
    label_state = lv_label_create(scr);
    lv_label_set_text(label_state, "State: IDLE");
    lv_obj_set_style_text_font(label_state, &lv_font_montserrat_16, 0);
    lv_obj_set_style_text_color(label_state, lv_color_hex(0x7ee787), 0);
    lv_obj_align(label_state, LV_ALIGN_TOP_LEFT, 10, 30);

    /* ===== LED Indicator ===== */
    led_status = lv_led_create(scr);
    lv_obj_set_size(led_status, 24, 24);
    lv_obj_align(led_status, LV_ALIGN_TOP_RIGHT, -10, 30);
    lv_led_set_color(led_status, lv_palette_main(LV_PALETTE_GREY));
    lv_led_off(led_status);

    /* ===== Stats Label ===== */
    label_stats = lv_label_create(scr);
    lv_label_set_text(label_stats, "Total:0  IMU:0  ADC:0  BTN:0  TMR:0");
    lv_obj_set_style_text_font(label_stats, &lv_font_montserrat_12, 0);
    lv_obj_set_style_text_color(label_stats, lv_color_hex(0x8b949e), 0);
    lv_obj_align(label_stats, LV_ALIGN_TOP_MID, 0, 55);

    /* ===== Event Log (Scrollable Container) ===== */
    lv_obj_t *log_panel = lv_obj_create(scr);
    lv_obj_set_size(log_panel, 300, 130);
    lv_obj_align(log_panel, LV_ALIGN_BOTTOM_MID, 0, -25);
    lv_obj_set_style_bg_color(log_panel, lv_color_hex(0x010409), 0);
    lv_obj_set_style_border_color(log_panel, lv_color_hex(0x30363d), 0);
    lv_obj_set_style_pad_all(log_panel, 5, 0);

    label_event_log = lv_label_create(log_panel);
    lv_label_set_text(label_event_log, "(waiting for events...)");
    lv_obj_set_width(label_event_log, 280);
    lv_label_set_long_mode(label_event_log, LV_LABEL_LONG_WRAP);
    lv_obj_set_style_text_font(label_event_log, &lv_font_montserrat_12, 0);
    lv_obj_set_style_text_color(label_event_log, lv_color_hex(0xc9d1d9), 0);

    /* ===== Subscribe Events ===== */
    /* Log handler - รับทุก event type */
    event_subscribe(EVENT_IMU,       event_log_handler, NULL);
    event_subscribe(EVENT_ADC,       event_log_handler, NULL);
    event_subscribe(EVENT_BUTTON,    event_log_handler, NULL);
    event_subscribe(EVENT_TIMER,     event_log_handler, NULL);
    event_subscribe(EVENT_THRESHOLD, event_log_handler, NULL);

    /* Stats handler */
    event_subscribe(EVENT_IMU,       event_stats_handler, NULL);
    event_subscribe(EVENT_ADC,       event_stats_handler, NULL);
    event_subscribe(EVENT_BUTTON,    event_stats_handler, NULL);
    event_subscribe(EVENT_TIMER,     event_stats_handler, NULL);

    /* LED handler */
    event_subscribe(EVENT_IMU,       event_led_handler, NULL);
    event_subscribe(EVENT_BUTTON,    event_led_handler, NULL);
    event_subscribe(EVENT_THRESHOLD, event_led_handler, NULL);

    /* Threshold handler */
    event_subscribe(EVENT_IMU, event_threshold_handler, NULL);

    /* ===== Register IPC Callback ===== */
    cm55_ipc_register_callback(ipc_event_callback, NULL);

    /* ===== Create Timers ===== */
    lv_timer_create(bridge_timer_cb, 50, NULL);         /* Flag -> Event */
    lv_timer_create(periodic_timer_cb, 5000, NULL);     /* Timer event */
    lv_timer_create(sensor_poll_timer_cb, 200, NULL);   /* Sensor poll */

    CM55_LOGI("Part4 Ex4: Event Bus initialized");
}
```

#### 3.5 Subscriber Registration Map

```
+------------------------------------------------------------------------+
|                    Subscriber Registration Map                         |
+------------------------------------------------------------------------+
|                                                                        |
|  Event Type       Subscriber [0]     [1]           [2]          [3]    |
|  ----------       --------------     ----          ----         ----   |
|  EVENT_IMU        log_handler        stats_handler led_handler  thresh |
|  EVENT_ADC        log_handler        stats_handler (empty)      (empty)|
|  EVENT_BUTTON     log_handler        stats_handler led_handler  (empty)|
|  EVENT_TIMER      log_handler        stats_handler (empty)      (empty)|
|  EVENT_THRESHOLD  log_handler        led_handler   (empty)      (empty)|
|                                                                        |
|  Flow example (EVENT_IMU published):                                   |
|  1. event_publish(EVENT_IMU, value, NULL)                              |
|  2. -> event_counts[EVENT_IMU]++                                       |
|  3. -> log_handler(event)       <- บันทึก log                            |
|  4. -> stats_handler(event)     <- อัปเดตสถิติ                            |
|  5. -> led_handler(event)       <- เปลี่ยนสี LED                          |
|  6. -> threshold_handler(event) <- ตรวจค่าเกิน -> อาจ publish THRESHOLD  |
|                                                                        |
+------------------------------------------------------------------------+
```

***

### 4. Part B: Advanced IPC Integration (Ex8 - Real Hardware)

Part B ยกระดับจาก Part A โดยใช้ **AIC Library APIs** (`aic_event_*`, `aic_gpio_*`, layout helpers) แทน manual Event Bus -- รวม IPC + EventBus + Logging + GPIO real hardware เข้าด้วยกัน

#### 4.1 Layout Helpers (AIC Layout System)

| Function                      | Description                           | เทียบเท่า LVGL Manual                            |
| ----------------------------- | ------------------------------------- | ------------------------------------------------ |
| `aic_col_create(parent)`      | สร้าง container แนวตั้ง (Flex Column) | `lv_obj_set_flex_flow(obj, LV_FLEX_FLOW_COLUMN)` |
| `aic_row_create(parent)`      | สร้าง container แนวนอน (Flex Row)     | `lv_obj_set_flex_flow(obj, LV_FLEX_FLOW_ROW)`    |
| `aic_full_size(obj)`          | ขยาย obj เต็ม parent                  | `lv_obj_set_size(obj, LV_PCT(100), LV_PCT(100))` |
| `aic_pad(obj, px)`            | ตั้ง padding ทุกด้าน                  | `lv_obj_set_style_pad_all(obj, px, 0)`           |
| `aic_apply_dark_theme(scr)`   | ตั้งค่า dark theme                    | Multiple style calls                             |
| `aic_create_footer(scr)`      | สร้าง footer bar                      | Custom footer creation                           |
| `aic_xyz_display_create(...)` | สร้าง XYZ display                     | 3 labels + header                                |

#### 4.2 Layout Helpers vs Manual Positioning

```c
/*******************************************************************************
 * BEFORE (Manual Positioning) - Lab ก่อนหน้า
 *
 * ข้อเสีย: ต้องคำนวณ pixel ทุกตำแหน่ง, แก้ไขยาก, ไม่ responsive
 ******************************************************************************/
lv_obj_t *panel = lv_obj_create(scr);
lv_obj_set_size(panel, 480, 272);
lv_obj_set_pos(panel, 0, 0);
lv_obj_set_style_bg_color(panel, lv_color_hex(0x0a0e27), 0);
lv_obj_clear_flag(panel, LV_OBJ_FLAG_SCROLLABLE);

lv_obj_t *title = lv_label_create(panel);
lv_obj_set_pos(title, 10, 5);
lv_obj_t *btn1 = lv_button_create(panel);
lv_obj_set_pos(btn1, 10, 40);
lv_obj_t *btn2 = lv_button_create(panel);
lv_obj_set_pos(btn2, 100, 40);   /* ต้องคำนวณ offset! */

/*******************************************************************************
 * AFTER (Layout Helpers) - Lab นี้
 *
 * ข้อดี: อัตโนมัติ, responsive, เพิ่ม/ลบ widgets ง่าย
 ******************************************************************************/
lv_obj_t *cont = aic_col_create(scr);    /* แนวตั้ง auto-layout */
aic_full_size(cont);                      /* เต็มจอ */
aic_pad(cont, 12);                        /* ขอบ 12px ทุกด้าน */

lv_obj_t *title = lv_label_create(cont);  /* อยู่บนสุด auto */
lv_obj_t *row = aic_row_create(cont);     /* แถวถัดไป auto */
lv_obj_t *btn1 = lv_button_create(row);   /* ซ้ายสุดในแถว */
lv_obj_t *btn2 = lv_button_create(row);   /* ถัดไปทางขวา auto */
```

#### 4.3 Layout Structure ของ Part B

```
Screen (aic_apply_dark_theme)
  |
  +-- cont = aic_col_create(scr)         <- Column layout
  |     aic_full_size(cont)               <- Full screen
  |     aic_pad(cont, 12)                 <- 12px padding
  |     |
  |     +-- title label                   <- "Part 4 Ex8: Advanced"
  |     |
  |     +-- subtitle label                <- "IPC + EventBus + Logging + HW"
  |     |
  |     +-- led_row = aic_row_create()    <- Row layout for LEDs
  |     |     |
  |     |     +-- wrap[0] (80x60)         <- LED R + button L1
  |     |     +-- wrap[1] (80x60)         <- LED G + button L2
  |     |     +-- wrap[2] (80x60)         <- LED B + button L3
  |     |
  |     +-- btn_label                     <- "BTN1: Released"
  |     |
  |     +-- aic_xyz_display               <- "Accel (EventBus)"
  |     |     +-- X: +0.05                   XYZ labels
  |     |     +-- Y: -0.12
  |     |     +-- Z: +9.81
  |     |
  |     +-- adc_label                     <- "ADC: 2048 (1.65V)"
  |     |
  |     +-- stats_row = aic_row_create()  <- Row layout for stats
  |           +-- event_label             <- "Events: 42"
  |           +-- ipc_label               <- "IPC TX:10 RX:8 Err:0"
  |
  +-- aic_create_footer(scr)              <- Footer bar
```

#### 4.4 Data Flow Diagram

```
+===================================================================+
|                     DATA FLOW DIAGRAM                             |
+===================================================================+
|                                                                   |
|  (1) LED Control Flow:                                            |
|  ~~~~~~~~~~~~~~~~~~~~~~                                           |
|  User Tap Button --> LVGL event_cb --> toggle state               |
|                 --> aic_gpio_led_set() (direct HW)                |
|                 --> cm55_ipc_set_led() (send to CM33)             |
|                 --> CM55_LOGI() (log the action)                  |
|                                                                   |
|  (2) Button Read Flow:                                            |
|  ~~~~~~~~~~~~~~~~~~~~~~                                           |
|  Timer (100ms) --> aic_gpio_button_read_raw()                     |
|                --> compare with last state (edge detect)          |
|                --> update UI label                                |
|                --> CM55_LOGI() if pressed (log the event)         |
|                                                                   |
|  (3) IMU Data Flow (Event Bus):                                   |
|  ~~~~~~~~~~~~~~~~~~~~~~~~~~~~~~~~                                 |
|  Timer (100ms) --> imu_shared_read_accel()                        |
|                --> aic_event_publish_imu()  ----+                 |
|                --> direct UI update (backup)    |                 |
|                                                  v                |
|                                      +-------------------+        |
|                                      | Event Bus         |        |
|                                      | AIC_EVENT_IMU     |        |
|                                      +-------------------+        |
|                                                  |                |
|                                                  v                |
|                                      ex8_imu_event_cb()           |
|                                      --> update IMU labels        |
|                                      --> ex8_event_count++        |
|                                                                   |
|  (4) ADC Data Flow (Event Bus):                                   |
|  ~~~~~~~~~~~~~~~~~~~~~~~~~~~~~~~~                                 |
|  Timer (100ms) --> aic_adc_read()                                 |
|                --> aic_event_publish_adc() -----+                 |
|                --> direct UI update (backup)    |                 |
|                                                 v                 |
|                                      +-------------------+        |
|                                      | Event Bus         |        |
|                                      | AIC_EVENT_ADC     |        |
|                                      +-------------------+        |
|                                                  |                |
|                                                  v                |
|                                      ex8_adc_event_cb()           |
|                                      --> update ADC label         |
|                                      --> ex8_event_count++        |
|                                                                   |
|  (5) IPC Stats Flow:                                              |
|  ~~~~~~~~~~~~~~~~~~~~                                             |
|  Timer (100ms) --> cm55_ipc_get_stats(&tx, &rx, &errors)          |
|                --> update stats label                             |
|                                                                   |
+===================================================================+
```

#### 4.5 Event Bus Pub/Sub ใน Part B

```
+===================================================================+
|                EVENT BUS PUB/SUB IN PART B                        |
+===================================================================+
|                                                                   |
|  PUBLISHERS (ใน Timer Callback)                                   |
|  ==============================                                   |
|                                                                   |
|  ex8_timer_cb() (100ms)                                           |
|     |                                                             |
|     |-- imu_shared_read_accel(&ax, &ay, &az)                      |
|     |   |                                                         |
|     |   +-- aic_event_publish_imu(ax, ay, az, 0, 0, 0)            |
|     |       (publishes AIC_EVENT_IMU_UPDATE)                      |
|     |                                                             |
|     |-- aic_adc_read(AIC_ADC_CH0)                                 |
|     |   |                                                         |
|     |   +-- aic_event_publish_adc(0, raw, mv)                     |
|     |       (publishes AIC_EVENT_ADC_UPDATE)                      |
|     |                                                             |
|                                                                   |
|  SUBSCRIBERS (registered ใน part4_ex8_advanced)                   |
|  ==============================================                   |
|                                                                   |
|  AIC_EVENT_IMU_UPDATE --> ex8_imu_event_cb()                      |
|     +-- update X/Y/Z labels                                       |
|     +-- ex8_event_count++                                         |
|                                                                   |
|  AIC_EVENT_ADC_UPDATE --> ex8_adc_event_cb()                      |
|     +-- update ADC label (raw + voltage)                          |
|     +-- ex8_event_count++                                         |
|                                                                   |
+===================================================================+
```

#### 4.6 Static Variables

```c
/*******************************************************************************
 * Part 4 - Example 8: Advanced Features
 *
 * Combines IPC + Event Bus + Logging + Real Hardware.
 * Full-featured dashboard showing all Part 4 concepts.
 ******************************************************************************/

/* LVGL Widget References */
static lv_obj_t *ex8_led_widgets[3];   /* LED indicator widgets (R, G, B) */
static lv_obj_t *ex8_imu_labels[3];    /* IMU X/Y/Z value labels */
static lv_obj_t *ex8_adc_label;        /* ADC display label */
static lv_obj_t *ex8_btn_label;        /* Button state label */
static lv_obj_t *ex8_event_label;      /* Event counter label */
static lv_obj_t *ex8_ipc_label;        /* IPC stats label */
static lv_timer_t *ex8_timer;          /* Main update timer */

/* State Variables */
static bool ex8_led_states[3] = {false, false, false};  /* LED ON/OFF */
static bool ex8_gpio_ready = false;    /* GPIO init success? */
static bool ex8_btn1_last = false;     /* Last button state (for edge detect) */
static uint32_t ex8_event_count = 0;   /* Total Event Bus events received */
```

#### 4.7 Event Bus Callbacks (Subscribers)

```c
/*******************************************************************************
 * IMU Event Callback
 *
 * เรียกโดย Event Bus เมื่อมี AIC_EVENT_IMU_UPDATE
 * แปลง raw int16 (milli-g) กลับเป็น float แล้วแสดง
 ******************************************************************************/
static void ex8_imu_event_cb(aic_event_t event,
                              const aic_event_data_t *data,
                              void *user_data)
{
    (void)event;
    (void)user_data;

    if (data != NULL) {
        /* data->imu.ax/ay/az เป็น int16_t ในหน่วย milli-g */
        /* แปลงกลับเป็น g ก่อนแสดง */
        lv_label_set_text_fmt(ex8_imu_labels[0], "%+.2f",
            (double)(data->imu.ax / 1000.0f));
        lv_label_set_text_fmt(ex8_imu_labels[1], "%+.2f",
            (double)(data->imu.ay / 1000.0f));
        lv_label_set_text_fmt(ex8_imu_labels[2], "%+.2f",
            (double)(data->imu.az / 1000.0f));
    }
    ex8_event_count++;   /* นับจำนวน events ที่ได้รับ */
}

/*******************************************************************************
 * ADC Event Callback
 *
 * เรียกโดย Event Bus เมื่อมี AIC_EVENT_ADC_UPDATE
 * แสดง raw value + voltage
 ******************************************************************************/
static void ex8_adc_event_cb(aic_event_t event,
                              const aic_event_data_t *data,
                              void *user_data)
{
    (void)event;
    (void)user_data;

    if (data != NULL) {
        lv_label_set_text_fmt(ex8_adc_label, "ADC: %d (%.2fV)",
            data->adc.raw_value,
            (double)(data->adc.voltage_mv / 1000.0f));
    }
    ex8_event_count++;
}
```

#### 4.8 LED Toggle Callback (IPC + GPIO + Logging)

```c
/*******************************************************************************
 * LED Toggle Button Callback
 *
 * เมื่อ user tap ปุ่ม L1/L2/L3:
 * 1. Toggle internal state
 * 2. Update LVGL LED widget
 * 3. Control real GPIO LED (ถ้ามี)
 * 4. Send IPC command ไป CM33 (ถ้า IPC ready)
 * 5. Log the action
 *
 * user_data = LED index (0, 1, 2) ส่งมาตอน add_event_cb
 ******************************************************************************/
static void ex8_led_cb(lv_event_t *e)
{
    /* ดึง LED index จาก user_data */
    int id = (int)(intptr_t)lv_event_get_user_data(e);
    if (id < 0 || id > 2) return;

    /* (1) Toggle state */
    ex8_led_states[id] = !ex8_led_states[id];

    /* (2) Update LVGL LED widget */
    if (ex8_led_states[id]) {
        lv_led_on(ex8_led_widgets[id]);
    } else {
        lv_led_off(ex8_led_widgets[id]);
    }

    /* (3) Direct GPIO control (ถ้า init สำเร็จ) */
    if (ex8_gpio_ready) {
        aic_gpio_led_set((aic_led_t)id, ex8_led_states[id]);
    }

    /* (4) IPC + (5) Logging */
    if (cm55_ipc_is_init()) {
        cm55_ipc_set_led((uint8_t)id, ex8_led_states[id]);
        CM55_LOGI("LED%d -> %s", id,
            ex8_led_states[id] ? "ON" : "OFF");
    }
}
```

#### 4.9 Timer Callback (Heart of the System)

```c
/*******************************************************************************
 * Main Timer Callback (100ms interval)
 *
 * ทำ 4 อย่างทุก cycle:
 * 1. Poll button (edge detection)
 * 2. Read IMU + publish event
 * 3. Read ADC + publish event
 * 4. Update IPC statistics
 ******************************************************************************/
static void ex8_timer_cb(lv_timer_t *timer)
{
    (void)timer;

    /* ===== (1) Button Polling with Edge Detection ===== */
    if (ex8_gpio_ready) {
        bool pressed = aic_gpio_button_read_raw(AIC_BTN_USER);

        /* เฉพาะตอนสถานะเปลี่ยน (edge) เท่านั้น */
        if (pressed != ex8_btn1_last) {
            lv_label_set_text(ex8_btn_label,
                pressed ? "BTN1: PRESSED" : "BTN1: Released");
            lv_obj_set_style_text_color(ex8_btn_label,
                pressed ? AIC_COLOR_SUCCESS : AIC_COLOR_TEXT_DIM, 0);

            if (cm55_ipc_is_init() && pressed) {
                CM55_LOGI("BTN1 pressed");
            }
            ex8_btn1_last = pressed;  /* บันทึกสถานะล่าสุด */
        }
    }

    /* ===== (2) Read IMU + Publish via Event Bus ===== */
    float ax, ay, az;
    if (imu_shared_read_accel(&ax, &ay, &az)) {
        /* Publish ผ่าน Event Bus (subscribers จะได้รับ) */
        aic_event_publish_imu(
            (int16_t)(ax * 1000),    /* แปลง g -> milli-g */
            (int16_t)(ay * 1000),
            (int16_t)(az * 1000),
            0, 0, 0);               /* gyro (ไม่ใช้) */

        /* Direct update (backup path) */
        lv_label_set_text_fmt(ex8_imu_labels[0], "%+.2f", (double)ax);
        lv_label_set_text_fmt(ex8_imu_labels[1], "%+.2f", (double)ay);
        lv_label_set_text_fmt(ex8_imu_labels[2], "%+.2f", (double)az);
    }

    /* ===== (3) Read ADC + Publish via Event Bus ===== */
    uint16_t adc_raw = aic_adc_read(AIC_ADC_CH0);
    uint16_t mv = (uint16_t)(adc_raw * 3300 / 4095);  /* Raw -> millivolts */
    aic_event_publish_adc(0, adc_raw, mv);

    /* Direct update (backup path) */
    lv_label_set_text_fmt(ex8_adc_label, "ADC: %d (%.2fV)",
        adc_raw, (double)(mv / 1000.0f));

    /* ===== (4) Update Statistics ===== */
    lv_label_set_text_fmt(ex8_event_label, "Events: %u",
        (unsigned)ex8_event_count);

    uint32_t tx, rx, errors;
    cm55_ipc_get_stats(&tx, &rx, &errors);
    lv_label_set_text_fmt(ex8_ipc_label, "IPC TX:%u RX:%u Err:%u",
        (unsigned)tx, (unsigned)rx, (unsigned)errors);
}
```

#### 4.10 Main Function (Full UI Build)

```c
/*******************************************************************************
 * Main Entry: part4_ex8_advanced()
 *
 * Initialization order ต้องถูกต้อง!
 * GPIO -> Sensors -> EventBus -> Logging -> UI -> Subscribe -> Timer
 ******************************************************************************/
void part4_ex8_advanced(void)
{
    /* ===== Step 1-4: Initialize Subsystems ===== */
    ex8_gpio_ready = aic_gpio_init();   /* GPIO (return bool) */
    aic_sensors_init();                  /* Sensors (ต้องก่อน ADC read!) */
    aic_event_init();                    /* Event Bus */
    aic_log_init();                      /* Logging */

    /* ===== Step 5: Build UI ===== */
    lv_obj_t *scr = lv_screen_active();
    aic_apply_dark_theme(scr);

    /* Main column container */
    lv_obj_t *cont = aic_col_create(scr);
    aic_full_size(cont);
    aic_pad(cont, 12);

    /* Title + Subtitle */
    lv_obj_t *title = lv_label_create(cont);
    lv_label_set_text(title, "Part 4 Ex8: Advanced");
    lv_obj_set_style_text_color(title, AIC_COLOR_TEXT, 0);
    lv_obj_set_style_text_font(title, &lv_font_montserrat_18, 0);

    lv_obj_t *subtitle = lv_label_create(cont);
    lv_label_set_text(subtitle, "IPC + EventBus + Logging + HW");
    lv_obj_set_style_text_color(subtitle, AIC_COLOR_TEXT_DIM, 0);
    lv_obj_set_style_text_font(subtitle, &lv_font_montserrat_12, 0);

    /* === LED Row (aic_row_create) === */
    lv_obj_t *led_row = aic_row_create(cont);
    lv_color_t led_colors[] = {
        lv_color_hex(0xFF4444),   /* Red */
        lv_color_hex(0x44FF44),   /* Green */
        lv_color_hex(0x4444FF)    /* Blue */
    };
    const char *led_names[] = {"L1", "L2", "L3"};

    for (int i = 0; i < 3; i++) {
        /* Card wrapper for each LED + button pair */
        lv_obj_t *wrap = lv_obj_create(led_row);
        lv_obj_set_size(wrap, 80, 60);
        lv_obj_set_style_bg_color(wrap, AIC_COLOR_BG_CARD, 0);
        lv_obj_set_style_border_width(wrap, 0, 0);
        lv_obj_set_style_radius(wrap, 6, 0);
        lv_obj_set_flex_flow(wrap, LV_FLEX_FLOW_ROW);
        lv_obj_set_flex_align(wrap,
            LV_FLEX_ALIGN_CENTER,
            LV_FLEX_ALIGN_CENTER,
            LV_FLEX_ALIGN_CENTER);
        lv_obj_set_style_pad_all(wrap, 4, 0);
        lv_obj_remove_flag(wrap, LV_OBJ_FLAG_SCROLLABLE);

        /* LED widget */
        ex8_led_widgets[i] = lv_led_create(wrap);
        lv_led_set_color(ex8_led_widgets[i], led_colors[i]);
        lv_obj_set_size(ex8_led_widgets[i], 24, 24);
        lv_led_off(ex8_led_widgets[i]);

        /* Toggle button */
        lv_obj_t *btn = lv_button_create(wrap);
        lv_obj_set_size(btn, 40, 28);
        lv_obj_set_style_bg_color(btn, AIC_COLOR_PRIMARY, 0);
        lv_obj_add_event_cb(btn, ex8_led_cb, LV_EVENT_CLICKED,
                            (void *)(intptr_t)i);

        lv_obj_t *lbl = lv_label_create(btn);
        lv_label_set_text(lbl, led_names[i]);
        lv_obj_set_style_text_color(lbl, AIC_COLOR_TEXT, 0);
        lv_obj_center(lbl);
    }

    /* Button state label */
    ex8_btn_label = lv_label_create(cont);
    lv_label_set_text(ex8_btn_label, "BTN1: Released");
    lv_obj_set_style_text_color(ex8_btn_label, AIC_COLOR_TEXT_DIM, 0);

    /* IMU via Event Bus (aic_xyz_display helper) */
    aic_xyz_display_create(cont, "Accel (EventBus)", ex8_imu_labels);

    /* ADC via Event Bus */
    ex8_adc_label = lv_label_create(cont);
    lv_label_set_text(ex8_adc_label, "ADC: --- (-.--V)");
    lv_obj_set_style_text_color(ex8_adc_label, AIC_COLOR_TEXT, 0);

    /* Stats row */
    lv_obj_t *stats_row = aic_row_create(cont);

    ex8_event_label = lv_label_create(stats_row);
    lv_label_set_text(ex8_event_label, "Events: 0");
    lv_obj_set_style_text_color(ex8_event_label, AIC_COLOR_PRIMARY, 0);
    lv_obj_set_style_text_font(ex8_event_label, &lv_font_montserrat_12, 0);

    ex8_ipc_label = lv_label_create(stats_row);
    lv_label_set_text(ex8_ipc_label, "IPC TX:0 RX:0 Err:0");
    lv_obj_set_style_text_color(ex8_ipc_label, AIC_COLOR_TEXT_DIM, 0);
    lv_obj_set_style_text_font(ex8_ipc_label, &lv_font_montserrat_12, 0);

    aic_create_footer(scr);

    /* ===== Step 6: Subscribe to Events ===== */
    aic_event_subscribe(AIC_EVENT_IMU_UPDATE, ex8_imu_event_cb, NULL);
    aic_event_subscribe(AIC_EVENT_ADC_UPDATE, ex8_adc_event_cb, NULL);

    /* ===== Step 7: Start Timer ===== */
    ex8_timer = lv_timer_create(ex8_timer_cb, 100, NULL);

    /* Log startup */
    if (cm55_ipc_is_init()) {
        CM55_LOGI("Week6 Ex8: Advanced Features started");
    }
    printf("[Week6] Ex8: Advanced Features started\n");
}
```

***

### 5. องค์ความรู้และเทคนิค (Patterns & Tips)

#### 5.1 Integration Checklist Pattern

```
+===================================================================+
|         SUBSYSTEM INTEGRATION CHECKLIST                           |
+===================================================================+
|                                                                   |
|  [ ] 1. Init Order ถูกต้อง?                                         |
|        GPIO -> Sensors -> EventBus -> Logging -> UI -> Timer      |
|                                                                   |
|  [ ] 2. ทุก subsystem init สำเร็จ?                                  |
|        ตรวจ return value (เช่น ex8_gpio_ready)                     |
|        ถ้า fail: graceful degradation (ข้าม feature นั้น)             |
|                                                                   |
|  [ ] 3. Event Bus subscribe หลัง UI สร้างเสร็จ?                      |
|        subscribe ก่อน UI = crash (NULL labels)                     |
|                                                                   |
|  [ ] 4. Timer สร้างเป็นอันสุดท้าย?                                     |
|        Timer ทำงานทันที -> ทุกอย่างต้องพร้อมก่อน                         |
|                                                                   |
|  [ ] 5. NULL checks ครบ?                                          |
|        if (ex8_gpio_ready) { ... }                                |
|        if (cm55_ipc_is_init()) { ... }                            |
|        if (data != NULL) { ... }                                  |
|                                                                   |
|  [ ] 6. Thread safety?                                            |
|        ทุก UI update อยู่ใน LVGL context (timer/callback)            |
|        ไม่ call LVGL จาก IPC task โดยตรง                           |
|                                                                   |
+===================================================================+
```

#### 5.2 Graceful Degradation Pattern

```c
/*******************************************************************************
 * Graceful Degradation: ระบบทำงานได้แม้บาง subsystem ล้มเหลว
 ******************************************************************************/

/* GPIO ไม่พร้อม? ข้าม hardware functions */
ex8_gpio_ready = aic_gpio_init();

/* ใน timer: ตรวจก่อนใช้ */
if (ex8_gpio_ready) {
    bool pressed = aic_gpio_button_read_raw(AIC_BTN_USER);
    aic_gpio_led_set(id, state);
}

/* IPC ไม่พร้อม? ข้าม IPC commands */
if (cm55_ipc_is_init()) {
    cm55_ipc_set_led(id, state);
    CM55_LOGI("LED%d -> %s", id, state ? "ON" : "OFF");
}

/* IMU ไม่พร้อม? shared read return false */
float ax, ay, az;
if (imu_shared_read_accel(&ax, &ay, &az)) {
    /* อ่านได้: publish + update */
} else {
    /* อ่านไม่ได้: ไม่ crash, แค่ไม่ update */
}
```

#### 5.3 Button Edge Detection

```c
/*******************************************************************************
 * ตรวจจับ "เปลี่ยนสถานะ" ไม่ใช่ "สถานะปัจจุบัน"
 ******************************************************************************/
static bool btn1_last = false;

void timer_cb(lv_timer_t *t) {
    bool pressed = aic_gpio_button_read_raw(AIC_BTN_USER);
    if (pressed != btn1_last) {   /* สถานะเปลี่ยน! */
        if (pressed) {
            /* Rising edge: กด */
            CM55_LOGI("BTN1 pressed"); /* Log เฉพาะตอนกด */
        }
        btn1_last = pressed;
    }
    /* สถานะเหมือนเดิม -> ไม่ทำอะไร (ไม่ log ซ้ำ) */
}
```

#### 5.4 Event Count as System Health Metric

```c
/*******************************************************************************
 * ใช้ event count เป็น system health indicator
 ******************************************************************************/

/* ค่าที่ควรเห็น (ที่ 100ms timer):
 * - 10 IMU events/sec + 10 ADC events/sec = ~20 events/sec
 * - ถ้าน้อยกว่า: sensor อ่านไม่ได้ หรือ Event Bus มีปัญหา
 * - ถ้ามากกว่า: ปกติ (subscriber อื่นอาจ publish event เพิ่ม)
 */

static uint32_t ex8_event_count = 0;

/* ใน subscriber callback: */
ex8_event_count++;

/* ใน timer: แสดง */
lv_label_set_text_fmt(ex8_event_label, "Events: %u",
    (unsigned)ex8_event_count);
```

#### 5.5 Design Patterns ที่เกี่ยวข้อง

```
Event Bus (Lab นี้)
    |
    +-- Observer Pattern
    |   +-- One publisher -> Many subscribers
    |
    +-- Mediator Pattern
    |   +-- Event Bus เป็น mediator ระหว่าง modules
    |
    +-- State Pattern
    |   +-- State machine ขับเคลื่อนด้วย events
    |
    +-- Command Pattern
        +-- IPC commands เป็น command objects
```

***

### 6. แบบฝึกหัด (Exercises)

#### Exercise 1: Event Counter Dashboard (Bar Chart) -- Part A

สร้าง dashboard แสดง bar chart ของจำนวน event แต่ละ type:

* แกน X: EVENT\_IMU, EVENT\_ADC, EVENT\_BUTTON, EVENT\_TIMER, EVENT\_THRESHOLD
* แกน Y: จำนวน events
* อัปเดตทุก 1 วินาที
* แสดง event rate (events/sec) สำหรับแต่ละ type

**Hints:**

```c
/* สร้าง Chart type BAR */
lv_obj_t *chart_bar = lv_chart_create(scr);
lv_chart_set_type(chart_bar, LV_CHART_TYPE_BAR);
lv_chart_set_point_count(chart_bar, 5);  /* 5 event types */

lv_chart_series_t *ser_bar = lv_chart_add_series(chart_bar,
    lv_palette_main(LV_PALETTE_CYAN), LV_CHART_AXIS_PRIMARY_Y);

/* อัปเดตใน timer */
void update_bar_chart(void) {
    lv_chart_set_value_by_id(chart_bar, ser_bar, 0, event_counts[EVENT_IMU]);
    lv_chart_set_value_by_id(chart_bar, ser_bar, 1, event_counts[EVENT_ADC]);
    lv_chart_set_value_by_id(chart_bar, ser_bar, 2, event_counts[EVENT_BUTTON]);
    lv_chart_set_value_by_id(chart_bar, ser_bar, 3, event_counts[EVENT_TIMER]);
    lv_chart_set_value_by_id(chart_bar, ser_bar, 4, event_counts[EVENT_THRESHOLD]);
    lv_chart_refresh(chart_bar);
}
```

#### Exercise 2: Event-Driven State Machine -- Part A

สร้าง state machine ที่มี 3 states:

* **IDLE**: ปกติ (สีเขียว) -- เมื่อได้ EVENT\_BUTTON --> ไป ACTIVE
* **ACTIVE**: กำลังทำงาน (สีเหลือง) -- เมื่อได้ EVENT\_THRESHOLD --> ไป ALERT
* **ALERT**: แจ้งเตือน (สีแดง กระพริบ) -- เมื่อได้ EVENT\_BUTTON --> กลับ IDLE

```
State Diagram:
                 EVENT_BUTTON
    +-------+ ----------------> +--------+
    | IDLE  |                   |ACTIVE  |
    |(green)| <---------------- |(yellow)|
    +-------+   EVENT_BUTTON   +---+-----+
        ^                          |
        |     EVENT_BUTTON         | EVENT_THRESHOLD
        |                          v
        |                    +--------+
        +------------------- | ALERT  |
                             | (red)  |
                             +--------+
```

**Hints:**

```c
typedef enum {
    STATE_IDLE = 0,
    STATE_ACTIVE,
    STATE_ALERT
} app_state_t;

static app_state_t current_state = STATE_IDLE;
static const char *state_names[] = { "IDLE", "ACTIVE", "ALERT" };
static const uint32_t state_colors[] = { 0x7ee787, 0xd29922, 0xf85149 };

static void state_machine_handler(const event_t *event, void *user_data);
```

#### Exercise 3: Sensor Threshold Alerts -- Part B

เพิ่มระบบ alert เมื่อค่า sensor เกิน threshold:

**Requirements:**

* เพิ่ม label "Alert: NONE" ใต้ ADC label
* ADC > 80% (raw > 3276): "Alert: HIGH VOLTAGE" สีแดง + LED1 on
* IMU |accel| > 15 m/s^2: "Alert: VIBRATION" สีส้ม + LED2 on
* ค่ากลับปกติ: "Alert: NONE" สีเขียว + LED off
* ส่ง `CM55_LOGW("ALERT: ...")` เมื่อ alert เปลี่ยนสถานะ (edge detect)

**Hints:**

* ใช้ `static bool alert_active = false;` สำหรับ edge detect (log เฉพาะตอนเปลี่ยน)
* Check thresholds ใน `ex8_timer_cb()` หลัง sensor read

```c
static lv_obj_t *ex8_alert_label;
static bool alert_high_voltage = false;

/* เพิ่มใน timer callback: */
bool adc_high = (adc_raw > 3276);
if (adc_high != alert_high_voltage) {
    alert_high_voltage = adc_high;
    if (adc_high) {
        lv_label_set_text(ex8_alert_label, "Alert: HIGH VOLTAGE");
        lv_obj_set_style_text_color(ex8_alert_label, AIC_COLOR_ERROR, 0);
        if (cm55_ipc_is_init()) CM55_LOGW("ALERT: HIGH VOLTAGE");
    } else {
        lv_label_set_text(ex8_alert_label, "Alert: NONE");
        lv_obj_set_style_text_color(ex8_alert_label, AIC_COLOR_SUCCESS, 0);
    }
}
```

#### Exercise 4: IPC Health Card -- Part B

เพิ่ม IPC statistics card:

**Requirements:**

* TX Rate / RX Rate: messages/sec (delta per second)
* Error Rate: % (errors / total \* 100)
* Status LED: green (OK) / red (error > 5%)
* Uptime: seconds since start
* ถ้า error > 5%: `CM55_LOGW("IPC health degraded")`

**Hints:**

* เก็บ `last_tx, last_rx` สำหรับ rate calculation
* สร้าง timer แยก 1 วินาที สำหรับ rate update

```c
static uint32_t rate_last_tx = 0, rate_last_rx = 0;

static void rate_timer_cb(lv_timer_t *timer) {
    uint32_t tx, rx, errors;
    cm55_ipc_get_stats(&tx, &rx, &errors);

    uint32_t tx_rate = tx - rate_last_tx;
    uint32_t rx_rate = rx - rate_last_rx;
    rate_last_tx = tx;
    rate_last_rx = rx;

    lv_label_set_text_fmt(tx_rate_label, "TX: %u/s", (unsigned)tx_rate);
    lv_label_set_text_fmt(rx_rate_label, "RX: %u/s", (unsigned)rx_rate);
}

/* สร้าง timer 1 วินาที */
lv_timer_create(rate_timer_cb, 1000, NULL);
```

***

### 7. Quick Reference

#### Event Bus API (Part A)

```c
event_bus_init();                                /* Initialize */
event_subscribe(EVENT_IMU, handler, user_data);  /* Subscribe */
event_unsubscribe(EVENT_IMU, index);             /* Unsubscribe */
event_publish(EVENT_IMU, value, data);           /* Publish */

typedef struct {
    event_type_t type;       /* EVENT_IMU, EVENT_BUTTON, ... */
    uint32_t     timestamp;  /* lv_tick_get() at publish time */
    int32_t      value;      /* Numeric payload */
    void         *data;      /* Pointer payload (optional) */
} event_t;

void my_handler(const event_t *event, void *user_data) {
    /* ทำงานใน LVGL context - เรียก lv_xxx() ได้ */
}

/* IPC -> Event Bus Bridge Pattern */
/* 1. IPC callback: ตั้ง flag (IPC Task) */
/* 2. Bridge timer: อ่าน flag -> event_publish() (LVGL Task) */
/* 3. Event Bus: dispatch to all subscribers */
```

#### AIC Event Bus API (Part B)

| Function                                        | Description             |
| ----------------------------------------------- | ----------------------- |
| `aic_event_init()`                              | Initialize Event Bus    |
| `aic_event_subscribe(event, cb, user_data)`     | Subscribe to event type |
| `aic_event_publish_imu(ax, ay, az, gx, gy, gz)` | Publish IMU data event  |
| `aic_event_publish_adc(ch, raw, mv)`            | Publish ADC data event  |

#### Layout Helper Functions (Part B)

| Function                                        | Description                   |
| ----------------------------------------------- | ----------------------------- |
| `aic_col_create(parent)`                        | สร้าง Flex Column container   |
| `aic_row_create(parent)`                        | สร้าง Flex Row container      |
| `aic_full_size(obj)`                            | ขยาย 100% x 100%              |
| `aic_pad(obj, px)`                              | ตั้ง padding ทุกด้าน          |
| `aic_apply_dark_theme(scr)`                     | ตั้ง dark background + colors |
| `aic_xyz_display_create(par, title, labels[3])` | สร้าง XYZ display panel       |
| `aic_create_footer(scr)`                        | สร้าง footer bar              |

#### IPC + Hardware Functions (Part B)

| Function                               | Description                         |
| -------------------------------------- | ----------------------------------- |
| `cm55_ipc_is_init()`                   | ตรวจว่า IPC พร้อมหรือยัง            |
| `cm55_ipc_set_led(id, state)`          | ส่งคำสั่ง LED ไป CM33               |
| `cm55_ipc_get_stats(&tx, &rx, &err)`   | ดึง IPC statistics                  |
| `CM55_LOGI(fmt, ...)`                  | Send INFO log to CM33 via IPC       |
| `aic_gpio_init()`                      | Init GPIO, return bool (success)    |
| `aic_gpio_led_set(led, state)`         | Set LED ON/OFF                      |
| `aic_gpio_button_read_raw(btn)`        | Read button state (true=pressed)    |
| `aic_sensors_init()`                   | Init sensor subsystem               |
| `imu_shared_read_accel(&ax, &ay, &az)` | Read accelerometer (float, g units) |
| `aic_adc_read(channel)`                | Read ADC (uint16\_t, 0-4095)        |

#### Architecture Principles

```
+===================================================================+
|           ARCHITECTURE PRINCIPLES                                 |
+===================================================================+
|                                                                   |
|  1. PROPER INIT ORDER                                             |
|     GPIO -> Sensors -> EventBus -> Logging -> UI -> Timer         |
|                                                                   |
|  2. GRACEFUL DEGRADATION                                          |
|     ถ้า subsystem fail -> ข้าม feature นั้น, ไม่ crash                 |
|                                                                   |
|  3. EVENT-DRIVEN DECOUPLING                                       |
|     Publisher ไม่รู้จัก subscriber (และกลับกัน)                         |
|     Timer -> publish -> Event Bus -> subscribers -> UI            |
|                                                                   |
|  4. LAYOUT HELPERS FOR PRODUCTIVITY                               |
|     Flex layout แทน manual pixel positioning                      |
|     aic_col + aic_row = responsive + maintainable                 |
|                                                                   |
+===================================================================+
```

#### Application ในงาน Industrial

| Use Case                | คำอธิบาย                                            |
| ----------------------- | --------------------------------------------------- |
| **SCADA System**        | Event-driven monitoring ของโรงงานทั้งหมด            |
| **PLC Programming**     | State machine สำหรับควบคุมกระบวนการผลิต             |
| **Alarm Management**    | จัดการ alarm ตามมาตรฐาน ISA-18.2                    |
| **Industrial IoT**      | Edge computing ที่ประมวลผล event ก่อนส่งขึ้น cloud  |
| **Automotive ECU**      | Event-driven architecture สำหรับ ADAS, Body Control |
| **Building Automation** | BACnet/BMS event management สำหรับ HVAC, Lighting   |
| **Medical Device**      | Monitor: vitals + pump control + alarm + audit log  |


# GPIO via IPC

## Lab 3: Hardware IPC GPIO (LED + Button Control)

### Part 4 - IPC & Event Bus (Hardware Labs)

***

### 1. โครงสร้างภาพรวม (Overview)

#### Why? - ทำไมต้องเรียนรู้เรื่องนี้

ในระบบ Multi-Core จริง การควบคุม Hardware ไม่ได้ทำจาก core เดียว -- LED เป็น **output** (ส่งคำสั่งจาก UI ไปควบคุม GPIO) และ Button เป็น **input** (อ่าน GPIO แล้วส่ง event กลับมาแสดงบน UI) ทั้งสองเป็นคู่ธรรมชาติของ GPIO control ผ่าน IPC:

**Output (LED):**

* **Industrial Automation**: หน้าจอ HMI (CM55) ส่งคำสั่งไปยัง PLC Controller (CM33) เพื่อเปิด/ปิดมอเตอร์ วาล์ว ไฟสัญญาณ
* **Smart Factory**: Operator กด UI บน Dashboard --> คำสั่งเดินทางผ่าน IPC --> CM33 ควบคุม Actuator จริง
* **Safety Isolation**: แยก UI core กับ Control core เพื่อความปลอดภัย ถ้า UI crash, control ยังทำงาน

**Input (Button):**

* **Industrial Safety**: ปุ่ม E-STOP (Emergency Stop) อยู่ที่ PLC controller --> ส่ง event ไป HMI แสดงสถานะ
* **Remote Monitoring**: ปุ่มกดที่ field device --> event ถูกส่งผ่าน bus --> แสดงที่ control room
* **Safety Interlock**: ปุ่ม confirm ต้องถูกกดก่อน actuator จะทำงาน (Two-hand safety control)

ในบอร์ด PSoC Edge E84:

* **CM55** รัน LVGL display แต่ไม่มี GPIO access โดยตรง
* **CM33-NS** ควบคุม GPIO, LED, PWM และอ่าน button ได้
* การควบคุม LED จาก UI ต้องส่งคำสั่ง IPC จาก CM55 ไปยัง CM33-NS
* การอ่าน Button ต้องให้ CM33-NS poll แล้วส่ง event กลับมา CM55

#### What? - จะได้เรียนรู้อะไร

**Part A (Ex5 - IPC LED Control):**

1. **IPC LED Commands**: ส่ง `IPC_CMD_LED_SET` และ `IPC_CMD_LED_BRIGHTNESS` จาก CM55
2. **Multi-LED Control**: ควบคุม LED 3 ดวง (Red, Green, Blue) ผ่าน IPC
3. **PWM Brightness**: ควบคุมความสว่างผ่าน Slider --> IPC --> CM33 PWM
4. **Status Feedback**: CM33 ยืนยันสถานะ LED กลับมาแสดงบน UI
5. **Flag-Based Pattern**: อัพเดท LVGL อย่างปลอดภัยจาก IPC callback
6. **IPC Timing**: จัดการ 20ms delay ระหว่าง IPC sends

**Part B (Ex6 - IPC Button Events):**

1. **Button Polling + Debounce**: CM33-NS อ่าน button ด้วย debounce algorithm
2. **IPC Button Events**: ส่ง `IPC_CMD_BUTTON_EVENT` จาก CM33 ไป CM55
3. **Long-Press Detection**: ตรวจจับการกดค้าง (>1 วินาที) แยกจาก short press
4. **Flag-Based UI Update**: CM55 รับ event แล้ว update UI ผ่าน LVGL timer
5. **Event Counter**: นับจำนวนครั้งที่กด + แสดง timestamp
6. **Event Logger**: บันทึก button events พร้อม timestamp

#### How? - ทำอย่างไร

**Part A:** สร้าง LED Control Panel บน CM55 ที่มี Switch 3 ตัว + Brightness Slider --> เมื่อ user สั่งจาก UI --> CM55 ส่ง IPC command --> CM33-NS ควบคุม GPIO LED จริง --> CM33-NS ตอบกลับสถานะ --> CM55 อัพเดท UI

**Part B:** CM33-NS poll USER button ทุก 10ms พร้อม debounce --> เมื่อตรวจจับ press/release/long-press ส่ง IPC event ไป CM55 --> CM55 IPC callback ตั้ง flag --> LVGL timer อ่าน flag แล้ว update UI

***

### 2. หลักการทำงาน (Technical Principles)

#### 2.1 Data Flow Direction Comparison

```
+-----------------------------------------------------------+
|         DATA FLOW DIRECTION COMPARISON                    |
+-----------------------------------------------------------+
|                                                           |
|  Part A (LED Control):                                    |
|  CM55 (UI command) ---------> CM33 (GPIO action)          |
|  CM55 <-------- (ACK/status) CM33                         |
|  Direction: CM55 --> CM33 (command)                       |
|                                                           |
|  Part B (Button Events):                                  |
|  CM33 (GPIO read) ----------> CM55 (UI display)           |
|  Direction: CM33 --> CM55 (event)                         |
|                                                           |
|  Lab 4 (Dashboard): ทั้งสองทิศทางพร้อมกัน!                     |
|  CM55 <--> CM33 (bidirectional)                           |
|                                                           |
+-----------------------------------------------------------+
```

#### 2.2 IPC LED Control Architecture (Part A)

```
+-----------------------------------------------------------+
|            IPC LED CONTROL ARCHITECTURE                   |
+-----------------------------------------------------------+
|                                                           |
|  CM55 Core (LVGL Display)        CM33-NS Core (GPIO)      |
|  ========================        =====================    |
|                                                           |
|  +------------------+            +------------------+     |
|  | LVGL Switch/     |  IPC TX   | IPC RX Callback   |     |
|  | Slider Event     |---------->| Parse LED cmd     |     |
|  | - LED ON/OFF     |  0xB2     | - Set GPIO        |     |
|  | - Brightness     |  0xB3     | - Set PWM duty    |     |
|  +------------------+           +-------------------+     |
|                                          |                |
|  +------------------+            +-------v----------+     |
|  | IPC RX Callback  |  IPC TX   | LED GPIO Driver   |     |
|  | - Set flag       |<----------| - aic_gpio_led    |     |
|  | - Store state    |  ACK/NAK  | - PWM control     |     |
|  +--------+---------+           +-------------------+     |
|           |                                               |
|           v (LVGL timer reads flag)                       |
|  +------------------+                                     |
|  | Update UI        |                                     |
|  | - LED widget     |                                     |
|  | - Status label   |                                     |
|  +------------------+                                     |
|                                                           |
+-----------------------------------------------------------+
```

#### 2.3 IPC LED Command Protocol

```
+-----------------------------------------------------------+
|              IPC LED COMMAND PROTOCOL                     |
+-----------------------------------------------------------+
|                                                           |
|  Command              Code   Direction    Payload         |
|  ---------------------------------------------------------|
|  IPC_CMD_LED_SET      0xB2   CM55->CM33   ipc_led_data_t  |
|  IPC_CMD_LED_BRIGHTNESS 0xB3 CM55->CM33   ipc_led_data_t  |
|  IPC_CMD_ACK          0x44   CM33->CM55   led_id + state  |
|                                                           |
|  ipc_led_data_t structure:                                |
|  +--------+--------+------------+----------+              |
|  | led_id | state  | brightness | reserved |              |
|  | 1 byte | 1 byte | 1 byte     | 1 byte   |              |
|  +--------+--------+------------+----------+              |
|                                                           |
|  LED IDs:                                                 |
|  +-- 0: Red LED    (AIC_LED_RED / CYBSP_USER_LED)         |
|  +-- 1: Green LED  (AIC_LED_GREEN)                        |
|  +-- 2: Blue LED   (AIC_LED_BLUE)                         |
|                                                           |
|  Brightness: 0-100 (percent, mapped to PWM duty cycle)    |
|                                                           |
+-----------------------------------------------------------+
```

#### 2.4 Flag-Based Pattern (Thread Safety)

```
+-----------------------------------------------------------+
|         CRITICAL: LVGL THREAD SAFETY PATTERN              |
+-----------------------------------------------------------+
|                                                           |
|  IPC Callback (ISR context)     LVGL Timer (UI context)   |
|  ==========================     ======================    |
|                                                           |
|  void ipc_rx_cb(msg) {          void led_timer_cb() {     |
|    if(msg->cmd == ACK) {          if(led_flag_updated) {  |
|      led_state[id] = state;         led_flag_updated=0;   |
|      led_flag_updated = 1;          // Safe: update UI    |
|      // NEVER call LVGL here!       update_led_ui();      |
|    }                              }                       |
|  }                              }                         |
|                                                           |
|  WRONG (will crash):            RIGHT (thread-safe):      |
|  void ipc_rx_cb(msg) {          1. IPC sets flag + data   |
|    lv_label_set_text(..);       2. LVGL timer checks flag |
|    // CRASH! LVGL not safe!     3. Timer updates UI       |
|  }                                                        |
|                                                           |
+-----------------------------------------------------------+
```

#### 2.5 IPC Button Event Architecture (Part B)

```
+-----------------------------------------------------------+
|            IPC BUTTON EVENT ARCHITECTURE                  |
+-----------------------------------------------------------+
|                                                           |
|  CM33-NS Core (GPIO Reader)      CM55 Core (LVGL UI)      |
|  ==========================      =====================    |
|                                                           |
|  +------------------+                                     |
|  | GPIO Button Poll |  Every 10ms                         |
|  | (USER_BTN pin)   |                                     |
|  +--------+---------+                                     |
|           |                                               |
|           v                                               |
|  +------------------+                                     |
|  | Debounce Filter  |  30ms stable required               |
|  | (software)       |                                     |
|  +--------+---------+                                     |
|           |                                               |
|           v                                               |
|  +------------------+            +------------------+     |
|  | Detect Event:    |  IPC TX   | IPC RX Callback   |     |
|  | - PRESS          |---------->| Set flags:        |     |
|  | - RELEASE        |  0xB5     | - btn_pressed     |     |
|  | - LONG_PRESS     |           | - btn_long_press  |     |
|  +------------------+           +--------+----------+     |
|                                          |                |
|                                          v (LVGL timer)   |
|                                 +------------------+      |
|                                 | Update UI:       |      |
|                                 | - Status label   |      |
|                                 | - LED widget     |      |
|                                 | - Press counter  |      |
|                                 | - Event log      |      |
|                                 +------------------+      |
|                                                           |
+-----------------------------------------------------------+
```

#### 2.6 Button Debounce Algorithm

```
+-----------------------------------------------------------+
|              BUTTON DEBOUNCE STATE MACHINE                |
+-----------------------------------------------------------+
|                                                           |
|  Physical Button Signal (noisy):                          |
|  _____|~|~|__________|~|~|~|___________                   |
|                                                           |
|  After Debounce (clean):                                  |
|  _____|-------------|________________                     |
|       ^             ^                                     |
|       PRESS         RELEASE                               |
|                                                           |
|  States:                                                  |
|  +-- IDLE:       รอกด (GPIO = HIGH = ไม่กด)                |
|  +-- DEBOUNCING: ตรวจพบการกด รอ 30ms ยืนยัน                 |
|  +-- PRESSED:    กดแล้ว เริ่มนับเวลา long-press               |
|  +-- LONG_PRESS: กดค้างเกิน 1000ms                          |
|  +-- RELEASING:  ตรวจพบปล่อย รอ 30ms ยืนยัน                  |
|                                                           |
|  Timing:                                                  |
|  +-- Debounce time:   30ms                                |
|  +-- Long-press time: 1000ms                              |
|  +-- Poll interval:   10ms                                |
|                                                           |
|         Press detected     30ms stable    1000ms hold     |
|  IDLE ------> DEBOUNCING ------> PRESSED ------> LONG     |
|   ^                 |                |         PRESS      |
|   |          bounce |                |            |       |
|   |          <------+        Release |            |       |
|   |                          detected|            |       |
|   |                 RELEASING <------+            |       |
|   |                     |                         |       |
|   |            30ms     |                 Release |       |
|   +--------- stable ----+                         |       |
|   |                                               |       |
|   +-----------------------------------------------+       |
|                                                           |
+-----------------------------------------------------------+
```

#### 2.7 IPC Button Data Structure

```
+-----------------------------------------------------------+
|           IPC_CMD_BUTTON_EVENT (0xB5) PAYLOAD             |
+-----------------------------------------------------------+
|                                                           |
|  ipc_button_data_t:                                       |
|  +-----------+---------+------------+----------+          |
|  | button_id | pressed | long_press | reserved |          |
|  | 1 byte    | 1 byte  | 1 byte     | 1 byte   |          |
|  +-----------+---------+------------+----------+          |
|  | timestamp (uint32_t, 4 bytes)               |          |
|  +---------------------------------------------+          |
|                                                           |
|  Events:                                                  |
|  +-- Short Press:  pressed=1, long_press=0                |
|  +-- Long Press:   pressed=1, long_press=1                |
|  +-- Release:      pressed=0, long_press=0                |
|                                                           |
|  button_id:                                               |
|  +-- 0: USER Button (CYBSP_USER_BTN)                      |
|                                                           |
+-----------------------------------------------------------+
```

***

### 3. ฟังก์ชันสำคัญ (API Reference)

#### 3.1 CM55 IPC Send Functions (LED Control)

<table><thead><tr><th width="332.6363525390625">Function</th><th>Description</th><th>Return</th></tr></thead><tbody><tr><td><code>cm55_ipc_set_led(led_id, state)</code></td><td>ส่งคำสั่ง LED ON/OFF ไป CM33</td><td><code>cy_en_ipc_pipe_status_t</code></td></tr><tr><td><code>cm55_ipc_set_led_brightness(led_id, brightness)</code></td><td>ส่งคำสั่ง brightness (0-100)</td><td><code>cy_en_ipc_pipe_status_t</code></td></tr><tr><td><code>cm55_ipc_send_retry(msg, retries)</code></td><td>ส่ง IPC message พร้อม retry</td><td><code>cy_en_ipc_pipe_status_t</code></td></tr><tr><td><code>cm55_ipc_register_callback(cb, data)</code></td><td>ลงทะเบียน IPC callback</td><td>void</td></tr></tbody></table>

#### 3.2 CM33-NS GPIO Functions

<table><thead><tr><th width="351.1875">Function</th><th width="245.492919921875">Description</th><th>Return</th></tr></thead><tbody><tr><td><code>aic_gpio_init()</code></td><td>Initialize GPIO subsystem</td><td>void</td></tr><tr><td><code>aic_gpio_led_set(led, state)</code></td><td>ควบคุม LED GPIO จริง</td><td>void</td></tr><tr><td><code>aic_gpio_button_read_raw(AIC_BTN_USER)</code></td><td>อ่าน button state (0=pressed)</td><td><code>uint8_t</code></td></tr><tr><td><code>Cy_SysLib_Delay(ms)</code></td><td>Delay (CM33, ไม่ใช่ FreeRTOS)</td><td>void</td></tr></tbody></table>

#### 3.3 CM33-NS IPC Functions

<table><thead><tr><th width="245.00714111328125">Function</th><th width="277.757080078125">Description</th><th>Return</th></tr></thead><tbody><tr><td><code>cm33_ipc_send_button_event(id, pressed)</code></td><td>ส่ง button event ไป CM55</td><td><code>cy_en_ipc_pipe_status_t</code></td></tr><tr><td><code>cm33_ipc_send_retry(msg, retries)</code></td><td>ส่ง IPC message พร้อม retry</td><td><code>cy_en_ipc_pipe_status_t</code></td></tr><tr><td><code>cm33_ipc_send_led_state(led_id, state)</code></td><td>ส่งยืนยันสถานะ LED กลับ</td><td><code>cy_en_ipc_pipe_status_t</code></td></tr></tbody></table>

#### 3.4 IPC Data Structures

<table><thead><tr><th width="186.7769775390625">Structure</th><th width="363.5545654296875">Fields</th><th>Usage</th></tr></thead><tbody><tr><td><code>ipc_led_data_t</code></td><td><code>led_id</code>, <code>state</code>, <code>brightness</code>, <code>reserved</code></td><td>LED control payload</td></tr><tr><td><code>ipc_button_data_t</code></td><td><code>button_id</code>, <code>pressed</code>, <code>long_press</code>, <code>timestamp</code></td><td>Button event payload</td></tr><tr><td><code>ipc_msg_t</code></td><td><code>client_id</code>, <code>intr_mask</code>, <code>cmd</code>, <code>value</code>, <code>data[]</code></td><td>IPC message wrapper</td></tr></tbody></table>

#### 3.5 LVGL Timer

<table><thead><tr><th width="365.7535400390625">Function</th><th width="233.1939697265625">Description</th><th>Return</th></tr></thead><tbody><tr><td><code>lv_timer_create(cb, period_ms, user_data)</code></td><td>สร้าง timer สำหรับ poll flags</td><td><code>lv_timer_t *</code></td></tr><tr><td><code>lv_led_set_brightness(led, bright)</code></td><td>ตั้ง LED widget brightness (0-255)</td><td>void</td></tr></tbody></table>

***

### 4. Part A: IPC LED Control (Ex5)

Part A สอน output direction -- CM55 ส่งคำสั่งไปควบคุม LED จริงบน CM33-NS ผ่าน IPC พร้อม ACK feedback

#### 4.1 Program Flowchart

```
+-----------------------------------------------------------+
|                  PROGRAM FLOW                             |
+-----------------------------------------------------------+
|                                                           |
|                   +----------+                            |
|                   |  Start   |                            |
|                   +----+-----+                            |
|                        |                                  |
|                        v                                  |
|             +---------------------+                       |
|             | cm55_ipc_init()     |                       |
|             | Register callback   |                       |
|             +----------+----------+                       |
|                        |                                  |
|                        v                                  |
|             +---------------------+                       |
|             | Create LVGL UI      |                       |
|             | - 3x Switch (RGB)   |                       |
|             | - Brightness Slider |                       |
|             | - Status labels     |                       |
|             +----------+----------+                       |
|                        |                                  |
|                        v                                  |
|             +---------------------+                       |
|             | Create LVGL Timer   |                       |
|             | (check IPC flags)   |                       |
|             +----------+----------+                       |
|                        |                                  |
|                        v                                  |
|             +---------------------+                       |
|             | User toggles switch |<-----------+          |
|             +----------+----------+            |          |
|                        |                       |          |
|                        v                       |          |
|             +---------------------+            |          |
|             | Send IPC_CMD_LED_SET|            |          |
|             | to CM33-NS          |            |          |
|             +----------+----------+            |          |
|                        |                       |          |
|                        v                       |          |
|             +---------------------+            |          |
|             | CM33 receives       |            |          |
|             | Controls GPIO LED   |            |          |
|             | Sends ACK back      |            |          |
|             +----------+----------+            |          |
|                        |                       |          |
|                        v                       |          |
|             +---------------------+            |          |
|             | CM55 IPC callback   |            |          |
|             | Sets flag + state   |            |          |
|             +----------+----------+            |          |
|                        |                       |          |
|                        v                       |          |
|             +---------------------+            |          |
|             | LVGL timer fires    |            |          |
|             | Updates LED widget  |            |          |
|             | Updates status label|            |          |
|             +----------+----------+            |          |
|                        |                       |          |
|                        +-----------------------+          |
|                                                           |
+-----------------------------------------------------------+
```

#### 4.2 CM55 Code - LED Control UI + IPC Send

```c
/*******************************************************************************
 * Part 4 - Example 5: Hardware IPC LED Control (CM55 Side)
 *
 * Learning: IPC LED commands, flag-based pattern, multi-LED control
 * Platform: PSoC Edge E84 - CM55 Core + LVGL v9.2.0
 *
 * CRITICAL: LVGL is NOT thread-safe!
 * - IPC callback sets flags only
 * - LVGL timer reads flags and updates UI
 ******************************************************************************/

#include "lvgl.h"
#include "ipc/cm55_ipc_pipe.h"
#include "../../shared/ipc_shared.h"

/* ===== LED Definitions ===== */
#define NUM_LEDS  3

typedef struct {
    uint8_t     id;
    const char *name;
    lv_color_t  color;
    bool        state;
    uint8_t     brightness;
} led_info_t;

static led_info_t leds[NUM_LEDS] = {
    { 0, "Red",   {0}, false, 100 },
    { 1, "Green", {0}, false, 100 },
    { 2, "Blue",  {0}, false, 100 },
};

/* ===== LVGL UI Objects ===== */
static lv_obj_t * led_widgets[NUM_LEDS];    /* LED indicator widgets */
static lv_obj_t * led_switches[NUM_LEDS];   /* ON/OFF switches */
static lv_obj_t * led_status[NUM_LEDS];     /* Status labels */
static lv_obj_t * brightness_slider;
static lv_obj_t * brightness_label;
static lv_obj_t * ipc_status_label;

/* ===== IPC Flag Variables (volatile for thread safety) ===== */
static volatile bool     ipc_led_ack_flag = false;
static volatile uint8_t  ipc_ack_led_id   = 0;
static volatile bool     ipc_ack_state    = false;
static volatile uint8_t  ipc_ack_brightness = 0;
static volatile uint32_t ipc_error_count  = 0;

/*******************************************************************************
 * IPC Receive Callback (ISR context - NEVER call LVGL here!)
 ******************************************************************************/
static void ex5_ipc_rx_callback(const ipc_msg_t *msg, void *user_data)
{
    (void)user_data;

    switch (msg->cmd) {
        case IPC_CMD_ACK: {
            /* CM33 confirmed LED state change */
            ipc_led_data_t *led_data = (ipc_led_data_t *)msg->data;
            ipc_ack_led_id    = led_data->led_id;
            ipc_ack_state     = (led_data->state != 0);
            ipc_ack_brightness = led_data->brightness;
            ipc_led_ack_flag  = true;  /* Set flag - LVGL timer will handle */
            break;
        }
        case IPC_CMD_NACK:
            ipc_error_count++;
            break;
        default:
            break;
    }
}

/*******************************************************************************
 * LVGL Timer: Check IPC flags and update UI (safe context)
 ******************************************************************************/
static void ex5_ipc_timer_cb(lv_timer_t *timer)
{
    (void)timer;

    if (ipc_led_ack_flag) {
        ipc_led_ack_flag = false;

        uint8_t id = ipc_ack_led_id;
        if (id < NUM_LEDS) {
            /* Update internal state */
            leds[id].state      = ipc_ack_state;
            leds[id].brightness = ipc_ack_brightness;

            /* Update LED widget */
            if (leds[id].state) {
                lv_led_on(led_widgets[id]);
                lv_led_set_brightness(led_widgets[id],
                    (uint8_t)(leds[id].brightness * 255 / 100));
            } else {
                lv_led_off(led_widgets[id]);
            }

            /* Update status label */
            if (leds[id].state) {
                lv_label_set_text_fmt(led_status[id],
                    "%s: ON (%d%%)", leds[id].name, (int)leds[id].brightness);
                lv_obj_set_style_text_color(led_status[id],
                    lv_palette_main(LV_PALETTE_GREEN), 0);
            } else {
                lv_label_set_text_fmt(led_status[id], "%s: OFF", leds[id].name);
                lv_obj_set_style_text_color(led_status[id],
                    lv_palette_main(LV_PALETTE_RED), 0);
            }
        }

        /* Update IPC status */
        lv_label_set_text_fmt(ipc_status_label,
            "IPC: ACK received (LED%d = %s) | Errors: %u",
            (int)id, ipc_ack_state ? "ON" : "OFF",
            (unsigned int)ipc_error_count);
    }
}

/*******************************************************************************
 * Switch Event Callback - ส่ง IPC LED ON/OFF
 ******************************************************************************/
static void ex5_switch_cb(lv_event_t *e)
{
    lv_obj_t *sw = lv_event_get_target(e);
    int *led_idx = (int *)lv_event_get_user_data(e);
    int idx = *led_idx;

    if (idx < 0 || idx >= NUM_LEDS) return;

    bool is_on = lv_obj_has_state(sw, LV_STATE_CHECKED);

    /* ส่ง IPC command ไป CM33-NS */
    cy_en_ipc_pipe_status_t status;
    status = cm55_ipc_set_led(leds[idx].id, is_on);

    if (status == CY_IPC_PIPE_SUCCESS) {
        lv_label_set_text_fmt(ipc_status_label,
            "IPC: Sent LED_%s %s (waiting ACK...)",
            leds[idx].name, is_on ? "ON" : "OFF");
        CM55_LOGI("LED %s -> %s", leds[idx].name, is_on ? "ON" : "OFF");
    } else {
        lv_label_set_text_fmt(ipc_status_label,
            "IPC: SEND FAILED (LED_%s) err=%d",
            leds[idx].name, (int)status);
        CM55_LOGE("IPC send failed for LED%d, err=%d", idx, (int)status);
        ipc_error_count++;
    }
}

/*******************************************************************************
 * Slider Event Callback - ส่ง IPC LED Brightness
 ******************************************************************************/
static void ex5_brightness_cb(lv_event_t *e)
{
    lv_obj_t *slider = lv_event_get_target(e);
    int32_t value = lv_slider_get_value(slider);

    /* Update label */
    lv_label_set_text_fmt(brightness_label, "Brightness: %d%%", (int)value);

    /* ส่ง brightness ให้ LED ทุกดวงที่เปิดอยู่ */
    for (int i = 0; i < NUM_LEDS; i++) {
        if (leds[i].state) {
            cm55_ipc_set_led_brightness(leds[i].id, (uint8_t)value);

            /* CRITICAL: 20ms delay ระหว่าง IPC sends
             * ป้องกัน CM55 rx_buffer overwrite */
            vTaskDelay(pdMS_TO_TICKS(20));
        }
    }

    CM55_LOGD("Brightness set to %d%%", (int)value);
}

/*******************************************************************************
 * Main Function: สร้าง LED Control Panel
 ******************************************************************************/

/* Static index storage for user_data (ต้องเป็น static เพื่อให้ pointer valid) */
static int led_indices[NUM_LEDS] = {0, 1, 2};

void part4_ex5_hw_ipc_led(void)
{
    /* [1] Initialize LED colors */
    leds[0].color = lv_palette_main(LV_PALETTE_RED);
    leds[1].color = lv_palette_main(LV_PALETTE_GREEN);
    leds[2].color = lv_palette_main(LV_PALETTE_BLUE);

    /* [2] Register IPC callback */
    cm55_ipc_register_callback(ex5_ipc_rx_callback, NULL);

    /* [3] Background */
    lv_obj_set_style_bg_color(lv_screen_active(),
                              lv_color_hex(0x0a0e27), LV_PART_MAIN);
    lv_obj_clear_flag(lv_screen_active(), LV_OBJ_FLAG_SCROLLABLE);

    /* [4] Title */
    lv_obj_t *title = lv_label_create(lv_screen_active());
    lv_label_set_text(title, "Part 4 - Ex5: IPC LED Control");
    lv_obj_set_style_text_color(title, lv_color_hex(0xFFFFFF), 0);
    lv_obj_set_style_text_font(title, &lv_font_montserrat_18, 0);
    lv_obj_align(title, LV_ALIGN_TOP_MID, 0, 8);

    lv_obj_t *subtitle = lv_label_create(lv_screen_active());
    lv_label_set_text(subtitle, "CM55 UI --> IPC --> CM33 GPIO");
    lv_obj_set_style_text_color(subtitle, lv_color_hex(0x888888), 0);
    lv_obj_align(subtitle, LV_ALIGN_TOP_MID, 0, 30);

    /* [5] LED Control Panel (Container) */
    lv_obj_t *panel = lv_obj_create(lv_screen_active());
    lv_obj_set_size(panel, 440, 160);
    lv_obj_align(panel, LV_ALIGN_TOP_MID, 0, 50);
    lv_obj_set_style_bg_color(panel, lv_color_hex(0x111633), 0);
    lv_obj_set_style_border_color(panel, lv_color_hex(0x333366), 0);
    lv_obj_set_style_border_width(panel, 1, 0);
    lv_obj_set_style_radius(panel, 8, 0);
    lv_obj_clear_flag(panel, LV_OBJ_FLAG_SCROLLABLE);

    /* [6] สร้าง LED rows (LED widget + Switch + Status) */
    for (int i = 0; i < NUM_LEDS; i++) {
        int y_pos = 5 + i * 48;

        /* LED indicator widget */
        led_widgets[i] = lv_led_create(panel);
        lv_obj_set_size(led_widgets[i], 30, 30);
        lv_obj_set_pos(led_widgets[i], 10, y_pos);
        lv_led_set_color(led_widgets[i], leds[i].color);
        lv_led_off(led_widgets[i]);

        /* LED name label */
        lv_obj_t *name_lbl = lv_label_create(panel);
        lv_label_set_text(name_lbl, leds[i].name);
        lv_obj_set_style_text_color(name_lbl, lv_color_hex(0xCCCCCC), 0);
        lv_obj_set_pos(name_lbl, 50, y_pos + 6);

        /* ON/OFF Switch */
        led_switches[i] = lv_switch_create(panel);
        lv_obj_set_size(led_switches[i], 60, 28);
        lv_obj_set_pos(led_switches[i], 130, y_pos + 2);
        lv_obj_set_style_bg_color(led_switches[i],
            leds[i].color, LV_PART_INDICATOR | LV_STATE_CHECKED);
        lv_obj_add_event_cb(led_switches[i], ex5_switch_cb,
            LV_EVENT_VALUE_CHANGED, &led_indices[i]);

        /* Status label */
        led_status[i] = lv_label_create(panel);
        lv_label_set_text_fmt(led_status[i], "%s: OFF", leds[i].name);
        lv_obj_set_style_text_color(led_status[i],
            lv_palette_main(LV_PALETTE_RED), 0);
        lv_obj_set_pos(led_status[i], 210, y_pos + 6);
    }

    /* [7] Brightness Control */
    lv_obj_t *bright_panel = lv_obj_create(lv_screen_active());
    lv_obj_set_size(bright_panel, 440, 50);
    lv_obj_align(bright_panel, LV_ALIGN_TOP_MID, 0, 218);
    lv_obj_set_style_bg_color(bright_panel, lv_color_hex(0x111633), 0);
    lv_obj_set_style_border_color(bright_panel, lv_color_hex(0x333366), 0);
    lv_obj_set_style_border_width(bright_panel, 1, 0);
    lv_obj_set_style_radius(bright_panel, 8, 0);
    lv_obj_clear_flag(bright_panel, LV_OBJ_FLAG_SCROLLABLE);

    brightness_label = lv_label_create(bright_panel);
    lv_label_set_text(brightness_label, "Brightness: 100%");
    lv_obj_set_style_text_color(brightness_label, lv_color_hex(0xCCCCCC), 0);
    lv_obj_set_pos(brightness_label, 10, 8);

    brightness_slider = lv_slider_create(bright_panel);
    lv_obj_set_size(brightness_slider, 200, 15);
    lv_obj_set_pos(brightness_slider, 200, 12);
    lv_slider_set_range(brightness_slider, 0, 100);
    lv_slider_set_value(brightness_slider, 100, LV_ANIM_OFF);
    lv_obj_set_style_bg_color(brightness_slider,
        lv_palette_main(LV_PALETTE_AMBER),
        LV_PART_INDICATOR);
    lv_obj_set_style_bg_color(brightness_slider,
        lv_palette_main(LV_PALETTE_AMBER),
        LV_PART_KNOB);
    lv_obj_add_event_cb(brightness_slider, ex5_brightness_cb,
        LV_EVENT_VALUE_CHANGED, NULL);

    /* [8] IPC Status bar */
    ipc_status_label = lv_label_create(lv_screen_active());
    lv_label_set_text(ipc_status_label, "IPC: Ready (waiting for command...)");
    lv_obj_set_style_text_color(ipc_status_label,
        lv_palette_main(LV_PALETTE_CYAN), 0);
    lv_obj_set_style_text_font(ipc_status_label, &lv_font_montserrat_12, 0);
    lv_obj_align(ipc_status_label, LV_ALIGN_BOTTOM_MID, 0, -8);

    /* [9] Create LVGL Timer to check IPC flags (50ms interval) */
    lv_timer_create(ex5_ipc_timer_cb, 50, NULL);

    CM55_LOGI("Part4 Ex5: IPC LED Control initialized");
}
```

#### 4.3 CM33-NS Code - LED IPC Handler

```c
/*******************************************************************************
 * Part 4 - Example 5: CM33-NS Side - LED GPIO Handler
 *
 * Receives IPC LED commands from CM55 and controls real GPIO LEDs.
 * Sends ACK back to CM55 with confirmed state.
 *
 * IMPORTANT: CM33-NS has NO retarget-io -- NEVER use printf()!
 ******************************************************************************/

#include "ipc/cm33_ipc_pipe.h"
#include "../../shared/ipc_shared.h"
#include "aic-eec/aic-eec.h"    /* GPIO API */

/* LED ID to hardware pin mapping */
#define LED_ID_RED    0
#define LED_ID_GREEN  1
#define LED_ID_BLUE   2

/* Local LED state tracking */
static bool     led_states[3]      = {false, false, false};
static uint8_t  led_brightness[3]  = {100, 100, 100};

/*******************************************************************************
 * Handle LED commands from CM55
 ******************************************************************************/
static void cm33_handle_led_cmd(const ipc_msg_t *msg)
{
    ipc_led_data_t *led_data = (ipc_led_data_t *)msg->data;
    uint8_t led_id = led_data->led_id;

    if (led_id > LED_ID_BLUE) return;  /* Invalid LED */

    switch (msg->cmd) {
        case IPC_CMD_LED_SET: {
            led_states[led_id] = (led_data->state != 0);

            /* Control actual GPIO LED */
            switch (led_id) {
                case LED_ID_RED:
                    aic_gpio_led_set(AIC_LED1, led_states[led_id]);
                    break;
                case LED_ID_GREEN:
                    aic_gpio_led_set(AIC_LED2, led_states[led_id]);
                    break;
                case LED_ID_BLUE:
                    aic_gpio_led_set(AIC_LED3, led_states[led_id]);
                    break;
            }

            /* Send ACK back to CM55 with confirmed state */
            ipc_msg_t ack_msg;
            IPC_MSG_INIT(&ack_msg, IPC_CMD_ACK);
            ipc_led_data_t *ack_data = (ipc_led_data_t *)ack_msg.data;
            ack_data->led_id     = led_id;
            ack_data->state      = led_states[led_id] ? 1 : 0;
            ack_data->brightness = led_brightness[led_id];
            cm33_ipc_send_retry(&ack_msg, 5);
            break;
        }

        case IPC_CMD_LED_BRIGHTNESS: {
            led_brightness[led_id] = led_data->brightness;

            /* TODO: Set PWM duty cycle for actual brightness control
             * cyhal_pwm_set_duty_cycle(&pwm_led, led_brightness[led_id], 1000);
             */

            /* Send ACK with updated brightness */
            ipc_msg_t ack_msg;
            IPC_MSG_INIT(&ack_msg, IPC_CMD_ACK);
            ipc_led_data_t *ack_data = (ipc_led_data_t *)ack_msg.data;
            ack_data->led_id     = led_id;
            ack_data->state      = led_states[led_id] ? 1 : 0;
            ack_data->brightness = led_brightness[led_id];
            cm33_ipc_send_retry(&ack_msg, 5);
            break;
        }

        default:
            break;
    }
}

/*******************************************************************************
 * CM33 IPC Callback - route commands to handlers
 ******************************************************************************/
static void cm33_ipc_rx_handler(const ipc_msg_t *msg, void *user_data)
{
    (void)user_data;

    switch (msg->cmd) {
        case IPC_CMD_LED_SET:
        case IPC_CMD_LED_BRIGHTNESS:
            cm33_handle_led_cmd(msg);
            break;

        case IPC_CMD_PING:
            cm33_ipc_send_cmd(IPC_CMD_PONG, 0);
            break;

        case IPC_CMD_LOG:
        case IPC_CMD_LOG_INFO:
        case IPC_CMD_LOG_WARN:
        case IPC_CMD_LOG_ERROR:
        case IPC_CMD_LOG_DEBUG:
            cm33_ipc_handle_log(msg);
            break;

        default:
            break;
    }
}

/*******************************************************************************
 * CM33-NS Main Initialization (relevant portion)
 ******************************************************************************/
void cm33_app_init(void)
{
    /* Initialize GPIO */
    aic_gpio_init();

    /* Initialize IPC */
    cm33_ipc_init();
    cm33_ipc_register_callback(cm33_ipc_rx_handler, NULL);

    /* Enable CM55 core */
    Cy_SysEnableCM55(CY_CORTEX_M55_APPL_ADDR);

    /* Main loop: process IPC messages */
    for (;;) {
        cm33_ipc_process();
        Cy_SysLib_Delay(5);  /* 5ms polling interval */
    }
}
```

***

### 5. Part B: IPC Button Read (Ex6)

Part B สอน input direction -- CM33-NS อ่าน button ด้วย debounce state machine แล้วส่ง event ไป CM55 แสดงผล

#### 5.1 CM33-NS Code - Button Polling with Debounce

```c
/*******************************************************************************
 * Part 4 - Example 6: CM33-NS Button Handler
 *
 * Polls USER button with software debounce.
 * Sends IPC_CMD_BUTTON_EVENT to CM55 on press/release/long-press.
 *
 * IMPORTANT: CM33-NS has NO retarget-io -- NEVER use printf()!
 ******************************************************************************/

#include "ipc/cm33_ipc_pipe.h"
#include "../../shared/ipc_shared.h"
#include "aic-eec/aic-eec.h"

/* ===== Button Configuration ===== */
#define BTN_POLL_INTERVAL_MS    10      /* Poll ทุก 10ms */
#define BTN_DEBOUNCE_MS         30      /* Debounce 30ms (3 samples) */
#define BTN_LONG_PRESS_MS       1000    /* Long press = 1 วินาที */
#define BTN_ACTIVE_LOW          1       /* 0 = pressed on this board */

/* ===== Button State Machine ===== */
typedef enum {
    BTN_STATE_IDLE,
    BTN_STATE_DEBOUNCE_PRESS,
    BTN_STATE_PRESSED,
    BTN_STATE_LONG_PRESSED,
    BTN_STATE_DEBOUNCE_RELEASE
} btn_state_t;

static btn_state_t  btn_state          = BTN_STATE_IDLE;
static uint32_t     btn_debounce_start = 0;
static uint32_t     btn_press_start    = 0;
static bool         btn_long_sent      = false;

/*******************************************************************************
 * Send Button Event via IPC
 ******************************************************************************/
static void send_button_event(bool pressed, bool long_press)
{
    ipc_msg_t msg;
    IPC_MSG_INIT(&msg, IPC_CMD_BUTTON_EVENT);

    ipc_button_data_t *btn_data = (ipc_button_data_t *)msg.data;
    btn_data->button_id  = 0;   /* USER button */
    btn_data->pressed    = pressed ? 1 : 0;
    btn_data->long_press = long_press ? 1 : 0;
    btn_data->timestamp  = Cy_SysLib_GetTicks();

    cm33_ipc_send_retry(&msg, 5);
}

/*******************************************************************************
 * Button Polling with Debounce State Machine
 * เรียกจาก main loop ทุก 10ms
 ******************************************************************************/
static void button_poll(void)
{
    /* อ่าน button (active low: 0 = pressed) */
    uint8_t raw = aic_gpio_button_read_raw(AIC_BTN_USER);
    bool is_pressed = (raw == 0);  /* Active low */
    uint32_t now = Cy_SysLib_GetTicks();

    switch (btn_state) {
        case BTN_STATE_IDLE:
            if (is_pressed) {
                /* เริ่ม debounce สำหรับ press */
                btn_state = BTN_STATE_DEBOUNCE_PRESS;
                btn_debounce_start = now;
            }
            break;

        case BTN_STATE_DEBOUNCE_PRESS:
            if (!is_pressed) {
                /* Bounce - กลับ IDLE */
                btn_state = BTN_STATE_IDLE;
            } else if ((now - btn_debounce_start) >= BTN_DEBOUNCE_MS) {
                /* Debounce passed - confirmed press */
                btn_state = BTN_STATE_PRESSED;
                btn_press_start = now;
                btn_long_sent = false;

                /* ส่ง press event */
                send_button_event(true, false);
            }
            break;

        case BTN_STATE_PRESSED:
            if (!is_pressed) {
                /* เริ่ม debounce สำหรับ release */
                btn_state = BTN_STATE_DEBOUNCE_RELEASE;
                btn_debounce_start = now;
            } else if (!btn_long_sent &&
                       (now - btn_press_start) >= BTN_LONG_PRESS_MS) {
                /* Long press detected */
                btn_long_sent = true;
                btn_state = BTN_STATE_LONG_PRESSED;

                /* ส่ง long-press event */
                send_button_event(true, true);
            }
            break;

        case BTN_STATE_LONG_PRESSED:
            if (!is_pressed) {
                /* เริ่ม debounce สำหรับ release */
                btn_state = BTN_STATE_DEBOUNCE_RELEASE;
                btn_debounce_start = now;
            }
            break;

        case BTN_STATE_DEBOUNCE_RELEASE:
            if (is_pressed) {
                /* Bounce - กลับสถานะก่อนหน้า */
                btn_state = btn_long_sent ?
                    BTN_STATE_LONG_PRESSED : BTN_STATE_PRESSED;
            } else if ((now - btn_debounce_start) >= BTN_DEBOUNCE_MS) {
                /* Debounce passed - confirmed release */
                btn_state = BTN_STATE_IDLE;

                /* ส่ง release event */
                send_button_event(false, false);
            }
            break;
    }
}

/*******************************************************************************
 * CM33-NS Main Loop (relevant portion)
 ******************************************************************************/
void cm33_button_app(void)
{
    aic_gpio_init();
    cm33_ipc_init();
    cm33_ipc_register_callback(cm33_ipc_handler, NULL);

    Cy_SysEnableCM55(CY_CORTEX_M55_APPL_ADDR);

    /* Main loop: poll button + process IPC */
    for (;;) {
        button_poll();
        cm33_ipc_process();
        Cy_SysLib_Delay(BTN_POLL_INTERVAL_MS);
    }
}
```

#### 5.2 CM55 Code - Button Event UI Display

```c
/*******************************************************************************
 * Part 4 - Example 6: Hardware IPC Button Events (CM55 Side)
 *
 * Receives button events from CM33-NS via IPC.
 * Updates LVGL UI using flag-based pattern (thread-safe).
 *
 * CRITICAL: LVGL is NOT thread-safe!
 ******************************************************************************/

#include "lvgl.h"
#include "ipc/cm55_ipc_pipe.h"
#include "../../shared/ipc_shared.h"

/* ===== IPC Flags (volatile for thread safety) ===== */
static volatile bool     btn_event_flag    = false;
static volatile bool     btn_pressed       = false;
static volatile bool     btn_long_press    = false;
static volatile uint32_t btn_timestamp     = 0;

/* ===== Button Statistics ===== */
static uint32_t press_count      = 0;
static uint32_t long_press_count = 0;
static uint32_t release_count    = 0;

/* ===== LVGL UI Objects ===== */
static lv_obj_t * btn_status_label;
static lv_obj_t * btn_led_widget;
static lv_obj_t * counter_label;
static lv_obj_t * long_press_label;
static lv_obj_t * event_log_label;
static lv_obj_t * timestamp_label;

/* Event log buffer (circular) */
#define EVENT_LOG_SIZE  8
static char event_log[EVENT_LOG_SIZE][48];
static int  event_log_idx = 0;

/*******************************************************************************
 * IPC Receive Callback (ISR context - NEVER call LVGL!)
 ******************************************************************************/
static void ex6_ipc_rx_callback(const ipc_msg_t *msg, void *user_data)
{
    (void)user_data;

    if (msg->cmd == IPC_CMD_BUTTON_EVENT) {
        ipc_button_data_t *btn_data = (ipc_button_data_t *)msg->data;

        /* Store data in volatile variables */
        btn_pressed    = (btn_data->pressed != 0);
        btn_long_press = (btn_data->long_press != 0);
        btn_timestamp  = btn_data->timestamp;

        /* Set flag for LVGL timer to process */
        btn_event_flag = true;
    }
}

/*******************************************************************************
 * Add entry to event log
 ******************************************************************************/
static void add_log_entry(const char *event, uint32_t ts)
{
    /* Format: "[12345] PRESS" */
    lv_snprintf(event_log[event_log_idx], sizeof(event_log[0]),
                "[%u] %s", (unsigned int)ts, event);
    event_log_idx = (event_log_idx + 1) % EVENT_LOG_SIZE;
}

/*******************************************************************************
 * Build log display string from circular buffer
 ******************************************************************************/
static void update_log_display(void)
{
    static char log_buf[512];
    log_buf[0] = '\0';

    /* แสดง log ล่าสุด EVENT_LOG_SIZE entries */
    for (int i = 0; i < EVENT_LOG_SIZE; i++) {
        int idx = (event_log_idx - EVENT_LOG_SIZE + i + EVENT_LOG_SIZE)
                  % EVENT_LOG_SIZE;
        if (event_log[idx][0] != '\0') {
            strcat(log_buf, event_log[idx]);
            strcat(log_buf, "\n");
        }
    }

    lv_label_set_text(event_log_label, log_buf);
}

/*******************************************************************************
 * LVGL Timer: Check IPC flags and update UI (safe context)
 ******************************************************************************/
static void ex6_ipc_timer_cb(lv_timer_t *timer)
{
    (void)timer;

    if (!btn_event_flag) return;
    btn_event_flag = false;

    /* ===== Update status label ===== */
    if (btn_pressed && btn_long_press) {
        lv_label_set_text(btn_status_label, "LONG PRESS!");
        lv_obj_set_style_text_color(btn_status_label,
            lv_palette_main(LV_PALETTE_ORANGE), 0);
        long_press_count++;
        add_log_entry("LONG_PRESS", btn_timestamp);
    } else if (btn_pressed) {
        lv_label_set_text(btn_status_label, "PRESSED");
        lv_obj_set_style_text_color(btn_status_label,
            lv_palette_main(LV_PALETTE_GREEN), 0);
        press_count++;
        add_log_entry("PRESS", btn_timestamp);
    } else {
        lv_label_set_text(btn_status_label, "RELEASED");
        lv_obj_set_style_text_color(btn_status_label,
            lv_palette_main(LV_PALETTE_RED), 0);
        release_count++;
        add_log_entry("RELEASE", btn_timestamp);
    }

    /* ===== Update LED widget ===== */
    if (btn_pressed) {
        lv_led_on(btn_led_widget);
        if (btn_long_press) {
            lv_led_set_color(btn_led_widget,
                lv_palette_main(LV_PALETTE_ORANGE));
        } else {
            lv_led_set_color(btn_led_widget,
                lv_palette_main(LV_PALETTE_GREEN));
        }
    } else {
        lv_led_off(btn_led_widget);
    }

    /* ===== Update counters ===== */
    lv_label_set_text_fmt(counter_label,
        "Press: %u | Release: %u",
        (unsigned int)press_count, (unsigned int)release_count);
    lv_label_set_text_fmt(long_press_label,
        "Long Press: %u", (unsigned int)long_press_count);

    /* ===== Update timestamp ===== */
    lv_label_set_text_fmt(timestamp_label,
        "Last Event: tick=%u", (unsigned int)btn_timestamp);

    /* ===== Update event log ===== */
    update_log_display();
}

/*******************************************************************************
 * Main Function: สร้าง Button Event UI
 ******************************************************************************/
void part4_ex6_hw_ipc_button(void)
{
    /* Initialize event log */
    for (int i = 0; i < EVENT_LOG_SIZE; i++) {
        event_log[i][0] = '\0';
    }

    /* Register IPC callback */
    cm55_ipc_register_callback(ex6_ipc_rx_callback, NULL);

    /* Background */
    lv_obj_set_style_bg_color(lv_screen_active(),
                              lv_color_hex(0x0a0e27), LV_PART_MAIN);
    lv_obj_clear_flag(lv_screen_active(), LV_OBJ_FLAG_SCROLLABLE);

    /* Title */
    lv_obj_t *title = lv_label_create(lv_screen_active());
    lv_label_set_text(title, "Part 4 - Ex6: IPC Button Events");
    lv_obj_set_style_text_color(title, lv_color_hex(0xFFFFFF), 0);
    lv_obj_set_style_text_font(title, &lv_font_montserrat_18, 0);
    lv_obj_align(title, LV_ALIGN_TOP_MID, 0, 8);

    lv_obj_t *subtitle = lv_label_create(lv_screen_active());
    lv_label_set_text(subtitle, "CM33 Button --> IPC --> CM55 Display");
    lv_obj_set_style_text_color(subtitle, lv_color_hex(0x888888), 0);
    lv_obj_align(subtitle, LV_ALIGN_TOP_MID, 0, 30);

    /* ===== Status Panel (Left) ===== */
    lv_obj_t *status_panel = lv_obj_create(lv_screen_active());
    lv_obj_set_size(status_panel, 200, 180);
    lv_obj_set_pos(status_panel, 10, 50);
    lv_obj_set_style_bg_color(status_panel, lv_color_hex(0x111633), 0);
    lv_obj_set_style_border_color(status_panel, lv_color_hex(0x333366), 0);
    lv_obj_set_style_border_width(status_panel, 1, 0);
    lv_obj_set_style_radius(status_panel, 8, 0);
    lv_obj_clear_flag(status_panel, LV_OBJ_FLAG_SCROLLABLE);

    /* Panel title */
    lv_obj_t *panel_title = lv_label_create(status_panel);
    lv_label_set_text(panel_title, "Button Status");
    lv_obj_set_style_text_color(panel_title, lv_color_hex(0xFFFFFF), 0);
    lv_obj_set_pos(panel_title, 10, 5);

    /* LED indicator */
    btn_led_widget = lv_led_create(status_panel);
    lv_obj_set_size(btn_led_widget, 50, 50);
    lv_obj_align(btn_led_widget, LV_ALIGN_CENTER, 0, -15);
    lv_led_set_color(btn_led_widget, lv_palette_main(LV_PALETTE_GREEN));
    lv_led_off(btn_led_widget);

    /* Status label */
    btn_status_label = lv_label_create(status_panel);
    lv_label_set_text(btn_status_label, "RELEASED");
    lv_obj_set_style_text_color(btn_status_label,
        lv_palette_main(LV_PALETTE_RED), 0);
    lv_obj_set_style_text_font(btn_status_label, &lv_font_montserrat_16, 0);
    lv_obj_align(btn_status_label, LV_ALIGN_CENTER, 0, 30);

    /* Counters */
    counter_label = lv_label_create(status_panel);
    lv_label_set_text(counter_label, "Press: 0 | Release: 0");
    lv_obj_set_style_text_color(counter_label, lv_color_hex(0xCCCCCC), 0);
    lv_obj_set_style_text_font(counter_label, &lv_font_montserrat_12, 0);
    lv_obj_set_pos(counter_label, 10, 130);

    long_press_label = lv_label_create(status_panel);
    lv_label_set_text(long_press_label, "Long Press: 0");
    lv_obj_set_style_text_color(long_press_label,
        lv_palette_main(LV_PALETTE_ORANGE), 0);
    lv_obj_set_style_text_font(long_press_label, &lv_font_montserrat_12, 0);
    lv_obj_set_pos(long_press_label, 10, 148);

    /* ===== Event Log Panel (Right) ===== */
    lv_obj_t *log_panel = lv_obj_create(lv_screen_active());
    lv_obj_set_size(log_panel, 260, 180);
    lv_obj_set_pos(log_panel, 220, 50);
    lv_obj_set_style_bg_color(log_panel, lv_color_hex(0x0d1117), 0);
    lv_obj_set_style_border_color(log_panel, lv_color_hex(0x30363d), 0);
    lv_obj_set_style_border_width(log_panel, 1, 0);
    lv_obj_set_style_radius(log_panel, 8, 0);
    lv_obj_clear_flag(log_panel, LV_OBJ_FLAG_SCROLLABLE);

    /* Log title */
    lv_obj_t *log_title = lv_label_create(log_panel);
    lv_label_set_text(log_title, "Event Log");
    lv_obj_set_style_text_color(log_title, lv_color_hex(0xFFFFFF), 0);
    lv_obj_set_pos(log_title, 10, 5);

    /* Log content */
    event_log_label = lv_label_create(log_panel);
    lv_label_set_text(event_log_label, "(waiting for events...)");
    lv_obj_set_style_text_color(event_log_label,
        lv_palette_main(LV_PALETTE_LIME), 0);
    lv_obj_set_style_text_font(event_log_label, &lv_font_montserrat_12, 0);
    lv_obj_set_pos(event_log_label, 10, 25);

    /* ===== Timestamp bar ===== */
    timestamp_label = lv_label_create(lv_screen_active());
    lv_label_set_text(timestamp_label, "Last Event: (none)");
    lv_obj_set_style_text_color(timestamp_label,
        lv_palette_main(LV_PALETTE_CYAN), 0);
    lv_obj_set_style_text_font(timestamp_label, &lv_font_montserrat_12, 0);
    lv_obj_align(timestamp_label, LV_ALIGN_BOTTOM_MID, 0, -30);

    /* Instruction */
    lv_obj_t *instr = lv_label_create(lv_screen_active());
    lv_label_set_text(instr,
        "Press USER button on board | Hold >1s for Long Press");
    lv_obj_set_style_text_color(instr, lv_color_hex(0x666666), 0);
    lv_obj_set_style_text_font(instr, &lv_font_montserrat_12, 0);
    lv_obj_align(instr, LV_ALIGN_BOTTOM_MID, 0, -10);

    /* Create LVGL timer to check IPC flags (30ms interval) */
    lv_timer_create(ex6_ipc_timer_cb, 30, NULL);

    CM55_LOGI("Part4 Ex6: IPC Button Events initialized");
}
```

***

### 6. องค์ความรู้และเทคนิค (Patterns & Tips)

#### 6.1 IPC Message Packing Pattern

```c
/* วิธีส่ง struct ผ่าน IPC data field */

/* ===== ฝั่งส่ง (CM55) ===== */
ipc_msg_t msg;
IPC_MSG_INIT(&msg, IPC_CMD_LED_SET);

/* Cast data[] เป็น struct pointer แล้วเขียนค่า */
ipc_led_data_t *payload = (ipc_led_data_t *)msg.data;
payload->led_id     = 0;      /* Red LED */
payload->state      = 1;      /* ON */
payload->brightness = 75;     /* 75% */

cm55_ipc_send_retry(&msg, 0); /* 0 = use default retries */

/* ===== ฝั่งรับ (CM33) ===== */
void rx_handler(const ipc_msg_t *msg, void *data)
{
    /* Cast data[] กลับเป็น struct pointer */
    ipc_led_data_t *led = (ipc_led_data_t *)msg->data;
    uint8_t id    = led->led_id;     /* 0 = Red */
    bool    on    = (led->state != 0);
    uint8_t bright = led->brightness; /* 75 */
}
```

#### 6.2 Convenience API vs Raw Message

```c
/* วิธีที่ 1: ใช้ convenience API (แนะนำ) */
cm55_ipc_set_led(0, true);             /* LED 0 ON */
cm55_ipc_set_led_brightness(0, 50);    /* LED 0, 50% */

/* วิธีที่ 2: สร้าง message เอง (flexible กว่า) */
ipc_msg_t msg;
IPC_MSG_INIT(&msg, IPC_CMD_LED_SET);
ipc_led_data_t *d = (ipc_led_data_t *)msg.data;
d->led_id = 0;
d->state  = 1;
d->brightness = 50;
cm55_ipc_send_retry(&msg, 10);

/* ใช้วิธีที่ 2 เมื่อ:
 * - ต้องการ custom retry count
 * - ต้องการส่ง data field เพิ่มเติม
 * - Debug: ดู return status แต่ละ step
 */
```

#### 6.3 Multiple LED Animation with Delay

```c
/* WRONG - จะ overwrite buffer! */
cm55_ipc_set_led(0, true);   /* Red ON */
cm55_ipc_set_led(1, true);   /* Green ON -- อาจ overwrite Red command! */
cm55_ipc_set_led(2, true);   /* Blue ON  -- อาจ overwrite Green command! */

/* RIGHT - 20ms delay ระหว่าง sends */
cm55_ipc_set_led(0, true);
vTaskDelay(pdMS_TO_TICKS(20));
cm55_ipc_set_led(1, true);
vTaskDelay(pdMS_TO_TICKS(20));
cm55_ipc_set_led(2, true);
```

#### 6.4 Debounce Timing Selection

```c
/* ===== เลือก debounce time ตามประเภทปุ่ม ===== */

/* Tactile switch (ปุ่มจิ๋ว บนบอร์ด) - bounce 5-20ms */
#define DEBOUNCE_TACTILE    30   /* ใช้ 30ms เผื่อปลอดภัย */

/* Mechanical switch (toggle switch) - bounce 10-50ms */
#define DEBOUNCE_MECHANICAL 50

/* Reed switch (magnetic) - bounce น้อย */
#define DEBOUNCE_REED       15

/* Rule of thumb: debounce = 2x maximum bounce time */
```

#### 6.5 Long-Press vs Short-Press Pattern

```c
/*
 * Pattern: แยก short-press กับ long-press
 *
 * ใช้ในงานจริง:
 * - Short press: Toggle ON/OFF
 * - Long press:  Reset / Factory reset / Enter config mode
 */

case BTN_STATE_DEBOUNCE_RELEASE:
    if ((now - debounce_start) >= DEBOUNCE_MS) {
        btn_state = BTN_STATE_IDLE;

        if (was_long_press) {
            send_event("LONG_PRESS_RELEASE");
            /* Execute long-press action here */
        } else {
            send_event("SHORT_PRESS_RELEASE");
            /* Execute short-press action here */
        }
    }
    break;
```

#### 6.6 Circular Event Log Buffer

```c
/* Circular buffer สำหรับเก็บ log entries */
#define LOG_SIZE 8
static char log_buf[LOG_SIZE][48];
static int  log_idx = 0;

/* เพิ่ม entry (overwrite เก่าสุดเมื่อเต็ม) */
static void add_log(const char *event, uint32_t ts)
{
    lv_snprintf(log_buf[log_idx], 48, "[%u] %s", (unsigned int)ts, event);
    log_idx = (log_idx + 1) % LOG_SIZE;
}

/* สร้าง string แสดง log (เรียงจากเก่าไปใหม่) */
static void build_log_str(char *out, int out_size)
{
    out[0] = '\0';
    for (int i = 0; i < LOG_SIZE; i++) {
        int idx = (log_idx - LOG_SIZE + i + LOG_SIZE) % LOG_SIZE;
        if (log_buf[idx][0] != '\0') {
            strcat(out, log_buf[idx]);
            strcat(out, "\n");
        }
    }
}
```

***

### 7. แบบฝึกหัด (Exercises)

#### Exercise 1: LED Animation Controller (Part A - Intermediate)

สร้าง LED Sequence Pattern Controller ที่ส่ง pattern ผ่าน IPC:

**Requirements:**

* 4 pattern buttons: "Chase", "Blink All", "Alternate", "Fade"
* Chase: LED แดง -> เขียว -> น้ำเงิน วนไป
* Blink All: กะพริบพร้อมกัน (ON 500ms -> OFF 500ms)
* Alternate: สลับ (Red+Blue ON, Green OFF -> Red+Blue OFF, Green ON)
* Fade: ไล่ brightness จาก 0-100-0 แบบ smooth
* ปุ่ม STOP หยุด animation ทันที
* แสดง pattern ปัจจุบันบน UI

**Hints:**

* สร้าง FreeRTOS task แยกสำหรับ animation
* ใช้ global flag `animation_running` + `animation_type`
* STOP button ตั้ง flag false --> task หยุดวน
* ระหว่าง IPC sends ใน animation ต้อง delay 20ms
* Fade: ใช้ loop step ละ 5% ส่ง brightness ทุก 50ms

#### Exercise 2: Long-Press Detection with Different Actions (Part B - Intermediate)

เพิ่ม long-press detection ที่มี action แตกต่างจาก short press:

**Requirements:**

* Short press (<1s): Toggle LED widget (ON/OFF) + increment counter
* Long press (>1s): Reset counter เป็น 0 + flash LED widget 3 ครั้ง
* Very long press (>3s): แสดง "FACTORY RESET" warning label (แค่แสดง ไม่ reset จริง)
* LED widget เปลี่ยนสีตาม action (Green/Orange/Red)
* Progress bar แสดง hold duration (0-3s) ขณะกดค้าง

#### Exercise 3: LED Brightness Sync (Part A - Advanced)

สร้างระบบ Sync ที่ Slider บน CM55 ควบคุม PWM brightness บน CM33 พร้อม feedback:

**Requirements:**

* 3 Sliders แยกสำหรับ Red, Green, Blue (range 0-100)
* แต่ละ slider ส่ง `IPC_CMD_LED_BRIGHTNESS` ไป CM33
* CM33 set PWM duty cycle --> ส่ง ACK + actual brightness กลับ
* แสดง "Requested: 75%" vs "Actual: 73%"
* Color Preview: สี่เหลี่ยมแสดง mixed color จาก R+G+B values
* มีปุ่ม "All 100%", "All 0%", "Random" presets
* IPC round-trip time display

#### Exercise 4: Button Event Logger with Statistics (Part B - Advanced)

สร้าง full event logger ที่บันทึกทุก button event พร้อม timestamp และ statistics:

**Requirements:**

* Event Log แสดง 12 entries ล่าสุด (circular buffer)
* แต่ละ entry แสดง: \[timestamp] event\_type (duration)
* Statistics panel: Total events, Average press duration, Longest/shortest press, Events per minute rate
* Export button: รวม log เป็น string ส่งไป CM33 console ผ่าน IPC LOG
* Clear button: ล้าง log + reset statistics

***

### 8. สรุป (Summary)

#### สิ่งที่เรียนรู้ใน Lab นี้

**Part A (LED):**

1. **IPC LED Control**: ส่งคำสั่ง `IPC_CMD_LED_SET` จาก CM55 ไปควบคุม GPIO บน CM33-NS
2. **Flag-Based Pattern**: วิธีเดียวที่ปลอดภัยในการ update LVGL จาก IPC callback
3. **Status Feedback**: CM33 ส่ง ACK กลับเพื่อยืนยันว่า LED ทำงานจริง
4. **20ms IPC Delay**: จำเป็นเมื่อส่ง IPC หลายครั้งติดกัน ป้องกัน buffer overwrite
5. **Multi-LED Management**: จัดการ LED หลายดวงด้วย struct array + user\_data pattern

**Part B (Button):**

1. **Button Debounce**: State machine pattern สำหรับกรอง contact bounce
2. **Long-Press Detection**: ใช้ timer ตรวจ hold duration ในขณะ pressed state
3. **IPC Button Events**: ส่ง `ipc_button_data_t` จาก CM33 ไป CM55 พร้อม timestamp
4. **Event Logging**: Circular buffer pattern สำหรับเก็บ event history
5. **Flag-Based Update**: Volatile flags + LVGL timer = thread-safe UI update

#### กฎสำคัญที่ต้องจำ

```
+-----------------------------------------------------------+
|            MULTI-CORE IPC GOLDEN RULES                    |
+-----------------------------------------------------------+
|                                                           |
|  1. NEVER call LVGL from IPC callback                     |
|     --> ใช้ flag + LVGL timer เท่านั้น                        |
|                                                           |
|  2. 20ms delay ระหว่าง IPC sends                           |
|     --> Single rx_buffer ที่ CM55                           |
|                                                           |
|  3. NEVER use printf() in CM33-NS                         |
|     --> ไม่มี retarget-io, ใช้ IPC log แทน                   |
|                                                           |
|  4. Always use volatile for IPC flags                     |
|     --> ISR เขียน, main thread อ่าน                         |
|                                                           |
|  5. Use cm55_ipc_send_retry() not cm55_ipc_send()         |
|     --> Pipe อาจ busy, retry ช่วยป้องกัน                     |
|                                                           |
+-----------------------------------------------------------+
```

#### Application ในงานจริง

<table><thead><tr><th width="212.03265380859375">ด้าน</th><th>ตัวอย่าง</th></tr></thead><tbody><tr><td><strong>Industrial Automation</strong></td><td>HMI panel ควบคุม motor, valve, indicator light ผ่าน fieldbus</td></tr><tr><td><strong>Smart Building</strong></td><td>Touch panel ควบคุมไฟ, HVAC, ม่าน ผ่าน KNX/BACnet</td></tr><tr><td><strong>Medical Device</strong></td><td>UI แสดงผล + ควบคุม actuator (pump, valve) แยก core เพื่อ safety</td></tr><tr><td><strong>Automotive</strong></td><td>Instrument cluster ส่งคำสั่งไป body control module</td></tr><tr><td><strong>Safety Systems</strong></td><td>E-STOP button detection, safety interlock monitoring</td></tr><tr><td><strong>Access Control</strong></td><td>Keypad/card reader events --> central monitoring</td></tr><tr><td><strong>IoT Gateway</strong></td><td>Physical reset button --> cloud notification</td></tr></tbody></table>


# IPC Dashboard

## Lab 4: Hardware IPC Dashboard

### Part 4 - IPC & Event Bus (Hardware Labs)

***

### 1. โครงสร้างภาพรวม (Overview)

#### Why? - ทำไมต้องเรียนรู้เรื่องนี้

ในระบบ Industrial จริง Dashboard ต้องแสดงข้อมูลหลายอย่างพร้อมกัน และ ควบคุมอุปกรณ์หลายตัวผ่าน Multi-Core IPC:

* **SCADA System**: หน้าจอ HMI แสดง sensor data, alarm status, control panels ทั้งหมดในหน้าเดียว
* **Factory Floor Dashboard**: แสดง production line status, machine health, operator controls
* **Smart Building BMS**: HVAC sensor data + lighting control + access events ใน TabView
* **IoT Gateway**: Sensor fusion จากหลาย source แสดงรวมพร้อม control interface

Lab นี้รวมทุกอย่างจาก Lab 5 (LED) + Lab 6 (Button) เข้ากับ Sensor data (IMU, ADC) ที่ส่งจาก CM33-NS ผ่าน IPC --> แสดงใน TabView Dashboard บน CM55

#### What? - จะได้เรียนรู้อะไร

1. **Multi-Channel IPC**: จัดการ IPC หลาย command type พร้อมกัน (LED + Button + IMU + ADC)
2. **TabView Dashboard**: แยก UI เป็น 3 Tabs: Controls | Sensors | Status
3. **Real-Time Charts**: แสดง IMU data แบบ real-time chart ผ่าน IPC
4. **Bidirectional IPC**: CM55 ส่งคำสั่ง + CM33 ส่ง data/events กลับพร้อมกัน
5. **System Health**: Monitor IPC latency, error count, uptime
6. **Concurrent Flag Management**: จัดการ flags หลายตัวสำหรับ IPC commands ต่าง ๆ

#### How? - ทำอย่างไร

สร้าง TabView Dashboard บน CM55 ที่แบ่งเป็น 3 tabs:

* **Controls**: LED switches + brightness slider + button status
* **Sensors**: IMU 3-axis chart + ADC gauge (data จาก CM33 ผ่าน IPC)
* **Status**: IPC statistics + event log + system health

CM33-NS ทำหน้าที่: อ่าน sensor data ส่งมาทุก 100ms + รับคำสั่ง LED + ส่ง button events

***

### 2. หลักการทำงาน (Technical Principles)

#### 2.1 Full IPC Dashboard Architecture

```
+-----------------------------------------------------------+
|         FULL IPC DASHBOARD ARCHITECTURE                   |
+-----------------------------------------------------------+
|                                                           |
|  CM55 Core (LVGL Dashboard)                               |
|  ============================                             |
|  +--------------------------------------------------+     |
|  | TabView                                          |     |
|  | +----------+ +----------+ +----------+           |     |
|  | | Controls | | Sensors  | | Status   |           |     |
|  | +----------+ +----------+ +----------+           |     |
|  | | LED SW x3| | IMU Chart| | IPC Stats|           |     |
|  | | Bright.  | | ADC Gauge| | Event Log|           |     |
|  | | Btn Stat | |          | | Health   |           |     |
|  | +----------+ +----------+ +----------+           |     |
|  +--------------------------------------------------+     |
|      |               ^                                    |
|      | IPC TX        | IPC RX                             |
|      v               |                                    |
|  +----------------------------------------------+         |
|  |              IPC PIPE (bidirectional)        |         |
|  +----------------------------------------------+         |
|      |               ^                                    |
|      | IPC RX        | IPC TX                             |
|      v               |                                    |
|  CM33-NS Core (Hardware Controller)                       |
|  ================================                         |
|  +--------------------------------------------------+     |
|  | +----------+ +----------+ +----------+           |     |
|  | | LED GPIO | | Sensors  | | Button   |           |     |
|  | | Handler  | | Reader   | | Poller   |           |     |
|  | | (PWM)    | | (IMU+ADC)| | (Debounce|           |     |
|  | +----------+ +----------+ +----------+           |     |
|  +--------------------------------------------------+     |
|                                                           |
+-----------------------------------------------------------+
```

#### 2.2 IPC Command Map (All Channels)

```
+-----------------------------------------------------------+
|           ACTIVE IPC CHANNELS IN DASHBOARD                |
+-----------------------------------------------------------+
|                                                           |
|  Direction: CM55 --> CM33                                 |
|  ------------------------------------------------         |
|  IPC_CMD_LED_SET       (0xB2)  LED ON/OFF control         |
|  IPC_CMD_LED_BRIGHTNESS(0xB3)  LED PWM brightness         |
|  IPC_CMD_SENSOR_REQ    (0xA0)  Request sensor data        |
|  IPC_CMD_BUTTON        (0xB4)  Request button state       |
|  IPC_CMD_PING          (0x42)  Health check               |
|                                                           |
|  Direction: CM33 --> CM55                                 |
|  ------------------------------------------------         |
|  IPC_CMD_ACK           (0x44)  LED command confirmed      |
|  IPC_CMD_BUTTON_EVENT  (0xB5)  Button press/release       |
|  IPC_CMD_IMU_DATA      (0xA2)  IMU 6-axis data            |
|  IPC_CMD_ADC_DATA      (0xA3)  ADC channel data           |
|  IPC_CMD_PONG          (0x43)  Health check response      |
|                                                           |
|  Total Active Channels: 10                                |
|  Max Concurrent Traffic: ~20 msg/sec                      |
|                                                           |
+-----------------------------------------------------------+
```

#### 2.3 Multi-Flag Management Pattern

```
+-----------------------------------------------------------+
|        MANAGING MULTIPLE IPC FLAGS                        |
+-----------------------------------------------------------+
|                                                           |
|  /* แต่ละ IPC command type มี flag set แยก */               |
|                                                           |
|  volatile struct {                                        |
|      bool led_ack;         /* LED ACK received */         |
|      bool btn_event;       /* Button event received */    |
|      bool imu_data;        /* IMU data received */        |
|      bool adc_data;        /* ADC data received */        |
|      bool pong;            /* PONG received */            |
|  } ipc_flags;                                             |
|                                                           |
|  volatile struct {                                        |
|      ipc_led_data_t    led;                               |
|      ipc_button_data_t button;                            |
|      ipc_imu_data_t    imu;                               |
|      ipc_adc_data_t    adc;                               |
|  } ipc_data;                                              |
|                                                           |
|  /* LVGL timer ตรวจทุก flag ทุก cycle */                    |
|  void timer_cb() {                                        |
|   if (flags.led_ack)   { flags.led_ack=0; update_led(); } |
|   if (flags.btn_event){ flags.btn_event=0; update_btn(); }|
|   if (flags.imu_data) { flags.imu_data=0; update_imu(); } |
|   if (flags.adc_data)  { flags.adc_data=0; update_adc(); }|
|   if (flags.pong)      { flags.pong=0; update_health(); } |
|  }                                                        |
|                                                           |
+-----------------------------------------------------------+
```

#### 2.4 Program Flowchart

```
+-----------------------------------------------------------+
|              DASHBOARD INITIALIZATION FLOW                |
+-----------------------------------------------------------+
|                                                           |
|     +----------+                                          |
|     |  Start   |                                          |
|     +----+-----+                                          |
|          |                                                |
|          v                                                |
|  +------------------+                                     |
|  | IPC Init         |                                     |
|  | Register callback|                                     |
|  +--------+---------+                                     |
|           |                                               |
|           v                                               |
|  +------------------+                                     |
|  | Create TabView   |                                     |
|  | - Tab 1: Controls|                                     |
|  | - Tab 2: Sensors |                                     |
|  | - Tab 3: Status  |                                     |
|  +--------+---------+                                     |
|           |                                               |
|           v                                               |
|  +------------------+                                     |
|  | Create Timers:   |                                     |
|  | - UI flag check  | 50ms                                |
|  | - Sensor request | 100ms                               |
|  | - Health check   | 5000ms                              |
|  +--------+---------+                                     |
|           |                                               |
|           v                                               |
|  +------------------+         +------------------+        |
|  | LVGL Main Loop   |-------->| IPC RX Callback  |        |
|  | Process timers   |         | Set flags + data |        |
|  | Check flags      |         +------------------+        |
|  | Update UI        |                                     |
|  +------------------+                                     |
|                                                           |
+-----------------------------------------------------------+
```

***

### 3. ฟังก์ชันสำคัญ (API Reference)

#### 3.1 CM55 IPC Functions

<table><thead><tr><th width="289.52557373046875">Function</th><th>Description</th><th>Return</th></tr></thead><tbody><tr><td><code>cm55_ipc_set_led(id, state)</code></td><td>ส่ง LED ON/OFF</td><td><code>cy_en_ipc_pipe_status_t</code></td></tr><tr><td><code>cm55_ipc_set_led_brightness(id, bright)</code></td><td>ส่ง LED brightness</td><td><code>cy_en_ipc_pipe_status_t</code></td></tr><tr><td><code>cm55_ipc_request_sensor(type)</code></td><td>ขอ sensor data จาก CM33</td><td><code>cy_en_ipc_pipe_status_t</code></td></tr><tr><td><code>cm55_ipc_request_button(id)</code></td><td>ขอ button state</td><td><code>cy_en_ipc_pipe_status_t</code></td></tr><tr><td><code>cm55_ipc_send_cmd(IPC_CMD_PING, tick)</code></td><td>ส่ง PING + timestamp</td><td><code>cy_en_ipc_pipe_status_t</code></td></tr><tr><td><code>cm55_ipc_get_stats(tx, rx, err)</code></td><td>ดึง IPC statistics</td><td>void</td></tr></tbody></table>

#### 3.2 LVGL TabView Functions

<table><thead><tr><th width="318.6129150390625">Function</th><th>Description</th><th>Return</th></tr></thead><tbody><tr><td><code>lv_tabview_create(parent)</code></td><td>สร้าง TabView container</td><td><code>lv_obj_t *</code></td></tr><tr><td><code>lv_tabview_add_tab(tv, title)</code></td><td>เพิ่ม tab ใหม่</td><td><code>lv_obj_t *</code></td></tr><tr><td><code>lv_tabview_set_active(tv, idx, anim)</code></td><td>เลือก tab ที่ active</td><td>void</td></tr><tr><td><code>lv_tabview_get_tab_bar(tv)</code></td><td>ดึง tab bar สำหรับ styling</td><td><code>lv_obj_t *</code></td></tr></tbody></table>

#### 3.3 LVGL Chart Functions

| Function                                    | Description        | Return                |
| ------------------------------------------- | ------------------ | --------------------- |
| `lv_chart_create(parent)`                   | สร้าง chart widget | `lv_obj_t *`          |
| `lv_chart_add_series(chart, color, axis)`   | เพิ่ม data series  | `lv_chart_series_t *` |
| `lv_chart_set_next_value(chart, ser, val)`  | เพิ่มค่าถัดไป      | void                  |
| `lv_chart_set_range(chart, axis, min, max)` | ตั้งช่วงค่า        | void                  |
| `lv_chart_set_point_count(chart, count)`    | จำนวน data points  | void                  |

#### 3.4 CM33-NS Sensor Functions

| Function                               | Description                 | Return                    |
| -------------------------------------- | --------------------------- | ------------------------- |
| `aic_sensors_init()`                   | Initialize sensor subsystem | void                      |
| `imu_shared_read_accel(&ax, &ay, &az)` | อ่าน accelerometer          | void                      |
| `aic_adc_read(channel)`                | อ่าน ADC channel            | `uint16_t`                |
| `cm33_ipc_send_imu(data)`              | ส่ง IMU data ไป CM55        | `cy_en_ipc_pipe_status_t` |
| `cm33_ipc_send_adc(data)`              | ส่ง ADC data ไป CM55        | `cy_en_ipc_pipe_status_t` |

***

### 4. โค้ดตัวอย่าง (Code Examples)

#### 4.1 CM55 Code - Full IPC Dashboard

```c
/*******************************************************************************
 * Part 4 - Example 7: Hardware IPC Dashboard (CM55 Side)
 *
 * Full dashboard with TabView:
 * - Tab 1: LED Controls + Button Status
 * - Tab 2: IMU Chart + ADC Gauge (data via IPC from CM33)
 * - Tab 3: IPC Statistics + System Health
 *
 * CRITICAL: All UI updates through flag-based pattern only!
 ******************************************************************************/

#include "lvgl.h"
#include "ipc/cm55_ipc_pipe.h"
#include "../../shared/ipc_shared.h"
#include "FreeRTOS.h"
#include "task.h"

/* ===== IPC Flag Structure ===== */
typedef struct {
    volatile bool led_ack;
    volatile bool btn_event;
    volatile bool imu_data;
    volatile bool adc_data;
    volatile bool pong;
} ipc_flags_t;

static ipc_flags_t flags = {0};

/* ===== IPC Data Buffers (volatile) ===== */
static volatile ipc_led_data_t    rx_led    = {0};
static volatile ipc_button_data_t rx_button = {0};
static volatile ipc_imu_data_t    rx_imu    = {0};
static volatile ipc_adc_data_t    rx_adc    = {0};
static volatile uint32_t          rx_pong_tick = 0;

/* ===== IPC Statistics ===== */
static volatile uint32_t total_rx_count = 0;
static volatile uint32_t total_tx_count = 0;
static volatile uint32_t ipc_error_count = 0;
static volatile uint32_t ping_send_tick = 0;
static volatile uint32_t ipc_rtt_ms = 0;

/* ===== LED State ===== */
#define NUM_LEDS 3
static bool led_states[NUM_LEDS] = {false, false, false};
static int led_indices[NUM_LEDS] = {0, 1, 2};

/* ===== UI Objects: Tab 1 (Controls) ===== */
static lv_obj_t * led_switches[NUM_LEDS];
static lv_obj_t * led_indicators[NUM_LEDS];
static lv_obj_t * led_status_labels[NUM_LEDS];
static lv_obj_t * brightness_slider;
static lv_obj_t * brightness_label;
static lv_obj_t * btn_status_label;
static lv_obj_t * btn_led_widget;
static lv_obj_t * btn_counter_label;

/* ===== UI Objects: Tab 2 (Sensors) ===== */
static lv_obj_t * imu_chart;
static lv_chart_series_t * imu_ser_x;
static lv_chart_series_t * imu_ser_y;
static lv_chart_series_t * imu_ser_z;
static lv_obj_t * imu_value_label;
static lv_obj_t * adc_arc;
static lv_obj_t * adc_value_label;

/* ===== UI Objects: Tab 3 (Status) ===== */
static lv_obj_t * stat_tx_label;
static lv_obj_t * stat_rx_label;
static lv_obj_t * stat_err_label;
static lv_obj_t * stat_rtt_label;
static lv_obj_t * stat_uptime_label;
static lv_obj_t * event_log_label;

/* Button counts */
static uint32_t press_count = 0;

/* Event log */
#define EVENT_LOG_MAX 6
static char event_log_buf[EVENT_LOG_MAX][40];
static int event_log_idx = 0;

static uint32_t start_tick = 0;

/*******************************************************************************
 * IPC Receive Callback (ISR context)
 ******************************************************************************/
static void dashboard_ipc_rx_cb(const ipc_msg_t *msg, void *user_data)
{
    (void)user_data;
    total_rx_count++;

    switch (msg->cmd) {
        case IPC_CMD_ACK: {
            ipc_led_data_t *d = (ipc_led_data_t *)msg->data;
            rx_led = *d;
            flags.led_ack = true;
            break;
        }
        case IPC_CMD_BUTTON_EVENT: {
            ipc_button_data_t *d = (ipc_button_data_t *)msg->data;
            rx_button = *d;
            flags.btn_event = true;
            break;
        }
        case IPC_CMD_IMU_DATA: {
            ipc_imu_data_t *d = (ipc_imu_data_t *)msg->data;
            rx_imu = *d;
            flags.imu_data = true;
            break;
        }
        case IPC_CMD_ADC_DATA: {
            ipc_adc_data_t *d = (ipc_adc_data_t *)msg->data;
            rx_adc = *d;
            flags.adc_data = true;
            break;
        }
        case IPC_CMD_PONG:
            rx_pong_tick = msg->value;
            ipc_rtt_ms = xTaskGetTickCount() - ping_send_tick;
            flags.pong = true;
            break;
        case IPC_CMD_NACK:
            ipc_error_count++;
            break;
        default:
            break;
    }
}

/*******************************************************************************
 * Event Log Helper
 ******************************************************************************/
static void log_event(const char *fmt, ...)
{
    va_list args;
    va_start(args, fmt);
    vsnprintf(event_log_buf[event_log_idx],
              sizeof(event_log_buf[0]), fmt, args);
    va_end(args);
    event_log_idx = (event_log_idx + 1) % EVENT_LOG_MAX;
}

static void refresh_event_log(void)
{
    static char display_buf[320];
    display_buf[0] = '\0';
    for (int i = 0; i < EVENT_LOG_MAX; i++) {
        int idx = (event_log_idx - EVENT_LOG_MAX + i + EVENT_LOG_MAX)
                  % EVENT_LOG_MAX;
        if (event_log_buf[idx][0] != '\0') {
            strcat(display_buf, event_log_buf[idx]);
            strcat(display_buf, "\n");
        }
    }
    lv_label_set_text(event_log_label, display_buf);
}

/*******************************************************************************
 * LVGL Timer: Check ALL IPC flags and update UI
 ******************************************************************************/
static void dashboard_timer_cb(lv_timer_t *timer)
{
    (void)timer;

    /* --- LED ACK --- */
    if (flags.led_ack) {
        flags.led_ack = false;
        uint8_t id = rx_led.led_id;
        if (id < NUM_LEDS) {
            led_states[id] = (rx_led.state != 0);
            if (led_states[id]) {
                lv_led_on(led_indicators[id]);
            } else {
                lv_led_off(led_indicators[id]);
            }
            lv_label_set_text_fmt(led_status_labels[id], "%s",
                led_states[id] ? "ON" : "OFF");
            lv_obj_set_style_text_color(led_status_labels[id],
                led_states[id] ? lv_palette_main(LV_PALETTE_GREEN) :
                                 lv_palette_main(LV_PALETTE_RED), 0);
            log_event("LED%d -> %s", (int)id, led_states[id] ? "ON" : "OFF");
        }
    }

    /* --- Button Event --- */
    if (flags.btn_event) {
        flags.btn_event = false;
        bool pressed = (rx_button.pressed != 0);
        bool long_p  = (rx_button.long_press != 0);

        if (pressed) {
            lv_led_on(btn_led_widget);
            if (long_p) {
                lv_label_set_text(btn_status_label, "LONG PRESS");
                lv_obj_set_style_text_color(btn_status_label,
                    lv_palette_main(LV_PALETTE_ORANGE), 0);
                lv_led_set_color(btn_led_widget,
                    lv_palette_main(LV_PALETTE_ORANGE));
                log_event("BTN: LONG_PRESS");
            } else {
                press_count++;
                lv_label_set_text(btn_status_label, "PRESSED");
                lv_obj_set_style_text_color(btn_status_label,
                    lv_palette_main(LV_PALETTE_GREEN), 0);
                lv_led_set_color(btn_led_widget,
                    lv_palette_main(LV_PALETTE_GREEN));
                log_event("BTN: PRESS #%u", (unsigned int)press_count);
            }
        } else {
            lv_led_off(btn_led_widget);
            lv_label_set_text(btn_status_label, "RELEASED");
            lv_obj_set_style_text_color(btn_status_label,
                lv_palette_main(LV_PALETTE_RED), 0);
        }
        lv_label_set_text_fmt(btn_counter_label,
            "Count: %u", (unsigned int)press_count);
    }

    /* --- IMU Data --- */
    if (flags.imu_data) {
        flags.imu_data = false;
        /* Scale: raw int16 -> chart range (e.g., -2000 to +2000) */
        lv_chart_set_next_value(imu_chart, imu_ser_x, rx_imu.accel_x);
        lv_chart_set_next_value(imu_chart, imu_ser_y, rx_imu.accel_y);
        lv_chart_set_next_value(imu_chart, imu_ser_z, rx_imu.accel_z);
        lv_chart_refresh(imu_chart);

        lv_label_set_text_fmt(imu_value_label,
            "X:%d  Y:%d  Z:%d",
            (int)rx_imu.accel_x, (int)rx_imu.accel_y, (int)rx_imu.accel_z);
    }

    /* --- ADC Data --- */
    if (flags.adc_data) {
        flags.adc_data = false;
        /* Scale ADC to 0-100 for arc display */
        int32_t adc_pct = (int32_t)rx_adc.adc_ch0 * 100 / 4095;
        lv_arc_set_value(adc_arc, adc_pct);
        lv_label_set_text_fmt(adc_value_label,
            "%d%%\n(%u)", (int)adc_pct, (unsigned int)rx_adc.adc_ch0);
    }

    /* --- PONG (Health) --- */
    if (flags.pong) {
        flags.pong = false;
        lv_label_set_text_fmt(stat_rtt_label,
            "RTT: %u ms", (unsigned int)ipc_rtt_ms);
        log_event("PONG: RTT=%ums", (unsigned int)ipc_rtt_ms);
    }

    /* --- Update Status Tab stats (always) --- */
    uint32_t uptime = (xTaskGetTickCount() - start_tick) / 1000;
    lv_label_set_text_fmt(stat_tx_label,
        "TX: %u", (unsigned int)total_tx_count);
    lv_label_set_text_fmt(stat_rx_label,
        "RX: %u", (unsigned int)total_rx_count);
    lv_label_set_text_fmt(stat_err_label,
        "Errors: %u", (unsigned int)ipc_error_count);
    lv_label_set_text_fmt(stat_uptime_label,
        "Uptime: %us", (unsigned int)uptime);

    refresh_event_log();
}

/*******************************************************************************
 * Sensor Request Timer (100ms) - ขอ data จาก CM33
 ******************************************************************************/
static void sensor_request_timer_cb(lv_timer_t *timer)
{
    (void)timer;

    /* Request IMU data */
    cm55_ipc_request_sensor(IPC_CMD_IMU_DATA);
    total_tx_count++;

    /* 20ms delay ก่อนส่ง request ถัดไป */
    vTaskDelay(pdMS_TO_TICKS(20));

    /* Request ADC data */
    cm55_ipc_request_sensor(IPC_CMD_ADC_DATA);
    total_tx_count++;
}

/*******************************************************************************
 * Health Check Timer (5000ms) - ส่ง PING
 ******************************************************************************/
static void health_timer_cb(lv_timer_t *timer)
{
    (void)timer;
    ping_send_tick = xTaskGetTickCount();
    cm55_ipc_send_cmd(IPC_CMD_PING, ping_send_tick);
    total_tx_count++;
}

/*******************************************************************************
 * LED Switch Callback
 ******************************************************************************/
static void led_switch_cb(lv_event_t *e)
{
    int *idx = (int *)lv_event_get_user_data(e);
    lv_obj_t *sw = lv_event_get_target(e);
    bool on = lv_obj_has_state(sw, LV_STATE_CHECKED);

    cm55_ipc_set_led(*idx, on);
    total_tx_count++;
    CM55_LOGD("LED%d -> %s", *idx, on ? "ON" : "OFF");
}

/*******************************************************************************
 * Brightness Slider Callback
 ******************************************************************************/
static void brightness_cb(lv_event_t *e)
{
    lv_obj_t *slider = lv_event_get_target(e);
    int32_t val = lv_slider_get_value(slider);
    lv_label_set_text_fmt(brightness_label, "%d%%", (int)val);

    /* ส่ง brightness ให้ LED ที่เปิดอยู่ (ทีละดวง + delay) */
    for (int i = 0; i < NUM_LEDS; i++) {
        if (led_states[i]) {
            cm55_ipc_set_led_brightness(i, (uint8_t)val);
            total_tx_count++;
            vTaskDelay(pdMS_TO_TICKS(20));
        }
    }
}

/*******************************************************************************
 * Build Tab 1: Controls
 ******************************************************************************/
static void build_controls_tab(lv_obj_t *tab)
{
    lv_obj_set_style_bg_color(tab, lv_color_hex(0x0a0e27), 0);
    lv_obj_clear_flag(tab, LV_OBJ_FLAG_SCROLLABLE);

    /* --- LED Control Section --- */
    lv_obj_t *led_panel = lv_obj_create(tab);
    lv_obj_set_size(led_panel, 230, 160);
    lv_obj_set_pos(led_panel, 5, 5);
    lv_obj_set_style_bg_color(led_panel, lv_color_hex(0x111633), 0);
    lv_obj_set_style_border_color(led_panel, lv_color_hex(0x333366), 0);
    lv_obj_set_style_border_width(led_panel, 1, 0);
    lv_obj_set_style_radius(led_panel, 6, 0);
    lv_obj_clear_flag(led_panel, LV_OBJ_FLAG_SCROLLABLE);

    lv_obj_t *led_title = lv_label_create(led_panel);
    lv_label_set_text(led_title, "LED Control");
    lv_obj_set_style_text_color(led_title, lv_color_hex(0xFFFFFF), 0);
    lv_obj_set_pos(led_title, 5, 2);

    const char *led_names[] = {"Red", "Green", "Blue"};
    lv_color_t led_colors[] = {
        lv_palette_main(LV_PALETTE_RED),
        lv_palette_main(LV_PALETTE_GREEN),
        lv_palette_main(LV_PALETTE_BLUE)
    };

    for (int i = 0; i < NUM_LEDS; i++) {
        int y = 22 + i * 35;

        led_indicators[i] = lv_led_create(led_panel);
        lv_obj_set_size(led_indicators[i], 20, 20);
        lv_obj_set_pos(led_indicators[i], 8, y + 2);
        lv_led_set_color(led_indicators[i], led_colors[i]);
        lv_led_off(led_indicators[i]);

        lv_obj_t *name = lv_label_create(led_panel);
        lv_label_set_text(name, led_names[i]);
        lv_obj_set_style_text_color(name, lv_color_hex(0xCCCCCC), 0);
        lv_obj_set_style_text_font(name, &lv_font_montserrat_12, 0);
        lv_obj_set_pos(name, 35, y + 4);

        led_switches[i] = lv_switch_create(led_panel);
        lv_obj_set_size(led_switches[i], 45, 22);
        lv_obj_set_pos(led_switches[i], 95, y + 2);
        lv_obj_set_style_bg_color(led_switches[i], led_colors[i],
            LV_PART_INDICATOR | LV_STATE_CHECKED);
        lv_obj_add_event_cb(led_switches[i], led_switch_cb,
            LV_EVENT_VALUE_CHANGED, &led_indices[i]);

        led_status_labels[i] = lv_label_create(led_panel);
        lv_label_set_text(led_status_labels[i], "OFF");
        lv_obj_set_style_text_color(led_status_labels[i],
            lv_palette_main(LV_PALETTE_RED), 0);
        lv_obj_set_style_text_font(led_status_labels[i],
            &lv_font_montserrat_12, 0);
        lv_obj_set_pos(led_status_labels[i], 150, y + 4);
    }

    /* Brightness */
    lv_obj_t *br_lbl = lv_label_create(led_panel);
    lv_label_set_text(br_lbl, "Bright:");
    lv_obj_set_style_text_color(br_lbl, lv_color_hex(0x888888), 0);
    lv_obj_set_style_text_font(br_lbl, &lv_font_montserrat_12, 0);
    lv_obj_set_pos(br_lbl, 8, 130);

    brightness_slider = lv_slider_create(led_panel);
    lv_obj_set_size(brightness_slider, 100, 10);
    lv_obj_set_pos(brightness_slider, 60, 134);
    lv_slider_set_range(brightness_slider, 0, 100);
    lv_slider_set_value(brightness_slider, 100, LV_ANIM_OFF);
    lv_obj_set_style_bg_color(brightness_slider,
        lv_palette_main(LV_PALETTE_AMBER), LV_PART_INDICATOR);
    lv_obj_add_event_cb(brightness_slider, brightness_cb,
        LV_EVENT_VALUE_CHANGED, NULL);

    brightness_label = lv_label_create(led_panel);
    lv_label_set_text(brightness_label, "100%");
    lv_obj_set_style_text_color(brightness_label, lv_color_hex(0xCCCCCC), 0);
    lv_obj_set_style_text_font(brightness_label, &lv_font_montserrat_12, 0);
    lv_obj_set_pos(brightness_label, 170, 130);

    /* --- Button Status Section --- */
    lv_obj_t *btn_panel = lv_obj_create(tab);
    lv_obj_set_size(btn_panel, 220, 160);
    lv_obj_set_pos(btn_panel, 245, 5);
    lv_obj_set_style_bg_color(btn_panel, lv_color_hex(0x111633), 0);
    lv_obj_set_style_border_color(btn_panel, lv_color_hex(0x333366), 0);
    lv_obj_set_style_border_width(btn_panel, 1, 0);
    lv_obj_set_style_radius(btn_panel, 6, 0);
    lv_obj_clear_flag(btn_panel, LV_OBJ_FLAG_SCROLLABLE);

    lv_obj_t *btn_title = lv_label_create(btn_panel);
    lv_label_set_text(btn_title, "Button Status");
    lv_obj_set_style_text_color(btn_title, lv_color_hex(0xFFFFFF), 0);
    lv_obj_set_pos(btn_title, 5, 2);

    btn_led_widget = lv_led_create(btn_panel);
    lv_obj_set_size(btn_led_widget, 50, 50);
    lv_obj_align(btn_led_widget, LV_ALIGN_CENTER, 0, -15);
    lv_led_set_color(btn_led_widget, lv_palette_main(LV_PALETTE_GREEN));
    lv_led_off(btn_led_widget);

    btn_status_label = lv_label_create(btn_panel);
    lv_label_set_text(btn_status_label, "RELEASED");
    lv_obj_set_style_text_color(btn_status_label,
        lv_palette_main(LV_PALETTE_RED), 0);
    lv_obj_set_style_text_font(btn_status_label, &lv_font_montserrat_14, 0);
    lv_obj_align(btn_status_label, LV_ALIGN_CENTER, 0, 30);

    btn_counter_label = lv_label_create(btn_panel);
    lv_label_set_text(btn_counter_label, "Count: 0");
    lv_obj_set_style_text_color(btn_counter_label, lv_color_hex(0xCCCCCC), 0);
    lv_obj_set_style_text_font(btn_counter_label, &lv_font_montserrat_12, 0);
    lv_obj_align(btn_counter_label, LV_ALIGN_BOTTOM_MID, 0, -10);
}

/*******************************************************************************
 * Build Tab 2: Sensors
 ******************************************************************************/
static void build_sensors_tab(lv_obj_t *tab)
{
    lv_obj_set_style_bg_color(tab, lv_color_hex(0x0a0e27), 0);
    lv_obj_clear_flag(tab, LV_OBJ_FLAG_SCROLLABLE);

    /* --- IMU Chart --- */
    lv_obj_t *imu_panel = lv_obj_create(tab);
    lv_obj_set_size(imu_panel, 310, 160);
    lv_obj_set_pos(imu_panel, 5, 5);
    lv_obj_set_style_bg_color(imu_panel, lv_color_hex(0x111633), 0);
    lv_obj_set_style_border_color(imu_panel, lv_color_hex(0x333366), 0);
    lv_obj_set_style_border_width(imu_panel, 1, 0);
    lv_obj_set_style_radius(imu_panel, 6, 0);
    lv_obj_clear_flag(imu_panel, LV_OBJ_FLAG_SCROLLABLE);

    lv_obj_t *imu_title = lv_label_create(imu_panel);
    lv_label_set_text(imu_title, "IMU Accelerometer (via IPC)");
    lv_obj_set_style_text_color(imu_title, lv_color_hex(0xFFFFFF), 0);
    lv_obj_set_style_text_font(imu_title, &lv_font_montserrat_12, 0);
    lv_obj_set_pos(imu_title, 5, 2);

    imu_chart = lv_chart_create(imu_panel);
    lv_obj_set_size(imu_chart, 290, 100);
    lv_obj_set_pos(imu_chart, 5, 18);
    lv_chart_set_type(imu_chart, LV_CHART_TYPE_LINE);
    lv_chart_set_point_count(imu_chart, 60);
    lv_chart_set_range(imu_chart, LV_CHART_AXIS_PRIMARY_Y, -2000, 2000);
    lv_obj_set_style_bg_color(imu_chart, lv_color_hex(0x0a0e27), 0);
    lv_obj_set_style_line_width(imu_chart, 0, LV_PART_TICKS);
    lv_chart_set_div_line_count(imu_chart, 3, 0);

    imu_ser_x = lv_chart_add_series(imu_chart,
        lv_palette_main(LV_PALETTE_RED), LV_CHART_AXIS_PRIMARY_Y);
    imu_ser_y = lv_chart_add_series(imu_chart,
        lv_palette_main(LV_PALETTE_GREEN), LV_CHART_AXIS_PRIMARY_Y);
    imu_ser_z = lv_chart_add_series(imu_chart,
        lv_palette_main(LV_PALETTE_BLUE), LV_CHART_AXIS_PRIMARY_Y);

    imu_value_label = lv_label_create(imu_panel);
    lv_label_set_text(imu_value_label, "X:--  Y:--  Z:--");
    lv_obj_set_style_text_color(imu_value_label, lv_color_hex(0xCCCCCC), 0);
    lv_obj_set_style_text_font(imu_value_label, &lv_font_montserrat_12, 0);
    lv_obj_set_pos(imu_value_label, 5, 125);

    /* Legend */
    lv_obj_t *legend = lv_label_create(imu_panel);
    lv_label_set_text(legend, "R:X  G:Y  B:Z");
    lv_obj_set_style_text_color(legend, lv_color_hex(0x888888), 0);
    lv_obj_set_style_text_font(legend, &lv_font_montserrat_10, 0);
    lv_obj_set_pos(legend, 220, 125);

    /* --- ADC Gauge --- */
    lv_obj_t *adc_panel = lv_obj_create(tab);
    lv_obj_set_size(adc_panel, 140, 160);
    lv_obj_set_pos(adc_panel, 325, 5);
    lv_obj_set_style_bg_color(adc_panel, lv_color_hex(0x111633), 0);
    lv_obj_set_style_border_color(adc_panel, lv_color_hex(0x333366), 0);
    lv_obj_set_style_border_width(adc_panel, 1, 0);
    lv_obj_set_style_radius(adc_panel, 6, 0);
    lv_obj_clear_flag(adc_panel, LV_OBJ_FLAG_SCROLLABLE);

    lv_obj_t *adc_title = lv_label_create(adc_panel);
    lv_label_set_text(adc_title, "ADC (IPC)");
    lv_obj_set_style_text_color(adc_title, lv_color_hex(0xFFFFFF), 0);
    lv_obj_set_style_text_font(adc_title, &lv_font_montserrat_12, 0);
    lv_obj_set_pos(adc_title, 5, 2);

    adc_arc = lv_arc_create(adc_panel);
    lv_obj_set_size(adc_arc, 100, 100);
    lv_obj_align(adc_arc, LV_ALIGN_CENTER, 0, 5);
    lv_arc_set_range(adc_arc, 0, 100);
    lv_arc_set_value(adc_arc, 0);
    lv_arc_set_bg_angles(adc_arc, 135, 45);
    lv_obj_remove_flag(adc_arc, LV_OBJ_FLAG_CLICKABLE);
    lv_obj_set_style_arc_color(adc_arc,
        lv_palette_main(LV_PALETTE_TEAL), LV_PART_INDICATOR);
    lv_obj_set_style_arc_width(adc_arc, 10, LV_PART_INDICATOR);
    lv_obj_set_style_arc_width(adc_arc, 10, LV_PART_MAIN);

    adc_value_label = lv_label_create(adc_arc);
    lv_label_set_text(adc_value_label, "--\n(0)");
    lv_obj_set_style_text_color(adc_value_label, lv_color_hex(0xFFFFFF), 0);
    lv_obj_set_style_text_font(adc_value_label, &lv_font_montserrat_14, 0);
    lv_obj_set_style_text_align(adc_value_label, LV_TEXT_ALIGN_CENTER, 0);
    lv_obj_center(adc_value_label);
}

/*******************************************************************************
 * Build Tab 3: Status
 ******************************************************************************/
static void build_status_tab(lv_obj_t *tab)
{
    lv_obj_set_style_bg_color(tab, lv_color_hex(0x0a0e27), 0);
    lv_obj_clear_flag(tab, LV_OBJ_FLAG_SCROLLABLE);

    /* --- IPC Statistics Panel --- */
    lv_obj_t *stats_panel = lv_obj_create(tab);
    lv_obj_set_size(stats_panel, 200, 160);
    lv_obj_set_pos(stats_panel, 5, 5);
    lv_obj_set_style_bg_color(stats_panel, lv_color_hex(0x111633), 0);
    lv_obj_set_style_border_color(stats_panel, lv_color_hex(0x333366), 0);
    lv_obj_set_style_border_width(stats_panel, 1, 0);
    lv_obj_set_style_radius(stats_panel, 6, 0);
    lv_obj_clear_flag(stats_panel, LV_OBJ_FLAG_SCROLLABLE);

    lv_obj_t *s_title = lv_label_create(stats_panel);
    lv_label_set_text(s_title, "IPC Statistics");
    lv_obj_set_style_text_color(s_title, lv_color_hex(0xFFFFFF), 0);
    lv_obj_set_pos(s_title, 5, 2);

    lv_obj_t **stat_labels[] = {&stat_tx_label, &stat_rx_label,
                                &stat_err_label, &stat_rtt_label,
                                &stat_uptime_label};
    const char *stat_defaults[] = {"TX: 0", "RX: 0", "Errors: 0",
                                   "RTT: --", "Uptime: 0s"};
    lv_color_t stat_colors[] = {
        lv_palette_main(LV_PALETTE_CYAN),
        lv_palette_main(LV_PALETTE_GREEN),
        lv_palette_main(LV_PALETTE_RED),
        lv_palette_main(LV_PALETTE_AMBER),
        lv_palette_main(LV_PALETTE_GREY)
    };

    for (int i = 0; i < 5; i++) {
        *stat_labels[i] = lv_label_create(stats_panel);
        lv_label_set_text(*stat_labels[i], stat_defaults[i]);
        lv_obj_set_style_text_color(*stat_labels[i], stat_colors[i], 0);
        lv_obj_set_style_text_font(*stat_labels[i], &lv_font_montserrat_14, 0);
        lv_obj_set_pos(*stat_labels[i], 10, 25 + i * 26);
    }

    /* --- Event Log Panel --- */
    lv_obj_t *log_panel = lv_obj_create(tab);
    lv_obj_set_size(log_panel, 255, 160);
    lv_obj_set_pos(log_panel, 215, 5);
    lv_obj_set_style_bg_color(log_panel, lv_color_hex(0x0d1117), 0);
    lv_obj_set_style_border_color(log_panel, lv_color_hex(0x30363d), 0);
    lv_obj_set_style_border_width(log_panel, 1, 0);
    lv_obj_set_style_radius(log_panel, 6, 0);
    lv_obj_clear_flag(log_panel, LV_OBJ_FLAG_SCROLLABLE);

    lv_obj_t *log_title = lv_label_create(log_panel);
    lv_label_set_text(log_title, "Event Log");
    lv_obj_set_style_text_color(log_title, lv_color_hex(0xFFFFFF), 0);
    lv_obj_set_pos(log_title, 5, 2);

    event_log_label = lv_label_create(log_panel);
    lv_label_set_text(event_log_label, "(waiting...)");
    lv_obj_set_style_text_color(event_log_label,
        lv_palette_main(LV_PALETTE_LIME), 0);
    lv_obj_set_style_text_font(event_log_label, &lv_font_montserrat_10, 0);
    lv_obj_set_pos(event_log_label, 5, 20);
}

/*******************************************************************************
 * Main Function: Build Full Dashboard
 ******************************************************************************/
void part4_ex7_hw_ipc_dashboard(void)
{
    start_tick = xTaskGetTickCount();

    /* Initialize event log */
    for (int i = 0; i < EVENT_LOG_MAX; i++) {
        event_log_buf[i][0] = '\0';
    }

    /* Register IPC callback */
    cm55_ipc_register_callback(dashboard_ipc_rx_cb, NULL);

    /* Background */
    lv_obj_set_style_bg_color(lv_screen_active(),
        lv_color_hex(0x0a0e27), LV_PART_MAIN);
    lv_obj_clear_flag(lv_screen_active(), LV_OBJ_FLAG_SCROLLABLE);

    /* Title bar */
    lv_obj_t *title = lv_label_create(lv_screen_active());
    lv_label_set_text(title, "IPC Dashboard");
    lv_obj_set_style_text_color(title, lv_color_hex(0xFFFFFF), 0);
    lv_obj_set_style_text_font(title, &lv_font_montserrat_16, 0);
    lv_obj_align(title, LV_ALIGN_TOP_LEFT, 10, 2);

    /* ===== TabView ===== */
    lv_obj_t *tv = lv_tabview_create(lv_screen_active());
    lv_obj_set_size(tv, 480, 260);
    lv_obj_align(tv, LV_ALIGN_BOTTOM_MID, 0, 0);
    lv_obj_set_style_bg_color(tv, lv_color_hex(0x0a0e27), 0);

    /* Style tab bar */
    lv_obj_t *tab_bar = lv_tabview_get_tab_bar(tv);
    lv_obj_set_style_bg_color(tab_bar, lv_color_hex(0x16213e), 0);

    /* Create tabs */
    lv_obj_t *tab1 = lv_tabview_add_tab(tv, "Controls");
    lv_obj_t *tab2 = lv_tabview_add_tab(tv, "Sensors");
    lv_obj_t *tab3 = lv_tabview_add_tab(tv, "Status");

    /* Build tab contents */
    build_controls_tab(tab1);
    build_sensors_tab(tab2);
    build_status_tab(tab3);

    /* ===== Create Timers ===== */
    /* UI update timer (50ms) */
    lv_timer_create(dashboard_timer_cb, 50, NULL);

    /* Sensor request timer (100ms) - requests IMU+ADC from CM33 */
    lv_timer_create(sensor_request_timer_cb, 100, NULL);

    /* Health check timer (5s) - sends PING */
    lv_timer_create(health_timer_cb, 5000, NULL);

    CM55_LOGI("Part4 Ex7: IPC Dashboard initialized");
    log_event("Dashboard started");
}
```

#### 4.2 CM33-NS Code - Multi-Channel Handler

```c
/*******************************************************************************
 * Part 4 - Example 7: CM33-NS Multi-Channel IPC Handler
 *
 * Handles: LED commands, sensor requests, button polling, PING/PONG
 ******************************************************************************/

#include "ipc/cm33_ipc_pipe.h"
#include "../../shared/ipc_shared.h"
#include "aic-eec/aic-eec.h"

/* Button state machine (from Lab 6) */
static btn_state_t btn_state = BTN_STATE_IDLE;
/* ... (same debounce code as Lab 6) */

/* LED state (from Lab 5) */
static bool led_states[3] = {false};
static uint8_t led_brightness[3] = {100, 100, 100};

/*******************************************************************************
 * Send Sensor Data to CM55
 ******************************************************************************/
static void send_sensor_data(ipc_cmd_t sensor_type)
{
    switch (sensor_type) {
        case IPC_CMD_IMU_DATA: {
            int16_t ax, ay, az;
            imu_shared_read_accel(&ax, &ay, &az);

            ipc_msg_t msg;
            IPC_MSG_INIT(&msg, IPC_CMD_IMU_DATA);
            ipc_imu_data_t *imu = (ipc_imu_data_t *)msg.data;
            imu->accel_x = ax;
            imu->accel_y = ay;
            imu->accel_z = az;
            imu->gyro_x  = 0;  /* อ่านเพิ่มถ้ามี */
            imu->gyro_y  = 0;
            imu->gyro_z  = 0;
            imu->timestamp = Cy_SysLib_GetTicks();
            cm33_ipc_send_retry(&msg, 5);
            break;
        }
        case IPC_CMD_ADC_DATA: {
            ipc_msg_t msg;
            IPC_MSG_INIT(&msg, IPC_CMD_ADC_DATA);
            ipc_adc_data_t *adc = (ipc_adc_data_t *)msg.data;
            adc->adc_ch0 = aic_adc_read(0);
            adc->adc_ch1 = aic_adc_read(1);
            adc->adc_ch2 = 0;
            adc->adc_ch3 = 0;
            adc->timestamp = Cy_SysLib_GetTicks();
            cm33_ipc_send_retry(&msg, 5);
            break;
        }
        default:
            break;
    }
}

/*******************************************************************************
 * CM33 IPC Callback - Route ALL commands
 ******************************************************************************/
static void cm33_dashboard_handler(const ipc_msg_t *msg, void *user_data)
{
    (void)user_data;

    switch (msg->cmd) {
        /* LED Commands */
        case IPC_CMD_LED_SET:
        case IPC_CMD_LED_BRIGHTNESS:
            cm33_handle_led_cmd(msg);  /* จาก Lab 5 */
            break;

        /* Sensor Requests */
        case IPC_CMD_SENSOR_REQ:
            send_sensor_data(msg->value);
            break;

        /* Button Request */
        case IPC_CMD_BUTTON:
            send_button_event(btn_state == BTN_STATE_PRESSED, false);
            break;

        /* Health Check */
        case IPC_CMD_PING:
            cm33_ipc_send_cmd(IPC_CMD_PONG, msg->value);
            break;

        /* Logging */
        case IPC_CMD_LOG:
        case IPC_CMD_LOG_INFO:
        case IPC_CMD_LOG_WARN:
        case IPC_CMD_LOG_ERROR:
        case IPC_CMD_LOG_DEBUG:
            cm33_ipc_handle_log(msg);
            break;

        default:
            break;
    }
}

/*******************************************************************************
 * CM33-NS Main
 ******************************************************************************/
void cm33_dashboard_app(void)
{
    aic_gpio_init();
    aic_sensors_init();  /* ต้องเรียกก่อนอ่าน sensor! */
    cm33_ipc_init();
    cm33_ipc_register_callback(cm33_dashboard_handler, NULL);

    Cy_SysEnableCM55(CY_CORTEX_M55_APPL_ADDR);

    for (;;) {
        button_poll();       /* Poll button ทุก loop */
        cm33_ipc_process();  /* Process IPC messages */
        Cy_SysLib_Delay(10); /* 10ms loop */
    }
}
```

***

### 5. องค์ความรู้และเทคนิค (Patterns & Tips)

#### 5.1 Multi-Flag IPC Handler Pattern

```c
/* รวม flags ทั้งหมดใน struct สำหรับจัดการง่าย */
typedef struct {
    volatile bool led_ack;
    volatile bool btn_event;
    volatile bool imu_data;
    volatile bool adc_data;
    volatile bool pong;
} ipc_flags_t;

static ipc_flags_t flags = {0};

/* IPC callback ตั้ง flag ตาม command */
void ipc_cb(const ipc_msg_t *msg, void *data) {
    switch (msg->cmd) {
        case IPC_CMD_ACK:          flags.led_ack = true; break;
        case IPC_CMD_BUTTON_EVENT: flags.btn_event = true; break;
        case IPC_CMD_IMU_DATA:     flags.imu_data = true; break;
        case IPC_CMD_ADC_DATA:     flags.adc_data = true; break;
        case IPC_CMD_PONG:         flags.pong = true; break;
    }
}

/* LVGL timer ตรวจทุก flag */
void timer_cb(lv_timer_t *t) {
    if (flags.led_ack)   { flags.led_ack = false;   update_led(); }
    if (flags.btn_event) { flags.btn_event = false;  update_btn(); }
    if (flags.imu_data)  { flags.imu_data = false;   update_imu(); }
    if (flags.adc_data)  { flags.adc_data = false;   update_adc(); }
    if (flags.pong)      { flags.pong = false;       update_health(); }
}
```

#### 5.2 TabView Best Practices

```c
/* ===== TabView ใน Embedded: ข้อควรระวัง ===== */

/* 1. ปิด scrollable ทุก tab */
lv_obj_clear_flag(tab, LV_OBJ_FLAG_SCROLLABLE);

/* 2. Update เฉพาะ tab ที่แสดงอยู่ (ประหยัด CPU) */
uint32_t active_tab = lv_tabview_get_tab_active(tv);
if (active_tab == 1) {  /* Sensors tab */
    lv_chart_set_next_value(chart, ser, value);
}

/* 3. Chart ไม่ refresh ถ้า tab ไม่ active
 * --> ข้อมูลยัง buffer อยู่ เมื่อสลับ tab จะเห็นข้อมูลล่าสุด */

/* 4. ใช้ font ขนาดเล็กในพื้นที่จำกัด */
lv_obj_set_style_text_font(label, &lv_font_montserrat_10, 0);
```

#### 5.3 IPC RTT Measurement

```c
/* วัด Round-Trip Time (RTT) ของ IPC */

static uint32_t ping_tick = 0;

/* ส่ง PING พร้อม timestamp */
void send_ping(void) {
    ping_tick = xTaskGetTickCount();
    cm55_ipc_send_cmd(IPC_CMD_PING, ping_tick);
}

/* CM33 ตอบ PONG พร้อม timestamp เดิม */
/* cm33: cm33_ipc_send_cmd(IPC_CMD_PONG, msg->value); */

/* CM55 รับ PONG คำนวณ RTT */
void on_pong(uint32_t pong_tick) {
    uint32_t rtt = xTaskGetTickCount() - ping_tick;
    /* rtt = round-trip latency in ticks (1 tick = 1ms typically) */
}
```

#### 5.4 Sensor Request Rate Control

```c
/* ===== อย่า request sensor เร็วเกินไป! ===== */

/* WRONG: request ทุก 10ms = 100 requests/sec = IPC flood */
lv_timer_create(sensor_req, 10, NULL);

/* RIGHT: request ทุก 100ms = 10 requests/sec */
lv_timer_create(sensor_req, 100, NULL);

/* ในแต่ละ request cycle ต้อง delay ระหว่าง IPC sends */
void sensor_req(lv_timer_t *t) {
    cm55_ipc_request_sensor(IPC_CMD_IMU_DATA);
    vTaskDelay(pdMS_TO_TICKS(20));  /* 20ms delay! */
    cm55_ipc_request_sensor(IPC_CMD_ADC_DATA);
    /* รวม: 2 messages per 100ms = 20 msg/sec (acceptable) */
}
```

***

### 6. แบบฝึกหัด (Exercises)

#### Exercise 1: System Health Monitor (Intermediate)

เพิ่ม System Health Monitor ใน Status tab:

**Requirements:**

* IPC Latency Graph: chart แสดง RTT 20 ค่าล่าสุด
* Error Rate: % ของ messages ที่ error (error/total \* 100)
* Connection Status LED: เขียว (RTT < 50ms), เหลือง (50-200ms), แดง (>200ms หรือ no pong)
* Message Rate: แสดง TX/s และ RX/s (คำนวณจาก delta per second)
* Health Score: 0-100 คำนวณจาก RTT + error rate + uptime
* Auto-alert: ถ้า health score < 50 ให้ LED widget แดงกะพริบ

**Expected Output:**

```
+-------------------------------------------+
| Status Tab                                |
|                                           |
| Health: [=========] 92/100   [G] OK       |
|                                           |
| RTT Graph: [/\/\/\/\___/\]  avg: 12ms     |
|                                           |
| TX Rate: 22/s  |  RX Rate: 20/s           |
| Error Rate: 0.5%                          |
| Connection: GOOD (RTT < 50ms)             |
+-------------------------------------------+
```

**Hints:**

* Health Score = 100 - (RTT > 100 ? 30 : RTT \* 0.3) - (error\_pct \* 2)
* Rate calculation: count\_now - count\_1s\_ago
* ใช้ `lv_chart_create()` สำหรับ RTT graph
* PING ทุก 2s แทน 5s สำหรับ responsive health monitoring

***

#### Exercise 2: Alarm Conditions (Advanced)

เพิ่มระบบ alarm ที่ sensor threshold trigger action:

**Requirements:**

* Alarm rules (configurable):
  * IMU |accel| > 1500: "VIBRATION ALERT" --> flash Red LED
  * ADC > 80%: "HIGH VOLTAGE" --> turn on Green LED as warning
  * ADC < 10%: "LOW SIGNAL" --> blink Blue LED
* Alarm panel แสดง active alarms (max 5) พร้อม timestamp
* Alarm history (last 10 alarms)
* Alarm acknowledge button: กด ACK เพื่อ silence alarm
* Sound indicator: LED widget กะพริบเมื่อมี unacknowledged alarm
* Auto-clear: alarm หายเมื่อ condition กลับปกติ

**Expected Output:**

```
+-------------------------------------------+
|  ALARM PANEL                    [ACK ALL] |
+-------------------------------------------+
| [!] VIBRATION ALERT  12:34:56  [ACTIVE]   |
| [!] HIGH VOLTAGE     12:34:58  [ACTIVE]   |
| [v] LOW SIGNAL       12:30:01  [CLEARED]  |
+-------------------------------------------+
| Active: 2  |  Total: 15  |  ACK'd: 13     |
+-------------------------------------------+
```

**Hints:**

* Alarm state: INACTIVE -> ACTIVE -> ACKNOWLEDGED -> CLEARED
* Check thresholds ใน LVGL timer หลัง update sensor data
* LED control ผ่าน IPC ด้วย 20ms delay
* ใช้ `lv_obj_set_style_bg_opa(panel, LV_OPA_100, 0)` + animation สำหรับ flash
* Timestamp: ใช้ `xTaskGetTickCount() / 1000` เป็น seconds since boot

***

### 7. สรุปและขั้นตอนถัดไป (Summary & Next Steps)

#### สิ่งที่เรียนรู้ใน Lab นี้

1. **Multi-Channel IPC**: จัดการ 10+ IPC command types ในระบบเดียว
2. **TabView Dashboard**: แยก UI complex ออกเป็น logical tabs
3. **Bidirectional Communication**: CM55 ส่งคำสั่ง + รับ data จาก CM33 พร้อมกัน
4. **Real-Time Sensor Display**: Chart + Gauge update จาก IPC data stream
5. **System Health Monitoring**: RTT, error rate, connection status

#### Architecture Lessons

```
+-----------------------------------------------------------+
|       KEY ARCHITECTURE PRINCIPLES LEARNED                 |
+-----------------------------------------------------------+
|                                                           |
|  1. SEPARATION OF CONCERNS                                |
|     CM55 = UI + Logic    CM33 = Hardware + Sensors        |
|                                                           |
|  2. FLAG-BASED BRIDGE                                     |
|     IPC ISR --> flags --> LVGL timer --> UI update        |
|     Never cross the boundary directly!                    |
|                                                           |
|  3. RATE LIMITING                                         |
|     Sensor request: 100ms interval                        |
|     IPC send gap: 20ms minimum                            |
|     Health check: 5s interval                             |
|                                                           |
|  4. GRACEFUL DEGRADATION                                  |
|     If IPC fails: show error, keep running                |
|     If sensor fails: show stale data, flag warning        |
|     If button fails: disable controls, show status        |
|                                                           |
+-----------------------------------------------------------+
```

#### ขั้นตอนถัดไป

* **Mini Project Part 4**: Multi-Core Sensor Fusion System
  * รวมทุกอย่าง + Event Bus + Advanced Logging
  * ระบบ production-grade ที่ถูก grade

#### Application ในงานจริง

<table><thead><tr><th width="221.8551025390625">ด้าน</th><th>ตัวอย่าง</th></tr></thead><tbody><tr><td><strong>SCADA/HMI</strong></td><td>Factory floor monitoring + control dashboard</td></tr><tr><td><strong>Building Management</strong></td><td>HVAC + lighting + security ใน TabView</td></tr><tr><td><strong>Medical Devices</strong></td><td>Patient monitoring + pump control + alarm</td></tr><tr><td><strong>Automotive</strong></td><td>Instrument cluster + vehicle diagnostics</td></tr></tbody></table>


# CAPSENSE via IPC

## Lab 5: CAPSENSE via IPC

### Part 4 - IPC & Event Bus (Hardware Labs)

***

### 1. โครงสร้างภาพรวม (Overview)

#### Why? - ทำไมต้องเรียนรู้เรื่องนี้

ในระบบ Embedded จริง อุปกรณ์ Input (sensor, touch, keypad) มักแชร์ bus กับอุปกรณ์อื่น:

* **HMI Touch Panel + External Sensor**: หน้าจอ touch กับ sensor ภายนอกใช้ I2C bus เดียวกัน ถ้าอ่านพร้อมกันจะ crash
* **Automotive Cluster**: CAPSENSE steering wheel controls อ่านจาก MCU ตัวนึง ส่งข้อมูลผ่าน CAN bus ไปแสดงบน instrument cluster
* **Industrial Keypad**: keypad module ต่อกับ controller ผ่าน I2C แล้วส่ง key event ผ่าน internal bus ไป HMI core
* **Medical Device**: capacitive touch interface ต้องแยก core อ่าน touch กับ core แสดงผลเพื่อความปลอดภัย (safety isolation)

ในบอร์ด PSoC Edge E84:

* **PSoC 4000T CAPSENSE** (2 ปุ่ม + 1 slider) ต่อผ่าน **I2C SCB0** (address 0x08)
* **Display Touch** ก็ใช้ **I2C SCB0** เหมือนกัน
* **Part 1 Ex11**: CM55 อ่าน CAPSENSE ตรง ต้อง disable touch screen --> ใช้ touch จากหน้าจอไม่ได้!
* **Part 4 Ex9**: CM33-NS อ่าน CAPSENSE --> ส่ง IPC ไป CM55 --> touch screen ยังทำงานปกติ!

#### What? - จะได้เรียนรู้อะไร

1. **IPC-Based Peripheral Access**: CM33 อ่าน CAPSENSE ผ่าน I2C แล้วส่งข้อมูลผ่าน IPC ไป CM55
2. **Thread-Safe Flag Pattern**: IPC callback ตั้ง flag --> LVGL timer อ่าน flag --> update UI
3. **Edge Detection**: ส่ง IPC เฉพาะเมื่อสถานะเปลี่ยน (ลด traffic)
4. **IPC Protocol Design**: ออกแบบ command + payload สำหรับ CAPSENSE data
5. **Architecture Comparison**: เปรียบเทียบ Direct I2C vs IPC approach
6. **Bus Conflict Resolution**: แก้ปัญหา I2C bus sharing ด้วย multi-core architecture

#### How? - ทำอย่างไร

CM33-NS poll PSoC 4000T CAPSENSE ทุก 100ms ผ่าน I2C --> เปรียบเทียบกับ state ก่อนหน้า (edge detection) --> ถ้าเปลี่ยน ส่ง `IPC_CMD_CAPSENSE_DATA` พร้อม payload \[BTN0, BTN1, Slider, SliderActive] ไป CM55 --> CM55 IPC callback เก็บข้อมูลใน volatile variables + set flag --> LVGL timer (50ms) ตรวจ flag --> update UI (slider, LED, panel backgrounds)

***

### 2. หลักการทำงาน (Technical Principles)

#### 2.1 เปรียบเทียบ: Direct I2C vs IPC Approach

```
+-----------------------------------------------------------+
|     DIRECT I2C (Part 1 Ex11) vs IPC (Part 4 Ex9)          |
+-----------------------------------------------------------+
|                                                           |
|  Part 1 Ex11: Direct I2C on CM55                          |
|  ====================================                     |
|                                                           |
|  CM55 Core:                                               |
|  +-------------------+    +-------------------+           |
|  | LVGL Display      |    | CAPSENSE I2C Read |           |
|  | (needs touch)     |    | (needs SCB0)      |           |
|  +---+---+-----------+    +---+---+-----------+           |
|      |   ^                    |   ^                       |
|      |   |   CONFLICT!        |   |                       |
|      v   |                    v   |                       |
|  +---+---+--------------------+---+-+                     |
|  |        I2C SCB0 (shared)         |                     |
|  +----------------------------------+                     |
|  Result: Must DISABLE touch screen!                       |
|                                                           |
|  Part 4 Ex9: IPC Approach                                 |
|  ====================================                     |
|                                                           |
|  CM33-NS Core:           CM55 Core:                       |
|  +------------------+    +------------------+             |
|  | CAPSENSE I2C     |    | LVGL Display     |             |
|  | Reader (SCB0)    |    | + Touch (SCB0)   |             |
|  +--------+---------+    +--------+---------+             |
|           |                       ^                       |
|           | IPC_CMD_CAPSENSE_DATA |                       |
|           +------------>----------+                       |
|  Result: Touch screen WORKS! Best of both worlds!         |
|                                                           |
+-----------------------------------------------------------+
```

#### 2.2 Comparison Table: Direct I2C vs IPC

<table><thead><tr><th width="201.2691650390625">หัวข้อ</th><th>Part 1 Ex11 (Direct I2C)</th><th>Part 4 Ex9 (IPC)</th></tr></thead><tbody><tr><td><strong>CAPSENSE อ่านจาก</strong></td><td>CM55 (direct)</td><td>CM33-NS (via I2C)</td></tr><tr><td><strong>Touch Screen</strong></td><td>DISABLED (bus conflict)</td><td>WORKS normally</td></tr><tr><td><strong>I2C Bus</strong></td><td>CM55 ใช้ทั้ง touch + CAPSENSE</td><td>แยก: CM33=CAPSENSE, CM55=touch</td></tr><tr><td><strong>Latency</strong></td><td>~50ms (direct read)</td><td>~70ms (I2C + IPC + LVGL timer)</td></tr><tr><td><strong>Code Complexity</strong></td><td>ต่ำ (single core)</td><td>ปานกลาง (IPC callback + flags)</td></tr><tr><td><strong>Thread Safety</strong></td><td>ไม่มีปัญหา (single thread)</td><td>ต้องใช้ volatile + flag pattern</td></tr><tr><td><strong>Architecture</strong></td><td>ไม่ดี (bus conflict)</td><td>ดี (CM33=HW, CM55=UI)</td></tr><tr><td><strong>Scalability</strong></td><td>ยาก (bus เต็ม)</td><td>ดี (เพิ่ม sensor ได้)</td></tr><tr><td><strong>Production Ready</strong></td><td>ไม่ (touch ใช้ไม่ได้)</td><td>ใช่ (ทุกอย่างทำงาน)</td></tr><tr><td><strong>I2C Contention</strong></td><td>มี (must disable touch)</td><td>ไม่มี (แยก core)</td></tr></tbody></table>

#### 2.3 CAPSENSE IPC Architecture

```
+-----------------------------------------------------------+
|          CAPSENSE IPC ARCHITECTURE (Ex9)                  |
+-----------------------------------------------------------+
|                                                           |
|  CM33-NS Core (HW Service)       CM55 Core (LVGL UI)      |
|  ==========================      =====================    |
|                                                           |
|  +------------------+                                     |
|  | I2C SCB0         |  Poll every 100ms                   |
|  | Read PSoC 4000T  |                                     |
|  | (addr 0x08)      |                                     |
|  +--------+---------+                                     |
|           |                                               |
|           v                                               |
|  +------------------+                                     |
|  | Parse 3 bytes:   |                                     |
|  | [0] BTN0 (ASCII) |                                     |
|  | [1] BTN1 (ASCII) |                                     |
|  | [2] Slider (raw) |                                     |
|  +--------+---------+                                     |
|           |                                               |
|           v                                               |
|  +------------------+            +------------------+     |
|  | Edge Detection:  |  IPC TX   | IPC RX Callback   |     |
|  | Changed from     |---------->| (NOT LVGL-safe!)  |     |
|  | previous state?  |  0xB6     |                   |     |
|  |                  |           | Copy to volatile: |     |
|  | YES -> send IPC  |           | ex9_rx_btn0       |     |
|  | NO  -> skip      |           | ex9_rx_btn1       |     |
|  +------------------+           | ex9_rx_slider     |     |
|                                 | Set flag = true   |     |
|                                 +--------+----------+     |
|                                          |                |
|                                          v (LVGL timer)   |
|                                 +------------------+      |
|                                 | Check flag:      |      |
|                                 | if (flag) {      |      |
|                                 |   flag = false;  |      |
|                                 |   update_ui();   |      |
|                                 | }                |      |
|                                 +------------------+      |
|                                                           |
+-----------------------------------------------------------+
```

#### 2.4 IPC CAPSENSE Data Format

```
+-----------------------------------------------------------+
|       IPC_CMD_CAPSENSE_DATA (0xB6) PAYLOAD                |
+-----------------------------------------------------------+
|                                                           |
|  ipc_msg_t.data[0..3]:                                    |
|  +--------+--------+-----------+---------------+          |
|  | btn0   | btn1   | slider    | slider_active |          |
|  | 1 byte | 1 byte | 1 byte    | 1 byte        |          |
|  +--------+--------+-----------+---------------+          |
|                                                           |
|  btn0:          0 = released, 1 = pressed (CSB1)          |
|  btn1:          0 = released, 1 = pressed (CSB2)          |
|  slider:        0-100 position (0 = no touch) (CSS1)      |
|  slider_active: 0 = not touching, 1 = touching            |
|                                                           |
|  Total: 4 bytes (minimal IPC payload)                     |
|                                                           |
|  Commands:                                                |
|  IPC_CMD_CAPSENSE_DATA (0xB6): CM33 -> CM55 (data)        |
|  IPC_CMD_CAPSENSE_REQ  (0xB7): CM55 -> CM33 (request)     |
|                                                           |
+-----------------------------------------------------------+
```

#### 2.5 Thread-Safe Flag Pattern (CRITICAL)

```
+-----------------------------------------------------------+
|      WHY NEVER CALL LVGL FROM IPC CALLBACK                |
+-----------------------------------------------------------+
|                                                           |
|  IPC Callback runs in IPC task/ISR context:               |
|                                                           |
|  WRONG (will crash randomly):                             |
|  void ipc_cb(msg) {                                       |
|      lv_slider_set_value(slider, msg->data[2]);  // NO!   |
|      lv_label_set_text(label, "PRESSED");         // NO!  |
|  }                                                        |
|                                                           |
|  WHY? LVGL is NOT thread-safe.                            |
|  If LVGL is rendering a frame while IPC callback          |
|  modifies widget data, the internal state becomes         |
|  corrupted -> crash, visual glitches, or memory leak.     |
|                                                           |
|  CORRECT (flag-based pattern):                            |
|  volatile bool flag = false;                              |
|  volatile uint8_t rx_data = 0;                            |
|                                                           |
|  void ipc_cb(msg) {                                       |
|      rx_data = msg->data[2];    // OK: just copy data     |
|      flag = true;               // OK: just set flag      |
|  }                                                        |
|                                                           |
|  void lvgl_timer_cb(timer) {    // Runs in LVGL context   |
|      if (flag) {                                          |
|          flag = false;                                    |
|          lv_slider_set_value(slider, rx_data);  // SAFE!  |
|      }                                                    |
|  }                                                        |
|                                                           |
+-----------------------------------------------------------+
```

#### 2.6 Program Flowchart

```
+-----------------------------------------------------------+
|              CAPSENSE IPC PROGRAM FLOW                    |
+-----------------------------------------------------------+
|                                                           |
|  CM55 Side:                                               |
|  ==========                                               |
|     +----------+                                          |
|     |  Start   |                                          |
|     +----+-----+                                          |
|          |                                                |
|          v                                                |
|  +--------------------+                                   |
|  | Register IPC cb    |                                   |
|  | ex9_ipc_callback() |                                   |
|  +--------+-----------+                                   |
|           |                                               |
|           v                                               |
|  +--------------------+                                   |
|  | Build UI:          |                                   |
|  | - Slider panel     |                                   |
|  | - Button panels x2 |                                   |
|  | - Status footer    |                                   |
|  +--------+-----------+                                   |
|           |                                               |
|           v                                               |
|  +--------------------+                                   |
|  | Create timer (50ms)|                                   |
|  +--------+-----------+                                   |
|           |                                               |
|           v                                               |
|  +--------------------+                                   |
|  | Send CAPSENSE_REQ  |  Request initial state            |
|  | to CM33            |                                   |
|  +--------+-----------+                                   |
|           |                                               |
|           v                                               |
|  +--------------------+         +--------------------+    |
|  | LVGL timer loop:   |<--flag--| IPC callback:      |    |
|  | check flag         |         | copy data to       |    |
|  | update_ui()        |         | volatile vars      |    |
|  | edge detection     |         | set flag = true    |    |
|  +--------------------+         +--------------------+    |
|                                                           |
|  CM33-NS Side:                                            |
|  =============                                            |
|  +--------------------+                                   |
|  | capsense_init()    |  Init I2C SCB0, addr 0x08         |
|  +--------+-----------+                                   |
|           |                                               |
|           v                                               |
|  +--------------------+                                   |
|  | capsense_poll()    |<------+ Loop every 100ms          |
|  | Read 3 bytes I2C   |       |                           |
|  | Parse buttons/slider|      |                           |
|  | Edge detection     |       |                           |
|  | Changed? send IPC  |-------+                           |
|  +--------------------+                                   |
|                                                           |
+-----------------------------------------------------------+
```

***

### 3. ฟังก์ชันสำคัญ (API Reference)

#### 3.1 CM55 IPC Functions

<table><thead><tr><th width="277.68603515625">Function</th><th>Description</th><th>Return</th></tr></thead><tbody><tr><td><code>cm55_ipc_register_callback(cb, data)</code></td><td>ลงทะเบียน IPC callback</td><td>void</td></tr><tr><td><code>cm55_ipc_send_cmd(IPC_CMD_CAPSENSE_REQ, 0)</code></td><td>ขอ CAPSENSE state จาก CM33</td><td><code>cy_en_ipc_pipe_status_t</code></td></tr><tr><td><code>cm55_ipc_is_init()</code></td><td>ตรวจว่า IPC initialized หรือไม่</td><td><code>bool</code></td></tr><tr><td><code>cm55_ipc_get_stats(tx, rx, err)</code></td><td>ดึง IPC statistics</td><td>void</td></tr></tbody></table>

#### 3.2 CM33-NS CAPSENSE Functions

| Function                         | Description                      | Return |
| -------------------------------- | -------------------------------- | ------ |
| `capsense_module_init(hw, ctx)`  | Initialize CAPSENSE module + I2C | void   |
| `capsense_module_poll()`         | อ่าน I2C + edge detect + ส่ง IPC | void   |
| `capsense_module_send_current()` | ส่งสถานะปัจจุบัน (for REQ)       | void   |

#### 3.3 LVGL Widget Functions

| Function                                         | Description                   | Return       |
| ------------------------------------------------ | ----------------------------- | ------------ |
| `lv_slider_create(parent)`                       | สร้าง slider (read-only mode) | `lv_obj_t *` |
| `lv_slider_set_value(slider, val, anim)`         | ตั้งค่า slider                | void         |
| `lv_led_create(parent)`                          | สร้าง LED widget              | `lv_obj_t *` |
| `lv_led_on(led)` / `lv_led_off(led)`             | เปิด/ปิด LED widget           | void         |
| `lv_led_set_brightness(led, bright)`             | ตั้ง brightness (0-255)       | void         |
| `lv_obj_set_style_bg_color(obj, color, sel)`     | เปลี่ยนสีพื้นหลัง panel       | void         |
| `lv_obj_remove_flag(obj, LV_OBJ_FLAG_CLICKABLE)` | ปิด click บน slider           | void         |

#### 3.4 IPC CAPSENSE Data

| Field           | Type      | Byte     | Description                  |
| --------------- | --------- | -------- | ---------------------------- |
| `btn0`          | `uint8_t` | data\[0] | 0=released, 1=pressed (CSB1) |
| `btn1`          | `uint8_t` | data\[1] | 0=released, 1=pressed (CSB2) |
| `slider_pos`    | `uint8_t` | data\[2] | 0-100 (0=no touch)           |
| `slider_active` | `uint8_t` | data\[3] | 0=not touching, 1=touching   |

***

### 4. โค้ดตัวอย่าง (Code Examples)

#### 4.1 CM55 Code - CAPSENSE IPC Display

```c
/*******************************************************************************
 * Part 4 - Example 9: CAPSENSE via IPC (CM55 Side)
 *
 * CM33-NS reads PSoC 4000T CAPSENSE via I2C (slave 0x08) and sends
 * state changes to CM55 via IPC_CMD_CAPSENSE_DATA.
 *
 * Advantages over Part 1 Ex11 (direct I2C on CM55):
 * - Touch screen remains functional (no lv_port_indev_disable_touch)
 * - Follows CM33=HW service, CM55=UI pattern (IPC architecture)
 * - Edge detection on CM33 reduces IPC traffic
 *
 * Data format (ipc_msg_t.data[0..3]):
 *   [0] btn0:          0=released, 1=pressed
 *   [1] btn1:          0=released, 1=pressed
 *   [2] slider_pos:    0-100 (0=no touch)
 *   [3] slider_active: 0=not touching, 1=touching
 *
 * CRITICAL: LVGL is NOT thread-safe!
 *   IPC callback -> volatile flags -> LVGL timer -> UI update
 ******************************************************************************/

#include "lvgl.h"
#include "ipc/cm55_ipc_pipe.h"
#include "../../shared/ipc_shared.h"

#define EX9_NUM_BUTTONS 2

/* ===== UI Elements ===== */
static lv_obj_t *ex9_btn_panels[EX9_NUM_BUTTONS];
static lv_obj_t *ex9_btn_leds[EX9_NUM_BUTTONS];
static lv_obj_t *ex9_btn_status[EX9_NUM_BUTTONS];
static lv_obj_t *ex9_slider;
static lv_obj_t *ex9_slider_value;
static lv_obj_t *ex9_output_led;
static lv_obj_t *ex9_ipc_count_label;
static lv_timer_t *ex9_timer;

/* ===== IPC Flag-Based Pattern (volatile for thread safety) ===== */
static volatile bool    ex9_capsense_updated  = false;
static volatile uint8_t ex9_rx_btn0           = 0;
static volatile uint8_t ex9_rx_btn1           = 0;
static volatile uint8_t ex9_rx_slider         = 0;
static volatile uint8_t ex9_rx_slider_active  = 0;
static uint32_t         ex9_ipc_event_count   = 0;

/* Previous state for UI edge detection (reduces unnecessary redraws) */
static uint8_t ex9_prev_btn0   = 0xFF;
static uint8_t ex9_prev_btn1   = 0xFF;
static uint8_t ex9_prev_slider = 0xFF;

/*******************************************************************************
 * IPC Receive Callback (NOT LVGL-safe context!)
 *
 * CRITICAL: This function runs in IPC task context.
 * NEVER call any lv_* function here!
 * Only copy data to volatile variables and set the flag.
 ******************************************************************************/
static void ex9_ipc_callback(const ipc_msg_t *msg, void *user_data)
{
    (void)user_data;
    if (msg->cmd == IPC_CMD_CAPSENSE_DATA) {
        /* Copy payload to volatile variables */
        ex9_rx_btn0          = (uint8_t)msg->data[0];
        ex9_rx_btn1          = (uint8_t)msg->data[1];
        ex9_rx_slider        = (uint8_t)msg->data[2];
        ex9_rx_slider_active = (uint8_t)msg->data[3];

        /* Set flag -- LVGL timer will read and update UI */
        ex9_capsense_updated = true;
    }
}

/*******************************************************************************
 * Update UI with CAPSENSE data (called from LVGL timer - SAFE context)
 *
 * Uses edge detection: only update widgets when state actually changes.
 * This reduces unnecessary LVGL redraws and improves performance.
 ******************************************************************************/
static void ex9_update_ui(uint8_t btn0, uint8_t btn1, uint8_t slider_pos)
{
    /* ===== Button 0 (CSB1) ===== */
    if (btn0 != ex9_prev_btn0) {
        if (btn0) {
            lv_obj_set_style_bg_color(ex9_btn_panels[0],
                lv_color_hex(0x00AA00), 0);
            lv_led_on(ex9_btn_leds[0]);
            lv_label_set_text(ex9_btn_status[0], "TOUCHED");
            lv_obj_set_style_text_color(ex9_btn_status[0],
                AIC_COLOR_SUCCESS, 0);
        } else {
            lv_obj_set_style_bg_color(ex9_btn_panels[0],
                lv_color_hex(0x333355), 0);
            lv_led_off(ex9_btn_leds[0]);
            lv_label_set_text(ex9_btn_status[0], "Ready");
            lv_obj_set_style_text_color(ex9_btn_status[0],
                AIC_COLOR_TEXT_DIM, 0);
        }
        ex9_prev_btn0 = btn0;
    }

    /* ===== Button 1 (CSB2) ===== */
    if (btn1 != ex9_prev_btn1) {
        if (btn1) {
            lv_obj_set_style_bg_color(ex9_btn_panels[1],
                lv_color_hex(0x00AA00), 0);
            lv_led_on(ex9_btn_leds[1]);
            lv_label_set_text(ex9_btn_status[1], "TOUCHED");
            lv_obj_set_style_text_color(ex9_btn_status[1],
                AIC_COLOR_SUCCESS, 0);
        } else {
            lv_obj_set_style_bg_color(ex9_btn_panels[1],
                lv_color_hex(0x333355), 0);
            lv_led_off(ex9_btn_leds[1]);
            lv_label_set_text(ex9_btn_status[1], "Ready");
            lv_obj_set_style_text_color(ex9_btn_status[1],
                AIC_COLOR_TEXT_DIM, 0);
        }
        ex9_prev_btn1 = btn1;
    }

    /* ===== Slider (CSS1) ===== */
    if (slider_pos != ex9_prev_slider) {
        lv_slider_set_value(ex9_slider, slider_pos, LV_ANIM_ON);
        lv_label_set_text_fmt(ex9_slider_value, "%d%%", slider_pos);

        /* LED brightness follows slider position */
        if (slider_pos > 0) {
            uint8_t brightness = (uint8_t)(slider_pos * 255 / 100);
            lv_led_on(ex9_output_led);
            lv_led_set_brightness(ex9_output_led, brightness);
        } else {
            lv_led_off(ex9_output_led);
        }

        ex9_prev_slider = slider_pos;
    }
}

/*******************************************************************************
 * LVGL Timer Callback (50ms) - Check IPC flag and update UI
 *
 * This runs in LVGL context - SAFE to call lv_* functions here.
 ******************************************************************************/
static void ex9_timer_cb(lv_timer_t *timer)
{
    (void)timer;

    if (ex9_capsense_updated) {
        ex9_capsense_updated = false;  /* Clear flag FIRST */
        ex9_ipc_event_count++;

        /* Update UI widgets (with edge detection) */
        ex9_update_ui(ex9_rx_btn0, ex9_rx_btn1, ex9_rx_slider);

        /* Update IPC event counter in footer */
        lv_label_set_text_fmt(ex9_ipc_count_label,
            "Ex9: CAPSENSE (IPC)    IPC events: %u",
            (unsigned)ex9_ipc_event_count);
    }
}

/*******************************************************************************
 * Main Function: Build CAPSENSE IPC UI
 ******************************************************************************/
void part4_ex9_capsense_ipc(void)
{
    /* Register IPC callback for CAPSENSE_DATA */
    cm55_ipc_register_callback(ex9_ipc_callback, NULL);

    /* Reset UI state */
    ex9_prev_btn0   = 0xFF;
    ex9_prev_btn1   = 0xFF;
    ex9_prev_slider = 0xFF;
    ex9_ipc_event_count  = 0;
    ex9_capsense_updated = false;

    lv_obj_t *scr = lv_screen_active();
    lv_obj_set_style_bg_color(scr, lv_color_hex(0x1a1a2e), LV_PART_MAIN);

    /* ===== TITLE ===== */
    lv_obj_t *title = lv_label_create(scr);
    lv_label_set_text(title, "Part 4 Ex9: CAPSENSE (IPC)");
    lv_obj_set_style_text_color(title, AIC_COLOR_TEXT, 0);
    lv_obj_set_style_text_font(title, &lv_font_montserrat_20, 0);
    lv_obj_align(title, LV_ALIGN_TOP_MID, 0, 8);

    /* ===== MODE LABEL ===== */
    lv_obj_t *mode_label = lv_label_create(scr);
    if (cm55_ipc_is_init()) {
        lv_label_set_text(mode_label,
            "Mode: IPC (CM33 reads I2C -> CM55 display)");
        lv_obj_set_style_text_color(mode_label, AIC_COLOR_SUCCESS, 0);
    } else {
        lv_label_set_text(mode_label, "Mode: IPC NOT initialized");
        lv_obj_set_style_text_color(mode_label, AIC_COLOR_ERROR, 0);
    }
    lv_obj_align(mode_label, LV_ALIGN_TOP_MID, 0, 32);

    /* ===== CAPSENSE SLIDER PANEL (420x80) ===== */
    lv_obj_t *slider_panel = lv_obj_create(scr);
    lv_obj_set_size(slider_panel, 420, 80);
    lv_obj_align(slider_panel, LV_ALIGN_TOP_MID, 0, 55);
    lv_obj_set_style_bg_color(slider_panel, lv_color_hex(0x0f0f23), 0);
    lv_obj_set_style_pad_all(slider_panel, 8, 0);
    lv_obj_clear_flag(slider_panel, LV_OBJ_FLAG_SCROLLABLE);

    lv_obj_t *slider_title = lv_label_create(slider_panel);
    lv_label_set_text(slider_title, "SLIDER (CSS1)");
    lv_obj_set_style_text_color(slider_title, AIC_COLOR_TEXT, 0);
    lv_obj_align(slider_title, LV_ALIGN_TOP_LEFT, 10, 0);

    ex9_slider_value = lv_label_create(slider_panel);
    lv_label_set_text(ex9_slider_value, "0%");
    lv_obj_set_style_text_color(ex9_slider_value, AIC_COLOR_PRIMARY, 0);
    lv_obj_set_style_text_font(ex9_slider_value, &lv_font_montserrat_16, 0);
    lv_obj_align(ex9_slider_value, LV_ALIGN_TOP_RIGHT, -10, 0);

    /* Slider widget (read-only: controlled by IPC data, not touch) */
    ex9_slider = lv_slider_create(slider_panel);
    lv_obj_set_width(ex9_slider, 340);
    lv_obj_set_height(ex9_slider, 25);
    lv_obj_align(ex9_slider, LV_ALIGN_BOTTOM_MID, 0, -8);
    lv_slider_set_range(ex9_slider, 0, 100);
    lv_slider_set_value(ex9_slider, 0, LV_ANIM_OFF);
    lv_obj_set_style_bg_color(ex9_slider, lv_color_hex(0x333355),
        LV_PART_MAIN);
    lv_obj_set_style_bg_color(ex9_slider, AIC_COLOR_PRIMARY,
        LV_PART_INDICATOR);
    lv_obj_remove_flag(ex9_slider, LV_OBJ_FLAG_CLICKABLE);

    /* Output LED next to slider */
    ex9_output_led = lv_led_create(slider_panel);
    lv_obj_set_size(ex9_output_led, 25, 25);
    lv_obj_align(ex9_output_led, LV_ALIGN_BOTTOM_RIGHT, -5, -8);
    lv_led_set_color(ex9_output_led,
        lv_palette_main(LV_PALETTE_LIGHT_BLUE));
    lv_led_off(ex9_output_led);

    /* ===== CAPSENSE BUTTON PANELS (140x150 each) ===== */
    const char *btn_names[] = {"BTN0", "BTN1"};
    const char *btn_ids[]   = {"(CSB1)", "(CSB2)"};
    uint32_t led_colors[]   = {0xff0000, 0x00ff00};
    int btn_x_pos[]         = {-110, 110};

    for (int i = 0; i < EX9_NUM_BUTTONS; i++) {
        ex9_btn_panels[i] = lv_obj_create(scr);
        lv_obj_set_size(ex9_btn_panels[i], 140, 150);
        lv_obj_align(ex9_btn_panels[i], LV_ALIGN_BOTTOM_MID,
            btn_x_pos[i], -55);
        lv_obj_set_style_bg_color(ex9_btn_panels[i],
            lv_color_hex(0x333355), 0);
        lv_obj_set_style_border_width(ex9_btn_panels[i], 3, 0);
        lv_obj_set_style_border_color(ex9_btn_panels[i],
            lv_color_hex(0x666699), 0);
        lv_obj_set_style_radius(ex9_btn_panels[i], 10, 0);
        lv_obj_set_style_pad_all(ex9_btn_panels[i], 5, 0);
        lv_obj_clear_flag(ex9_btn_panels[i], LV_OBJ_FLAG_SCROLLABLE);

        /* Button name */
        lv_obj_t *name = lv_label_create(ex9_btn_panels[i]);
        lv_label_set_text(name, btn_names[i]);
        lv_obj_set_style_text_color(name, AIC_COLOR_TEXT, 0);
        lv_obj_set_style_text_font(name, &lv_font_montserrat_16, 0);
        lv_obj_align(name, LV_ALIGN_TOP_MID, 0, 2);

        /* Hardware ID */
        lv_obj_t *id_lbl = lv_label_create(ex9_btn_panels[i]);
        lv_label_set_text(id_lbl, btn_ids[i]);
        lv_obj_set_style_text_color(id_lbl, AIC_COLOR_TEXT_DIM, 0);
        lv_obj_align(id_lbl, LV_ALIGN_TOP_MID, 0, 22);

        /* LED indicator */
        ex9_btn_leds[i] = lv_led_create(ex9_btn_panels[i]);
        lv_obj_set_size(ex9_btn_leds[i], 50, 50);
        lv_obj_align(ex9_btn_leds[i], LV_ALIGN_CENTER, 0, 8);
        lv_led_set_color(ex9_btn_leds[i], lv_color_hex(led_colors[i]));
        lv_led_off(ex9_btn_leds[i]);

        /* Status label */
        ex9_btn_status[i] = lv_label_create(ex9_btn_panels[i]);
        lv_label_set_text(ex9_btn_status[i], "Ready");
        lv_obj_set_style_text_color(ex9_btn_status[i],
            AIC_COLOR_TEXT_DIM, 0);
        lv_obj_align(ex9_btn_status[i], LV_ALIGN_BOTTOM_MID, 0, -2);
    }

    /* ===== FOOTER STATUS ===== */
    ex9_ipc_count_label = lv_label_create(scr);
    lv_label_set_text(ex9_ipc_count_label,
        "Ex9: CAPSENSE (IPC)    IPC events: 0");
    lv_obj_set_style_text_color(ex9_ipc_count_label,
        AIC_COLOR_TEXT_DIM, 0);
    lv_obj_set_style_text_align(ex9_ipc_count_label,
        LV_TEXT_ALIGN_CENTER, 0);
    lv_obj_align(ex9_ipc_count_label, LV_ALIGN_BOTTOM_MID, 0, -25);

    /* Copyright footer */
    aic_create_footer(scr);

    /* Timer to check IPC flags and update UI (50ms interval) */
    ex9_timer = lv_timer_create(ex9_timer_cb, 50, NULL);

    /* Request initial CAPSENSE state from CM33 */
    if (cm55_ipc_is_init()) {
        cm55_ipc_send_cmd(IPC_CMD_CAPSENSE_REQ, 0);
    }

    printf("[Part4] Ex9: CAPSENSE via IPC started\n");
    printf("  - CM33-NS reads PSoC 4000T (I2C 0x08)\n");
    printf("  - State changes sent via IPC_CMD_CAPSENSE_DATA\n");
    printf("  - Touch screen remains functional!\n");
}
```

#### 4.2 CM33-NS Code - CAPSENSE I2C Reader + IPC Sender

```c
/*******************************************************************************
 * File: capsense_task.c
 * Description: CAPSENSE I2C reader for CM33-NS
 *
 * Reads PSoC 4000T CAPSENSE chip via I2C and sends state changes
 * to CM55 via IPC_CMD_CAPSENSE_DATA. Uses edge detection to only
 * send data when button/slider state actually changes.
 *
 * I2C Protocol:
 *   Slave address: 0x08
 *   Read 3 bytes:
 *     [0] Button 0 (CSB1) - ASCII '0' or '1' (subtract 0x30)
 *     [1] Button 1 (CSB2) - ASCII '0'/'1'/'2' (subtract 0x30)
 *     [2] Slider (CSS1) - raw value 0-100
 *
 * IMPORTANT: CM33-NS has NO retarget-io -- NEVER use printf()!
 ******************************************************************************/

#include "capsense_task.h"
#include "../../shared/ipc_shared.h"
#include "../ipc/cm33_ipc_pipe.h"
#include <string.h>

/* ===== I2C Configuration ===== */
#define CAPSENSE_I2C_SLAVE_ADDR     (0x08U)
#define CAPSENSE_I2C_READ_SIZE      (3U)
#define CAPSENSE_I2C_TIMEOUT_MS     (0U)    /* Blocking */
#define CAPSENSE_ASCII_OFFSET       (0x30U)

/* ===== Private State ===== */
static CySCB_Type *cs_hw = NULL;
static cy_stc_scb_i2c_context_t *cs_ctx = NULL;
static bool cs_initialized = false;

/* Previous state for edge detection */
static uint8_t prev_btn0 = 0;
static uint8_t prev_btn1 = 0;
static uint8_t prev_slider = 0;
static uint8_t prev_slider_active = 0;

/* Current state */
static uint8_t cur_btn0 = 0;
static uint8_t cur_btn1 = 0;
static uint8_t cur_slider = 0;
static uint8_t cur_slider_active = 0;

/*******************************************************************************
 * Private: Read 3 bytes from CAPSENSE via I2C
 ******************************************************************************/
static bool capsense_i2c_read(uint8_t *btn0, uint8_t *btn1,
                               uint8_t *slider_pos, uint8_t *slider_active)
{
    if (!cs_initialized || !cs_hw || !cs_ctx) return false;

    uint8_t buffer[CAPSENSE_I2C_READ_SIZE] = {0};
    uint8_t *pData = &buffer[0];
    uint8_t remaining = CAPSENSE_I2C_READ_SIZE;
    cy_en_scb_i2c_command_t ack = CY_SCB_I2C_ACK;
    cy_en_scb_i2c_status_t status;

    /* Start I2C read transaction */
    status = (cs_ctx->state == CY_SCB_I2C_IDLE) ?
        Cy_SCB_I2C_MasterSendStart(cs_hw, CAPSENSE_I2C_SLAVE_ADDR,
                                    CY_SCB_I2C_READ_XFER,
                                    CAPSENSE_I2C_TIMEOUT_MS, cs_ctx) :
        Cy_SCB_I2C_MasterSendReStart(cs_hw, CAPSENSE_I2C_SLAVE_ADDR,
                                      CY_SCB_I2C_READ_XFER,
                                      CAPSENSE_I2C_TIMEOUT_MS, cs_ctx);

    if (CY_SCB_I2C_SUCCESS == status) {
        while (remaining > 0) {
            if (remaining == 1) {
                ack = CY_SCB_I2C_NAK;  /* NAK on last byte */
            }
            status = Cy_SCB_I2C_MasterReadByte(cs_hw, ack, pData,
                                                CAPSENSE_I2C_TIMEOUT_MS,
                                                cs_ctx);
            if (status != CY_SCB_I2C_SUCCESS) break;
            ++pData;
            --remaining;
        }
    }

    /* Always send STOP */
    Cy_SCB_I2C_MasterSendStop(cs_hw, CAPSENSE_I2C_TIMEOUT_MS, cs_ctx);

    if (status != CY_SCB_I2C_SUCCESS) return false;

    /* Parse: subtract ASCII offset for buttons */
    buffer[0] -= CAPSENSE_ASCII_OFFSET;
    buffer[1] -= CAPSENSE_ASCII_OFFSET;

    /* Button 0: 0=not pressed, non-zero=pressed */
    *btn0 = (buffer[0] != 0) ? 1 : 0;

    /* Button 1: 1=not pressed, 2=pressed (inverted logic) */
    *btn1 = (buffer[1] != 1) ? 1 : 0;

    /* Slider: 0=no touch, 1-100=position */
    *slider_pos = buffer[2];
    *slider_active = (buffer[2] != 0) ? 1 : 0;

    return true;
}

/*******************************************************************************
 * Private: Send current state via IPC
 ******************************************************************************/
static void capsense_send_ipc(void)
{
    ipc_msg_t msg;
    IPC_MSG_INIT(&msg, IPC_CMD_CAPSENSE_DATA);
    msg.data[0] = cur_btn0;
    msg.data[1] = cur_btn1;
    msg.data[2] = cur_slider;
    msg.data[3] = cur_slider_active;
    cm33_ipc_send_retry(&msg, 0);
}

/*******************************************************************************
 * Public: Initialize CAPSENSE module
 ******************************************************************************/
void capsense_module_init(CySCB_Type *hw,
                           cy_stc_scb_i2c_context_t *context)
{
    cs_hw  = hw;
    cs_ctx = context;
    cs_initialized = (hw != NULL && context != NULL);

    prev_btn0 = 0;
    prev_btn1 = 0;
    prev_slider = 0;
    prev_slider_active = 0;
}

/*******************************************************************************
 * Public: Poll CAPSENSE and send IPC on state change
 ******************************************************************************/
void capsense_module_poll(void)
{
    uint8_t b0, b1, sp, sa;

    if (!capsense_i2c_read(&b0, &b1, &sp, &sa)) return;

    cur_btn0 = b0;
    cur_btn1 = b1;
    cur_slider = sp;
    cur_slider_active = sa;

    /* Edge detection: only send IPC when state changes */
    if (b0 != prev_btn0 || b1 != prev_btn1 ||
        sp != prev_slider || sa != prev_slider_active) {

        capsense_send_ipc();

        prev_btn0 = b0;
        prev_btn1 = b1;
        prev_slider = sp;
        prev_slider_active = sa;
    }
}

/*******************************************************************************
 * Public: Send current state (for CAPSENSE_REQ from CM55)
 ******************************************************************************/
void capsense_module_send_current(void)
{
    capsense_send_ipc();
}
```

#### 4.3 Code Breakdown

**Part A: Volatile Flag Pattern (CRITICAL)**

```c
/* ===== ทำไมต้อง volatile? ===== */

/*
 * IPC callback ทำงานใน IPC task context (อีก thread/interrupt)
 * LVGL timer ทำงานใน LVGL task context
 *
 * ถ้าไม่ใช้ volatile:
 * - Compiler อาจ optimize ออก (cache ค่าใน register)
 * - LVGL timer อาจไม่เห็นค่าที่ IPC callback เขียน
 * - Bug ที่หาไม่เจอ: ทำงานบาง build, ไม่ทำงานบาง build
 */

static volatile bool    flag = false;    /* volatile = ห้าม cache! */
static volatile uint8_t data = 0;       /* volatile = อ่านจาก RAM เสมอ */

/* IPC callback (thread A) */
void ipc_cb(const ipc_msg_t *msg, void *user) {
    data = msg->data[0];    /* เขียน volatile */
    flag = true;            /* เขียน volatile - ต้องเป็นคำสั่งสุดท้าย! */
}

/* LVGL timer (thread B) */
void timer_cb(lv_timer_t *t) {
    if (flag) {             /* อ่าน volatile */
        flag = false;       /* Clear ก่อนใช้ data */
        use_data(data);     /* อ่าน volatile */
    }
}

/*
 * ทำไม flag = false ต้องมาก่อน use_data()?
 * - ถ้า clear หลัง: IPC อาจ set flag ใหม่ระหว่าง use_data()
 *   แล้ว clear ทำให้ event ใหม่หาย
 * - ถ้า clear ก่อน: IPC set flag ใหม่จะถูกจับในรอบถัดไป
 */
```

**Part B: Edge Detection (CM33 Side)**

```c
/* ===== Edge detection ลด IPC traffic อย่างมาก ===== */

/*
 * WITHOUT edge detection:
 * - Poll 100ms = 10 IPC/sec = 600 IPC/min
 * - ส่งทุกครั้งแม้ไม่มีอะไรเปลี่ยน
 * - IPC traffic สูง -> เสี่ยง buffer overwrite
 *
 * WITH edge detection:
 * - ส่งเฉพาะตอนเปลี่ยน = ~1-5 IPC/event
 * - ผู้ใช้แตะ slider 2 วินาที = ~20 IPC (slider position changes)
 * - ผู้ใช้ไม่แตะ = 0 IPC
 * - ลด traffic 90%+
 */

if (b0 != prev_btn0 || b1 != prev_btn1 ||
    sp != prev_slider || sa != prev_slider_active) {
    /* State changed! Send IPC */
    capsense_send_ipc();
    prev_btn0 = b0;      /* Update previous state */
    prev_btn1 = b1;
    prev_slider = sp;
    prev_slider_active = sa;
}
/* else: no change, skip IPC -> save bandwidth */
```

**Part C: Edge Detection (CM55 Side)**

```c
/* ===== CM55 ก็ทำ edge detection ลด LVGL redraws ===== */

/*
 * แม้ CM33 ส่งมาเฉพาะเมื่อเปลี่ยน
 * CM55 ก็ควรเช็คอีกชั้น:
 * - กัน race condition (IPC ส่งซ้ำ retry)
 * - กัน initial state request ซ้ำซ้อน
 * - ลด LVGL redraw ที่ไม่จำเป็น
 */

/* ใช้ 0xFF เป็น initial "unknown" state */
static uint8_t prev = 0xFF;

/* อัพเดท UI เฉพาะเมื่อค่าเปลี่ยนจริง */
if (btn0 != prev) {
    if (btn0) {
        lv_led_on(led);          /* 1 redraw */
    } else {
        lv_led_off(led);         /* 1 redraw */
    }
    prev = btn0;
}
/* ถ้า btn0 == prev: ไม่มี lv_* call = 0 redraws */
```

**Part D: Read-Only Slider Widget**

```c
/* ===== ปิด click บน slider เพราะควบคุมจาก IPC เท่านั้น ===== */

ex9_slider = lv_slider_create(slider_panel);
lv_slider_set_range(ex9_slider, 0, 100);

/* CRITICAL: ปิด clickable flag */
lv_obj_remove_flag(ex9_slider, LV_OBJ_FLAG_CLICKABLE);

/*
 * ถ้าไม่ปิด:
 * - ผู้ใช้แตะ slider บน touch screen
 * - LVGL เปลี่ยนค่า slider
 * - แต่ CAPSENSE ไม่ได้เปลี่ยน
 * - IPC ส่งค่าเดิมมา -> slider กระโดดกลับ
 * - UX ไม่ดี + confusing
 *
 * การปิด clickable ทำให้ slider เป็น "display-only"
 * ค่าเปลี่ยนได้จาก lv_slider_set_value() เท่านั้น
 */
```

***

### 5. องค์ความรู้และเทคนิค (Patterns & Tips)

#### 5.1 I2C Bus Sharing Problem

```c
/* ===== ปัญหา I2C Bus Sharing บน PSoC Edge E84 ===== */

/*
 * SCB0 I2C Bus:
 * +-------+     +-------------------+
 * | SCB0  |---->| Display Touch     |  (built-in to display)
 * | I2C   |---->| PSoC 4000T CAPS.  |  (on-board CAPSENSE)
 * +-------+
 *
 * ปัญหา: ถ้า CM55 อ่านทั้ง touch + CAPSENSE:
 * 1. Touch driver อ่าน I2C (60Hz)
 * 2. CAPSENSE poll อ่าน I2C (20Hz)
 * 3. I2C bus contention -> NAK, timeout, crash
 *
 * วิธีแก้ใน Part 1 Ex11:
 * lv_port_indev_disable_touch();  // ปิด touch!
 * // ใช้ CAPSENSE แทน touch -> จอแตะไม่ได้
 *
 * วิธีแก้ใน Part 4 Ex9 (IPC):
 * CM33-NS อ่าน CAPSENSE (I2C bus แยก)
 * CM55 ใช้ I2C สำหรับ touch เท่านั้น
 * ข้อมูล CAPSENSE มาผ่าน IPC pipe -> ไม่ conflict!
 */
```

#### 5.2 IPC Message Protocol Design

```c
/* ===== ออกแบบ IPC Protocol สำหรับ CAPSENSE ===== */

/*
 * Design decisions:
 *
 * 1. ใช้ data[] แทน struct ใน payload
 *    - CAPSENSE data แค่ 4 bytes
 *    - ไม่ต้องสร้าง struct แยก
 *    - msg.data[0..3] = btn0, btn1, slider, slider_active
 *
 * 2. ใช้ uint8_t (0/1) แทน bool
 *    - IPC ส่ง raw bytes
 *    - bool ขนาดอาจต่างกันระหว่าง cores
 *    - uint8_t = 1 byte แน่นอน
 *
 * 3. แยก CAPSENSE_DATA (0xB6) กับ CAPSENSE_REQ (0xB7)
 *    - DATA: CM33 -> CM55 (push data)
 *    - REQ: CM55 -> CM33 (pull request)
 *    - ใช้ REQ ตอน startup เพื่อ sync initial state
 *
 * 4. Edge detection บน CM33
 *    - CM33 เปรียบเทียบกับ state ก่อนหน้า
 *    - ส่งเฉพาะเมื่อเปลี่ยน
 *    - ลด IPC traffic 90%+
 */

/* Command allocation ใน GPIO range (0xB0-0xBF) */
IPC_CMD_CAPSENSE_DATA = 0xB6,  /* อยู่หลัง BUTTON_EVENT (0xB5) */
IPC_CMD_CAPSENSE_REQ  = 0xB7,  /* อยู่ถัดจาก DATA */
```

#### 5.3 PSoC 4000T I2C Protocol Details

```c
/* ===== PSoC 4000T CAPSENSE I2C Protocol ===== */

/*
 * Slave address: 0x08 (7-bit)
 * Transaction: Master Read, 3 bytes
 *
 * Byte 0: Button 0 (CSB1)
 *   - ASCII encoded: '0' (0x30) = not pressed
 *                    '1' (0x31) = pressed
 *   - Subtract 0x30: 0 = not pressed, 1 = pressed
 *
 * Byte 1: Button 1 (CSB2)
 *   - ASCII encoded: '1' (0x31) = not pressed (!)
 *                    '2' (0x32) = pressed
 *   - Subtract 0x30: 1 = not pressed, 2 = pressed
 *   - INVERTED LOGIC: check (value != 1) for pressed
 *
 * Byte 2: Slider (CSS1)
 *   - Raw value: 0 = not touching
 *                1-100 = position (left to right)
 *   - No ASCII encoding (direct value)
 *
 * I2C Read sequence:
 *   START -> Addr+R -> ACK -> Byte0 -> ACK ->
 *   Byte1 -> ACK -> Byte2 -> NAK -> STOP
 *
 * Last byte gets NAK per I2C protocol.
 */

/* Parse example */
buffer[0] -= 0x30;           /* ASCII to number */
buffer[1] -= 0x30;           /* ASCII to number */
*btn0 = (buffer[0] != 0);   /* Standard logic */
*btn1 = (buffer[1] != 1);   /* INVERTED logic! */
*slider = buffer[2];         /* Direct value, no offset */
```

#### 5.4 CAPSENSE\_REQ: Request-Response Pattern

```c
/* ===== Initial State Sync via CAPSENSE_REQ ===== */

/*
 * ปัญหา: CM55 เริ่มทำงานหลัง CM33
 * CM33 อาจส่ง CAPSENSE_DATA ก่อน CM55 register callback
 * --> CM55 พลาด initial state
 *
 * แก้ไข: CM55 ส่ง CAPSENSE_REQ หลัง setup เสร็จ
 */

void part4_ex9_capsense_ipc(void)
{
    /* 1. Register callback ก่อน */
    cm55_ipc_register_callback(ex9_ipc_callback, NULL);

    /* 2. สร้าง UI */
    /* ... build UI ... */

    /* 3. สร้าง timer */
    lv_timer_create(ex9_timer_cb, 50, NULL);

    /* 4. ขอ initial state (หลังจากทุกอย่าง ready) */
    if (cm55_ipc_is_init()) {
        cm55_ipc_send_cmd(IPC_CMD_CAPSENSE_REQ, 0);
    }
}

/* CM33 side: handle CAPSENSE_REQ */
case IPC_CMD_CAPSENSE_REQ:
    capsense_module_send_current();  /* ส่งสถานะปัจจุบัน */
    break;
```

***

### 6. แบบฝึกหัด (Exercises)

#### Exercise 1: CAPSENSE Event Counter + Statistics (Intermediate)

เพิ่มระบบนับ event และแสดง statistics ของ CAPSENSE:

**Requirements:**

* นับจำนวนครั้งที่กด BTN0, BTN1, และ slider touch
* แสดง total events, events per minute
* Last event timestamp (tick count)
* Longest slider touch duration (ms)
* Average slider position (เฉพาะขณะ touch)
* Statistics panel เพิ่มระหว่าง button panels

**Expected Output:**

```
+-------------------------------------------+
|  CAPSENSE Statistics                      |
|                                           |
|  BTN0 touches: 12    BTN1 touches: 8      |
|  Slider touches: 15                       |
|  Total events: 35    Rate: 7/min          |
|  Avg slider pos: 62%                      |
|  Longest touch: 2400ms                    |
|  Last event: tick 145230                  |
+-------------------------------------------+
```

**Hints:**

* เก็บ `touch_start_tick` เมื่อ `slider_active` เปลี่ยนจาก 0 -> 1
* คำนวณ duration เมื่อ `slider_active` เปลี่ยนจาก 1 -> 0
* Average = `total_position_sum / total_position_count`
* Rate = `total_events * 60 / (uptime_seconds)`
* ใช้ panel ขนาด 300x80 อยู่กลางระหว่าง slider กับ buttons

***

#### Exercise 2: CAPSENSE LED Control via IPC (Advanced)

ใช้ CAPSENSE ควบคุม physical LED ผ่าน IPC chain:

```
CAPSENSE -> I2C -> CM33 -> IPC(CAPSENSE_DATA) -> CM55 -> IPC(LED_SET) -> CM33 -> GPIO LED
```

**Requirements:**

* BTN0 (CSB1): Toggle Red LED (กด = toggle ON/OFF)
* BTN1 (CSB2): Toggle Green LED (กด = toggle ON/OFF)
* Slider (CSS1): Blue LED brightness (0-100% via IPC\_CMD\_LED\_BRIGHTNESS)
* UI แสดง LED state + slider brightness
* IPC flow: CAPSENSE data มาถึง CM55 -> CM55 ส่ง LED command กลับ CM33
* 20ms delay ระหว่าง IPC sends (CRITICAL)
* LED toggle ต้องมี edge detection (กดทีเดียว toggle ครั้งเดียว)

**Expected Output:**

```
+-------------------------------------------+
| CAPSENSE -> LED Control (IPC Chain)       |
|                                           |
| Slider: [========|-----] 62% -> Blue LED  |
|                                           |
| BTN0 -> Red LED: [ON]    Toggle count: 5  |
| BTN1 -> Green LED: [OFF] Toggle count: 3  |
|                                           |
| IPC Chain: CAPS->CM33->CM55->CM33->LED    |
| Total IPC: TX=42  RX=38                   |
+-------------------------------------------+
```

**Hints:**

* Toggle pattern: track `prev_btn0` state, toggle only on 0->1 transition
* Slider brightness: ส่ง `cm55_ipc_set_led_brightness(2, slider_pos)` เฉพาะเมื่อค่าเปลี่ยน
* 20ms delay ระหว่าง LED commands:

```c
/* ถ้าต้องส่ง LED + brightness พร้อมกัน */
cm55_ipc_set_led(0, true);
vTaskDelay(pdMS_TO_TICKS(20));   /* delay 20ms! */
cm55_ipc_set_led_brightness(2, slider_val);
```

* Full IPC chain creates round-trip latency: \~100-150ms end-to-end
* ใช้ `cm55_ipc_get_stats()` แสดง TX/RX statistics

***

### 7. สรุปและขั้นตอนถัดไป (Summary & Next Steps)

#### สิ่งที่เรียนรู้ใน Lab นี้

1. **IPC-Based Peripheral Access**: ย้ายการอ่าน CAPSENSE จาก CM55 ไป CM33 ผ่าน IPC เพื่อแก้ปัญหา I2C bus conflict
2. **Thread-Safe Flag Pattern**: ใช้ volatile flags + LVGL timer เพื่อ update UI อย่างปลอดภัยจาก IPC callback
3. **Edge Detection (Dual-Layer)**: ทั้ง CM33 (ลด IPC traffic) และ CM55 (ลด LVGL redraws)
4. **IPC Protocol Design**: ออกแบบ command + payload สำหรับ CAPSENSE data (4 bytes)
5. **Architecture Decision**: เลือก IPC approach แทน direct I2C เพื่อให้ touch screen ทำงานได้

#### Architecture Lesson

```
+-----------------------------------------------------------+
|      KEY LESSON: PROPER MULTI-CORE ARCHITECTURE           |
+-----------------------------------------------------------+
|                                                           |
|  WRONG (Part 1 Ex11):                                     |
|  CM55 does EVERYTHING:                                    |
|  - Read CAPSENSE (I2C)                                    |
|  - Read Touch (I2C)        <-- BUS CONFLICT!              |
|  - Display LVGL                                           |
|  Solution: disable touch   <-- BAD TRADEOFF               |
|                                                           |
|  RIGHT (Part 4 Ex9):                                      |
|  CM33-NS = Hardware Service:                              |
|  - Read CAPSENSE (I2C)                                    |
|  - Send data via IPC                                      |
|                                                           |
|  CM55 = UI Controller:                                    |
|  - Read Touch (I2C)        <-- NO CONFLICT                |
|  - Receive IPC data                                       |
|  - Display LVGL                                           |
|                                                           |
|  RULE: CM33 owns HW peripherals, CM55 owns display.       |
|  IPC bridges the gap between them.                        |
|                                                           |
+-----------------------------------------------------------+
```

#### ขั้นตอนถัดไป

* **Previous**: Lab 4: HW IPC Dashboard
* **Next**: Mini Project Part 4 -- Multi-Core Sensor Fusion System

#### Application ในงานจริง

<table><thead><tr><th width="214.55755615234375">ด้าน</th><th>ตัวอย่าง</th></tr></thead><tbody><tr><td><strong>Automotive</strong></td><td>Touch controls on steering wheel -> CAN -> instrument cluster display</td></tr><tr><td><strong>Industrial HMI</strong></td><td>Capacitive keypad on machine -> fieldbus -> SCADA display</td></tr><tr><td><strong>Consumer Electronics</strong></td><td>Touch slider (volume/brightness) -> MCU -> display controller</td></tr><tr><td><strong>Medical Devices</strong></td><td>Capacitive buttons (sealed enclosure) -> MCU -> UI processor</td></tr><tr><td><strong>Smart Home</strong></td><td>Touch panel -> Zigbee/BLE -> central hub display</td></tr></tbody></table>


# Edge AI via DEEPCRAFT™ Studio


# AIoT Secure Platform


# Infineon PSoC™ Edge Troubleshooting

## การ Flash ชิป PSoC™ 4000T CAPSENSE™

โฟลเดอร์นี้มีไฟล์ `psoc4-csd-button-slider.cyacd2` — เฟิร์มแวร์ CAPSENSE™ (ปุ่ม/สไลเดอร์) สำหรับชิป **PSoC™ 4000T** บน SOM ของ PSoC™ Edge E84 โปรแกรมผ่าน **I2C** ด้วย DFU Host Tool (ไม่ใช่ผ่าน SWD)

> **ไฟล์ `.cyacd2` แถมมาในโฟลเดอร์นี้แล้ว** — ไม่ต้องไปดาวน์โหลด ไฟล์นี้ไม่ใช่ไฟล์เดี่ยว ๆ ให้โหลด แต่**แถมมากับ Infineon code example** ชื่อ *"PSoC Edge: Bluetooth® LE with CAPSENSE™ Button and Slider"* (และ example *wifi-web-server*) ดึงผ่าน ModusToolbox Project Creator หรือ GitHub code-example ของ Infineon — สำเนาในโฟลเดอร์นี้คือ build ที่ยืนยันแล้วว่าใช้กับบอร์ดได้

***

### ทำไม DFU ถึง "fail แบบสุ่ม"

PSoC™ 4000T กับ PSoC™ Edge E84 **ใช้สาย I2C เส้นเดียวกัน (`P8_0` / `P8_1`)** KitProg3 ทำหน้าที่ bridge USB→I2C ไปยัง bootloader ของ 4000T บนบัสเส้นนี้

ถ้า **แอปของ E84 กำลังรันอยู่** (คือเพิ่ง `make program` ไป) มันจะ**ขับบัส I2C เส้นเดียวกันตลอดเวลา**เพื่ออ่านเซนเซอร์บนบอร์ด สัญญาณนี้จะ**ชนกับการโอนข้อมูล DFU** → คำสั่งสั้น ๆ ผ่านได้ แต่ data row พัง แล้วขึ้น error ประมาณนี้:

```
Operation FAILED.
Operation returned unknown value 16639
Error: write operation failed.
[CRITICAL] Error code: -2
Internal error occured. Please enable logging using --debug to get details.
```

อาการนี้ **ไม่ใช่**บอร์ดเสีย สายเสีย หรือไฟล์ผิด แต่เป็น **bus contention** จากแอป E84 ที่รันอยู่ — แก้โดยทำให้ E84 เงียบก่อน

### ลำดับที่ถูกต้อง — ห้ามข้าม / ห้ามสลับ

<table><thead><tr><th width="152.04296875">ขั้น</th><th>ทำอะไร</th><th>จุดประสงค์</th></tr></thead><tbody><tr><td>1</td><td>Erase แอป E84</td><td><strong>ปลดบัส I2C ให้ว่าง</strong></td></tr><tr><td>2</td><td>DFU flash 4000T ที่ <code>0x08</code>, 400 kHz</td><td>วิ่งจนจบเพราะบัสว่าง</td></tr><tr><td>3</td><td>Flash แอป E84 กลับ</td><td>คืนแอป <strong>เป็นขั้นสุดท้าย</strong></td></tr></tbody></table>

ถ้า program E84 **ก่อน** flash 4000T → DFU จะ fail ทุกครั้ง

***

### วิธีที่ 1 — คำสั่งเดียวจบ (script)

**ทุก OS (แนะนำ)** — ต้องมี Python 3:

```bash
python3 flash_capsense.py --program-after
```

**macOS / Linux** — bash:

```bash
./flash_capsense.sh --program-after
```

script จะ auto-detect KitProg3, เลือก DFU tool ที่รองรับ I2C, บังคับ HID mode, แล้วทำ: erase E84 → flash 4000T (มี retry) → program E84

<table><thead><tr><th width="262.17578125">Flag</th><th>ผล</th></tr></thead><tbody><tr><td><em>(ไม่ใส่)</em></td><td>erase E84, flash 4000T, ถามยืนยันก่อน erase</td></tr><tr><td><code>--yes</code></td><td>ข้ามการถามยืนยัน erase</td></tr><tr><td><code>--program-after</code></td><td>รัน program คืนแอป E84 ตอนจบให้ด้วย</td></tr><tr><td><code>--no-erase</code></td><td>flash อย่างเดียว (E84 ว่างอยู่แล้ว)</td></tr><tr><td><code>--dry-run</code></td><td>(python) แค่ตรวจหาเครื่องมือ + แสดงแผน ไม่ flash จริง</td></tr><tr><td><code>--file &#x3C;f.cyacd2></code></td><td>flash ไฟล์ image อื่น</td></tr></tbody></table>

***

### วิธีที่ 2 — ทำมือทั้งหมด (ไม่ต้องใช้ script)

ใช้วิธีนี้ถ้าอยากรันเองทีละขั้น สิ่งที่ต่างกันแต่ละ OS มีแค่ **ตำแหน่งของเครื่องมือ**

#### ตำแหน่งเครื่องมือ

<table><thead><tr><th width="147.515625">เครื่องมือ</th><th>Windows</th><th>macOS</th><th width="192.9375">Linux</th></tr></thead><tbody><tr><td><strong>DFU Host Tool</strong> (GUI/CLI)</td><td><code>C:\Users\&#x3C;you>\ModusToolbox\tools_3.x\dfuh-tool\</code></td><td><code>/Applications/ModusToolbox/tools_3.x/dfuh-tool/</code></td><td><code>~/ModusToolbox/tools_3.x/dfuh-tool/</code></td></tr><tr><td><strong>fw-loader</strong></td><td><code>...\ModusToolboxProgtools-1.x\fw-loader\bin\fw-loader.exe</code></td><td><code>/Applications/ModusToolboxProgtools-1.x/fw-loader/bin/fw-loader</code></td><td><code>~/...Progtools-1.x/fw-loader/bin/fw-loader</code></td></tr></tbody></table>

> แทน `3.x` / `1.x` ด้วยเวอร์ชันที่ติดตั้งจริง บน Windows ตัว CLI ชื่อ `dfuh-cli.exe` บน macOS/Linux ชื่อ `dfuh-cli` — **ใช้รุ่น 2.80** เพราะ **2.120+ ตัด I2C ออก**

#### ขั้น 1 — Erase แอป E84 (ปลดบัส I2C)

เปิด **ModusToolbox terminal** (Quick Panel → *Terminal* หรือ *modus-shell* บน Windows) ที่ project root `AIC-EEC_psoc-e84-e2-lvgl-bill` แล้วรัน:

```bash
make erase
```

(หรือใช้ launch config **Erase** ใน Quick Panel ของ IDE)

#### ขั้น 2 — ตั้ง KitProg3 เป็น HID mode (จำเป็นสำหรับ bridge I2C)

ก่อนอื่นหา serial (ส่วนที่ตามหลัง `KitProg3-`):

```bash
# จากโฟลเดอร์ dfuh-tool
dfuh-cli --display-hw        # มองหาบรรทัด:  I2C: KitProg3-<SERIAL>
```

แล้วจากโฟลเดอร์ fw-loader:

```bash
fw-loader --mode kp3-hid <SERIAL>
```

(โหมด `bulk` bridge I2C ไม่เสถียร)

#### ขั้น 3 — Flash 4000T

**ง่ายสุด ข้าม OS ได้ — ใช้ GUI:**

1. เปิด **Device Firmware Update Host Tool** (จาก Quick Panel หรือรัน `dfuh-tool` จากโฟลเดอร์ข้างบน)
2. **File:** เลือก `firmware/psoc4-csd-button-slider.cyacd2`
3. **Port:** `KitProg3-... - I2C` · **I2C address:** `8` · **Speed:** `400 kHz`
4. กด **Program** (ปิด serial terminal บน KitProg3 ให้หมดก่อน)

**หรือใช้ command line** (จากโฟลเดอร์ `dfuh-tool`):

```bash
dfuh-cli --i2c-address 8 --i2c-speed 400 \
         --hwid "KitProg3-<SERIAL>" \
         --program-device <path>/firmware/psoc4-csd-button-slider.cyacd2
```

ต้องได้ข้อความ: `Operation succeeded.`

#### ขั้น 4 — Flash แอป E84 กลับ (ขั้นสุดท้าย)

```bash
make program
```

***

### ข้อควรระวัง / อ้างอิง

* **ใช้ DFU Host Tool 2.80** (`tools_3.6`) เวอร์ชัน **2.120** (`tools_3.8`) **ตัด I2C-bridge ออกแล้ว** — `dfuh-cli --display-hw` จะไม่มีบรรทัด `I2C:` จึง flash ชิปนี้ไม่ได้ (script เลือกเวอร์ชันที่ใช้ได้ให้อัตโนมัติ)
* **KitProg3 ต้องอยู่ HID mode** (`fw-loader --mode kp3-hid`)
* **I2C address:** `0x08` = bootloader, `0x09` = application
* ถ้า 4000T **รัน application ไปแล้ว** (เคย flash สำเร็จ ยังไม่ reset) bootloader ที่ `0x08` อาจไม่ตอบ ให้ดึงกลับ bootloader ด้วย **Bridge Control Panel** (มากับ PSoC™ Programmer) ส่งคำสั่ง:

  ```
  w 09 01 EA 17 p
  ```
* ปิด serial terminal / โปรแกรมอื่นที่จับ KitProg3 ให้หมดก่อน flash


# Basic MCU Interfacing

> **Topics:**
>
> * Embedded System Architectures and Interfacing Techniques
> * GPIO
> * User Input / Output
> * Serial Terminal
> * ADC / PWM


# Introduction to CY8CKIT-062S2-43012 Pioneer Kit

<figure><img src="/files/hyRbLDdJuKaV4lJSjzBT" alt="" width="300"><figcaption><p>CY8CKIT-062S2-43012 Pioneer Kit</p></figcaption></figure>

&#x20;   PSoC™ 62S2 Wi-Fi BT Pioneer Kit (CY8CKIT-062S2-43012) is a feature rich hardware evaluation platform that enables development of applications based on the [**PSoC™ 62 series MCU**](https://www.infineon.com/cms/en/product/microcontroller/32-bit-psoc-arm-cortex-microcontroller/psoc-6-32-bit-arm-cortex-m4-mcu/psoc-62/). The kit also includes a wireless module based on the AIROC™ CYW43012 combo device to develop cloud connected IoT applications including Matter over Wi-Fi applications.

**Kit Features**

* Featuring the [**PSoC™ 6 CY8C62xA MCU**](https://www.infineon.com/dgdl/Infineon-PSOC_6_MCU_CY8C62X8_CY8C62XA-DataSheet-v18_00-EN.pdf?fileId=8ac78c8c7d0d8da4017d0ee7d03a70b1) (MPN: [CY8C624ABZI-S2D44](https://www.infineon.com/cms/en/product/microcontroller/32-bit-psoc-arm-cortex-microcontroller/psoc-6-32-bit-arm-cortex-m4-mcu/cy8c624abzi-s2d44/)): Ultra low power, high performance MCU based on the dual core CPU architecture of Arm® Cortex®-M4 and Arm® Cortex®-M0+, 2 MB of on-chip Flash, 1 MB of SRAM, built-in hardware and software security features, rich analog, digital, and communication peripherals
* Wireless module(Murata 1LV) based on Infineon’s AIROC™ CYW43012 device supporting 1x1 Dual-band Wi-Fi 4 (802.11n) + Bluetooth® 5.2 combo. The low power PSoC™ 6 and AIROC™ CYW43012 device is especially suited for battery operated IoT applications with PSoC™ 6 as the Wi-Fi host MCU.
* Support for Matter over Wi-Fi applications. More details available in [application note](https://www.infineon.com/dgdl/Infineon-AN237138_Getting_Started_with_Matter_over_Wi-Fi_on_PSoC6_MCUs_in_ModusToolbox-ApplicationNotes-v01_00-EN.pdf?fileId=8ac78c8c869190210187029c453e134c).
* Industry leading CAPSENSE™ featuring linear slider, and two buttons for prototyping elegant, robust capacitive touch-based user interfaces
* Headers compatible with Arduino Uno R3 for hardware expansion using Arduino shields
* Memory expansion through 512-Mbit Quad-SPI NOR Flash, 4-Mbit Quad SPI F-RAM, and microSD card interface
* Integrated on-board programmer / debugger, PDM microphone, thermistor, push buttons, LEDs
* PSoC™ 6 USB device and host functionality supported through a separate micro-B USB connector
* **Applicable MCU Families**: PSoC™ 6 CY8C62xA, CY8C62x8, CY8C61xA, CY8C61x8 MCUs

**Software Support**

* ModusToolbox™ software provides support for design and development of the applications using this kit. To download ModusToolbox software, please visit the [ModusToolbox](https://www.cypress.com/ModusToolbox)
* Board Support Package (BSP) repository - [TARGET\_CY8CKIT-062S2-43012](https://github.com/Infineon/TARGET_CY8CKIT-062S2-43012)
* Code examples available at Infineon’s [GitHub Repository](https://github.com/Infineon/Code-Examples-for-ModusToolbox-Software)

**Target Applications**

* Smart Home, Home Appliances
* Matter over Wi-Fi applications
* Wearables
* Industrial Automation
* Battery powered IoT products with cloud connectivity
* Edge compute applications for low sensor processing, machine learning

**Kit Contents**

* PSoC® 62S2 Wi-Fi BT Pioneer Board
* USB Type-A to Micro-B cable
* Quick Start Guide
* Jumper wires

***

Ref: <https://www.infineon.com/cms/en/product/evaluation-boards/cy8ckit-062s2-43012/>


# Development Environment Preparation

for Infineon PSoC 62S2 Wi-Fi BT Pioneer Kit

Requirements

![image](https://github.com/Advance-Innovation-Centre-AIC/Part-I-Basic-MCU-Interfacing/assets/88732241/a9cbaff6-f6a2-47f2-87ac-d4a9233b470f)

| Resources                                                                                                   | Link                                                                                   |
| ----------------------------------------------------------------------------------------------------------- | -------------------------------------------------------------------------------------- |
| Computer                                                                                                    | 💻                                                                                     |
| Infineon PSoC 62S2 Wi-Fi BT Pioneer Kit (CY8CKIT-062S2-43012) Wireless Development Tool CY8CKIT-062S2-43012 | [Link](https://www.infineon.com/cms/en/product/evaluation-boards/cy8ckit-062s2-43012/) |

## 1. ModusToolbox Installation

### 1.1 ModusToolbox Installation

**💻 System Requirement**

```
- Windows 7 64-bit / Windows 10 64-bit
- macOS10.x
- UbuntuLinux18LTS
```

**📀 Download the Software**

Go to the Cypress ModusToolbox website ([www.cypress.com/modustoolbox](https://softwaretools.infineon.com/tools/com.ifx.tb.tool.modustoolbox?_ga=2.97324886.898567723.1701071038-1695350571.1690950123&_gac=1.149377348.1699339824.Cj0KCQiAuqKqBhDxARIsAFZELmJBGzn0NpnZoC78O6mAXw2T9gyJFcrFV9kRyIIOKN3XTwKCBlGT1ZUaAsHVEALw_wcB)) and download your appropriate software from your platform:

```
- Windows:ModusToolbox_1.1.0.<build>-windows-install.exe
- Linux:ModusToolbox_1.1.0.<build>-linux-install.tar.gz
- macOS:ModusToolbox_1.1.0.<build>-osx-install.pkg
```

<figure><img src="/files/XQFoaQnsHqEXPhMFhSmh" alt="" width="563"><figcaption><p>For Windows</p></figcaption></figure>

<figure><img src="/files/fSAZ2MRLj56oQqjg6k2i" alt="" width="563"><figcaption><p>For MacOS</p></figcaption></figure>

### 1.2 Adding the BDH Code Template

* Open modus-shell

<figure><img src="/files/4NvOAE5KueHNkPQJXey3" alt=""><figcaption><p>modus-shell</p></figcaption></figure>

* Navigate to directory ModusToolbox and Adding the BDH code Template:

```
cd ~/.modustoolbox/
```

```
echo 'https://raw.githubusercontent.com/Advance-Innovation-Centre-AIC/mtb2-bdh-academy-manifests/master/bdh-academy-basic-app-super-manifest.xml' > ~/.modustoolbox/manifest.loc
```

<figure><img src="/files/HrEPNt1eEe86ERdNNLIh" alt=""><figcaption></figcaption></figure>

## 2. Eclipse IDE Development Tools and Project Creator

#### 2.1. Open ModusToolbox Tool

<figure><img src="/files/G5Llofb6BtUPm0dQgZ25" alt="" width="563"><figcaption><p>Open ModusToolbox</p></figcaption></figure>

#### 2.2. Click Eclipse IDE for ModbusToolbox

<figure><img src="/files/bOmmgXf9ighT1LnwJW7S" alt=""><figcaption></figcaption></figure>

#### 2.3. Click “New Application ” and it will automatically shell to Project Creator 2.0

<figure><img src="/files/Yc38JoEWafN6642NPTx7" alt=""><figcaption></figcaption></figure>

<figure><img src="/files/YlrOl2zWqwBm3Wrz2xC5" alt=""><figcaption></figcaption></figure>

#### 2.4. Click “PSoC6 BSP s” and follow the below step

<figure><img src="/files/NHtxRJTSdPpCj9SBUw7a" alt=""><figcaption></figcaption></figure>

#### 2.5. Go to “Getting Started”

<figure><img src="/files/VNI0pnu9IPeOnbq7gLNr" alt=""><figcaption></figcaption></figure>

## 3. “Hello World and LED Blinking” Programming.

#### 3.1. Choose “Hello World” project and you can setting any name you want

<figure><img src="/files/NvfPcCGW6L87AhJdzKoh" alt=""><figcaption></figcaption></figure>

#### 3.2. Building and running project by click

`Build Application` —> `[Project_Name] Program (KitProg3_MiniProg4)`

<figure><img src="/files/eMSGXWyvTR23tKpHIqTt" alt=""><figcaption></figcaption></figure>

## 🧮 Serial Studio Installation.

### 💻 For windows

* 👉 Go to Serial Studio download link: [https://serial-studio.github.io](https://serial-studio.github.io/) and click on `Install`.

<figure><img src="/files/0tF58kmxkTdOPiMJXVQB" alt="" width="563"><figcaption></figcaption></figure>

* 👉 Choose `SerialStudio-3.0.6-Windows.exe` &#x20;

<figure><img src="/files/e8qpAQQL35YYAEQnn9ey" alt=""><figcaption></figcaption></figure>

* 👉 Click on `Run anyway`&#x20;

<figure><img src="/files/kXZ4PKULWydyU0317crz" alt="" width="375"><figcaption></figcaption></figure>

* 👉 Click `Next`&#x20;

<figure><img src="/files/geoBud47oUPrxAQtszNi" alt="" width="228"><figcaption></figcaption></figure>

* 👉 Click `Install`&#x20;

<figure><img src="/files/knJObHVVWAAFgarVbWVY" alt="" width="229"><figcaption></figcaption></figure>

* 👉 Click `Finish`&#x20;

<figure><img src="/files/9xmleD2GSKHVQUbGdXgr" alt="" width="231"><figcaption></figcaption></figure>

* 😲 Now you can open and use Serial Studio Program&#x20;

<figure><img src="/files/SkttKr89wYNuqzYkM2Gx" alt=""><figcaption><p>Serial Studio</p></figcaption></figure>

### 💻 For MacOS

* Open this [link](https://github.com/Serial-Studio/Serial-Studio/releases/tag/v3.0.6) and click download SerialStudio-1.1.7-macOS.zip

  * ​[Serial-Studio-3.0.6-macOS-arm64.dmg](https://github.com/Serial-Studio/Serial-Studio/releases/download/v3.0.6/Serial-Studio-3.0.6-macOS-arm64.dmg) is for Macs with an M1 chip.
  * ​[Serial-Studio-3.0.6-macOS-x86\_64.dmg](https://github.com/Serial-Studio/Serial-Studio/releases/download/v3.0.6/Serial-Studio-3.0.6-macOS-x86_64.dmg) is for Macs with an Intel chip.

  <figure><img src="/files/XbR33zHbZiC54mXMKvwQ" alt=""><figcaption></figcaption></figure>
* 👉 When you’ve been downloaded, “Serial Studio” still cannot be opened in your computer due to the firmware hasn’t verified yet.&#x20;

<figure><img src="/files/pXjYaR8Dk2Z5tdYMt87p" alt="" width="563"><figcaption></figcaption></figure>

* 👉 Click “Cancel” and go to System Settings -→ Privacy & Security and scroll down until you see “Security” header&#x20;

<figure><img src="/files/jgnAukyTZZak2XPDVTyA" alt="" width="563"><figcaption></figcaption></figure>

* 👉 Click “Open Anyway” to unlock the verification from firmware&#x20;

<figure><img src="/files/rjuchJoEzgP7cPLR42Uq" alt="" width="563"><figcaption></figcaption></figure>

* 😲 Now you can open your program anytime&#x20;

<figure><img src="/files/YdrouWY5RpMFcSD7qUDx" alt=""><figcaption><p>Serial Studio</p></figcaption></figure>


# PSoC™ 6S2 Peripherals Interfacing (GPIO)

## *Adding the BDH's Code Template Repository*

### **🖥️** For windows&#x20;

#### 👉  *Open modus-shell 1.3.1*

<figure><img src="/files/7OsD5RoRJiGuSfIyuSPg" alt=""><figcaption><p>modus-shell</p></figcaption></figure>

#### 👉  *And follow the below steps*

```
cd ~/.modustoolbox/
```

<figure><img src="/files/F1UQmtQYFX9g9ujZfjLu" alt=""><figcaption></figcaption></figure>

```
echo 'https://raw.githubusercontent.com/Advance-Innovation-Centre-AIC/mtb2-bdh-academy-manifests/master/bdh-academy-super-manifest.xml' > ~/.modustoolbox/manifest.loc
```

<figure><img src="/files/mzhjWMYYYAvkjXsM9X85" alt=""><figcaption></figcaption></figure>

***

### **💻  For MacOS**

#### 👉  *Open terminal*

<figure><img src="/files/Ic5ez30zDST3QyhNwaIC" alt="" width="188"><figcaption></figcaption></figure>

#### 👉  *Adding the BDH Code Template*

```
$ cd 
$ cd ~/.modustoolbox/
$ echo 'https://raw.githubusercontent.com/Advance-Innovation-Centre-AIC/mtb2-bdh-academy-manifests/master/bdh-academy-super-manifest.xml' > ~/.modustoolbox/manifest.loc
```

<figure><img src="/files/KTHOF8Rmh3W49wTK2UoQ" alt=""><figcaption></figcaption></figure>

***


# Hello World and LED Blinking

Lab 100

## Hello World and LED Blinking Programming

This lab will guide you through the process of using the PSOC Infineon board with the Eclipse IDE for ModusToolbox. You will learn how to create, build, and launch application programs. By the end of this lab, you will be able to independently perform these tasks.

### 🔥 Requirements

| Resources                            | Links                                                                                                                                                                        |
| ------------------------------------ | ---------------------------------------------------------------------------------------------------------------------------------------------------------------------------- |
| Computer                             | 💻                                                                                                                                                                           |
| ModusToolbox™ software v3.0 or later | [Link](https://www.infineon.com/modustoolbox)                                                                                                                                |
| CY8CKIT-062S2-43012 Infineon Board   | [Link](https://github.com/Advance-Innovation-Centre-AIC/BIIL_MTB-100_Hello_World_and_LED_Blinking_Programming_Template/assets/88732241/0215501d-b774-4045-8e64-ef49e28d8404) |
| Technical Report                     | [dropbox](https://www.dropbox.com/scl/fi/amaxc94pte0ut2i1r5ewx/Technical-Report-Lab00.paper?rlkey=b3xm3vrerz9xgv1glb30cvy9z\&dl=0)                                           |

### 🚩 Let start

* 👉 Open Eclipse IDE ModusToolbox

<figure><img src="/files/O6mfHigUCcXmjY86s4Zu" alt=""><figcaption><p>Modus Toolbox GUI</p></figcaption></figure>

<figure><img src="https://github.com/Advance-Innovation-Centre-AIC/BIIL_MTB-100_Hello_World_and_LED_Blinking_Programming_Template/assets/88732241/276b5ee3-7752-488c-baa7-3b55f6615b27" alt=""><figcaption></figcaption></figure>

* 👉 Select Board<br>

  <figure><img src="https://github.com/Advance-Innovation-Centre-AIC/BIIL_MTB-100_Hello_World_and_LED_Blinking_Programming_Template/assets/88732241/df637b74-1bee-4c0c-9bdc-4b70d7f0cee8" alt="" width="563"><figcaption></figcaption></figure>
* 👉 Select Application<br>

  <figure><img src="https://github.com/Advance-Innovation-Centre-AIC/BIIL_MTB-100_Hello_World_and_LED_Blinking_Programming_Template/assets/88732241/3df6fbb2-eea7-4f1b-b09b-36d88f10ad2f" alt="" width="563"><figcaption></figcaption></figure>
* 👉 Build Application<br>

  <figure><img src="https://github.com/Advance-Innovation-Centre-AIC/BIIL_MTB-100_Hello_World_and_LED_Blinking_Programming_Template/assets/88732241/7c230ae2-b6ec-4acc-9713-9cb6325c834d" alt="" width="563"><figcaption></figcaption></figure>
* 👉 Launching Program
  * Before launching the program to the board, make sure that you have already connected the board to the computer through USB cable.<br>

    <figure><img src="https://github.com/Advance-Innovation-Centre-AIC/BIIL_MTB-100_Hello_World_and_LED_Blinking_Programming_Template/assets/88732241/7a6bb6ef-cb63-4613-98a1-42f9617ad724" alt="" width="375"><figcaption></figcaption></figure>
  * Launching Program<br>

    <figure><img src="https://github.com/Advance-Innovation-Centre-AIC/BIIL_MTB-100_Hello_World_and_LED_Blinking_Programming_Template/assets/88732241/e95bb346-1205-4e5f-a6d6-20ee60a2cd1d" alt="" width="563"><figcaption></figcaption></figure>
* 👉 Serial Terminal Setup
  * Download and Install Putty

    [Download link](https://www.putty.org/)&#x20;

    <figure><img src="https://github.com/Advance-Innovation-Centre-AIC/BIIL_MTB-100_Hello_World_and_LED_Blinking_Programming_Template/assets/88732241/d199b0a6-034b-4259-9662-5bd264aa5cd9" alt=""><figcaption></figcaption></figure>
  * After Install the Putty now let follow the below
    * Open `Device Manager` and check COM Port&#x20;

      <figure><img src="https://github.com/Advance-Innovation-Centre-AIC/BIIL_MTB-100_Hello_World_and_LED_Blinking_Programming_Template/assets/88732241/5ffc6e53-aa99-4be4-a8f6-b945c4ecc21a" alt="" width="563"><figcaption></figcaption></figure>
    * Open Putty and Setup as below:
      * Select `Serial`
      * Serial line `COM_`
      * Speed `115200`
      * Click `Open`<br>

        <figure><img src="https://github.com/Advance-Innovation-Centre-AIC/BIIL_MTB-100_Hello_World_and_LED_Blinking_Programming_Template/assets/88732241/aa8f838a-743b-4b5a-bd4f-ab5c2b951afa" alt="" width="375"><figcaption></figcaption></figure>
* 👉 Check the Result
  * You will see `Hello World!!!` on the serial terminal.<br>

    <figure><img src="https://github.com/Advance-Innovation-Centre-AIC/BIIL_MTB-100_Hello_World_and_LED_Blinking_Programming_Template/assets/88732241/2eb45911-1df7-4581-9e73-2e79c28364a5" alt="" width="563"><figcaption></figcaption></figure>
  * LED Blinking<br>

    <figure><img src="https://github.com/Advance-Innovation-Centre-AIC/BIIL_MTB-100_Hello_World_and_LED_Blinking_Programming_Template/assets/88732241/e43ee093-c57b-4d65-81a2-e8326e729b74" alt="" width="563"><figcaption><p>LED Blinking</p></figcaption></figure>

#### 🎉 Congratulations! You can now complete Lab100 by creating, building, and launching the application program.

***

### Supported toolchains (make variable 'TOOLCHAIN')

* GNU Arm® embedded compiler v10.3.1 (`GCC_ARM`) - Default value of `TOOLCHAIN`
* Arm® compiler v6.16 (`ARM`)
* IAR C/C++ compiler v9.30.1 (`IAR`)

### Supported kits (make variable 'TARGET')

* [PSoC™ 62S2 Wi-Fi Bluetooth® pioneer kit](https://www.infineon.com/CY8CKIT-062S2-43012) (`CY8CKIT-062S2-43012`)
* [PSoC™ 62S1 Wi-Fi Bluetooth® pioneer kit](https://www.infineon.com/CYW9P62S1-43438EVB-01) (`CYW9P62S1-43438EVB-01`)
* [PSoC™ 62S1 Wi-Fi Bluetooth® pioneer kit](https://www.infineon.com/CYW9P62S1-43012EVB-01) (`CYW9P62S1-43012EVB-01`)
* [PSoC™ 62S3 Wi-Fi Bluetooth® prototyping kit](https://www.infineon.com/CY8CPROTO-062S3-4343W) (`CY8CPROTO-062S3-4343W`)

***

© BDH Corporation, 2022-2023


# GPIO Principles

GPIOs are the interface between the PSoC:tm: and the outside world. They allow you to connect the PSoC:tm: to just about any type of external component, be it analog or digital. To enable this functionality, PSoC:tm: GPIOs can take on any one of 14 different drive modes. Each drive mode is a combination of of 7 output configurations along with the selection to enable or disable the input buffer. When enabled, the input buffer allows the CPU to directly read a digital value from the pin. The output configurations that PSoC:tm: GPIOs can take on are the following below.&#x20;

## Drive Mode

A drive mode is essentially a specific electrical configuration that a GPIO can take on. The PSoC:tm: GPIOs support seven primary drive modes:

### **Strong**

Used for digital outputs, able to pull the pin high or low. These are often used for LEDs.&#x20;

<div align="center"><figure><img src="/files/aqyFCmPoKihGKSCbOimB" alt=""><figcaption></figcaption></figure></div>

### **High Impedance**&#x20;

(High-Z) – Used for digital input pins and analog pins.

<figure><img src="/files/SL8zNZfCYEggoTn5pGB5" alt=""><figcaption></figcaption></figure>

### **Resistive Pull Up**&#x20;

Able to drive the pin low, but only pulls the pin high through a resistor so that an external source can force the pin low. These are often used for active low buttons.

<figure><img src="/files/fvg0K9ibYXCsou2FIcO5" alt=""><figcaption></figcaption></figure>

### **Resistive Pull Down**

Able to drive the high, but only pulls the pin low through a resistor so that an external source can force the pin high.

<figure><img src="/files/saGykqvtpfDBO8beiALB" alt=""><figcaption></figcaption></figure>

### **Open Drain Drives Low**

Able to drive the pin low, can be pulled high externally. These are often used for wired-or communication standards such as I2C.

<figure><img src="/files/14RpnkkBV38oRAERCUGe" alt=""><figcaption></figcaption></figure>

### **Open Drain Drives High**

Able to drive the pin high, can be pulled low externally.

<figure><img src="/files/Ry7DECszjpwdvn6bO9mK" alt=""><figcaption></figcaption></figure>

### **Resistive Pull Up and Down**

DC biases the pin, useful for some analog pins. Also allows external sources to force the pin to the opposite state.

<figure><img src="/files/OauQF8MftgaqoCnSmswk" alt=""><figcaption></figcaption></figure>

## External Components

### LED (Light Emitting Diode)

An LED is a device that glows when you pass electrical current through it. The brightness of the LED depends on the amount of current that passes through it. If you pass too much current through the LED it will blow up (think fire and smoke). In general, LEDs are connected in series with a resistor that limits the amount of current (remember Ohms law? V=IR... look at the schematics below). You can vary the brightness of an LED by either controlling the input voltage (which limits the current) or by "blinking" the LED faster than the human eye can see and varying the duty-cycle (see PWM). An LED is connected to a PSoCTM in one of two ways:

* <mark style="color:green;">**Active High**</mark> (driving the LED with a "1" lights it up)&#x20;
* <mark style="color:red;">**Active Low**</mark> (driving the LED with a "0" lights it up)

<figure><img src="/files/F3wWQqTL99P3c927mOc8" alt=""><figcaption></figcaption></figure>

### Mechanical switch (push-button)

<div align="center"><figure><img src="/files/JaQCTLD1lJMR1zGMTRoK" alt="" width="200"><figcaption><p>Push Button Switch</p></figcaption></figure></div>

A mechanical switch is an electromechanical device that electrically connects two terminals when it is in the closed position. A very common type of switch is a push-button. In this case, the terminals are connected when the button is pressed. When connecting a button to a PSoCTM, the pin is typically configured using a resistor that pulls the PSoCTM input to either Vdd or Vss. This is done so a separate resistor is not required on the board.&#x20;

On Infineon development kits, buttons are typically active low and do not have a separate resistor so the pin should be configured as an input with resistive pullup and the pin's initial state should be set to a 1 so that the pin will be pulled high when the button is not being pressed.

The circuit can be configured as:

* Active High (when the button is pressed the PSoCTM reads "1")
* Active Low (when the button is pressed the PSoCTM reads "0") The active low case is much more common.

The active low case is much more common.

<figure><img src="/files/McZQzXWZwmxjPG8CepX0" alt=""><figcaption></figcaption></figure>

### Potentiometer (a.k.a. pot)

<figure><img src="/files/vn925J10i1FpAOaRLGXc" alt="" width="182"><figcaption><p>Potentiometer</p></figcaption></figure>

A pot is a 3-terminal electromechanical (meaning that mechanical movements cause electrical actions) analog device. Two of its terminals normally connect to power and ground while the third terminal is used for output. The output terminal produces a voltage that varies between power and ground based on the position of the dial. Mechanically, a pot uses a sliding contact along a resistor to form an adjustable resistor voltage divider. A pot may be thought of as simply an analog voltage reference source.

The arrow in the pot schematic symbol represents the variable contact, controlled by turning the dial. As the contact slides toward the power rail (Vdd), the output voltage (Vout) rises higher. As the contact slides toward ground (Vss), Vout drops.

<figure><img src="/files/UawSde96m66GY4rzVf2d" alt=""><figcaption></figcaption></figure>

สำหรับการเขียนโปรแกรมติดต่อกับ GPIO บน PSoC:tm: ไม่ว่าจะเป็นการตั้งค่าเริ่มต้นให้กับแต่ละ pin (Pin Configuration and initialization) การอ่าน/เขียนข้อมูล (Read and Write Data) รวมถึงการทำให้ pin สามารถสร้างสัญญาณอินเทอร์รัพท์ (Interrupt Generation) ตามการเปลี่ยนของสัญญาณ (rising, falling หรือ ทั้งสองกรณี)

> ในกรณีที่ GPIO pin นั้นๆถูกใช้ในการสื่อสารหรือหน้าที่อื่นๆเช่น การสื่อสารผ่าน I²C หรือ PWM เป็นต้น ก็ไม่จำเป็นที่จะต้องกำหนดตามเงื่อนไขข้างต้น

ตัวแปรชนิด enum หลักๆที่จะถูกเรียกใช้ในการตั้งค่าเริ่มต้นให้กับ pin ได้แก่ [cyhal\_gpio\_direction\_t](https://infineon.github.io/mtb-hal-cat1/html/group__group__hal__gpio.html#ga54f023b4b455556095b64f4f5d7e3446)  จะใช้ในการกำหนดทิศทางข้อมูล (จะให้เป็น Input หรือ Output), [cyhal\_gpio\_drive\_mode\_t](https://infineon.github.io/mtb-hal-cat1/html/group__group__hal__gpio.html#ga2eb76143375648febb0ef73f00a681b2) จะใช้ในการกำหนดโหมดการขับ ([drive mode](#drive-mode)) และ [cyhal\_gpio\_event\_t](https://infineon.github.io/mtb-hal-cat1/html/group__group__hal__gpio.html#gaa18cb21d1ea9d64311a7c8ddc6a27656) สำหรับการกำหนดการสร้างสัญญาณอินเทอร์รัพท์เมื่อเกิดเหตุการณ์ใดๆ กับ pin นั้นๆ (GPIO events) เพื่อไปเรียกฟังก์ชันเป้าหมายที่กำหนดไว้ (callback) &#x20;

โดยฟังก์ชันที่จะกำหนดลักษณะของการทำงานเริ่มต้นให้แต่ละ pin จะได้แก่ฟังก์ชัน [cyhal\_gpio\_init](https://infineon.github.io/mtb-hal-cat1/html/group__group__hal__gpio.html#gab93322030909d3af6a9fc1a3b2eccbaa) โดยจะมีการระบุหมายเลข pin, pin direction, pin drive mode และค่าสถานะของ pin เริ่มต้น (initial value) ดังตัวอย่างข้างล่าง

```c
cy_rslt_t rslt;
bool read_val;
bool write_val = true;
 
// Initialize pin P0_0 as an input
rslt = cyhal_gpio_init(P0_0, CYHAL_GPIO_DIR_INPUT, CYHAL_GPIO_DRIVE_NONE, false);

// Initialize pin P0_1 GPIO as an output with strong drive mode and initial value = false (low)
rslt = cyhal_gpio_init(P0_1, CYHAL_GPIO_DIR_OUTPUT, CYHAL_GPIO_DRIVE_STRONG, false);
 
// Read the logic level on the input pin
read_val = cyhal_gpio_read(P0_0);

// Write the value to the output pin
cyhal_gpio_write(P0_1, write_val);
```

ตัวอย่างการกำหนดการสร้างสัญญาณ interrupt

```c
uint32_t global_count = 0;
cyhal_gpio_callback_data_t cb_data =
{
    .callback     = gpio_interrupt_handler,
    .callback_arg = (void*)&global_count
};
 
// Interrupt handler callback function
void gpio_interrupt_handler(void* handler_arg, cyhal_gpio_event_t event)
{
    CY_UNUSED_PARAMETER(event);
    // Increment global_count (passed as handler_arg) using a pointer
    uint32_t* count = (uint32_t*)handler_arg;
    *count = *count + 1;
 
    // Toggle pin P0_1 on every interrupt
    cyhal_gpio_toggle(P0_1);
}
 
cy_rslt_t snippet_cyhal_gpio_interrupt()
{
    cy_rslt_t rslt;
 
    // Initialize pin P0_0 GPIO as an input pin
    rslt = cyhal_gpio_init(P0_0, CYHAL_GPIO_DIR_INPUT, CYHAL_GPIO_DRIVE_NONE, false);
 
    // Initialize pin P0_1 GPIO as an output with strong drive mode and initial value = true (high)
    if (CY_RSLT_SUCCESS == rslt)
    {
        rslt = cyhal_gpio_init(P0_1, CYHAL_GPIO_DIR_OUTPUT, CYHAL_GPIO_DRIVE_STRONG, true);
    }
 
 
    if (CY_RSLT_SUCCESS == rslt)
    {
        // Register callback function - gpio_interrupt_handler and pass the value global_count
        cyhal_gpio_register_callback(P0_0, &cb_data);
 
        // Enable falling edge interrupt event with interrupt priority set to 3
        cyhal_gpio_enable_event(P0_0, CYHAL_GPIO_IRQ_FALL, 3, true);
    }
 
    return rslt;
}
```

{% hint style="info" %}
***Ref**: ModusToolboxTM Software Training - Level 2 – PSoCTM MCUs*
{% endhint %}


# PSoC™ 6S2 GPIO-HAL LED Blink Lab

Lab 107

## GPIO-HAL LED Blink Lab

### *Lab Objective:*

The objective of this lab is to familiarize students with the basic concepts of GPIO (General Purpose Input Output) using a PSoC 6 microcontroller from Cypress (CY8CKIT-062S2-43012 Infineon Board). By the end of this lab, students should be able to initialize GPIOs, manipulate GPIO states, and create basic delay functions.

### *Lab Description:*

In this lab, students will be tasked with programming a PSoC 6 microcontroller to control an LED through a GPIO. The LED will be made to blink at a regular interval, demonstrating basic GPIO output functionality.

### *The code will:*

1. Initialize the board and all necessary peripherals.
2. Initialize a GPIO pin (connected to the LED) as an output.
3. Create an infinite loop where it:
   * Drives the LED GPIO pin low, turning the LED on.
   * Waits for 250 milliseconds.
   * Drives the LED GPIO pin high, turning the LED off.
   * Waits for another 250 milliseconds. This sequence will result in the LED blinking on and off every 250 milliseconds.

## 🔥 Requirements

<table><thead><tr><th width="421">Resources</th><th>Links</th></tr></thead><tbody><tr><td>Computer</td><td>💻</td></tr><tr><td>ModusToolbox™ software v3.0 or later</td><td><a href="https://www.infineon.com/modustoolbox">Link</a></td></tr><tr><td>CY8CKIT-062S2-43012 Infineon Board</td><td><a href="https://github.com/Advance-Innovation-Centre-AIC/BIIL_MTB-100_Hello_World_and_LED_Blinking_Programming_Template/assets/88732241/0215501d-b774-4045-8e64-ef49e28d8404">Link</a></td></tr><tr><td>Technical Report</td><td><a href="https://www.dropbox.com/scl/fi/amaxc94pte0ut2i1r5ewx/Technical-Report-Lab00.paper?rlkey=b3xm3vrerz9xgv1glb30cvy9z&#x26;dl=0">dropbox</a></td></tr></tbody></table>

## 🚩 Let start

### Create Application

* 👉 Open Eclipse IDE ModusToolbox<br>

  <figure><img src="https://github.com/Advance-Innovation-Centre-AIC/BIIL_MTB-100_Hello_World_and_LED_Blinking_Programming_Template/assets/88732241/276b5ee3-7752-488c-baa7-3b55f6615b27" alt=""><figcaption></figcaption></figure>
* 👉 Select Board<br>

  <figure><img src="https://github.com/Advance-Innovation-Centre-AIC/BIIL_MTB-100_Hello_World_and_LED_Blinking_Programming_Template/assets/88732241/df637b74-1bee-4c0c-9bdc-4b70d7f0cee8" alt=""><figcaption></figcaption></figure>
* 👉 Select Application

<figure><img src="/files/61Xqyx0Is4d6cSey5r0J" alt=""><figcaption></figcaption></figure>

### Coding

* 👉 Add Code to the main() in main.c file:&#x20;

<figure><img src="/files/Q3NMhQWtfZEGpLDVAkLF" alt="" width="375"><figcaption><p>main.c file</p></figcaption></figure>

```c
// Add loop
for (;;)
{
  	 /* Drive CYBSP_USER_LED low (LED on) */
	cyhal_gpio_write(CYBSP_USER_LED, 0);

	/* Wait 250 ms */
	cyhal_system_delay_ms(250);

	/* Drive CYBSP_USER_LED high (LED off) */
	cyhal_gpio_write(CYBSP_USER_LED, 1);

	/* Wait 250 ms */
	cyhal_system_delay_ms(250);
}
```

* `for (;;) { ... }`: This is an infinite loop. Everything within this loop will be repeated indefinitely. This is common in embedded systems where the program is meant to run until the device is powered off.
* `cyhal_gpio_write(CYBSP_USER_LED, 0);`: This sets the state of the CYBSP\_USER\_LED GPIO pin to low (0 volts), which typically turns the LED on.
* `cyhal_system_delay_ms(250);`: This waits for 250 milliseconds.
* `cyhal_gpio_write(CYBSP_USER_LED, 1);`: This sets the state of the CYBSP\_USER\_LED GPIO pin to high (usually 3.3 or 5 volts, depending on the microcontroller), which typically turns the LED off.&#x20;
* `cyhal_system_delay_ms(250);`: This waits for another 250 milliseconds.

> This sequence makes the LED blink - it will be on for a quarter of a second, then off for a quarter of a second, continuously.

### Build the Application

* 👉 Build Application

<figure><img src="/files/HMZqReYrBCgTyxONptHA" alt=""><figcaption></figcaption></figure>

### Launching the Application

* 👉 Launching Program
  * Before launching the program to the board, make sure that you have already connected the board to the computer through a USB cable.<br>

    <figure><img src="https://github.com/Advance-Innovation-Centre-AIC/BIIL_MTB-100_Hello_World_and_LED_Blinking_Programming_Template/assets/88732241/7a6bb6ef-cb63-4613-98a1-42f9617ad724" alt="" width="188"><figcaption></figcaption></figure>
  * Launching Program

<figure><img src="/files/gfN9s2If1mPQz85UOpPS" alt="" width="475"><figcaption></figcaption></figure>

* 👉 Check the Result

<figure><img src="/files/UDGGEDzADR54AEIBWDM3" alt="" width="375"><figcaption><p>You will see the LED blinking with a 250ms delay.</p></figcaption></figure>

#### 🎉 Congratulations! You can now complete Lab101

### Supported toolchains (make variable 'TOOLCHAIN')

* GNU Arm® embedded compiler v10.3.1 (`GCC_ARM`) - Default value of `TOOLCHAIN`
* Arm® compiler v6.16 (`ARM`)
* IAR C/C++ compiler v9.30.1 (`IAR`)

### Supported kits (make variable 'TARGET')

* [PSoC™ 62S2 Wi-Fi Bluetooth® pioneer kit](https://www.infineon.com/CY8CKIT-062S2-43012) (`CY8CKIT-062S2-43012`)
* [PSoC™ 62S1 Wi-Fi Bluetooth® pioneer kit](https://www.infineon.com/CYW9P62S1-43438EVB-01) (`CYW9P62S1-43438EVB-01`)
* [PSoC™ 62S1 Wi-Fi Bluetooth® pioneer kit](https://www.infineon.com/CYW9P62S1-43012EVB-01) (`CYW9P62S1-43012EVB-01`)
* [PSoC™ 62S3 Wi-Fi Bluetooth® prototyping kit](https://www.infineon.com/CY8CPROTO-062S3-4343W) (`CY8CPROTO-062S3-4343W`)

## Related resources

| Resources                       | Links                                                                                                                                                      |
| ------------------------------- | ---------------------------------------------------------------------------------------------------------------------------------------------------------- |
| ModusToolbox™ Software Training | [link](https://www.dropbox.com/sh/waj898o4o8eccx0/AAB3hBBaIQo2OvJ5-fubGJIha/training-modustoolbox-level1-getting-started-master/Manual/Ch2-Tools.pdf?dl=0) |

## Other resources

Infineon provides a wealth of data at [www.infineon.com](http://www.infineon.com) to help you select the right device, and quickly and effectively integrate it into your design.

## Document history

Document title: *BILL\_MTB-101* – *GPIO LED Blink Template*

<table><thead><tr><th width="156">Version</th><th>Description of change</th></tr></thead><tbody><tr><td>1.0.0</td><td>Lab101: Introduction to GPIO control with PSoC 6, featuring an LED blinking .</td></tr></tbody></table>

## Authors:

* *Assoc. Prof. Wiroon Sriborrirux*
* *Mr. Sriengchhun Chheang*
* *Mr. Sabol Socare*

***

© BDH Corporation, 2022-2023


# PSoC™ 6S2 GPIO-PDL LED Blink Lab

Lab 102

## GPIO-PDL LED Blink Lab

### *Lab Objective:*

The purpose of this lab is to offer students a hands-on understanding of GPIO (General Purpose Input Output) implementation using the PSoC 6 microcontroller from Cypress (CY8CKIT-062S2-43012 Infineon Board). Upon completing this lab, students will be proficient in initializing GPIOs, controlling GPIO states, and developing basic delay functions.

### *Lab Description:*

This lab instructs students to program a PSoC 6 microcontroller to manage an LED through a GPIO, employing the GPIO-PDL (Peripheral Driver Library). The task will demonstrate the core functionality of GPIO output.

### *The code will:*

* Initialize the device and necessary board peripherals.
* Set up a GPIO pin (connected to the LED) as an output utilizing GPIO-PDL functions.
* Establish an endless loop that will:
  * Drive the pin low
  * Wait 250 ms
  * Drive the pin high
  * Wait 250 ms This sequence will lead to the LED blinking on and off every half-second (250ms on, 250ms off), showcasing an elementary control of GPIO output through GPIO-PDL.
    * *Note:* [*See the PDL API documentation for the GPIO functions to drive the pin high and low.*](https://infineon.github.io/mtb-hal-cat1/html/group__group__hal__gpio.html#nested-classes)
    * *Note: Use the `Cy_SysLib_Delay` function for the delay.*

## 🔥 Requirements

<table><thead><tr><th width="429">Resources</th><th>Links</th></tr></thead><tbody><tr><td>Computer</td><td>💻</td></tr><tr><td>ModusToolbox™ software v3.0 or later</td><td><a href="https://www.infineon.com/modustoolbox">Link</a></td></tr><tr><td>CY8CKIT-062S2-43012 Infineon Board</td><td><a href="https://github.com/Advance-Innovation-Centre-AIC/BIIL_MTB-100_Hello_World_and_LED_Blinking_Programming_Template/assets/88732241/0215501d-b774-4045-8e64-ef49e28d8404">Link</a></td></tr><tr><td>Technical Report</td><td><a href="https://www.dropbox.com/scl/fi/amaxc94pte0ut2i1r5ewx/Technical-Report-Lab00.paper?rlkey=b3xm3vrerz9xgv1glb30cvy9z&#x26;dl=0">dropbox</a></td></tr></tbody></table>

## 🚩 Let start

### Create Application

* 👉 Open Eclipse IDE ModusToolbox<br>

<figure><img src="https://github.com/Advance-Innovation-Centre-AIC/BIIL_MTB-100_Hello_World_and_LED_Blinking_Programming_Template/assets/88732241/276b5ee3-7752-488c-baa7-3b55f6615b27" alt=""><figcaption></figcaption></figure>

* 👉 Select Board

![image](https://github.com/Advance-Innovation-Centre-AIC/BIIL_MTB-100_Hello_World_and_LED_Blinking_Programming_Template/assets/88732241/df637b74-1bee-4c0c-9bdc-4b70d7f0cee8)

* 👉 Select Application<br>

  <figure><img src="https://github.com/Advance-Innovation-Centre-AIC/BIIL_MTB-102_GPIO-PDL_LED_Blink_Template/assets/88732241/662a9e38-6f1b-4558-b8b7-49ed8cc1d42b" alt=""><figcaption></figcaption></figure>

### Device Configuration  for initializing LED and UART pin

#### Open Device Configuration to initialize LED Pin

<figure><img src="/files/VzZJypJgTpdOHvgCpuUw" alt="" width="563"><figcaption></figcaption></figure>

* Find Pin and search for `led` then select the `P1[5]`<br>

  <figure><img src="https://github.com/Advance-Innovation-Centre-AIC/BIIL_MTB-102_GPIO-PDL_LED_Blink_Template/assets/88732241/5f516394-f05e-43e3-b0f7-2eb7daf2d8a6" alt=""><figcaption></figcaption></figure>
* Set the pins `Drive Mode` parameter to [`Strong Drive Input buffer off`](/biil_psoc6/basic-mcu-interfacing/psoc-tm-6s2-peripherals-interfacing-gpio/gpio-principles#strong).<br>

  <figure><img src="https://github.com/Advance-Innovation-Centre-AIC/BIIL_MTB-102_GPIO-PDL_LED_Blink_Template/assets/88732241/a3fe848a-4396-4788-8ead-0afce0b0ddbd" alt=""><figcaption></figcaption></figure>

#### &#x20;Initialize debug UART

<figure><img src="/files/EZxDWUvcfoeLWUlf107F" alt=""><figcaption></figcaption></figure>

<figure><img src="/files/2Sl0YQkc7URHfVI00usC" alt=""><figcaption></figcaption></figure>

### Coding

* Coding: Open the main.c file and add the following code to the main() function.

```
for (;;)
  {
        /* Drive the USER LED pin high (LED off) */
      	Cy_GPIO_Set(CYBSP_USER_LED_PORT, CYBSP_USER_LED_NUM);
      
        /* Wait 250 ms */
    	Cy_SysLib_Delay(250U);
    
        /* Drive the USER LED pin low (LED on) */
    	Cy_GPIO_Clr(CYBSP_USER_LED_PORT, CYBSP_USER_LED_NUM);
    
        /* Wait 250 ms */
	Cy_SysLib_Delay(250U);
  }
```

* `for (;;)` This line starts an infinite loop. The code contained within the curly braces {} will repeat indefinitely.
* `Cy_GPIO_Set(CYBSP_USER_LED_PORT, CYBSP_USER_LED_NUM);`sets the GPIO pin specified by CYBSP\_USER\_LED\_PORT and CYBSP\_USER\_LED\_NUM to a high state, turning off the LED.&#x20;
* `Cy_SysLib_Delay(250U);` introduces a delay of 250 milliseconds, causing a pause in the execution of the program. This delay is implemented using a system library function.
* `Cy_GPIO_Clr(CYBSP_USER_LED_PORT, CYBSP_USER_LED_NUM);` clears (sets to a low state) the GPIO pin specified by CYBSP\_USER\_LED\_PORT and CYBSP\_USER\_LED\_NUM, turning On the LED.&#x20;
* Another `Cy_SysLib_Delay(250U);` introduces another delay of 250 milliseconds.

*This sequence of code turns on the LED, waits for 250 milliseconds, turns off the LED, and then waits for another 250 milliseconds. The cycle then repeats, creating a blinking effect for the LED.*

### Build the Application

* 👉 Build the Application

<figure><img src="/files/d3YNRkwCAKqYcwecdmsj" alt=""><figcaption></figcaption></figure>

### Launching the Application

* 👉 Launching the Application
  * Before launching the program to the board, make sure that you have already connected the board to the computer through a USB cable.<br>

    <figure><img src="https://github.com/Advance-Innovation-Centre-AIC/BIIL_MTB-100_Hello_World_and_LED_Blinking_Programming_Template/assets/88732241/7a6bb6ef-cb63-4613-98a1-42f9617ad724" alt="" width="188"><figcaption></figcaption></figure>
  * Launching Program<br>

    <figure><img src="https://github.com/Advance-Innovation-Centre-AIC/BIIL_MTB-102_GPIO-PDL_LED_Blink_Template/assets/88732241/efee18cb-0e32-4d4e-93d1-6dd0ee609140" alt=""><figcaption></figcaption></figure>
* 👉 Check the Result&#x20;

  <figure><img src="https://github.com/Advance-Innovation-Centre-AIC/BIIL_MTB-102_GPIO-PDL_LED_Blink_Template/assets/88732241/7d1bbd14-4157-4f9c-823d-e8f147dfea2e" alt="" width="375"><figcaption></figcaption></figure>

> #### 🎉 <mark style="color:blue;">Congratulations! You can now complete Lab102</mark>

## Supported toolchains (make variable 'TOOLCHAIN')

* GNU Arm® embedded compiler v10.3.1 (`GCC_ARM`) - Default value of `TOOLCHAIN`
* Arm® compiler v6.16 (`ARM`)
* IAR C/C++ compiler v9.30.1 (`IAR`)

## Supported kits (make variable 'TARGET')

* [PSoC™ 62S2 Wi-Fi Bluetooth® pioneer kit](https://www.infineon.com/CY8CKIT-062S2-43012) (`CY8CKIT-062S2-43012`)
* [PSoC™ 62S1 Wi-Fi Bluetooth® pioneer kit](https://www.infineon.com/CYW9P62S1-43438EVB-01) (`CYW9P62S1-43438EVB-01`)
* [PSoC™ 62S1 Wi-Fi Bluetooth® pioneer kit](https://www.infineon.com/CYW9P62S1-43012EVB-01) (`CYW9P62S1-43012EVB-01`)
* [PSoC™ 62S3 Wi-Fi Bluetooth® prototyping kit](https://www.infineon.com/CY8CPROTO-062S3-4343W) (`CY8CPROTO-062S3-4343W`)

## Related resources

| Resources                       | Links                                                                                                                                                      |
| ------------------------------- | ---------------------------------------------------------------------------------------------------------------------------------------------------------- |
| ModusToolbox™ Software Training | [link](https://www.dropbox.com/sh/waj898o4o8eccx0/AAB3hBBaIQo2OvJ5-fubGJIha/training-modustoolbox-level1-getting-started-master/Manual/Ch2-Tools.pdf?dl=0) |

## Other resources

Infineon provides a wealth of data at [www.infineon.com](http://www.infineon.com) to help you select the right device, and quickly and effectively integrate it into your design.

## Document history

Document title: *BILL\_MTB-102* – *GPIO-PDL LED Blink Template*

<table><thead><tr><th width="149">Version</th><th>Description of change</th></tr></thead><tbody><tr><td>1.0.0</td><td>Lab 102: Learn basic GPIO control with PSoC 6 using GPIO PDL and implement an LED blinker.</td></tr></tbody></table>

## Authors:

* *Assoc. Prof. Wiroon Sriborrirux*
* *Mr. Sriengchhun Chheang*
* *Mr. Sabol Socare*<br>

<br>

***

© BDH Corporation, 2022-2023


# Button "Bounce" Principles

การเชื่อมต่อ push button switch เพื่อเป็นอินพุตไปยังไมโครคอนโทรลเลอร์เป็นเรื่องที่ไม่ยาก แต่ก็จะเกิดปัญหาในบางครั้ง ซึ่ง ปัญหาหลักคือสวิตช์จะมีการกระเด้ง (Bouncing) ซึ่งหมายถึง เมื่อมีการกด (หรือปล่อย) push button switch มันจะมักเปลี่ยนระดับสองครั้งก่อนที่จะคงที่ที่ระดับใหม่ ดังนั้นถ้าเชื่อมต่อสวิตช์กับขาที่เปิดใช้งาน interrupt ภายนอก เมื่อมีการกดปุ่มครั้งเดียว มีโอกาสที่จะได้รับสัญญาณ interrupts หลายครั้งซ้อนกัน ทำให้โปรแกรมอาจจะเข้าใจผิดว่ามีการกดเกิดขึ้นหลายครั้ง โดยทั่วไปประมาณ 10 ถึง 100 ครั้งในช่วงเวลาประมาณ 1 มิลลิวินาที *("The Art of electronics", Horowitz & Hill, Second edition, p. 506)* ดังแสดงในรูป

<figure><img src="/files/DTOOeOuaB5MqGIMb7MHt" alt=""><figcaption></figcaption></figure>

หนึ่งในเทคนิคที่ถูกนำใช้เพื่อจัดการกับปัญหานี้คือ ให้มีการตรวจสอบ (check/poll) ค่าสถานะของ push button switch เป็นระยะๆ และตัดสินใจว่า push button switch ได้ถูกกดอยู่ ถ้าหากมันอยู่ในสถานะที่ถูกกดเป็นครั้งที่สอง

ดังนั้นเมื่อมีการเชื่อมต่อ push button switch กับขาอินพุตบนไมโครคอนโทรเลอร์ เราจำเป็นต้องมีการกำหนดสถานะที่ชัดเจนทั้งในกรณีที่สวิตช์เปิดและเมื่อสวิตช์ปิด สามารถทำได้ด้วยตัวต้านทานที่ดึงขาพอร์ตในทิศทางหนึ่งเมื่อปุ่มเปิด เราสามารถเลือกการตั้งค่าที่มีสถานะสูงหรือสถานะต่ำ

<figure><img src="/files/Zo7CxA8aba9pfME2EUjz" alt=""><figcaption></figcaption></figure>

เนื่องจากไมโครคอนโทรเลอร์ มีตัวต้านทาน pull-up ภายใน เรามักจะเลือกการตั้งค่าที่มีสถานะต่ำที่แสดงอยู่ทางซ้ายในภาพ เราสามารถข้ามตัวต้านทานภายนอกและเปิดใช้งานตัวต้านทาน pull-up ภายในแทน


# Push/Pull Button to Turn ON/OFF LED via HAL

Lab103

## *Lab Objective:*

&#x20;   In this lab, participants will harness the Hardware Abstraction Layer (HAL) to interface with a push/pull button connected to the Infineon PSoC 6 microcontroller. Upon pressing the button, participants will program the microcontroller to toggle an LED's state between ON and OFF. This hands-on activity aims to familiarize participants with basic input/output operations, demonstrating real-time hardware interactions and the effective use of HAL for device control.

## 🔥 Requirements

<table><thead><tr><th width="429">Resources</th><th>Links</th></tr></thead><tbody><tr><td>Computer</td><td>💻</td></tr><tr><td>ModusToolbox™ software v3.0 or later</td><td><a href="https://www.infineon.com/modustoolbox">Link</a></td></tr><tr><td>CY8CKIT-062S2-43012 Infineon Board</td><td><a href="https://github.com/Advance-Innovation-Centre-AIC/BIIL_MTB-100_Hello_World_and_LED_Blinking_Programming_Template/assets/88732241/0215501d-b774-4045-8e64-ef49e28d8404">Link</a></td></tr><tr><td>Technical Report</td><td><a href="https://www.dropbox.com/scl/fi/amaxc94pte0ut2i1r5ewx/Technical-Report-Lab00.paper?rlkey=b3xm3vrerz9xgv1glb30cvy9z&#x26;dl=0">dropbox</a></td></tr></tbody></table>

## 🚩 Let start

### Create Application

* 👉 Open Eclipse IDE ModusToolbox

<figure><img src="/files/UuVJgdSBpbjszmTGLqD5" alt=""><figcaption><p>Select board and Application</p></figcaption></figure>

### Hardware Abstraction Layer (HAL) API

Open Hardware Abstraction Layer (HAL) API to see the functions that use for GPIO Pin

<figure><img src="/files/eFG0VlQDT8ZEoSne003I" alt=""><figcaption><p>HAL API documentation </p></figcaption></figure>

The `HAL API` documentation provides a comprehensive set of functions to interact with the board efficiently. This API documentation offers detailed guidance on utilizing various functionalities to optimize your development process.

### Coding

* Coding: Open the main.c file and add the following code to the main(void) function.

```c
int main(void)
{
    cy_rslt_t result;

    /* Initialize the device and board peripherals */
    result = cybsp_init() ;
    /*BSP init failed. Stop program execution */
    if (result != CY_RSLT_SUCCESS)
    {
        CY_ASSERT(0);
    }
    __enable_irq();


    /* Initialize the User LED */
    cyhal_gpio_init(CYBSP_USER_LED, CYHAL_GPIO_DIR_OUTPUT, CYHAL_GPIO_DRIVE_STRONG, CYBSP_LED_STATE_ON);

    /* Initialize the user button */
    cyhal_gpio_init(CYBSP_USER_BTN, CYHAL_GPIO_DIR_INPUT, CYHAL_GPIO_DRIVE_PULLDOWN, CYBSP_BTN_OFF);

    /* Initialize retarget-io to use the debug UART port. It sets up the standard input/output functions (such as printf)*/
    cy_retarget_io_init(CYBSP_DEBUG_UART_TX, CYBSP_DEBUG_UART_RX, CY_RETARGET_IO_BAUDRATE);

    printf("\x1b[2J\x1b[;H");

    for (;;)
    {
    	//Button is active low
    	if(!cyhal_gpio_read(CYBSP_USER_BTN)){
            // Button is pressed
            cyhal_gpio_write(CYBSP_USER_LED, CYBSP_LED_STATE_ON);
            printf("Button Pressed --> LED ON \r\n");
            cyhal_system_delay_ms(250);
        }

        else {
            // Button is not pressed
            cyhal_gpio_write(CYBSP_USER_LED, CYBSP_LED_STATE_OFF);
            printf("Button not Pressed --> LED OFF \r\n");
            cyhal_system_delay_ms(250);
        }
    }
}
```

<figure><img src="/files/uis5EBiyFEWLPSgOYgry" alt=""><figcaption><p>Here is the sample functions that we use from the HAL API documentation</p></figcaption></figure>

### Build the Application

* 👉 Build the Application

<figure><img src="/files/1wh3YO8tuhZkFDwZnvsW" alt="" width="491"><figcaption></figcaption></figure>

### Launching the Application

* 👉 Launching the Application

  * Before launching the program to the board, make sure that you have already connected the board to the computer through a USB cable.<br>

    <figure><img src="https://github.com/Advance-Innovation-Centre-AIC/BIIL_MTB-100_Hello_World_and_LED_Blinking_Programming_Template/assets/88732241/7a6bb6ef-cb63-4613-98a1-42f9617ad724" alt="" width="188"><figcaption><p>set up USB cable</p></figcaption></figure>
  * Launching Program

  <figure><img src="/files/LlhAJSxjwCZfUsuwwn4F" alt="" width="563"><figcaption></figcaption></figure>
* 👉 Check the Result&#x20;

<figure><img src="/files/absRBc6EgaGSISyRTaZ7" alt=""><figcaption></figcaption></figure>

> #### 🎉 <mark style="color:blue;">Congratulations! You can now complete Lab103</mark>

## Supported toolchains (make variable 'TOOLCHAIN')

* GNU Arm® embedded compiler v10.3.1 (`GCC_ARM`) - Default value of `TOOLCHAIN`
* Arm® compiler v6.16 (`ARM`)
* IAR C/C++ compiler v9.30.1 (`IAR`)

## Supported kits (make variable 'TARGET')

* [PSoC™ 62S2 Wi-Fi Bluetooth® pioneer kit](https://www.infineon.com/CY8CKIT-062S2-43012) (`CY8CKIT-062S2-43012`)
* [PSoC™ 62S1 Wi-Fi Bluetooth® pioneer kit](https://www.infineon.com/CYW9P62S1-43438EVB-01) (`CYW9P62S1-43438EVB-01`)
* [PSoC™ 62S1 Wi-Fi Bluetooth® pioneer kit](https://www.infineon.com/CYW9P62S1-43012EVB-01) (`CYW9P62S1-43012EVB-01`)
* [PSoC™ 62S3 Wi-Fi Bluetooth® prototyping kit](https://www.infineon.com/CY8CPROTO-062S3-4343W) (`CY8CPROTO-062S3-4343W`)

## Related resources

| Resources                       | Links                                                                                                                                                      |
| ------------------------------- | ---------------------------------------------------------------------------------------------------------------------------------------------------------- |
| ModusToolbox™ Software Training | [link](https://www.dropbox.com/sh/waj898o4o8eccx0/AAB3hBBaIQo2OvJ5-fubGJIha/training-modustoolbox-level1-getting-started-master/Manual/Ch2-Tools.pdf?dl=0) |

## Other resources

Infineon provides a wealth of data at [www.infineon.com](http://www.infineon.com) to help you select the right device, and quickly and effectively integrate it into your design.

## Document history

Document title: *BILL\_MTB-103* – *GPIO-HAL Button with LED Template*<br>

<table><thead><tr><th width="149">Version</th><th>Description of change</th></tr></thead><tbody><tr><td>1.0.0</td><td>Lab 103: Learn basic GPIO control with PSoC 6 using Push/Pull Button to Turn ON/OFF LED via HAL</td></tr></tbody></table>

## Authors:

* *Assoc. Prof. Wiroon Sriborrirux*
* *Mr. Sriengchhun Chheang*
* *Mr. Sabol Socare*<br>

<br>

***

© BDH Corporation, 2022-2023


# Push/Pull Button to Turn ON/OFF LED via PDL

Lab104

## *Lab Objective:*

&#x20;    In this lab, participants will utilize the Peripheral Driver Library (PDL) to interface with a push/pull button linked to the Infineon PSoC 6 microcontroller. The task will involve programming the microcontroller such that an LED's state is toggled between ON and OFF upon button actuation. This exercise is designed to provide participants with a deeper understanding of direct peripheral interactions, emphasizing the capabilities and advantages of using PDL for efficient and streamlined hardware control.

## 🔥 Requirements

<table><thead><tr><th width="429">Resources</th><th>Links</th></tr></thead><tbody><tr><td>Computer</td><td>💻</td></tr><tr><td>ModusToolbox™ software v3.0 or later</td><td><a href="https://www.infineon.com/modustoolbox">Link</a></td></tr><tr><td>CY8CKIT-062S2-43012 Infineon Board</td><td><a href="https://github.com/Advance-Innovation-Centre-AIC/BIIL_MTB-100_Hello_World_and_LED_Blinking_Programming_Template/assets/88732241/0215501d-b774-4045-8e64-ef49e28d8404">Link</a></td></tr><tr><td>Technical Report</td><td><a href="https://www.dropbox.com/scl/fi/amaxc94pte0ut2i1r5ewx/Technical-Report-Lab00.paper?rlkey=b3xm3vrerz9xgv1glb30cvy9z&#x26;dl=0">dropbox</a></td></tr></tbody></table>

## 🚩 Let start

### Create Application

* 👉 Open Eclipse IDE ModusToolbox&#x20;

<figure><img src="/files/yvdAREduukvnrZOgM0Dj" alt=""><figcaption><p>Create application</p></figcaption></figure>

### Enable Button and LED Pin

<figure><img src="/files/Csm9tM4UtCHWGjiQIMlE" alt=""><figcaption><p>Enable Button Pin</p></figcaption></figure>

<figure><img src="/files/v2tilhEsCAFBsSmtLge1" alt=""><figcaption><p>Enable LED Pin</p></figcaption></figure>

### Coding

* Coding: Open the main.c file and add the following code to the main(void) function.

```c
int main(void)
{
    cy_rslt_t result;

    /* Initialize the device and board peripherals */
    result = cybsp_init() ;
    if (result != CY_RSLT_SUCCESS)
    {
        CY_ASSERT(0);
    }
    /* Enable global interrupts */
    __enable_irq();

    // Embedded systems to redirect the standard input/output (I/O) functions like printf() and scanf()
    cy_retarget_io_init(CYBSP_DEBUG_UART_TX, CYBSP_DEBUG_UART_RX, CY_RETARGET_IO_BAUDRATE);
    printf("\x1b[2J\x1b[;H");

    for (;;)
    {
    	//Button is active low -> 0 is pressed and 1 is not pressed.
    	if(!Cy_GPIO_Read(CYBSP_USER_BTN_PORT, CYBSP_USER_BTN_NUM)){
    		Cy_GPIO_Clr(CYBSP_USER_LED1_PORT, CYBSP_USER_LED1_NUM); // Turn On LED
    		printf("Button Pressed --> LED ON \r\n");
    		Cy_SysLib_Delay(500U);
    	}
    	else{
    		Cy_GPIO_Set(CYBSP_USER_LED1_PORT, CYBSP_USER_LED1_NUM);
    		printf("Button not Pressed --> LED OFF \r\n"); // Turn Off LED
    		Cy_SysLib_Delay(500U);
    	}
    }
}
```

### Build the Application

* 👉 Build the Application

<figure><img src="/files/LLLuPe1notDDF2T45jiX" alt=""><figcaption><p>Build Application</p></figcaption></figure>

### Launching the Application

* 👉 Launching the Application

  * Before launching the program to the board, make sure that you have already connected the board to the computer through a USB cable.<br>

    <figure><img src="https://github.com/Advance-Innovation-Centre-AIC/BIIL_MTB-100_Hello_World_and_LED_Blinking_Programming_Template/assets/88732241/7a6bb6ef-cb63-4613-98a1-42f9617ad724" alt="" width="188"><figcaption><p>set up USB cable</p></figcaption></figure>
  * Launching Program

  <figure><img src="/files/1AI685hXop9QfBRA9ZWW" alt=""><figcaption><p>Launching Program</p></figcaption></figure>
* 👉 Check the Result

<figure><img src="/files/absRBc6EgaGSISyRTaZ7" alt=""><figcaption></figcaption></figure>

> #### 🎉 <mark style="color:blue;">Congratulations! You can now complete Lab104</mark>

## Supported toolchains (make variable 'TOOLCHAIN')

* GNU Arm® embedded compiler v10.3.1 (`GCC_ARM`) - Default value of `TOOLCHAIN`
* Arm® compiler v6.16 (`ARM`)
* IAR C/C++ compiler v9.30.1 (`IAR`)

## Supported kits (make variable 'TARGET')

* [PSoC™ 62S2 Wi-Fi Bluetooth® pioneer kit](https://www.infineon.com/CY8CKIT-062S2-43012) (`CY8CKIT-062S2-43012`)
* [PSoC™ 62S1 Wi-Fi Bluetooth® pioneer kit](https://www.infineon.com/CYW9P62S1-43438EVB-01) (`CYW9P62S1-43438EVB-01`)
* [PSoC™ 62S1 Wi-Fi Bluetooth® pioneer kit](https://www.infineon.com/CYW9P62S1-43012EVB-01) (`CYW9P62S1-43012EVB-01`)
* [PSoC™ 62S3 Wi-Fi Bluetooth® prototyping kit](https://www.infineon.com/CY8CPROTO-062S3-4343W) (`CY8CPROTO-062S3-4343W`)

## Related resources

| Resources                       | Links                                                                                                                                                      |
| ------------------------------- | ---------------------------------------------------------------------------------------------------------------------------------------------------------- |
| ModusToolbox™ Software Training | [link](https://www.dropbox.com/sh/waj898o4o8eccx0/AAB3hBBaIQo2OvJ5-fubGJIha/training-modustoolbox-level1-getting-started-master/Manual/Ch2-Tools.pdf?dl=0) |

## Other resources

Infineon provides a wealth of data at [www.infineon.com](http://www.infineon.com) to help you select the right device, and quickly and effectively integrate it into your design.

## Document history

Document title: *BILL\_MTB-104* – *GPIO-PDL Button with LED Template*<br>

<table><thead><tr><th width="149">Version</th><th>Description of change</th></tr></thead><tbody><tr><td>1.0.0</td><td>Lab 104: Learn basic GPIO control with PSoC 6 using Push/Pull Button to Turn ON/OFF LED via PDL</td></tr></tbody></table>

## Authors:

* *Assoc. Prof. Wiroon Sriborrirux*
* *Mr. Sriengchhun Chheang*
* *Mr. Sabol Socare*<br>

<br>

***

© BDH Corporation, 2022-2023


# GPIO Button Interrupt via HAL

Lab105

## L*ab Objective:*

&#x20;   In this lab, participants will configure the Infineon PSoC 6 microcontroller to detect button presses using GPIO interrupts via the Hardware Abstraction Layer (HAL). Rather than continuously polling the button's state, the microcontroller will be set up to respond immediately upon a button press through an interrupt mechanism. This hands-on experience aims to educate participants on the efficient use of hardware interrupts, showcasing how HAL can facilitate real-time responsiveness and optimize system performance by minimizing unnecessary CPU cycles.

## 🔥 Requirements

<table><thead><tr><th width="429">Resources</th><th>Links</th></tr></thead><tbody><tr><td>Computer</td><td>💻</td></tr><tr><td>ModusToolbox™ software v3.0 or later</td><td><a href="https://www.infineon.com/modustoolbox">Link</a></td></tr><tr><td>CY8CKIT-062S2-43012 Infineon Board</td><td><a href="https://github.com/Advance-Innovation-Centre-AIC/BIIL_MTB-100_Hello_World_and_LED_Blinking_Programming_Template/assets/88732241/0215501d-b774-4045-8e64-ef49e28d8404">Link</a></td></tr><tr><td>Technical Report</td><td><a href="https://www.dropbox.com/scl/fi/amaxc94pte0ut2i1r5ewx/Technical-Report-Lab00.paper?rlkey=b3xm3vrerz9xgv1glb30cvy9z&#x26;dl=0">dropbox</a></td></tr></tbody></table>

## 🚩 Let start

### Create Application

<figure><img src="/files/NC8GZ96rSCj8OuLeYGuP" alt=""><figcaption><p>Create Application</p></figcaption></figure>

### Coding

* Coding: Open the main.c file and add the following code to the main(void) function.

{% code title="main.c" %}

```c
#include "cy_pdl.h"
#include "cyhal.h"
#include "cybsp.h"
#include "cy_retarget_io.h"

#define GPIO_INTERRUPT_PRIORITY (7u)

//Interrupt handler
static void button_isr(void *handler_arg, cyhal_gpio_event_t event)
{
	cyhal_gpio_toggle(CYBSP_USER_LED);
}

// GPIO callback initialization structure
cyhal_gpio_callback_data_t cb_data =
{
	.callback     = button_isr,
	.callback_arg = NULL
};

int main(void)
{
    cy_rslt_t result;

    /* Initialize the device and board peripherals */
    result = cybsp_init() ;
    /*BSP init failed. Stop program execution */
    if (result != CY_RSLT_SUCCESS)
    {
        CY_ASSERT(0);
    }

    /* Initialize the User LED */
    result = cyhal_gpio_init(CYBSP_USER_LED, CYHAL_GPIO_DIR_OUTPUT, CYHAL_GPIO_DRIVE_STRONG, CYBSP_LED_STATE_OFF);
	/* GPIO init failed. Stop program execution */
	if (result != CY_RSLT_SUCCESS)
	{
		CY_ASSERT(0);
	}

	/* Initialize the user button */
	result = cyhal_gpio_init(CYBSP_USER_BTN, CYHAL_GPIO_DIR_INPUT, CYHAL_GPIO_DRIVE_PULLUP, CYBSP_BTN_OFF);
	/* GPIO init failed. Stop program execution */
	if (result != CY_RSLT_SUCCESS)
	{
		CY_ASSERT(0);
	}

	/* Configure GPIO interrupt */
	cyhal_gpio_register_callback(CYBSP_USER_BTN, &cb_data);
	cyhal_gpio_enable_event(CYBSP_USER_BTN, CYHAL_GPIO_IRQ_FALL, GPIO_INTERRUPT_PRIORITY, true);


	/* Enable global interrupts */
    __enable_irq();


    for (;;)
    {
    	/* Enter deep sleep mode */
		cyhal_syspm_deepsleep();


    }
}
```

{% endcode %}

### Build the Application

### Launching the Application

> Note: Before launching the program to the board, make sure that you have already connected the board to the computer through a USB cable.

<figure><img src="https://github.com/Advance-Innovation-Centre-AIC/BIIL_MTB-100_Hello_World_and_LED_Blinking_Programming_Template/assets/88732241/7a6bb6ef-cb63-4613-98a1-42f9617ad724" alt="" width="188"><figcaption><p>set up USB cable</p></figcaption></figure>

### Result&#x20;

<figure><img src="/files/kqGaxp5tT7hBiTWFF5C4" alt=""><figcaption><p>Press Button 1st time to Turn ON LED (toggle LED), Press Button 2nd time to Turn OFF LED</p></figcaption></figure>

> #### 🎉 <mark style="color:blue;">Congratulations! You can now complete Lab105</mark>

## Workshop:

#### Exercise 1: Change From USER LED to RGB Green/Red/Blue

#### Exercise 2: Add Loop LED to the Loop function

```
	//cyhal_syspm_deepsleep();
    	cyhal_gpio_write(CYBSP_LED_RGB_BLUE, CYBSP_LED_STATE_ON);
    	cyhal_system_delay_ms(500);

    	cyhal_gpio_write(CYBSP_LED_RGB_BLUE, CYBSP_LED_STATE_OFF);
    	cyhal_system_delay_ms(500);
```

## Supported toolchains (make variable 'TOOLCHAIN')

* GNU Arm® embedded compiler v10.3.1 (`GCC_ARM`) - Default value of `TOOLCHAIN`
* Arm® compiler v6.16 (`ARM`)
* IAR C/C++ compiler v9.30.1 (`IAR`)

## Supported kits (make variable 'TARGET')

* [PSoC™ 62S2 Wi-Fi Bluetooth® pioneer kit](https://www.infineon.com/CY8CKIT-062S2-43012) (`CY8CKIT-062S2-43012`)
* [PSoC™ 62S1 Wi-Fi Bluetooth® pioneer kit](https://www.infineon.com/CYW9P62S1-43438EVB-01) (`CYW9P62S1-43438EVB-01`)
* [PSoC™ 62S1 Wi-Fi Bluetooth® pioneer kit](https://www.infineon.com/CYW9P62S1-43012EVB-01) (`CYW9P62S1-43012EVB-01`)
* [PSoC™ 62S3 Wi-Fi Bluetooth® prototyping kit](https://www.infineon.com/CY8CPROTO-062S3-4343W) (`CY8CPROTO-062S3-4343W`)

## Related resources

| Resources                       | Links                                                                                                                                                      |
| ------------------------------- | ---------------------------------------------------------------------------------------------------------------------------------------------------------- |
| ModusToolbox™ Software Training | [link](https://www.dropbox.com/sh/waj898o4o8eccx0/AAB3hBBaIQo2OvJ5-fubGJIha/training-modustoolbox-level1-getting-started-master/Manual/Ch2-Tools.pdf?dl=0) |

## Other resources

Infineon provides a wealth of data at [www.infineon.com](http://www.infineon.com) to help you select the right device, and quickly and effectively integrate it into your design.

## Document history

Document title: *BILL\_MTB-105* – *GPIO-PDL Button Interrupt*

<table><thead><tr><th width="149">Version</th><th>Description of change</th></tr></thead><tbody><tr><td>1.0.0</td><td>Lab 105: Learn basic GPIO control with PSoC 6 using Interrupt Button to toggle the LED via HAL</td></tr></tbody></table>

## Authors:

* *Assoc. Prof. Wiroon Sriborrirux*
* *Mr. Sriengchhun Chheang*
* *Mr. Sabol Socare*<br>

<br>

***

© BDH Corporation, 2022-2023


# GPIO Button Interrupt via PDL

Lab106

## L*ab Objective:*

&#x20;   In this lab, participants will employ the Peripheral Driver Library (PDL) to set up GPIO interrupts for detecting button presses on the Infineon PSoC 6 microcontroller. Instead of traditional polling techniques, the system will be optimized to immediately react to button actuation via the interrupt-driven method. Through this activity, participants will gain insights into leveraging PDL for efficient interrupt handling, and learning to utilize hardware features to enhance system responsiveness while preserving CPU resources for other critical tasks.

## 🔥 Requirements

<table><thead><tr><th width="429">Resources</th><th>Links</th></tr></thead><tbody><tr><td>Computer</td><td>💻</td></tr><tr><td>ModusToolbox™ software v3.0 or later</td><td><a href="https://www.infineon.com/modustoolbox">Link</a></td></tr><tr><td>CY8CKIT-062S2-43012 Infineon Board</td><td><a href="https://github.com/Advance-Innovation-Centre-AIC/BIIL_MTB-100_Hello_World_and_LED_Blinking_Programming_Template/assets/88732241/0215501d-b774-4045-8e64-ef49e28d8404">Link</a></td></tr><tr><td>Technical Report</td><td><a href="https://www.dropbox.com/scl/fi/amaxc94pte0ut2i1r5ewx/Technical-Report-Lab00.paper?rlkey=b3xm3vrerz9xgv1glb30cvy9z&#x26;dl=0">dropbox</a></td></tr></tbody></table>

## 🚩 Let start

### Create Application

<figure><img src="/files/BKeo3ticHGjm40dGJEYa" alt=""><figcaption></figcaption></figure>

### Use Device Configurator and set the button pin to have a falling edge interrupt.

<figure><img src="/files/TYvTVPj2GzB6ZIpTt1fe" alt=""><figcaption><p>Enable the button Pin </p></figcaption></figure>

<figure><img src="/files/ZUqEwLyCKZZEVbDkWapc" alt=""><figcaption><p>Enable the LED Pin</p></figcaption></figure>

### Coding

* Coding: Open the main.c file and add the following code to the main(void) function.

{% code title="main.c" %}

```c
#include "cy_pdl.h"
#include "cyhal.h"
#include "cybsp.h"
#include "cy_retarget_io.h"

#define PORT_INTR_MASK  (0x00000001UL << CYBSP_USER_BTN_PORT_NUM)

void Interrupt_Handler(void){
	// Get interrupt cause
	uint32_t intrSrc = Cy_GPIO_GetInterruptCause0();
	/* Check if the interrupt was from the button's port */
	if(PORT_INTR_MASK == (intrSrc & PORT_INTR_MASK)){
		/* Clear the interrupt */
		Cy_GPIO_ClearInterrupt(CYBSP_USER_BTN_PORT, CYBSP_USER_BTN_NUM);
		// Toggle LED
		Cy_GPIO_Inv(CYBSP_USER_LED_PORT, CYBSP_USER_LED_NUM);
	}
}

int main(void)
{
    cy_rslt_t result;

    /* Initialize the device and board peripherals */
    result = cybsp_init() ;
    if (result != CY_RSLT_SUCCESS)
    {
        CY_ASSERT(0);
    }

    /* Enable global interrupts */
    __enable_irq();

    // Interrupt config structure
     cy_stc_sysint_t intrCfg =
 	{
 		/*.intrSrc =*/ CYBSP_USER_BTN_IRQ,
 		/*.intrPriority =*/ 3UL
 	};

     /* Initialize the interrupt with vector for Interrupt_Handler */
 	Cy_SysInt_Init(&intrCfg, &Interrupt_Handler);
 	/* Send the button through the glitch filter */
 	Cy_GPIO_SetFilter(CYBSP_USER_BTN_PORT, CYBSP_USER_BTN_NUM);

	
 	/* Enable the interrupt*/
 	NVIC_EnableIRQ(intrCfg.intrSrc);


    for (;;)
    {
    	/* Do nothing */
    }
}
```

{% endcode %}

### Build the Application

### Launching the Application

> Note: Before launching the program to the board, make sure that you have already connected the board to the computer through a USB cable.

<figure><img src="https://github.com/Advance-Innovation-Centre-AIC/BIIL_MTB-100_Hello_World_and_LED_Blinking_Programming_Template/assets/88732241/7a6bb6ef-cb63-4613-98a1-42f9617ad724" alt="" width="188"><figcaption><p>set up USB cable</p></figcaption></figure>

### Result&#x20;

<figure><img src="/files/kqGaxp5tT7hBiTWFF5C4" alt=""><figcaption><p>Press Button 1st time to Turn ON LED (toggle LED), Press Button 2nd time to Turn OFF LED</p></figcaption></figure>

> #### 🎉 <mark style="color:blue;">Congratulations! You can now complete Lab105</mark>

## Workshop:

#### Exercise 1: Change From USER LED to RGB Green/Red/Blue

#### Exercise 2: Add Loop LED to the Loop function

```
// RED LED turn on and Turn of
Cy_GPIO_Clr(CYBSP_LED_RGB_RED_PORT, CYBSP_LED_RGB_RED_NUM); // Turn ON the Red LED
Cy_SysLib_Delay(1000U);

Cy_GPIO_Set(CYBSP_LED_RGB_RED_PORT, CYBSP_LED_RGB_RED_NUM); // Turn OFF the Red LED
Cy_SysLib_Delay(1000U);
```

## Supported toolchains (make variable 'TOOLCHAIN')

* GNU Arm® embedded compiler v10.3.1 (`GCC_ARM`) - Default value of `TOOLCHAIN`
* Arm® compiler v6.16 (`ARM`)
* IAR C/C++ compiler v9.30.1 (`IAR`)

## Supported kits (make variable 'TARGET')

* [PSoC™ 62S2 Wi-Fi Bluetooth® pioneer kit](https://www.infineon.com/CY8CKIT-062S2-43012) (`CY8CKIT-062S2-43012`)
* [PSoC™ 62S1 Wi-Fi Bluetooth® pioneer kit](https://www.infineon.com/CYW9P62S1-43438EVB-01) (`CYW9P62S1-43438EVB-01`)
* [PSoC™ 62S1 Wi-Fi Bluetooth® pioneer kit](https://www.infineon.com/CYW9P62S1-43012EVB-01) (`CYW9P62S1-43012EVB-01`)
* [PSoC™ 62S3 Wi-Fi Bluetooth® prototyping kit](https://www.infineon.com/CY8CPROTO-062S3-4343W) (`CY8CPROTO-062S3-4343W`)

## Related resources

| Resources                       | Links                                                                                                                                                      |
| ------------------------------- | ---------------------------------------------------------------------------------------------------------------------------------------------------------- |
| ModusToolbox™ Software Training | [link](https://www.dropbox.com/sh/waj898o4o8eccx0/AAB3hBBaIQo2OvJ5-fubGJIha/training-modustoolbox-level1-getting-started-master/Manual/Ch2-Tools.pdf?dl=0) |

## Other resources

Infineon provides a wealth of data at [www.infineon.com](http://www.infineon.com) to help you select the right device, and quickly and effectively integrate it into your design.

## Document history

Document title: *BILL\_MTB-106* – *GPIO-PDL Button interrupt*<br>

<table><thead><tr><th width="149">Version</th><th>Description of change</th></tr></thead><tbody><tr><td>1.0.0</td><td>Lab 106: Learn basic GPIO control with PSoC 6 using Interrupt Button to toggle the LED via PDL</td></tr></tbody></table>

## Authors:

* *Assoc. Prof. Wiroon Sriborrirux*
* *Mr. Sriengchhun Chheang*
* *Mr. Sabol Socare*<br>

<br>

***

© BDH Corporation, 2022-2023


# GPIO variables & functions

{% hint style="info" %}
**Knowledge Bank:**

```
ชื่อฟังก์ชันที่เรียกใช้บ่อยๆ
cyhal_gpio_init();
cyhal_gpio_configure();
cyhal_gpio_write();
cyhal_gpio_read();
cyhal_gpio_toggle();
cyhal_system_delay_ms();
cyhal_gpio_register_callback();
cyhal_gpio_enable_event();
cyhal_adc_read();
cyhal_adc_init();
```

{% endhint %}

{% hint style="info" %}

```
ชื่อตัวแปรที่เรียกใช้บ่อยๆ
CYBSP_USER_LED
CYBSP_USER_BTN
CYBSP_USER_BTN1
CYBSP_USER_BTN2
CYHAL_GPIO_DIR_OUTPUT
CYHAL_GPIO_DRIVE_STRONG
CYBSP_LED_STATE_OFF
CYBSP_LED_STATE_ON
```

{% endhint %}

> For more detail of each function and variable: <https://infineon.github.io/psoc6hal/html/group__group__hal__gpio.html>


# PSoC™ 6S2 Peripherals Interfacing (ADC, PWM)


# PSoC™ 6S2 SAR ADC


# ADC Principles

<figure><img src="/files/sTgBFZ7swhLrcfOQzcOA" alt=""><figcaption></figcaption></figure>

มีหลายเทคนิคที่ถูกนำมาใช้ในการแปลงสัญญาณอนาล็อก เพื่อเป็นข้อมูลค่าดิจิตอล ที่นิยมกันตัวอย่างเช่น successive approximation conversion, parallel-encoded conversion (หรือ flash conversion), delta-sigma processing และ pulse-code modulation (PCM) เป็นต้น&#x20;

ซึ่งหนึ่งในเทคนิคที่ถูกใช้มากที่สุดคือ วิธีการประมาณค่าต่อเนื่อง (successive approximation conversion) โดยเทคนิคนี้จะทำการแปลงแต่ละบิตของผลลัพธ์แบบไบนารีจะถูกค้นหา หนึ่งบิตต่อครั้ง—เริ่มจาก [MSB bit](https://www.youtube.com/watch?v=_VmD99A69TY) ซึ่งวิธีนี้จะทำการแปลงที่ค่อนข้างเร็ว (ในช่วงเวลาประมาณ 10 ถึง 300 μs) ด้วยจำนวนวงจรที่จำกัด ดังตัวอย่างรูปข้างล่าง เป็นการแปลงค่าประมาณต่อเนื่องขนาด 8-bit แบบง่าย&#x20;

<figure><img src="/files/sCDMrop1xEIuPSLCH7Fq" alt=""><figcaption><p>Successive Approximation Conversion Technique</p></figcaption></figure>

ใน  PSoCᵀᴹ ไมโครคอลโทรเลอร์ จะมีตัว ADC เป็นส่วนประกอบฮาร์ดแวร์ที่สามารถอ่านแรงดันจากขาอนาล็อก (โหมดแบบเดี่ยว - <mark style="color:blue;">single ended mode</mark>) หรือคู่ขาอนาล็อก (โหมดเชิงเส้น - <mark style="color:blue;">differential mode</mark>) แล้วแปลงเป็นค่าดิจิตอลที่ PSoCᵀᴹ ไมโครคอลโทรเลอร์ สามารถตีความได้ โดยในโหมดแบบเดี่ยว ADC จะอ่านแรงดันที่ขาอนาล็อกที่ระบุเมื่อเทียบกับดินหรือค่าอ้างอิงอื่นๆ <mark style="color:red;">ในขณะที่</mark> ในโหมดเชิงเส้น ADC จะอ่านแรงดันระหว่างขาอนาล็อกสองขาที่ระบุ จำนวนบิตในผลลัพธ์ที่ ADC สร้างขึ้นจะกำหนดความละเอียดของ ADC ตัวอย่างเช่น ผลลัพธ์ที่ 12-bit ADC สามารถสร้างขึ้นจะอยู่ในช่วง

* `0 → 2¹²` = `0 → 4096` สำหรับการวัดในโหมดแบบเดี่ยว&#x20;
* `-2¹¹ → 2¹¹` = `-2048 → +2048` สำหรับการวัดในโหมดแบบเชิงเส้น

ในช่วงแรงดันอินพุตของ PSoCᵀᴹ ADC สามารถปรับค่าได้และแตกต่างกันตามอุปกรณ์ โดยทั่วไปแรงดันที่สามารถวัดได้คือ `0 → 2*Vref` สำหรับการวัดแบบเดี่ยวและ `Vx ± Vref` สำหรับการวัดแบบเชิงเส้น โดยที่ Vref เป็นแรงดันอ้างอิงที่สร้างขึ้นในชิป และ Vx เป็นอินพุตลบ สำหรับการวัดแบบเชิงเส้น&#x20;

ผลลัพธ์ที่ ADC สร้างขึ้นมีหน่วยว่า "counts" โดยแต่ละ "count" แทนส่วนหนึ่งของช่วงแรงดันอินพุตทั้งหมด&#x20;

> **ตัวอย่างเช่น**
>
> &#x20;ถ้าช่วงอินพุตคือ ±5V (ทั้งหมด 10V) และ ADC มีความละเอียด 12 บิต (12-bit หรือ 2¹²) ดังนั้นแต่ละ count จะเท่ากับ

$$
count = {10v  \over 2^{12}-1} \approx 0.00242 V/count
$$

หรือเท่ากับ

$$
\= 409.5 counts/V
$$

{% hint style="info" %} <mark style="color:red;">**คำถาม:**</mark> ถ้า input voltage ที่เข้าไปเท่ากับ 2V ตัว ADC จะนับจำนวน count ออกมาได้เท่าไหร่

<mark style="color:green;">**คำตอบ:**</mark> counts = 409.5 \* 2 = 819 counts
{% endhint %}

PSoCᵀᴹ devices มี ADC อยู่สองแบบคือ

1. Successive Approximation Register (SAR)
2. Sigma-Delta or Delta-Sigma&#x20;

ในการเขียนโปรแกรมสำหรับบอร์ด PSoC6 จะมีการเรียกใช้ฟังก์ชัน [cyhal\_adc\_init](https://infineon.github.io/mtb-hal-cat1/html/group__group__hal__adc.html#ga7618b26a0677cb3f8cd477e3731da510) เพื่อกำหนดการทำงานเริ่มต้นให้กับ PSoCᵀᴹ ADC ผ่านตัวแปร `obj` ของ ADC object, ตัวแปร `pin ของ` input pin และตัวแปร `clk` ของ clock&#x20;

นอกจากนั้นจะเรียกใช้ฟังก์ชัน [cyhal\_adc\_channel\_init\_diff](https://infineon.github.io/mtb-hal-cat1/html/group__group__hal__adc.html#gaba21a0c4d83266951823ea5d9eba39b9) เพื่อกำหนดจำนวนช่องสัญญาณที่จะรับเข้ามา (channel) และฟังก์ชัน [cyhal\_adc\_read](https://infineon.github.io/mtb-hal-cat1/html/group__group__hal__adc.html#ga7207c3d089c48255e382cfe159a04ed0) สำหรับการอ่านผลลัพธ์จากการแปลงสัญญาณอนาล็อกเป็นดิจิตอลต่อไป

{% hint style="info" %}
*ตัวอย่างโปรแกรมการอ่านค่าสัญญาณอนาล็อกแบบ 1 channel* &#x20;
{% endhint %}

```c
cy_rslt_t           rslt;
cyhal_adc_t         adc_obj;
cyhal_adc_channel_t adc_chan_0_obj;
// ADC conversion result.
int32_t adc_out;
 
// Initialize ADC. The ADC block which can connect to pin ADC_VPLUS1 is selected
rslt = cyhal_adc_init(&adc_obj, ADC_VPLUS1, NULL);
 
// Initialize ADC channel, allocate channel number 0 to pin ADC_VPLUS1 as this is the first
// channel initialized
const cyhal_adc_channel_config_t channel_config =
    { .enable_averaging = false, .min_acquisition_ns = 220, .enabled = true };
rslt = cyhal_adc_channel_init_diff(&adc_chan_0_obj, &adc_obj, ADC_VPLUS1, CYHAL_ADC_VNEG,
                                 &channel_config);
 
// Read the ADC conversion result for corresponding ADC channel. Repeat as necessary.
adc_out = cyhal_adc_read(&adc_chan_0_obj);
 
// Release ADC and channel objects when no longer needed
cyhal_adc_channel_free(&adc_chan_0_obj);
cyhal_adc_free(&adc_obj);
```

รายละเอียดเพิ่มเติมทางเทคนิค

* [PSoCᵀᴹ 6 SAR ADC Datasheet](https://www.infineon.com/dgdl/Infineon-PSoC_6_Scanning_SAR_ADC_\(Scan_ADC\)_2.0-Software+Module+Datasheets-v03_01-EN.pdf?fileId=8ac78c8c7d0d8da4017d0eb28a4b2b24\&utm_source=cypress\&utm_medium=referral\&utm_campaign=202110_globe_en_all_integration-files\&redirId=File_3_2120)
* [Cypress Delta-Sigma ADC Datasheet](https://www.infineon.com/dgdl/Infineon-Component_Delta_Sigma_ADC_\(ADC_DelSig\)_V3.30-Software+Module+Datasheets-v03_03-EN.pdf?fileId=8ac78c8c7d0d8da4017d0e7ce9430ebe\&utm_source=cypress\&utm_medium=referral\&utm_campaign=202110_globe_en_all_integration-files\&redirId=File_4_0_18)
* [SAR ADC Architecture](https://www.analog.com/media/en/training-seminars/tutorials/MT-021.pdf)
* [Sigma-Delta ADC Interactive Illustration](https://www.analog.com/en/design-center/interactive-design-tools/sigma-delta-adc-tutorial.html)
* [SAR and delta-sigma: Basic operation](https://www.youtube.com/watch?v=U_Yv69IGAfQ)


# PSoC™ 6S2 with ADC Labs


# Reading potentiometer sensor value via an ADC HAL

Lab 107

## *Lab Objective:*

This lab demonstrates the process of reading a potentiometer sensor value through an Analog-to-Digital Converter (ADC) using a Hardware Abstraction Layer (HAL) on a PSoC 6 microcontroller.

## 🔥 Requirements

<table><thead><tr><th width="429">Resources</th><th>Links</th></tr></thead><tbody><tr><td>Computer</td><td>💻</td></tr><tr><td>ModusToolbox™ software v3.0 or later</td><td><a href="https://www.infineon.com/modustoolbox">Link</a></td></tr><tr><td>CY8CKIT-062S2-43012 Infineon Board</td><td><a href="https://github.com/Advance-Innovation-Centre-AIC/BIIL_MTB-100_Hello_World_and_LED_Blinking_Programming_Template/assets/88732241/0215501d-b774-4045-8e64-ef49e28d8404">Link</a></td></tr><tr><td>Technical Report</td><td><a href="https://www.dropbox.com/scl/fi/amaxc94pte0ut2i1r5ewx/Technical-Report-Lab00.paper?rlkey=b3xm3vrerz9xgv1glb30cvy9z&#x26;dl=0">dropbox</a></td></tr></tbody></table>

## 🚩 Let start

### Create Application&#x20;

<figure><img src="/files/W6fGdSlvXI4R36fIHq9S" alt=""><figcaption><p>Create Application</p></figcaption></figure>

### Coding

* Coding: Open the main.c file and add the following code to the main(void) function.

{% code title="main.c" %}

```c
#include "cy_pdl.h"
#include "cyhal.h"
#include "cybsp.h"
#include "cy_retarget_io.h"


int main(void)
{
    cy_rslt_t result;
	cyhal_adc_t adc_obj;
	cyhal_adc_channel_t adc_chan_0_obj;

    /* Initialize the device and board peripherals */
    result = cybsp_init() ;
    if (result != CY_RSLT_SUCCESS)
    {
        CY_ASSERT(0);
    }

    __enable_irq();

    /* Initialize retarget-io to use the debug UART port */
	result = cy_retarget_io_init(CYBSP_DEBUG_UART_TX, CYBSP_DEBUG_UART_RX, CY_RETARGET_IO_BAUDRATE);
	CY_ASSERT(result == CY_RSLT_SUCCESS);

	/* ADC conversion result. */
	int adc_out;

	/* Initialize ADC. The ADC block which can connect to pin 10[6] is selected */
	result = cyhal_adc_init(&adc_obj, P10_6, NULL);

	// ADC configuration structure
	const cyhal_adc_config_t ADCconfig ={
		.continuous_scanning = false,
		.resolution = 12,
		.average_count = 1,
		.average_mode_flags = 0,
		.ext_vref_mv = 0,
		.vneg = CYHAL_ADC_VNEG_VREF,
		.vref = CYHAL_ADC_REF_VDDA,
		.ext_vref = NC,
		.is_bypassed = false,
		.bypass_pin = NC
	};

	// Configure to use VDD as Vref
	result = cyhal_adc_configure(&adc_obj, &ADCconfig);

	/* Initialize ADC channel, allocate channel number 0 to pin 10[6] as this is the first channel initialized */
	const cyhal_adc_channel_config_t channel_config = { .enable_averaging = false, .min_acquisition_ns = 220, .enabled = true };
	result = cyhal_adc_channel_init_diff(&adc_chan_0_obj, &adc_obj, P10_6, CYHAL_ADC_VNEG, &channel_config);

    for (;;)
    {
    	/* Read the ADC conversion result for corresponding ADC channel. Repeat as necessary. */
		adc_out = cyhal_adc_read_uv(&adc_chan_0_obj);
		printf("ADC = %d\r\n", adc_out);
		cyhal_system_delay_ms(100);
    }
}
```

{% endcode %}

### Build the Application

<figure><img src="/files/9aPocgXVdCvBAbOXC6ip" alt=""><figcaption><p>Build Application</p></figcaption></figure>

### Launching the Application

<figure><img src="/files/51Okql7h2DXRqzUqNmzW" alt=""><figcaption><p>Launching</p></figcaption></figure>

> Note: Before launching the program to the board, make sure that you have already connected the board to the computer through a USB cable.

<figure><img src="https://github.com/Advance-Innovation-Centre-AIC/BIIL_MTB-100_Hello_World_and_LED_Blinking_Programming_Template/assets/88732241/7a6bb6ef-cb63-4613-98a1-42f9617ad724" alt="" width="188"><figcaption><p>set up USB cable</p></figcaption></figure>

### Result&#x20;

<figure><img src="/files/9tnMhC5xhyaNt436TACf" alt=""><figcaption><p>Once the device is set up, run the program. The microcontroller will continuously read the potentiometer's analog value, convert it to a digital signal through the ADC, and then convert that signal to millivolts using the PDL functions.</p></figcaption></figure>

> #### 🎉 <mark style="color:blue;">Congratulations! You can now complete Lab105</mark>

## Supported toolchains (make variable 'TOOLCHAIN')

* GNU Arm® embedded compiler v10.3.1 (`GCC_ARM`) - Default value of `TOOLCHAIN`
* Arm® compiler v6.16 (`ARM`)
* IAR C/C++ compiler v9.30.1 (`IAR`)

## Supported kits (make variable 'TARGET')

* [PSoC™ 62S2 Wi-Fi Bluetooth® pioneer kit](https://www.infineon.com/CY8CKIT-062S2-43012) (`CY8CKIT-062S2-43012`)
* [PSoC™ 62S1 Wi-Fi Bluetooth® pioneer kit](https://www.infineon.com/CYW9P62S1-43438EVB-01) (`CYW9P62S1-43438EVB-01`)
* [PSoC™ 62S1 Wi-Fi Bluetooth® pioneer kit](https://www.infineon.com/CYW9P62S1-43012EVB-01) (`CYW9P62S1-43012EVB-01`)
* [PSoC™ 62S3 Wi-Fi Bluetooth® prototyping kit](https://www.infineon.com/CY8CPROTO-062S3-4343W) (`CY8CPROTO-062S3-4343W`)

## Related resources

| Resources                       | Links                                                                                                                                                      |
| ------------------------------- | ---------------------------------------------------------------------------------------------------------------------------------------------------------- |
| ModusToolbox™ Software Training | [link](https://www.dropbox.com/sh/waj898o4o8eccx0/AAB3hBBaIQo2OvJ5-fubGJIha/training-modustoolbox-level1-getting-started-master/Manual/Ch2-Tools.pdf?dl=0) |

## Other resources

Infineon provides a wealth of data at [www.infineon.com](http://www.infineon.com) to help you select the right device, and quickly and effectively integrate it into your design.

## Document history

Document title: *BILL\_MTB-107* – Read potentiometer sensor value via an ADC HAL<br>

<table><thead><tr><th width="149">Version</th><th>Description of change</th></tr></thead><tbody><tr><td>1.0.0</td><td>Lab 107: Learn basic GPIO control with PSoC 6, using ADC read potentiometer sensor value via HAL</td></tr></tbody></table>

## Authors:

* *Assoc. Prof. Wiroon Sriborrirux*
* *Mr. Sriengchhun Chheang*
* *Mr. Sabol Socare*<br>

<br>

***

© BDH Corporation, 2022-2023


# Reading potentiometer sensor value via an ADC PDL

Lab 108

## L*ab Objective:*

This lab demonstrates the process of reading a potentiometer sensor value through an Analog-to-Digital Converter (ADC) using a Peripheral Driver Library (PDL) on a PSoC 6 microcontroller.

## 🔥 Requirements

<table><thead><tr><th width="429">Resources</th><th>Links</th></tr></thead><tbody><tr><td>Computer</td><td>💻</td></tr><tr><td>ModusToolbox™ software v3.0 or later</td><td><a href="https://www.infineon.com/modustoolbox">Link</a></td></tr><tr><td>CY8CKIT-062S2-43012 Infineon Board</td><td><a href="https://github.com/Advance-Innovation-Centre-AIC/BIIL_MTB-100_Hello_World_and_LED_Blinking_Programming_Template/assets/88732241/0215501d-b774-4045-8e64-ef49e28d8404">Link</a></td></tr><tr><td>Technical Report</td><td><a href="https://www.dropbox.com/scl/fi/amaxc94pte0ut2i1r5ewx/Technical-Report-Lab00.paper?rlkey=b3xm3vrerz9xgv1glb30cvy9z&#x26;dl=0">dropbox</a></td></tr></tbody></table>

## 🚩 Let start

### Create Application

<figure><img src="/files/vQS82zIdXu9svfGpdLVw" alt=""><figcaption><p>Create Application</p></figcaption></figure>

### Use Device Configurator and set the UART and ADC pin

#### Enable UART Pin:

<figure><img src="/files/WO7UufydmL72EnfyPgol" alt=""><figcaption></figcaption></figure>

<figure><img src="/files/Mdjs0V1iYNACQmhyyNQC" alt=""><figcaption></figcaption></figure>

#### Config ADC

<figure><img src="/files/bJoa2x1WPe4HhkFQI3VE" alt=""><figcaption></figcaption></figure>

<figure><img src="/files/lbRolMDsE1aLTOuSzrv7" alt=""><figcaption><p>Always do a file save</p></figcaption></figure>

### Coding

* Coding: Open the main.c file and add the following code to the main(void) function.

{% code title="main.c" %}

```c
#include "cy_pdl.h"
#include "cyhal.h"
#include "cybsp.h"
#include "cy_retarget_io.h"
#include <stdio.h>

int main(void)
{
    cy_rslt_t result;

    // UART context variable
	cy_stc_scb_uart_context_t UART_context;

    /* Initialize the device and board peripherals */
    result = cybsp_init() ;
    if (result != CY_RSLT_SUCCESS)
    {
        CY_ASSERT(0);
    }

    __enable_irq();

    /* Configure and enable the UART peripheral */
	Cy_SCB_UART_Init(UART_HW, &UART_config, &UART_context);
	Cy_SCB_UART_Enable(UART_HW);

	// Initialize the AREF - block needed by ADC_HW ADC
	Cy_SysAnalog_Init(&AREF_config);
	// Initialize AREF
	Cy_SysAnalog_Enable();

	// Initialize the ADC
	Cy_SAR_Init(ADC_HW, &ADC_config);
	// Enable the ADC
	Cy_SAR_Enable(ADC_HW);

	int32_t ADCresult = 0; // ADC conversion result
	int32_t mVolts = 0; // Var to store voltage conversion of ADC result

    for (;;){
    	// Start a single conversion
		Cy_SAR_StartConvert(ADC_HW, CY_SAR_START_CONVERT_SINGLE_SHOT);
		if(Cy_SAR_IsEndConversion(ADC_HW, CY_SAR_WAIT_FOR_RESULT) == CY_SAR_SUCCESS){
			ADCresult = Cy_SAR_GetResult32(ADC_HW, 0);
			mVolts = Cy_SAR_CountsTo_mVolts(ADC_HW, 0, ADCresult);
		}
		char stringBuffer[20];
		sprintf(stringBuffer, "ADC = %ld\r\n", mVolts);
		Cy_SCB_UART_PutString(UART_HW, stringBuffer);
		Cy_SysLib_Delay(100);
    }
}
```

{% endcode %}

### Build the Application

<figure><img src="/files/1digBg7hsUeADbW8AU0R" alt=""><figcaption><p>Build Application</p></figcaption></figure>

### Launching the Application

<figure><img src="/files/3gCSRnJjVtU2b8BnXk3M" alt=""><figcaption><p>Launching Application</p></figcaption></figure>

> Note: Before launching the program to the board, make sure that you have already connected the board to the computer through a USB cable.

<figure><img src="https://github.com/Advance-Innovation-Centre-AIC/BIIL_MTB-100_Hello_World_and_LED_Blinking_Programming_Template/assets/88732241/7a6bb6ef-cb63-4613-98a1-42f9617ad724" alt="" width="188"><figcaption><p>set up USB cable</p></figcaption></figure>

### Result&#x20;

<figure><img src="/files/jnMUuQEdQN9A3vCbdlwj" alt=""><figcaption><p>Once the device is set up, run the program. The microcontroller will continuously read the potentiometer's analog value, convert it to a digital signal through the ADC, and then convert that signal to millivolts using the PDL functions.</p></figcaption></figure>

> #### 🎉 <mark style="color:blue;">Congratulations! You can now complete Lab108</mark>

## Supported toolchains (make variable 'TOOLCHAIN')

* GNU Arm® embedded compiler v10.3.1 (`GCC_ARM`) - Default value of `TOOLCHAIN`
* Arm® compiler v6.16 (`ARM`)
* IAR C/C++ compiler v9.30.1 (`IAR`)

## Supported kits (make variable 'TARGET')

* [PSoC™ 62S2 Wi-Fi Bluetooth® pioneer kit](https://www.infineon.com/CY8CKIT-062S2-43012) (`CY8CKIT-062S2-43012`)
* [PSoC™ 62S1 Wi-Fi Bluetooth® pioneer kit](https://www.infineon.com/CYW9P62S1-43438EVB-01) (`CYW9P62S1-43438EVB-01`)
* [PSoC™ 62S1 Wi-Fi Bluetooth® pioneer kit](https://www.infineon.com/CYW9P62S1-43012EVB-01) (`CYW9P62S1-43012EVB-01`)
* [PSoC™ 62S3 Wi-Fi Bluetooth® prototyping kit](https://www.infineon.com/CY8CPROTO-062S3-4343W) (`CY8CPROTO-062S3-4343W`)

## Related resources

| Resources                       | Links                                                                                                                                                      |
| ------------------------------- | ---------------------------------------------------------------------------------------------------------------------------------------------------------- |
| ModusToolbox™ Software Training | [link](https://www.dropbox.com/sh/waj898o4o8eccx0/AAB3hBBaIQo2OvJ5-fubGJIha/training-modustoolbox-level1-getting-started-master/Manual/Ch2-Tools.pdf?dl=0) |

## Other resources

Infineon provides a wealth of data at [www.infineon.com](http://www.infineon.com) to help you select the right device, and quickly and effectively integrate it into your design.

## Document history

Document title: *BILL\_MTB-108* – Read potentiometer sensor value via an ADC PDL<br>

<table><thead><tr><th width="149">Version</th><th>Description of change</th></tr></thead><tbody><tr><td>1.0.0</td><td>Lab 108: Learn basic GPIO control with PSoC 6, using ADC read potentiometer sensor value via PDL</td></tr></tbody></table>

## Authors:

* *Assoc. Prof. Wiroon Sriborrirux*
* *Mr. Sriengchhun Chheang*
* *Mr. Sabol Socare*<br>

<br>

***

© BDH Corporation, 2022-2023


# PSoC™ 6S2 PWM & TCPWM

Timer-Counter-Pulse width modulation


# PWM Principles

Pulse width modulation

Pulse width modulation เรียกสั้นๆว่า PWM เป็นการโมดูเลชั่นความกว้างพัลส์ ที่ถูกนำมาใช้ในงานประยุกต์หลายด้าน ตัวอย่างเช่น การสื่อสารดิจิตอล(digital communication), อิเล็กทรอนิกส์กำลัง (power electronics), การควบคุมความเข้มแสงของไฟถนนอัตโนมัติ (street lighting), การควบคุมความเร็วของมอเตอร์ DC และการสร้างสัญญาณอนาล็อกจากสัญญาณดิจิตอลด้วย PWM ที่แปรผันได้ (ADC) และการ แปลงดิจิตอลเป็นอนาล็อก (DAC) เป็นต้น ซึ่งเทคนิคในการสร้างสัญญาณ PWM มีอยู่ด้วยกัน 2 วิธี คือวิธีทางดิจิตอลและวิธีทางอนาล็อก&#x20;

PWM จะทำการสร้างคลื่นสี่เหลี่ยม (square wave) โดยสามารถควบคุมระยะเวลาค่าสัญญาณขึ้น/สูง (up หรือ high) ในสัญญาณ PWM โดยค่าแรงดันต่ำสุดและสูงสุดจะเป็นค่าที่จำกัดการพื้นที่ของคลื่น (waves oscillation space) เรียกว่า "ความสูงคลื่น - <mark style="color:blue;">Amplitude</mark>" สำหรับรอบของคลื่นเพื่อเกิดเต็มรูปแบบของช่วงเวลานั้น จะเรียกว่า "คาบเวลา - <mark style="color:blue;">Time period</mark>" โดยที่ time period มีค่าเท่ากับ

$$
Time \space period = on \space time + off \space time
$$

### ความถี่ของ PWM

ค่าความถี่ (frequency) คือจำนวนลูกคลื่น (cycle) ต่อ 1 หน่วยคาบเวลา (time peroid) ตัวอย่างเช่น ในคาบเวลาของสัญญาณ 20ms จะมีจำนวนลูกคลื่น 50 ลูก หรือ 50Hz&#x20;

$$
Frequency =  {1 \over  Time \space period}
$$

<figure><img src="/files/zK4qjZeLQjgTRiliuaM2" alt=""><figcaption><p>Time Period, Cycle Time, Frequency</p></figcaption></figure>

### Duty cycle&#x20;

Duty Cycle คือหลักการสำคัญที่ถูกใช้ใน PWM เนื่องจากมันจะเป็นตัวแทนของระยะเวลาที่สัญญาณอยู่ในสถานะ high โดยที่สูตรในการหาค่า duty cycle ดังนี้

$$
Duty \space Cycle = {  On \space time \space of \space signal \over  total \space time \space period \space of \space signal }
$$

<figure><img src="/files/jt8IQvaRqbYu64cdKi4g" alt=""><figcaption><p>Duty Cycle</p></figcaption></figure>

### การคำนวณค่า Voltage ของสัญญาณ PWM

เพื่อคำนวณหาค่า duty cycle เราจะต้องรู้ว่าระยะเวลาในขณะที่สัญญาณมีค่า high นานเท่าใด ตัวอย่างเช่น ถ้าเราทราบว่าระยะเวลาในขณะที่สัญญาณมีค่า high เป็นระยะเวลา 6ms และระยะเวลาในขณะที่ค่าสัญญาณ low เป็นระยะเวลา 4ms ซึ่งทำให้รวมระยะเวลาทั้งหมดคือ 10ms ดังนั้นก็สามารถใช้สูตรข้างต้นหาค่า duty cycle ได้ดังนี้

$$
Duty \space Cycle = {  6 \space ms \over 10 \space ms } = 0.6 \space \space or \space 60%
$$

จากการแก้สมการจะได้ duty cycle เท่ากับ 0.6 ซึ่งไม่มีหน่วย ดังนั้นเราจึงมักจะวัด duty cycle เป็นหน่วยของเปอร์เซ็นต์ (%) ของการที่สถานะของสัญญาณอยู่ในค่า high นั่นเอง

<figure><img src="/files/9d9NSjUjhIyOEvivqLT6" alt=""><figcaption></figcaption></figure>

### Amplitude of PWM

ในกรณีของสัญญาณดิจิตอล แรงดันต่ำสุดส่วนใหญ่จะเป็นศูนย์ ดังนั้นความสูงคลื่น (Amplitude) จะเป็นแรงดันสูงสุดของสัญญาณ ตัวอย่างเช่น จากรูปด้านล่าง PWM มี duty cycle อยู่ที่ 50% และระดับแรงดันไฟฟ้าอยู่ระหว่าง 0 ถึง 5 โวลต์ ที่จ่ายให้กับ LED ดังนั้นค่าแรงดันขาออกจะอยู่ที่ 2.5 โวลต์เท่านั้น

<figure><img src="/files/bAXPnwGzHbD9U07lyxLs" alt=""><figcaption></figcaption></figure>

$$
Vout = D  \times  Vmax \space \space , where \space D \space  is \space duty \space cycle
$$

ในการโปรแกรม PSoC เพื่อสร้างสัญญาณ PWM ออกผ่านขาของไมโครคอนโทรเลอร์จะเรียกใช้ฟังก์ชัน [cyhal\_pwm\_init](https://infineon.github.io/mtb-hal-cat1/html/group__group__hal__pwm.html#ga54a93c541bdbb3fce066a2af00d8b67f) นอกจากนั้นการตั้งค่า clock จะอ้างอิงสัญญาณนาฬิกาหลักของไมโครคอนโทรเลอร์ และกำหนดค่า duty cycle ผ่านฟังก์ชัน [cyhal\_pwm\_set\_duty\_cycle](https://infineon.github.io/mtb-hal-cat1/html/group__group__hal__pwm.html#ga9c468081d85d103ec10f9feeffe416ce) หลักจากที่กำหนดค่าเริ่มต้นต่างๆเรียบร้อยแล้ว ก็จะเริ่มสร้างสัญญาณ PWM โดยเรียกใช้ฟังก์ชัน [cyhal\_pwm\_start](https://infineon.github.io/mtb-hal-cat1/html/group__group__hal__pwm.html#ga95006bcc5841e610719433660365e3e2) ดังตัวอย่างโปรแกรมข้างล่าง

```c
cy_rslt_t   rslt;
cyhal_pwm_t pwm_obj;
 
// Initialize PWM on the supplied pin and assign a new clock
rslt = cyhal_pwm_init(&pwm_obj, P0_0, NULL);
 
// Set a duty cycle of 50% and frequency of 1Hz
rslt = cyhal_pwm_set_duty_cycle(&pwm_obj, 50, 1);
 
// Start the PWM output
rslt = cyhal_pwm_start(&pwm_obj);
```

{% hint style="info" %}
**Ref:**&#x20;

* [What is PWM?](https://www.youtube.com/watch?v=B_Ysdv1xRbA)
* [Infineon Documentation](https://infineon.github.io/mtb-hal-cat1/html/group__group__hal__pwm.html)
  {% endhint %}


---

[Next Page](/llms-full.txt/1)